This time we will configure basic AD and DNS functionality. The terms object, organizational unit, domain, tree, and forest are used to describe the way Active Directory organizes its directory data. Like all directories, Active Directory is essentially a database management system. The Active Directory database is where the individual objects tracked by the directory are stored. Active Directory uses a hierarchical database model, which groups items in a tree-like structure
Objects
- The basic unit of data in Active Directory is called an object. Active Directory can store information about many different kinds of objects. The objects you work with most are users, groups, computers, and printers.
Domains
- A domain is the basic unit for grouping related objects in Active Directory. Typically, domains correspond to departments in a company. For example, a company with separate Accounting, Manufacturing, and Sales departments might have domains named (you guessed it) Accounting, Manufacturing, and Sales. Or the domains correspond to geographical locations. For example, a company with offices in Detroit, Dallas, and Denver might have domains named det, dal, and den.
- if your company is named Nimbus Brooms and you’ve registered NimbusBroom.com as your domain name, you should create a top-level domain named NimbusBroom.com before you create any other domains. Then, you can create subdomains such as Accounting.NimbusBroom.com, Manufacturing.NimbusBroom.com, and Sales.NimbusBroom.com.

Organizational units
- Many domains have too many objects to manage all together in a single group. Fortunately, Active Directory lets you create one or more organizational units, also known as OUs. OUs let you organize objects within a domain, without the extra work and inefficiency of creating additional domains.
Trees
- A tree is a set of Active Directory names that share a common namespace. For example, the domains NimbusBroom.com, Accounting.NimbusBroom.com, Manufacturing.NimbusBroom.com, and Sales.NimbusBroom.com make up a tree that is derived from a common root domain, NimbusBroom.com.
Forests
- As its name suggests, a forest is a collection of trees. In other words, a forest is a collection of one or more domain trees that do not share a common parent domain.
- For example, suppose Nimbus Brooms acquires Tracorum Technical Enterprises, which already has its own root domain named TracorumTech.com, with several subdomains of its own. Then, you can create a forest from these two domain trees so the domains can trust each other.

Networking
Active Directory communications involve a number of ports, some of which are more familiar to network and security administrators than others.
- RPC endpoint mapper: port 135 TCP, UDP
- NetBIOS name service: port 137 TCP, UDP
- NetBIOS datagram service: port 138 UDP
- NetBIOS session service: port 139 TCP
- SMB over IP (Microsoft-DS): port 445 TCP, UDP
- LDAP: port 389 TCP, UDP
- LDAP over SSL: port 636 TCP
- Global catalog LDAP: port 3268 TCP
- Global catalog LDAP over SSL: port 3269 TCP
- Kerberos: port 88 TCP, UDP
- DNS: port 53 TCP, UDP
- WINS resolution: port 1512 TCP, UDP
- WINS replication: 42 TCP, UDP
- RPC: Dynamically-assigned ports TCP, unless restricted
AD Replication
The ports that need to be open to facilitate cross-firewall AD replication differ, depending on the versions of Microsoft Windows in your environment.
- RPC endpoint mapper: port 135 TCP
- LDAP: port 389 TCP, UDP
- LDAP over SSL: port 636 TCP
- Global catalog LDAP: port 3268 TCP
- Global catalog LDAP over SSL: port 3269 TCP
- DNS: port 53 TCP, UDP
- Kerberos: port 88 TCP, UDP
- SMB over IP (Microsoft-DS): port 445 TCP
- RPC: Dynamically-assigned ports TCP, unless restricted
Authentication to AD
AD uses the following ports to support user and computer authentication
- SMB over IP (Microsoft-DS): port 445 TCP, UDP
- Kerberos: port 88 TCP, UDP
- LDAP: port 389 UDP
- DNS: port 53 TCP, UDP
- RPC: Dynamically-assigned ports TCP, unless restricted
Install Active Directory
Use the following steps to install Active Directory on the server:
1. Open the Server Manager from the task bar.
2. From the Server Manager dashboard, select Add roles and features.
3. On the Installation Type screen, select Role-based or features-based and click Next.
4. By default, the current server is selected. Click Next.
5. On the Server Roles screen, select the check box next to Active Directory Domain Services.
6. To select additional capabilities, click Add Features.
7. Review the information on the AD DS tab, then click Next.
8. Review the information on the Confirm installation selections screen, then click Install.
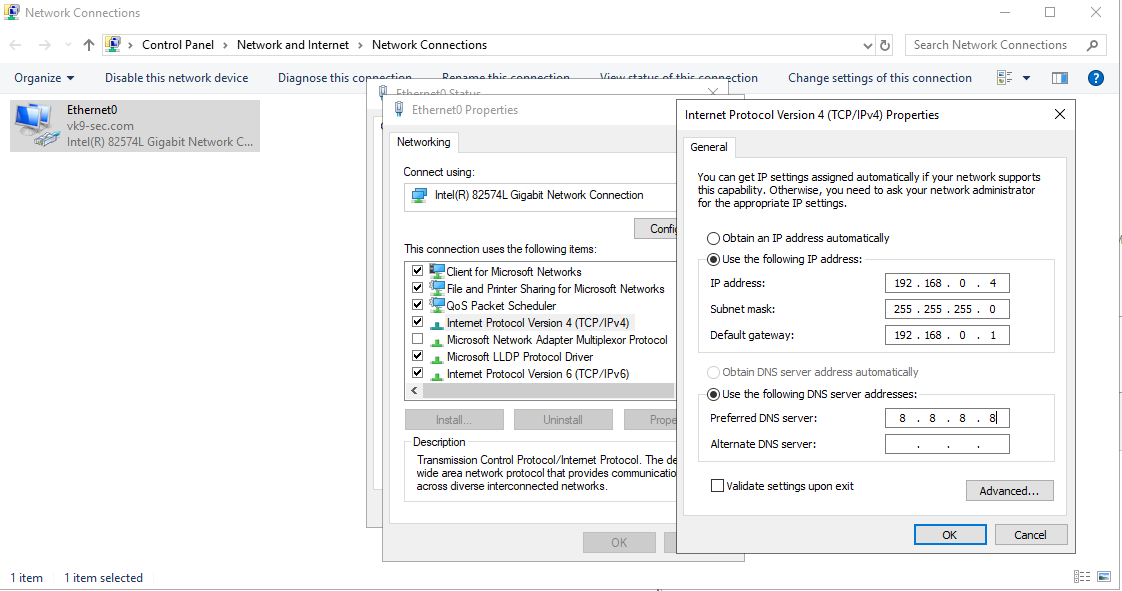
Assign a static IP address
1. Go to Settings -> Network & Internet -> Change adapter options
2. Select the network interface
3. Properties
4. Select “Internet Protocol Version 4 (TCP/IPv4)” -> Properties
5. Select “Use the following IP address”, and, fill the blanks, then click OK
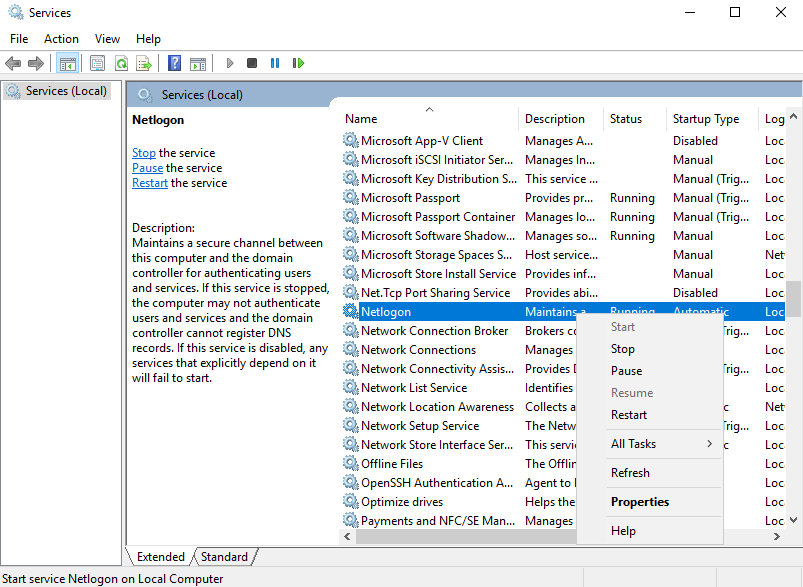
Start the Remote Registry Service & Netlogon
Before you can promote the server to domain controller, you must start the remote registry service by using the following steps:
1. Server Manager -> Tools
2. Services
3. Look for remote registry service.
4. Right click, Start
5. Do the same for Netlogon
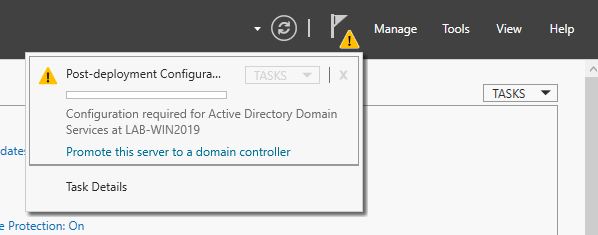
Post-Deployment
1. Complete Post-Deployment steps to promote the server to a domain controller
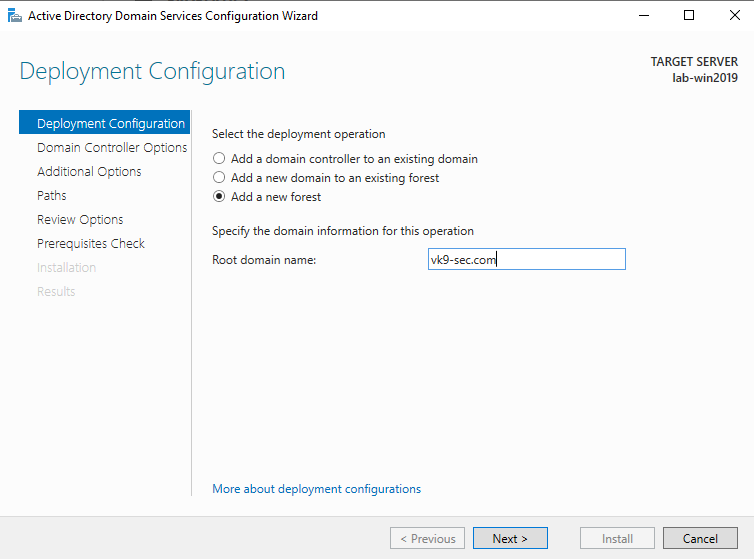
2. From the Deployment Configuration tab, select Add a new forest. Enter your root domain name in the Root domain name field and click Next.
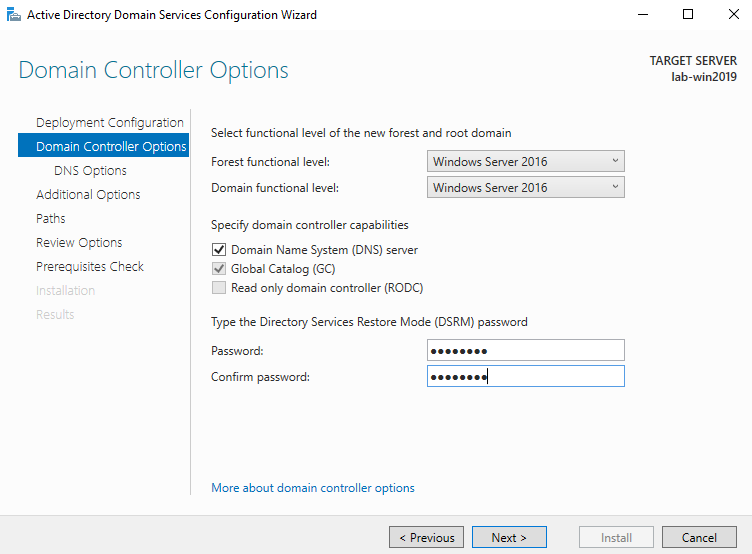
3. Select a Domain and a Forest functional level.
4. Enter a password for Directory Services Restore Mode (DSRM) in the Password field. In this case Admin13579. Click next
5. Uncheck DNS if you’re not using this server as a DNS (optional)
6. Confirm or enter a NetBIOS name and click Next.
7. Specify the locations of the Database, Log files, and SYSVOL folders, then click Next
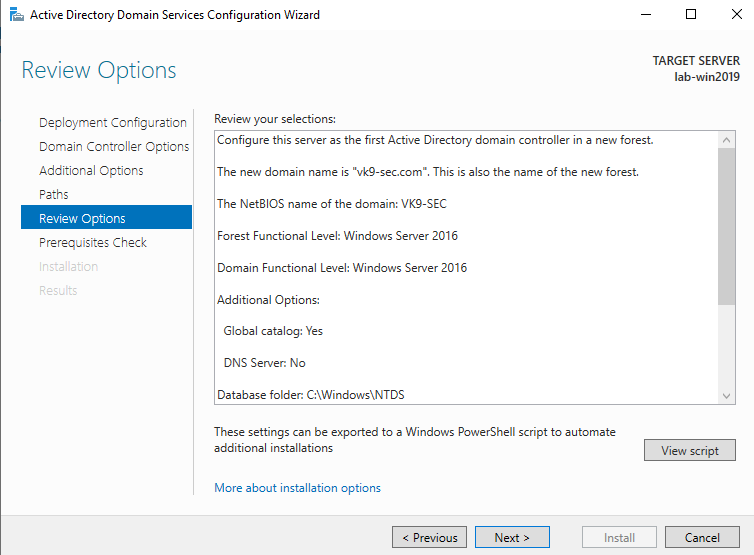
8. Review the configuration options and click Next.
9. If this is a fresh install, we will get a warning indicating that the user Administrator password needs to be set
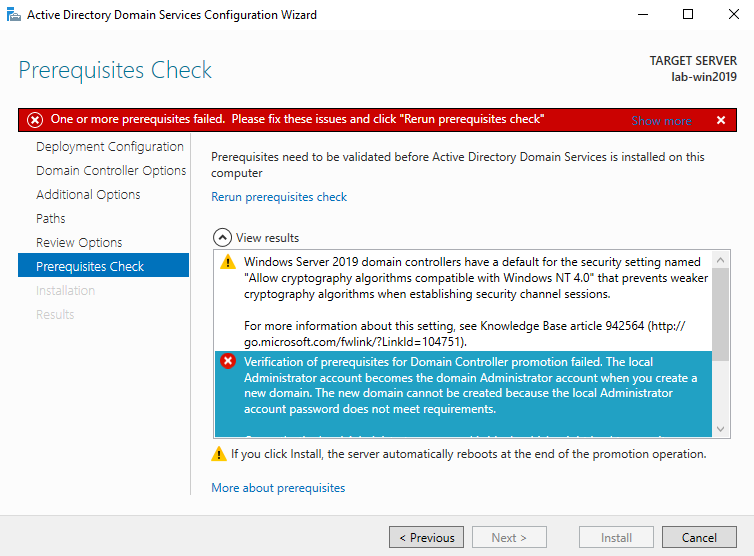
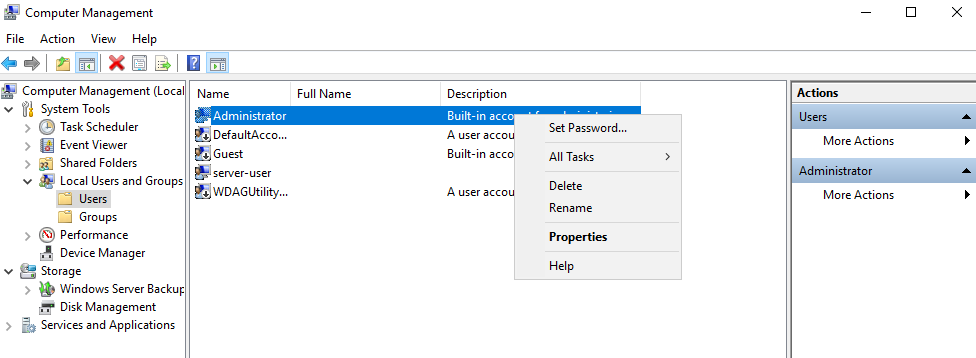
10. To set the user Administrator password
- Server Manager -> Computer Management -> Local Users and Groups -> Users
- Select the user -> Right click it -> Set Password
- New Password: Admin.1
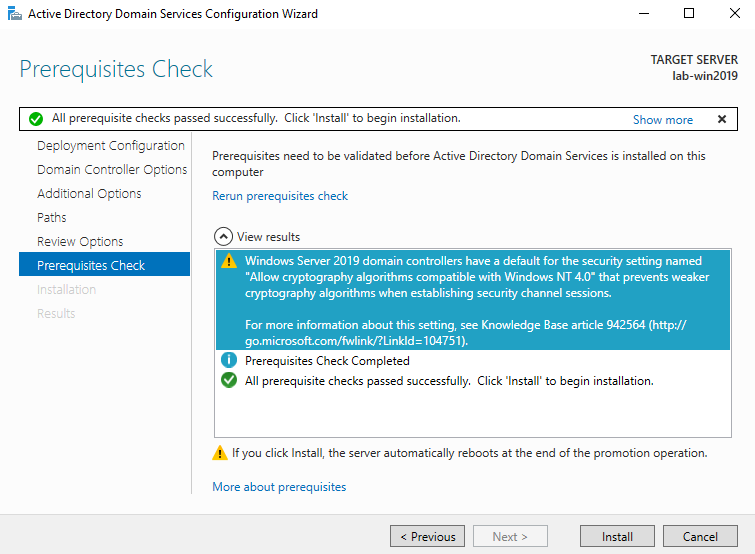
11. Now do the tests again and click on install
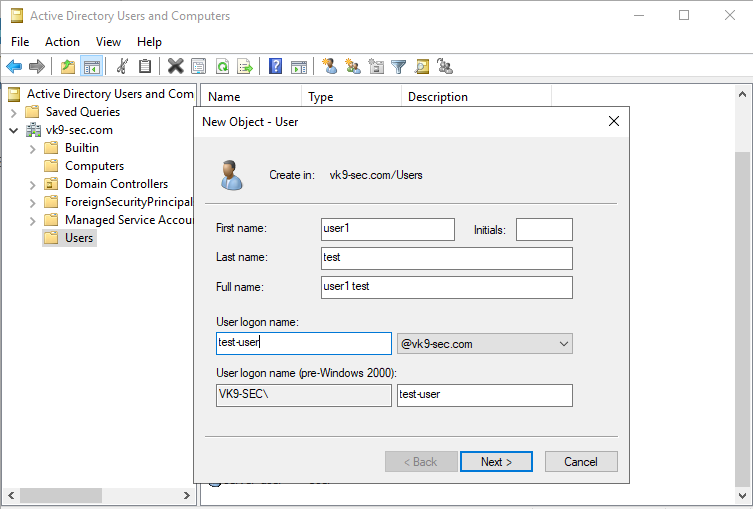
12. Create a new user
- Go to Server Manager -> Tools -> Active Directory Users and Computers -> Users
- Create a new user in the current container
- User logon name: test-user
- next
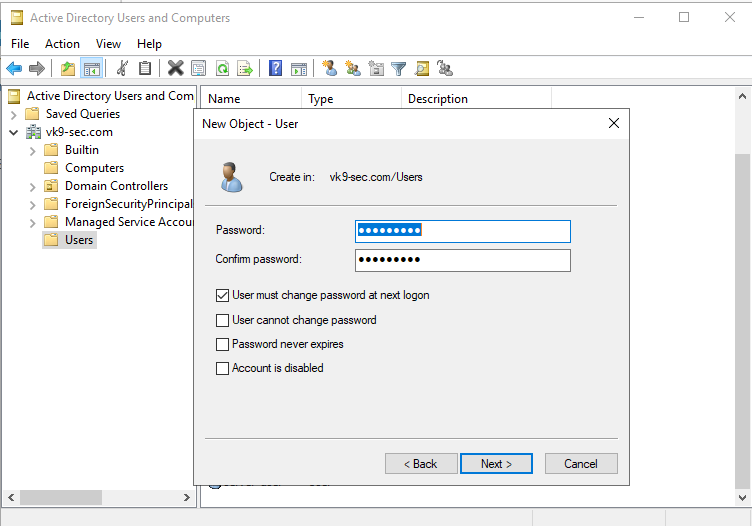
Now set a password
- Password: Password1
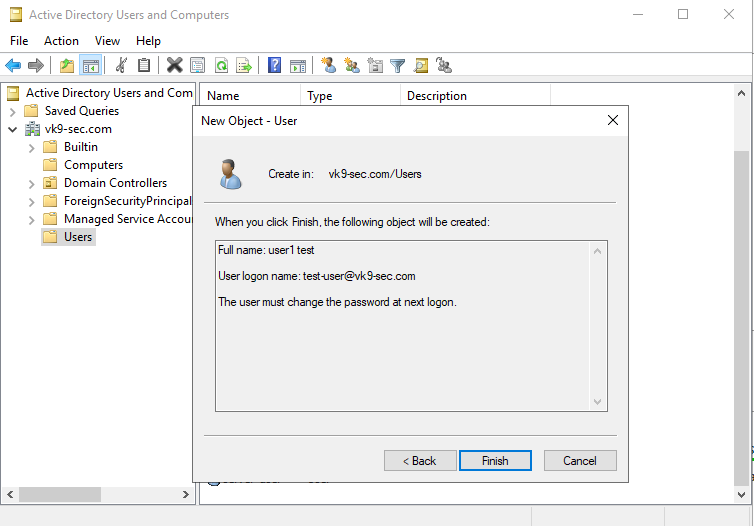
13. Confirm the account creation
Add DNS capabilities
Use the following steps to install DNS on the server:
1. Open the Server Manager from the task bar.
2. From the Server Manager dashboard, select Add roles and features.
3. On the Installation Type screen, select Role-based or features-based and click Next.
4. By default, the current server is selected. Click Next.
5. On the Server Roles screen, select the check box next to DNS Server.
6. To select additional capabilities, click Add Features.
7. Review the information on the Confirm installation selections screen, then click Install.
Configure DNS
1. Go to Server Management -> Tools -> DNS
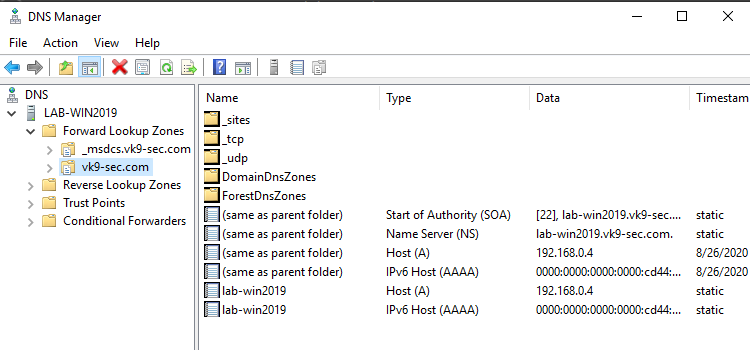
2. There should be a domain server
3. Expand the option, and there you should already see a Zone for the domain created under “Forward Lookup Zones”
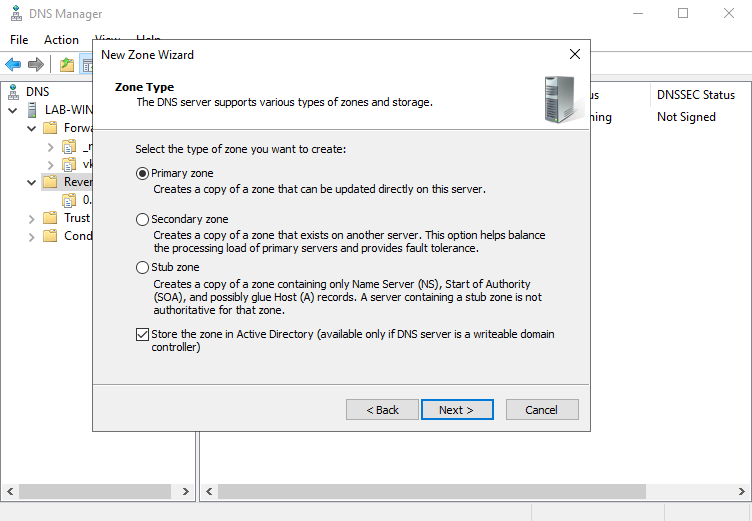
4. Create a “Reverse Lookup Zone” -> New Zone
- Select “Primary Zone” and check “Store the zone in Active Directory”
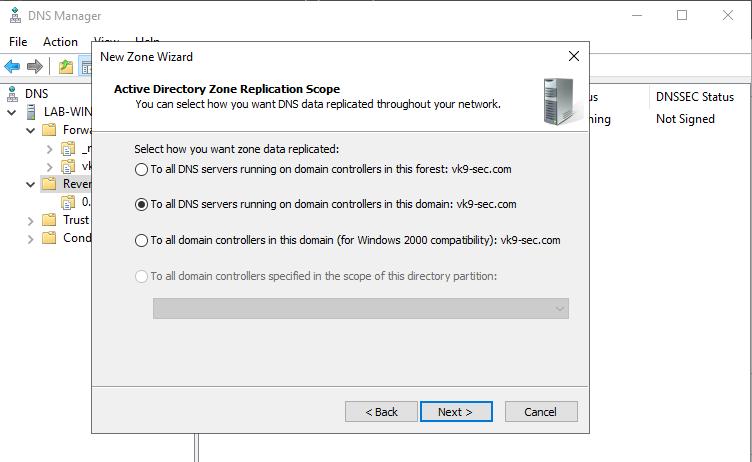
5. Select the type of zone data to be replicated, in this case I’ll choose
- To all DNS servers running on domain controllers in this domain: vk9-sec.com
6. After clicking on next, we need to select the type of Reverse Lookup Zone, I’ll choose IPv4
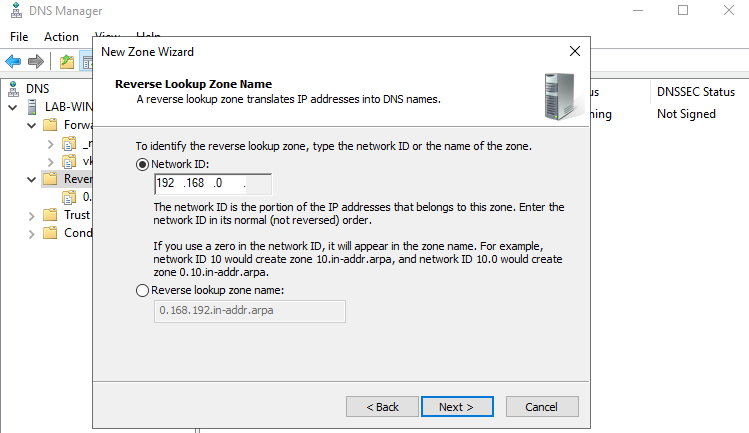
7. Next step, is to select the network ID which are the first 3 octets of the network
- 192.168.0
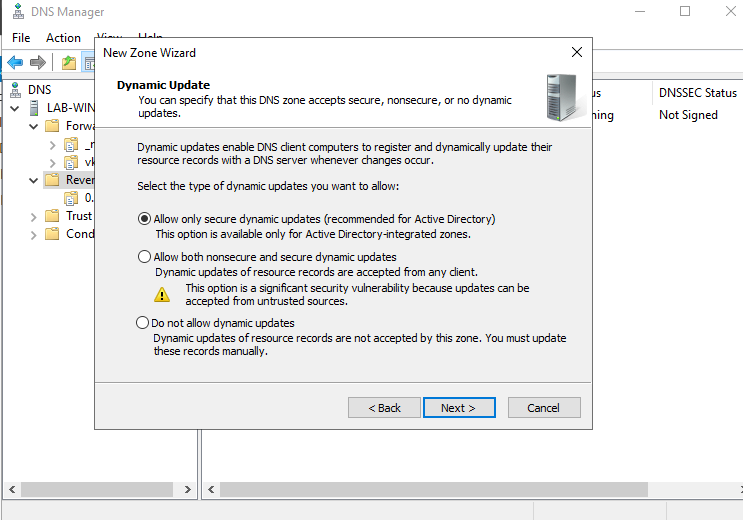
8. Now, On Dynamic Update I’ll select
- Allow only secure dynamic updates
9. Confirm the information and then finish
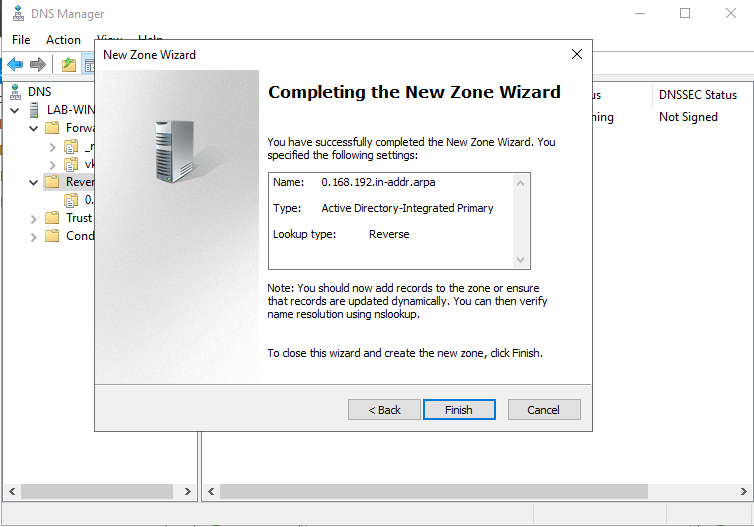
10. Now we will see the Reverse Lookup Zone already created
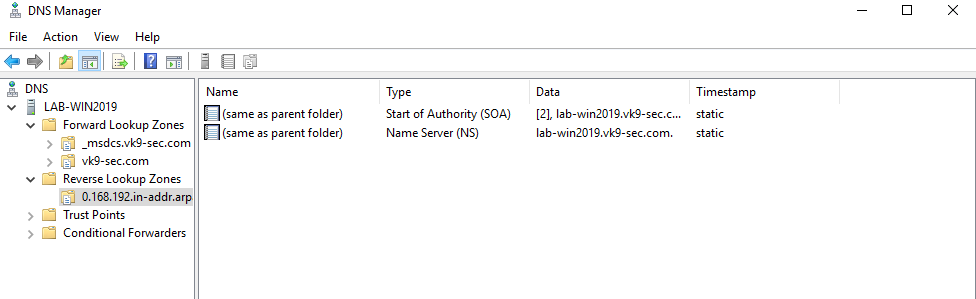
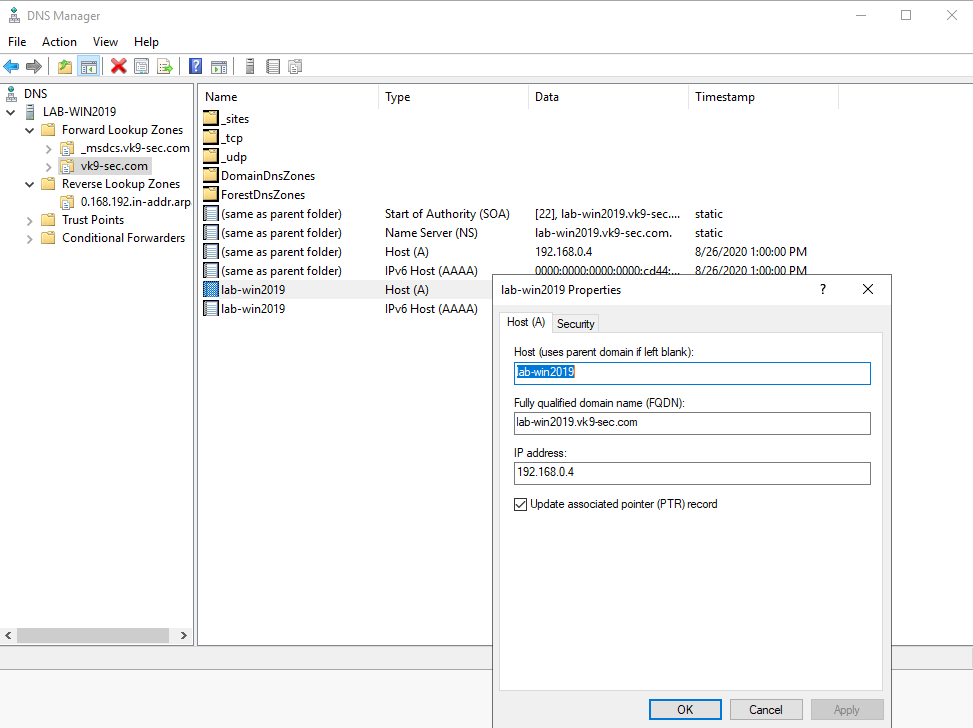
11. Now create an associated pointer record based on the DNS server address
- Go to Forwards Lookup Zones -> domain
- Select the A record -> Properties
- Check the box “Update associated pointer (PTR) record
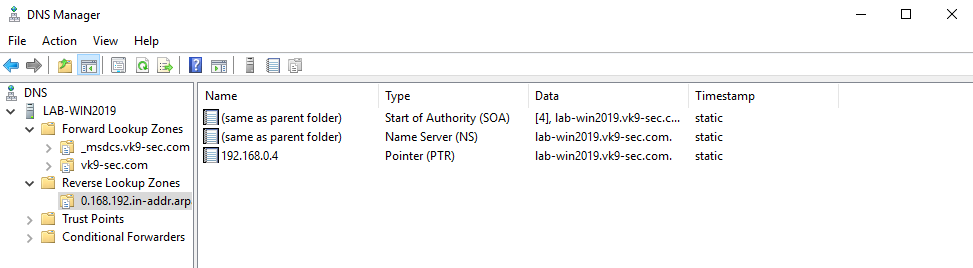
12. Now, confirm the PTR has been added to “Reverse Lookup Zones”
- Go to “Reverse Lookup Zones” -> entry we created
- Refresh
13. Now set the DNS on the hosts to point to the AD DS server
Join a Windows 10 PC to active directory
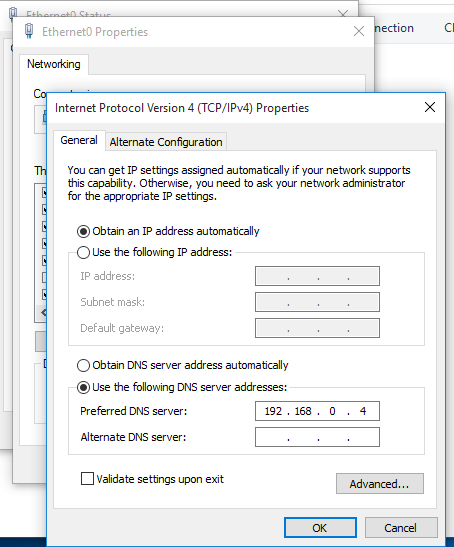
1. Assign manual DNS
- Go to Settings -> Network & Internet -> Change adapter options
- Select the network interface
- Properties
- Select “Internet Protocol Version 4 (TCP/IPv4)” -> Properties
- Select “Use the following DNS server addresses”, and, fill the blanks, then click OK
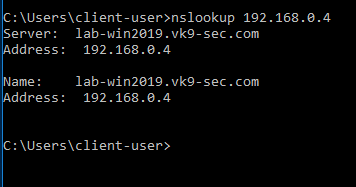
2. Attempt to resolve the DNS server address in Cmd from the remote client
- nslookup 192.168.0.4
3. In the Client machine go to Settings -> System -> About
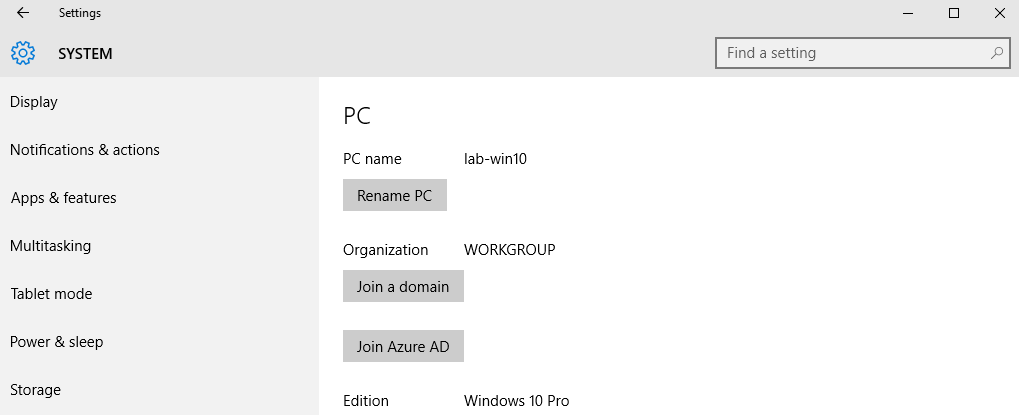
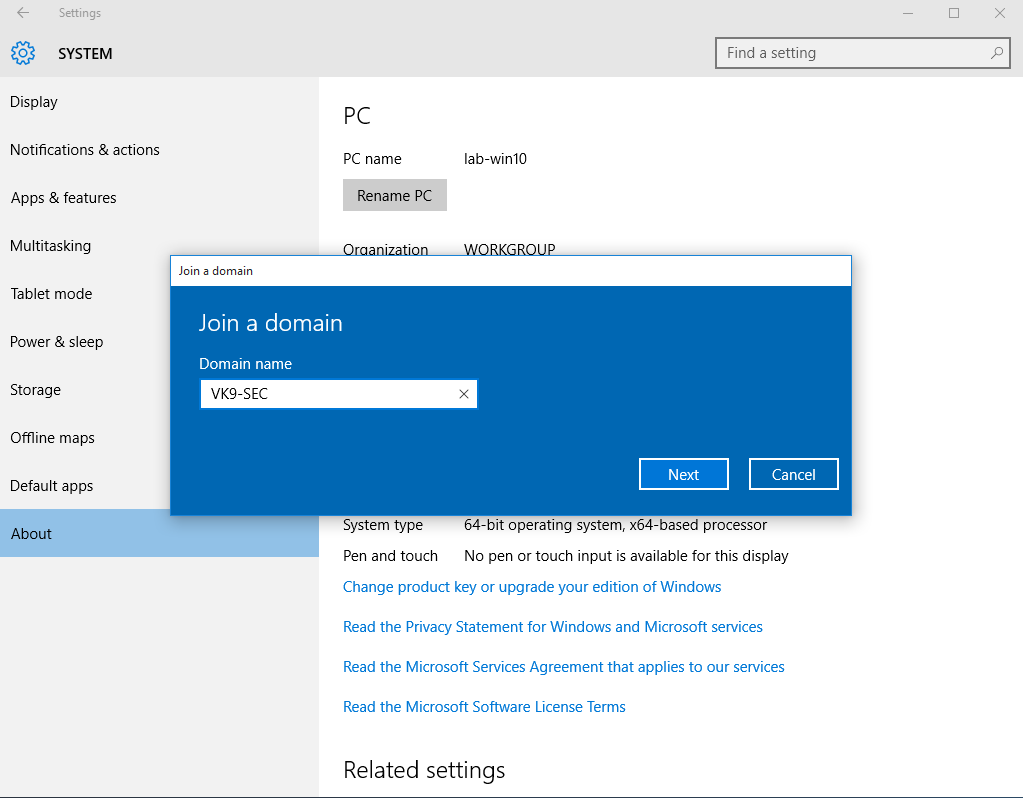
2. Click on “Join a domain”. In this case I use the one I created, VK9-SEC
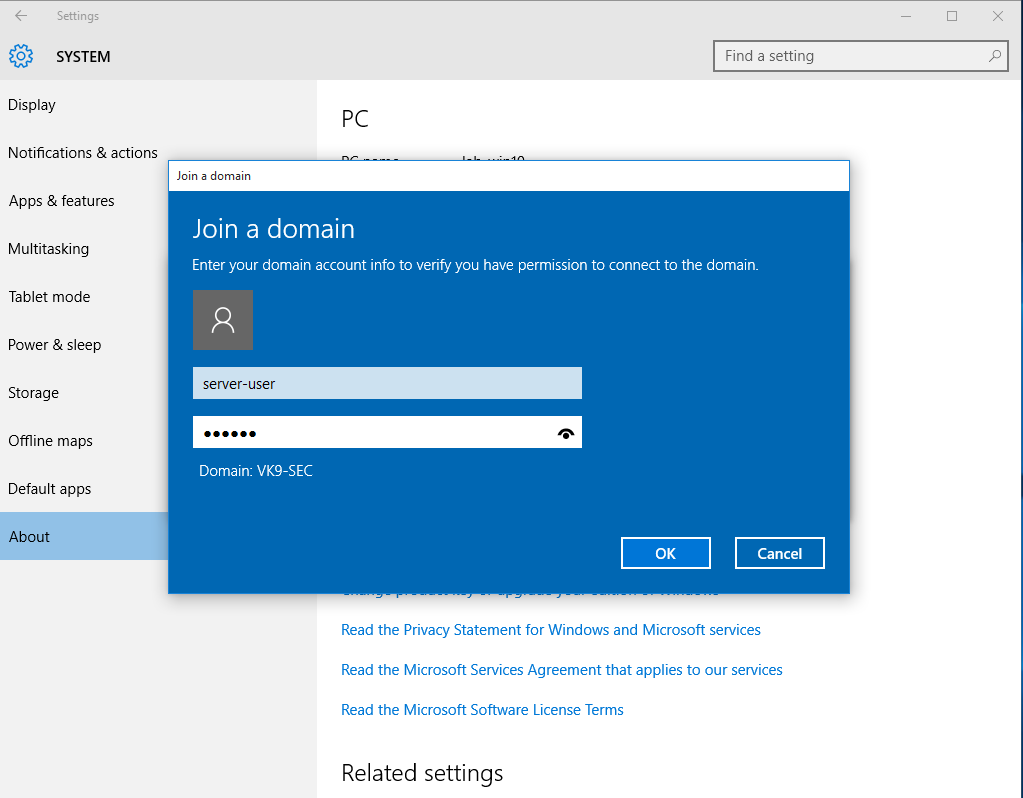
3. Use an account that is part of domain controller, in this case I would use server-user
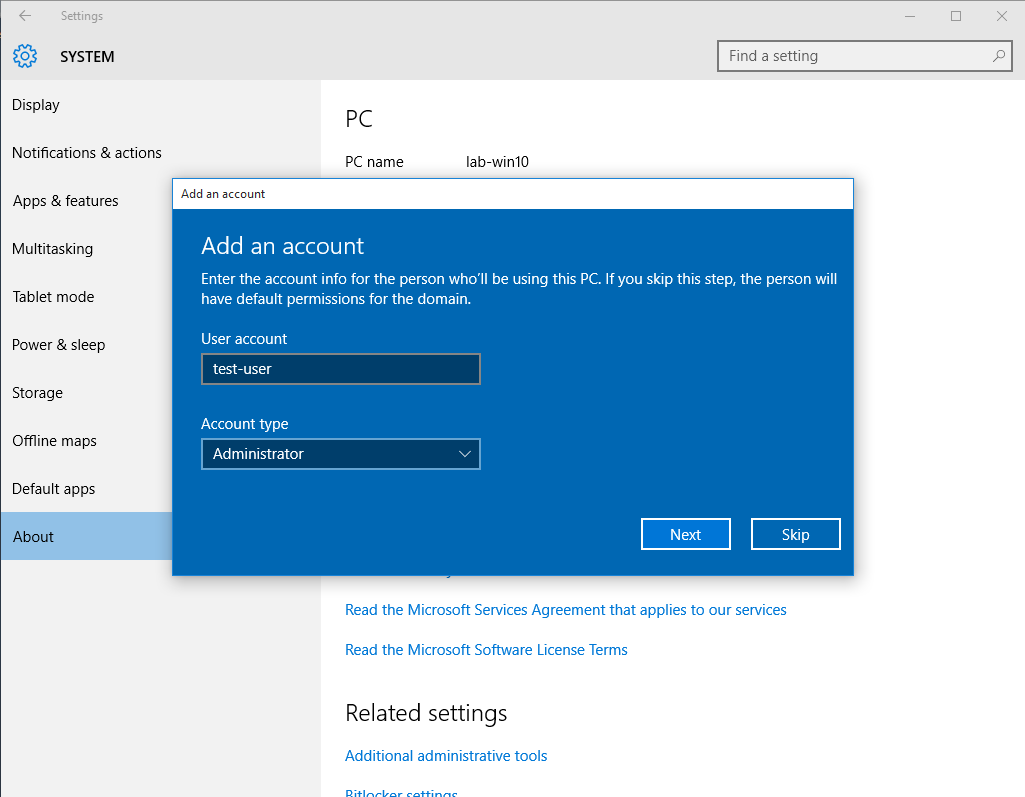
4. Now that the account has been confirmed, type the name of the user that will have access to this PC, I will use the user test-user and will give administrator access
5. Restart the computer
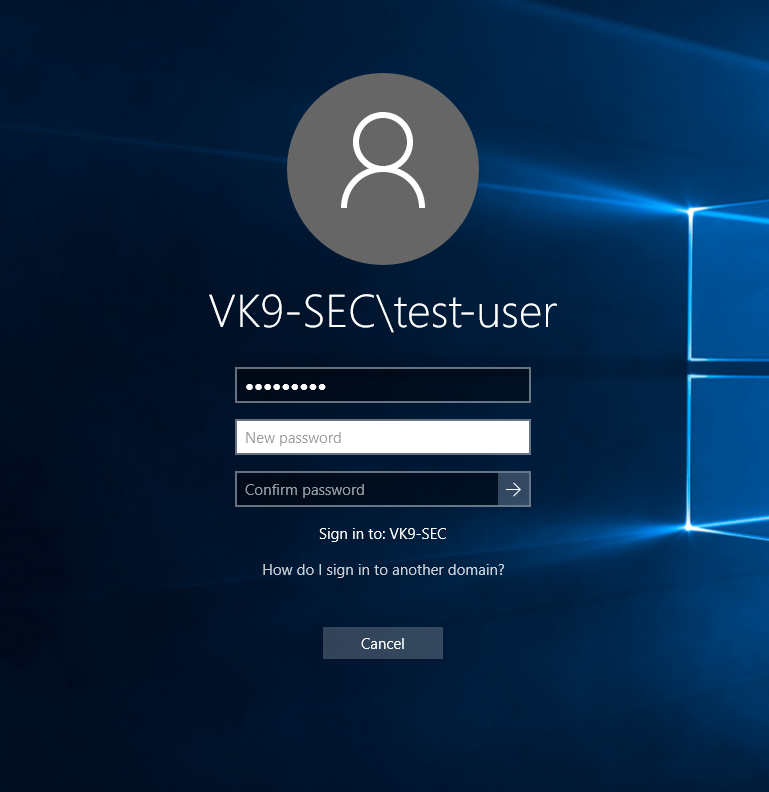
6. Upon restart, you will be prompted to log in using the AD credentials
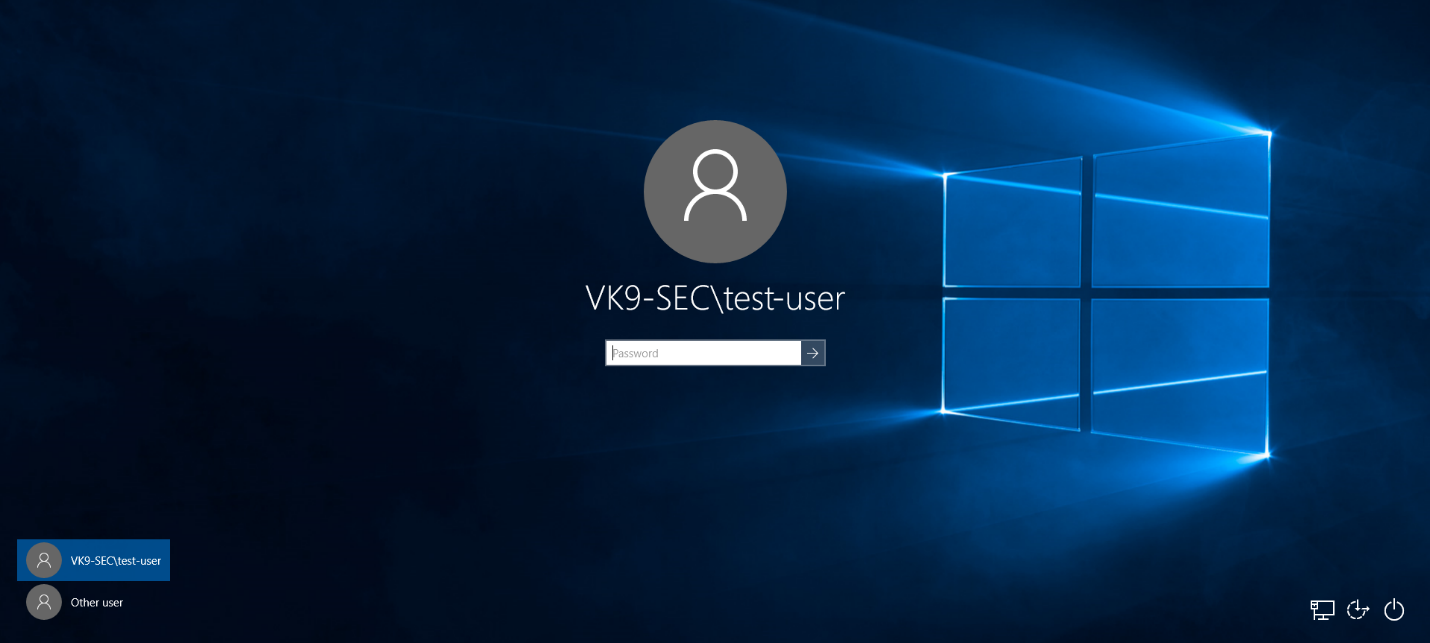
7. Probably you’ll be asked to change the password, and then you’ll be able to log in
8. Run in CMD whoami
- whoami
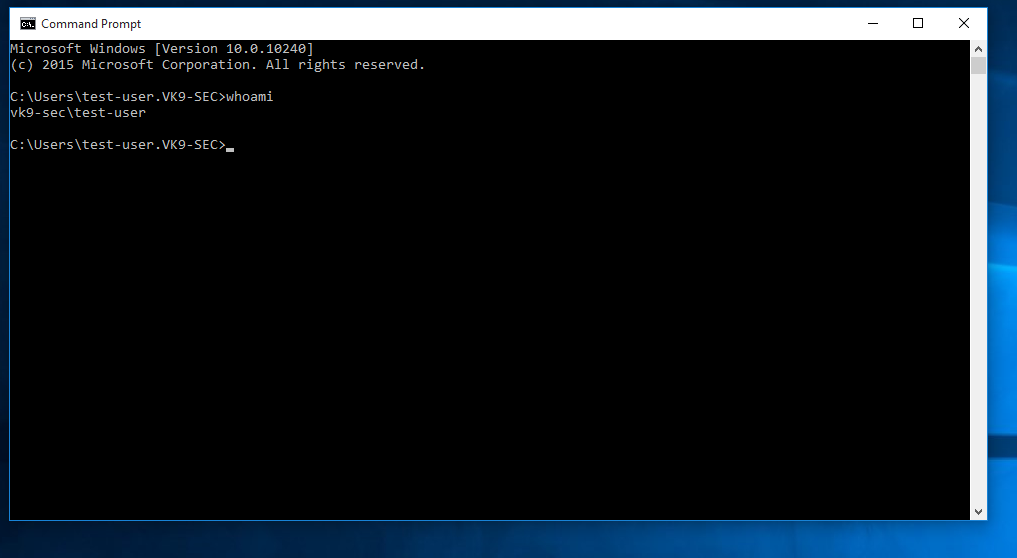
9. In the server in Active Directory Users & Groups you will see the computer listed after a refresh
- Go to Computers
