Hardening SMB
Server Message Block (SMB) is a networking file share protocol included in Windows workstation and Windows server that provides the ability to read and write files and perform other service requests to network devices on a share.
Windows supports file and printer sharing traffic by using the Server Message Block (SMB) protocol directly hosted on TCP. This differs from earlier operating systems, in which SMB traffic requires the NetBIOS over TCP (NBT) protocol to work on a TCP/IP transport. Removing the NetBIOS transport has several advantages, including:
- Simplifying the transport of SMB traffic.
- Removing WINS and NetBIOS broadcast as a means of name resolution.
- Standardizing name resolution on DNS for file and printer sharing.
NetBIOS over TCP traditionally uses the following ports:
| nbname | 137/UDP |
| nbname | 137/TCP |
| nbdatagram | 138/UDP |
| nbsession | 139/TCP |
Usually, you’ll be using SMB to connect to devices that don’t run Windows and Windows machines, such as a router with file sharing capabilities, Network-Attached Storage (NAS), or other computers running Linux.
Windows SMB versions
- SMB 1 – Windows 2000
- SMB 2 – Windows Server 2008 and WIndows Vista SP1
- SMB 2.1 – Windows Server 2008 R2 and Windows 7
- SMB 3.0 – Windows Server 2012 and Windows 8 / 10
SMBv1 has been in use since Windows 95, and in 2019, it’s still often found and abused in networks. If you have SMB v1 enabled in your network, it can be used in blended attacks that might include ransomware and other malware. Recommendation is to use SMB3
Features of SMB3
- Pre-authentication Integrity (SMB 3.1.1+). Protects against security downgrade attacks.
- Secure Dialect Negotiation (SMB 3.0, 3.02). Protects against security downgrade attacks.
- Encryption (SMB 3.0+). Prevents inspection of data on the wire, MiTM attacks. In SMB 3.1.1 encryption performance is even better than signing!
- Insecure guest auth blocking (SMB 3.0+ on Windows 10+) . Protects against MiTM attacks.
- Better message signing (SMB 2.02+). HMAC SHA-256 replaces MD5 as the hashing algorithm in SMB 2.02, SMB 2.1 and AES-CMAC replaces that in SMB 3.0+. Signing performance increases in SMB2 and 3.
Windows documentation
Enable The service
Windows 10
1. Enable, go to
- Control Panel – Network and Sharing Center – Change advanced sharing settings

Turn the options on depending on your needs
- Private Network
- Public Network
- All Networks
In this case I would do it for the private network

2. In all Networks there are some security setting to take into consideration
Public folder sharing
- Turn off
File sharing connections
- Strongest encryption in this case 128-bit encryption
Password protected sharing
- Turn on password protected sharing

3. Access the Network share
- Win key + e
- Network

Windows Server 2008
Same procedure just that in 2008 We get different options in Change advanced sharing settings
- Home or work
- Public
In this case I will enable Home or work

Click on save changes, and then, access the Network
Access the Network share
- Win key + e
- Network

Methods to check what version of SMB is installed on the Server (enable, disable & detect)
We will be using the following methods to check what version of SMB is installed on your computer:
- The PowerShell Method.
- The Registry Editor Method.
How to enable, disable & detect SMB1 (Powershell)
Windows 10, Windows 8.1
Detect
- Get-WindowsOptionalFeature -Online -FeatureName SMB1Protocol
- Get-SmbServerConfiguration | Select EnableSMB1Protocol

Enable
- Enable-WindowsOptionalFeature -Online -FeatureName SMB1Protocol

- Get-WindowsOptionalFeature -Online -FeatureName SMB1Protocol

Disable
- Disable-WindowsOptionalFeature -Online -FeatureName SMB1Protocol

- Get-WindowsOptionalFeature -Online -FeatureName SMB1Protocol

Alternative way
1. Go to
- Control Panel – Programs and Features – Turn Windows features on or off

2. This pop up will show, disable SMB 1.0/CIFS File Sharing Support, uncheck the boxes under “SMB 1.0/CIFS File Sharing Support”, including the top folder

Windows Server 2008 & 2008 R2, Windows 7, Windows Vista (Powershell)
Detect
- Get-Item HKLM:\SYSTEM\CurrentControlSet\Services\LanmanServer\Parameters | ForEach-Object {Get-ItemProperty $_.pspath}

Enable
- Set-ItemProperty -Path “HKLM:\SYSTEM\CurrentControlSet\Services\LanmanServer\Parameters” SMB1 -Type DWORD -Value 1 -Force

Disable
- Set-ItemProperty -Path “HKLM:\SYSTEM\CurrentControlSet\Services\LanmanServer\Parameters” SMB1 -Type DWORD -Value 0 -Force

How to enable, disable & Detect SMB3 (Powershell)
Windows 10
Detect
- Get-SmbServerConfiguration | Select EnableSMB2Protocol
- Get-SmbServerConfiguration

Enable
- Set-SmbServerConfiguration -EnableSMB2Protocol $true

Disable
- Set-SmbServerConfiguration -EnableSMB2Protocol $false

Windows Server 2008 (Powershell)
Detect
- Get-ItemProperty HKLM:\SYSTEM\CurrentControlSet\Services\LanmanServer\Parameters | ForEach-Object {Get-ItemProperty $_.pspath}

Enable
- Set-ItemProperty -Path “HKLM:\SYSTEM\CurrentControlSet\Services\LanmanServer\Parameters” SMB2 -Type DWORD -Value 1 -Force

Disable

Check the version of SMB using the registry
1. execute regedit from “ run” utility. Win key + r

2. Now visit the following path
- HKEY_LOCAL_MACHINE\SYSTEM\CurrentControlSet\Services\LanmanServer\Parameters

3. Now if you have the DWORDs named as SMB1 or SMB2, check their Value Data. If it is set to 0, it is disabled, 1 means enabled. Default 1

Methods to check what version of SMB is installed on the Clients
This method will work on Windows Vista, Windows Server 2008, Windows 7, Windows Server 2008 R2, Windows 8, and Windows Server 2012
- The PowerShell Method.
- You must run these commands at an elevated command prompt.
- You must restart the computer after you make these changes.
SMB v1 on SMB Client
Detect
- sc.exe qc lanmanworkstation

Enable
- sc.exe config lanmanworkstation depend= bowser/mrxsmb10/mrxsmb20/nsi
- sc.exe config mrxsmb10 start= auto

Disable
- sc.exe config lanmanworkstation depend= bowser/mrxsmb20/nsi
- sc.exe config mrxsmb10 start= disabled
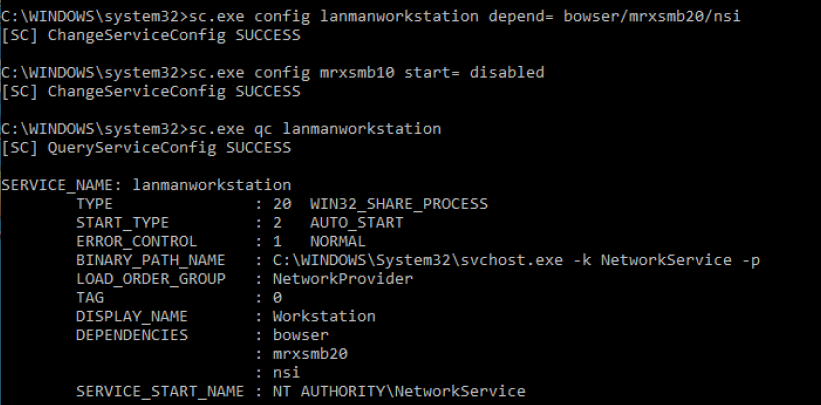
SMB v2/v3 on SMB Client
Detect
- sc.exe qc lanmanworkstation

Enable
- sc.exe config lanmanworkstation depend= bowser/mrxsmb10/mrxsmb20/nsi
- sc.exe config mrxsmb20 start= auto

Disable
- sc.exe config lanmanworkstation depend= bowser/mrxsmb10/nsi
- sc.exe config mrxsmb20 start= disabled

Securing SMB
1. The first step is to disable SMB1 using the previous examples according to the type of OS, and, only use SMB3 if possible. Check if the protocol is enabled, if so, disable it, and enable a newer version.
Disabling SMBv1 is very complicated as many applications, platforms, printers, etc., are heavily dependent on it. SMBv1 should be carefully examined on an OS basis before hardening is performed.
You should make sure that any new software and hardware that requires the SMB protocol is able to negotiate newer versions (at least SMBv2, preferably SMBv3). For existing devices and software that only support SMBv1, you should contact the manufacturer for updates to support the newer dialects.
Be careful when you make these changes on domain controllers on which legacy Windows XP or older Linux and third-party systems (that do not support SMBv2 or SMBv3) require access to SYSVOL or other file shares where SMB v1 is being disabled.
Windows 10 example
- Get-WindowsOptionalFeature -Online -FeatureName SMB1Protocol

2. You might find that older copiers and printers or older network-accessible storage still depends on SMB v1 to be functional. You need to determine if the risk of SMB v1 is acceptable, or you can contact the vendors on your impacting devices to determine if you can get a firmware update to support SMB v2 and SMB v3 on these older devices.
3. Block SMB at the firewall level to prevent access from outside. It would do so by blocking TCP port 445 with related protocols on UDP ports 137-138 and TCP port 139, for all boundary devices.
- Avoid exposing SMB ports: Ports 135-139 and 445 are not safe to publicly expose and have not been for a decade.
4. Use the following steps to disable NetBIOS over TCP/IP; this procedure forces all SMB traffic to be direct hosted using only port 445. Take care in implementing this setting because it causes the Windows-based computer to be unable to communicate with earlier operating systems using SMB traffic due to the lack of ports 139 as an example:
- Click Start, Control Panel – Network and Internet – Network Connections
- Right-click Local Area Connection, or the adapter network card, and then click Properties.

- Click Internet Protocol (TCP/IP), and then click Properties.

- Click Advanced.
- Click the WINS tab, and then click Disable NetBIOS over TCP/IP.
If NetBIOS over TCP/IP is disabled, only port 445 will be used. You can also disable NetBIOS over TCP/IP by using a DHCP server with Microsoft vendor-specific option code 1, (“Disable NetBIOS over TCP/IP”). Setting this option to a value of 2 disables NBT. 
To determine if NetBIOS over TCP/IP is enabled on a Windows-based computer, issue a net config redirector or net config server command at a command prompt. The output shows bindings for:
NetbiosSmb device (which is the “NetBIOS-less” transport)
- NetBT_Tcpip is bound to each adapter individually; an instance of NetBT_Tcpip is shown for each network adapter that it is bound to.
NetBT_Tcpip device (which is the NetBIOS over TCP transport).
- NetbiosSmb is a global device, and is not bound on a per-adapter basis.
Command output when NetBIOS over TCP/IP is enabled
- net config server

NetBT_Tcpip device (which is the NetBIOS over TCP transport)
- net config redirector

5. Disable null session
A well-known vulnerability within Windows can map an anonymous connection (or null session) to a hidden share called IPC$ (which stands for interprocess communication).
- Open “Run” & run regedit
- Navigate to HKEY_LOCAL_MACHINE\SYSTEM\CurrentControlSet\Control\LsaInformation
- Set the value to 0 (restrictanonymous, restrictanonymoussam)
0 – None. Rely on default permissions
1 – Do not allow enumeration of Security Accounts Manager (SAM) accounts and names
2 – No access without explicit anonymous permissions (not available on Windows NT 4.0)

To confirm we can check “Local Security Policy”
- Go to Local Policies – Security Options
- Look for status on Network access (Network access allow anonymous SID/Name translation)
- Should be disabled

6. General Recommendations
- Patch everything: Keep your systems up-to-date to avoid exploits of known vulnerabilities.
- No single point of failure: Whether it’s ransomware, malware, hardware failure, database error, or something else. If your data is important, then it should be backed up, at least one other secure location.
- Use a firewall or endpoint protection: Most solutions will include a blacklist of known attacker IP addresses.
- Use a virtual private network (VPN): VPNs encypt and protect network traffic.
- Implement virtual local area networks (VLANs): VLANs can be used to isolate internal network traffic
- Use MAC address filtering: This can prevent unknown systems from accessing your network.