Cracking Password John The Ripper
John the Ripper is a fast password cracker, currently available for many flavors of Unix, macOS, Windows, DOS, BeOS, and OpenVMS (the latter requires a contributed patch). Its primary purpose is to detect weak passwords.
It is one of the most popular password testing and breaking programs as it combines a number of password crackers into one package, auto-detects password hash types, and includes a customizable cracker
It comes preinstalled in most security distributions. you just need to supply it a password file and the desired options. If no mode is specified, john will try “single” first, then “wordlist” and finally “incremental”. (see later)
Getting started
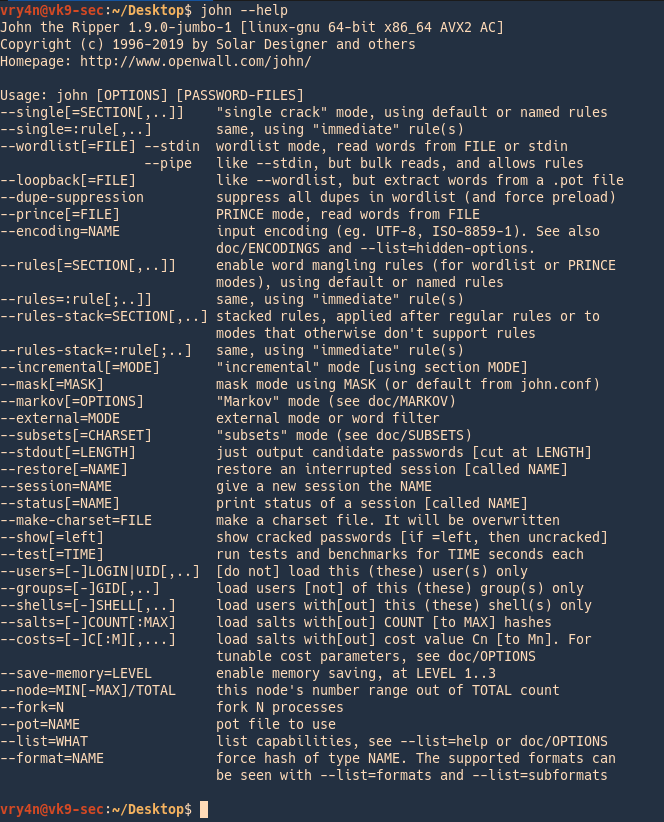
1. Run john to see some options
- john –help
2. Listing help
- john –list=help

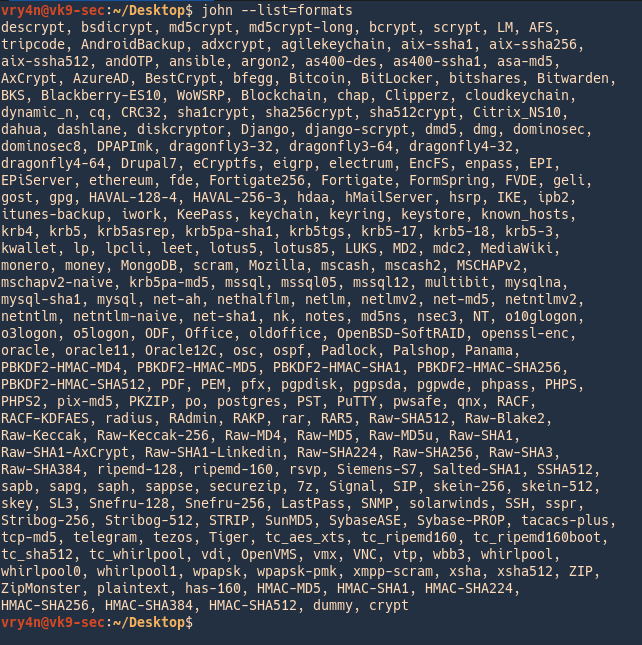
3. Check the supported formats
- john –list=formats
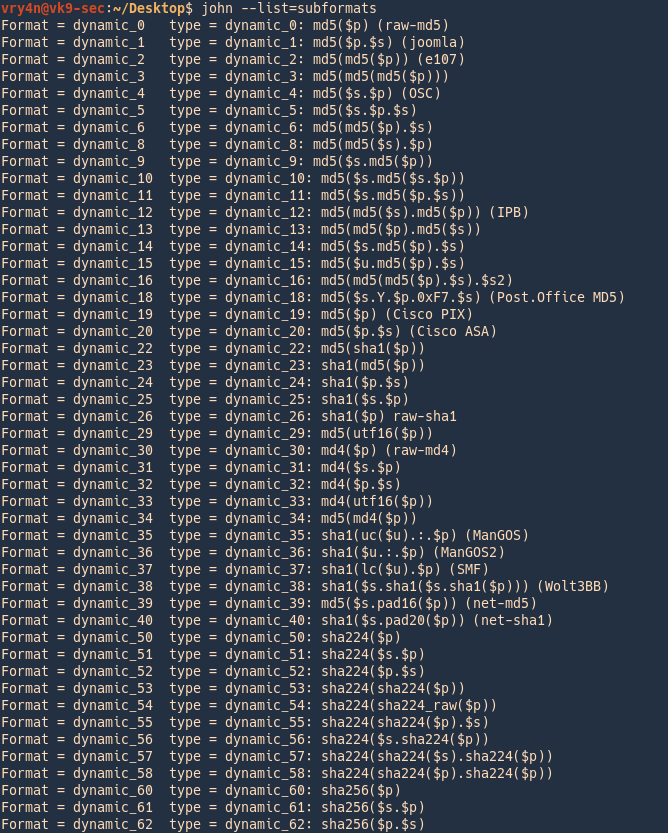
4. List the supported subformats
- john –list=subformats
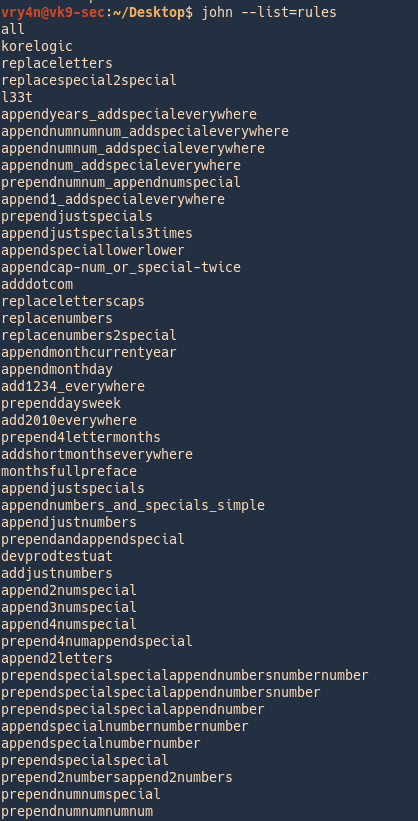
5. List rules
- john –list=rules
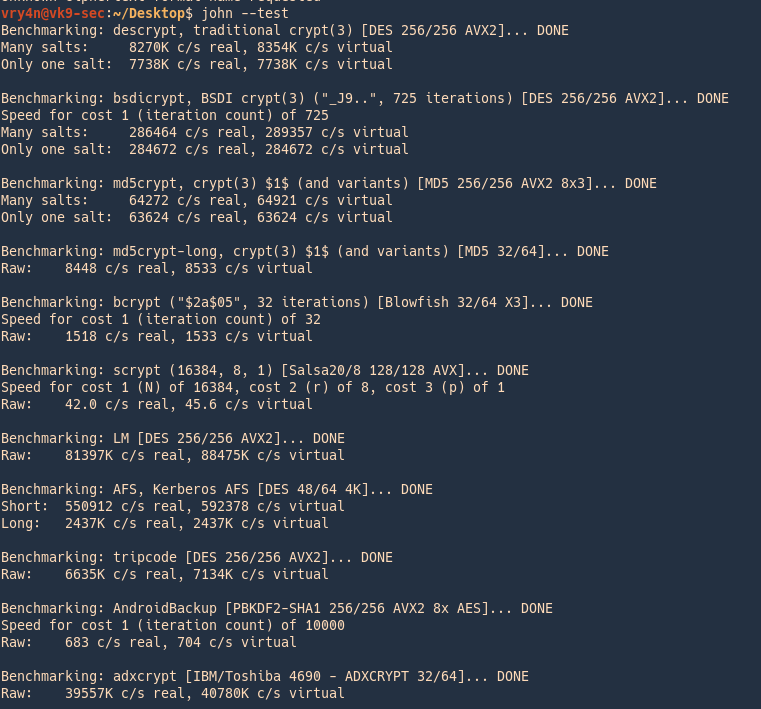
6. It is good practice to test hardware and resources before using john
- john –test
Modes
John the Ripper works in 3 distinct modes to crack the passwords, if none is specified it will go through each one of them
- Single Crack Mode
- Wordlist Crack Mode
- Incremental Mode
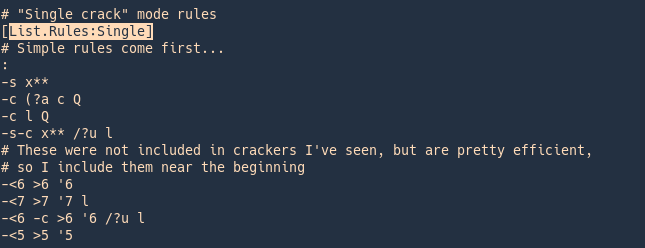
Single Crack Mode (GECOS)
When running in “single crack” mode, JtR itself takes the login name, the home directory name, extracts “words” from the GECOS field, and it uses all of these as input to “single crack” mode rules. Since the information is only used against passwords for the accounts it was taken from (and against password hashes which happened to be assigned the same salt), “single crack” mode is much faster than wordlist mode.
This permits for the use of a much larger set of word mangling rules with “single crack”, and their use is always enabled with this mode. Successfully guessed passwords are also tried against all loaded password hashes just in case more users have the same password.
GECOS
- username:password:userid:groupid:gecos:home-dir:shell
- :FullName,RoomAddress,WorkPhone,HomePhone,Others:
Rules information syntax
https://www.openwall.com/john/doc/RULES.shtml
Rules config
- https://www.openwall.com/lists/john-users/2010/04/05/4
- https://openwall.info/wiki/_media/john/korelogic-rules-20100801.txt
- /etc/john/john.conf
Rule syntax explained
| l | convert to lowercase |
| u | convert to uppercase |
| c | capitalize |
| C | lowercase the first character, and uppercase the rest |
| l r | lowercase the word and reverse it |
| r | reverse: “Fred” -> “derF” |
| l Az”2015″ | lowercase the word and append at end of the word (Az) the number 2015 |
| d | duplicate: “Fred” -> “FredFred” |
| l A0″2015″ | lowercase the word and prepend at beggining of the word (A0) the number 2015 |
| A0″#”Az”#” | Add # to the beginning and end of the word |
| t | toggle case of all characters in the word |
| TN | toggle case of the character in position N |
| f | reflect: “Fred” -> “FredderF” |
| { | rotate the word left: “jsmith”-> “smithj” |
| } | rotate the word right: “smithj” -> “jsmith |
| $X | append character X to the word |
| ^X | prefix the word with character X |
| [ | Remove the first char from the word |
| ] | Remove the last char from the word |
| DN | delete the character in position N |
| xNM | extract substring from position N for up to M characters |
| iNX | insert character X in position N and shift the rest right |
| oNX | overstrike character in position N with character X |
| s | shift case: “Crack96” -> “cRACK(^” |
| V | lowercase vowels, uppercase consonants: “Crack96” -> “CRaCK96” |
| R | shift each character right, by keyboard: “Crack96” -> “Vtsvl07” |
| L | shift each character left, by keyboard: “Crack96” -> “Xeaxj85” |
| <N | reject the word unless it is less than N characters long |
| >N | reject the word unless it is greater than N characters long |
| ‘N | truncate the word at length N |
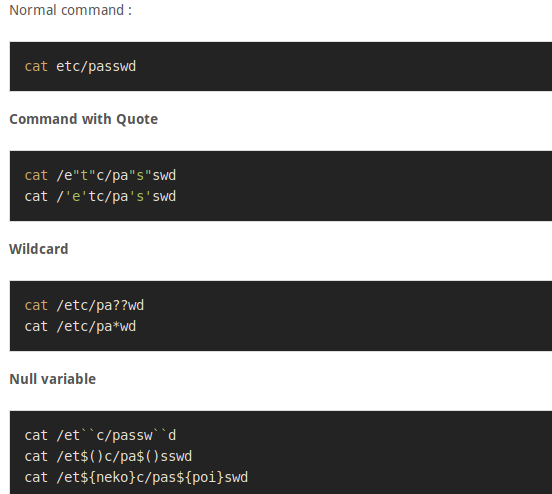
Types for formats
Example Single crack
secret:dd02c7c2232759874e1c205587017bed
The hashed password is also “secret”, in case that the word is case sensitive you need to adjust the rules to fit your needs.
- john –single –format=raw-md5 hash.txt

Wordlist Crack Mode (Dictionary)
This is the simplest cracking mode supported by John. All you need to do is specify a wordlist (a text file containing one word per line) and some password files.
You can enable word mangling rules (which are used to modify or “mangle” words producing other likely passwords). If enabled, all of the rules will be applied to every line in the wordlist file producing multiple candidate passwords from each source word.
Consider the following
- The wordlist should not contain duplicate lines
- John does not sort entries in the wordlist since that would consume a lot of resources and would prevent you from making John try the candidate passwords in the order that you define
- John runs a bit faster if each candidate password it tries only differs from the previous one by a few characters
- if your wordlist is sorted alphabetically, you do not need to bother about some wordlist entries being longer than the maximum supported password length for the hash type you’re cracking
- If no wordlist is set, john will use its default
In this mode John the ripper uses a wordlist that can also be called a Dictionary and it compares the hashes of the words present in the Dictionary with the password hash.
Example
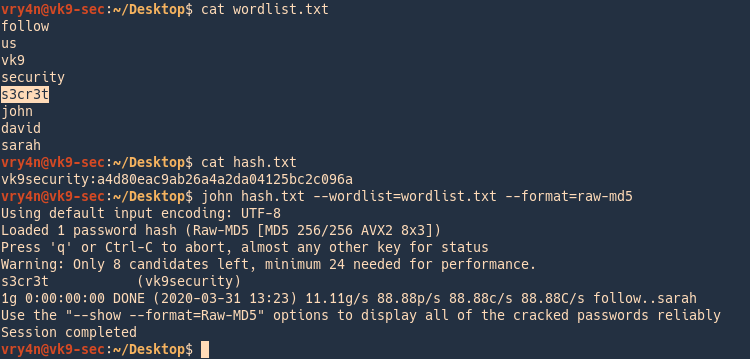
In this case we have a custom wordlist, and a hash that we need to compare
vk9security:a4d80eac9ab26a4a2da04125bc2c096a
- cat wordlist.txt
- cat hash.txt
- john –wordlist=wordlist.txt –format=raw-md5 hash.txt
Incremental mode (Bruteforce)
This is the most powerful cracking mode, it can try all possible character combinations as passwords. However, it is assumed that cracking with this mode will never terminate because of the number of combinations being too large
- it will terminate if you set a low password length limit or make it use a small charset
- To use the mode you need a specific definition for the mode’s parameters, including password length limits and the charset to use
Type of incremental modes
- cat /etc/john/john.conf | grep -i incremental
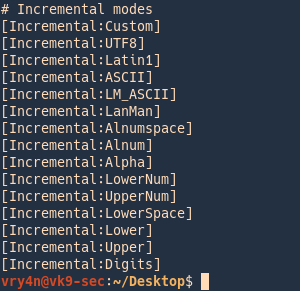
- –incremental:Lower (26 char)
- –incremental:Alpha(52 char)
- –incremental:Digits(10 char)
- –incremental:Alnum(62 char)
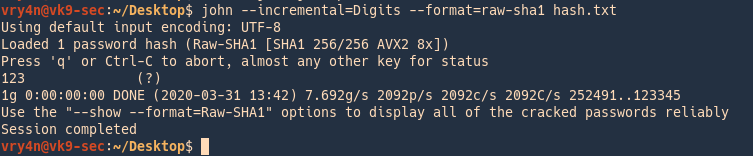
Cracking Digits only (Default numeric range is from 0 to 99999999999999999999)
Hash value is 123
- john –incremental=Digits –format=raw-sha1 hash.txt
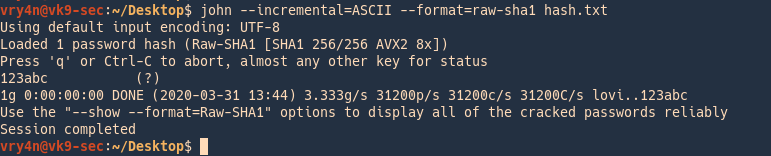
Cracking ASCII values
Has value is 123abc
- john –incremental=ASCII –format=raw-sha1 has h.txt
Cracking different services example
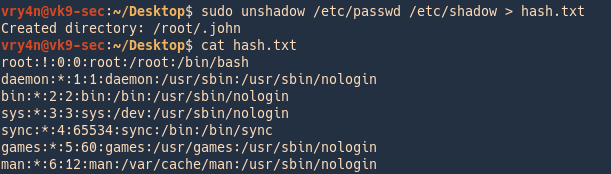
Cracking Unix/Linux password
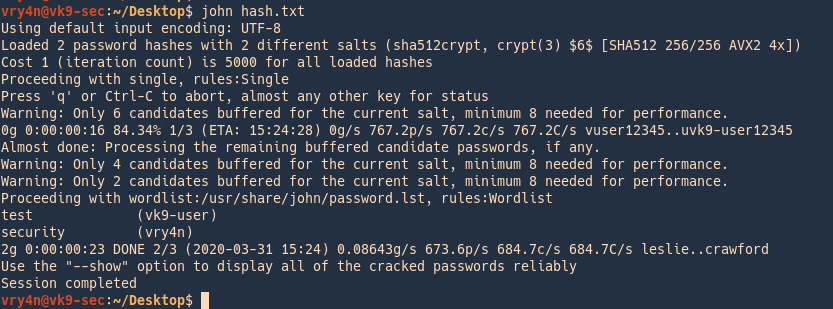
1. Create the file containing GECOS data
Unshadow = combines passwd and shadow files
- sudo unshadow /etc/passwd /etc/shadow > hash.txt
- cat hash.txt
2. run John against that, it goes through the list trying to crack each, this time it cracked 2 users
- john hash.txt
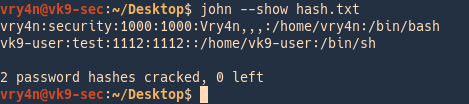
Check results
3. To see the results you can point at the hash file as the name
- john –show hash.txt
Cracking SSH Password Hash
1. Create a private key
- ssh-keygen
- <select the location of the new file>
- <enter the password>
- <confirm the password>
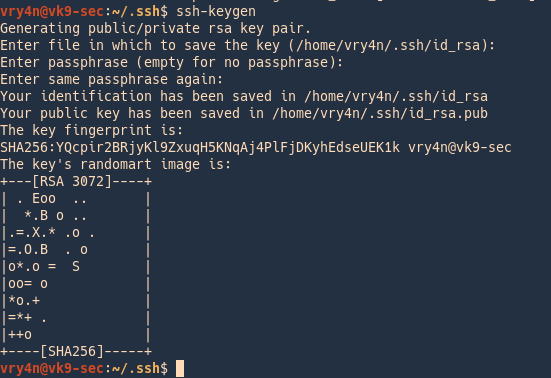
Id_rsa (private-key) & id_rsa.pub (public-key) have been created.
- ls -l

2. I copied the key to /tmp and try to use it wth a different user other than the owner, only being able to read, we are asked for the id_rsa key
- whoami
- ls -l id_rsa
- ssh -i id_rsa vry4n@localhost

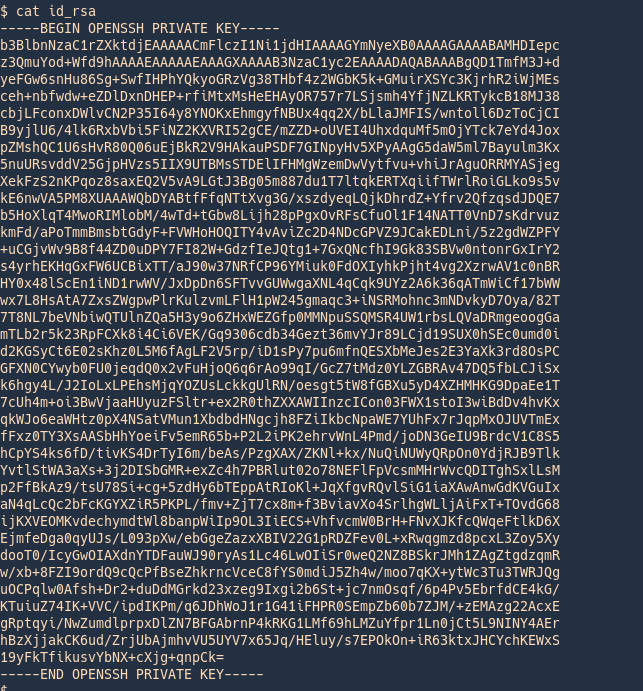
3. Now, convert this encrypted file to john format using ssh2john
View before
- cat id_rsa
Converting to john format
- /usr/share/john/ssh2john.py id_rsa > new_key
- cat new_key
View after

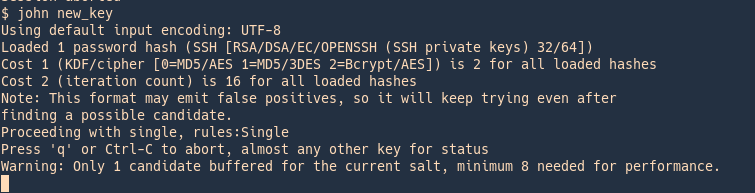
Wait until john finishes cracking
- john new_key
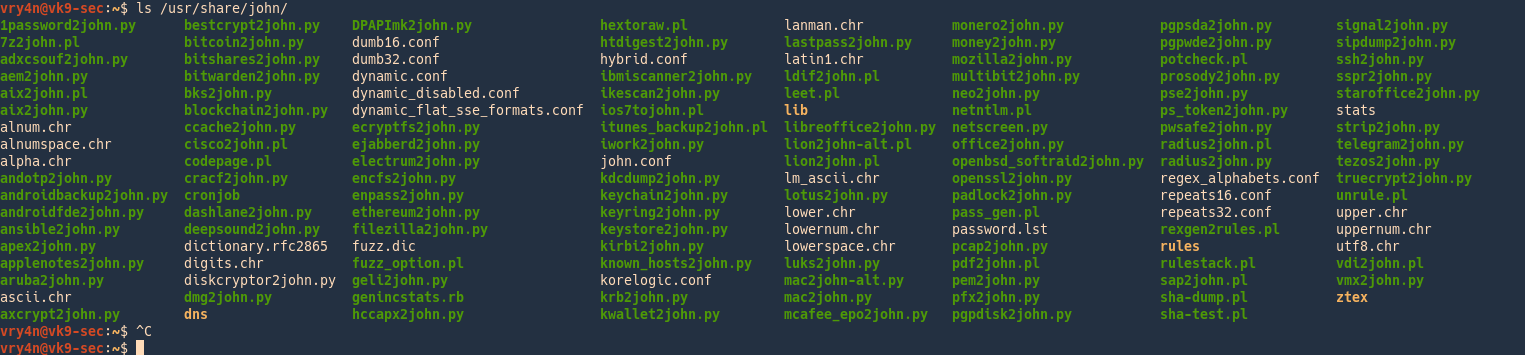
As well as for SSH we have scripts to convert hashes from different tools (keepass2john, pdf2john, pcap2john) to john readable. All of those are located in John binary directory /usr/share/john/
- ls /usr/share/john/
Examples of HASH formats
Here is the list of encryption technologies found in JtR:
- UNIX crypt(3)
- Traditional DES-based
- “bigcrypt”
- BSDI extended DES-based
- FreeBSD MD5-based (linux and Cisco IOS)
- OpenBSD Blowfish-based
- Kerberos/AFS
- Windows LM (DES-based)
- DES-based tripcodes
- SHA-crypt hashes (newer versions of Fedora and Ubuntu)
- SHA-crypt and SUNMD5 hashes (Solaris)
afs – Kerberos AFS DES
Supported Hash Formats
$ cat hashes.txt
$K4$a8dc8aeaa2c48a97,
$ john hashes.txt
$ john –format=afs hashes.txt
$ cat hashes.txt
username:$K4$a8dc8aeaa2c48a97,
$ john hashes.txt
$ john –format=afs hashes.txt
$ cat hashes.txt
username:$K4$a8dc8aeaa2c48a97,:::::::
$ john hashes.txt
$ john –format=afs hashes.txt
bfegg – Eggdrop
Supported Hash Formats
$ cat hashes.txt
+C/.8o.Wuph9.
$ john hashes.txt # Doesn’t work. JTR detects hash as “Traditional DES”.
$ john –format=bfegg hashes.txt
$ cat hashes.txt
username:+C/.8o.Wuph9.
$ john hashes.txt # Doesn’t work. JTR detects hash as “Traditional DES”.
$ john –format=bfegg hashes.txt
$ cat hashes.txt
username:+C/.8o.Wuph9.:::::::
$ john hashes.txt # Doesn’t work. JTR detects hash as “Traditional DES”.
$ john –format=bfegg hashes.txt
bf – OpenBSD Blowfish
Supported Hash Formats
$ cat hashes.txt
$2a$05$CCCCCCCCCCCCCCCCCCCCC.7uG0VCzI2bS7j6ymqJi9CdcdxiRTWNy
$ john hashes.txt
$ john –format=bf hashes.txt
$ cat hashes.txt
username:$2a$05$CCCCCCCCCCCCCCCCCCCCC.7uG0VCzI2bS7j6ymqJi9CdcdxiRTWNy
$ john hashes.txt
$ john –format=bf hashes.txt
$ cat hashes.txt
username:$2a$05$CCCCCCCCCCCCCCCCCCCCC.7uG0VCzI2bS7j6ymqJi9CdcdxiRTWNy:::::::
$ john hashes.txt
$ john –format=bf hashes.txt
bsdi – BSDI DES
Supported Hash Formats
$ cat hashes.txt
_J9..SDSD5YGyRCr4W4c
$ john hashes.txt
$ john –format=bsdi hashes.txt
$ cat hashes.txt
username:_J9..SDSD5YGyRCr4W4c
$ john hashes.txt
$ john –format=bsdi hashes.txt
$ cat hashes.txt
username:_J9..SDSD5YGyRCr4W4c:::::::
$ john hashes.txt
$ john –format=bsdi hashes.txt
crypt – generic crypt(3)
Supported Hash Formats
$ cat hashes.txt
SDbsugeBiC58A
$ john hashes.txt # Doesn’t work. JTR detects hash as “Traditional DES”.
$ john –format=crypt hashes.txt
$ cat hashes.txt
username:SDbsugeBiC58A
$ john hashes.txt # Doesn’t work. JTR detects hash as “Traditional DES”.
$ john –format=crypt hashes.txt
$ cat hashes.txt
username:SDbsugeBiC58A:::::::
$ john hashes.txt # Doesn’t work. JTR detects hash as “Traditional DES”.
$ john –format=crypt hashes.txt
des – Traditional DES
Supported Hash Formats
$ cat hashes.txt
SDbsugeBiC58A
$ john hashes.txt
$ john –format=des hashes.txt
$ cat hashes.txt
username:SDbsugeBiC58A
$ john hashes.txt
$ john –format=des hashes.txt
$ cat hashes.txt
username:SDbsugeBiC58A:::::::
$ john hashes.txt
$ john –format=des hashes.txt
dominosec – More Secure Internet Password
Supported Hash Formats
$ cat hashes.txt
(GVMroLzc50YK/Yd+L8KH)
$ john hashes.txt
$ john –format=dominosec hashes.txt
$ cat hashes.txt
username:(GVMroLzc50YK/Yd+L8KH)
$ john hashes.txt
$ john –format=dominosec hashes.txt
$ cat hashes.txt
username:(GVMroLzc50YK/Yd+L8KH):::::::
$ john hashes.txt
$ john –format=dominosec hashes.txt
EPiServer SID Hashes
Supported Hash Formats
$ cat hashes.txt
0x5F1D84A6DE97E2BEFB637A3CB5318AFEF0750B856CF1836BD1D4470175BE 0x4D5EFDFA143EDF74193076F174AC47CEBF2F417F
$ john hashes.txt
$ # NB: There is no –format option for this hash type
$ cat hashes.txt
username:0x5F1D84A6DE97E2BEFB637A3CB5318AFEF0750B856CF1836BD1D4470175BE 0x4D5EFDFA143EDF74193076F174AC47CEBF2F417F
$ john hashes.txt
$ # NB: There is no –format option for this hash type
$ cat hashes.txt
username:0x5F1D84A6DE97E2BEFB637A3CB5318AFEF0750B856CF1836BD1D4470175BE 0x4D5EFDFA143EDF74193076F174AC47CEBF2F417F:::::::
$ john hashes.txt
$ # NB: There is no –format option for this hash type
hdaa – HTTP Digest access authentication
Supported Hash Formats
$ cat hashes.txt
$response$679066476e67b5c7c4e88f04be567f8b$user$myrealm$GET$/$8c12bd8f728afe56d45a0ce846b70e5a$00000001$4b61913cec32e2c9$auth
$ john hashes.txt
$ john –format=hdaa hashes.txt
$ cat hashes.txt
username:$response$679066476e67b5c7c4e88f04be567f8b$user$myrealm$GET$/$8c12bd8f728afe56d45a0ce846b70e5a$00000001$4b61913cec32e2c9$auth
$ john hashes.txt
$ john –format=hdaa hashes.txt
$ cat hashes.txt
username:$response$679066476e67b5c7c4e88f04be567f8b$user$myrealm$GET$/$8c12bd8f728afe56d45a0ce846b70e5a$00000001$4b61913cec32e2c9$auth:::::::
$ john hashes.txt
$ john –format=hdaa hashes.txt
hmac-md5 – HMAC MD5
Supported Hash Formats
$ cat hashes.txt
what do ya want for nothing?#750c783e6ab0b503eaa86e310a5db738
$ john hashes.txt
$ john –format=hmac-md5 hashes.txt
$ cat hashes.txt
username:what do ya want for nothing?#750c783e6ab0b503eaa86e310a5db738
$ john hashes.txt
$ john –format=hmac-md5 hashes.txt
$ cat hashes.txt
username:what do ya want for nothing?#750c783e6ab0b503eaa86e310a5db738:::::::
$ john hashes.txt
$ john –format=hmac-md5 hashes.txt
hmailserver – hmailserver
Supported Hash Formats
$ cat hashes.txt
cc06fa688a64cdeea43d3c0fb761fede7e3ccf00a9daea9c79f7d458e06f88327f16dd
$ john hashes.txt
$ john –format=hmailserver hashes.txt
$ cat hashes.txt
username:cc06fa688a64cdeea43d3c0fb761fede7e3ccf00a9daea9c79f7d458e06f88327f16dd
$ john hashes.txt
$ john –format=hmailserver hashes.txt
$ cat hashes.txt
username:cc06fa688a64cdeea43d3c0fb761fede7e3ccf00a9daea9c79f7d458e06f88327f16dd:::::::
$ john hashes.txt
$ john –format=hmailserver hashes.txt
ipb2 – IPB2 MD5
Supported Hash Formats
$ cat hashes.txt
$IPB2$2e75504633$d891f03a7327639bc632d62a7f302604
$ john hashes.txt
$ john –format=ipb2 hashes.txt
$ cat hashes.txt
username:$IPB2$2e75504633$d891f03a7327639bc632d62a7f302604
$ john hashes.txt
$ john –format=ipb2 hashes.txt
$ cat hashes.txt
username:$IPB2$2e75504633$d891f03a7327639bc632d62a7f302604:::::::
$ john hashes.txt
$ john –format=ipb2 hashes.txt
krb4 – Kerberos v4 TGT
Supported Hash Formats
$ cat hashes.txt
$af$ENGIN.UMICH.EDU$44feffd06e68e30bc8890e253760858d
$ john hashes.txt
$ john –format=krb4 hashes.txt
$ cat hashes.txt
username:$af$ENGIN.UMICH.EDU$44feffd06e68e30bc8890e253760858d
$ john hashes.txt
$ john –format=krb4 hashes.txt
$ cat hashes.txt
username:$af$ENGIN.UMICH.EDU$44feffd06e68e30bc8890e253760858d:::::::
$ john hashes.txt
$ john –format=krb4 hashes.txt
krb5 – Kerberos v5 TGT
Supported Hash Formats
$ cat hashes.txt
$krb5$oskov$ACM.UIUC.EDU$4730d7249765615d6f3652321c4fb76d09fb9cd06faeb0c31b8737f9fdfcde4bd4259c31cb1dff25df39173b09abdff08373302d99ac09802a290915243d9f0ea0313fdedc7f8d1fae0d9df8f0ee6233818d317f03a72c2e77b480b2bc50d1ca14fba85133ea00e472c50dbc825291e2853bd60a969ddb69dae35b604b34ea2c2265a4ffc72e9fb811da17c7f2887ccb17e2f87cd1f6c28a9afc0c083a9356a9ee2a28d2e4a01fc7ea90cc8836b8e25650c3a1409b811d0bad42a59aa418143291d42d7b1e6cb5b1876a4cc758d721323a762e943f774630385c9faa68df6f3a94422f97
$ john hashes.txt
$ john –format=krb5 hashes.txt
$ cat hashes.txt
username:$krb5$oskov$ACM.UIUC.EDU$4730d7249765615d6f3652321c4fb76d09fb9cd06faeb0c31b8737f9fdfcde4bd4259c31cb1dff25df39173b09abdff08373302d99ac09802a290915243d9f0ea0313fdedc7f8d1fae0d9df8f0ee6233818d317f03a72c2e77b480b2bc50d1ca14fba85133ea00e472c50dbc825291e2853bd60a969ddb69dae35b604b34ea2c2265a4ffc72e9fb811da17c7f2887ccb17e2f87cd1f6c28a9afc0c083a9356a9ee2a28d2e4a01fc7ea90cc8836b8e25650c3a1409b811d0bad42a59aa418143291d42d7b1e6cb5b1876a4cc758d721323a762e943f774630385c9faa68df6f3a94422f97
$ john hashes.txt
$ john –format=krb5 hashes.txt
$ cat hashes.txt
username:$krb5$oskov$ACM.UIUC.EDU$4730d7249765615d6f3652321c4fb76d09fb9cd06faeb0c31b8737f9fdfcde4bd4259c31cb1dff25df39173b09abdff08373302d99ac09802a290915243d9f0ea0313fdedc7f8d1fae0d9df8f0ee6233818d317f03a72c2e77b480b2bc50d1ca14fba85133ea00e472c50dbc825291e2853bd60a969ddb69dae35b604b34ea2c2265a4ffc72e9fb811da17c7f2887ccb17e2f87cd1f6c28a9afc0c083a9356a9ee2a28d2e4a01fc7ea90cc8836b8e25650c3a1409b811d0bad42a59aa418143291d42d7b1e6cb5b1876a4cc758d721323a762e943f774630385c9faa68df6f3a94422f97:::::::
$ john hashes.txt
$ john –format=krb5 hashes.txt
lm – LM DES
Supported Hash Formats
$ cat hashes.txt
$LM$a9c604d244c4e99d
$ john hashes.txt
$ john –format=lm hashes.txt
$ cat hashes.txt
username:$LM$a9c604d244c4e99d
$ john hashes.txt
$ john –format=lm hashes.txt
$ cat hashes.txt
username:$LM$a9c604d244c4e99d:::::::
$ john hashes.txt
$ john –format=lm hashes.txt
lotus5 – Lotus5
Supported Hash Formats
$ cat hashes.txt
355E98E7C7B59BD810ED845AD0FD2FC4
$ john hashes.txt # Doesn’t work. JTR detects hash as “LM DES”.
$ john –format=lotus5 hashes.txt
$ cat hashes.txt
username:355E98E7C7B59BD810ED845AD0FD2FC4
$ john hashes.txt # Doesn’t work. JTR detects hash as “LM DES”.
$ john –format=lotus5 hashes.txt
$ cat hashes.txt
username:355E98E7C7B59BD810ED845AD0FD2FC4:::::::
$ john hashes.txt # Doesn’t work. JTR detects hash as “LM DES”.
$ john –format=lotus5 hashes.txt
md4-gen – Generic salted MD4
Supported Hash Formats
$ cat hashes.txt
$MD4p$salt$15ad2b7a23e5088942f9d3772181b384
$ john hashes.txt
$ john –format=md4-gen hashes.txt
$ cat hashes.txt
username:$MD4p$salt$15ad2b7a23e5088942f9d3772181b384
$ john hashes.txt
$ john –format=md4-gen hashes.txt
$ cat hashes.txt
username:$MD4p$salt$15ad2b7a23e5088942f9d3772181b384:::::::
$ john hashes.txt
$ john –format=md4-gen hashes.txt
md5 – FreeBSD MD5
Supported Hash Formats
$ cat hashes.txt
$1$12345678$aIccj83HRDBo6ux1bVx7D1
$ john hashes.txt
$ john –format=md5 hashes.txt
$ cat hashes.txt
username:$1$12345678$aIccj83HRDBo6ux1bVx7D1
$ john hashes.txt
$ john –format=md5 hashes.txt
$ cat hashes.txt
username:$1$12345678$aIccj83HRDBo6ux1bVx7D1:::::::
$ john hashes.txt
$ john –format=md5 hashes.txt
$ cat hashes.txt
$apr1$Q6ZYh…$RV6ft2bZ8j.NGrxLYaJt9.
$ john hashes.txt
$ john –format=md5 hashes.txt
$ cat hashes.txt
username:$apr1$Q6ZYh…$RV6ft2bZ8j.NGrxLYaJt9.
$ john hashes.txt
$ john –format=md5 hashes.txt
$ cat hashes.txt
username:$apr1$Q6ZYh…$RV6ft2bZ8j.NGrxLYaJt9.:::::::
$ john hashes.txt
$ john –format=md5 hashes.txt
mediawiki – MediaWiki MD5s
Supported Hash Formats
$ cat hashes.txt
$B$113$de2874e33da25313d808d2a8cbf31485
$ john hashes.txt
$ john –format=mediawiki hashes.txt
$ cat hashes.txt
username:$B$113$de2874e33da25313d808d2a8cbf31485
$ john hashes.txt
$ john –format=mediawiki hashes.txt
$ cat hashes.txt
username:$B$113$de2874e33da25313d808d2a8cbf31485:::::::
$ john hashes.txt
$ john –format=mediawiki hashes.txt
mscash – M$ Cache Hash
Supported Hash Formats
$ cat hashes.txt
M$test1#64cd29e36a8431a2b111378564a10631
$ john hashes.txt # Doesn’t work. JTR detects hash as “HMAC MD5”.
$ john –format=mscash hashes.txt
$ cat hashes.txt
username:M$test1#64cd29e36a8431a2b111378564a10631
$ john hashes.txt # Doesn’t work. JTR detects hash as “HMAC MD5”.
$ john –format=mscash hashes.txt
$ cat hashes.txt
username:M$test1#64cd29e36a8431a2b111378564a10631:::::::
$ john hashes.txt # Doesn’t work. JTR detects hash as “HMAC MD5”.
$ john –format=mscash hashes.txt
mscash2 – M$ Cache Hash 2 (DCC2)
Supported Hash Formats
$ cat hashes.txt
$DCC2$10240#test1#607bbe89611e37446e736f7856515bf8
$ john hashes.txt # Doesn’t work. JTR detects hash as “M$ Cache Hash”.
$ john –format=mscash2 hashes.txt
$ cat hashes.txt
username:$DCC2$10240#test1#607bbe89611e37446e736f7856515bf8
$ john hashes.txt
$ john –format=mscash2 hashes.txt
$ cat hashes.txt
username:$DCC2$10240#test1#607bbe89611e37446e736f7856515bf8:::::::
$ john hashes.txt
$ john –format=mscash2 hashes.txt
mschapv2 – MSCHAPv2 C/R MD4 DES
Supported Hash Formats
$ cat hashes.txt
$MSCHAPv2$d94e7c7972b2376b28c268583e162de7$eba25a3b04d2c7085d01f842e2befc91745c40db0f792356$0677ca7318fd7f65ae1b4f58c9f4f400$lameuser
$ john hashes.txt
$ john –format=mschapv2 hashes.txt
$ cat hashes.txt
username:$MSCHAPv2$d94e7c7972b2376b28c268583e162de7$eba25a3b04d2c7085d01f842e2befc91745c40db0f792356$0677ca7318fd7f65ae1b4f58c9f4f400$lameuser
$ john hashes.txt
$ john –format=mschapv2 hashes.txt
$ cat hashes.txt
username:$MSCHAPv2$d94e7c7972b2376b28c268583e162de7$eba25a3b04d2c7085d01f842e2befc91745c40db0f792356$0677ca7318fd7f65ae1b4f58c9f4f400$lameuser:::::::
$ john hashes.txt
$ john –format=mschapv2 hashes.txt
mskrb5 – MS Kerberos 5 AS-REQ Pre-Auth
Supported Hash Formats
$ cat hashes.txt
$mskrb5$$$98cd00b6f222d1d34e08fe0823196e0b$5937503ec29e3ce4e94a051632d0fff7b6781f93e3decf7dca707340239300d602932154
$ john hashes.txt
$ john –format=mskrb5 hashes.txt
$ cat hashes.txt
username:$mskrb5$$$98cd00b6f222d1d34e08fe0823196e0b$5937503ec29e3ce4e94a051632d0fff7b6781f93e3decf7dca707340239300d602932154
$ john hashes.txt
$ john –format=mskrb5 hashes.txt
$ cat hashes.txt
username:$mskrb5$$$98cd00b6f222d1d34e08fe0823196e0b$5937503ec29e3ce4e94a051632d0fff7b6781f93e3decf7dca707340239300d602932154:::::::
$ john hashes.txt
$ john –format=mskrb5 hashes.txt
mssql05 – MS-SQL05
Supported Hash Formats
$ cat hashes.txt
0x01004086CEB6BF932BC4151A1AF1F13CD17301D70816A8886908
$ john hashes.txt
$ john –format=mssql05 hashes.txt
$ cat hashes.txt
username:0x01004086CEB6BF932BC4151A1AF1F13CD17301D70816A8886908
$ john hashes.txt
$ john –format=mssql05 hashes.txt
$ cat hashes.txt
username:0x01004086CEB6BF932BC4151A1AF1F13CD17301D70816A8886908:::::::
$ john hashes.txt
$ john –format=mssql05 hashes.txt
mssql – MS-SQL
Supported Hash Formats
$ cat hashes.txt
0x0100A607BA7C54A24D17B565C59F1743776A10250F581D482DA8B6D6261460D3F53B279CC6913CE747006A2E3254
$ john hashes.txt
$ john –format=mssql hashes.txt
$ cat hashes.txt
username:0x0100A607BA7C54A24D17B565C59F1743776A10250F581D482DA8B6D6261460D3F53B279CC6913CE747006A2E3254
$ john hashes.txt
$ john –format=mssql hashes.txt
$ cat hashes.txt
username:0x0100A607BA7C54A24D17B565C59F1743776A10250F581D482DA8B6D6261460D3F53B279CC6913CE747006A2E3254:::::::
$ john hashes.txt
$ john –format=mssql hashes.txt
mysql-fast – MYSQL_fast
Supported Hash Formats
$ cat hashes.txt
60671c896665c3fa
$ john hashes.txt
$ john –format=mysql-fast hashes.txt
$ cat hashes.txt
username:60671c896665c3fa
$ john hashes.txt
$ john –format=mysql-fast hashes.txt
$ cat hashes.txt
username:60671c896665c3fa:::::::
$ john hashes.txt
$ john –format=mysql-fast hashes.txt
mysql – MYSQL
Supported Hash Formats
$ cat hashes.txt
5d2e19393cc5ef67
$ john hashes.txt # Doesn’t work. JTR detects hash as “MYSQL_fast”.
$ john –format=mysql hashes.txt
$ cat hashes.txt
username:5d2e19393cc5ef67
$ john hashes.txt # Doesn’t work. JTR detects hash as “MYSQL_fast”.
$ john –format=mysql hashes.txt
$ cat hashes.txt
username:5d2e19393cc5ef67:::::::
$ john hashes.txt # Doesn’t work. JTR detects hash as “MYSQL_fast”.
$ john –format=mysql hashes.txt
mysql-sha1 – MySQL 4.1 double-SHA-1
Supported Hash Formats
$ cat hashes.txt
*2470C0C06DEE42FD1618BB99005ADCA2EC9D1E19
$ john hashes.txt
$ john –format=mysql-sha1 hashes.txt
$ cat hashes.txt
username:*2470C0C06DEE42FD1618BB99005ADCA2EC9D1E19
$ john hashes.txt
$ john –format=mysql-sha1 hashes.txt
$ cat hashes.txt
username:*2470C0C06DEE42FD1618BB99005ADCA2EC9D1E19:::::::
$ john hashes.txt
$ john –format=mysql-sha1 hashes.txt
netlm – LM C/R DES
Supported Hash Formats
$ cat hashes.txt
$NETLM$1122334455667788$0836F085B124F33895875FB1951905DD2F85252CC731BB25
$ john hashes.txt
$ john –format=netlm hashes.txt
$ cat hashes.txt
username:$NETLM$1122334455667788$0836F085B124F33895875FB1951905DD2F85252CC731BB25
$ john hashes.txt
$ john –format=netlm hashes.txt
$ cat hashes.txt
username:$NETLM$1122334455667788$0836F085B124F33895875FB1951905DD2F85252CC731BB25:::::::
$ john hashes.txt
$ john –format=netlm hashes.txt
netlmv2 – LMv2 C/R MD4 HMAC-MD5
Supported Hash Formats
$ cat hashes.txt
$NETLMv2$USER1$1122334455667788$B1D163EA5881504F3963DC50FCDC26C1$EB4D9E8138149E20
$ john hashes.txt
$ john –format=netlmv2 hashes.txt
$ cat hashes.txt
username:$NETLMv2$USER1$1122334455667788$B1D163EA5881504F3963DC50FCDC26C1$EB4D9E8138149E20
$ john hashes.txt
$ john –format=netlmv2 hashes.txt
$ cat hashes.txt
username:$NETLMv2$USER1$1122334455667788$B1D163EA5881504F3963DC50FCDC26C1$EB4D9E8138149E20:::::::
$ john hashes.txt
$ john –format=netlmv2 hashes.txt
netntlm – NTLMv1 C/R MD4 DES [ESS MD5]
Supported Hash Formats
$ cat hashes.txt
$NETNTLM$1122334455667788$B2B2220790F40C88BCFF347C652F67A7C4A70D3BEBD70233
$ john hashes.txt
$ john –format=netntlm hashes.txt
$ cat hashes.txt
username:$NETNTLM$1122334455667788$B2B2220790F40C88BCFF347C652F67A7C4A70D3BEBD70233
$ john hashes.txt
$ john –format=netntlm hashes.txt
$ cat hashes.txt
username:$NETNTLM$1122334455667788$B2B2220790F40C88BCFF347C652F67A7C4A70D3BEBD70233:::::::
$ john hashes.txt
$ john –format=netntlm hashes.txt
netntlmv2 – NTLMv2 C/R MD4 HMAC-MD5
Supported Hash Formats
$ cat hashes.txt
$NETNTLMv2$NTLMV2TESTWORKGROUP$1122334455667788$07659A550D5E9D02996DFD95C87EC1D5$0101000000000000006CF6385B74CA01B3610B02D99732DD000000000200120057004F0052004B00470052004F00550050000100200044004100540041002E00420049004E0043002D0053004500430055005200490000000000
$ john hashes.txt
$ john –format=netntlmv2 hashes.txt
$ cat hashes.txt
username:$NETNTLMv2$NTLMV2TESTWORKGROUP$1122334455667788$07659A550D5E9D02996DFD95C87EC1D5$0101000000000000006CF6385B74CA01B3610B02D99732DD000000000200120057004F0052004B00470052004F00550050000100200044004100540041002E00420049004E0043002D0053004500430055005200490000000000
$ john hashes.txt
$ john –format=netntlmv2 hashes.txt
$ cat hashes.txt
username:$NETNTLMv2$NTLMV2TESTWORKGROUP$1122334455667788$07659A550D5E9D02996DFD95C87EC1D5$0101000000000000006CF6385B74CA01B3610B02D99732DD000000000200120057004F0052004B00470052004F00550050000100200044004100540041002E00420049004E0043002D0053004500430055005200490000000000:::::::
$ john hashes.txt
$ john –format=netntlmv2 hashes.txt
nethalflm – HalfLM C/R DES
Supported Hash Formats
$ cat hashes.txt
$NETHALFLM$1122334455667788$6E1EC36D3417CE9E09A4424309F116C4C991948DAEB4ADAD
$ john hashes.txt
$ john –format=nethalflm hashes.txt
$ cat hashes.txt
username:$NETHALFLM$1122334455667788$6E1EC36D3417CE9E09A4424309F116C4C991948DAEB4ADAD
$ john hashes.txt
$ john –format=nethalflm hashes.txt
$ cat hashes.txt
username:$NETHALFLM$1122334455667788$6E1EC36D3417CE9E09A4424309F116C4C991948DAEB4ADAD:::::::
$ john hashes.txt
$ john –format=nethalflm hashes.txt
md5ns – Netscreen MD5
Supported Hash Formats
$ cat hashes.txt
admin$nMjFM0rdC9iOc+xIFsGEm3LtAeGZhn
$ john hashes.txt
$ john –format=md5ns hashes.txt
$ cat hashes.txt
username:admin$nMjFM0rdC9iOc+xIFsGEm3LtAeGZhn
$ john hashes.txt
$ john –format=md5ns hashes.txt
$ cat hashes.txt
username:admin$nMjFM0rdC9iOc+xIFsGEm3LtAeGZhn:::::::
$ john hashes.txt
$ john –format=md5ns hashes.txt
nsldap – Netscape LDAP SHA
Supported Hash Formats
$ cat hashes.txt
{SHA}cMiB1KJphN3OeV9vcYF8nPRIDnk=
$ john hashes.txt
$ john –format=nsldap hashes.txt
$ cat hashes.txt
username:{SHA}cMiB1KJphN3OeV9vcYF8nPRIDnk=
$ john hashes.txt
$ john –format=nsldap hashes.txt
$ cat hashes.txt
username:{SHA}cMiB1KJphN3OeV9vcYF8nPRIDnk=:::::::
$ john hashes.txt
$ john –format=nsldap hashes.txt
ssha – Netscape LDAP SSHA
Supported Hash Formats
$ cat hashes.txt
{SSHA}WTT3B9Jjr8gOt0Q7WMs9/XvukyhTQj0Ns0jMKQ==
$ john hashes.txt
$ john –format=ssha hashes.txt
$ cat hashes.txt
username:{SSHA}WTT3B9Jjr8gOt0Q7WMs9/XvukyhTQj0Ns0jMKQ==
$ john hashes.txt
$ john –format=ssha hashes.txt
$ cat hashes.txt
username:{SSHA}WTT3B9Jjr8gOt0Q7WMs9/XvukyhTQj0Ns0jMKQ==:::::::
$ john hashes.txt
$ john –format=ssha hashes.txt
nt – NT MD4
Supported Hash Formats
$ cat hashes.txt
$NT$8846f7eaee8fb117ad06bdd830b7586c
$ john hashes.txt
$ john –format=nt hashes.txt
$ cat hashes.txt
username:$NT$8846f7eaee8fb117ad06bdd830b7586c
$ john hashes.txt
$ john –format=nt hashes.txt
$ cat hashes.txt
username:$NT$8846f7eaee8fb117ad06bdd830b7586c:::::::
$ john hashes.txt
$ john –format=nt hashes.txt
openssha – OpenLDAP SSHA
Supported Hash Formats
$ cat hashes.txt
{SSHA}hHSEPW3qeiOo5Pl2MpHQCXh0vgfyVR/X
$ john hashes.txt
$ john –format=openssha hashes.txt
$ cat hashes.txt
username:{SSHA}hHSEPW3qeiOo5Pl2MpHQCXh0vgfyVR/X
$ john hashes.txt
$ john –format=openssha hashes.txt
$ cat hashes.txt
username:{SSHA}hHSEPW3qeiOo5Pl2MpHQCXh0vgfyVR/X:::::::
$ john hashes.txt
$ john –format=openssha hashes.txt
oracle11 – Oracle 11g
Supported Hash Formats
$ cat hashes.txt
5FDAB69F543563582BA57894FE1C1361FB8ED57B903603F2C52ED1B4D642
$ john hashes.txt
$ john –format=oracle11 hashes.txt
$ cat hashes.txt
username:5FDAB69F543563582BA57894FE1C1361FB8ED57B903603F2C52ED1B4D642
$ john hashes.txt
$ john –format=oracle11 hashes.txt
$ cat hashes.txt
username:5FDAB69F543563582BA57894FE1C1361FB8ED57B903603F2C52ED1B4D642:::::::
$ john hashes.txt
$ john –format=oracle11 hashes.txt
oracle – Oracle
Supported Hash Formats
$ cat hashes.txt
O$SIMON#4F8BC1809CB2AF77
$ john hashes.txt
$ john –format=oracle hashes.txt
$ cat hashes.txt
username:O$SIMON#4F8BC1809CB2AF77
$ john hashes.txt
$ john –format=oracle hashes.txt
$ cat hashes.txt
username:O$SIMON#4F8BC1809CB2AF77:::::::
$ john hashes.txt
$ john –format=oracle hashes.txt
pdf – pdf
Supported Hash Formats
$ cat hashes.txt
$pdf$Standard*badad1e86442699427116d3e5d5271bc80a27814fc5e80f815efeef839354c5f*289ece9b5ce451a5d7064693dab3badf101112131415161718191a1b1c1d1e1f*16*34b1b6e593787af681a9b63fa8bf563b*1*1*0*1*4*128*-4*3*2
$ john hashes.txt
$ john –format=pdf hashes.txt
$ cat hashes.txt
username:$pdf$Standard*badad1e86442699427116d3e5d5271bc80a27814fc5e80f815efeef839354c5f*289ece9b5ce451a5d7064693dab3badf101112131415161718191a1b1c1d1e1f*16*34b1b6e593787af681a9b63fa8bf563b*1*1*0*1*4*128*-4*3*2
$ john hashes.txt
$ john –format=pdf hashes.txt
$ cat hashes.txt
username:$pdf$Standard*badad1e86442699427116d3e5d5271bc80a27814fc5e80f815efeef839354c5f*289ece9b5ce451a5d7064693dab3badf101112131415161718191a1b1c1d1e1f*16*34b1b6e593787af681a9b63fa8bf563b*1*1*0*1*4*128*-4*3*2:::::::
$ john hashes.txt
$ john –format=pdf hashes.txt
phpass-md5 – PHPass MD5
Supported Hash Formats
$ cat hashes.txt
$H$9aaaaaSXBjgypwqm.JsMssPLiS8YQ00
$ john hashes.txt
$ john –format=phpass-md5 hashes.txt
$ cat hashes.txt
username:$H$9aaaaaSXBjgypwqm.JsMssPLiS8YQ00
$ john hashes.txt
$ john –format=phpass-md5 hashes.txt
$ cat hashes.txt
username:$H$9aaaaaSXBjgypwqm.JsMssPLiS8YQ00:::::::
$ john hashes.txt
$ john –format=phpass-md5 hashes.txt
phps – PHPS MD5
Supported Hash Formats
$ cat hashes.txt
$PHPS$433925$5d756853cd63acee76e6dcd6d3728447
$ john hashes.txt
$ john –format=phps hashes.txt
$ cat hashes.txt
username:$PHPS$433925$5d756853cd63acee76e6dcd6d3728447
$ john hashes.txt
$ john –format=phps hashes.txt
$ cat hashes.txt
username:$PHPS$433925$5d756853cd63acee76e6dcd6d3728447:::::::
$ john hashes.txt
$ john –format=phps hashes.txt
pix-md5 – PIX MD5
Supported Hash Formats
$ cat hashes.txt
NuLKvvWGg.x9HEKO
$ john hashes.txt
$ john –format=pix-md5 hashes.txt
$ cat hashes.txt
username:NuLKvvWGg.x9HEKO
$ john hashes.txt
$ john –format=pix-md5 hashes.txt
$ cat hashes.txt
username:NuLKvvWGg.x9HEKO:::::::
$ john hashes.txt
$ john –format=pix-md5 hashes.txt
po – Post.Office MD5
Supported Hash Formats
$ cat hashes.txt
0c78bdef7d5448105cfbbc9aaa490a44550c41c11bab48f9dbd8203ed313eef0
$ john hashes.txt
$ john –format=po hashes.txt
$ cat hashes.txt
username:0c78bdef7d5448105cfbbc9aaa490a44550c41c11bab48f9dbd8203ed313eef0
$ john hashes.txt
$ john –format=po hashes.txt
$ cat hashes.txt
username:0c78bdef7d5448105cfbbc9aaa490a44550c41c11bab48f9dbd8203ed313eef0:::::::
$ john hashes.txt
$ john –format=po hashes.txt
rar – rar
Supported Hash Formats
$ cat hashes.txt
$rar3$*0*c9dea41b149b53b4*fcbdb66122d8ebdb32532c22ca7ab9ec*24
$ john hashes.txt
$ john –format=rar hashes.txt
$ cat hashes.txt
username:$rar3$*0*c9dea41b149b53b4*fcbdb66122d8ebdb32532c22ca7ab9ec*24
$ john hashes.txt
$ john –format=rar hashes.txt
$ cat hashes.txt
username:$rar3$*0*c9dea41b149b53b4*fcbdb66122d8ebdb32532c22ca7ab9ec*24:::::::
$ john hashes.txt
$ john –format=rar hashes.txt
raw-md4 – Raw MD4
Supported Hash Formats
$ cat hashes.txt
8a9d093f14f8701df17732b2bb182c74
$ john hashes.txt # Doesn’t work. JTR detects hash as “LM DES”.
$ john –format=raw-md4 hashes.txt
$ cat hashes.txt
username:8a9d093f14f8701df17732b2bb182c74
$ john hashes.txt # Doesn’t work. JTR detects hash as “LM DES”.
$ john –format=raw-md4 hashes.txt
$ cat hashes.txt
username:8a9d093f14f8701df17732b2bb182c74:::::::
$ john hashes.txt # Doesn’t work. JTR detects hash as “LM DES”.
$ john –format=raw-md4 hashes.txt
raw-md5 – Raw MD5
Supported Hash Formats
$ cat hashes.txt
5a105e8b9d40e1329780d62ea2265d8a
$ john hashes.txt # Doesn’t work. JTR detects hash as “LM DES”.
$ john –format=raw-md5 hashes.txt
$ cat hashes.txt
username:5a105e8b9d40e1329780d62ea2265d8a
$ john hashes.txt # Doesn’t work. JTR detects hash as “LM DES”.
$ john –format=raw-md5 hashes.txt
$ cat hashes.txt
username:5a105e8b9d40e1329780d62ea2265d8a:::::::
$ john hashes.txt # Doesn’t work. JTR detects hash as “LM DES”.
$ john –format=raw-md5 hashes.txt
raw-md5-unicode – Raw MD5 of Unicode plaintext
Supported Hash Formats
$ cat hashes.txt
16c47151c18ac087cd12b3a70746c790
$ john hashes.txt # Doesn’t work. JTR detects hash as “LM DES”.
$ john –format=raw-md5-unicode hashes.txt
$ cat hashes.txt
username:16c47151c18ac087cd12b3a70746c790
$ john hashes.txt # Doesn’t work. JTR detects hash as “LM DES”.
$ john –format=raw-md5-unicode hashes.txt
$ cat hashes.txt
username:16c47151c18ac087cd12b3a70746c790:::::::
$ john hashes.txt # Doesn’t work. JTR detects hash as “LM DES”.
$ john –format=raw-md5-unicode hashes.txt
raw-sha1 – Raw SHA-1
Supported Hash Formats
$ cat hashes.txt
A9993E364706816ABA3E25717850C26C9CD0D89D
$ john hashes.txt
$ john –format=raw-sha1 hashes.txt
$ cat hashes.txt
username:A9993E364706816ABA3E25717850C26C9CD0D89D
$ john hashes.txt
$ john –format=raw-sha1 hashes.txt
$ cat hashes.txt
username:A9993E364706816ABA3E25717850C26C9CD0D89D:::::::
$ john hashes.txt
$ john –format=raw-sha1 hashes.txt
raw-sha224 – Raw SHA-224
Supported Hash Formats
$ cat hashes.txt
d63dc919e201d7bc4c825630d2cf25fdc93d4b2f0d46706d29038d01
$ john hashes.txt
$ john –format=raw-sha224 hashes.txt
$ cat hashes.txt
username:d63dc919e201d7bc4c825630d2cf25fdc93d4b2f0d46706d29038d01
$ john hashes.txt
$ john –format=raw-sha224 hashes.txt
$ cat hashes.txt
username:d63dc919e201d7bc4c825630d2cf25fdc93d4b2f0d46706d29038d01:::::::
$ john hashes.txt
$ john –format=raw-sha224 hashes.txt
raw-sha256 – Raw SHA-256
Supported Hash Formats
$ cat hashes.txt
5e884898da28047151d0e56f8dc6292773603d0d6aabbdd62a11ef721d1542d8
$ john hashes.txt # Doesn’t work. JTR detects hash as “Post.Office MD5”.
$ john –format=raw-sha256 hashes.txt
$ cat hashes.txt
username:5e884898da28047151d0e56f8dc6292773603d0d6aabbdd62a11ef721d1542d8
$ john hashes.txt # Doesn’t work. JTR detects hash as “Post.Office MD5”.
$ john –format=raw-sha256 hashes.txt
$ cat hashes.txt
username:5e884898da28047151d0e56f8dc6292773603d0d6aabbdd62a11ef721d1542d8:::::::
$ john hashes.txt # Doesn’t work. JTR detects hash as “Post.Office MD5”.
$ john –format=raw-sha256 hashes.txt
raw-sha384 – Raw SHA-384
Supported Hash Formats
$ cat hashes.txt
a8b64babd0aca91a59bdbb7761b421d4f2bb38280d3a75ba0f21f2bebc45583d446c598660c94ce680c47d19c30783a7
$ john hashes.txt
$ john –format=raw-sha384 hashes.txt
$ cat hashes.txt
username:a8b64babd0aca91a59bdbb7761b421d4f2bb38280d3a75ba0f21f2bebc45583d446c598660c94ce680c47d19c30783a7
$ john hashes.txt
$ john –format=raw-sha384 hashes.txt
$ cat hashes.txt
username:a8b64babd0aca91a59bdbb7761b421d4f2bb38280d3a75ba0f21f2bebc45583d446c598660c94ce680c47d19c30783a7:::::::
$ john hashes.txt
$ john –format=raw-sha384 hashes.txt
raw-sha512 – Raw SHA-512
Supported Hash Formats
$ cat hashes.txt
b109f3bbbc244eb82441917ed06d618b9008dd09b3befd1b5e07394c706a8bb980b1d7785e5976ec049b46df5f1326af5a2ea6d103fd07c95385ffab0cacbc86
$ john hashes.txt
$ john –format=raw-sha512 hashes.txt
$ cat hashes.txt
username:b109f3bbbc244eb82441917ed06d618b9008dd09b3befd1b5e07394c706a8bb980b1d7785e5976ec049b46df5f1326af5a2ea6d103fd07c95385ffab0cacbc86
$ john hashes.txt
$ john –format=raw-sha512 hashes.txt
$ cat hashes.txt
username:b109f3bbbc244eb82441917ed06d618b9008dd09b3befd1b5e07394c706a8bb980b1d7785e5976ec049b46df5f1326af5a2ea6d103fd07c95385ffab0cacbc86:::::::
$ john hashes.txt
$ john –format=raw-sha512 hashes.txt
$ cat hashes.txt
$SHA512$fa585d89c851dd338a70dcf535aa2a92fee7836dd6aff1226583e88e0996293f16bc009c652826e0fc5c706695a03cddce372f139eff4d13959da6f1f5d3eabe
$ john hashes.txt
$ john –format=raw-sha512 hashes.txt
$ cat hashes.txt
username:$SHA512$fa585d89c851dd338a70dcf535aa2a92fee7836dd6aff1226583e88e0996293f16bc009c652826e0fc5c706695a03cddce372f139eff4d13959da6f1f5d3eabe
$ john hashes.txt
$ john –format=raw-sha512 hashes.txt
$ cat hashes.txt
username:$SHA512$fa585d89c851dd338a70dcf535aa2a92fee7836dd6aff1226583e88e0996293f16bc009c652826e0fc5c706695a03cddce372f139eff4d13959da6f1f5d3eabe:::::::
$ john hashes.txt
$ john –format=raw-sha512 hashes.txt
salted-sha – Salted SHA
Supported Hash Formats
$ cat hashes.txt
{SSHA}hHSEPW3qeiOo5Pl2MpHQCXh0vgfyVR/X
$ john hashes.txt # Doesn’t work. JTR detects hash as “OpenLDAP SSHA”.
$ john –format=salted-sha hashes.txt
$ cat hashes.txt
username:{SSHA}hHSEPW3qeiOo5Pl2MpHQCXh0vgfyVR/X
$ john hashes.txt # Doesn’t work. JTR detects hash as “OpenLDAP SSHA”.
$ john –format=salted-sha hashes.txt
$ cat hashes.txt
username:{SSHA}hHSEPW3qeiOo5Pl2MpHQCXh0vgfyVR/X:::::::
$ john hashes.txt # Doesn’t work. JTR detects hash as “OpenLDAP SSHA”.
$ john –format=salted-sha hashes.txt
sapb – SAP BCODE
Supported Hash Formats
$ cat hashes.txt
ROOT
$8366A4E9E6B72CB0
$ john hashes.txt
$ john –format=sapb hashes.txt
$ cat hashes.txt
username:ROOT
$8366A4E9E6B72CB0
$ john hashes.txt
$ john –format=sapb hashes.txt
$ cat hashes.txt
username:ROOT
$8366A4E9E6B72CB0:::::::
$ john hashes.txt
$ john –format=sapb hashes.txt
sapg – SAP CODVN G (PASSCODE)
Supported Hash Formats
$ cat hashes.txt
ROOT
$1194E38F14B9F3F8DA1B181F14DEB70E7BDCC239
$ john hashes.txt
$ john –format=sapg hashes.txt
$ cat hashes.txt
username:ROOT
$1194E38F14B9F3F8DA1B181F14DEB70E7BDCC239
$ john hashes.txt
$ john –format=sapg hashes.txt
$ cat hashes.txt
username:ROOT
$1194E38F14B9F3F8DA1B181F14DEB70E7BDCC239:::::::
$ john hashes.txt
$ john –format=sapg hashes.txt
sha1-gen – Generic salted SHA-1
Supported Hash Formats
$ cat hashes.txt
$SHA1p$salt$59b3e8d637cf97edbe2384cf59cb7453dfe30789
$ john hashes.txt
$ john –format=sha1-gen hashes.txt
$ cat hashes.txt
username:$SHA1p$salt$59b3e8d637cf97edbe2384cf59cb7453dfe30789
$ john hashes.txt
$ john –format=sha1-gen hashes.txt
$ cat hashes.txt
username:$SHA1p$salt$59b3e8d637cf97edbe2384cf59cb7453dfe30789:::::::
$ john hashes.txt
$ john –format=sha1-gen hashes.txt
ssh – ssh
Supported Hash Formats
$ cat hashes.txt
$ssh2$2d2d2d2d2d424547494e204453412050524956415445204b45592d2d2d2d2d0a50726f632d547970653a20342c454e435259505445440a44454b2d496e666f3a204145532d3132382d4342432c35413830363832373943304634364539383230373135304133433245433631340a0a2f756954696e4a3452556a6f5a76302b705931694d763163695661724369347a2f62365a694c4161565970794a31685854327463692b593266334c61614578630a6f357772316141464d3437786d526d476f3832492f76434847413952786735776147433970574f475a5675555172447355367463556b434d422b325a344753390a354f44474364444b32674e6574446e62324a764873714154736d3443633633476468695a30734346594c71796d2b576531774359616c78734f3231572b4f676f0a42336f6746464977327232462b714a7a714d37415543794c466869357a476d7536534e6558765534477a784750464a4e47306d414f55497761614e3161446a630a4e326b3462437266796271337a366e436533444273384b3232694e2b3875526e534162434f717a5a5845645971555959354b6b6a326e654354525458494e64670a512b61535359673379355937626f4b6b6a494f727650555748654f796475512b74657273414577376e43564a7a72394e387452673271563450557631434b66700a4f49467742372f39736f6d6a59496a71576f61537a6a784b30633852777a305331706d722b7571726277792b50656f75354d3373656d486c426b4769553237660a776f684b792b4d554e4862734e6a7973535a53456c4e4b734d4950715449567a5a45316d5646412f30754d477164705133627a424f6a58325a6f36656446434f0a6d4a34775961765735774d2b6a6d75564b5056564e7939395a78796570304645644c50354b623263345a6c3053396631342f62366836415069785665377a75760a5662536b4279664a6e797a68494f5942497954374d64773134723441584a56362b5a6f457730397769774d3d0a2d2d2d2d2d454e44204453412050524956415445204b45592d2d2d2d2d0a*771
$ john hashes.txt
$ john –format=ssh hashes.txt
$ cat hashes.txt
username:$ssh2$2d2d2d2d2d424547494e204453412050524956415445204b45592d2d2d2d2d0a50726f632d547970653a20342c454e435259505445440a44454b2d496e666f3a204145532d3132382d4342432c35413830363832373943304634364539383230373135304133433245433631340a0a2f756954696e4a3452556a6f5a76302b705931694d763163695661724369347a2f62365a694c4161565970794a31685854327463692b593266334c61614578630a6f357772316141464d3437786d526d476f3832492f76434847413952786735776147433970574f475a5675555172447355367463556b434d422b325a344753390a354f44474364444b32674e6574446e62324a764873714154736d3443633633476468695a30734346594c71796d2b576531774359616c78734f3231572b4f676f0a42336f6746464977327232462b714a7a714d37415543794c466869357a476d7536534e6558765534477a784750464a4e47306d414f55497761614e3161446a630a4e326b3462437266796271337a366e436533444273384b3232694e2b3875526e534162434f717a5a5845645971555959354b6b6a326e654354525458494e64670a512b61535359673379355937626f4b6b6a494f727650555748654f796475512b74657273414577376e43564a7a72394e387452673271563450557631434b66700a4f49467742372f39736f6d6a59496a71576f61537a6a784b30633852777a305331706d722b7571726277792b50656f75354d3373656d486c426b4769553237660a776f684b792b4d554e4862734e6a7973535a53456c4e4b734d4950715449567a5a45316d5646412f30754d477164705133627a424f6a58325a6f36656446434f0a6d4a34775961765735774d2b6a6d75564b5056564e7939395a78796570304645644c50354b623263345a6c3053396631342f62366836415069785665377a75760a5662536b4279664a6e797a68494f5942497954374d64773134723441584a56362b5a6f457730397769774d3d0a2d2d2d2d2d454e44204453412050524956415445204b45592d2d2d2d2d0a*771
$ john hashes.txt
$ john –format=ssh hashes.txt
$ cat hashes.txt
username:$ssh2$2d2d2d2d2d424547494e204453412050524956415445204b45592d2d2d2d2d0a50726f632d547970653a20342c454e435259505445440a44454b2d496e666f3a204145532d3132382d4342432c35413830363832373943304634364539383230373135304133433245433631340a0a2f756954696e4a3452556a6f5a76302b705931694d763163695661724369347a2f62365a694c4161565970794a31685854327463692b593266334c61614578630a6f357772316141464d3437786d526d476f3832492f76434847413952786735776147433970574f475a5675555172447355367463556b434d422b325a344753390a354f44474364444b32674e6574446e62324a764873714154736d3443633633476468695a30734346594c71796d2b576531774359616c78734f3231572b4f676f0a42336f6746464977327232462b714a7a714d37415543794c466869357a476d7536534e6558765534477a784750464a4e47306d414f55497761614e3161446a630a4e326b3462437266796271337a366e436533444273384b3232694e2b3875526e534162434f717a5a5845645971555959354b6b6a326e654354525458494e64670a512b61535359673379355937626f4b6b6a494f727650555748654f796475512b74657273414577376e43564a7a72394e387452673271563450557631434b66700a4f49467742372f39736f6d6a59496a71576f61537a6a784b30633852777a305331706d722b7571726277792b50656f75354d3373656d486c426b4769553237660a776f684b792b4d554e4862734e6a7973535a53456c4e4b734d4950715449567a5a45316d5646412f30754d477164705133627a424f6a58325a6f36656446434f0a6d4a34775961765735774d2b6a6d75564b5056564e7939395a78796570304645644c50354b623263345a6c3053396631342f62366836415069785665377a75760a5662536b4279664a6e797a68494f5942497954374d64773134723441584a56362b5a6f457730397769774d3d0a2d2d2d2d2d454e44204453412050524956415445204b45592d2d2d2d2d0a*771:::::::
$ john hashes.txt
$ john –format=ssh hashes.txt
sybasease – sybasease
Supported Hash Formats
$ cat hashes.txt
0xc0074BE393C06BE420AD541671aa5e6f1a19a4a73bb51c59f45790f0887cfb70e0599747c6844d4556b3
$ john hashes.txt
$ john –format=sybasease hashes.txt
$ cat hashes.txt
username:0xc0074BE393C06BE420AD541671aa5e6f1a19a4a73bb51c59f45790f0887cfb70e0599747c6844d4556b3
$ john hashes.txt
$ john –format=sybasease hashes.txt
$ cat hashes.txt
username:0xc0074BE393C06BE420AD541671aa5e6f1a19a4a73bb51c59f45790f0887cfb70e0599747c6844d4556b3:::::::
$ john hashes.txt
$ john –format=sybasease hashes.txt
xsha – Mac OS X 10.4+ salted SHA-1
Supported Hash Formats
$ cat hashes.txt
12345678F9083C7F66F46A0A102E4CC17EC08C8AF120571B
$ john hashes.txt
$ john –format=xsha hashes.txt
$ cat hashes.txt
username:12345678F9083C7F66F46A0A102E4CC17EC08C8AF120571B
$ john hashes.txt
$ john –format=xsha hashes.txt
$ cat hashes.txt
username:12345678F9083C7F66F46A0A102E4CC17EC08C8AF120571B:::::::
$ john hashes.txt
$ john –format=xsha hashes.txt
zip – zip
Supported Hash Formats
$ cat hashes.txt
$zip$*0*1*8005b1b7d077708d*dee4
$ john hashes.txt
$ john –format=zip hashes.txt
$ cat hashes.txt
username:$zip$*0*1*8005b1b7d077708d*dee4
$ john hashes.txt
$ john –format=zip hashes.txt
$ cat hashes.txt
username:$zip$*0*1*8005b1b7d077708d*dee4:::::::
$ john hashes.txt
$ john –format=zip hashes.txt