by Vry4n_ | Mar 12, 2020 | Linux Management
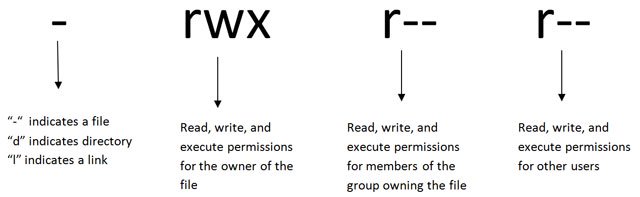
The concept of permissions and ownership is crucial in Linux. On a Linux system, each file and directory is assigned access rights for the owner of the file, the members of a group of related users, and everybody else.
- owner – The Owner permissions apply only the owner of the file or directory
- group – The Group permissions apply only to the group that has been assigned to the file or directory
- other users – The other users’ permissions apply to all other users on the system, that are not the owner, nor, part of the group
| ———- |
0000 |
no permissions |
| -rwx—— |
0700 |
read, write, & execute only for owner |
| -rwxrwx— |
0770 |
read, write, & execute for owner and group |
| -rwxrwxrwx |
0777 |
read, write, & execute for owner, group and others |
| —x–x–x |
0111 |
execute |
| –w–w–w- |
0222 |
write |
| –wx-wx-wx |
0333 |
write & execute |
| -r–r–r– |
0444 |
read |
| -r-xr-xr-x |
0555 |
read & execute |
| -rw-rw-rw- |
0666 |
read & write |
| -rwxr—– |
0740 |
owner can read, write, & execute; group can only read; others have no permissions |
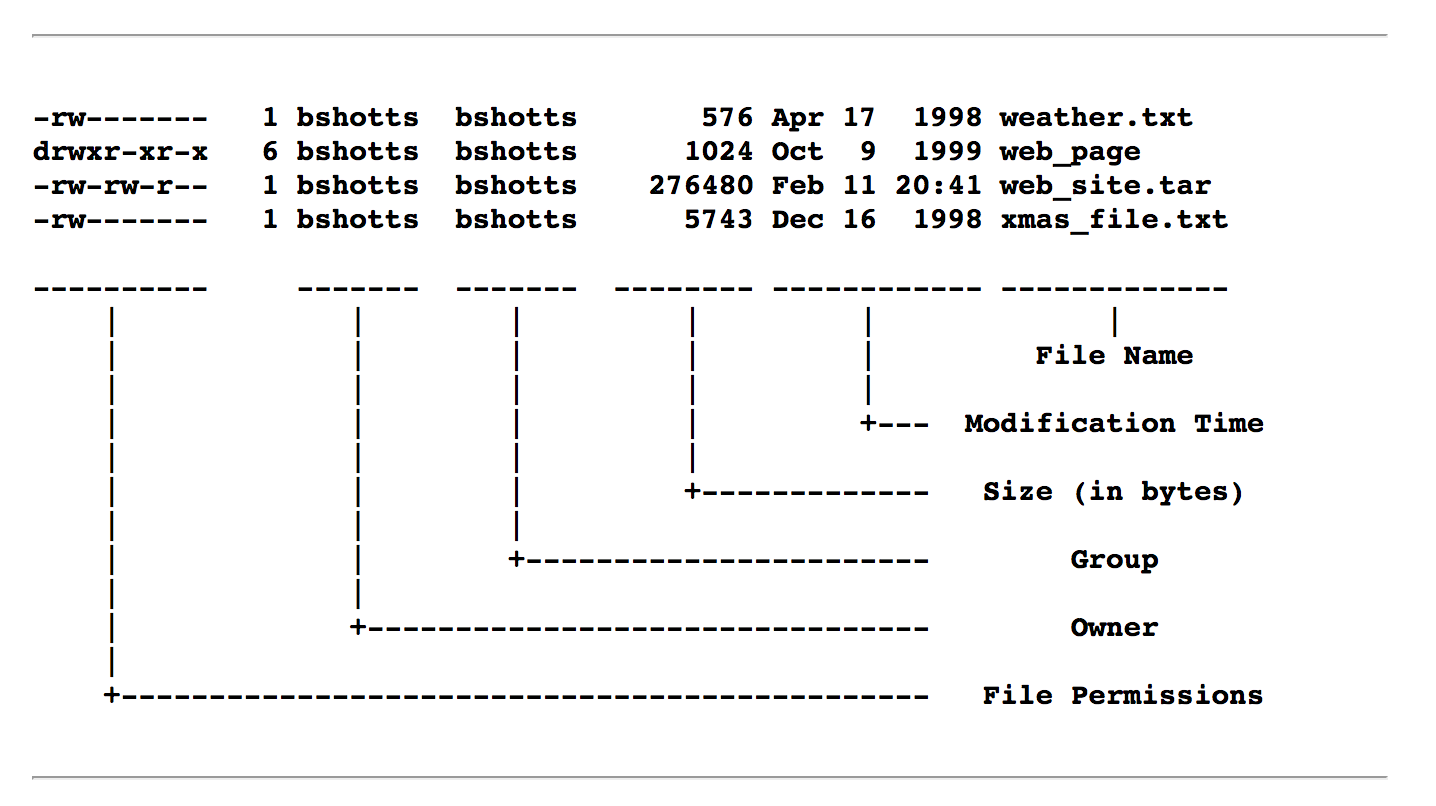
In order to see the permissions of a file/directory, we use ‘ls -l’ linux command
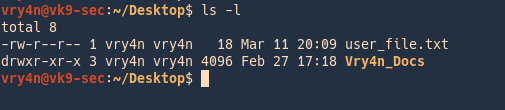
The ‘ls -l’ command also shows other information about the file besides file permissions. The first character indicates the type of each
- d = directory
- – = file
- l = link
Modifying file permissions
chmod
The chmod command is used to change the permissions of a file or directory. There are two ways to specify the permissions.
Method #1
- chmod 744 user_file.txt
- ls -l user_file.txt

In this example we assigned
- read,write,execute -> owner
- read -> group members
- read -> others
Meaning
- rwx = 111 in binary = 7
- rw- = 110 in binary = 6
- r-x = 101 in binary = 5
- r– = 100 in binary = 4
Method #2
- chmod u=rx,g=r,o=rw user_file.txt
- ls -l user_file.txt

In this example we assigned
- read,execute -> owner
- read -> group members
- read,write -> others
Meaning
- rwx rwx rwx = 111 111 111
- rw- rw- rw- = 110 110 110
- rwx — — = 111 000 000

Symbolic mode
you can modify permissions of a specific owner. It makes use of mathematical symbols to modify the file permissions.
- chmod a+x some_file.txt
- chmod g-x some_file.txt
- chmod o+wx some_file.txt
Meaning table
| Operator |
Description |
| + |
Adds a permission to a file or directory |
| – |
Removes the permission |
| = |
Sets the permission and overrides the permissions set earlier. |
| User Denotations |
| u |
user/owner |
| g |
group |
| o |
other |
| a |
all |
Examples
| Value |
Meaning |
| 777 |
(rwxrwxrwx) No restrictions on permissions. Anybody may do anything. Generally not a desirable setting. |
| 755 |
(rwxr-xr-x) The file’s owner may read, write, and execute the file. All others may read and execute the file. This setting is common for programs that are used by all users. |
| 700 |
(rwx——) The file’s owner may read, write, and execute the file. Nobody else has any rights. This setting is useful for programs that only the owner may use and must be kept private from others. |
| 666 |
(rw-rw-rw-) All users may read and write the file. |
| 644 |
(rw-r–r–) The owner may read and write a file, while all others may only read the file. A common setting for data files that everybody may read, but only the owner may change. |
| 600 |
(rw——-) The owner may read and write a file. All others have no rights. A common setting for data files that the owner wants to keep private. |
Modifying directory permissions
The chmod command can also be used to control the access permissions for directories.
- r – Allows the contents of the directory to be listed if the x attribute is also set.
- w – Allows files within the directory to be created, deleted, or renamed if the x attribute is also set.
- x – Allows a directory to be entered (i.e. cd dir).
chmod
Initial directory permissions example:
In this example we assigned
- read,write,execute -> owner
- read,execute -> group members
- read,execute -> others
Changing permissions
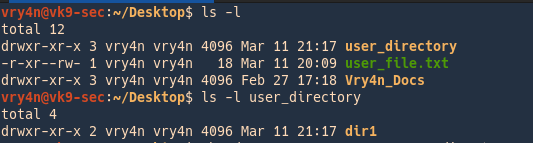
- chmod u=rwx,g=rx,o=wx user_directory
- ls -l
- ls -l user_directory
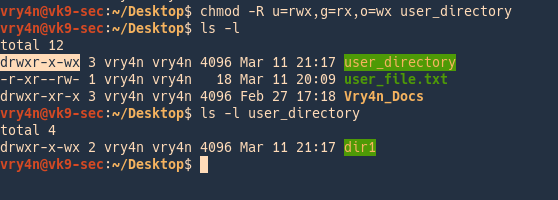
In this example we changed to
- read,write,execute -> owner
- read,execute -> group members
- write,execute -> others
Examples
| Value |
Meaning |
| 777 |
(rwxrwxrwx) No restrictions on permissions. Anybody may list files, create new files in the directory and delete files in the directory. Generally not a good setting. |
| 755 |
(rwxr-xr-x) The directory owner has full access. All others may list the directory, but cannot create files nor delete them. This setting is common for directories that you wish to share with other users. |
| 700 |
(rwx——) The directory owner has full access. Nobody else has any rights. This setting is useful for directories that only the owner may use and must be kept private from others. |
Changing File/Directory Ownership
You can change the owner of a file/directory by using the chown command. This requires sudo or root privileges.
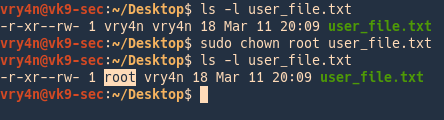
File
- ls -l user_file.txt
- sudo chown root user_file.txt
- ls -l user_file.txt
In this example we changed the owner of the file from vry4n to root
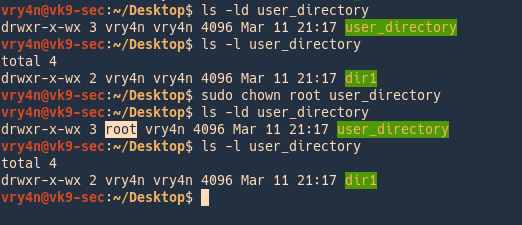
Directory
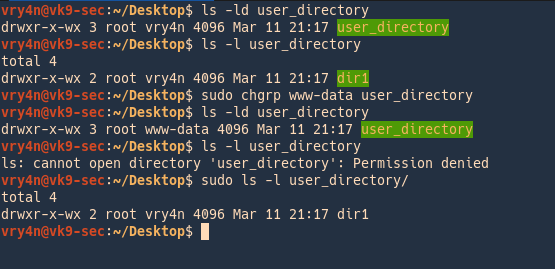
In this example we changed the owner of the directory “user_directory” but notice that the directory inside keeps its original owner
- ls -ld user_directory
- ls -l user_directory
- sudo chown root user_directory
- ls -ld user_directory
- ls -l user_directory
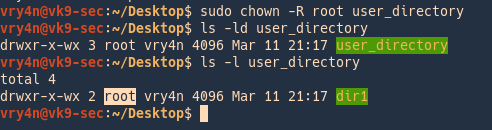
In order to change the owner of the directory/files within use the recursive option
-R = recursive
- sudo -R chown root user_directory
- ls -ld user_directory
- ls -l user_directory
Changing file/directory Group Ownership
The group ownership of a file or directory is changed with chgrp.
chgrp
File
- ls -l user_file.txt
- sudo chgrp www-data user_file.txt
- ls -l user_file.txt
In this example we changed the owner of the file from vry4n to www-data

Directory
In this example we changed the owner group of the directory “user_directory” but notice that the directory inside keeps its original group owner, since we are not the owner, nor, part of the ownergroup we get access denied with vry4n user
- ls -ld user_directory
- ls -l user_directory
- sudo chgrp www-data user_directory
- ls -ld user_directory
- sudo ls -l user_directory
In order to change the owner of the directory/files within use the recursive option
-R = recursive
- sudo -R chown root user_directory
- ls -ld user_directory
- ls -l user_directory

Advanced
Special Permissions
s – This indicated the setuid/setgid permissions. This is not set displayed in the special permission part of the permissions display, but is represented as a s in the read portion of the owner or group permissions.
t – This indicates the sticky bit permissions. This is not set displayed in the special permission part of the permissions display, but is represented as a t in the executable portion of the all users permissions
setuid – s
The setuid/setguid permissions are used to tell the system to run an executable as the owner with the owner’s permissions.
Be careful using setuid/setgid bits in permissions. If you incorrectly assign permissions to a file owned by root with the setuid/setgid bit set, then you can open your system to intrusion.
You can only assign the setuid/setgid bit by explicitly defining permissions. The character for the setuid/setguid bit is s.
- chmod 4777 file_name
- chmod u+s file_name
How to
1. We have an executable file owned by root, can be executed by everyone, this file prints ‘whoami’ output (current user). In this case vry4n
- ls -l /usr/bin/whoami
- /usr/bin/whoami

2. we activate the setuid for user permissions to run as the owner (root)
- sudo chmod u+s /usr/bin/whoami
- ls -l /usr/bin/whoami

3. Run the program without sudo, as we have permissions from the root user to use it as if we were him.and the whoami output changes top root, user running the app

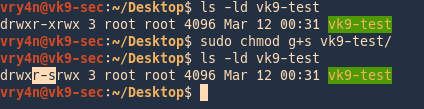
Setguid – s
The setgid affects both files as well as directories. When used on a file, it executes with the privileges of the group of the user who owns it instead of executing with those of the group of the user who executed it.
- chmod 2777 file_name
- chmod u+g file_name
When the bit is set for a directory, the set of files in that directory will have the same group as the group of the parent directory, this is used for file sharing since they can be now modified by all the users who are part of the group of the parent directory.
How to
1. This file is owned by root group, I confirm my user is not part of the root group

2. check the permissions on the file, and, activate SGUID
- ls -ld vk9-test
- sudo chmod g+s vk9-test
- ls -ld vk9-test
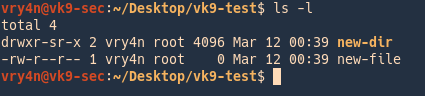
3. Since, we have permissions to write on this folder, others permission, we will create a directory and a file
- cd vk9-test
- mkdir new-dir
- touch new-file

4. Listing details of these files, show the owner group is root, even though, our user vry4n is not part of root group
Sticky Bit
A Sticky bit is a permission bit that is set on a file or a directory that lets only the owner of the file/directory or the root user to delete or rename the file. No other user is given privileges to delete the file created by some other user.
- chmod -t vk9-dir
- chmod +t vk9-dir
- chmod 1777 vk9-dir
Sticky bit shows as ‘t’ in file permissions. This technique is most likely done on directories over files.
- sudo chmod +t vk9-dir
- ls -ld vk9-dir
The rest of the users that have (READ,WRITE) permissions will be able to read/modify the directory but not delete it.
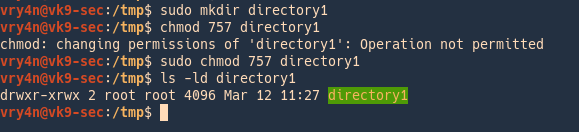
How to
1. We create a directory owned by root, with permissions 757
- sudo mkdir directory1
- chmod 757 directory1
- ls -ld directory1
2. We can see that Others have rights to read/write/execute. Users can create files and then delete others files, as long as they have proper rights, we can also modify the contents within the file
vk9-user (Creates a file within directory1)
- touch my_file.txt
- ls -l test

Vry4n (deletes that file)
3. Now I will set the sticky bit to directory1
- cd ..
- sudo chmod 1757 directory1
- ls -ld directory1

4. We will try the same steps as before
Create a file within directory1 using vk9-user account
Delete directory1 using vry4n account
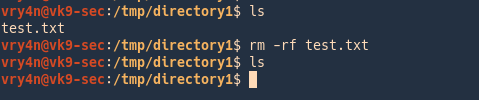
vk9-user
- touch test.txt
- ls -l test.txt

vry4n
- rm -rf test.txt
- ls -l test.txt
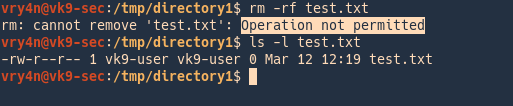
As a result, users can add/modify files within the directory that has sticky bit set, but, only the owner of the file will be able to delete that file.
by Vry4n_ | Mar 8, 2020 | Linux Management
This is a guide written to help administering Users and Groups properly in Linux.
User Management
useradd
useradd is a low level utility for adding a new user or update default new user information
When we run ‘useradd‘ command in Linux terminal, it performs following major things:
- It edits /etc/passwd, /etc/shadow, /etc/group and /etc/gshadow files for the newly created User account.
- Creates and populate a home directory for the new user.
- Sets permissions and ownerships to home directory.
1. Basic add a new user
- sudo useradd vk9security
- id vk9security

We need to set a password to unlock the user account. As per the command below, ! in /etc/shadow means the account is locked, we use ‘passwd’ to change the user password.
- sudo cat /etc/shadow
- sudo passwd vk9security
- sudo cat /etc/shadow

Extra
To check if the account is locked. P means unlocked, L means Locked
- passwd -S vk9sec
- usermod -L vk9sec
- passwd -S vk9sec

Once, the password is set, we can confirm the creation of the user in /etc/passwd (users file)

Analyzing /etc/passwd 7 fields

- Username: User login name used to login into system. It should be between 1 to 32 characters long.
- Password: User password (or x character) stored in /etc/shadow file in encrypted format.
- User ID (UID): Every user must have a User ID (UID) User Identification Number. By default UID 0 is reserved for root, user and UID’s ranging from 1-99 are reserved for other predefined accounts. Further UID’s ranging from 100-999 are reserved for system accounts and groups.
- Group ID (GID): The primary Group ID (GID) Group Identification Number stored in /etc/group file.
- User Info: Description text
- Home Directory: The absolute location of user’s home directory.
- Shell: The absolute location of a user’s shell i.e. /bin/bash.
2. Create an user with different home directory
-d = The directory HOME_DIR does not have to exist but will not be created if it is missing.
- useradd -d /tmp/test vk9security
- cat /etc/passwd | grep vk9

3. Create a user with a defined UID
-u = The default is to use the smallest ID value greater than or equal to UID_MIN and greater than every other user.
- useradd -u 1999 vk9security
- id vk9security

4. Create a user and add it to an existing group
-g = The group name or number of the user’s initial login group. The group name must exist.
- useradd -g 60 vk9security
- id vk9security

5. Add a user to multiple groups
-G = A list of supplementary groups which the user is also a member of. Each group is separated from the next by a comma, with no intervening whitespace. (name or GID)
- useradd -G bluetooth,122,www-data vk9security
- id vk9security

6. Add a user without home directory
-M = Do not create the user’s home directory, even if the system wide setting from /etc/login.defs (CREATE_HOME) is set to yes.
- useradd -M vk9security
- cat /etc/passwd | grep vk9
- ls /home/vk9security

7. Create a temporary account
-e = The date on which the user account will be disabled. The date is specified in the format YYYY-MM-DD.
-f = The number of days after a password expires until the account is permanently disabled.
- useradd -e 2020-03-08 -f 5 vk9security
- chage -l vk9security

8. Create the account and leave a comment
-c = Any text string. It is generally a short description of the login
- useradd -c “This is a test account” vk9security
- cat /etc/passwd | grep vk9

9. Choose the login shell
-s = The name of the user’s login shell. The default is to leave this field blank, which causes the system to select the default login shell specified by the SHELL variable in /etc/default/useradd
/usr/sbin/nologin = add the account without user shell
- useradd -s /usr/sbin/nologin vk9security
- cat /etc/passwd | grep vk9

userdel
delete a user account and related files
1. Delete the user account and the user home directory
-r, –remove = Files in the user’s home directory will be removed along with the home directory itself and the user’s mail spool.

2. Force the removal
-f, –force = This option forces the removal of the user account, even if the user is still logged in.

usermod
After creating user accounts, in some scenarios where we need to change the attributes of an existing user such as, change user’s home directory, login name, login shell, password expiry date, etc, where in such case ‘usermod’ command is used.
When we execute ‘usermod‘ command in terminal, the following files are used and affected.
- /etc/passwd – User account information.
- /etc/shadow – Secure account information.
- /etc/group – Group account information.
- /etc/gshadow – Secure group account information.
- /etc/login.defs – Shadow password suite configuration..
Requirements
- existing user accounts to execute usermod command.
- Only superuser (root) is allowed to execute usermod command.
Command options
- -c = We can add comment field for the useraccount.
- -d = To modify the directory for any existing user account.
- -e = Using this option we can make the account expiry in specific period.
- -g = Change the primary group for a User.
- -G = To add a supplementary groups.
- -a = To add anyone of the group to a secondary group.
- -l = To change the login name from tecmint to tecmint_admin.
- -L = To lock the user account. This will lock the password so we can’t use the account.
- -m = moving the contents of the home directory from existing home dir to new dir.
- -p = To Use un-encrypted password for the new password. (NOT Secured).
- -s = Create a Specified shell for new accounts.
- -u = Used to Assigned UID for the user account between 0 to 999.
- -U = To unlock the user accounts. This will remove the password lock and allow us to use the user account.
1. Add a comment
-c, –comment = The new value of the user’s password file comment field.
- cat /etc/passwd | grep vk9
- usermod -c “This is a test acc” vk9security
- cat /etc/passwd | grep vk9

2. Change user home directory
-d, –home = The user’s new login directory.
- cat /etc/passwd | grep vk9
- usermod -d /tmp/test vk9security
- cat /etc/passwd | grep vk9

3. Set account expiration
-e, –expiredate = The date on which the user account will be disabled. The date is specified in the format YYYY-MM-DD.
- chage -l vk9security
- usermod -e 2020-03-09 vk9security
- chage -l vk9security

4. Change user primary group
-g, –gid = The group name or number of the user’s new initial login group. The group must exist.
- id vk9security
- usermod -g www-data vk9security
- id vk9security

5. Adding an existing user to other groups
-G, –groups = A list of supplementary groups which the user is also a member of. Each group is separated from the next by a comma, with no intervening whitespace.
- id vk9security
- usermod -G bluetooth,vk9security vk9security
- id vk9security

6. Change login name, or username
-l, –login = The name of the user will be changed from LOGIN to NEW_LOGIN. Nothing else is changed. In particular, the user’s home directory or mail spool should probably be renamed manually to reflect the new login name.
- id vk9security
- usermod -l vk9sec vk9security
- id vk9security

7. Lock user account
-L, –lock = Lock a user’s password. This puts a ‘!’ in front of the encrypted password, effectively disabling the password.
- cat /etc/shadow | grep vk9
- usermod -L vk9sec
- cat /etc/shadow | grep vk9

8. Unlock a user
-U, –unlock = Unlock a user’s password. This removes the ‘!’ in front of the encrypted password.
- cat /etc/shadow | grep vk9
- usermod -U vk9sec
- cat /etc/shadow | grep vk9

9. Move home directory to a new location
-m, –move-home = Move the content of the user’s home directory to the new location.
- usermod -d /home/vk9security -m vk9sec
10. Change user shell
-s, –shell = The name of the user’s new login shell.
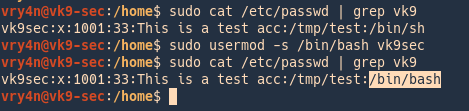
- cat /etc/passwd | grep vk9
- usermod -s /bin/bash vk9sec
- cat /etc/passwd | grep vk9
11. Change user UID
-u, –uid = The new numerical value of the user’s ID.
- id vk9sec
- usermod -u 1111 vk9sec
- id vk9sec

12. Change user GID
-g, –gid = The group name or number of the user’s new initial login group.
- id vk9sec
- usermod -g 129 vk9sec
- id vk9sec

Group Management
groupadd
The /etc/group file holds all of the group information, as well as the users belonging to each group. The structure is very similar to that of /etc/password.

1. Create a new group
- groupadd test_g
- cat /etc/group | grep test

2. Specify the GID
-g, –gid = The numerical value of the group’s ID. This value must be unique, unless the -o option is used.
- groupadd -g 1050 test_g
- cat /etc/group | grep test

3. Create a system group
-r, –system = Create a system group.
- groupadd -r sys_test
- cat /etc/group | grep sys_test

groupdel
delete a group
1. Delete an existing group
- cat /etc/group | grep sys_tes
- groupdel sys_test
- cat /etc/group | grep sys_tes

groupmod
modify a group definition on the system
1. Change group name
-n, –new-name = The name of the group will be changed from GROUP to NEW_GROUP name.
- groupmod -n test test_g
- cat /etc/group | grep test

2. Change GID
-g, –gid = The group ID of the given GROUP will be changed to GID.
- cat /etc/group | grep test
- groupmod -g 1100 test
- cat /etc/group | grep test

by Vry4n_ | Mar 8, 2020 | Linux Management
The Linux terminal has a number of useful commands that can display running processes, kill them, and change their priority level.
Parent and Child Processes
Each unix process has two ID numbers assigned to it: The Process ID (pid) and the Parent process ID (ppid). Each user process in the system has a parent process.
Starting a Process
When you start a process (run a command), there are two ways you can run it −
- Foreground Processes
- Background Processes
1. Foreground Processes
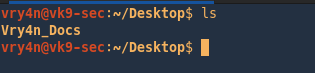
By default, every process that you start runs in the foreground. If the command is like “ls” it will print the output, and, exit the command, most likely when a persistent program runs it stays and the terminal actively shows that running, events are displayed in the screen, in other words, the terminal becomes exclusively part of the program.
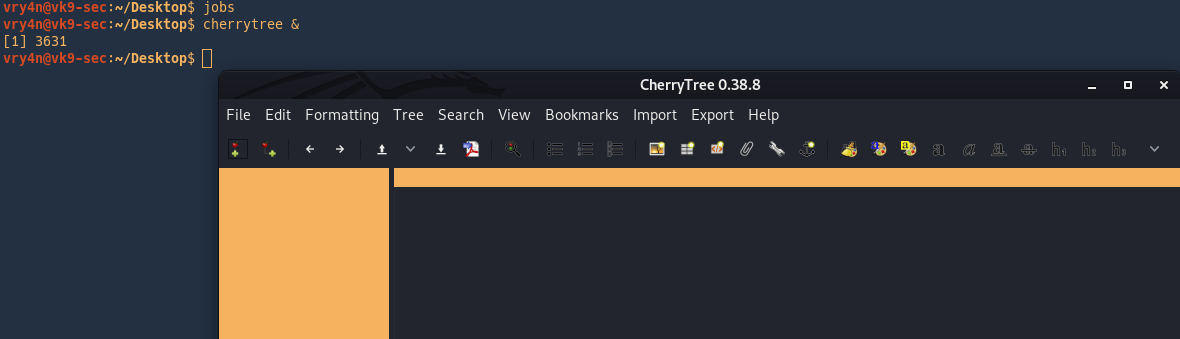
2. Background Processes
A background process runs without being connected to your keyboard. If the background process requires any keyboard input, it waits.
The advantage of running a process in the background is that you can run other commands; you do not have to wait until it completes to start another. Meaning the terminal is no longer exclusive to that newprocess.
& = send program to background
Sending a program to foreground or background
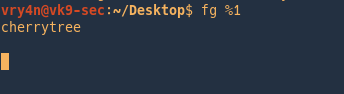
fg = send to foreground
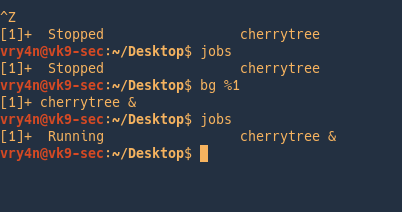
bg = send to background
use jobs to list the programs running for that terminal.

As we can see the program is running in the foreground
To send it to the background stop it (Ctrl + z) , and then run bg command
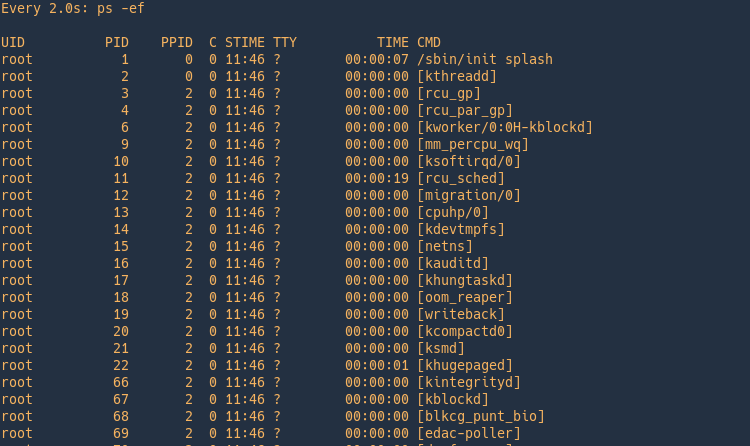
Listing Running processes
PS
1. To show processes use ‘ps’, run in bash
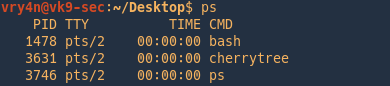
-f = Do full-format listing.

- UID = User ID that this process belongs to (the person running it)
- PID = Process ID
- PPID = Parent process ID (the ID of the process that started it)
- C = CPU utilization of process
- STIME = Process start time
- TTY = Terminal type associated with the process
- TIME = CPU time taken by the process
- CMD = The command that started this process
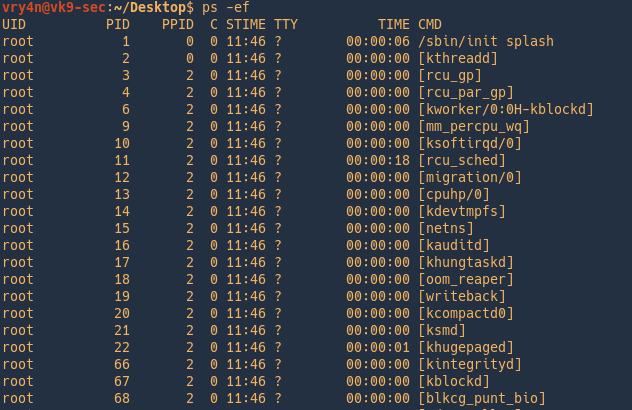
2. Show all information of all processes running
-e = Select all processes. Identical to -A
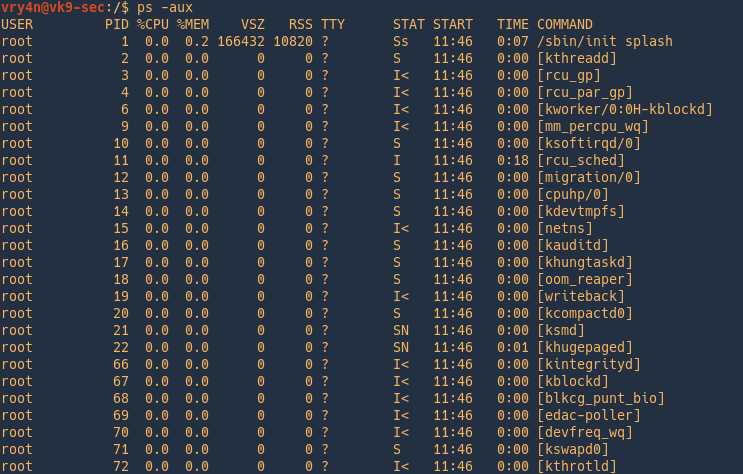
An alternative is
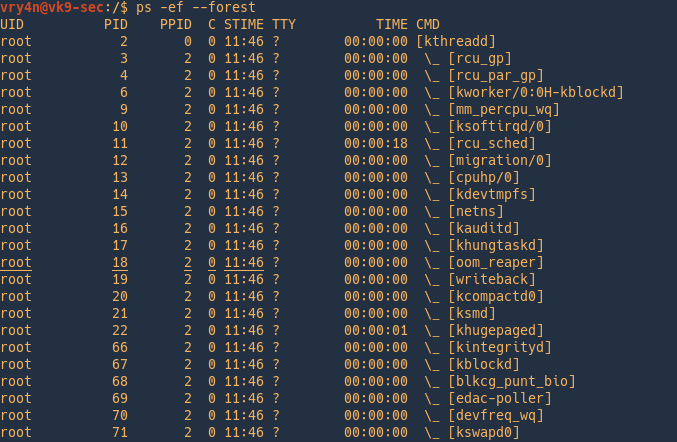
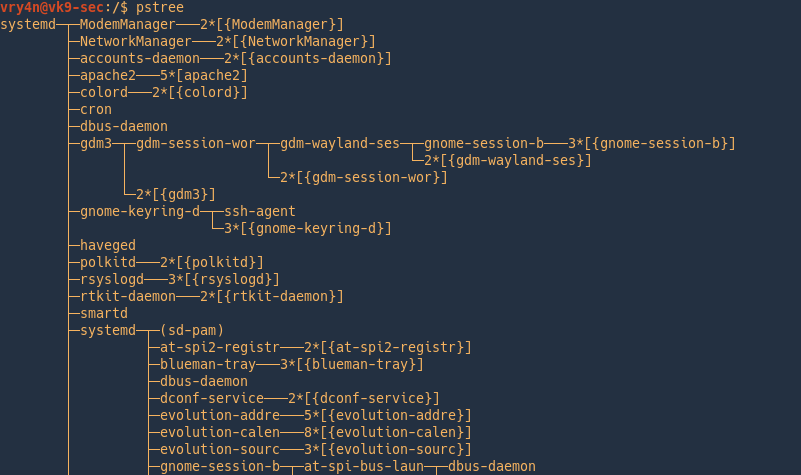
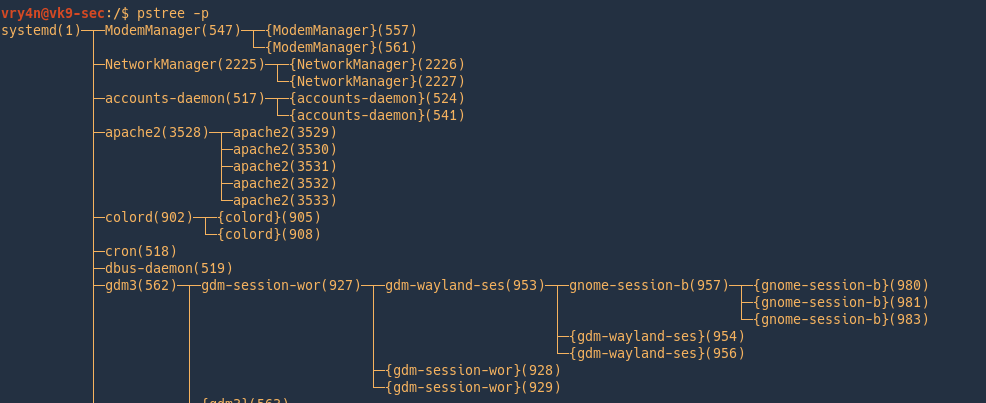
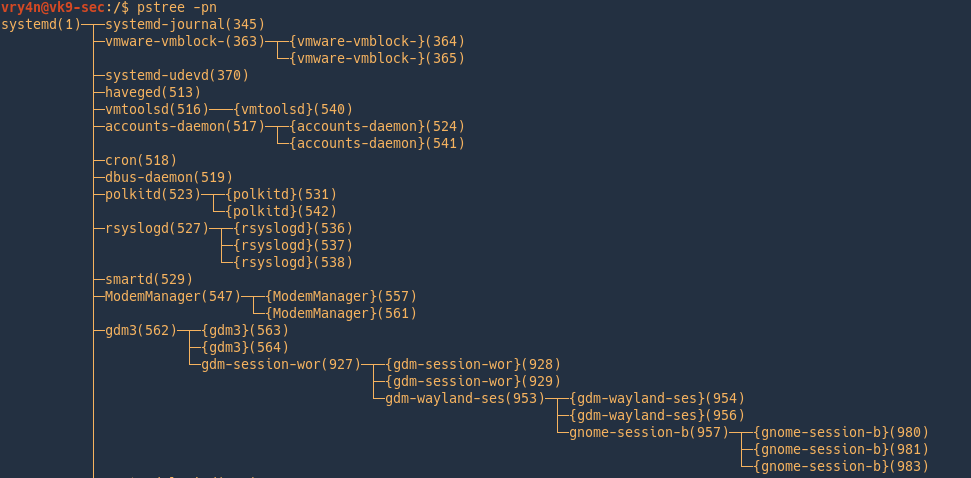
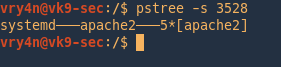
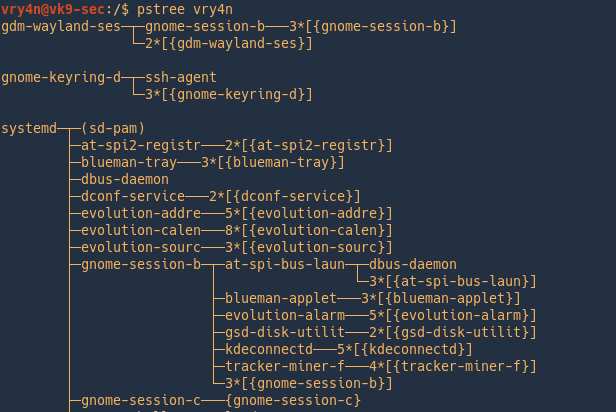
3. Display process tree
4. List processes dynamically
watch -n 2 = running the ps command every 2 seconds
PSTREE
Display a tree of processes
Print the tree with PID
Sorting the output
-n = Sort processes with the same ancestor by PID instead of by name
Filter by processes also
-s = Show parent processes of the specified process.
Filter process by users
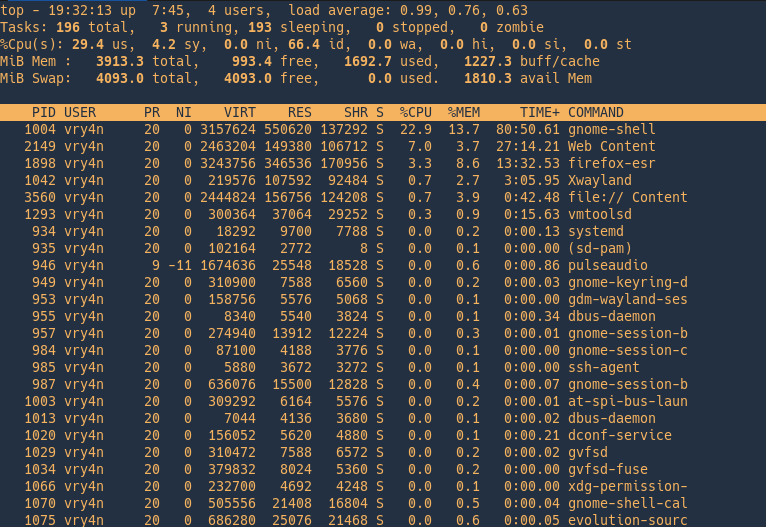
TOP
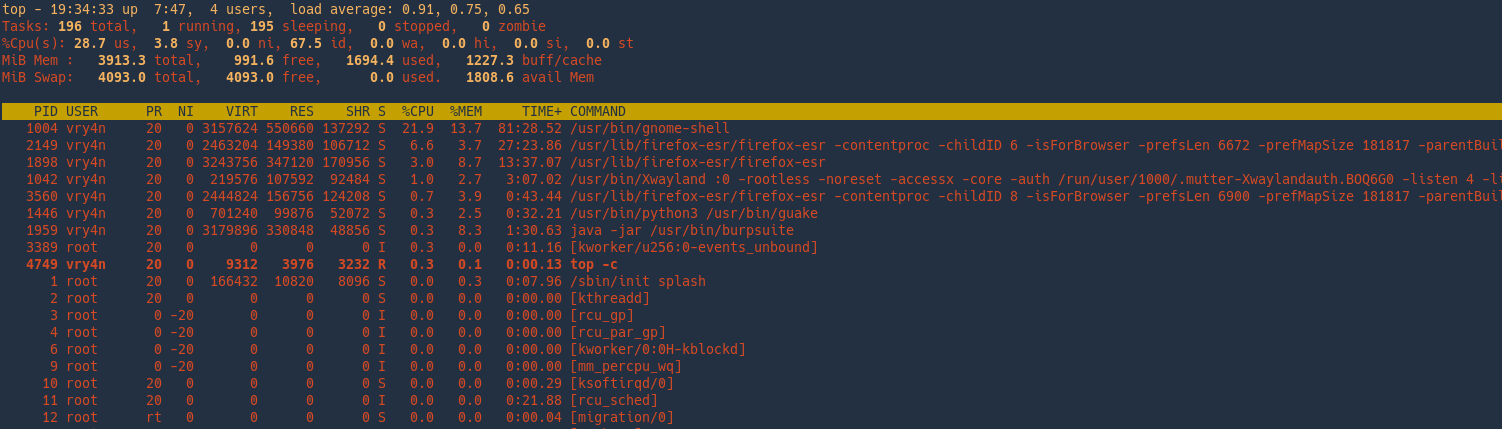
top command is used to show the Linux processes. It provides a dynamic real-time view of the running system.
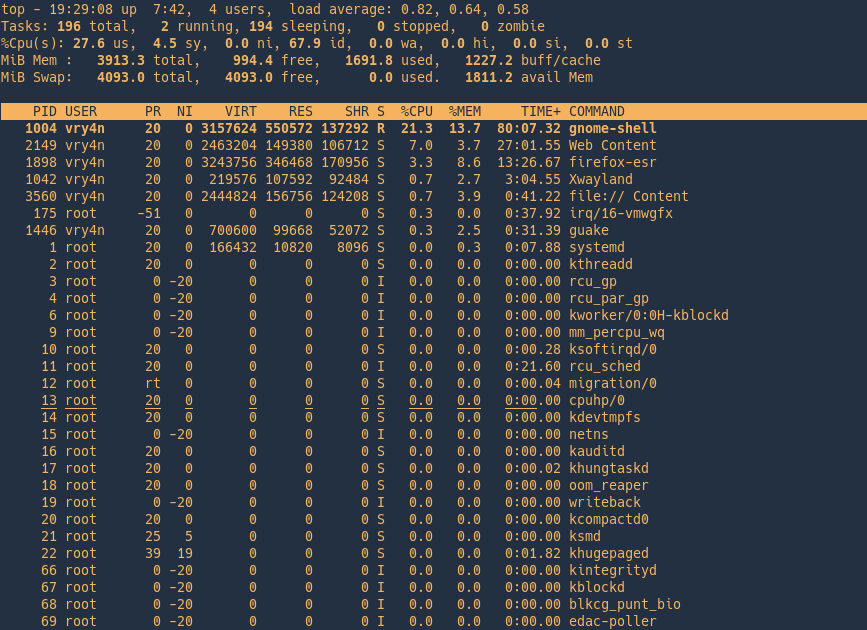
- PID: Shows task’s unique process id.
- USER: User name of owner of task.
- PR: Stands for priority of the task.
- NI: Represents a Nice Value of task. A Negative nice value implies higher priority, and positive Nice value means lower priority.
- VIRT: Total virtual memory used by the task.
- SHR: Represents the amount of shared memory used by a task.
- %CPU: Represents the CPU usage.
- %MEM: Shows the Memory usage of task.
- TIME+: CPU Time, the same as ‘TIME’, but reflecting more granularity through hundredths of a second.
- Command: Shows the command used to run the process
Display processes by user
Show absolute path

Top commands
While running to you can run commands
Use ‘h’ to display help menu
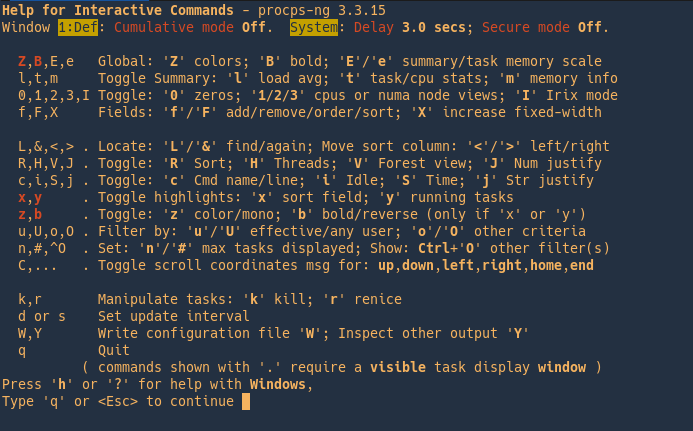
z = color output
k = kill a process
In this example we will kill Firefox, PID 4758
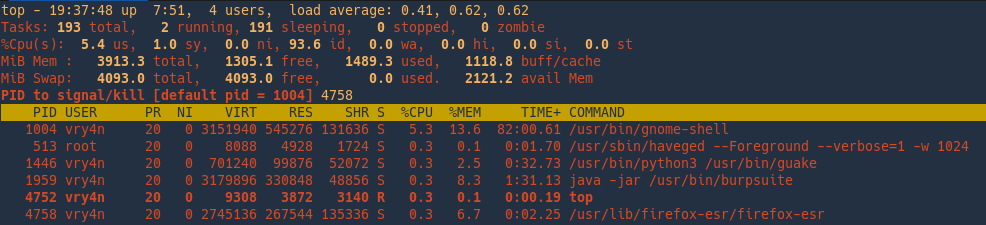
Choose the signal to send the kill

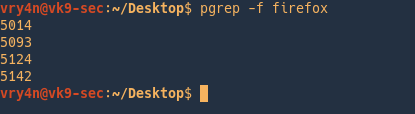
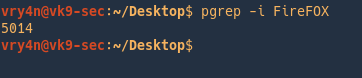
pgrep
pgrep returns the process IDs that match it.
- pgrep firefox
- ps -ef | grep -i firefox

Count matches
-c = Suppress normal output; instead print a count of matching processes.

Print full PID and child PID
-f = The pattern is normally only matched against the process name. When -f is set, the full command line is used.
Ignore case
-i = Match processes case-insensitively.
Print command line and PID
-a = List the full command line as well as the process ID.

Change process priority
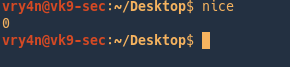
Nice is a command in Unix and Linux operating systems that allows for the adjustment of the “Niceness” value of processes. Adjusting the “niceness” value of processes allows for setting an advised CPU priority that the kernel’s scheduler will use to determine which processes get more or less CPU time.
Different OS distributions can have different default values for new processes. The simplest method to determine the default value is to simply run the nice command with no arguments.
Nice value is a user-space and priority PR is the process’s actual priority that use by Linux kernel
System priorities are 0 to 139 in which 0 to 99 for real time and 100 to 139 for users
Nice value range is -20 to +19 where -20 is highest, 0 default and +19 is lowest.
Checking current nice value of a running process
- ps -ef | grep firefox
- ps -lp 5014

Changing the nice value of a new process
The nice command itself will run the supplied command with the desired niceness value. This time the value is one, overwriting the default 0

Changing the nice value of a running process
To change the niceness value of a running process we will utilize the renice command.

Killing a process
Zombie and Orphan Processes
Normally, when a child process is killed, the parent process is updated via a SIGCHLD signal. Then the parent can do some other task or restart a new child as needed.
Daemon Processes
Daemons are system-related background processes that often run with the permissions of root and services requests from other processes.
A daemon has no controlling terminal. It cannot open /dev/tty. If you do a “ps -ef” and look at the tty field, all daemons will have a ? for the tty.
kill
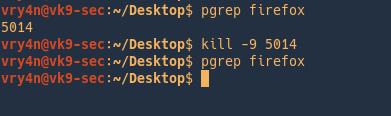
Send a signal to a process. The default signal for kill is TERM. Use -l or -L to list available signals. Particularly useful signals include HUP, INT, KILL, STOP, CONT, and 0. Alternate signals may be specified in three ways: -9, -SIGKILL or -KILL.

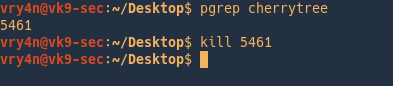
Kill a process
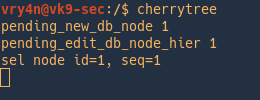
- pgrep cherrytree
- kill 5461
Send SIGKILL (powerful)
- pgrep firefox
- kill -9 5014
- pgrep firefox
Killing a job
- firefox &
- jobs
- kill %1
- jobs

pkill
pkill kills processes based on name and other attributes

killall
kill processes by name
List the signal

Kill a process by name
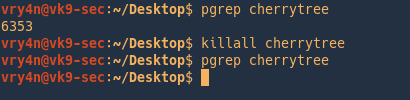
- pgrep cherrytree
- killall cherrytree
- pgrep cherrytree
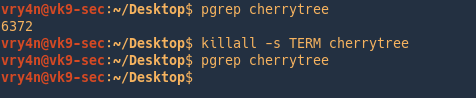
Kill using a signal
- pgrep cherrytree
- killall -s TERM cherrytree
- pgrep cherrytree
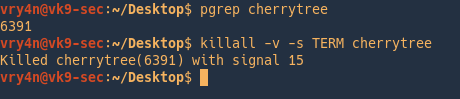
Be verbose
- pgrep cherrytree
- killall -v -s TERM cherrytree
Kill processes by user
- sudo killall -v -s TERM –user www-data

Keeping a process running
NOHUP
A process may not continue to run when you log out or close your terminal. This special case can be avoided by preceding the command you want to run with the nohup command.

/proc Linux folder
Proc file system (procfs) is virtual file system built at run time. It contains the useful information about the processes that are currently running, it is regarded as control and information centre for kernel.
The proc file system also provides communication medium between kernel space and user space.
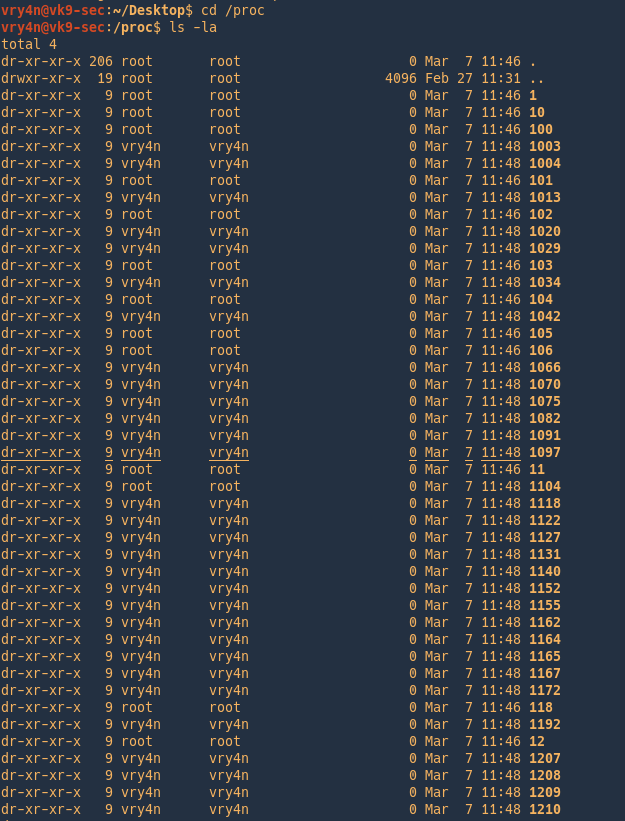
Examining a process using /proc as an example
- pgrep cherrytree
- ps -ef | grep 6832
- ls -l 6832

We now know that cherrytree has the pid of 6832, there is also a directory with that name within /proc.
Change to the pid folder
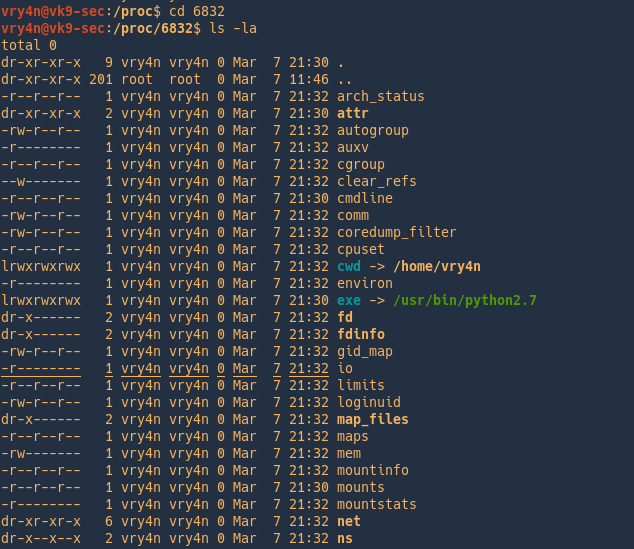
Below you have a summary of the most important files and directories within each process directory.
Directories
- /proc/PID/cmdline Command line arguments.
- /proc/PID/cpu Current and last cpu in which it was executed.
- /proc/PID/cwd Link to the current working directory.
- /proc/PID/environ Values of environment variables.
- /proc/PID/exe Link to the executable of this process.
- /proc/PID/fd Directory, which contains all file descriptors.
- /proc/PID/maps Memory maps to executables and library files.
- /proc/PID/mem Memory held by this process.
- /proc/PID/root Link to the root directory of this process.
- /proc/PID/stat Process status.
- /proc/PID/statm Process memory status information.
- /proc/PID/status Process status in human readable form.
Files
- /proc/crypto list of available cryptographic modules
- /proc/diskstats information (including device numbers) for each of the logical disk devices
- /proc/filesystems list of the file systems supported by the kernel at the time of listing
- /proc/kmsg holding messages output by the kernel
- /proc/meminfo summary of how the kernel is managing its memory.
- /proc/scsi information about any devices connected via a SCSI or RAID controller
- /proc/tty information about the current terminals
- /proc/version containing the Linux kernel version, distribution number, gcc version number (used to build the kernel) and any other pertinent information relating to the version of the kernel currently running
Important files with /proc besides the process specific directories

- /proc/apm: Provides information on Advanced Power Management, if it’s installed.
- /proc/acpi: A similar directory that offers plenty of data on the more modern Advanced Configuration and Power Interface.
- /proc/cmdline: Shows the parameters that were passed to the kernel at boot time.
- /proc/cpuinfo: Provides data on the processor of your box.
- /proc/loadavg: A related file that shows the average load on the processor; its information includes CPU usage in the last minute, last five minutes, and last 10 minutes, as well as the number of currently running processes.
- /proc/stat: Also gives statistics, but goes back to the last boot.
- /proc/uptime: A short file that has only two numbers: how many seconds your box has been up, and how many seconds it has been idle.
- /proc/devices: Displays all currently configured and loaded character and block devices.
- /proc/ide and /proc/scsi: Provide data on IDE and SCSI devices.
- /proc/ioports: Shows you information about the regions used for I/O communication with those devices.
- /proc/dma: Shows the Direct Memory Access channels in use.
- /proc/filesystems: Shows which filesystem types are supported by your kernel.
- /proc/mounts: Shows all the mounts used by your machine (its output looks much like /etc/mtab). Similarly,
- /proc/partitions: show all partitions
- /proc/swaps: show all swap space.
- /proc/fs: If you’re exporting filesystems with NFS, this directory has among its many subdirectories and files /proc/fs/nfsd/exports, which shows the file system that are being shared and their permissions.
- /proc/net: it includes /dev (each network device), several iptables (firewall) related files, net and socket statistics, wireless information, and more.
- /proc/meminfo: RAM-related files. I’ve already mentioned but you’ve also got
- /proc/iomem, which shows you how RAM memory is used in your box
- /proc/kcore, which represents the physical RAM of your box.
- /proc/kcore shows a size that’s equal to your RAM plus a small overhead. (Don’t try to cat this file, because its contents are binary and will mess up your screen.)
- Hardware-related files and directories, such as /proc/interrupts and /proc/irq, /proc/pci (all PCI devices), /proc/bus, and so on, but they include very specific information, which most users won’t need.
Within /proc/sys
- debug: Has debugging information. This is good if you’re into kernel development.
- dev: Provides parameters for specific devices on your system; for example, check the /dev/cdrom directory.
- fs: Offers data on every possible aspect of the filesystem.
- kernel: Lets you affect the kernel configuration and operation directly.
- net: Lets you control network-related matters. Be careful, because messing with this can make you lose connectivity!
- vm: Deals with the VM subsystem.