by Vry4n_ | Feb 1, 2021 | Linux Security
Port Knocking is a method used to secure your port access from unauthorized users. Port Knocking works by
- Opening ports on a firewall by generating a connection attempt on a set of defined closed/open ports.
- Once a correct sequence of connection attempts is received, the firewall will open the port that was previously closed.
The main purpose of port knocking is to defend yourself against port scanners.
Install and Configure SSH
1. First thing to do is to update the system and then proceed with apt install, run the program by using ‘service’ command
- sudo apt update && dist-upgrade -y
- sudo apt install ssh
- sudp systemctl enable ssh.service
- sudo service ssh start
- sudo service ssh status
2. From our Kali machine we will run nmap against port 80, it should show as ‘open’
- nmap -p 22 -sV 192.168.0.5

Install and Configure Iptables
1. Check if any other Firewall service is running and stop it before initiating/installing IPTables, in this case ‘UFW’ is installed on my machine
- sudo ufw status
- sudo ufw disable

2. Now install ‘iptables’
- sudo apt install iptables iptables-persistent

Note: default dir for rules IPv4: /etc/iptables/rules.v4 & IPv6: /etc/iptables/rules.v6

5. Once iptables is installed, you will need to allow all established connections and on-going sessions through iptables. Which means current sessions won’t be terminated.
| -A, –append chain rule-specification |
Append one or more rules to the end of the selected chain. When the source and/or destination names resolve to more than one address, a rule will be added for each possible address combination.
(Note: the chains INPUT and OUTPUT are only traversed for packets coming into the local host and originating from the local host respectively. |
| -m, –match match
-m conntrack |
Specifies a match to use, that is, an extension module that tests for a specific property. The set of matches make up the condition under which a target is invoked. Matches are evaluated first to last as specified on the command line and work in short-circuit fashion, i.e. if one extension yields false, evaluation will stop.
The one called conntrack works with the network connection tracking capabilities of the kernel. |
| -j, –jump target |
This specifies the target of the rule; i.e., what to do if the packet matches it. |
| ACCEPT |
means to let the packet through. |
| –cstate |
ESTABLISHED,RELATED: This specifies the type of connection to which the rule will apply, namely ESTABLISHED and RELATED connections. |
- sudo iptables -A INPUT -m conntrack –ctstate ESTABLISHED,RELATED -j ACCEPT
3. Next step after accepting active traffic traffic through IPTables, block the desired incoming port, in our case port SSH (22)
| -A: Append |
the rule to the firewall rules table, i.e., add it to the bottom. |
| INPUT |
This rule is about incoming connections. |
| -p tcp |
This rule applies to traffic that uses the Transmission Control Protocol. |
| –dport 22 |
This rule specifically applies to TCP traffic that targets port 22 (the SSH port). |
| -j REJECT |
If the traffic matches the rule, jump to the REJECT target in the firewall. So, if the traffic is rejected, it’s not permitted through the firewall. |
- sudo iptables -A INPUT -p tcp –dport 22 -j REJECT
4. Now, we start the netfilter service, and, save the rule we just created
- sudo systemctl start netfilter-persistent
- sudo systemctl enable netfilter-persistent
- sudo netfilter-persistent save
- sudo netfilter-persistent reload
5. Now running Nmap againg from our Kali machine, the port should show as ‘filtered’ or ‘closed’
- nmap -p 22 -sV 192.168.0.5

Install and Configure Knockd
knockd is a port-knock server. It listens to all traffic on an ethernet (or PPP) interface, looking for special “knock” sequences of port-hits.
- A client makes these port-hits by sending a TCP (or UDP) packet to a port on the server. This port need not be open
- Since knockd listens at the link-layer level, it sees all traffic even if it’s destined for a closed port.
- When the server detects a specific sequence of port-hits, it runs a command defined in its configuration file.
- This can be used to open up holes in a firewall for quick access.
1. Install the tool in the server
- sudo apt install knockd -y
2. Once knockd is installed, you will need to enable knockd service to start on boot. You can do this by editing /etc/default/knockd file (change value from 0 to 1), additionally we need to specify the network interface (change ), in our case “ens33”, this can be revealed with ‘ifconfig’
- sudo vi /etc/default/knockd
- START_KNOCKD=1
- KNOCKD_OPTS=”-i ens33”

3. you will need to configure knockd. You can configure it by editing /etc/knockd.conf file
| sequence |
The sequence of ports someone must access to open or close port 22. The default ports are 7000, 8000, and 9000 to open it, and 9000, 8000, and 7000 to close it. You can change these or add more ports to the list. For our purposes, we’ll stick with the defaults. |
| seq_timeout |
The time period within which someone has to access the ports to trigger it to open or close. |
| command |
The command sent to the iptables firewall when the open or close action is triggered. These commands either add a rule to the firewall (to open the port) or take it out (to close the port). |
| tcpflags |
The type of packet each port must receive in the secret sequence. A SYN (synchronize) packet is the first in a TCP connection request, called a three-way handshake. |

4. Change the [openSSH] and [closeSSH] section default knock sequence as per your requirements:
[openSSH]
- sequence = 10011, 10001,10111
- seq_timeout = 20
- tcpflags = syn
- command = /sbin/iptables -I INPUT -s %IP% -p tcp –dport 22 -j ACCEPT
[closeSSH]
- sequence = 10111,10011,10001
- seq_timeout = 20
- command = /sbin/iptables -D INPUT -s %IP% -p tcp –dport 22 -j ACCEPT
- tcpflags = syn

5. Save the file when you are finished, then start knock service to apply these changes:
- sudo systemctl start knockd
Note:
- sequence = 10011,10001,10111 : Knock will open the SSH port when the sequence is completed from client machine.
- seq_timeout = 20 : This option defines how long you have time to complete the sequenct for the knock.
- command = /sbin/iptables -I INPUT -s %IP% -p tcp –dport 22 -j ACCEPT : This command will open the port 22.
- sequence = 10111,10011,10001 : Knock will close the SSH port when the sequence is completed from client machine.
- command = /sbin/iptables -D INPUT -s %IP% -p tcp –dport 22 -j ACCEPT : This command will close the port 22.
6. Now activate the knockd service
- sudo systemctl enable knockd.service
- sudo service knockd start
- sudo service knockd status

At this point we are done with the configuration. Now it’s time to test it
Knocking ports to open SSH.
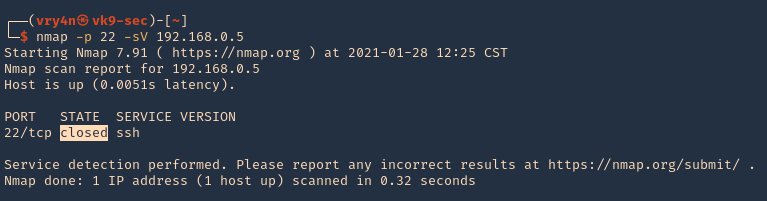
1. Running nmap on the target host, we can see that the port was actually closed.
- nmap -p 22 -sV 192.168.0.5
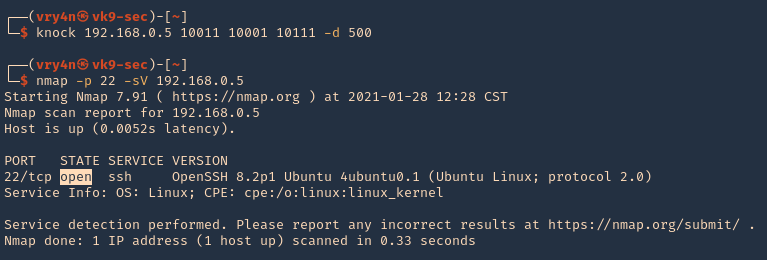
2. Running the knock command with the specific sequence will open the port.
- knock 192.168.0.5 10011 10001 10111 -d 500
- nmap -p 22 -sV 192.168.0.5
3. Now we are able to ssh to the box

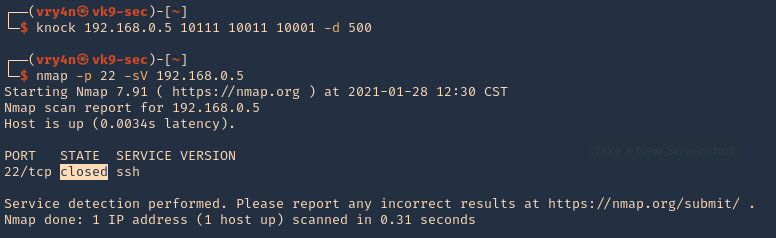
4. To close the port, we can run the sequence specified in /etc/knockd.conf [closeSSH]
- knock 192.168.0.5 10111 10011 10001 -d 500
- nmap -p 22 -sV 192.168.0.5
5. Checking Syslog log file we can find the activity open & close

Extra
When we have a port list and don’t know the sequence, we can use a script to automate things
1. I have written the following script to test different sequences
2. Download the script
- git clone https://github.com/vry4n/knock_test.git
3. Run the script
- cd knock_test
- python3.9 knock_test.py

by Vry4n_ | Jun 16, 2020 | Linux Security
A self-signed certificate is a certificate that is signed by the person creating it rather than a trusted certificate authority. Self-signed certificates can enable the same level of encryption as a $1700 certificate signed by a trusted authority. (Self-signed certificates or certificates issued by a private CAs are not appropriate for use with the general public.)
However, self-signed certificates can have their place:
- An Intranet. When clients only have to go through a local Intranet to get to the server, there is virtually no chance of a man-in-the-middle attack.
- A development server. There is no need to spend extra cash buying a trusted certificate when you are just developing or testing an application.
- Personal sites with few visitors. If you have a small personal site that transfers non-critical information, there is very little incentive for someone to attack the connections.
Best practices
- Limit the validity period, it should be as short as you can handle from the maintenance standpoint. Never go beyond 12 months.
- Do not use wildcards and limit the alt names, make it as specific as possible — the certificate should only be issued for the exact hosts/domains where it is going to be used. Use the alternative names extension to list all the hostnames.
- Use a meaningful and informative “subject” record. CN must match one of your domain names. You can use OU to specify the name of your application or service. Make sure that the full DN record used in the subject is unique across all of the certs. There are many attributes that can be used in the “subject” to make it more informative, you can find the full list here
- Make sure that the algorithm used for the signature is at least SHA256WITHRSA (which is the default in OpenSSL)
- Do not create unencrypted private keys. If a key is for a Java application, use the pkcs12 format, it can be used directly by any modern JVM. OpenSSL initially generates a DER encoded private key encrypted using DES, but it can be converted into pkcs12 using openssl pkcs12 command. PKCS12 is the implementation of the PKCS#11 format which is the universal, cross-platform cryptography interface, so it should be preferred over other formats.
- Use elliptic curve keys as opposed to the default RSA ones, they provide a number of benefits over RSA
- You can make your certificate more robust by specifying the certificate’s purpose using extended key usage and “key usage” extensions. “TLS Web Server Authentication” should be the only allowed usage for a server. This will prevent unintended use of the certificate.
- Make your extensions “critical”. Self-signed certificates/keys are only used internally, so all clients should be able to support the usage extensions.
- Create a repeatable/scriptable process for issuing certificates and keys. OpenSSL is a de-facto standard command line tool that can be used as the basis for this process.
Recommendation for OpenSSL configuration
[ extensions ]
basicConstraints = critical, CA:FALSE
keyUsage =critical, digitalSignature, keyEncipherment
extendedKeyUsage = critical, serverAuth
subjectKeyIdentifier = hash
subjectAltName = @alt_names
[ alt_names ]
DNS.1 = host1
DNS.2 = host2
Example of one liner SSL certificate creation
- openssl req -config cert_conf/self_signed_cert.conf -x509 -days 60 -new -newkey rsa:2048 -keyout certs/ss_keys/self_signed -out certs/ss_certs/self_signed.pem -verbose -passout pass:<your password>
Steps to create a self-signed certificate
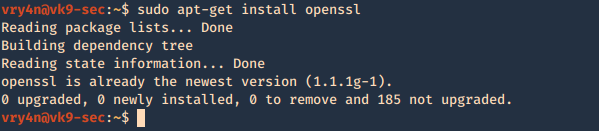
1. Inspect if OpenSSL is installed
- which openssl
- whereis openssl

If the file is missing use install it. The example below is debian based procedure. (In this case I already have it.)
- sudo apt-get install openssl
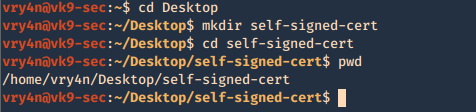
2. Create a working folder
- cd Desktop
- mkdir self-signed-cert
- cd self-signed-cert
- pwd
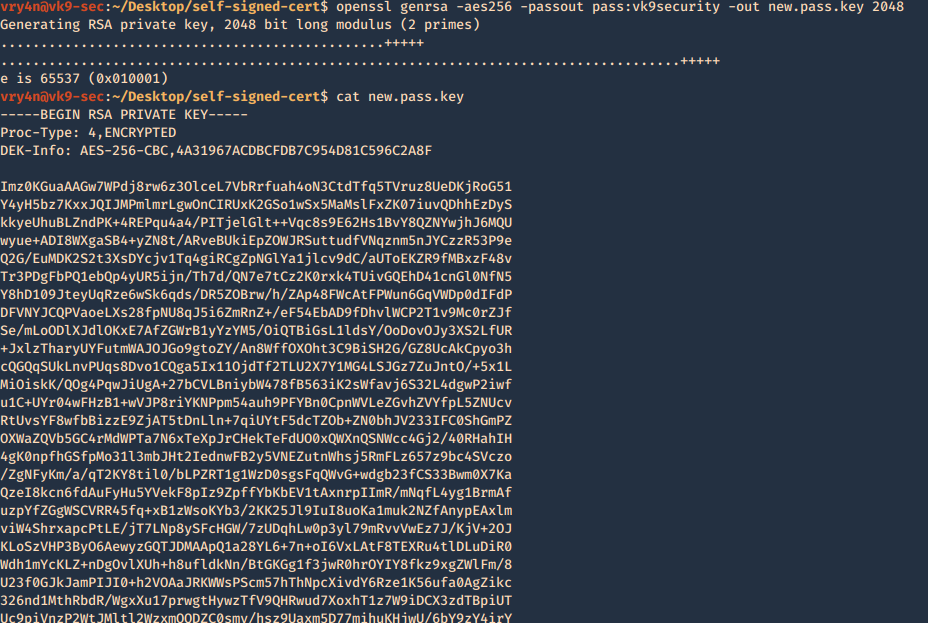
3. Now we need to generate the private key, and set the passphrase as vk9security, below some recommendation:
The best way of securely storing private keys is to use a cryptographic hardware storage device such as:
- USB Token
- Smart Card
- Hardware Storage Module (HSM)
Limit User Access
It’s important that you periodically verify who has access to private keys.
Minimum length of 2048
Type of algorithms
- Triple DES
- RSA
- Blowfish
- Twofish
- AES256
Creating the key
- openssl genrsa -aes256 -passout pass:vk9security -out new.pass.key 2048
- cat new.pass.key
Now we will use the just generated new.pass.key to create server.key
- openssl rsa -passin pass:vk9security -in new.pass.key -out server.key
- cat server.key
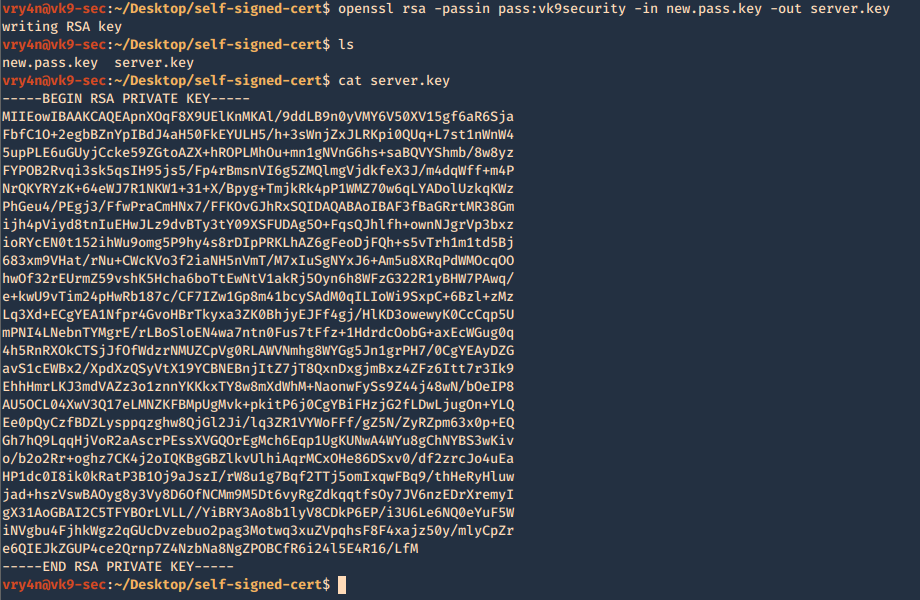
We no longer need new.pass.key, so, we delete it

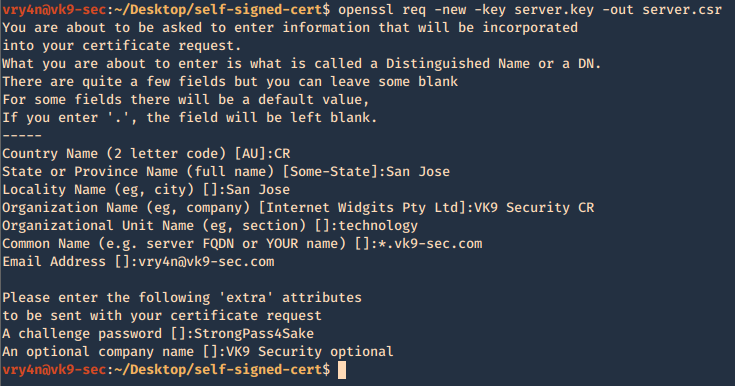
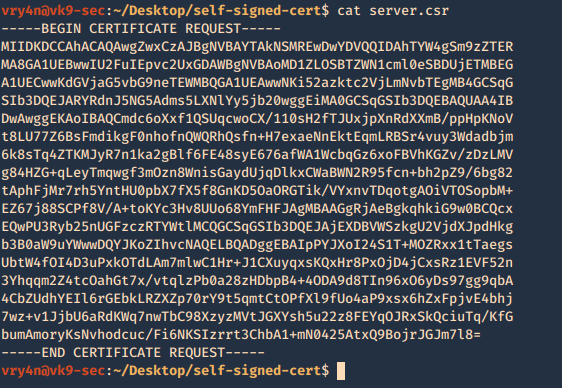
4. Having the and the password vk9security, we proceed to create the Certificate Signing Request (CSR) using the RSA key named server.key. You’ll be asked information to include in the certificate
- openssl req -new -key server.key -out server.csr
—–
Country Name (2 letter code) [AU]:CR
State or Province Name (full name) [Some-State]:San Jose
Locality Name (eg, city) []:San Jose
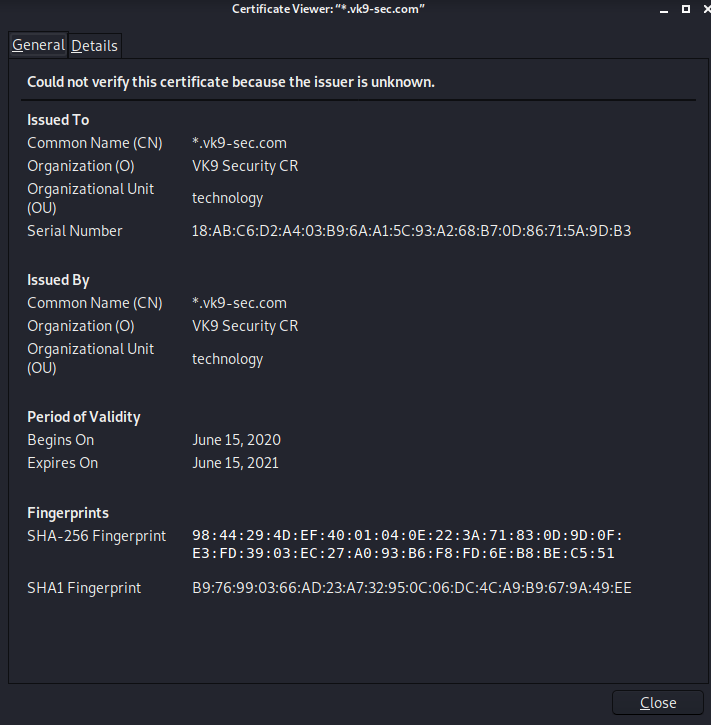
Organization Name (eg, company) [Internet Widgits Pty Ltd]:VK9 Security CR
Organizational Unit Name (eg, section) []:technology
Common Name (e.g. server FQDN or YOUR name) []:*.vk9-sec.com
Email Address []:vry4n@vk9-sec.com
Please enter the following ‘extra’ attributes
to be sent with your certificate request
A challenge password []:StrongPass4Sake
An optional company name []:VK9 Security optional
—–
End
A new file called server.csr has been created and it contains the request information
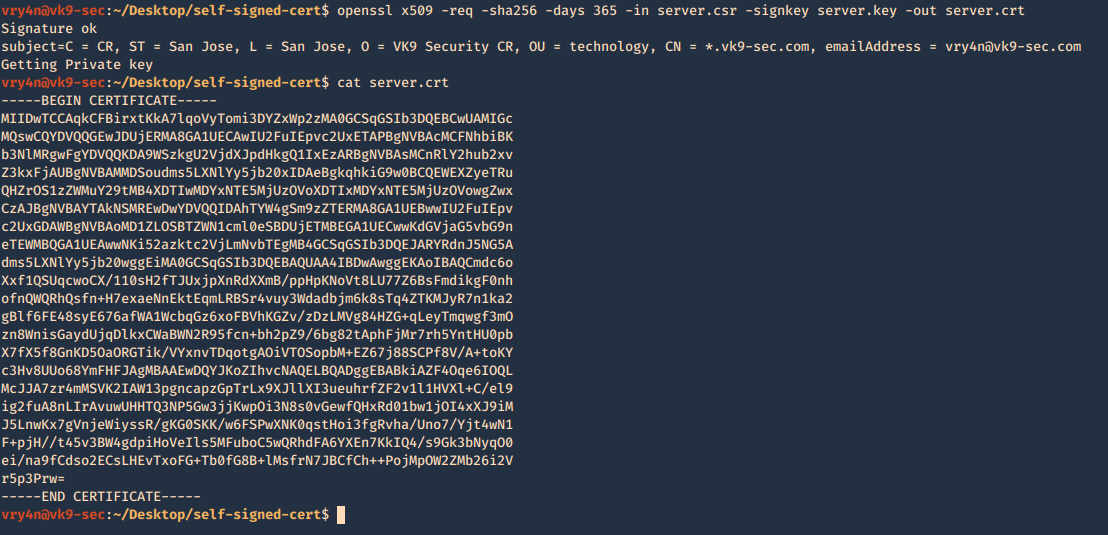
5. Now using the CSR we will sign the request with the following command, as a result we get the certificate named as server.crt
- openssl x509 -req -sha256 -days 365 -in server.csr -signkey server.key -out server.crt
- cat server.crt
We need to keep the private key protected. Only, managed by authorized people this is known by no one else but the server using it.
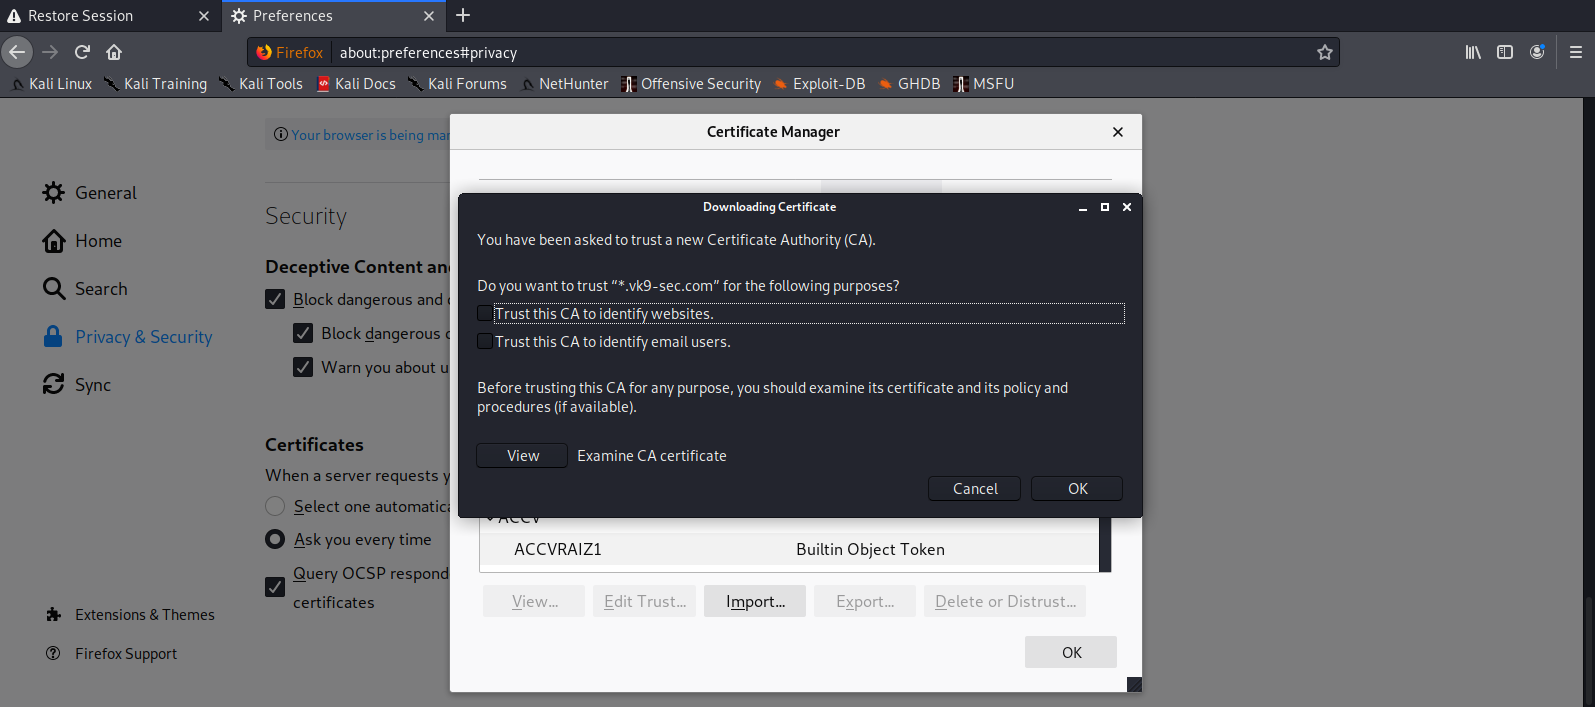
6. Add this new certificate to your browser, in this case Firefox
Since most browsers don’t know about self-signed certificates, there will be a warning by the browser. To avoid this you need to include it to the trusted list.
- Preferences – Privacy and Security – Certificates – View Certificates
- Import
- Select server.crt
- Check the boxes accordingly
- Then ok
7. Look for it within the list
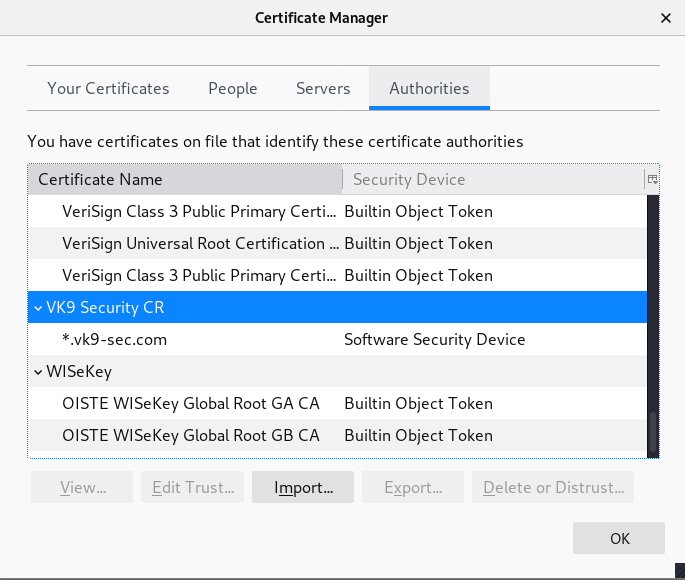
8. Click on view and confirm your info
by Vry4n_ | Mar 6, 2020 | Linux Security
Apache is an open-source and free web server software
How to use the services (System V)
Start
- /etc/init.d/apache2 start
- Or
- sudo service apache2 start

View Status

Restart the service

Stop the service
- service apache2 stop
- service apache2 status

Steps for RHEL 4.x/5.x/6.x or older
Start
Stop
Restart
How to use the services (Systemd)
RHEL 7.x or newer
Start
- systemctl start httpd.service
Stop
- systemctl stop httpd.service
Restart command
- systemctl restart httpd.service
Basic Info
- Document root Directory: /var/www/html or /var/www
- Main Configuration file: /etc/httpd/conf/httpd.conf (RHEL/CentOS/Fedora) and /etc/apache2/apache2.conf (Debian/Ubuntu).
- Default HTTP Port: 80 TCP
- Default HTTPS Port: 443 TCP
- Test your Configuration file settings and syntax: httpd -t
- Access Log files of Web Server: /var/log/apache2/access_log
- Error Log files of Web Server: /var/log/apache2/error_log
Best Practices
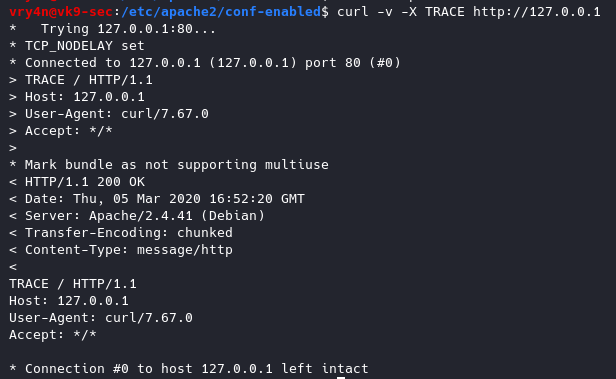
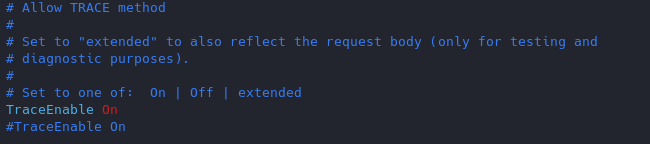
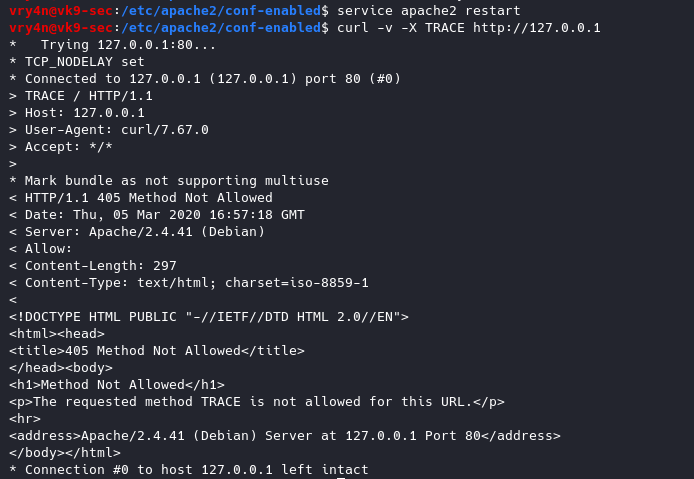
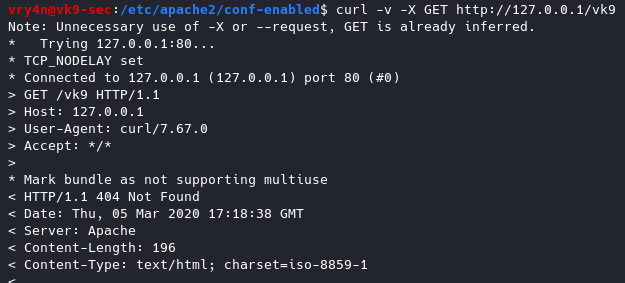
1. Disable TRACE HTTP Request
Having this feature on can lead to Cross Site Tracing attack (XST). (See, https://owasp.org/www-community/attacks/Cross_Site_Tracing )
TraceEnable on allows for Cross Site Tracing Issue and potentially giving the option to a hacker to steal your cookie information.
- curl -v -X TRACE http://127.0.0.1
Solution
Set the TraceEnable directive to “off” in the main configuration file and then restart Apache. (the directory may vary depending on apache installation, see user guide for more information)
- sudo vi /etc/apache2/conf-enabled/security.conf
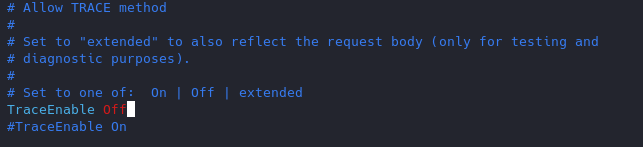
Restart apache service and try to run again curl command
- service apache2 restart
- curl -v -X TRACE http://127.0.0.1
2. Set User & Group
Never run as root, You can set a default user with minimal rights and accesses to exclusively run apache it can be set as follows

www-data is used by default by most administrators we can leave it as it is or modify the values at will.
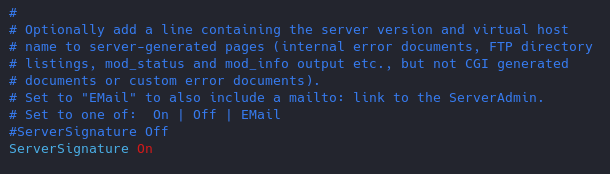
3. Disable Signatures
By default apache displays the version of the web service install as an error, can also show the information about Apache modules installed in your server.
Solution
Turn Off “ServerSignature”
- vi /etc/apache2/conf-enabled/security.conf
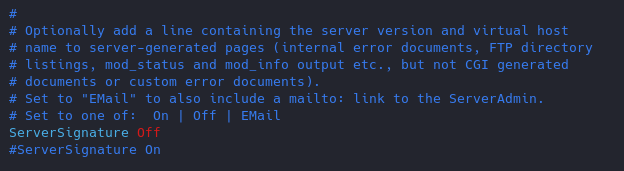
Results
(Optional)
Change the “serverTokens” value to hide OS-Type and modules disclosure. This also disables Banner
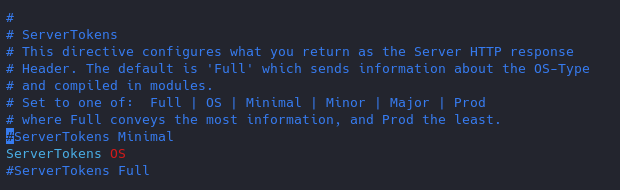
Having this feature on it displays in the response that the OS is Debian
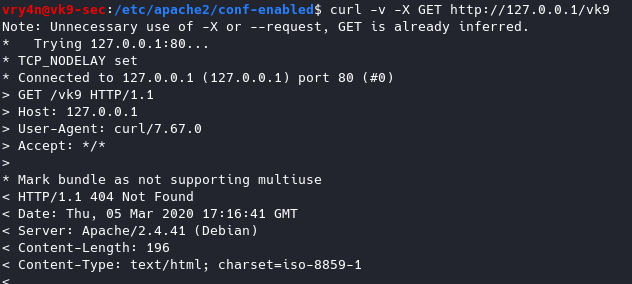
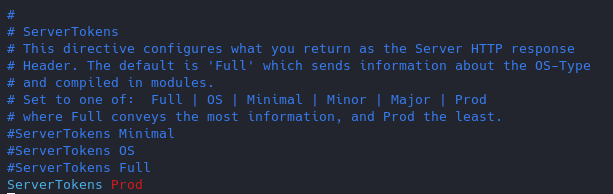
Now the OS info is not disclosed
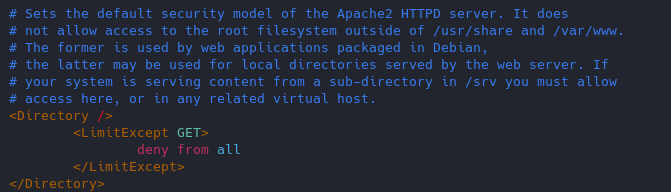
4. Restrict access to some network/file type
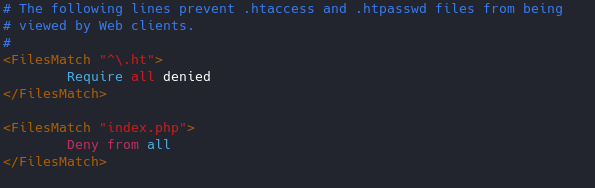
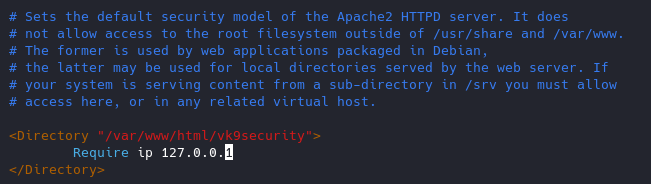
if the files are sensitive for example. Config file /etc/apache2/apache2.conf
File access control
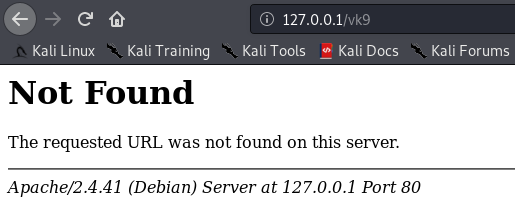
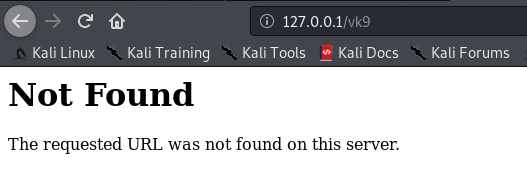
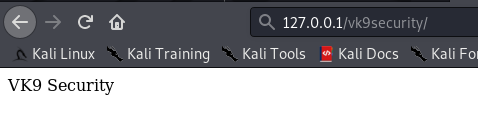
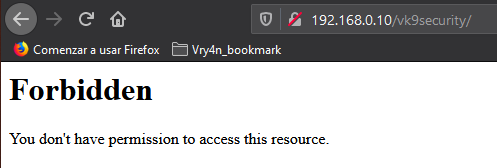
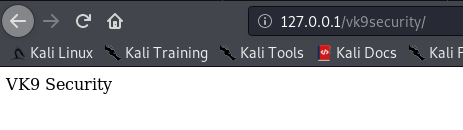
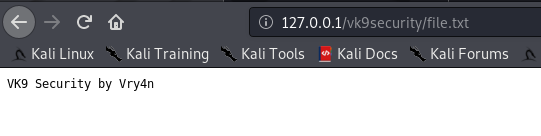
As of now, we can access 127.0.0.1/vk9security/
- Restrict index.php from anyone
Result
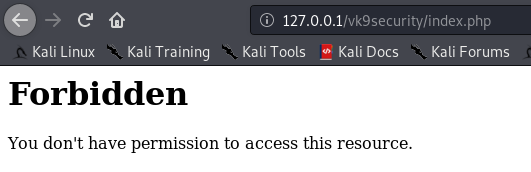
Note: I can still access other resources that are not index.php, like, index.html

Network access control
You can control which networks access which resources, in this case we are only allowing loopback 127.0.0.1.
5. Use strong encryption HTTPS
Use TLS 1.2, disable SSL v2 & v3
1. Copy the module ssl.conf from mods-available to mods-enabled
- sudo cp mods-available/ssl.conf mods-enabled/ (or create a link to the original file)
- cd mods-enabled
- ls -l ssl.conf

Highlight
Better to use a2enmod to activate the module
2. Modify the ssl.conf file and negate some protocols

6. You can remove unused or unnecessary modules

https://haydenjames.io/strip-apache-improve-performance-memory-efficiency/
Disable modules
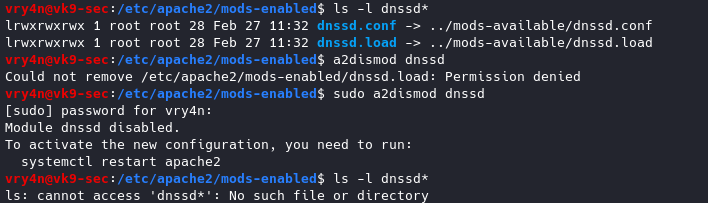
To enable a module
sudo a2enmod <module_name>
7. Control Ciphers
You can choose what ciphers are allowed
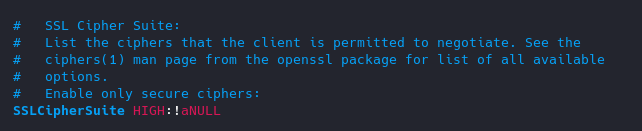
List of Ciphers
https://curl.haxx.se/docs/ssl-ciphers.html
8. Keep it updated!
Always use the latest software version.
9. Void directory listing
This works almost like “ls” linux & dir “windows”
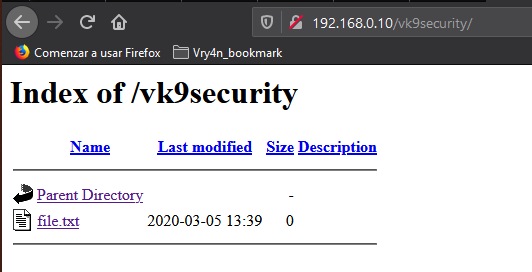
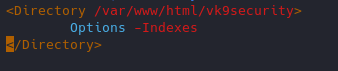
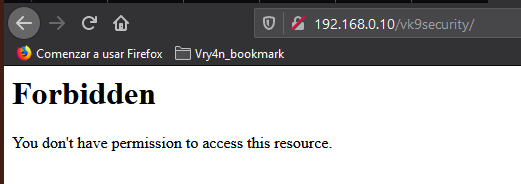
- vi /etc/apache2/apache2.conf
Result
We still have access to the file
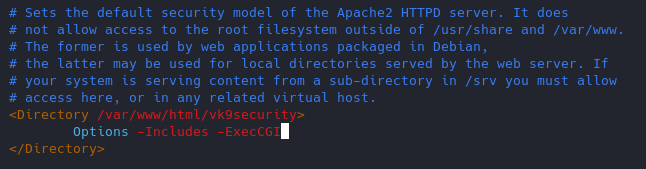
10. Turn off Server side Includes and CGI execution
If not in use turn off SSI and CGI
Server Side Includes: SSI are inserted into HTML code that allows us insert dynamic content in our web sites.
CGI: The Common Gateway Interface (CGI) is a set of rules for running scripts and programs on a Web server. Most Web servers include a cgi-bin directory in the root folder of each website on the server. Any scripts placed in this directory must follow the rules of the Common Gateway Interface.
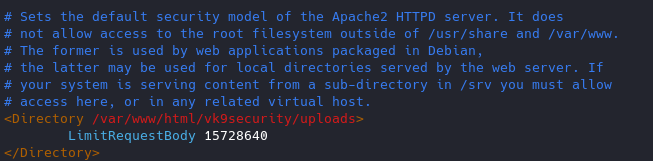
11. Limit the Request size
By default, Apache has no limit on the total size of the HTTP request (it’s possible that you could be a victim of Denial of service attacks)
You can set the value in bytes from 0 (unlimited) to 2147483647 (2GB) that are allowed in a request body.
If you upload files, and, you want to limit the upload size for a particular directory. (in Bytes)
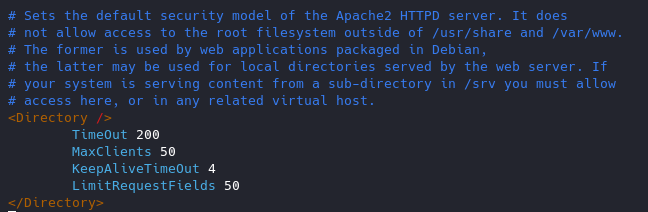
12. Protect against DDoS
it’s true that you cannot completely protect your web site from DDos attacks. Here are some directives which can help you to have a control on it.
- TimeOut : This directive allows you to set the amount of time the server will wait for certain events to complete before it fails. Its default value is 300 secs. It’s good to keep this value low on those sites which are subject to DDOS attacks.
- MaxClients : This directive allows you to set the limit on connections that will be served simultaneously. Every new connection will be queued up after this limit. The default value of it is 256.
- KeepAliveTimeout : Its the amount of time the server will wait for a subsequent request before closing the connection. Default value is 5 secs.
- LimitRequestFields : It helps us to set a limit on the number of HTTP request’s header fields that will be accepted from the clients. Its default value is 100. It is recommended to lower this value if DDos attacks are occurring as a result of so many http request headers.
- LimitRequestFieldSize : It helps us to set a size limit on the HTTP Request header.
13. Enable apache Logging
Apache allows you to logging independently of your OS logging. It is wise to enable Apache logging, because it provides more information, such as the commands entered by users that have interacted with your Web server.
To do so you need to include the mod_log_config module. There are three main logging-related directives available with Apache.
- TransferLog: Creating a log file.
- LogFormat : Specifying a custom format.
- CustomLog : Creating and formatting a log file.
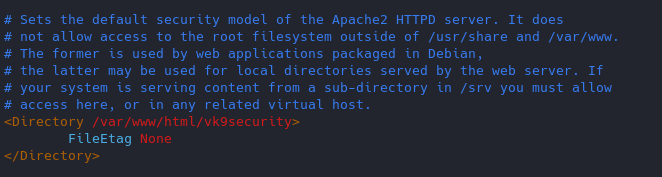
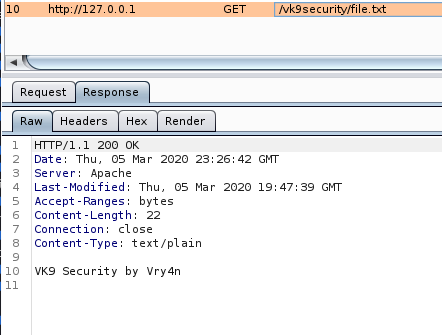
14. Disable Etag
It allows remote attackers to obtain sensitive information like inode number, multipart MIME boundary, and child process through Etag header.
ETag (entity tag) response header provides a mechanism to cache unchanged resources. Its value is an identifier which represents a specific version of the resource. Here’s an example ETag header:
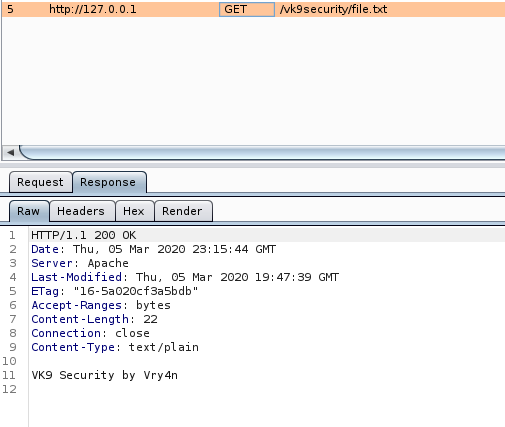
Disabling ETag
Response
15. change config files permission
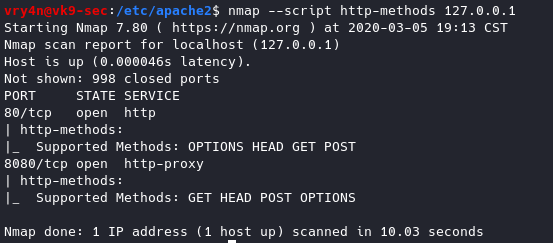
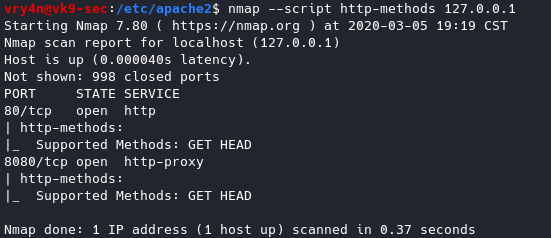
16. Restict HTTP methods in use
Using nmap we can query for the methods allowed
- nmap –script http-methods 127.0.0.1
Enabling methods
Results of nmap
- nmap –script http-methods 127.0.0.1
17. Set cookies (HttpOnly & Secure flag)
You can mitigate most of the common Cross Site Scripting attack using HttpOnly and Secure flag in a cookie. Without having HttpOnly and Secure, it is possible to steal or manipulate web application session and cookies, and it’s dangerous.
- Header edit Set-Cookie ^(.*)$ $1;HttpOnly;Secure
You can set up cookies using PHP or the config files of apache2.
18. Prevent Clickjacking
Clickjacking is a well-known web application vulnerabilities.
- Header always append X-Frame-Options SAMEORIGIN
19. Protection against Cross Site Scripting
Cross Site Scripting (XSS) protection can be bypassed in many browsers. You could apply this protection for a web application if it was disabled by the user. This is used by a majority of giant web companies like Facebook, Twitter, Google, etc.
- Header set X-XSS-Protection “1; mode=block”