by Vry4n_ | Apr 15, 2020 | Active Gathering
FTP is a method to access and share files on the internet. The protocol is a way to communicate between computers on a TCP/IP network, FTP is a TCP based service exclusively and it is a client-server protocol where a client will communicate with a server.
“File Transfer Protocol,” can transfer files between any computers that have an Inter communication, and also works between computers using totally different operating systems.
Anonymous FTP is a type of FTP that allows users to access files and other data without needing an ID or password.
- Transferring files from a client computer to a server computer is called “uploading”
- Transferring from a server to a client is “downloading”
How does it work
There are two distinct communication channels while establishing an FTP connection.
- Port 21: The first one is called the command channel where it initiates the instruction and response.
- Port 20: The other one is called a data channel, where the distribution of data happens. The confusion begins however, when we find that depending on the mode, the data port is not always on port 20.
Types of FTP communication
he FTP server may support Active or Passive connections or both. Most FTP client programs select passive connection mode by default because server administrators prefer it as a safety measure. Firewalls generally block connections that are “initiated” from the outside. Using passive mode, the FTP client (like Auto FTP Manager) is “reaching out” to the server to make the connection. The firewall will allow these outgoing connections, meaning that no special adjustments to firewall settings are required.
Active
Active FTP connection, the client opens a port and listens and the server actively connects to it.
command: client >1023 (to ->) server 21
data: client >1023 (<- to) server 20
- In active mode FTP the client connects from a random unprivileged port (N > 1023) to the FTP server’s command port, port 21.
- Then, the client starts listening to port N+1 and sends the FTP command PORT N+1 to the FTP server.
- The server will then connect back to the client’s specified data port from its local data port, which is port 20.

From the server-side firewall’s standpoint, to support active mode FTP the following communication channels need to be opened:
- FTP server’s port 21 from anywhere (Client initiates connection)
- FTP server’s port 21 to ports > 1023 (Server responds to client’s control port)
- FTP server’s port 20 to ports > 1023 (Server initiates data connection to client’s data port)
- FTP server’s port 20 from ports > 1023 (Client sends ACKs to server’s data port)

Passive
Passive FTP connection, the server opens a port and listens (passively) and the client connects to it. You must grant Auto FTP Manager access to the Internet and to choose the right type of FTP Connection Mode
command: client >1023 (to ->) server 21
data: client >1024 (to ->) server >1023
- In passive mode FTP the client initiates both connections to the server, solving the problem of firewalls filtering the incoming data port connection to the client from the server.
- When opening an FTP connection, the client opens two random unprivileged ports locally (N > 1023 and N+1). The first port contacts the server on port 21, but instead of then issuing a PORT command and allowing the server to connect back to its data port, the client will issue the PASV command.
- The result of this is that the server then opens a random unprivileged port (P > 1023) and sends P back to the client in response to the PASV command. The client then initiates the connection from port N+1 to port P on the server to transfer data.
From the server-side firewall’s standpoint, to support passive mode FTP the following communication channels need to be opened:
- FTP server’s port 21 from anywhere (Client initiates connection)
- FTP server’s port 21 to ports > 1023 (Server responds to client’s control port)
- FTP server’s ports > 1023 from anywhere (Client initiates data connection to random port specified by server)
- FTP server’s ports > 1023 to remote ports > 1023 (Server sends ACKs (and data) to client’s data port)

FTP command table
|
Task
|
DOS Command
|
Notes
|
|
Change user password on a site
|
Literal SITE PSWD oldpassword newpassword
|
“Literal” sends a command line to the remote FTP connection and executes the SITE PSWD command.
|
|
Connect to the specified FTP host on the specified port
|
open [host] [port]
|
For example, type:
open myftpsite.com 21
|
|
Navigate to a different directory on remote machine
|
cd [directory]
|
For example, type:
cd M:\InetPub\EFTRoot\MySite\Usr\jbug
|
|
Change to parent directory
|
cdup
|
Same as cd ..\
|
|
Changes directory on local machine
|
lcd [path]
|
For example, type lcd c:\temp.
|
|
Displays a list of files and folders in the current remote directory
|
dir [path]
ls [directory] [localfile]
|
For example, type:
dir M:\InetPub\EFTRoot\MySite\Usr\jbug
or
ls M:\InetPub\EFTRoot\MySite\Usr\jbug C:\temp\contents.txt
|
|
Creates a directory on the remote file system
|
mkdir [name]
|
For example, to create a folder into which you will upload your graphics files, type:
mkdir images
|
|
Copies a file from the local to the remote computer
|
put [filename.ext]
|
To upload the file with a different name, use
put oldfilename.ext newfilename.ext
|
|
Copies multiple files from the local to the remote computer
|
mput [files]
|
Puts multiple files; *.* puts all files; *.txt puts all .txt files, my_*.* puts all files that start with my_ with any extension.
|
|
Copies a file from the remote to the local computer
|
get [filename.ext]
|
For example, type:
get dog.jpg
|
|
Copies multiple files from the remote to the local computer
|
mget [files]
|
Gets multiple files; *.* gets all files; *.txt gets all .txt files, my_*.* gets all files that start with my_ with any extension.
|
|
Deletes a file
|
delete [filename.ext]
|
For example, type:
delete dog.jpg
|
|
Renames a file
|
rename [filename] [filename]
|
For example, to rename a picture of your dog, Pooh Bear, type:
rename dog.jpg PoohBear.jpg
|
|
Removes a directory on the remote computer
|
rmdir [name]
|
For example, type:
rmdir olddogpics
|
|
List current working directory
|
pwd
|
Use when you forget which directory you are in or if you want to copy the path
|
|
Close connection
|
bye (or quit)
|
Disconnect from remove FTP server
|
|
List of available commands or help for a specific command
|
help
help [command]
? [command]
|
help by itself lists available FTP commands; help [command] or ? [command] provides help for the specific command
|
|
Change transfer mode to ASCII
|
ascii
|
Used for HTML and text files
|
|
Change transfer mode to binary
|
binary
|
Used for graphics, compressed files, audio clips, etc.
|
|
Displays current transfer mode (ASCII or binary)
|
status
|
Query the status of files, transfers in process, and other system information. The STAT command implemented on some FTP servers could allow a remote attacker to obtain sensitive information; therefore, it is disabled on some servers.
|
|
Enable/disable prompts
|
prompt
|
Use this command if you do not want to be prompted for each file transfer when transferring multiple files.
|
Enumeration
Nmap
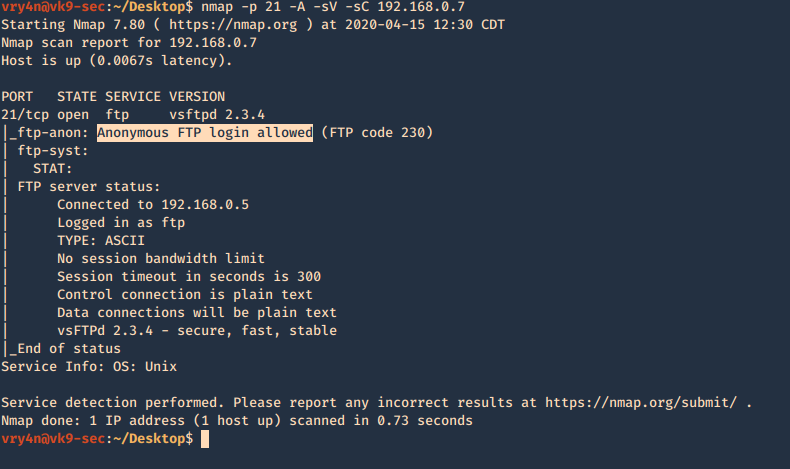
1. Basic enumeration scan
- nmap -p 21 -A -sV -sC 192.168.0.7
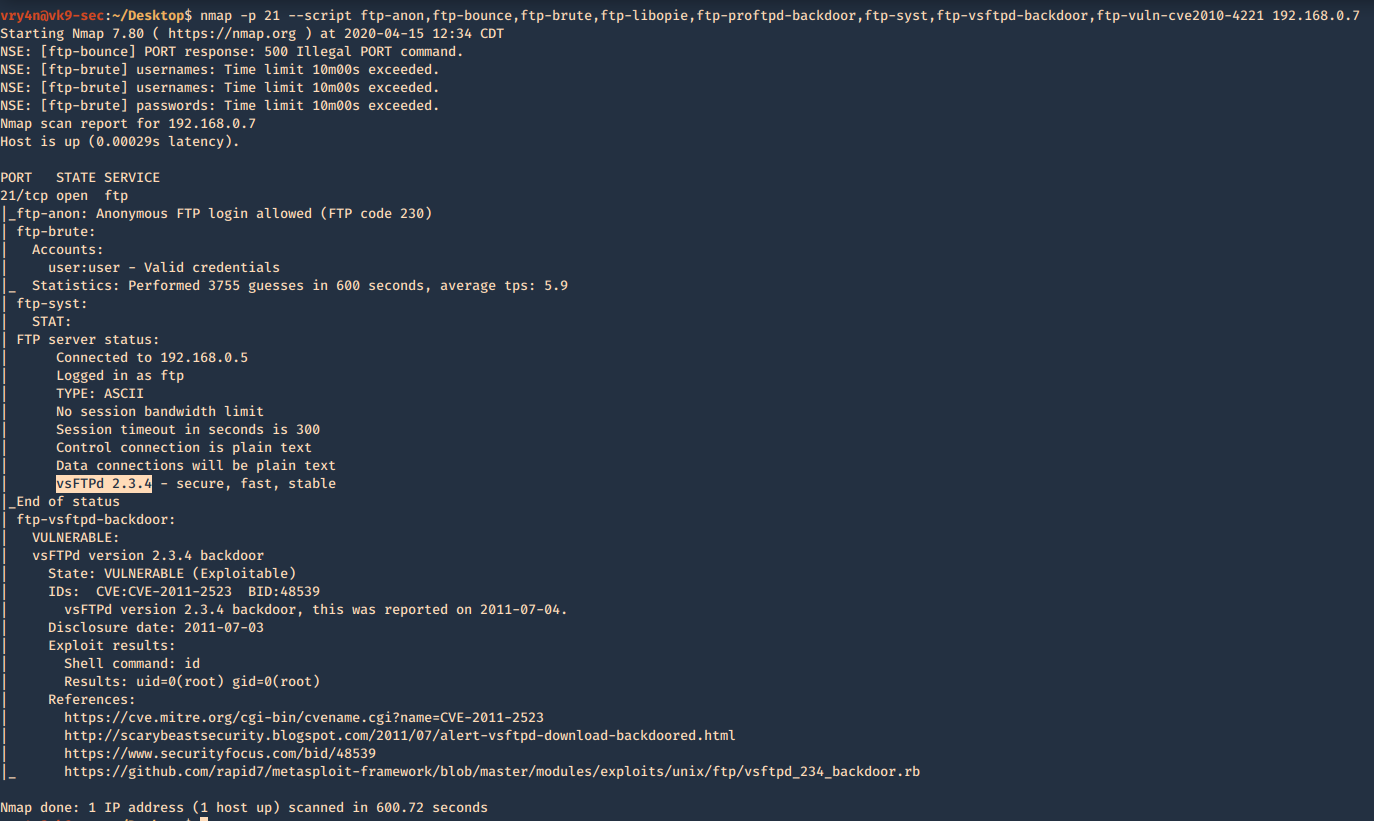
2. Using NSE scripts
- nmap -p 21 –script ftp-anon,ftp-bounce,ftp-brute,ftp-libopie,ftp-proftpd-backdoor,ftp-syst,ftp-vsftpd-backdoor,ftp-vuln-cve2010-4221 192.168.0.7
Metasploit
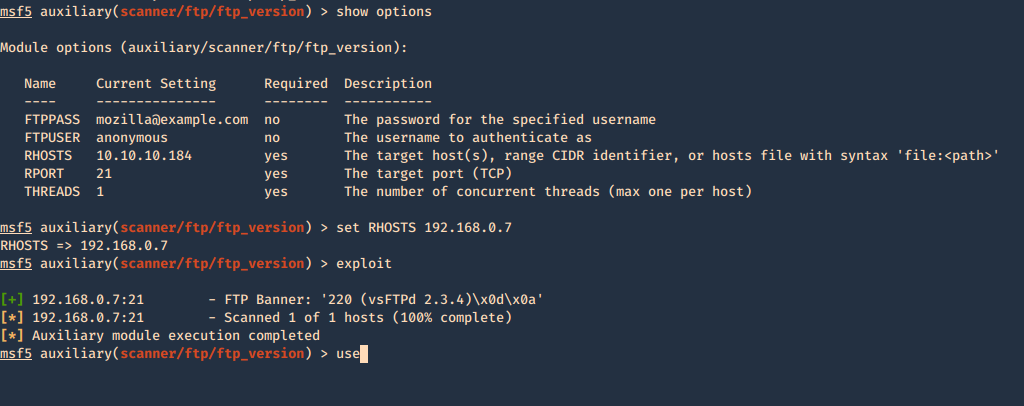
1. Enumerate banner
- use auxiliary/scanner/ftp/ftp_version
- show options
- set RHOSTS 192.168.0.7
- exploit
Secure banner: Edit the config file located in /etc, in our case it is named vsftpd.conf, enable custom banner, by uncommenting the line:
Before

After

Then restart the service and test again.

2. Brute force with Metasploit
- use auxiliary/scanner/ftp/ftp_login
- show options
- set blank_passwords true
- set RHOSTS 192.168.0.7
- set USERNAME anonymous
- exploit
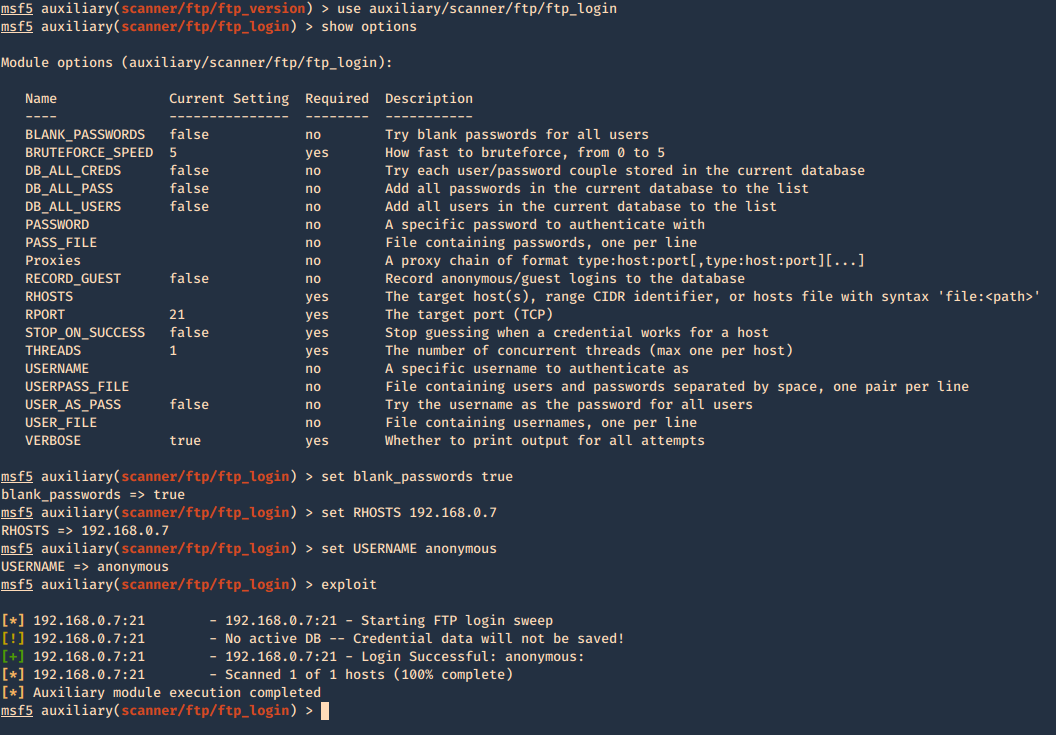
You can set password, username lists, stop on success, etc.
3. Find the privileges of anonymous login
- use auxiliary/scanner/ftp/anonymous
- show options
- set rhosts 192.168.0.7
- exploit

Connect using FTP command
1. Once, the username & password are identified. Or if anonymous log in is enabled. Access the remote service
- ftp 192.168.0.10
- USER: anonymous
- PASS: anonymous
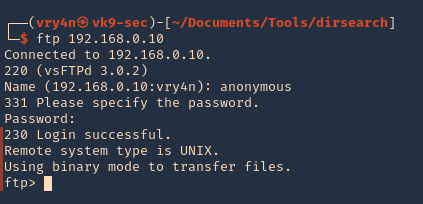
2. Once authenticated, you are permitted to run commands depending on permissions of the user.
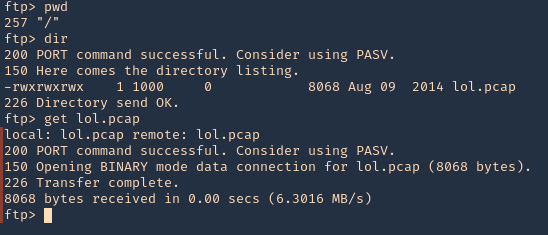
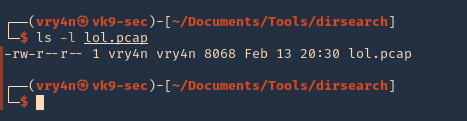
3. Since, we have read permission we could download the file
Hydra
You can brute force log in using hydra
- hydra -s 21 -C /usr/share/legion/wordlists/ftp-default-userpass.txt -u -f 192.168.0.7 ftp

There are other methods to enumerate ftp like capturing network traffic, sometime ftp is sent over insecure networks.
Once, you get log in you can explore and navigate through the file system, read or even write files.
I captured traffic using Wireshark and I see the log in messages flowing through the network

by Vry4n_ | Feb 15, 2020 | Active Gathering
Finger is primarily used to enumerate user information on the target system. It can also find out detailed information (if exists) such as full name, email address, phone number etc. of all its users.
Nmap result

finger-user-enum
finger-user-enum is a script used to enumerate users
https://github.com/pentestmonkey/finger-user-enum
Username guessing tool primarily for use against the default Solaris finger service.
Installation
- git clone https://github.com/pentestmonkey/finger-user-enum.git
- ls -l finger-user-enum

Using finger-user-enum
1. Displaying help
- perl finger-user-enum.pl -h

2. enumerate a single user
-u = user
-t = host IP
- perl finger-user-enum.pl -u root -t 10.10.10.76

We can see output of root user, it means the user exists (1 result). On the other hand, the screenshot below would show (0 results).
- perl finger-user-enum.pl -u vry4n -t 10.10.10.76

3. Enumerate users using a list
- perl finger-user-enum.pl -U /usr/share/seclists/Usernames/Names/names.txt -t 10.10.10.76

4. Using a list of IPs
- perl finger-user-enum.pl -U /usr/share/seclists/Usernames/Names/names.txt -T IP_list.txt
5. Using another port than default 79
- perl finger-user-enum.pl -p 8000 -U /usr/share/seclists/Usernames/Names/names.txt -t 10.10.10.76
6. Showing detailed output
- perl finger-user-enum.pl -d -u root -t 10.10.10.76

Metasploit
1. Metasploit has a module for finger scan (auxiliary/scanner/finger/finger_users)
- use auxiliary/scanner/finger/finger_users
- show options
- set RHOSTS 10.10.10.76
- set USERS_FILE /usr/share/seclists/Usernames/Names/names.txt
- exploit

Using finger
Finger is a tool used to enumerate users using port 79. Finger may be used to look up users on a remote machine. The format is to specify a user as “user@host”, or “@host”
1. Display man page for help

2. enumerate a known user. In this case root
- finger -s root@10.10.10.76

3. Show the home directory of the user
- finger -sl root@10.10.10.76

4. Preventing the -l option from displaying the contents of the “.plan”, “.project” and “.pgpkey” files.
- finger -slp sammy@10.10.10.76

by Vry4n_ | Dec 10, 2019 | Active Gathering
Dig stands for (Domain Information Groper). Dig is a network administration command-line tool for querying Domain Name System (DNS) name servers. It is useful for verifying and troubleshooting DNS problems and also to perform DNS lookups and displays the answers that are returned from the name server that were queried. dig is part of the BIND domain name server software suite. dig command replaces older tool such as nslookup and the host. dig tool is available in major Linux distributions.
Install Dig on Linux
Debian
CentOS 7
Dig Syntax
In its simplest form, the syntax of the dig utility will look like this:
- dig [server] [name] [type]
[server] – the IP address or hostname of the name server to query
If the server argument is the hostname then dig will resolve the hostname before proceeding with querying the name server.
It is optional and if you don’t provide a server argument then dig uses the name server listed in /etc/resolv.conf
[name] – the name of the resource record that is to be looked up
[type] – the type of query requested by dig. For example, it can be an A record, MX record, SOA record or any other types. By default dig performs a lookup for an A record if no type argument is specified.
Queries
Dig Commands Cheatsheet
Dig a Domain Name
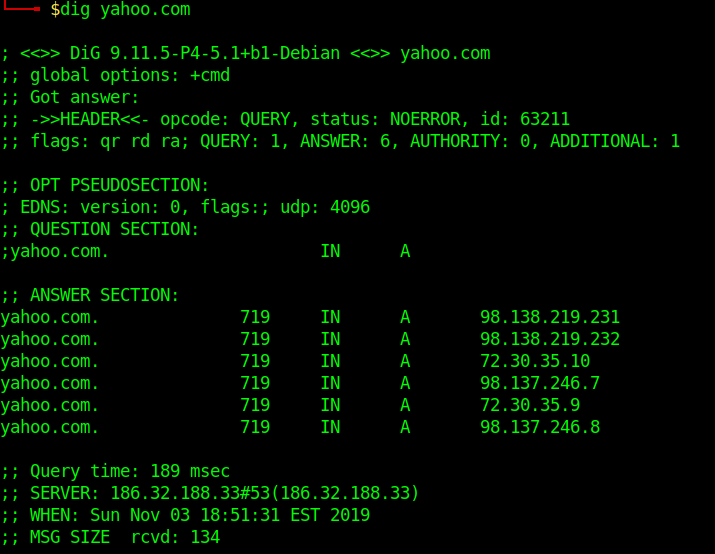
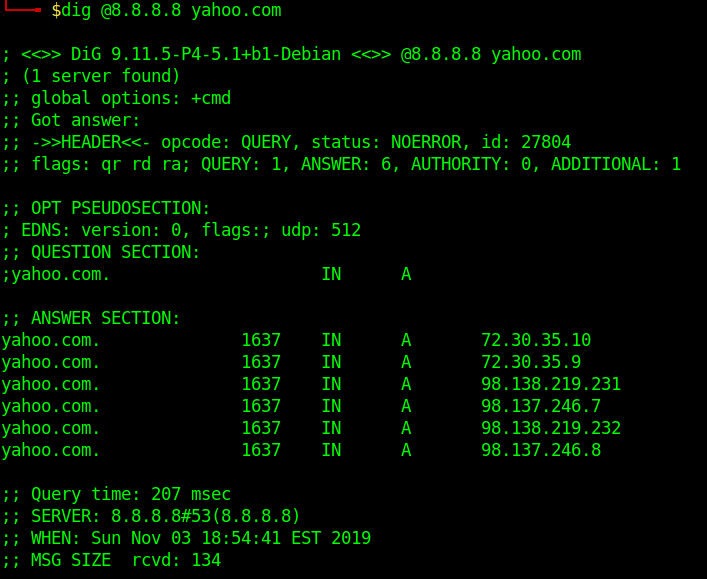
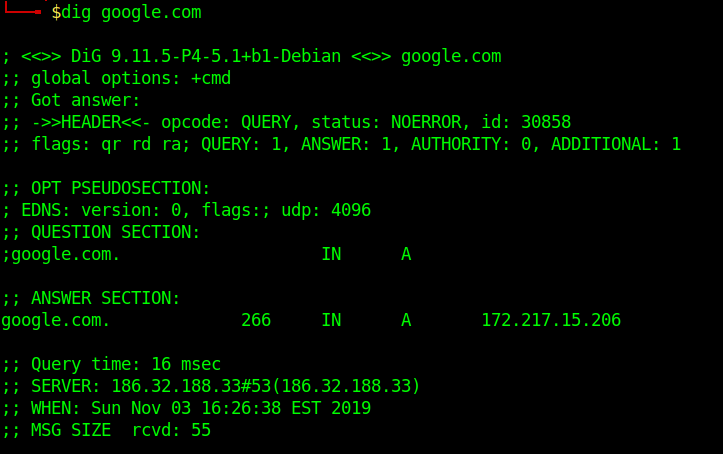
UNDERSTAND THE OUTPUT:
- Lines beginning with ; are comments not part of the information.
- The first line tell us the version of dig (9.11.5) command.
- Next, dig shows the header of the response it received from the DNS server
- Next comes the question section, which simply tells us the query, which in this case is a query for the “A” record of yahoo.com. The IN means this is an Internet lookup (in the Internet class).
- The answer section tells us that yahoo.com has the IP address 72.30.38.140
- Lastly there are some stats about the query. You can turn off these stats using the +nostats option.
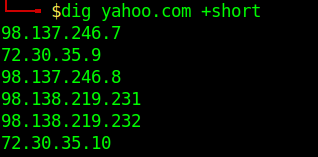
Short Answers
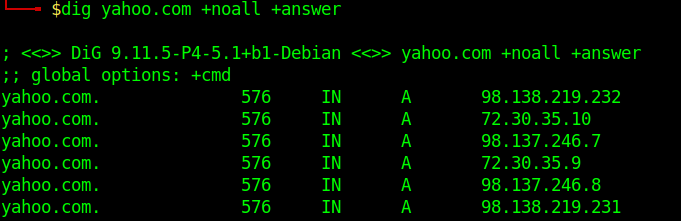
Detailed Answers
- dig yahoo.com +noall +answer
Specifying Nameservers
The following dig command sends the DNS query to Google’s name server(8.8.8.8) by using the @8.8.8.8 option
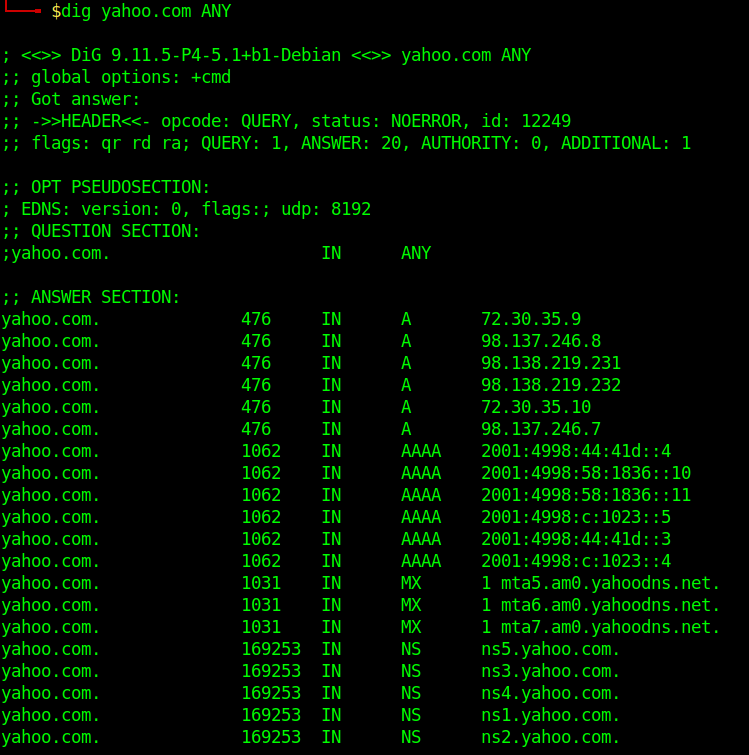
Query All DNS Record Types
Search For Record Type
- dig yahoo.com MX
- dig yahoo.com NS
- dig yahoo.com A
- dig yahoo.com SOA
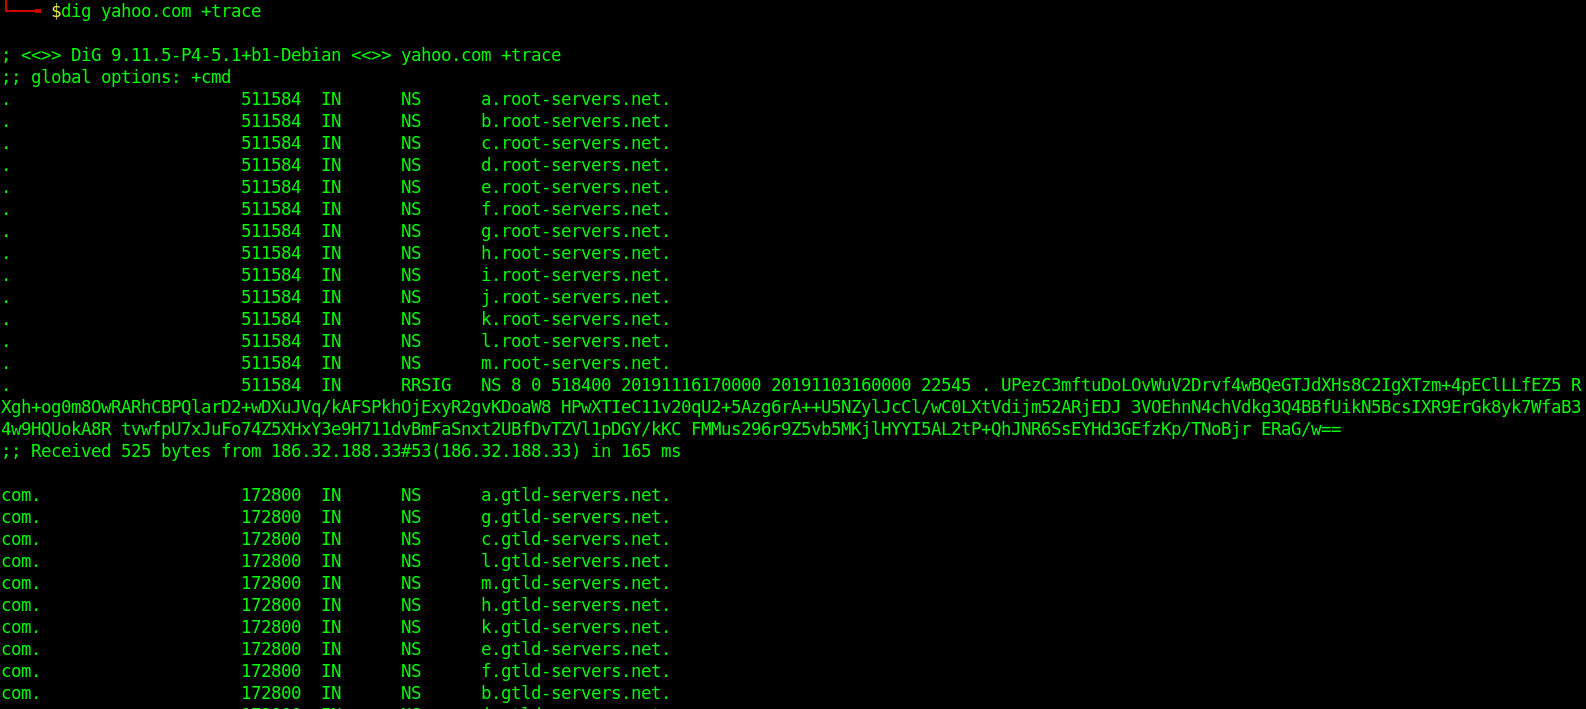
Trace DNS Path
Reverse DNS Lookup
- dig +answer -x 98.138.219.231
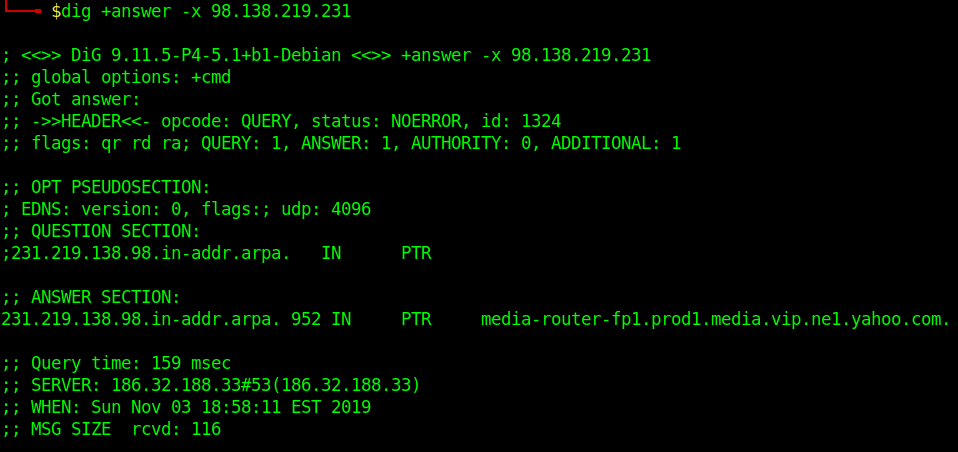
Reverse DNS lookup lets you look up the domain and hostname associated with an IP address.
Batch Queries
- dig -f domain_name.txt +short
provide dig with a list of domain names – one per line in a file
Custom Query
- dig axfr @10.10.10.13 cronos.htb
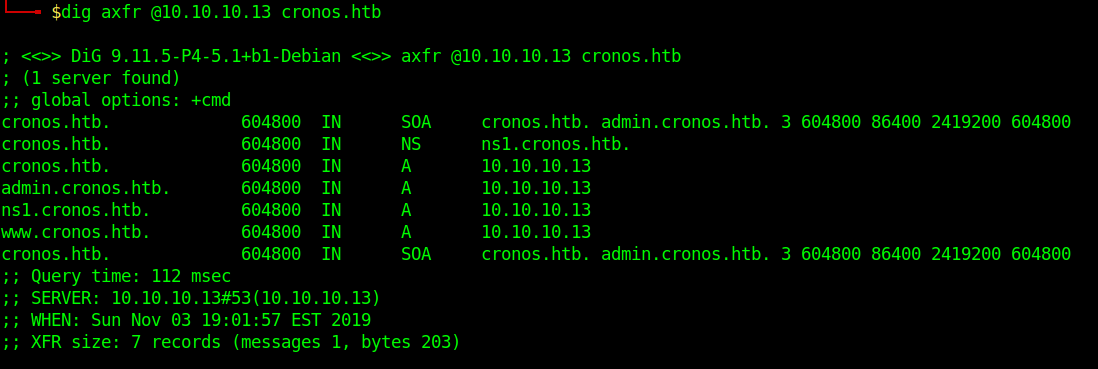
Those different domains in the output point to the same IP.
by Vry4n_ | Dec 2, 2019 | Active Gathering
Here you have a list of Linux Interesting files. They can be used to extract sensitive information leading to further exploitation.
It is always important to read the Administrator Guide of any application and appli the best security practices to configiguration file.
Any misconfiguration is a potential vector of attack.
• /etc/passwd
• /etc/shadow
• /etc/aliases
• /etc/anacrontab
• /etc/apache2/apache2.conf
• /etc/apache2/httpd.conf
• /etc/at.allow
• /etc/at.deny
• /etc/bashrc
• /etc/bootptab
• /etc/chrootUsers
• /etc/chttp.conf
• /etc/cron.allow
• /etc/cron.deny
• /etc/crontab
• /etc/cups/cupsd.conf
• /etc/exports
• /etc/fstab
• /etc/ftpaccess
• /etc/ftpchroot
• /etc/ftphosts
• /etc/groups
• /etc/grub.conf
• /etc/hosts
• /etc/hosts.allow
• /etc/hosts.deny
• /etc/httpd/access.conf
• /etc/httpd/conf/httpd.conf
• /etc/httpd/httpd.conf
• /etc/httpd/logs/access_log
• /etc/httpd/logs/access.log
• /etc/httpd/logs/error_log
• /etc/httpd/logs/error.log
• /etc/httpd/php.ini
• /etc/httpd/srm.conf
• /etc/inetd.conf
• /etc/inittab
• /etc/issue
• /etc/lighttpd.conf
• /etc/lilo.conf
• /etc/logrotate.d/ftp
• /etc/logrotate.d/proftpd
• /etc/logrotate.d/vsftpd.log
• /etc/lsb-release
• /etc/motd
• /etc/modules.conf
• /etc/motd
• /etc/mtab
• /etc/my.cnf
• /etc/my.conf
• /etc/mysql/my.cnf
• /etc/network/interfaces
• /etc/networks
• /etc/npasswd
• /etc/passwd
• /etc/php4.4/fcgi/php.ini
• /etc/php4/apache2/php.ini
• /etc/php4/apache/php.ini
• /etc/php4/cgi/php.ini
• /etc/php4/apache2/php.ini
• /etc/php5/apache2/php.ini
• /etc/php5/apache/php.ini
• /etc/php/apache2/php.ini
• /etc/php/apache/php.ini
• /etc/php/cgi/php.ini
• /etc/php.ini
• /etc/php/php4/php.ini
• /etc/php/php.ini
• /etc/printcap
• /etc/profile
• /etc/proftp.conf
• /etc/proftpd/proftpd.conf
• /etc/pure-ftpd.conf
• /etc/pureftpd.passwd
• /etc/pureftpd.pdb
• /etc/pure-ftpd/pure-ftpd.conf
• /etc/pure-ftpd/pure-ftpd.pdb
• /etc/pure-ftpd/putreftpd.pdb
• /etc/redhat-release
• /etc/resolv.conf
• /etc/samba/smb.conf
• /etc/snmpd.conf
• /etc/ssh/ssh_config
• /etc/ssh/sshd_config
• /etc/ssh/ssh_host_dsa_key
• /etc/ssh/ssh_host_dsa_key.pub
• /etc/ssh/ssh_host_key
• /etc/ssh/ssh_host_key.pub
• /etc/sysconfig/network
• /etc/syslog.conf
• /etc/termcap
• /etc/vhcs2/proftpd/proftpd.conf
• /etc/vsftpd.chroot_list
• /etc/vsftpd.conf
• /etc/vsftpd/vsftpd.conf
• /etc/wu-ftpd/ftpaccess
• /etc/wu-ftpd/ftphosts
• /etc/wu-ftpd/ftpusers
• /logs/pure-ftpd.log
• /logs/security_debug_log
• /logs/security_log
• /opt/lampp/etc/httpd.conf
• /opt/xampp/etc/php.ini
• /proc/cpuinfo
• /proc/filesystems
• /proc/interrupts
• /proc/ioports
• /proc/meminfo
• /proc/modules
• /proc/mounts
• /proc/stat
• /proc/swaps
• /proc/version
• /proc/self/net/arp
• /root/anaconda-ks.cfg
• /usr/etc/pure-ftpd.conf
• /usr/lib/php.ini
• /usr/lib/php/php.ini
• /usr/local/apache/conf/modsec.conf
• /usr/local/apache/conf/php.ini
• /usr/local/apache/log
• /usr/local/apache/logs
• /usr/local/apache/logs/access_log
• /usr/local/apache/logs/access.log
• /usr/local/apache/audit_log
• /usr/local/apache/error_log
• /usr/local/apache/error.log
• /usr/local/cpanel/logs
• /usr/local/cpanel/logs/access_log
• /usr/local/cpanel/logs/error_log
• /usr/local/cpanel/logs/license_log
• /usr/local/cpanel/logs/login_log
• /usr/local/cpanel/logs/stats_log
• /usr/local/etc/httpd/logs/access_log
• /usr/local/etc/httpd/logs/error_log
• /usr/local/etc/php.ini
• /usr/local/etc/pure-ftpd.conf
• /usr/local/etc/pureftpd.pdb
• /usr/local/lib/php.ini
• /usr/local/php4/httpd.conf
• /usr/local/php4/httpd.conf.php
• /usr/local/php4/lib/php.ini
• /usr/local/php5/httpd.conf
• /usr/local/php5/httpd.conf.php
• /usr/local/php5/lib/php.ini
• /usr/local/php/httpd.conf
• /usr/local/php/httpd.conf.ini
• /usr/local/php/lib/php.ini
• /usr/local/pureftpd/etc/pure-ftpd.conf
• /usr/local/pureftpd/etc/pureftpd.pdn
• /usr/local/pureftpd/sbin/pure-config.pl
• /usr/local/www/logs/httpd_log
• /usr/local/Zend/etc/php.ini
• /usr/sbin/pure-config.pl
• /var/adm/log/xferlog
• /var/apache2/config.inc
• /var/apache/logs/access_log
• /var/apache/logs/error_log
• /var/cpanel/cpanel.config
• /var/lib/mysql/my.cnf
• /var/lib/mysql/mysql/user.MYD
• /var/local/www/conf/php.ini
• /var/log/apache2/access_log
• /var/log/apache2/access.log
• /var/log/apache2/error_log
• /var/log/apache2/error.log
• /var/log/apache/access_log
• /var/log/apache/access.log
• /var/log/apache/error_log
• /var/log/apache/error.log
• /var/log/apache-ssl/access.log
• /var/log/apache-ssl/error.log
• /var/log/auth.log
• /var/log/boot
• /var/htmp
• /var/log/chttp.log
• /var/log/cups/error.log
• /var/log/daemon.log
• /var/log/debug
• /var/log/dmesg
• /var/log/dpkg.log
• /var/log/exim_mainlog
• /var/log/exim/mainlog
• /var/log/exim_paniclog
• /var/log/exim.paniclog
• /var/log/exim_rejectlog
• /var/log/exim/rejectlog
• /var/log/faillog
• /var/log/ftplog
• /var/log/ftp-proxy
• /var/log/ftp-proxy/ftp-proxy.log
• /var/log/httpd/access_log
• /var/log/httpd/access.log
• /var/log/httpd/error_log
• /var/log/httpd/error.log
• /var/log/httpsd/ssl.access_log
• /var/log/httpsd/ssl_log
• /var/log/kern.log
• /var/log/lastlog
• /var/log/lighttpd/access.log
• /var/log/lighttpd/error.log
• /var/log/lighttpd/lighttpd.access.log
• /var/log/lighttpd/lighttpd.error.log
• /var/log/mail.info
• /var/log/mail.log
• /var/log/maillog
• /var/log/mail.warn
• /var/log/message
• /var/log/messages
• /var/log/mysqlderror.log
• /var/log/mysql.log
• /var/log/mysql/mysql-bin.log
• /var/log/mysql/mysql.log
• /var/log/mysql/mysql-slow.log
• /var/log/proftpd
• /var/log/pureftpd.log
• /var/log/pure-ftpd/pure-ftpd.log
• /var/log/secure
• /var/log/vsftpd.log
• /var/log/wtmp
• /var/log/xferlog
• /var/log/yum.log
• /var/mysql.log
• /var/run/utmp
• /var/spool/cron/crontabs/root
• /var/webmin/miniserv.log
• /var/www/log/access_log
• /var/www/log/error_log
• /var/www/logs/access_log
• /var/www/logs/error_log
• /var/www/logs/access.log
• /var/www/logs/error.log
• ~/.atfp_history
• ~/.bash_history
• ~/.bash_logout
• ~/.bash_profile
• ~/.bashrc
• ~/.gtkrc
• ~/.login
• ~/.logout
• ~/.mysql_history
• ~/.nano_history
• ~/.php_history
• ~/.profile
• ~/.ssh/authorized_keys
• ~/.ssh/id_dsa
• ~/.ssh/id_dsa.pub
• ~/.ssh/id_rsa
• ~/.ssh/id_rsa.pub
• ~/.ssh/identity
• ~/.ssh/identity.pub
• ~/.viminfo
• ~/.wm_style
• ~/.Xdefaults
• ~/.xinitrc
• ~/.Xresources
• ~/.xsession
by Vry4n_ | Dec 2, 2019 | Active Gathering
Here you have a list of Windows Interesting files. They can be used to extract sensitive information leading to further exploitation.
It is always important to read the Administrator Guide of any application and appli the best security practices to configiguration file.
Any misconfiguration is a potential vector of attack.
• C:/Users/Administrator/NTUser.dat
• C:/Documents and Settings/Administrator/NTUser.dat
• C:/apache/logs/access.log
• C:/apache/logs/error.log
• C:/apache/php/php.ini
• C:/boot.ini
• C:/inetpub/wwwroot/global.asa
• C:/MySQL/data/hostname.err
• C:/MySQL/data/mysql.err
• C:/MySQL/data/mysql.log
• C:/MySQL/my.cnf
• C:/MySQL/my.ini
• C:/php4/php.ini
• C:/php5/php.ini
• C:/php/php.ini
• C:/Program Files/Apache Group/Apache2/conf/httpd.conf
• C:/Program Files/Apache Group/Apache/conf/httpd.conf
• C:/Program Files/Apache Group/Apache/logs/access.log
• C:/Program Files/Apache Group/Apache/logs/error.log
• C:/Program Files/FileZilla Server/FileZilla Server.xml
• C:/Program Files/MySQL/data/hostname.err
• C:/Program Files/MySQL/data/mysql-bin.log
• C:/Program Files/MySQL/data/mysql.err
• C:/Program Files/MySQL/data/mysql.log
• C:/Program Files/MySQL/my.ini
• C:/Program Files/MySQL/my.cnf
• C:/Program Files/MySQL/MySQL Server 5.0/data/hostname.err
• C:/Program Files/MySQL/MySQL Server 5.0/data/mysql-bin.log
• C:/Program Files/MySQL/MySQL Server 5.0/data/mysql.err
• C:/Program Files/MySQL/MySQL Server 5.0/data/mysql.log
• C:/Program Files/MySQL/MySQL Server 5.0/my.cnf
• C:/Program Files/MySQL/MySQL Server 5.0/my.ini
• C:/Program Files (x86)/Apache Group/Apache2/conf/httpd.conf
• C:/Program Files (x86)/Apache Group/Apache/conf/httpd.conf
• C:/Program Files (x86)/Apache Group/Apache/conf/access.log
• C:/Program Files (x86)/Apache Group/Apache/conf/error.log
• C:/Program Files (x86)/FileZilla Server/FileZilla Server.xml
• C:/Program Files (x86)/xampp/apache/conf/httpd.conf
• C:/WINDOWS/php.ini
• C:/WINDOWS/Repair/SAM
• C:/Windows/repair/system
• C:/Windows/repair/software
• C:/Windows/repair/security
• C:/WINDOWS/System32/drivers/etc/hosts
• C:/Windows/win.ini
• C:/WINNT/php.ini
• C:/WINNT/win.ini
• C:/xampp/apache/bin/php.ini
• C:/xampp/apache/logs/access.log
• C:/xampp/apache/logs/error.log
• C:/Windows/Panther/Unattend/Unattended.xml
• C:/Windows/Panther/Unattended.xml
• C:/Windows/debug/NetSetup.log
• C:/Windows/system32/config/AppEvent.Evt
• C:/Windows/system32/config/SecEvent.Evt
• C:/Windows/system32/config/default.sav
• C:/Windows/system32/config/security.sav
• C:/Windows/system32/config/software.sav
• C:/Windows/system32/config/system.sav
• C:/Windows/system32/config/regback/default
• C:/Windows/system32/config/regback/sam
• C:/Windows/system32/config/regback/security
• C:/Windows/system32/config/regback/system
• C:/Windows/system32/config/regback/software
• C:/Program Files/MySQL/MySQL Server 5.1/my.ini
• C:/Windows/System32/inetsrv/config/schema/ASPNET_schema.xml
• C:/Windows/System32/inetsrv/config/applicationHost.config
• C:/inetpub/logs/LogFiles/W3SVC1/u_ex[YYMMDD].log
by Vry4n_ | Dec 1, 2019 | Active Gathering
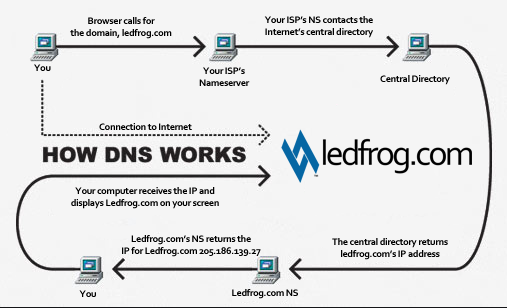
DNS is a naming system for computers that converts human readable domain names e.g. (infosecinstitute.com) into computer readable IP-addresses.
However, some security vulnerabilities exist due to misconfigured DNS name servers that can lead to information disclosure about the domain. This forms an important step of the Information Gathering stage during a Penetration test or Vulnerability assessment.
https://github.com/nixawk/pentest-wiki/blob/master/1.Information-Gathering/How-to-gather-dns-information.md
https://www.varonis.com/blog/what-is-dns/
DNS basics
Let’s say the user opens up the browser and types in infosecinstitute.com. It is now the responsibility of the DNS resolver in the user’s operating system to fetch the IP address. It first checks its local cache to see if it can find a record for the queried domain name. A cache usually contains a mapping of IP-addresses to hostnames which are saved during recent lookups so that the resolver does not have to fetch the IP address again and again. If it can’t find the IP address in its cache it queries the DNS server to see if it has a record for it. A DNS server is usually given to you by the ISP or you can manually set up a DNS server for yourself. If it still can’t find the IP Address then it goes through a process or recursive DNS query in which it queries different name servers to get the IP-address of the domain. As soon as it finds the IP-address it returns the IP-address back to the user and also caches it for its future use.
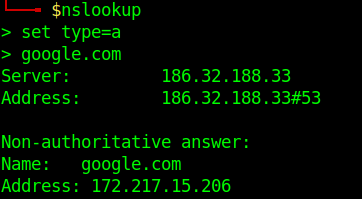
Basic DNS query
- nslookup
- set type=a
- google.com
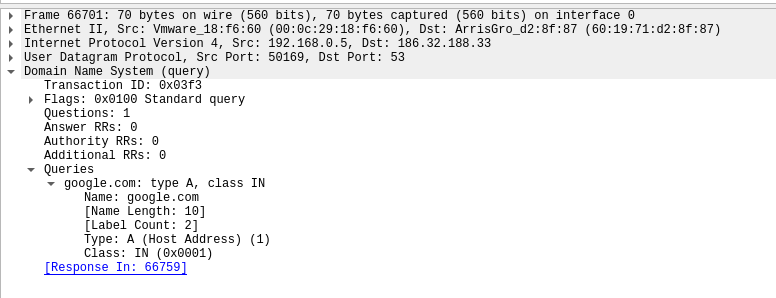
Network view of the request.

Request:
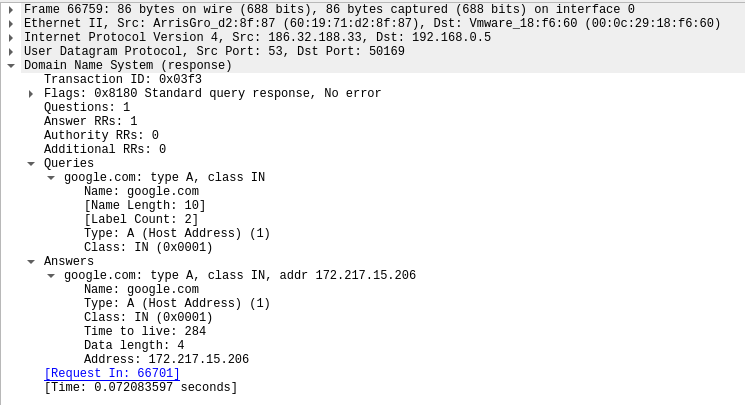
Response:
Running queries with dig
To simplify the output, we will be using those extra parameters on the following commands:
+nocmd – Removes the +cmd options output
+noall – Removes extra headers, flags, time information, message size, etc.
+answer – Tells dig to return the answer section (the “juicy” part of the output).
To specify the record we would like to query, we just have to add the record type right after the domain specification. Here is a basic syntax we will use:
- dig +nocmd google.com <record> +noall +answer

DNS Types: 10 Top DNS Record Types
DNS servers create a DNS record to provide important information about a domain or hostname, particularly its current IP address. The most common DNS record types are:
Address Mapping record (A Record)—also known as a DNS host record, stores a hostname and its corresponding IPv4 address.
IP Version 6 Address record (AAAA Record)—stores a hostname and its corresponding IPv6 address.
Canonical Name record (CNAME Record)—can be used to alias a hostname to another hostname. When a DNS client requests a record that contains a CNAME, which points to another hostname, the DNS resolution process is repeated with the new hostname.
Mail exchanger record (MX Record)—specifies an SMTP email server for the domain, used to route outgoing emails to an email server.
Name Server records (NS Record)—specifies that a DNS Zone, such as “example.com” is delegated to a specific Authoritative Name Server, and provides the address of the name server.
Reverse-lookup Pointer records (PTR Record)—allows a DNS resolver to provide an IP address and receive a hostname (reverse DNS lookup).
Certificate record (CERT Record)—stores encryption certificates—PKIX, SPKI, PGP, and so on.
Service Location (SRV Record)—a service location record, like MX but for other communication protocols.
Text Record (TXT Record)—typically carries machine-readable data such as opportunistic encryption, sender policy framework, DKIM, DMARC, etc.
Start of Authority (SOA Record)—this record appears at the beginning of a DNS zone file, and indicates the Authoritative Name Server for the current DNS zone, contact details for the domain administrator, domain serial number, and information on how frequently DNS information for this zone should be refreshed.
DNS Types: 3 DNS Query Types
There are three types of queries in the DNS system:
Recursive Query
In a recursive query, a DNS client provides a hostname, and the DNS Resolver “must” provide an answer—it responds with either a relevant resource record, or an error message if it can’t be found. The resolver starts a recursive query process, starting from the DNS Root Server, until it finds the Authoritative Name Server (for more on Authoritative Name Servers see DNS Server Types below) that holds the IP address and other information for the requested hostname.
Iterative Query
In an iterative query, a DNS client provides a hostname, and the DNS Resolver returns the best answer it can. If the DNS resolver has the relevant DNS records in its cache, it returns them. If not, it refers the DNS client to the Root Server, or another Authoritative Name Server which is nearest to the required DNS zone. The DNS client must then repeat the query directly against the DNS server it was referred to.
Non-Recursive Query
A non-recursive query is a query in which the DNS Resolver already knows the answer. It either immediately returns a DNS record because it already stores it in local cache, or queries a DNS Name Server which is authoritative for the record, meaning it definitely holds the correct IP for that hostname. In both cases, there is no need for additional rounds of queries (like in recursive or iterative queries). Rather, a response is immediately returned to the client.
Zone file
A Zone file is basically a text file present on the server hosting the domain that contains entries for different resource records. Each line is represented by a different record.
Each zone file must start with a Start of Authority (SOA) record containing an authoritative name server for the domain (for e.g. ns1.google.com for google.com) and an email address of someone responsible for the management of the name server.
Domains can be very large, so they are further organized into smaller books, called, “zones.” No single DNS server stores all the books – that would be impractical.
Different types of Resource Records exist within a Zone file. However we are going to discuss some of the important ones
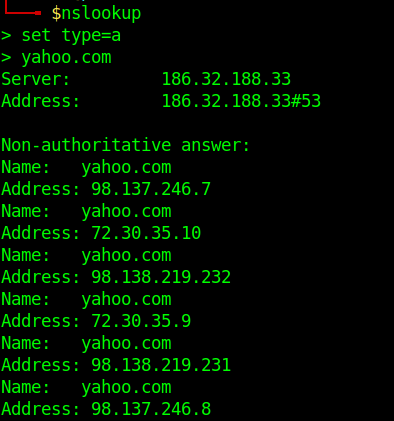
- A Records– Maps an IP Address to a hostname.For e.g. 74.125.236.80 for google.com.
- nslookup
- set type=a
- yahoo.com
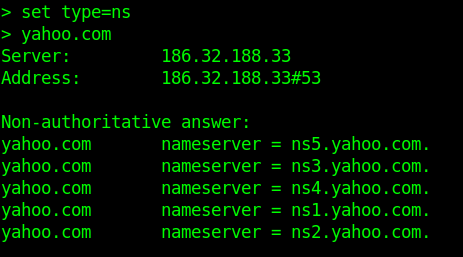
- NS Records-Delegates a given zone to use the given authoritative nameserver. For e.g. ns1.google.com is an authoritative nameserver for google.com
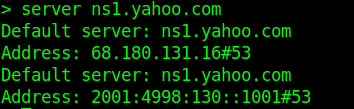
-
- server ns1.yahoo.com (set this as main server)
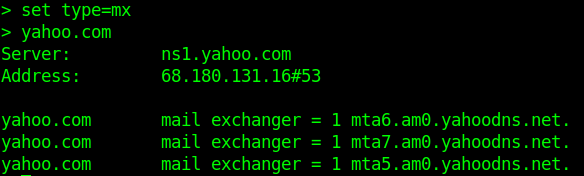
- MX Records-This basically tells us which server is responsible for receiving mails sent to that domain name.
- TXT Records-This consists of arbitrarily human readable text in a record.
- CNAME Records– Gives an alias of one name to another.
Enumeration
Nmap
- nmap –script=broadcast-dns-service-discovery google.com
- nmap -T4 -p 53 –script dns-brute google.com
- nmap -Pn -sU -p 53 –script=dns-recursion google.com
DNSEnum
Multithreaded Perl script to enumerate DNS information of a domain and to discover non-contiguous IP blocks.
OPERATIONS:
- Get the host’s address (A record).
- Get the nameservers (threaded).
- Get the MX record (threaded).
- Perform axfr queries on nameservers and get BIND VERSION (threaded).
- Get extra names and subdomains via google scraping (google query = “allinurl: -www site:domain”).
- Brute force subdomains from a file can also perform recursion on a subdomain that has NS records (all threaded).
- Calculate C class domain network ranges and perform whois queries on them (threaded).
- Perform reverse lookups on netranges ( C class or/and whois netranges) (threaded).
- Write to domain_ips.txt file IP-blocks.
Execution
- dnsenum –noreverse google.com

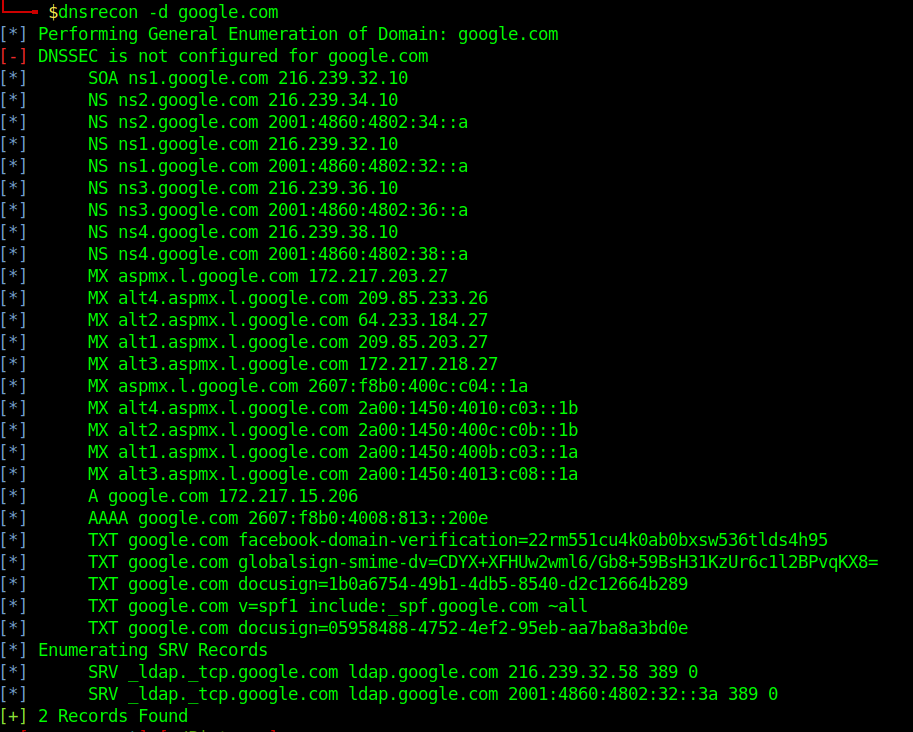
DNSRecon
DNSRecon provides the ability to perform:
- Check all NS Records for Zone Transfers
- Enumerate General DNS Records for a given Domain (MX, SOA, NS, A, AAAA, SPF and TXT)
- Perform common SRV Record Enumeration. Top Level Domain (TLD) Expansion
- Check for Wildcard Resolution
- Brute Force subdomain and host A and AAAA records are given a domain and a wordlist
- Perform a PTR Record lookup for a given IP Range or CIDR
- Check a DNS Server Cached records for A, AAAA and CNAME Records provided a list of host records in a text file to check
- Enumerate Common DNS records in the Local Network Enumerate Hosts and Subdomains using Google
Execution
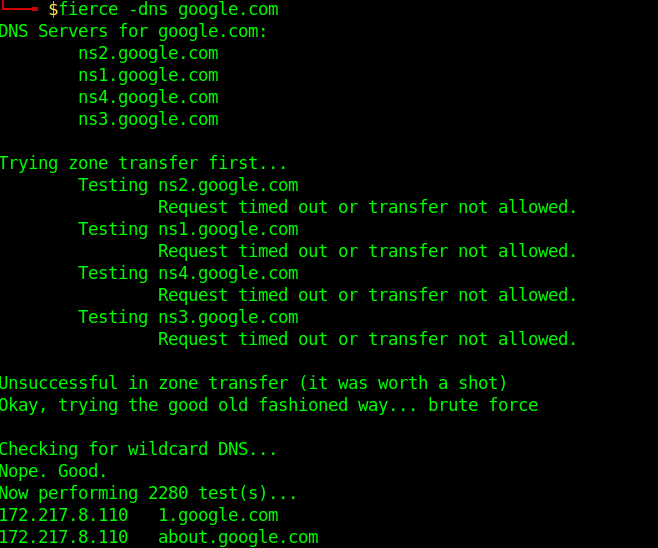
Fierce
Fierce is a reconnaissance tool. Fierce is a PERL script that quickly scans domains (usually in just a few minutes, assuming no network lag) using several tactics
Execution
Know the DNS server name
1. Scanning a host with nmap we can sometimes find a domain name, in this case LDAP
- nmap -sV -sC -A -T5 10.10.10.100
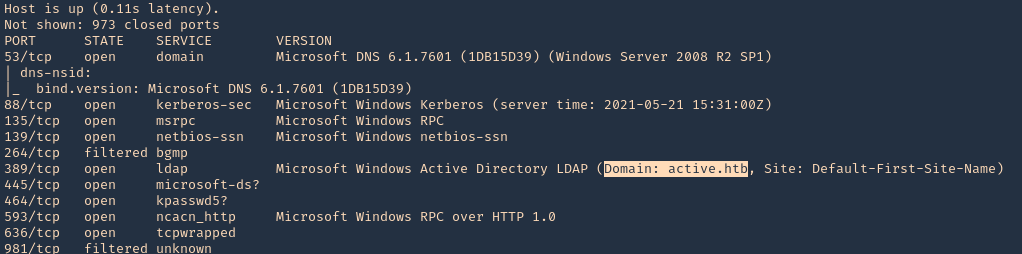
2. This server also has DNS (port 53) service opened. We can consult it
- nslookup
- server 10.10.10.100
- 127.0.0.1
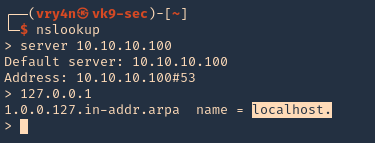
3. We now know this server is localhost, so, the FQDN would be localhost.active.htb